EDITS.WS

Author: Jen Swisher

  • Full WordPress Backups: A Complete Guide for Website Owners

    In life, we’re constantly reminded of the value of insurance — health insurance, car insurance, home insurance — but how often do we think about insurance for digital assets like websites? Not having insurance or a contingency plan is especially shocking when you consider that businesses, connections, and reputations depend so much on these online tools.

    A mistaken line of code, a software glitch, or an unforeseen cyberattack can bring operations and sales to a standstill. 

    But what if there were something even better than insurance? What if, instead of simply being compensated for the loss, you could actually repair the damage instantaneously? 

    That’s the purpose that backups serve. And the right WordPress backup solution can restore your online presence in minutes, even saving ecommerce sales that occurred between the time you restore and the time that the backup was taken (e.g. in the case of a malware injection). 

    Read on to learn about your digital safety net and how to find and implement the right solution for your site. 

    The importance of WordPress backups

    Every piece of content created, every update made, and every plugin installed on your WordPress site represents an investment — one of time, energy, and often money. Losing all of that in a blink of an eye is not only disruptive, but potentially catastrophic for a business, particularly for small to mid-sized companies. 

    Backups serve as a fallback, providing the assurance that even in the face of the unforeseen, you can rebound quickly, minimize downtime, and continue to serve your audience without disruption. They’re not just about recovering data, but about preserving the heart of your digital business.

    The different types of WordPress backups

    As with all good things, backup services range in functionality, catering to diverse needs and resources. Some of the differences include the frequency of backups (daily, weekly, real-time, etc.) and where the files are stored. 

    However, there are three major types of WordPress backups: full backups, incremental backups, and differential backups.

    1. Full backups

    Full backups are like they sound — they cover everything. All of your files, your settings, and your database are backed up entirely each time.

    2. Incremental backups

    Incremental backups, on the other hand, start with a full backup. But then, instead of creating a new, full backup every time, the tool saves just the files that are new or have changed since the last backup — whether that backup is full or incremental.

    The advantage here is that these small files can be saved quickly, using minimal resources. This means that they won’t impact the performance and speed of your site in the same way that full backups can.

    The disadvantage is that, to restore a complete backup, all the files must be merged to create a complete site. This can take a bit longer than with other backup types.

    3. Differential backups

    Differential backups strike a middle ground. Like incremental backups, they start with a full backup. But every time a new backup runs, it saves a file with all changes since the last full backup. So, backups taken after the initial full backup take very little space. However, as time goes by, each one increases in size. 

    This takes less storage space, overall, than storing a full backup each time. The main advantage over incremental backups is that, when a restore is needed, it only has to merge two backups to create a complete “set.” This process is much quicker than what’s required with incremental backups. 

    The disadvantage is that this strategy requires much more storage space than with incremental backups. 

    A detailed overview of full backups

    Full backups, as the name implies, are a complete backup of your entire WordPress site — every file, every folder, every line of data in your database. Nothing is left out. 

    It’s like making a mirror image of your site at a particular point in time. This includes all of your site’s core files, plugins, themes, uploads, and your database, which houses your posts, pages, and users. 

    Imagine having a complete clone of your website neatly packaged and ready to be deployed at a moment’s notice. That’s the peace of mind a full backup offers. However, as you may suspect, this thoroughness comes with a trade-off. Full backups can be resource-intensive, both in terms of storage space and server resources used while the backup runs.

    But, with the right tools and practices, these challenges can be effectively managed, making full backups an attractive proposition for WordPress site owners.

    Why most WordPress sites should use a combination of backups

    Incremental backups allow site owners to use the least amount of storage space while also reducing the number of server resources used at any given time. This is great for storing snapshots of a site’s history over a long period of time. You can keep lots of copies without much storage space, so if you want to revert to a time months in the past or simply restore an older version to check something, you can. 

    Differential backups can be used for a real-time backup strategy, so site owners can rest assured that every single action taken on the site is safe. Orders, comments, edits, post updates, and anything else you do between full backups will be saved if you need to restore the site. 

    And full backups, of course, ensure you have a complete picture of your site, its database, and all files in a single place. Restoring a full backup can be quicker than with other methods and, without a full backup to start, incremental and differential backups simply aren’t possible. 

    Top WordPress backup services like Jetpack VaultPress Backup employ each of these backup methods throughout your plan’s history. This allows for a fully secure site backup infrastructure that has all of your files in real time, but is quick to restore in an emergency.

    How often should you back up your site?

    To the extent that budget allows, you should back up your site every time a change is made or an update occurs. 

    So if someone places an order on your site? Back it up. Publish a new blog post? Back it up. Get a new comment? Back it up. 

    Real-time backups make this possible. While this term refers to the frequency of backups, it’s generally done through differential backups. 

    But if you rarely make changes to your site or your budget is very strapped, you may need to settle for more periodic updates. In a sense, there’s not a one-size-fits-all answer to this question other than you should back up your site as often as realistically possible given your resources and the importance of your site as a business asset. 

    Remember, the goal is not just to back up your files but to minimize potential data loss. If your last backup was a month ago, you stand to lose a month’s worth of data. And that can be a heavy blow for a business or blog.

    Limitations of traditional backup methods

    Let’s pause for a moment and consider the conventional ways of backing up WordPress sites. While they’ve served us well over the years, they have their limitations.

    1. Host backups 

    Many hosting providers offer backup services, often included in their plans. This might seem convenient and economical, but it’s not without drawbacks. 

    For one, host backups often lack the flexibility and control that a dedicated backup solution offers. You’re at the mercy of your host’s backup schedule and retention policy. 

    What’s more, if your host encounters issues, both your site and its backups could be at risk. For example, if a hacker gains access to your server, they could inject malware in your backup files as well as your live website. That would mean that you couldn’t safely restore a previous version of your site.

    2. Manual backups 

    For those who prefer a “do-it-yourself” approach, backing up your WordPress site manually through cPanel or an FTP client is a big temptation. 

    But while this provides full control over backups, it comes with a steep learning curve and a substantial time commitment. Backing up a site manually can be a complex process, one that includes the risk of human error. Miss a file or a database table, and your backup is incomplete. 

    Moreover, manual backups are a chore to automate and scale. As your site grows, so does the time and effort required to back it up manually.

    If you miss even a single day’s backups, for a decently-active site, you could suffer significant loss should disaster strike. 

    3. Third-party backup services 

    Third-party backup services offer more control and flexibility than host backups and are easier to manage than manual backups. However, not all backup services are created equal. Some lack real-time backup capabilities, saving your site only once a day, or worse, once a week.

    Others don’t offer easy-to-use restoration features, making the recovery process a nightmare. 

    The Jetpack VaultPress Backup advantage

    Jetpack VaultPress Backup, a feature-rich WordPress backup solution, addresses the shortcomings of traditional backup methods while offering a host of other benefits. 

    VaultPress Backup is more than just a backup tool; it’s a comprehensive backup and security solution for your WordPress site. It offers automatic, real-time backups that are securely stored separately from your server, along with easy-to-use restoration features, all in an intuitive, user-friendly interface. 

    How Jetpack VaultPress Backup works

    VaultPress Backup stands out in its approach, offering several features that make it a compelling choice for WordPress site owners, including:

    1. Real-time backups

    VaultPress Backup doesn’t make you wait for a scheduled backup to protect your latest updates. Its real-time backup feature automatically saves your site each time you make a change. Publish a new post, update a page, or earn a sale, and it’s backed up instantly. This reduces the risk of data loss to practically zero.

    2. One-click restores

    With VaultPress Backup, restoring your site is as easy as clicking a button. Whether you’re restoring your entire site or just a specific file or database table, VaultPress Backup guides you through the process in a few simple steps. No complex instructions, no technical jargon — just straightforward, simple steps.

    3. Off-site storage

    VaultPress Backup stores your backups off site, in separate infrastructure from your website. This means that your backups are safe even if your website or hosting provider encounters issues. 

    4. Ultra-secure storage infrastructure

    Your backups are not just offsite, but stored in a secure, reliable, and high-performance storage infrastructure. VaultPress Backup employs state-of-the-art security measures to protect your backups from unauthorized access and threats. 

    In fact, it’s the same infrastructure serving WordPress VIP clients, used by the world’s top organizations and run by elite WordPress experts. 

    The many advantages of VaultPress Backup

    VaultPress Backup offers benefits not just for businesses and site owners, but also for WordPress site builders and agencies, as well as WooCommerce stores.

    1. Benefits for businesses and site owners

    As a business owner, VaultPress Backup gives you peace of mind that your site’s data is safe and always accessible. Its real-time backup feature ensures you never lose a single update, while its easy-to-use restoration feature minimizes downtime during a site recovery.

    Plus, with VaultPress Backup, you’re not just getting a backup solution, but a dedicated support team ready to assist you 24/7.

    2. Benefits for WordPress site builders and agencies

    If you’re a WordPress site builder or run an agency, VaultPress Backup can be a game-changer for you. It’s an easy sell to your clients, offering comprehensive, real-time backups, one-click restores, and a secure off-site storage. Plus, it can save you countless hours in site management, with automatic backups and easy-to-use features.

    Learn more about Jetpack’s partner program for agencies and pros: https://jetpack.com/agencies-pros/

    3. Benefits for WooCommerce stores

    Running a WooCommerce store? VaultPress Backup is the perfect tool for you. It backs up not just your posts and pages, but your entire WooCommerce store — products, orders, customer information, and more. And with its real-time backup feature, every transaction is backed up instantly, ensuring you never lose a sale.

    Perhaps the coolest part? If you need to restore to a previous date, orders that occurred since that date will still be saved — even as the rest of your site reverts to a past version. 

    Setting up VaultPress Backup 

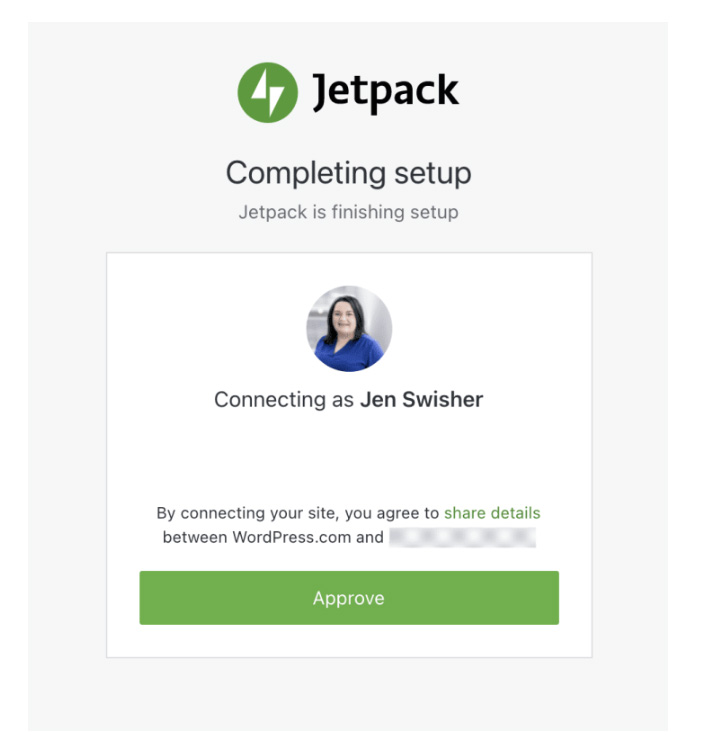
    Getting started with VaultPress Backup couldn’t be easier. To begin, go to Plugins → Add New in your WordPress dashboard. There, search for “VaultPress Backup.”

    Getting started with VaultPress Backup couldn't be easier from the WordPress Plugin Repository.

    Click on Install Now, then Activate. Then, click the Set up Jetpack button that appears.

    Click on Install Now, then Activate. Then, click the Set up Jetpack button that appears.

    Here, click Approve to connect your site to WordPress.com. There, you can create a new account or log into an existing one.

    You’ll now see a table with several options for plans. Choose the one that best fits your needs and finish the checkout process.

    Choose the option that best fits your needs and finish the checkout process.

    And you’re done! Your first backup will start immediately; no need to do anything else!

    Understanding the VaultPress Backup dashboard and settings

    The VaultPress Backup dashboard is your command center, giving you access to your backups, restoration features, settings, and more. It’s designed with simplicity in mind, making it easy for even non-technical users to manage their backups. 

    On your WordPress site, go to Jetpack → VaultPress Backup. This is where you’ll find your backup information and settings.

    First, you’ll see information about your latest backup, including the time it took place, and what was backed up. In this section, you can also:

    1. Click the See backups in the cloud button. This will take you to the Jetpack Cloud, where you can view all of your available backups, edit settings, and more.
    2. Click View your latest restore point. This will take you to your most recent backup in the Activity Log, with the ability to restore immediately.
    Click the See backups in the cloud button - you can view all of your available backups, edit settings, and more.

    In the next section, you’ll see a link to the Activity Log. This will allow you to see all the events that took place on your site, along with information about when they occurred and who was responsible. You can also restore backups based on each action.

    The Activity Log will allow you to see all the events that took place on your site, along with information about when they occurred and who was responsible.

    How to restore a backup created with VaultPress Backup

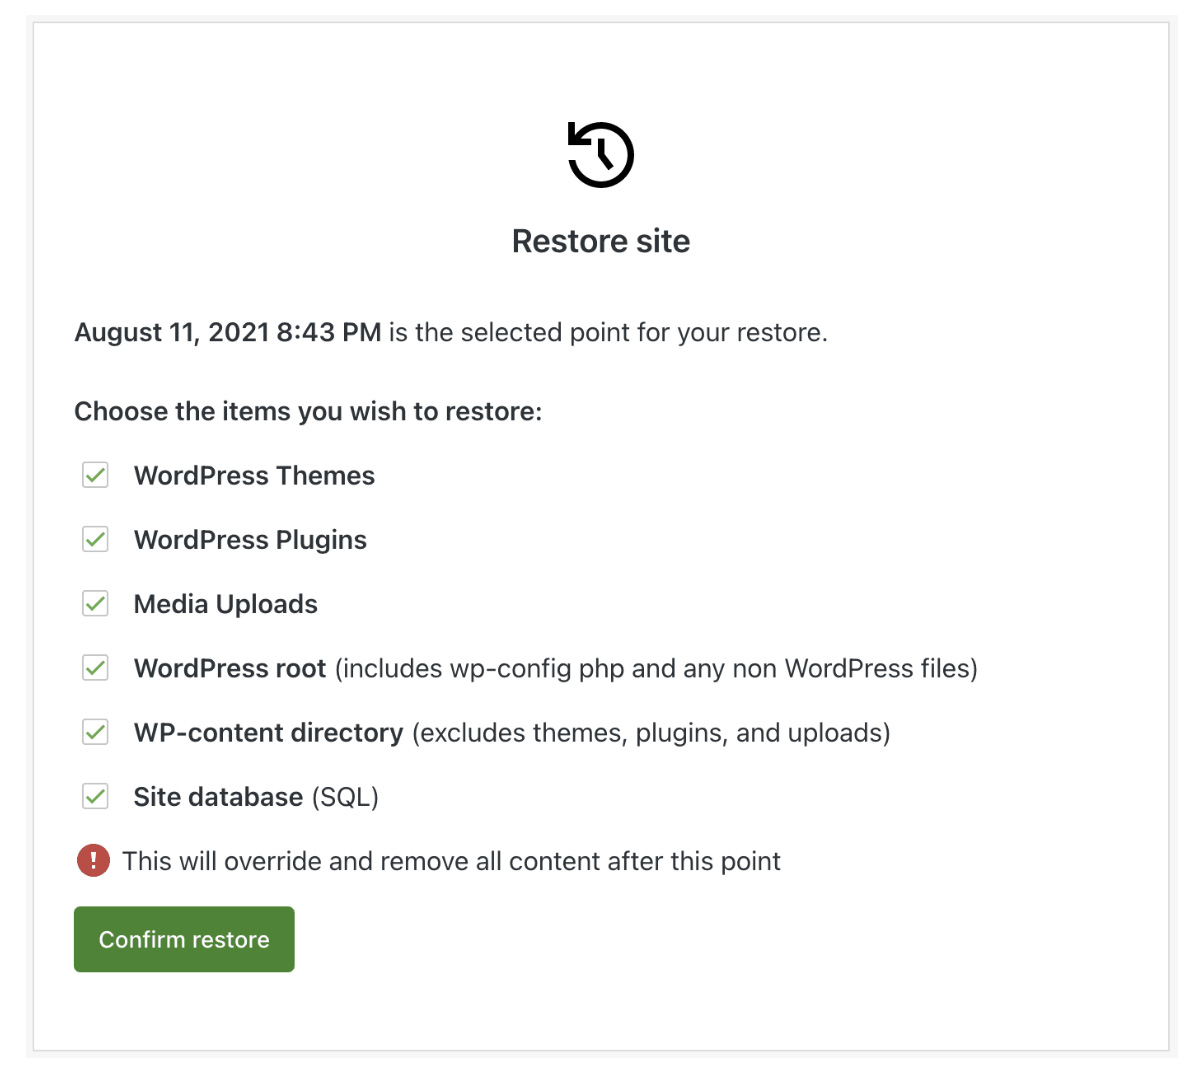
    Restoring a backup with VaultPress Backup is just as simple. In the VaultPress Backup dashboard, click See backups in the cloud. You can then choose which backup you want to restore, whether that’s the latest version, one from a previous time/date, or one based on an action taken on your site.

    Restoring a backup with VaultPress Backup is just as simple from the VaultPress Backup dashboard.

    Now, click Actions → Restore to this point.

    VaultPress Backup then guides you through the restoration process, letting you choose what to restore (entire site, files only, or database only) and how to restore (restore to the current site or download a ZIP file of the backup).

    VaultPress Backup then guides you through the restoration process, letting you choose what to restore and how to restore.

    Once you’ve made your selections, click on the Confirm restore button, and VaultPress Backup will begin restoring your site. That’s all there is to it.

    Frequently asked questions about full WordPress backups

    How frequently should I back up my WordPress website?

    Real-time backups are best for most WordPress sites. However, if your site is rarely updated, you could consider daily updates instead. 

    Does VaultPress Backup back up WordPress in real-time?

    VaultPress Backup offers real-time backups, using differential backups to automatically save your site each time you make a change. You can restore your website at any time with just a few clicks.

    See a full list of what is and is not included in the backups from VaultPress Backup.

    Why does VaultPress Backup store backups off-site? What are the benefits?

    Storing backups off-site, in a separate infrastructure from your website, offers several benefits. It protects your backups from issues affecting your website or hosting provider, reduces the load on your server, and provides additional security for your backups.

    What kind of support does VaultPress Backup offer?

    VaultPress Backup offers best-in-class support through email and live chat. They have a dedicated support team that’s ready to assist you with any issues or queries you may have.

    How do I get started with VaultPress Backup?

    Getting started with VaultPress Backup is easy. All you need is a WordPress.com account, a plan that includes VaultPress Backup, and a few minutes to set it up. Refer to our ‘Setting Up VaultPress Backup’ section earlier in this article for a detailed guide.

    VaultPress Backup: The gold standard in WordPress backups

    When it comes to WordPress backups, having a full backup available is important. This saves everything on your site, giving you the confidence that you can recover your site in its entirety, exactly as it was. 

    However, you don’t need to save an entire copy of your site each time to have a full copy available when you need to restore. Instead, consider a solution that’s nimble enough to save your site in-real time, so you never lose a thing, while also using minimal resources and preserving your site performance. 

    You also need to consider how backups are performed. Manual backups and backups from your hosting provider both have their shortcomings that can leave you in the lurch when you need them the most. They can be unreliable, cumbersome, expensive, or lack important features.

    That’s where VaultPress Backup shines. It’s a comprehensive, reliable, and easy-to-use backup solution that’s tailor-made for WordPress. It offers real-time backups with one-click restores, off-site storage, ultra-secure storage infrastructure, and more. It brings the many benefits of WordPress backups within reach of businesses, site owners, site builders, agencies, and WooCommerce stores.

    Getting started with VaultPress Backup is straightforward. The setup is simple, the dashboard and settings are easy to navigate, and creating and restoring backups is a walk in the park. With 24/7 support, VaultPress Backup is an excellent choice for all of your WordPress backup needs.So go ahead, give VaultPress Backup a try. It might just be the best investment you’ll ever make for your WordPress site.

  • How to Switch from a Classic Theme to a Block Theme in WordPress

    If you’re a WordPress developer or site owner, you’ve undoubtedly heard a lot of praise surrounding the Site Editor. This powerful tool enables users to edit every single component of their site — from headers and footers to templates — using blocks. 

    To take advantage of the Site Editor, however, you’ll need to have a block theme installed and activated on your site. The process of switching from a classic theme to a block theme may seem complicated, but will be more than worthwhile, whether you’re working on your own site or improving a client’s.

    Let’s explore why you might want to switch to a block theme and how you can do so safely and efficiently.

    What are the different theme options in WordPress?

    There are several different types of themes that are available in WordPress, and understanding the difference will help you identify the best solution for your situation.

    1. Classic themes

    WordPress classic themes have been around the longest, and are built using PHP-based templates. They’re typically not as flexible as block themes, and site owners use the Customizer and widget areas to make design changes. Classic themes are typically more difficult to customize, especially for global site elements and templates.

    If you’ve been working in the WordPress community for very long, you’re certainly familiar with classic themes.

    WordPress theme repository within the WP Dashboard.

    2. Block themes

    Block themes are built with HTML templates that are entirely composed of blocks. Instead of using widgets and the Customizer, site owners employ the Site Editor to make changes. This allows for a lot more flexibility, enabling users to edit everything from headers and footers to templates with blocks. 

    WordPress has supported block themes since Version 5.9, and there are some excellent options to choose from.

    3. Hybrid themes

    A hybrid theme is exactly what it sounds like — a mix of classic and block themes. They provide some of the traditional editing experiences from classic themes, alongside more advanced tools from block themes.

    Essentially, hybrid WordPress themes are classic themes that have incorporated one or more aspects of block themes (e.g. the Site Editor or theme.json file). 

    4. Universal themes

    Universal themes allow users to take full advantage of the Site Editor, but can also be set up to use classic WordPress elements like the Customizer and widget areas. These are designed to essentially “bridge the gap” between block and classic themes.

    Why switch to a block theme?

    Now that we’ve touched on the different types of themes, we’ll look at why it’s worth switching from a classic to a block theme.

    1. Improved performance

    Performance is always top of mind when building a website since it impacts everything from user experience to conversions and search engine rankings. Block themes are typically faster than classic themes because they load styles just for the rendered blocks on the page. 

    In many cases, you can also avoid heavy plugins that weigh down your site, using built-in functionality from the WordPress block editor instead. 

    2. Ease of updating and making changes

    When you can edit absolutely everything with blocks, the design and updating process is simpler and faster. Developers can build WordPress websites and make changes for their clients in less time by dragging and dropping blocks instead of editing classic theme templates. And thanks to features like reusable blocks, you can work smarter, not harder.

    Build and make changes faster by using reusable blocks.

    Website owners can also make changes to their WordPress site — even templates for blog posts, product pages, and 404 pages — without having to work with code. This means they’re less likely to break their website and, at the same time, can avoid heavy page builder plugins.

    Website owners can also make changes to their WordPress site — even templates for blog posts, product pages, and 404 pages.

    3. The ability to keep up with the future of WordPress

    Block themes and the Site Editor are a major part of the direction that WordPress is moving. These tools open up endless online possibilities for everyone, including those who wouldn’t consider themselves to be “tech-savvy.” 

    As Matt Mullenweg said, “[It] meets our challenges and opportunities head on while simultaneously benefiting everyone who makes a living working in the WP ecosystem. It’s about a lot more than just blocks.”

    As such, these features are constantly in development and improving. With each iteration, they’re more powerful and effective for both site owners and developers. With WordPress continuing to move in this direction, don’t get left behind.

    Website owners can also make changes to their WordPress site — even templates for blog posts, product pages, and 404 pages.

    4. The ability to edit all parts of your site using blocks

    We’ve touched on this a bit so far, but flexibility is definitely one of the biggest benefits of using a block theme. In addition to building pages and posts with blocks, you can customize nearly all parts of your website, including:

    • Headers and footers
    • Page and post templates
    • Cart and Checkout pages
    • Product and archive pages
    • 404 and search pages

    This provides a much better experience for developers — who want to save time for themselves and their clients — and site owners, no matter their experience level. Plus, it enables you to craft a truly unique WordPress website design that goes beyond out-of-the-box templates without having to spend a lot of time editing code.

    5. Built-in accessibility tools

    The Site Editor was built with accessibility in mind. Accessibility features like Skip to content, keyboard navigation, and landmarks are generated automatically without developers needing to add any code at all. With these responsibilities taken out of theme developers’ hands, it’s easier for themes to be usable for all.

    6. The ability to more easily switch themes in the future if needed

    With classic themes, you’re much more dependent on theme components like static templates, widgets, and page builders. If you want to switch themes, it requires a lot of work, often involving recreating much (if not all) of your site.

    WordPress theme repository within the WP dashboard.

    However, if you go ahead and make the switch from a classic to a block theme, changing themes in the future will be much simpler. 

    Because everything — even templates and global site elements like headers and footers — will be block-based, you won’t need to recreate them each time you switch themes.

    What are the practical steps to take before switching?

    Ready to switch from a classic to a block theme? There are a few steps to take first to ensure that things go smoothly.

    1. Back up your site

    It’s always important to have a backup of your site on hand before making any major changes. If something goes wrong, or if you simply want to revert your actions, a copy of your site will be invaluable. 

    Use a real-time backup plugin like Jetpack VaultPress Backup.

    While you can do this manually, the best solution is to use a real-time backup plugin like Jetpack VaultPress Backup. This tool saves a copy of your website each time you make a change, so you always have one on hand. And you can easily and quickly restore a backup even if your website is completely down. 

    2. Test in a staging environment

    It’s critical that you switch to a block theme within a staging environment. This will give you a safe place to make all your changes and ensure that everything’s working properly while your WordPress website remains usable. Then, once you’re ready, you can easily push your website with the new theme live. 

    WP Staging - Backup, Duplicator, Migration.  Download from the Plugin Repository.

    Many hosting providers include staging environments in their hosting packages. Alternatively, you can use a plugin like WP Staging. 

    Learn more about creating a staging site.

    3. Copy your widget content

    Widgets are an important part of classic themes, but aren’t used in block themes. So, take the time to save any widget content that you’d like to keep.

    If you have a widgetized homepage template, for example, copy any text that you’d like to keep and save it for future reference. Or, perhaps you have a powerful call to action for an email newsletter in your sidebar. You’ll want to save all of this information, so you can recreate it in your block theme.

    Be sure to save content stored in Widgets when switching from a classic to a block theme.

    4. Ensure that your plugins are compatible

    Make sure that any plugins you’re using work well with the block theme you’re switching to. In many cases, this won’t be a problem. 

    But if, for example, your WordPress website is built using a theme-specific page builder, you won’t be able to use that tool with the new block theme. Or, if a plugin works using widgets, you’ll need to confirm that it also has blocks available that provide the same functionality. 

    Here are some other cases in which plugins may not work with your block theme:

    • Tools that are designed for editing the classic menus rather than the Navigation block
    • Plugins for managing comments that don’t work with the comment blocks
    • Tools that were built for using the WordPress Customizer

    However, as we mentioned earlier, the majority of established WordPress plugins are adapting to work seamlessly with block themes, the Site Editor, and the future of WordPress.

    5. Save any custom code

    Check for any custom code you might have created in your current theme files. For example, you might have added PHP to the functions.php file or CSS to the style.css file. 

    Be sure to save any custom code in your theme's code or database before switching themes.

    Also copy anything you added to the Additional CSS section of the WordPress Customizer and any tracking codes you might be using, such as the Facebook Pixel.

    How to switch from a classic theme to a block theme in WordPress

    Have everything saved and backed up? Then let’s get started!

    This process will be very dependent on the classic theme you were using, along with the block theme you switch to. Some transitions will take more work, especially if your website was built largely using widgets and custom code. 

    So, understand that the steps below are a framework, and you may need to play around within them to achieve exactly what you’re looking for.

    1. Choose and activate your new block theme

    Your first step is to install and activate your block theme. Remember, you should be doing this in a staging environment so that your live site is not affected.

    If you haven’t selected a block theme, there are great options to choose from, including a plethora of free ones in the WordPress.org theme repository. 

    Go to Appearance → Themes, then slick Add New at the top. There, you can scroll through a variety of themes, search for one by name, and even preview a theme by hovering over it and selecting Preview.

    Install and Activate a new theme in the WordPress Theme repository via the WP Dashboard.

    Simply click Activate once you’ve made your selection. For the purposes of this example, we’ll be using the Twenty Twenty-Three theme. 

    WordPress Twenty Twenty-Three theme.  Click to activate.

    2.  Set up sitewide styles 

    Your next task is to set up the styles for your theme. This allows you to choose how certain aspects of your WordPress website will look on a sitewide level. 

    To do this, go to Appearance → Editor. This will open the Site Editor. Then, click Styles in the left-hand menu.

    Choose theme styles in "Styles" via Appearance, Editor, Styles.

    Let’s take a closer look at the options that are available to you. First, you’ll see a grid of pre-built style collections that you can toggle between and preview on the right side of the page. You can implement one of these if you’d like, to give you a head start on the design of your site.

    Now, click the pencil icon next to Styles. This will open a new menu on the right side of the page. Click Typography to see all the global options for fonts and text color. You can edit settings like the font family, appearance, line height, and size for everything from paragraphs to headings and buttons.

    Edit Typography within Appearance, Editor, Styles.

    The Colors panel lets you set a color palette for your site, and make color decisions for the background, text, links, buttons, and more.

    The Colors panel lets you set a color palette for your site, and make color decisions for the background, text, links, buttons, and more.

    In the Layout section, set options like content area width and padding.

    In the Layout section, set options like content area width and padding.

    Click Blocks at the bottom of the Styles panel for options that apply to specific blocks. Remember that any changes you make here will apply to blocks on a global level.

    Let’s use the Tiled Gallery block as an example. When you click on this in the list of blocks, you’ll see settings for colors, layouts, and style variations. You can also add custom CSS that’s specific to this block. 

    Let’s use the Tiled Gallery block as an example. When you click on this in the list of blocks, you’ll see settings for colors, layouts, and style variations.

    Being able to style blocks and site elements on a global level saves you a lot of development time and ensures that you can achieve a consistent look across your site. Spend some time here to get the style settings the way you’d like, whether you’re working to emulate the original classic theme you were using or are moving on to a new design entirely.

    One of the most interesting features of the Style panel is the Style Book, which you can access by clicking on the eye icon in the top right. This allows you to preview all the design changes you make across a wide variety of elements and blocks, like headings, paragraphs, quotes, tables, and more.

    Access the Style Book by clicking on the eye icon in the top right. This allows you to preview all the design changes you make.

    3. Build the framework of your site

    Now that you have your styles in place, it’s time to build the framework of your site, including your:

    • Header and footer
    • Site navigation/menus
    • Templates for blog posts, pages, ecommerce content, etc.

    You can access all of these by going to Appearance → Editor in the WordPress dashboard. You’ll see several options, including Templates and Patterns. Templates are page layouts for site content like blog posts, archives pages, and products. In the Patterns section, you’ll find template parts, which include elements like headers and footers. These will all vary based on the theme you’re using.

    You can access all of these by going to Appearance, Editor in the WordPress dashboard.

    Let’s look at the header, for example. Click on Patterns → Header, then select your specific header. You can now edit this using blocks. In this example, the header has a Site Title Block and a Navigation block.

    You can now edit this using blocks. In this example, the header has a Site Title Block and a Navigation block.

    You’ll use the Navigation block to create your site navigation, rather than going to Appearance → Menus as you did with a classic theme. 

    When you click on the Navigation Block, options will appear in a menu on top of the block, and in the Settings panel on the right side of the page. In that Settings panel, you’ll see the pages that are in your menu listed out. Click the + icon, followed by Page Link or Custom Link to add pages to the menu.

    Click on the Navigation Block, options will appear in a menu on top of the block, and in the Settings panel on the right side of the page.

    You can use the other tabs in the Settings panel to style the menu and make other design and functionality changes to the site’s navigation.

    Then, you can add blocks to the header just as you would with the block editor that you’re already familiar with. For example, you may want to add a search bar or social media icons.

    Once you’re happy with the header, go through any other template parts — like your footer — and get those to the place you’d like them to be.

    Now, let’s take a look at a template. Go to Appearance → Editor → Templates. In our example, we’re going to choose the Single template, which is the layout for blog posts.

    Choose the Single template, which is the layout for blog posts.

    Once you open the template, you’ll see that you can edit it just as you would any other page or post that uses the block editor. You’ll have some default blocks already added, such as the Featured Image block, Post Title block, and Post Content block. You can make changes to these, move them around, and style them as you wish.

    Once you open the template, you’ll see that you can edit it just as you would any other page or post that uses the block editor.

    But you can also add blocks that will appear on all the blog posts across your website. For example, you might add a call to action that directs readers to an email newsletter signup form, a contact page, or a product for sale. 

    You can also add blocks that will appear on all the blog posts across your website.

    Edit this template, along with any others that you’d like, saving your changes as you go. 

    If your classic theme was heavily dependent on widgets, you can also use the Widget Importer tool to make the migration process easier. You can watch a full tutorial video from the Learn WordPress blog.

    Learn more about using the block editor and site editor here. 

    4. Rebuild or tweak any pages and posts, as necessary

    If your pages were built using the block editor or the classic editor, they’ll likely need little to no work when migrating to a block theme. Content created with the classic editor will automatically appear in a Classic block. You can select the Classic block, then click Convert to blocks to separate the content into blocks.

    If your pages were built using the block editor or the classic editor, they’ll likely need little to no work when migrating to a block theme.

    You may need to make some tweaks and changes to blocks here and there. Take some time to go through your pages and posts and make sure that everything is to your liking.

    5. Remove any unused plugins

    You never want to install plugins you don’t need. And if you no longer need some of the plugins you have installed already — either because you’ve replaced the functionality with that of your block theme or because they’re not compatible — make sure to deactivate and delete them. 

    Unnecessary plugins can pose a security liability and slow down your WordPress website.

    6. Test the site in full

    Once you’re happy with how things look on your site, go through and test everything. Look at your pages on various screen sizes, test functionality like forms and payments, and ensure that everything works the way that you or your client prefer.

    7. Push the new website design live

    Now, use your staging environment to push the changes and new theme live. And your migration from a classic to a block theme is complete!

    Frequently asked questions about switching from a classic theme to a block theme

    Do you have some additional questions? Here are answers to some commonly-asked ones.

    What if I’m not ready to fully switch to a block theme?

    If you’re nervous about making the switch, you can take a more gradual approach. For example, you could choose a hybrid or universal theme that ties in some elements of a block theme while still allowing for classic theme features. 

    However, block themes are the future of WordPress and are quickly becoming the norm. In most scenarios, it’s best to go ahead and adopt these themes and get to know them as soon as possible.

    How do you convert the classic editor to blocks?

    When switching to the block editor, content created with the classic editor will automatically be turned into a Classic block. When you select this block, you’ll see a menu appear with the option to Convert to blocks. This will automatically separate the content into the appropriate blocks.

    When switching to the block editor, content created with the classic editor will automatically be turned into a Classic block.

    In some cases, you may need to make some tweaks to get your content exactly the way you’d like.

    How can I change my theme without losing content?

    When you switch themes, all the content from your posts, pages, products, and other post types will remain in place. The same thing goes for your media library and any information saved in your database. Switching themes will simply change the layout and design of your site.

    That being said, it’s always best to create a full backup of your site before switching themes. You should also work in a staging environment so that your live site is not affected.

    What’s the difference between a classic theme and a block theme?

    With classic themes, site owners and developers use the WordPress Customizer and widget areas to make design and layout changes. Classic themes are built using PHP, and aren’t as flexible and easy to use as block themes.

    In contrast, block themes use HTML-based templates that are made up of blocks. To make changes, site owners use the Site Editor and Global Styles, which enables them to edit every single part of their site using blocks. This means that they can make changes to everything from headers and footers to templates without editing any code.

    What’s the difference between the Gutenberg Editor and the Site Editor?

    If you’ve heard the term “Gutenberg,” you may be wondering how that differs from words like “block editor” and “site editor.” In general, these mean the same thing — the tools that enable WordPress users to edit their site with blocks.

    However, the name “Gutenberg” was used for the specific project of developing and implementing blocks in WordPress. This name is being retired as the project nears completion, with WordPress using “block editor” and “site editor” as the permanent names for these tools.

    The Gutenberg plugin is a free plugin from WordPress that allows site owners to test features before they’re released as part of WordPress core.

    Where can I learn more about block themes?

    There are several places that you can learn more about block themes and the block editor:

    Once you’ve made the transition, maximize your site’s performance, security, and marketing potential with a free plugin with premium options like Jetpack.

  • Automatic Website Backups: The Ultimate Guide by Backup Experts

    “Always back up your data.” 

    You’ve undoubtedly heard this advice time and time again. But when you’re running a business, the urgent often supersedes the important. You’re busy grappling with day-to-day challenges and this crucial advice goes ignored. 

    It’s not until disaster strikes — a malware attack, a server crash, or even simple human error — that the hard truth sinks in.

    Imagine losing all your website data and content in a single swoop. All the blood, sweat, and tears poured into creating your unique online presence, gone. It’s not just about the time, energy, and resources you’ve invested; it’s about your reputation, customer trust, and business continuity.

    Enter Jetpack VaultPress Backup, a powerful, intuitive, and automated solution designed to safeguard your site against this kind of catastrophic event. With VaultPress Backup, you don’t just get an important business tool; you get peace of mind and the ability to bounce back, even in the face of disaster.

    What are automatic website backups?

    Automatic website backups are your website’s safety net. They’re essentially a complete copy of your website, including your database, themes, plugins, posts, comments, and everything in between. In the case of VaultPress Backup, the files are stored in a secure, off-site location. 

    The “automatic” part is crucial here, as it means that these backups are created without any manual intervention and are ready to be restored at a moment’s notice.

    What are the benefits of automatic backups?

    1. Reduced liability

    At first glance, backups might just seem like an additional expense. But when you factor in the potential cost of data and content loss — the time spent reconstructing your site, the loss of customer trust and potential business, and the technical expertise needed for recovery — the investment in an automatic WordPress backup solution like VaultPress Backup is a drop in the ocean.

    2. Convenience

    With automatic backups, there’s no need to mark your calendar or set reminders. Once VaultPress Backup is configured, every update or change is saved in real time, without any effort on your part. It’s all the convenience of “set it and forget it.” 

    3. Enhanced security

    Website security is an ongoing battle. Despite your best efforts, threats can find a way through your defenses. Automatic backups ensure that even if your site is compromised, you can quickly revert to a secure, uncompromised version.

    4. Protection from data loss

    From human errors and hardware failures to cyberattacks and natural disasters, data loss threats are varied and unpredictable. Automatic backups offer a robust safety net, protecting against these scenarios.

    5. Reliability

    With an automatic backup solution like VaultPress Backup, you get consistent, reliable backups. There’s no risk of forgetting a backup or a manual process failing.

    6. Fast disaster recovery

    The faster you can get your site back up and running after a disaster, the less damage done to your business. With an automatic backup, you can quickly restore your site to its pre-disaster state.

    7. Scalability 

    As your website grows, so does the amount of data and content you’re storing. An automatic backup solution can easily scale with your needs, ensuring all your information is protected.

    8. Regulatory compliance and legal protection

    In many sectors, maintaining regular backups is not just best practice; it’s a legal requirement. Automatic backups can help you meet these requirements with minimal effort.

    9. Peace of mind

    There’s a tranquility in knowing that your data is safe no matter what. With automatic backups, you have that peace of mind.

    How do automatic backups differ from manual backups?

    With a manual backup process, you’re in the driver’s seat. You decide when to back up your data, what to back up, and where to store it. On the surface, it might seem like a good thing — after all, who knows your website better than you? But we’re human, and with our human tendencies come oversights, procrastination, and plain old forgetfulness.

    Here’s where automatic backups swoop in to save the day. With a tool like VaultPress Backup, your site is backed up regularly, without any work on your end. It’s a hands-off approach that offers a higher degree of consistency, accuracy, and reliability. While you’re focusing on growing your business, your backup solution is quietly working in the background, securing your website data and content.

    Common misconceptions about automatic backups

    1. “I don’t need backups; my host provides them.”

    It’s true that many web hosts provide backups. Unfortunately, these are typically infrequent and may not cover your entire site. Plus, in many cases, backups are stored on the same server as your site. This means that if your site is compromised due to a hack, your backups could be, too. Not to mention, restoring these backups can be complicated and time-consuming.

    2. “My site is too small for backups.”

    No website is too small for backups. If it’s important to you or your business, it’s worth protecting.

    3. “Backups are too complicated for me.”

    With an intuitive solution like VaultPress Backup, setting up automatic backups is a breeze. It’s designed to be user-friendly, even for those with minimal technical knowledge.

    4. “Backups slow down my website.”

    A well-optimized backup solution won’t hinder your website’s performance. VaultPress Backup, for instance, is designed to work quietly in the background, without diminishing your site’s speed or user experience.

    How to choose the right backup solution

    The right solution for your business should include several features: real-time backups, full-site coverage, off-site storage, easy restoration, and a secure environment. Beyond these, you should consider factors like scalability, cost, customer support, and compatibility with your website platform.

    Introducing Jetpack’s VaultPress Backup plugin

    VaultPress Backup, developed by the trusted team behind WordPress.com, is designed with these factors in mind. It’s more than just a backup tool — it’s a comprehensive security solution for your WordPress site.

    Features and benefits of VaultPress Backup

    VaultPress offers real-time backups, ample storage space, and easy restoration. It can also be bundled with WordPress security features like malware scanning, spam protection, and brute force attack protection. The plugin also provides a seamless experience for WordPress users.

    How VaultPress Backup works

    VaultPress Backup runs in the background, automatically backing up your website data every time something happens on your site — an update to a page, a new order, a new comment, and more. It stores these backups securely off-site, ready to be restored whenever needed. And with Jetpack’s team of Happiness Engineers, you’re never alone in your data protection journey.

    How to set up up automatic, real-time backups with VaultPress Backup

    Setting up VaultPress Backup is straightforward. Once you’ve purchased a plan, you’ll need to install and activate the plugin, connect to your WordPress.com account, and activate VaultPress. It’s a set-and-forget solution — the plugin will automatically start backing up your site. Here’s a step-by-step walkthrough of the easy setup procedure:

    1. Go to Plugins → Add New in your WordPress dashboard. Search for “Jetpack VaultPress Backup” and click Install Now → Activate.

    Jetpack VaultPress Backup plugin

    2. There, you’ll see a prompt to set up Jetpack VaultPress Backup. Click Set up Jetpack.

    option to set up Jetpack

    3. Click Approve to connect your site to WordPress.com. There, you can log into an existing account or create a new one. 

    4. There will now be a table with several options for plans. Choose the one that best fits your needs and continue through the checkout process.

    plans available with Jetpack Backup

    And that’s all there is to it! Once VaultPress Backup is set up, your backups will start running automatically.

    How to quickly restore a backup with VaultPress Backup

    With VaultPress Backup, restoring a backup is as easy as creating one. Simply choose the time to which you want to revert, and click Restore. VaultPress will take it from there, restoring your site to the state it was in when the backup was created. Here’s a step-by-step walkthrough of the restore procedure:

    1. Go to https://cloud.jetpack.com and click on your Activity Log.

    2. Now, you can filter by activity type or date range to find a specific restore point.

    backup filter for date range

    3. Click Actions → Restore to this point. 

    option to restore a backup

    4. You’ll see a list of items that you’d like to restore. In most scenarios, you should leave them all checked. Click Confirm Restore.

    options of what to restore with VaultPress Backup

    And your backup will start! Keep track of the restore progress on this same page, or just wait for a notification when the restoration is complete.

    Best practices for website backups

    1. Create backups in real time

    In the digital world, a lot can happen in a short span of time. That’s why real-time backups, like those offered by VaultPress Backup, are crucial. They ensure that even the most recent changes to your site are saved and protected.

    2. Store backups offsite for disaster recovery

    Storing backups on the same server as your website is a risky move. To ensure your backups are safe from server crashes or data breaches, it’s crucial to store them offsite, just like VaultPress Backup does.

    3. Store backups in an ultra-secure environment

    Your backups are only as good as the security protecting them. With VaultPress Backup, your site’s files are stored in a secure environment, protected against threats and breaches.

    4. Have a fast backup restoration procedure

    When disaster strikes, every second counts. An efficient, straightforward restoration procedure can make the difference between a minor hiccup and a major catastrophe. VaultPress Backup’s one-click restore feature ensures that you’re back in business in no time.

    Frequently asked questions about automatic WordPress backups

    What is the difference between manual backups and automatic backups?

    Manual backups involve a hands-on approach where you’ll manually create a copy of your site’s data and store it yourself. This process might involve navigating your site’s control panel, finding the appropriate option to download your site data, and saving it to a secure location of your choice.

    In contrast, automatic backups, like those performed by VaultPress Backup, happen without any intervention on your part. Once set up, they automatically save a copy of your site data at regular intervals or in real-time, depending on the tool you choose. You won’t need to remember to back up your data or worry about storing it securely.

    How often should I schedule automatic website backups?

    The frequency of your backups will largely depend on how often your website changes. However, most sites should opt for real-time backups so that every change is saved as it happens, and you never lose a moment on your site.

    For less frequently updated sites, daily backups might suffice. But remember, more frequent backups provide a more up-to-date safety net in case of data loss.

    How long does it take to restore a backup using VaultPress Backup?

    The duration of restoring a backup using VaultPress Backup depends on the size of your website and the speed of your server. However, VaultPress Backup aims to make this process as swift and seamless as possible. Once you initiate a restore, it goes to work immediately. For an average-sized website, the restoration can typically be completed within minutes.

    What happens if my website is compromised or hacked? Can I restore a clean backup?

    Yes, VaultPress Backup has you covered. If your site is compromised or hacked, you can select a backup version from before the breach occurred and restore your site to that state. By doing this, you’re essentially turning back the clock to a point when your site was safe and clean, thus eliminating any malicious alterations made by the hackers.

    Can I use VaultPress Backup with non-WordPress websites?

    VaultPress Backup is tailor-made for WordPress sites. It’s designed to work seamlessly with the WordPress ecosystem, backing up everything from posts, comments, and media files to your themes, plugins, and settings. As such, it does not support non-WordPress sites.

    How secure is the backup data stored with VaultPress Backup?

    Security is at the core of VaultPress Backup. Your data is stored on servers that are highly secure and monitored 24/7. These servers are designed to protect against unauthorized access and are equipped with multiple layers of protection to safeguard your data. 

    Are there any known conflicts between VaultPress Backup and other plugins or themes?

    VaultPress is developed by the same team behind WordPress.com, and is designed to work seamlessly with most plugins and themes. However, if you encounter any issues, Jetpack’s Happiness Engineers are ready to assist you.

    Who created VaultPress Backup?

    VaultPress Backup was created by Automattic, the same experienced team behind WordPress.com, WooCommerce, Jetpack, and many other widely-used WordPress products. The team’s in-depth experience with WordPress allows them to create a backup solution that integrates seamlessly with WordPress, providing a smooth and reliable experience.

    VaultPress Backup: Real time, automated backups for WordPress

    Data protection should not be an afterthought — it’s an essential part of running a successful website. 

    VaultPress Backup offers WordPress site owners a powerful, convenient, and reliable solution for data protection. Whether you’re a small business owner managing a single site, or a larger organization overseeing multiple WordPress sites, VaultPress is ready to safeguard your online presence. 

    Remember, there’s no such thing as a small disaster when it comes to data loss. 

    VaultPress Backup is more than just a backup solution. It’s a commitment to protect the website that represents your business, your livelihood, and your passion. With the Jetpack team standing by to support you, you’re never alone in this journey.

    You have the power of automatic backups, real-time updates, and the peace of mind that comes with knowing your website data is safe, secure, and ready to be restored at a moment’s notice.

    So take the leap. Leave behind the uncertainty and stress of manual backups, and step into the future with VaultPress Backup. 

    Learn more about VaultPress Backup here: https://jetpack.com/upgrade/backup/

  • What Are SSL Certificates? How Do They Impact Site Security?

    As a website owner welcoming people to your site, you have not only a responsibility to provide a warm greeting and relevant information, but to protect users and their information. Most visitors don’t keep web security on the top of their minds, but you should. 

    Thankfully, you don’t need a full time team of security experts constantly on guard. A few basic steps and tools can take care of the majority of potential threats for the average website and its visitors. Today we’ll talk about two. 

    The first is an SSL certificate — a non-negotiable tool that can encrypt information sent between your site and users. 

    The second is a WordPress security plugin that provides everything from spam protection to site backups, malware scans, and more.  

    What is an SSL certificate?

    An SSL (Secure Sockets Layer) certificate is a tiny bit of code that provides security for online communications. Think of it as the lock on your front door. It secures the information that travels from your computer to the site you’re visiting and back. 

    An SSL certificate enables an encrypted connection. It does this by establishing a ‘handshake’ between the user’s browser and the server. When this handshake is complete, a padlock or a green bar will appear in the browser’s address bar, signifying a secure connection.

    Padlock icon verifying SSL for jetpack.com with a secure connection.

    The different types of SSL certificates

    1. Domain Validated (DV) certificates

    Domain Validated Certificates are the ‘entry-level’ option. The verification process is quick and relatively easy, requiring only a check that the applicant owns the domain for which they’ve applied for the certificate.

    These certificates are a good fit for small websites or blogs where financial transactions or the transfer of sensitive data don’t occur. However, their simplicity is also their limitation; DV certificates only certify domain ownership, not the legitimacy of the organization behind the website.

    2. Organization Validated (OV) certificates

    Here, the validation process is more stringent, requiring verification of the business’s existence and legitimacy. This can include things like checking the business’s registration, physical location, and the authority of the applicant.

    OV certificates enhance your website’s credibility, making them ideal for businesses that require more trust from their visitors. The catch? The verification process takes a bit longer, and they’re more expensive than DV certificates.

    3. Extended Validation (EV) certificates

    For those who want the most stringent level of validation, Extended Validation (EV) Certificates are the answer. The process to obtain an EV certificate is rigorous, including all the checks of an OV certificate, plus some additional steps. 

    One key benefit of an EV certificate is the visual cues it provides, such as the green address bar. These cues offer immediate trust to visitors and are particularly valuable for websites dealing with sensitive information or financial transactions.

    4. Wildcard and Multi-Domain certificates

    Think about Wildcard and Multi-Domain Certificates as the jack-of-all-trades in the SSL world. A Wildcard SSL certificate secures your main domain and an unlimited number of its subdomains, while a Multi-Domain SSL Certificate allows you to secure multiple distinct domains with a single certificate.

    These are particularly handy for businesses with multiple subdomains or completely separate domains, offering a cost-effective, streamlined way to manage SSL certificates.

    Why SSL certificates are essential for site security

    1. Encryption and data integrity

    SSL certificates turn your sensitive information into an unintelligible series of characters that can only be returned to a readable format by the intended recipient. This ensures data integrity by protecting it from being tampered with or intercepted during transmission.

    2. Authentication and trust

    Think of a handshake when you first meet someone. The handshake isn’t just about being polite, it’s also about building trust. SSL certificates do just that for your website, assuring visitors that they’re interacting with the authentic website and not a malicious clone.

    The trust seal or green bar that appears in the browser is akin to a digital signature. It tells your visitors, “You can trust us. We’re not imposters.” 

    3. SEO and trust signals

    It’s not just about trust between you and your visitors, it’s also about trust between your site and search engines. SSL certificates are considered trust signals, and search engines like Google favor websites that are secure. As a result, having an SSL certificate can give your site a slight SEO boost. 

    4. Machine-in-the-middle attack mitigation

    In a machine-in-the-middle attack, a cybercriminal intercepts, and can potentially alter, the communication between two parties. SSL certificates help prevent these attacks by ensuring that communication between your site and its visitors is encrypted and secure.

    5. PCI compliance

    If your website accepts credit card payments, you need to be PCI compliant. One requirement of PCI compliance is having an SSL certificate. It’s a fundamental box to tick, the equivalent of making sure your car has an engine before you try to drive it.

    How to get an SSL certificate

    1. Choose the right SSL certificate for your site

    Just like you wouldn’t use a sledgehammer to crack a nut, you need to choose the right SSL certificate for your needs. Use DV for small, non-commercial sites, OV for businesses requiring more trust, and EV for websites dealing with sensitive data. Multi-domain or wildcard certificates are your go-to if you’re juggling multiple domains or subdomains.

    2. Find a provider

    Many hosting providers offer SSL certificates as part of their plans or for a small additional fee. If that’s the case, they’ll usually also install them on your behalf. Bluehost, Pressable, and A2 Hosting, among others on our recommended WordPress hosting list, include SSL certificates at no additional cost.

    Don’t want to use your hosting provider? 

    SSL For Free and Let’s Encrypt are two providers that offer free, DV SSL certificates. To find more options, read our article about how to get a free SSL certificate.

    Let’s Encrypt offers free, DV SSL certificates.

    3. Activate and install the SSL certificate

    You’ve chosen your certificate. Now, it’s time to install it. This process will vary based on the provider you choose, but each one should provide detailed documentation. Once installed, you’ll need to update your site to use HTTPS instead of HTTP. Most content management systems, like WordPress, offer tools to simplify this process.

    Best practices for using SSL certificates

    1. Choose the right SSL certificate for your needs

    Choosing the right SSL certificate is not just about ticking a box. It’s about understanding the different types of certificates, their strengths, and their limitations. By selecting the most appropriate certificate for your needs, you’re signaling to your visitors that you value their security and trust.

    2. Renew your SSL certificate

    It’s simple: a lapsed SSL certificate equates to an unsecured website. This can lead to warning messages appearing in users’ browsers, deterring them from visiting your site. It can also cause search engines to lose trust in your website, and could even cause hackers to gain access to user data.

    Most SSL certificate providers will email you when your term is about to lapse, while others have auto-renewal set up, so you don’t have to do anything. Make sure to know what the process is for your certificate and always stay on top of it.

    3. Ensure full website compatibility with SSL

    Every part of your website must align with SSL encryption. All your site’s elements, including images, videos, scripts, and CSS files, need to be served over HTTPS to avoid mixed content issues. Mixed content can undermine your site’s security and result in warnings being displayed in visitors’ browsers.

    Tools like Why No Padlock? can help you debug and troubleshoot mixed content warnings.

    Tools like Why No Padlock? can help you debug and troubleshoot mixed content warnings.

    4. Enhance security with SSL and other security measures

    Securing your website isn’t a one-time process. It takes continual monitoring and adjustments to stay ahead of threats. SSL certificates are just one part of site security.

    This is where Jetpack Security shines, offering a comprehensive suite of WordPress security features that go hand-in-hand with your SSL certificate, like automated backups, malware scanning, and spam protection.

    Frequently asked questions about SSL certificates

    What is an SSL certificate, and why do I need one for my website?

    An SSL certificate encrypts the data between your website and its visitors, ensuring it can’t be intercepted or tampered with. In today’s digital age, an SSL certificate is an essential component of any website, not just those that handle sensitive information.

    What is HTTPS, and how does it relate to SSL certificates?

    HTTPS stands for Hypertext Transfer Protocol Secure. It’s essentially the secure version of HTTP, and it’s enabled by installing an SSL certificate on your website. When your website uses HTTPS, it assures visitors that their connection is secure.

    How does an SSL certificate work to secure data transmission?

    An SSL certificate encrypts data in transit between your website and its visitors. It does this by creating a secure, encrypted tunnel through which data can safely travel. Without an SSL certificate, data is sent in plain text, making it easy for cybercriminals to intercept.

    What are the different types of SSL certificates available, and how do they differ from one another?

    There are several types of SSL certificates, each offering a different level of validation:

    • Domain Validated (DV) certificates offer basic validation by confirming domain ownership.
    • Organization Validated (OV) certificates provide an extra layer of trust by verifying the organization behind the domain.
    • Extended Validation (EV) certificates undergo a stringent validation process and offer visible cues, like a green address bar, to visitors.
    • Wildcard certificates secure a domain and its subdomains, while Multi-Domain certificates secure multiple separate domains.

    How can I obtain an SSL certificate for my website?

    You can obtain an SSL certificate from a certificate authority (CA). There are many CAs to choose from, and they all offer different types of certificates to cater to varying needs. Some hosting providers include SSL certificates in their plans or for an additional fee, while there are also external providers, like Let’s Encrypt.

    Can I use a free SSL certificate instead of purchasing one?

    Yes, you can. Free SSL certificates, like those provided by Let’s Encrypt, offer the same level of encryption as paid ones. However, they often lack some of the extras that come with paid certificates, such as warranties and the higher trust level offered by OV and EV certificates. 

    What is the process of installing and activating an SSL certificate on my website?

    Installing an SSL certificate involves several steps. First, you need to generate a Certificate Signing Request (CSR) on your server. You then submit this CSR to a Certificate Authority when you apply for your certificate. Once the CA has validated your details, they’ll send you your SSL certificate, which you then install on your server. 

    In most cases, your hosting provider will take care of all these steps for you, automatically.

    How often should I renew my SSL certificate, and what happens if I let it expire?

    Most SSL certificates need to be renewed every 1 to 2 years, although the exact timeline can vary. SSL For Free, for example, requires a renewal every 90 days. 

    If you let your SSL certificate expire, your website data will become unsecured and visitors will be greeted with warning messages. 

    Can I use the same SSL certificate for multiple websites or subdomains?

    If you have a Wildcard SSL certificate, you can use it for one domain and all its subdomains. If you want to secure multiple separate domains with one certificate, you’ll need a Multi-Domain SSL certificate.

    Are SSL certificates compatible with all web browsers and devices?

    Yes, most SSL certificates are compatible with all major web browsers and devices. That said, the visual indicators of the website’s security (like the padlock icon or green address bar) can vary between browsers.

    How can I verify if my SSL certificate is properly installed and working correctly?

    You can use an SSL Checker tool, which will analyze your SSL certificate and report on its status, expiration date, and any potential issues. 

    SSL Shopper has an SSL Checker tool, which will analyze your SSL certificate and report on its status, expiration date, and any potential issues. 

    What is mixed content, and why is it important to address it for a secure website?

    Mixed content occurs when a secure (HTTPS) webpage includes unsecured (HTTP) elements. This can create a weak spot in your website’s security, allowing hackers a chance to exploit it. It’s like having a fortress with one unguarded door — the entire fortress becomes vulnerable.

    How can I fix mixed content issues on my website?

    To fix mixed content issues, you need to ensure all elements of your website are served over HTTPS. This might involve updating links in your website’s code or configuring your server to automatically redirect HTTP requests to HTTPS.

    Are SSL certificates only necessary for websites that handle sensitive information?

    While it’s especially critical for websites handling sensitive information, such as payment details or personal data, every website will benefit from the added security and trust an SSL certificate provides. An SSL certificate tells your visitors that you care about their safety and is important from an SEO perspective as well.

    Some browsers will even display a warning for users who try to visit sites without an SSL certificate. So, for all intents and purposes, SSL certificates are required for every site regardless of its size or purpose.

    Can I transfer an SSL certificate from one hosting provider to another?

    Transferring an SSL certificate between hosts can be technically challenging and is often unnecessary. Instead, it’s usually easier to simply apply for a new SSL certificate from your new host or a third-party CA.

    What are some common SSL certificate errors, and how can I troubleshoot them?

    Common SSL certificate errors include an expired certificate, a domain name mismatch (where the domain name in the certificate doesn’t match the domain it’s installed on), or a certificate that’s not trusted (usually because it’s self-signed, or the CA isn’t recognized). Troubleshooting these errors usually involves renewing, reissuing, or replacing your certificate.

    Can I have multiple SSL certificates on my website for different purposes?

    Yes, you can. For instance, if you operate an ecommerce store with a blog, you might use an EV SSL certificate for the store and a DV SSL certificate for the blog. This allows you to tailor your security measures to the specific needs and risks of different parts of your website.

    Jetpack Security: a full security suite for WordPress sites

    Now that we’ve gone through the nitty-gritty of SSL certificates, let’s take a moment to switch gears. Because while SSL is vital for site security, it’s not the only tool in the toolbox. You need a comprehensive workshop to create and maintain a secure environment for your site and its users.

    That’s where Jetpack Security comes in. It’s the all-in-one security solution that takes care of your WordPress site’s security needs. 

    SSL certificates secure data between the site and its visitors. Jetpack Security focuses on protecting your site itself.

    While SSL certificates secure the transmission of data between your site and its visitors, Jetpack Security focuses on protecting your site itself. It offers a suite of powerful security tools that can help you fend off attacks, monitor your site’s health, and recover quickly if things do go wrong.

    For instance, Jetpack Security’s automated real-time backups ensure you always have a safe point to revert to, should the worst happen. 

    The WordPress malware scanning feature performs regular checks to sniff out any potential security threats. It’s your dedicated security guard, keeping an eagle eye on everything that’s happening on your site.

    The spam protection feature is like your personal doorman, keeping out any unwanted, spammy “visitors” that might try to wreak havoc in your comments section or contact forms.

    The activity log allows you to keep an eye on everything that happens on your site and even restore a backup to a specific point in time.

    Last but certainly not least, the downtime monitoring feature keeps tabs on your website’s availability. It’s the equivalent of a neighbor keeping an eye on your house while you’re on vacation, alerting you if something seems amiss.

    As we’ve shown, security is not a one-and-done deal. It’s an ongoing commitment that requires attention to many different facets. SSL certificates are a cornerstone of that commitment, providing a critical layer of protection for the data traveling between your website and its visitors. But they’re just one part of the picture.

    By using SSL certificates in conjunction with a comprehensive security solution like Jetpack Security, you’re doing your part to build a safer, more trustworthy internet.

    So tighten the bolts, check the locks, and turn on the alarm. Welcome to Jetpack Security. Start your journey by discovering more here: https://jetpack.com/features/security/

  • WordPress Backup Services: How to Choose the Best Solution

    WordPress has built a strong reputation of trust, ease, and adaptability, cementing its role as the backbone of countless websites. But even the most stable platforms aren’t immune to issues.

    The reality is that site owners can make mistakes, websites can be hacked, and servers can crash. And if any of these things happen, you could experience downtime, hassle, stress, compromised data, lost sales, and more.

    But this is where a WordPress backup service can save the day. While insurance can help compensate you for a loss, it can’t change whatever hiccup caused the damage. The right WordPress backup plugin allows you to essentially go back in time and return things to the way they were before, before anything went wrong. 

    But how do you choose the best solution? 

    The importance of a reliable WordPress backup service

    We often get caught in a false sense of security — the “It won’t happen to us!” mentality. That is until, of course, it does. 

    A server crash, a cyberattack, or a simple error can turn your busy WordPress site into a ghost town. But when something goes wrong, a WordPress backup service allows you to roll back the clock, restoring your site to a time when all was well.

    A reliable backup service isn’t just a contingency plan; it’s your peace of mind. It safeguards your hard work, your customer data, and your digital presence. It’s your assurance that, despite what may come, your website will endure. 

    Working from home with the assurance that, despite what may come, your website will endure. 

    Key considerations for choosing a WordPress backup solution

    When it comes to choosing a WordPress backup solution, your unique requirements need to guide your decision-making process. But how do you know what to look for? We’ve organized the myriad of factors into eight key considerations that should help.

    1. Backup method: automated vs. manual

    You might think you’re saving money by opting for manual backups, but they’re not worth the savings. Manual backups require your time, and time, as you know, is money. Moreover, they demand constant attention and, if missed, can leave your site vulnerable.

    On the other hand, an automated backup solution ensures your site is backed up regularly without your active involvement. This allows you to focus on what really matters — growing your business.

    If you almost never create new posts or pages, accept form submissions, or update content, you may be okay to choose a manual method. For the majority of sites, however, automatic WordPress backups are the way to go. 

    2. Backup frequency: real-time vs. scheduled vs. manual

    The frequency of backups is a vital aspect to consider. Are real-time backups necessary for your business, or would daily or weekly backups suffice? Real-time backups mean that your site data is backed up immediately whenever changes are made, ensuring you never lose a bit of your work. These are absolutely critical for any website that regularly publishes blog posts, receives form submissions, or accepts ecommerce orders. 

    Scheduled backups — whether daily or weekly — provide a regular snapshot of your site. If your site isn’t updated frequently, this might be an acceptable solution. Manual backups, on the other hand, give you full control but demand the highest level of attention and are completely dependent on how often you’re available to perform the task.

    For the majority of websites, real-time backups will be the best and most secure option to safeguard your hard work.

    Server Center - the location of your backup storage can make all the difference when disaster strikes.

    3. Data storage location

    The location of your backup storage can make all the difference when disaster strikes. Backups stored on your server are certainly better than nothing, but they share the same risks as your website. If your server goes down or is compromised, you lose your backups.

    Cloud storage, on the other hand, provides an extra layer of security by storing your backups offsite. Traditionally, the choice came down to a trade-off between convenience and security. But recent tools like Jetpack VaultPress Backup are so easy to integrate that you can benefit from convenience without sacrificing security. 

    4. Storage security and data encryption

    Not all storage is created equal, especially when it comes to security. A backup solution that doesn’t offer robust security measures is like a bank without vaults. It’s essential to ensure your backup tool offers solid security measures, including data encryption, to keep your files and data away from prying eyes.

    5. Ease of restoring a backup

    When your site goes down, time is of the essence. You need a backup solution that makes restoring your site as easy as possible. Some options can get you back online with a single click, while others might require you to go through complex procedures, often under stressful circumstances. You don’t want to be waiting through a long support chat queue while your site’s in distress.

    6. Scalability for growing websites

    As your presence grows, your website will too. You’ll add more content, get more traffic, or expand your commerce activities. It’s important to choose a backup solution that can grow with your site so, once it’s set up, you don’t have to ever worry about it again.

    7. Compatibility with WordPress versions and plugins

    Imagine buying a jigsaw puzzle only to discover the pieces don’t fit together. That’s what it’s like when your backup solution isn’t compatible with your WordPress version or the plugins you use. Ensuring compatibility is crucial to avoid unexpected surprises down the road.

    For example, if you’re running WordPress Multisite, verify that the backup plugin you choose is compatible with that type of installation.  

    Review the popularity, update frequency, and reviews of potential backup plugins. This should give you an idea of how reliable the solution is and how attentive its developers are to potential conflicts between software versions. 

    Learn more about how to choose the best WordPress plugins for your site

    8. Complexity

    Some backup solutions require a level of technical expertise that goes beyond the reach of most website owners. These solutions might offer more customizability, but they could also leave you reliant on a developer for setup and management. 

    Conversely, user-friendly solutions are designed with the average person in mind, making it easy to set up and manage backups without a costly developer. 

    So, what’s the best WordPress backup solution?

    An ideal backup solution is one that combines the best of these features — a solution that offers automated, real-time backups. One that stores your data securely offsite, yet allows for easy restoration. One that’s built by reliable developers who support integrations with the majority of popular plugins and can quickly troubleshoot and resolve issues.

    Enter Jetpack VaultPress Backup: real-time, disaster-proof backups

    From the people behind WordPress.com comes a backup solution built with the same philosophy of simplicity, accessibility, and reliability — VaultPress Backup. Picture this: your own personal vault, tucked safely away in the digital clouds, holding all of your precious website data, ready to be unlocked at a moment’s notice. That’s the essence of VaultPress.

    Enter Jetpack VaultPress Backup: real-time, disaster-proof backups.

    Overview of Jetpack VaultPress Backup

    Jetpack developed VaultPress Backup with every type of WordPress site owner in mind. The goal was to provide a way to easily safeguard your WordPress site and restore it without any advanced technical knowledge.

    VaultPress Backup saves every single change that happens on your site in real time, keeping it safe on secure cloud servers, and making it readily available if you ever need to restore a backup.

    It even has an activity log, so you can identify the exact point in time that issues occurred and restore to just moments before that action took place. 

    Features and benefits of Jetpack VaultPress Backup

    1. Real-time backups

    VaultPress Backup captures every change on your site as it happens. So whether you’re updating a post or adding a new product, you can rest easy knowing that every change is safely stored. 

    This even includes WooCommerce orders. And, if you have to restore a backup, all of your orders will be saved — no matter when they took place — so things can keep running smoothly. 

    2. Ultra-secure offsite cloud storage

    With VaultPress Backup, your files aren’t just stored anywhere. They’re tucked away in secure, offsite cloud storage. The digital vault is armored against threats, ensuring your data is safe and sound.

    3. A one-click restore process

    If you ever need to restore your site, VaultPress Backup makes it as simple as a mouse click. VaultPress Backup’s one-click restore feature is your express ticket back to normalcy, minimizing downtime and keeping your digital presence intact. You can even restore a backup if your site is completely down, and take advantage of the Jetpack mobile app if you’re on the go.

    4. Cost-effective pricing options

    Jetpack believes that peace of mind shouldn’t break the bank. That’s why pricing plans were crafted with small- and medium-sized organizations in mind. With VaultPress Backup, you’re not just buying a service, you’re investing in reliability, security, and peace of mind.

    5. Built by leading WordPress experts

    Who better to trust your site with than the folks who know WordPress inside out? VaultPress Backup is built by the same team behind WordPress.com, ensuring seamless integration, top-notch compatibility, and continued updates.

    6. Easy and fast to set up

    With VaultPress Backup, you won’t need to hire a developer or spend hours reading through a complex manual. The setup process is straightforward and user-friendly. And if you ever need assistance, Jetpack’s customer support team is always ready to help.

    How to set up VaultPress Backup on your WordPress site

    Setting up VaultPress Backup is a breeze. It’s a matter of a few clicks and entering a bit of information. Here’s a simple step-by-step guide:

    1. In your WordPress dashboard, go to Plugins → Add New. Search for “Jetpack VaultPress Backup,” then click Install Now → Activate.

    Jetpack VaultPress Backup in the WordPress Plugin Repository

    2. A new screen will appear asking you to set up Jetpack VaultPress Backup. Click the Set up Jetpack button.

    Jetpack VaultPress Setup Prompt - Click the Set up Jetpack button.

    3. On the next screen, click Approve to connect your site to an existing WordPress.com account or create a new one. 

    Approve to connect your site to an existing WordPress.com account or create a new one. 

    4. Then, choose a VaultPress Backup plan based on the needs of your site. Complete the purchase process. Your first backup will begin automatically.

    Pricing - choose a VaultPress Backup plan based on the needs of your site.

    It’s as simple as that. No coding, no complex configuration — just straightforward, reliable backups.

    Comparing VaultPress Backup to other WordPress backup solutions

    In the sea of backup solutions, VaultPress Backup shines like a lighthouse, guiding you safely through the storm. But don’t just take our word for it. We invite you to compare it to other WordPress backup solutions. 

    You’ll find that when it comes to real-time backups, secure offsite storage, one-click restoration, scalability, and overall reliability, VaultPress stands tall and proud. For a detailed, side-by-side look, check our comprehensive post: A Comparison of the Best Backup Plugins for WordPress.

    Frequently asked questions about WordPress backup services.

    Frequently asked questions about WordPress backup services

    What is Jetpack VaultPress Backup, and why choose it as my WordPress backup service?

    VaultPress Backup is a real-time backup and security scanning service designed and built by Automattic, the same people who are behind WordPress.com and contribute to the WordPress open source project. Choosing VaultPress Backup means investing in a reliable, comprehensive, and easy-to-use backup solution for your WordPress site.

    How does VaultPress Backup differ from other WordPress backup solutions?

    VaultPress stands out with its real-time backup capability, secure offsite storage, one-click restore feature, and seamless WordPress integration. It’s a robust, reliable, and comprehensive solution for WordPress site backups.

    Is VaultPress Backup suitable for small and large WordPress sites?

    Absolutely. VaultPress is built to scale with your site, whether you’re running a small blog or a large ecommerce store. Jetpack offers plans that cater to different needs, ensuring you pay only for what you use.

    It’s important to note, however, that Jetpack VaultPress Backup does not currently support WordPress Multisite.

    How often does VaultPress Backup back up my WordPress site?

    Jetpack VaultPress Backup performs real-time backups, meaning it records changes to your site as they happen. You can rest easy knowing that every update, every post, every comment, and every order is backed up immediately.

    What does “real-time backups” mean?

    “Real-time backups” means that Jetpack VaultPress Backup saves changes to your site as they happen. Whether you publish a new post or receive a new comment, it’s saved immediately.

    Are my backups secure and protected with VaultPress Backup?

    Yes. VaultPress Backup stores your backups in secure, offsite cloud storage. Additionally, the storage system is built to be resilient against hardware faults and cyber threats.

    How long does VaultPress Backup store my backups?

    VaultPress Backup stores your backups based on the plan you’ve chosen, and the storage space used by your site. You can choose a plan that stores for up to 30 days or even a full year. For more information, check out our detailed documentation.

    How do I restore a WordPress backup created by VaultPress backup?

    Restoring your site from a VaultPress backup is as simple as clicking a button. You can restore your site to the time of a particular event in the activity log or to a specific day. Either way, it just requires clicking a button and waiting for the restore process to complete. You can view the full documentation here.

    Does Jetpack VaultPress Backup save only my database or files as well?

    VaultPress Backup saves both your database and the files that make your site unique. This includes everything necessary to restore your website in case you ever need to. Learn more about what VaultPress Backup does and does not save

    Will using VaultPress Backup slow down my WordPress site?

    VaultPress Backup is designed to work in the background, saving copies of your site without impacting its performance. However, to make the most of the tool, make sure that you add server credentials to your settings. This allows your backups to run as efficiently as possible, plus ensures that you’re ready to restore a backup the second you need to.

    Can an agency use VaultPress Backup to back up its clients’ WordPress sites?

    Yes, agencies can definitely use VaultPress Backup to back up client sites. Jetpack has a dedicated Jetpack Agency program designed specifically for this. Learn how one agency has streamlined their recurring maintenance programs through Jetpack. 

    Jetpack Testimonial from Author Tim Ferris - "Millions of people depend on my site, and downtime isn't an option..."

    Jetpack VaultPress Backup: The most proven backup service for WordPress

    The value of your WordPress site extends beyond the bits and bytes that form its digital structure. It’s a collection of your hard work, dedication, creative expression, and professional growth. It’s your digital home. Safeguarding it should be a priority. 

    VaultPress Backup offers real-time, cloud-based backups, making sure that every change, every update, every comment, and every order on your site is immediately backed up. And in the event of a site crash, the one-click restore feature enables you to get your site up and running again in no time. 

    VaultPress Backup is the most proven WordPress backup plugin, with over 269 million backups over the last ten years. If you want the best for your website and business, then you’ll love what VaultPress Backup has to offer: https://jetpack.com/upgrade/backup/

  • Deploy Pre-Configured WordPress Sites with Jetpack and InstaWP

    Does your agency handle multiple clients, and as a result, multiple websites? Managing plenty of sites can be time-consuming. For example, setting up Jetpack alone — an essential step in making a website more functional and secure — isn’t exactly simple.

    Thankfully, there’s now a way to streamline the process of configuring a site for each client you serve. You can just do the initial setup for one website and just deploy the same configuration across all the other sites you will make, thanks to InstaWP. This not only makes the repetitive task faster but also ensures consistency in all your projects.

    In this post, we’ll show you how to do exactly just that.

    Why install Jetpack?

    Top banner from the Jetpack plugin listing.

    You might be wondering why you should install Jetpack in the first place when setting up a site. Well, Jetpack provides a variety of features for WordPress sites, such as better site security and site performance, as well as backups. You don’t have to turn on everything — Jetpack offers plugins that allow you to install only what you want and need.

    Ultimately, it really depends on you and/or your client. But it is highly recommended if you want to improve your site’s security, performance, and speed. Jetpack can help you attract more traffic.

    The question is, how do you make sure that you only set up Jetpack once and just copy your settings to every website you make? This is where InstaWP comes in with its test site/sandbox feature.

    What is InstaWP, and why use it?

    InstaWP dashboard with a listing of sites.

    InstaWP is a tool to create a WordPress Sandbox Environment. It lets you spin a test environment for your website in a few seconds. You can use it to make a completely new test website or a clone of your current website and test out plugins and configurations. You’ll get to do this all without affecting your original website’s settings and without fear of breaking your site!

    Plus, you don’t have to worry about things like your local storage, setting up DB, or even using a third party paid cloud hosting service. InstaWP handles all that, even with their free plan. And you can also use InstaWP in various ways, like building sites for your clients or developing and testing WordPress sites and products. 

    But one of the best features of InstaWP is the ability to create a website template with your preferred themes, plugins, and settings. That means you no longer have to do time-consuming setups for each new website you make. Instead, you can make one website as a base and start from there.

    How do you use InstaWP to generate a test WordPress site?

    Go to InstaWP and sign up for an account. Alternatively, use this link for quick onboarding.

    Once you sign in, you will see this screen:

    To create a new site from scratch, click New site.

    Click Add New + or + New Site to make this pop-up menu appear:

    Click Create Site to create your new site directly from the InstaWP dashboard.

    You can customize your WP version, PHP version, and site configuration, whether you want your website to be a default WordPress site, a WooCommerce site, or a multisite. When you’re done, press the Create Site button.

    This screen will appear:

    Click the Magic Login button to login to your new WordPress site.

    Click on the Magic Login button. It will take you to your WordPress test site instantly.

    How do you install the Jetpack Plugin on your InstaWP test site?

    When you have a test site ready, install the Jetpack plugin by following any of these procedures.

    Via the test website dashboard

    From your Dashboard, hove over Plugins and click Add New. On the next screen, type Jetpack in the search bar.

    Search for the Jetpack plugin from the add new screen in the WP Admin.

    When you see Jetpack, press Install Now.

    Click Install Now to install the Jetpack plugin.

    After installation, don’t forget to press the Activate button.

    Click Activate to activate the Jetpack plugin.

    Once you activate the plugin, the Jetpack button will appear on your dashboard menu. Set it up according to your preferences.

    Set up Jetpack.

    Via InstaWP’s Chrome Extension

    If you have the InstaWP Chrome Extension, an InstaWP account, and a ready test site, follow these steps.
    On WordPress, hover your cursor over the Download & Extend section then click Plugins.

    Hover your cursor over Download & Extend and then click on plugins.

    Input Jetpack in the white section next to the magnifying glass, then click on it when it appears.

    Search for Jetpack in the search bar on the plugin repository.

    You’ll see this appear on the next screen:

    To install Jetpack on one of your InstaWP sites, click Launch.

    Click Launch to install it on your current test website on InstaWP. 

    If you have two or more test websites on your InstaWP account, click the arrow on the right of the button. That will make a dropdown menu appear. You can then choose the site for plugin installation.

    From the dropdown, select the site that you want to install Jetpack on.

    A check will appear if you have installed Jetpack successfully.

    When Jetpack has been installed on your selected site, a checkmark will appear.

    And when you go to your test site, the Jetpack button will be on the left-hand menu:

    Set up Jetpack.

    What features of Jetpack should you activate?

    As mentioned earlier, Jetpack has plenty of features that will benefit your website and keep it safe, but you don’t have to turn them all on. If you feel confused about what to activate, here are some of our recommendations:

    • Brute Force Attack Protection – This feature will protect your site from brute force attacks when a hacker tries to guess your login credentials by repeatedly using diverse username-password pairs until they succeed. If a hacker ever attacks your site, Brute Force Attack Protection will limit the number of login attempts from the hacker’s IP address. And if the hacker keeps trying, the feature will temporarily block that IP address so that no new attempts can be made.
    • Downtime Monitoring – With this feature, Jetpack will continuously monitor your site and let you know if any downtime is detected. You’ll get notified via email.
    • Jetpack Scan – Anything that involves security, you can now view it in one location. You can also fix problems and restore backups. You’ll be notified via email.
    • VaultPress Backup – Whatever changes you make on your website, you can save them. And if your site gets broken for whatever reason, you can restore the original site in one click, even if you’re offline. 
    • Activity Log – Get a complete record of everything that happens on your website. This is especially important if you have a team with multiple people working on it. This is a clear way to monitor changes and remove the guesswork from the equation.

    What if you prefer using Jetpack CLI?

    Jetpack CLI is a command-line interface (CLI) tool for managing and deploying WordPress sites when you use Jetpack. It is used to make WP-CLI feature-rich and powerful. 

    You can configure Jetpack offline to your preference from the command line, making it easier to automate tasks and streamline your workflow.

    The question is, what if you want to edit Jetpack using this option? Is it possible with InstaWP? Yes – you can access InstaWP using SSH, and from there, access Jetpack CLI. 

    You first need to go to the rightmost part of your test website and press the three-dot menu.

    Click on the actions menu for the site that you want to turn on SFTP/SSH for.

    A drop-down menu will appear. Scroll down and click on the SFTP/SSH option.

    Click on SFTP/SSH in the dropdown.

    On the next screen, make sure to enable SSH and follow the instructions.

    Enable SFTP and SSH to be able to use Jetpack CLI.

    Once this is set up, you can run Jetpack CLI commands like the example below.

    Sample Jetpack CLI output.

    Whatever changes you make here will be carried out on the InstaWP test site, such as:

    • wp jetpack disconnect – Disconnect Jetpack from WordPress.com, or unlink any user’s account from their WordPress.com connection.
      • Use wp jetpack disconnect blog to disconnect Jetpack from WordPress
      • Use wp jetpack disconnect user <id|email|username> to unlink a user account from WordPress
    • wp jetpack reset – This command resets the Jetpack environment and brings it back to the starting default states. You can either reset all current options or simply revert to default active module settings.
      • Use wp jetpack reset modules to return modules to their default active state
      • Use wp jetpack reset options to go to the very initial Jetpack settings that you find upon getting started with it. This also resets all modules to default. 
    • wp jetpack options  – This command is for you to manage various available options. List them, their values, fetch separate option values, and update or delete them. 
      • Use wp jetpack options list to get all your options and their values related to the Jetpack configuration
      • Use wp jetpack options get <option_name> to fetch a specific option’s value.
      • Use wp jetpack options update <option_name> <option_value> to update an option’s current value to a new value. Take note that it only works for strings.
      • Use wp jetpack options delete <option_name> to delete any option – but only ones that are not important for keeping you connected with WordPress.com.

    Template Creation With Pre-Configured Jetpack Settings

    When you’re done setting up your Jetpack on the test site, here’s what you do next. At InstaWP, click on Templates.

    To make a template, you must first go to the templates page in the InstaWP dashboard.

    Click Add New + or the + Add Template.

    To create a template, click Add Template.

    When this popup appears, click on your created site, then Next.

    Click next on the popup.

    You’ll see this next:

    Name and save your template.

    Name your template, describe it, and set it as a shared or private template. Since you’ll be doing this template for your agency, making it a shared one might be better.

    Using this template to make an entirely new site

    Return to the Sites page and hit the Add New + button.

    Click Add New to create a new site from your template.

    Instead of making a blank website and starting over, click From Template. You’ll see your freshly-made template.

    Click Create Site to make your site from a template.

    Select it, then press Create Site. InstaWP will make a site based on the template. The settings you configured on Jetpack earlier will be there. Do this whenever you need to create different websites with the same settings for your convenience.

    Take The Website Live

    The great thing about InstaWP is that you can make many different websites from a template and take all those websites live if you want to. Go to your Sites page, look for the site you want to make live, click the three vertical dots adjacent to this site’s name. Select Migrate:

    From the dropdown menu, click on Migrate.

    Choose the hosting server you prefer. InstaWP can migrate to the following hosts:

    Migrate your site to your preferred hosting provider.

    Enter the important details and sit back, as InstaWP will handle the entire process. Read this comprehensive checklist before you go live, though, to have a launch, as smooth as possible.

    Conclusion

    To sum things up, installing Jetpack on any WordPress site you plan to make is recommended because of its many benefits. And by using InstaWP, you only need to configure Jetpack once and deploy it across all your sites, and you’ll save valuable time and resources.

    By doing so, you’ll not only have more protected and more efficient websites, you’ll have a better workflow and get to focus on delivering top-quality sites for your clients.
    Sign up at InstaWP today to get started.

  • 30+ of the Most Common WordPress Security Issues & Vulnerabilities

    WordPress is one of the safest content management systems (CMS) you can use to run a website. Still, every software comes with vulnerabilities and security issues, most of which are dependent on user behavior. If you don’t know what these issues are or how to prevent them, even the most secure software might not be able to safeguard your website from attacks.

    The good news is that protecting WordPress sites is easier than with other systems because you have access to powerful security plugins. Combine that with safe credentials and all but the most sophisticated attacks won’t stand a chance of breaching your site.

    In this article, we’ll talk about the importance of prevention when it comes to keeping WordPress secure. Then, we’ll discuss the most common types of issues WordPress site owners may encounter and what types of attacks websites fall prey to most often.

    From your first initial WordPress installation to managing a bustling, successful site, we’ve got you covered.

    woman working at a desktop computer

    The importance of closing all potential security vulnerabilities

    The concept of keeping your website “safe” can be a bit nebulous. When people talk about protecting your site, they’re usually referring to keeping unauthorized WordPress users from making changes to it, preventing malicious files from getting uploaded, or reducing the chances of data breaches.

    Failing to protect your website from potential security breaches can affect you in a multitude of ways, even if you’re not dealing with a large amount of sensitive user information. For instance, if you run a small but established online business, security issues can negatively impact the way customers perceive you. 

    To understand how important it is to prevent security issues, let’s elaborate on why they can be so damaging:

    • Unauthorized access. Many updates for WordPress sites contain patches for security vulnerabilities that have been discovered since the previous version was released. If your website isn’t updated, it’s at risk of being accessed and exploited by hackers who are aware of these vulnerabilities.
    • Loss of confidential information. If your website gets compromised, malicious actors can gain control of your site and sensitive data, including user information and other confidential materials. If you’re running an online store or any other type of site that handles private user data, this could have serious implications, both legally and in terms of your reputation.
    • Poor website performance. If someone gains access to your website, they can modify how it works and negatively impact its performance. In some cases, attackers might not even need to gain entry to bring a website “down”, like with Direct Denial of Service (DDoS) attacks.
    • Breach of compliance. In certain industries, failing to secure user data can put you in breach of regulatory compliance. For example, in the healthcare and financial sectors, companies are required to use up-to-date software to ensure the highest level of data security. And sites that accept credit card payments must comply with the Payment Card Industry Data Security Standard (PCI DSS).
    man working on a design on the computer

    If you run a WordPress website, security is of the utmost importance. Shoring up your website from the very beginning will prevent the most common types of issues and help you keep user data safe. 

    How to uncover security vulnerabilities on your WordPress site

    Unfortunately, it’s possible to use an infected computer without knowing it. In a lot of cases, devices end up riddled with malware and users are none the wiser.

    The same can happen with a website. Your WordPress site might be vulnerable to attacks, or it could already be infected with malware. Unless the attackers make it obvious, or you have access to the right tools, this can be hard to spot.

    Just as you have antivirus software for computers, there are also security scanners for WordPress. Tools like Jetpack Security can scan your website for WordPress security vulnerabilities and let you know if there are any issues or irregularities you need to fix.

    notice from Jetpack that everything looks safe on a site

    Jetpack Security’s Scan tool relies on the WPScan vulnerability database, which is used by enterprise companies. That means the database is very comprehensive, and has the ability to identify the most common vulnerabilities your site may face.

    Plus, Jetpack Security is an easy-to-use security plugin developed by Automattic, the company behind WordPress.com. In addition to Jetpack Scan, it includes VaultPress Backup and Akismet. So, when you opt for this tool, you’ll be able to protect your site from vulnerabilities as well as spam, and you’ll get advanced backup features, too.

    The 20 most common WordPress security issues and vulnerabilities

    In this section, we’ll focus on the most common security issues seen in WordPress sites. Every single one of these issues can lead to vulnerabilities that attackers can exploit.

    This can be a lot of information to digest, so don’t be overwhelmed. We’ll tell you what you need to know about each security issue, and provide some additional resources to learn more about them and how to fix them.

    1. Lack of WordPress security plugins

    Security plugins are among the most popular WordPress tools. Depending on which plugin you use, it may be able to scan your website for malware, set up a firewall, help you create backups, prevent spam, and more.

    You can do everything that a security plugin does manually. But, that typically involves customizing many aspects of your site on the back end. For instance, editing core files to block suspicious IPs. As you can imagine, manually securing your site can be very time-consuming.

    The beauty of security plugins is that they can save you a ton of time and hassle. What’s more, they can act as all-in-one solutions for a lot of the more common WordPress vulnerabilities. 

    WordPress plugins offer different functionality, so we recommend opting for a tool that covers as many vulnerabilities as possible, like Jetpack Security.

    Jetpack Security homepage

    As we mentioned, Jetpack Security can help you automate backups, keep security logs for your site, set up a firewall, scan your site for malware, and more. Plus, it integrates with Akismet to help you prevent spam in comments and forms on your site. 

    2. Lack of regular site scans

    Regular scans are like health check-ups for your website. They help you identify threats like malware infections, security loopholes, and unusual activity.

    Jetpack Scan information about scanning a website

    To put it simply, if you’re not running regular scans on your WordPress website, you’re leaving it vulnerable to security threats. This can lead to a compromised site, loss of sensitive data, damaged search engine rankings, and a loss of trust from visitors.

    Site scan tools typically run in the background without affecting any functionality. So, if you have a security plugin or scanning tool, it’ll usually run automatically every so often and only alert you if it finds anything wrong with your website.

    Think about site scanners like antivirus tools for your website. Every modern operating system (OS) comes with built-in malware scanners and removal tools, even if you’re not aware, they’re running in the background. These tools help keep your computer safe and, without them, your experience would be a lot worse.

    3. Lack of regular site backups

    Backups act as a safety net, preserving your site’s data in case of technical mishaps or security breaches. Without regular backups, you could lose all website content and user data. 

    Perhaps the biggest advantage of regular site backups is that they provide you with restore points in case you run into any issues. Instead of spending hours or days troubleshooting security breaches, you can simply revert your site to a previous state without losing critical data.

    latest available backups with VaultPress Backup

    Ideally, backups should be automatic, and you shouldn’t let too much time go between them. Plugins like Jetpack Security include backup tools that enable you to save your website’s information to the cloud. With VaultPress Backup (which is part of Jetpack Security), you’ll get access to real-time backups any time you make changes to your website.

    4. Outdated WordPress versions or plugins

    Keeping your WordPress core and plugins updated is crucial for your site’s security and functionality. That’s because outdated software versions tend to have known vulnerabilities that hackers can exploit. 

    On top of that, they may cause compatibility issues affecting your website’s performance. This could lead to compromised data, loss of site functionality, and a poor user experience.

    If your WordPress website has a bunch of pending updates, then it’s time to get to work on updating all of its components. You can also enable automatic updates for WordPress core directly from the Dashboard → Updates screen.

    developer working on two computer screens

    5. Outdated PHP version

    Hypertext Preprocessor, or PHP, is the backbone of WordPress. It’s one of the main programming languages that the CMS is built on. Using an outdated version of PHP can lead to WordPress security issues and compatibility issues.

    Newer versions of PHP also improve performance drastically. Typically, your web host will update your server to use newer versions of PHP as they come out. If you want to double-check what PHP version you’re using, you can do so directly from WordPress.

    6. A hosting environment that’s not secure

    Your hosting provider’s job is to help you build a website by providing you with the best resources possible. That means a stable server with decent hardware, an easy-to-use hosting management dashboard, and solid security measures.

    If your web host doesn’t provide you with basic security settings, it’ll impact the way you run your website. Basically, you’ll have to spend a lot more time working on covering basic WordPress security vulnerabilities instead of working on your site.

    Basic security tools available in a hosting dashboard

    A secure WordPress hosting provider will offer features like automated backups, Web Application Firewalls (WAFs), automatic blocking on known-malicious IPs, DDoS mitigation, and more. If you’re using a web host that doesn’t offer decent WordPress security measures, we recommend switching to a higher-quality WordPress hosting provider.

    7. Weak password and login credentials

    Using weak passwords and login credentials is probably the most common security issue with WordPress websites. In fact, this is a massive problem for any site or software that requires you to log in.

    It’s important to note that this doesn’t just include the WordPress admin login page. Weak web hosting and File Transfer Protocol (FTP) credentials can also lead to vulnerabilities.

    WordPress site login page

    Simply put, most users don’t like the hassle of complicated, unique passwords for every application they work with.

    Although weak and recycled passwords may be easier to remember, they can put your site at risk. That’s because they make it much easier for attackers to brute force their way into websites or use leaked credentials to gain access to accounts on other platforms.

    If you want to keep your site safe, anyone with access to critical tools will need to learn how to use secure credentials, only creating strong passwords and usernames. Additionally, adding support for Two-Factor Authentication (2FA) can help you further secure your site.

    8. Lack of 2FA

    Two-Factor Authentication, or 2FA, adds an extra layer of security by requiring a second verification step during the login process. This makes unauthorized logins significantly harder, since attackers would also need access to your email account or phone, depending on which type of 2FA you configure for your site.

    There’s no reason not to offer 2FA as an option on your website. Implementing the system is remarkably easy and there are a lot of WordPress plugins, including Jetpack, that can set up 2FA for you.

    9. Insecure login data storage

    Storing login data insecurely, like in plaintext (or using a Post-it), is akin to leaving your bank details out in the open. Poor storage practices make it easy for attackers to obtain these details if they gain access to the location. This can lead to unauthorized access, data breaches, and potential loss of website control.

    As a rule of thumb, don’t store login information anywhere where other people might get access to it, be it physically or digitally. If you have to store login credentials, use a password storage tool, like 1Password, that can encrypt that data for you.

    team working around a large table

    10. Mismanaged and undefined user roles

    Poorly managed user roles can lead to users having more permissions than they need, which creates security risks. This can result in unauthorized or accidental changes to the site, data leaks, or a misuse of resources.

    Ideally, the Administrator should be the only person with full access to the WordPress backend. For every other user role, accounts should be granted the bare minimum permissions needed to perform their duties.

    choosing from a user role dropdown in WordPress

    The good news is that WordPress gives the Administrator full control over user role assignments. Plus, each role comes with a defined set of permissions to match their duties. And, if you want to create additional roles or modify their permissions, you can do so using WordPress plugins.

    11. Insufficient monitoring of user logins and activities

    Without adequate monitoring, you may miss suspicious behavior or malicious activities on your site. This lack of visibility can lead to unauthorized changes, data breaches, and system misuse — all of which can harm your site’s functionality.

    Out of the box, WordPress core doesn’t offer any security log functionality. But, you can use plugins like Jetpack with its activity log feature to keep track of what’s happening on your website (and who’s accessing it).

    Some WordPress web hosts also give you access to activity logs at the server level, which enables you to monitor if anyone makes changes to its configuration. 

    When using this type of tool, it’s best to configure notifications for specific types of activities, like failed login attempts. That way, you’ll get a heads-up if anything sketchy is going on without having to read through dozens of pages of logs.

    several devices on a wooden desk

    12. Themes and plugins containing vulnerabilities

    WordPress themes and plugins with security vulnerabilities are often targeted by hackers. If they manage to exploit these vulnerabilities, it can lead to unauthorized access, data breaches, and more. 

    The good news is that this typically only happens if you use outdated plugins and themes. Likewise, it may be more likely to occur when you download “free” versions of premium plugins and themes from disreputable websites

    These free versions can include code that enables attackers to gain access to your site. So, unless you’re regularly scanning for vulnerabilities, it’s best to avoid this.

    Still, there are plenty of quality plugins and themes that are also free. So, if you need to install one, it’s best to read through user comments on sites like WordPress.org before downloading them. A lot of users will share their stories of problems or WordPress security issues, which can help you make an informed decision.

    13. Misconfigured WordPress database

    A misconfigured database can leave your site’s data exposed, making it susceptible to SQL injection attacks and/or data breaches. One of the most common types of misconfigurations is using the default prefix for databases in WordPress (wp).

    This makes it easy for attackers to identify the database and try to access it. Likewise, using weak credentials at the database level can leave it vulnerable.

    Keep in mind that WordPress stores all your site’s content in a unique database. That means if someone gains access to the database, they can see everything on your website and modify critical settings.

    14. A misconfigured content delivery network (CDN)

    If your audience is spread around the world, implementing a Content Delivery Network (CDN) can be a great way to improve its performance for visitors who are further away from your servers. But, a poorly configured CDN may lead to security gaps. 

    Attackers could exploit these vulnerabilities to launch DDoS attacks, manipulate content, or gain unauthorized access to sensitive data. By misconfiguration, we mean human error in terms of what content the CDN caches, problems with the SSL/TLS configurations, or exposing the site’s original IP address. 

    Configuring a CDN can be tricky with some providers. If you’re looking for a straightforward option, Jetpack’s CDN is super easy to set up and use. There’s no configuration required, so you don’t have to worry about user error!

    man standing in a room of computers and servers

    15. Insecure file and directory permissions

    File and directory permissions determine who can read, write, and execute files on your WordPress website. These permissions are crucial for maintaining the security and integrity of your site.

    If they’re insecure or misconfigured, they can leave your site vulnerable to various threats like attackers being able to upload malware or getting unauthorized access to files.

    Unsecure files also open you up to potential data breaches. If the permissions aren’t set correctly, attackers will be able to read or modify the contents of files, which means they can steal or erase critical data.

    16. Unrestricted public-facing file uploads

    A lot of WordPress websites enable users to upload files through forms. This can be useful if you want people to be able to submit files for you to review, attach images to comments, and more.

    man writing on a notepad next to a computer

    Any form that enables users to upload and submit files to your site needs to be tightly secured. That means full control over what type of files people can upload, so they can’t use the forms to get malware on your server.

    If you use a WordPress security plugin that offers real-time malware scanning, it should detect any malicious files that make it past your form’s security. Without security scanning, you may end up hosting malicious files that can give attackers access to your site.

    17. Insecure third-party services and integrations

    As you may already know, it’s common practice to use third-party services and integrations in WordPress. This can help you add new functionality. But, if you connect your website with a service that isn’t secure, you may end up with additional vulnerabilities on your website.

    For example, if a third-party service provides an unsecure API for integration, it can serve as a gateway for attacks. Hackers can exploit weak API security to perform actions like injecting malicious code, stealing data, or disrupting your site’s functionality.

    Third-party services with low-security standards can also compromise your credentials, which can give attackers access to your website if you’re not using 2FA or additional protections. In a nutshell, you should never connect your website with any third-party service unless you’re sure it’s reputable.

    18. Unauthenticated AJAX actions

    AJAX (Asynchronous JavaScript and XML) is a technique used to create dynamic, responsive web applications by sending and retrieving data from a server asynchronously. That means the sending and retrieval process doesn’t interfere with the page loading.

    As far as WordPress goes, it’s common to use AJAX to handle data submission and retrieval in the background. For example, a lot of plugins use AJAX to power “infinite” loading of content. It’s also frequently used to enable instant search functionality on ecommerce sites.

    Every AJAX action needs to follow security and authentication guidelines to keep your site safe. Without proper user verification, attackers can “trick” your website into performing actions that retrieve sensitive information from the database.

    large room full of servers

    19. Misconfigured web servers

    A web server that isn’t properly configured can be vulnerable from a security standpoint. By “server configuration”, we mean implementing basic security and access rules to protect it from attackers.

    To give you an example, a secure server won’t allow visitors to execute code because they don’t have the right permissions. Likewise, a good security configuration will prevent known malicious IPs from interacting with the server using tools like a Web Application Firewall (WAF).

    Unless you have direct access to the server, this security depends on your web host. Some web hosts take WordPress security issues more seriously than others, so it’s essential that you choose the right provider for your website.

    20. Zero-day exploits and unknown vulnerabilities

    There will always be new WordPress exploits and vulnerabilities that attackers will seek to use to damage your website. 

    Zero-day exploits and unknown vulnerabilities refer to security holes in software that are not known to the developers until they are exploited by attackers. The good news is that once attackers start targeting new vulnerabilities, developers usually patch them pretty quickly.

    In theory, it’s impossible to prevent zero-day exploits because we don’t know what they are. Still, you can drastically mitigate the risk they pose by using a robust WordPress security plugin like Jetpack Security. Since Jetpack Scan (powered by WPScan) uses a comprehensive database that’s updated regularly, it will be able to quickly catch the newest WordPress security issues as they emerge.

    The main types of security threats WordPress sites face

    So far, we’ve focused on specific security vulnerabilities in WordPress and how they can affect your website. But, it’s important to understand what an “attack” or “breach” on your website can look like in real life.

    Unlike in the movies, attackers usually aren’t typing away at a screen with neon letters to hack your website. In reality, “hacking” is a lot more interesting and attacks can come in many forms. So, let’s take a look at some of the most common WordPress security issues.

    1. Malware and virus infections

    You’re probably familiar with the terms malware and viruses. In the context of a website, malware (short for malicious software) and viruses are types of malicious code that can harm your site or its visitors.

    Malware is typically inserted into your website, and can cause a wide range of issues. For instance, it can be used to deface your site, steal data, or even spread malware to its visitors. 

    Types of website malware can include backdoors (allowing unauthorized access), drive-by downloads (automatically downloading harmful software to a user’s device), and defacement (changing the visual appearance of your website).

    man working on code, wearing headphones

    2. SQL injection attacks

    An SQL Injection is a type of attack that enables someone to interfere with the queries that an application makes to its database. In this case, the queries that WordPress submits to the database. The aim of this type of attack is to gain unauthorized access to information or to the site itself.

    Here’s how it works: When WordPress takes user input, it structures it in Structured Query Language (SQL) to fetch the corresponding information from the database. If the query isn’t “sanitized” first, an attacker can modify it. These statements can manipulate the original intent of the query, leading to unauthorized data exposure, data modification, or even data deletion. 

    3. Cross-Site Scripting (XSS) attacks

    Cross-Site Scripting, or XSS attacks, occur when an attacker manages to inject malicious scripts into web pages viewed by other users. These scripts are usually written in JavaScript and execute in the user’s browser.

    Once an XSS attack is successful, the attacker can steal sensitive data (like session cookies) and impersonate the user. Depending on how much access the user has to the site, they can wreak a lot of havoc.

    4. Cross-Site Request Forgery (CSRF) attacks

    Cross-Site Request Forgery (CSRF), also known as XSRF, is a type of attack that tricks the victim into submitting a malicious request. It exploits the trust that a site has in a user’s browser, essentially using the identity and privileges of the victim to “infiltrate” it.

    Suppose a user is logged into a web application where they can perform certain actions, like changing their email address. A CSRF attack could involve the attacker sending the user an email with a link or embedding a link on another website. 

    If the user clicks the link, it triggers a request to the web application that utilizes the user’s already authenticated session to perform the action — in this case, changing their email address to one controlled by the attacker.

    5. Brute force attacks

    A brute force attack involves trying multiple credential combinations until the right one is found. Attackers typically use bots or software to do this. Meaning, if your website doesn’t lock them out of the login screen, they may be able to try thousands of combinations.

    These attempts can be random, but more often, attackers use a dictionary of commonly used passwords or employ more advanced methods like using lists of breached credentials from other sites.

    6. DDoS attacks

    Distributed Denial of Service (DDoS) attacks involve multiple computers connecting to a website at the same time to try and overload it. This is possible because every server can only handle so much traffic before it starts to drop requests or goes down temporarily.

    Typically, attackers use a network of compromised computers to carry out DDoS attacks. Depending on how protected your site is, this type of attack can result in prolonged downtime.

    7. Malicious redirects

    A “redirect” is when you visit a URL and your browser sends you to a different address. This happens because the server you’re trying to access has instructions to redirect all or some traffic to that location.

    There are a lot of reasons to use redirects. For instance, if you change domain names or want to avoid users visiting pages that no longer exist. But, if attackers have access to the server, they can set up malicious redirects sending users to dangerous websites instead.

    8. File inclusion attacks

    A file inclusion attack happens when an attacker manages to trick your website into including files from a remote server that they control. This type of attack typically exploits poorly validated or unsanitized user inputs.

    Properly sanitizing inputs can help you prevent file inclusion attacks as well as SQL injections and other types of vulnerabilities. Another way to prevent this is by using a WAF and keeping your site updated to avoid holes in its security.

    man working on a computer in a dark room

    9. Directory traversal attacks

    Directory or path traversal attacks involve attackers manipulating a URL in such a way that the server executes or reveals the contents of files located anywhere within its file system.

    The goal of this type of attack is to gain access to files you don’t have permission to see or modify. The best way to prevent this type of attack is by configuring secure file and directory permissions.

    10. Remote code execution attacks

    A remote code execution attack happens when someone can execute harmful code remotely. For websites, this means attackers being able to execute malicious scripts on your hosting server.

    This type of attack can happen if your server is vulnerable. Depending on the type of access attackers get, they could potentially run any command they want on the server.

    11. Session hijacking and fixation attacks

    A “session hijacking” is a type of attack that exploits the mechanisms that sites use to help you remain logged in across multiple visits. Typically, websites use cookies to store information about each session. If an attacker can “steal” these cookies, they can hijack the session.

    In practical terms, this means the website will enable the attacker to use your account without having to go through the login process. Depending on what permissions the account has, someone can do a lot of damage with a hijacked session.

    12. SEO spam

    In terms of search engine optimization (SEO), spam can refer to reusing keywords, sharing the same links multiple times, and otherwise trying to game the algorithms that determine site rankings in results pages.

    A lot of times, attackers will try to gain access to websites and use them to improve their own rankings. They can do this by using your site to excessively link to their own.

    Depending on how aggressive the spam is, it can affect your own search engine rankings and lead to penalization. It can also erode the trust of your users because they might think you’re the one spamming them.

    13. Phishing attacks

    You’re probably familiar with phishing attacks. They involve pretending to be someone from an organization or a website to try and obtain login credentials or other critical information from a specific user.

    For a WordPress website, this could look like a fake email asking users to reset their credentials and directing them to a page that saves their inputs. A lot of non-tech-savvy users fall for phishing attacks, so it’s important you try and educate your visitors about official communications from your site.

    Frequently asked questions

    If you have any questions left about WordPress vulnerabilities or the types of attacks you might run into, this section will hopefully answer them. 

    three woman meeting in an office

    Is WordPress secure?

    The short answer is yes. By design, WordPress is a secure CMS. What’s more, its core software is regularly updated for maintenance and security purposes.

    But, just as with any other software, its security depends on how you use it.

    If you don’t update WordPress and its components regularly and use weak login credentials, you’re exposing your site to a lot of risks. 

    What are signs a WordPress site has been hacked?

    Sometimes, it can be hard to spot if a WordPress website is compromised. Still, there are a lot of telltale signs of attacks that can tip you off. For one, you may notice changes in key pages or differences in links.

    If the site is hacked, some search engines will also outright warn visitors when they try to access it. Running into one of these security notices is a solid indicator that you should scan your website for malware and look into ways to remove it.

    How can you remove malware from a WordPress site?

    The easiest way to remove malware from WordPress is by having access to backups. If you use a malware scanner like Jetpack Scan, it can detect changes to your server files as well as harmful code. 

    Jetpack Scan homepage with information about the tool

    You can purchase this tool on its own or get it as part of the Jetpack Security bundle.

    This scanner may be able to clean your website by removing the malware or restoring a backup from when the server wasn’t infected. 

    How can you prevent brute force attacks on WordPress?

    You can prevent brute force attacks on your website by using a firewall to block connections from known malicious IPs. Plugins like Jetpack enable you to do this and help protect your login page from repeated attempts to breach it.

    What is Jetpack Security?

    Jetpack Security is a service that includes VaultPress Backup, Jetpack Scan, and Akismet in one package. That means it helps you automate backups, set up regular malware scans, and protect your website from spam, all in one plan.

    woman working on a computer, with Jetpack Backup screen layered on top

    What is the WPScan vulnerability database?

    WPScan is a database of WordPress vulnerabilities maintained by experts in the CMS and security professions. The database gets constant updates, and you can access it via WP-CLI if you’re a developer. Jetpack Protect uses the WPScan database to identify any potential WordPress security vulnerabilities or malware on your website. 

    Jetpack Security: Your WordPress site’s shield against vulnerabilities

    No matter what type of WordPress site you run, it’s best to be proactive about protecting it from security threats and vulnerabilities. Otherwise, your website’s performance could suffer, and sensitive user data could fall into the wrong hands. As a result, your business or reputation could suffer.

    The easiest way to prevent this is to tighten things up with a WordPress security plugin like Jetpack Security. This powerful tool enables anyone to quickly tackle the most important tasks for more secure WordPress sites, including generating real-time backups, running automatic vulnerability and malware scans, and filtering spam. 

  • What is the Easiest & Best Way to Back Up a WordPress Site?

    You’ve heard the phrase, “Better safe than sorry”, right? It doesn’t just apply to double-checking that your car is locked or going the extra step with home maintenance. The same holds true in our digital lives as well, particularly if you run a website. 

    When you pour your heart, soul, and a great deal of time and resources into building and maintaining a WordPress site, losing it is unthinkable. But, without a backup, it really is a possibility. It could be gone in a flash.

    Fortunately, you don’t have to live with that worry. Hope exists in the form of Jetpack VaultPress Backup, a top-tier solution designed specifically for WordPress sites. When activated, it serves as a virtual time machine, giving you the ability to turn back the clock on any disaster. It reliably goes to work in the background with robust protection that you don’t have to even think about unless you need it.

    Let’s learn a bit more about WordPress backups. 

    WordPress Developer wearing a black shirt with the WordPress logo

    Why backing up your WordPress site is essential

    You wouldn’t buy a house without insurance, would you? A backup is kind of like insurance, but instead of simply compensating you for your loss, the right backup solution can actually make it like the issue never even happened. A website — whether it’s for personal use or professional — is a crucial asset that needs protection.

    1. Loss of data

    Have you ever experienced that gut-wrenching feeling of losing a document or photo? Now multiply that feeling by a hundred — that’s what losing a website feels like. And World Backup Day reports that 21% of people have never backed up their data, which is a startling statistic.

    2. Potential downtime

    Downtime is the stuff of nightmares for any online business. It can cost small businesses a few hundred dollars per hour (or more!) and larger organizations millions. That’s a steep price to pay for not having a reliable backup system in place.

    3. Financial implications

    The financial implications of a website crash can ripple out beyond just the cost of downtime. There’s the lost revenue from halted operations, not to mention the money needed to repair and restore the site. In some cases, businesses have had to start over entirely, an expense nobody is eager to pay.

    4. Loss of customer trust

    Imagine being a regular visitor to a site, only to find it vanished one day, with no explanation. You’d lose trust, wouldn’t you? Data from a survey conducted by KPMG showed that 19% of consumers would completely stop shopping at a retailer after a breach, and 33% would take a break from shopping there for an extended period.

    frustrated developer working on a laptop

    Traditional ways of backing up a WordPress site

    When it comes to protecting your WordPress site, there are a few traditional routes that developers have used time and again. They include manual backups using cPanel, FTP, and phpMyAdmin. While these methods are better than no backup plan at all, they do have their pitfalls.

    Manual backups, for example, can be labor-intensive and time-consuming. They require meticulous attention to detail. If one file is missed, the entire process could be worthless.

    cPanel backups come with storage issues, as they’re typically stored on the same server as the website. This means that if the server is compromised due to a hack or other cause, the backups could be lost too. FTP and phpMyAdmin have their merits but require a certain level of technical knowledge to use correctly, which can be daunting for many users.

    Plus, manual backups require you to remember and dedicate time to performing them. If you have an active site, this will need to be every single day. Even then, there could still be a gap in between your last backup and whenever an issue occurs. Any work, updates, new user activity, orders, etc. in between those times will be lost.

    The need for automated, real-time, off-site backups

    With an increasing reliance on digital platforms, automated, real-time, off-site backups are the new standard. You shouldn’t accept anything less. They provide peace of mind, doing all the heavy lifting while you get on with your day.

    Real-time means that your backup is always current, up to the last second. Automated means that you’re not required to constantly monitor your website and manually initiate backups. Off-site means that your backups are stored away from your primary server, shielding them from any server-wide damage or data loss.

    A trio of scalability, security, and convenience, these features are a must-have for businesses of all sizes. Why? Here are a few reasons:

    • Automated backups are scalable because, as your site grows, the backup system keeps pace, saving every bit of new data.
    • Off-site backups provide an extra layer of security, preventing a single server issue from wiping out both your site and your backups.
    • Real-time backups ensure you don’t lose recent updates or changes if disaster strikes.

    And all of this happens with little to no effort on your part.

    If you put traditional methods and automated, real-time, off-site backups side by side, the choice is as clear as day. Traditional methods might get the job done, but they can’t hold a candle to the efficiency, comprehensiveness, and peace of mind provided by their modern counterparts.

    Introducing Jetpack VaultPress Backup, the leading WordPress backup solution

    Jetpack VaultPress Backup was designed with WordPress sites in mind, boasting all the necessary features for an automated, real-time, off-site backup solution.

    VaultPress Backup sets itself apart through a variety of unique benefits. One of them is its subscription-based model, which includes not only the backup service but also access to an activity log to help you pinpoint issues and restore to the exact right moment in time. 

    Plus, if you subscribe as part of Jetpack Security, you also get a variety of the best WordPress security tools to help prevent issues in the first place and protect your users and digital assets.  

    But the real beauty of VaultPress Backup is its simplicity. It takes the complexity out of backing up a WordPress site, turning a potentially arduous process into a matter of a few clicks. Whether you’re a small business owner with no coding experience or a medium-sized company with a dedicated IT department, VaultPress Backup is crafted for your convenience.

    How to set up VaultPress Backup for your WordPress site

    Taking your first steps with VaultPress Backup is simple and straightforward. Here’s how you can set it up for your WordPress site:

    1. In your WordPress dashboard, go to Plugins → Add New. There, search for “Jetpack VaultPress Backup” and click Install Now → Activate.

    Install and activate Jetpack VaultPress Backup from the WordPress plugin repository.

    2. You’ll now see a prompt to set up Jetpack VaultPress Backup. Click the Set up Jetpack button.

    Next, setup VaultPress - Click the Set up Jetpack button.

    3. Click Approve to connect your site to WordPress.com — you can either log into an existing account or create a new one. 

    4. You’ll now see a table with several plan options. Choose the one that best fits your needs and proceed through the checkout process.

    Choose the one that best fits your needs and proceed through the checkout process.

    And that’s it! Your first backup will begin automatically.

    Once VaultPress is set up, you don’t need to worry about anything. Everything happens in the background, in real-time, and your backups are automatically stored in the ultra-secure Jetpack Cloud.

    Restoring your site with VaultPress Backup

    Nobody likes to think about worst-case scenarios, but they do happen. In such cases, VaultPress Backup is your best friend. It allows you to restore your WordPress site in a few straightforward steps:

    1. Start by going to https://cloud.jetpack.com and find your Activity Log.

    2. Here, you can filter by date range or activity type to find a specific restore point.

    You can filter by date range or activity type to find a specific restore point.

    3. Choose Actions → Restore to this point. 

    Choose Actions → Restore to this point.

    4. You’ll see a list of items that you’d like to restore. In most cases, you’ll leave them all checked. Click Confirm Restore.

    Select the components of your site that you'd like to restore.

    Now, all you have to do is wait! You can keep track of the restore progress on the same page, and you’ll also receive a notification when your site is restored.

    Whether your site has been hacked, was infected with malware, or experienced some other issue, VaultPress Backup ensures you’re never more than a few clicks away from getting things back to normal.

    Comparison of VaultPress Backup to other backup solutions

    There’s no shortage of WordPress backup solutions out there, but VaultPress Backup stands head and shoulders above the rest. This comparison of the best backup plugins puts it all into perspective.

    This comprehensive comparison clearly shows that VaultPress Backup excels in all key areas, including real-time backups, off-site storage, automated backups, ease of use, and support.

    VaultPress Backup is also part of Jetpack Security

    VaultPress Backup is also included in Jetpack Security. a complete security suite for your WordPress site. Picture a fortress, solid and impenetrable, protecting your WordPress site from threats of all kinds. That’s Jetpack Security for you.

    By opting for Jetpack Security, you get VaultPress Backup along with a web application firewall (WAF) working round the clock, automated daily malware scans, one-click fixes for most security issues and vulnerabilities, activity monitoring with a 30-day log, and robust anti-spam protection for WordPress forms and comments. It’s like having an expert security team watching over your website, every minute of every day.

    The reliability and resilience of Jetpack Security speaks for itself. More importantly, it’s a cost-effective solution for your business. With Jetpack Security, you’re not just buying a backup solution; you’re investing in the safety and longevity of your business.

    Frequently asked questions about WordPress backups

    What is Jetpack VaultPress Backup, and why choose it for my WordPress backups?

    Jetpack VaultPress Backup is a leading backup solution for WordPress sites. It offers automated, real-time, off-site backups, making it a secure and convenient choice for businesses of all sizes. 

    How does VaultPress Backup differ from other WordPress backup solutions?

    VaultPress Backup stands out with its comprehensive backup features, ease of use, and exceptional support services. You can use it as a standalone plugin, or as part of the Jetpack Security suite, which offers enhanced security and protection for your site.

    Is VaultPress Backup suitable for a small business WordPress site?

    Absolutely. VaultPress Backup is designed with companies of all sizes in mind, including small businesses. Its simple setup, automated backups, and affordable plans make it a great choice for small businesses.

    How often does VaultPress Backup back up my site?

    VaultPress Backup provides real-time backups, so every change you make on your site is instantly saved.

    What does “real-time backup” mean?

    Real-time backup means that VaultPress Backup constantly monitors your site and backs up any changes as they happen. So, every updated page, new blog post, comment, order, and more is available if something goes wrong.

    Are my backups safe with VaultPress Backup?

    Yes, VaultPress Backup stores your files off-site on secure servers. This means that, even if something happens to your primary server, your backups are safe.

    What is the process to set up VaultPress Backup on my WordPress site?

    Setting up VaultPress Backup on your WordPress site is a breeze. You just need to install the plugin, connect your website, choose a plan, and VaultPress Backup starts doing its magic automatically.

    How do I restore my WordPress site with VaultPress Backup?

    VaultPress Backup offers a simple restoration process. You just log into your dashboard, select the backup to restore, and click Restore to this point. VaultPress Backup takes care of the rest.

    Does VaultPress Backup save my database or files?

    VaultPress Backup saves both your database and your files. This includes posts, comments, media, and more.

    Will using VaultPress Backup slow down my WordPress site?

    VaultPress Backup operates in the background and doesn’t impact your site’s performance.

    Does VaultPress Backup provide support in case I encounter an issue?

    Yes. VaultPress Backup prides itself on its stellar customer support. As a subscriber, you’ll have access to expert help whenever you need it.

    How secure is my data with VaultPress Backup?

    Your data is very secure with VaultPress Backup. Not only are your backups stored off-site on secure servers, but the infrastructure employs strict security protocols to ensure your data’s safety.

    Can an agency use VaultPress Backup to back up its clients’ sites?

    Yes, and we encourage it. VaultPress is a great tool for agencies to provide secure and reliable backups for their clients’ WordPress sites. For more information, visit our Jetpack for Agencies program at https://jetpack.com/for/agencies/

    VaultPress is a great tool for agencies to provide secure and reliable backups.

    VaultPress Backup: Simply the best backup solution for WordPress

    So, there you have it. We’ve walked through the importance of WordPress backups, the pain points of traditional backup methods, the need for automated, real-time, off-site backups, and how VaultPress Backup is a solution that ticks all those boxes.

    Are you still wondering, “Is VaultPress Backup really the best backup solution for WordPress?” 

    Without a hint of hesitation, the answer is “Yes!”

    Remember, your WordPress site is like a vital organ of your business. You wouldn’t entrust the health of your heart to just anyone, would you? So, why should your WordPress site be any different?

    The beauty of VaultPress Backup lies in the incredible simplicity of use despite robust features. It doesn’t just provide a backup solution; it gives you peace of mind. You can sleep easy knowing that even if the unthinkable happens, you have a reliable recovery system at your disposal. 

    That’s the power of a solid backup solution. It does more than just store copies of your data. It guarantees that your business can bounce back from any setback, at any time. 

    In the end, what matters is not just having a backup solution, but having the right backup solution. And, as we’ve shown, VaultPress Backup is the right backup solution for WordPress.

    Are you ready to safeguard your WordPress site? Ready to trade worry for assurance? If so, then it’s time to choose VaultPress Backup. It’s time to choose peace of mind.

    Get started with VaultPress Backup today.

  • What are Offsite Backups & Why Use Them? (12 Advantages)

    In the world of business, particularly in the digital realm, we’re not just storing office supplies and paper files. We’re guarding treasure chests full of digital data, sensitive information that forms the bedrock of our enterprise.

    But, just as you wouldn’t bury treasure in your backyard, you shouldn’t store critical data only on your primary server. This is where the principle of offsite backups comes in.

    What is an offsite backup?

    In a world that’s rapidly going digital, data is the new gold. An offsite backup, then, is essentially a safe deposit box. It’s a copy of your data stored at a different location from your primary server. It could be another physical location, or, increasingly, it’s in the cloud.

    Unlike the more traditional onsite backup, which replicates your data on a local server or device, an offsite backup ensures that a version of your data is stored at a different geographical location, safe from any calamities or security breaches that could affect your primary server.

    Your WordPress site has a hosting provider that may offer backups. However, these are considered on-site since they’re hosted at the same place as your regular website files. If something happens, all of your data may be irrecoverable — your fortune gone. 

    Why offsite backups are essential

    Now you might wonder why you should even bother with offsite backups. You’ve got a reliable host and a strong password. Isn’t your data safe enough? 

    Well, as we’re about to delve into, there are numerous reasons why this belief is, not only flawed, but potentially dangerous.

    The digital landscape is fraught with risks, from natural disasters that can wipe out physical servers to cyber-attacks that can compromise your data integrity. These dangers pose a significant threat to your business continuity, especially if your primary server is your only line of defense.

    Think you’re not a target? Cybercriminals often aren’t individually selecting which sites to attack. Instead, they use automated programs that look to exploit any weak site, and they use economies of scale to penetrate just a few of thousands of attempts to make massive gains. 

    The role of offsite backups in a disaster recovery plan

    A sound disaster recovery plan is like a well-rehearsed fire drill. You hope you’ll never need it, but when disaster strikes, you’ll be glad you took the time to prepare. For websites, one of the central tenets of a good disaster recovery plan is offsite backups.

    If your primary server is compromised, you can lean on your offsite backups to restore your website and ensure that your operations continue as smoothly as possible. It’s the digital equivalent of having a fireproof safe to protect your most important documents from a blaze.

    The risks associated with a lack of offsite backups

    Imagine you’re a skilled acrobat, performing breathtaking stunts high above the ground. Now imagine doing so without a safety net. Sounds terrifying, right? That’s what running a business without offsite backups is like.

    The consequences could range from the inconvenient, such as delays in accessing your website, to the catastrophic, such as halted operations or a significant loss in revenue.

    What does the ideal offsite backup solution look like?

    We’ve established that offsite backups are crucial. But how do you choose an ideal solution for your business? The best offsite backup solution should offer you secure and robust storage, easy retrieval of your data, real-time updates, and scalability. Additionally, it should also offer remote management of your backups and a simplified process of restoring your data. Sound like a tall order? 

    Jetpack VaultPress Backup plugin homepage

    Let’s make it easier. Introducing Jetpack VaultPress Backup — a premier backup solution designed for WordPress sites. With VaultPress Backup, not only are you getting the peace of mind that comes with knowing your data is safe and secure, you’re also getting a solution that’s specifically designed to meet the unique needs of your WordPress site. 

    12 key advantages of using offsite backups

    1. Peace of mind — Your data is safe in case of an onsite disaster

    You’ve heard the stories. A server crash that wipes out months of hard work. A devastating natural disaster that destroys local data storage. Cybercriminals breaching defenses and holding valuable data for ransom. This stuff of nightmares is, unfortunately, a very possible reality in the digital world today.

    But with offsite backups, you don’t have to worry. It’s a safety net that stands ready, offering assurance that should the worst happen, your data will be safe. With tools like VaultPress Backup, every change you make is stored in a safe location, ready to step in if disaster strikes.

    2. Security — Keep your backups away from potential breaches

    Cybersecurity threats are a significant concern in today’s digital landscape. The security of your data shouldn’t be something that keeps you awake at night. Offsite backups provide an extra layer of protection, ensuring that even if your primary systems are compromised, your data remains secure. VaultPress Backup, for instance, encrypts your data during transmission and stores it in secure offsite locations, far from the prying eyes of cybercriminals.

    3. Safeguard your data — Protect against accidental deletions

    Ever deleted a file accidentally and wished you had a time machine? We’ve all been there. Accidental deletions are more common than you might think, and they can have catastrophic consequences. Offsite backups are like a digital time machine, enabling you to recover accidentally deleted data and get back on track. VaultPress Backup provides real-time backups, meaning every change is recorded — even those accidental deletions.

    4. Easy retrieval — Access and restore backups from anywhere

    You’re on vacation, and you get an urgent call — the website’s down, and they need it restored immediately. Is your day away ruined? Not if you have offsite backups. They can be accessed from anywhere, allowing you to retrieve and restore data whenever you need to.

    option to restore a backup with Jetpack VaultPress Backup

    5. Accessibility — Retrieve data even if the primary server is down

    Imagine your primary server is down, and nobody can access your WordPress site. What do you do? With offsite backups, you’re covered. Even if your primary server faces downtime, you can access your offsite backups and retrieve the necessary data. A plugin service like VaultPress Backup ensures that your data is always available when you need it, irrespective of what happens to your primary server.

    As a bonus, Jetpack’s full suite of WordPress tools include a downtime monitoring feature. So, you’ll know as soon as something is wrong and have the power to fix it from anywhere with just a few clicks. 

    6. Time efficiency — Offsite backups can be performed automatically

    Running a business is a juggling act, and time is one of the most valuable resources you have. Offsite backups can be set to run automatically, eliminating the need for manual backups that take up precious time. VaultPress Backup, for example, provides real-time automated backups. You set it up once, and it takes care of the rest, leaving you free to focus on growing your business.

    7. Peaceful updating/testing — Confidently experiment with changes

    Innovation is key to success in today’s fast-paced business world, but making changes to your website or testing new features can be risky without a safety net. Offsite backups allow you to confidently experiment and innovate, knowing you can restore your site to its previous state if necessary. VaultPress Backup keeps a detailed log of all changes, making it easy for you to undo any that don’t work out as planned.

    activity log showing all the actions on a site

    8. Scalability — Expand storage without affecting the primary server

    As your business grows, so does your data. Offsite backups are an efficient way to manage this growth. They allow you to quickly and easily scale your storage capacity. 

    9. Regulatory compliance — Meet data protection requirements

    Many industries are required by law to have a certain level of data protection in place, which often includes offsite backups. By ensuring your data is securely backed up offsite, you can work towards maintaining compliance with these regulations.

    10. Customer trust — Demonstrate reliability and show your clients their data is safe

    A slow website annoys visitors and potential customers. A site that’s completely down? It wreaks of incompetence and not much sends them to a competitor faster. Be there when customers are looking for you with a continuity plan that includes easily-recoverable offsite backups.

    Plus, having robust offsite backups in place, shows customers that you take their data security seriously, which builds trust in your business.

    11. Business continuity — Keep your business running smoothly

    In the event of a disaster, having offsite backups ensures that your business can continue to function. You can minimize downtime and disruption to your business operations. VaultPress Backup makes WordPress site recovery simple, fast, and efficient. 

    12. Easy migration — Simplify website transfers to new environments

    Picture this scenario. You’re poised to make a leap, set to transfer your website to a new hosting provider or perhaps a new domain. But the thought of the potential headaches involved makes you hesitate. We’ve been there. The truth is, migrating a website can be a daunting task, filled with uncertainties.

    But with offsite backups, this process becomes a walk in the park. Your website’s data, safely stored in an offsite location, can be easily moved and re-deployed in a new environment, significantly simplifying the process. It’s like packing up your belongings from your old house (your existing server) that have been carefully cataloged and stored away, ready to be set up in your new home (the new server) — except all the heavy lifting has been taken care of for you. 

    A deeper dive into VaultPress Backup

    As a part of the Jetpack suite of plugins for WordPress sites, VaultPress Backup fills the universal need for a robust, easy-to-use offsite backup solution. 

    Features and benefits of VaultPress Backup

    VaultPress Backup is more than just an offsite backup solution. It’s a comprehensive WordPress site recovery tool that offers:

    • Real-time and automated backups.
    • Easy restoration of your site — even if you can’t access your dashboard.
    • A centralized place to manage backups.
    • Premium support from a team of WordPress experts.
    • High-grade security to protect your backups from threats.

    How to configure VaultPress Backup on your WordPress site

    Setting up VaultPress Backup on your WordPress site takes just a few simple steps:

    1. In your WordPress dashboard, go to Plugins → Add New. Search for “Jetpack VaultPress Backup” and click Install now → Activate.
    2. In the new window that pops up, click Set up Jetpack.
    3. You’ll be prompted to connect to a WordPress.com account. You can either create a new one, or log into an existing profile. 
    4. Then, choose a VaultPress Backup plan based on your needs and set up your payment information.
    Jetpack set up screen

    And that’s it! Once VaultPress Backup is set up, you don’t need to worry about anything. Everything happens automatically, in real-time, and your backups are stored off-site in an ultra-secure cloud. And the Jetpack support team is always on standby to help you out.

    Frequently asked questions regarding offsite backups

    Onsite vs offsite backups — what’s the difference?

    Onsite backups involve storing copies of your data on your local devices or server, while offsite backups store copies of your data at a different location from your primary server. In other words, offsite backups shield your data even if something happens to your primary server, giving you an additional layer of protection.

    Why are offsite backups important for my website?

    Offsite backups are vital for your website because they protect your data and content from a multitude of risks, including physical damage to cyber threats. Having a copy of your website stored off site ensures that you can get it back up and running quickly if your server is ever compromised.

    How do offsite backups help in a disaster recovery scenario?

    In a disaster recovery scenario, offsite backups act as your fail-safe. They allow you to restore your website quickly and continue operations, minimizing downtime and data loss. 

    What key advantages do offsite backups offer compared to onsite backups?

    Offsite backups offer several advantages over onsite backups, including added security, accessibility, scalability, and help to comply with regulatory standards. They also provide a safety net in case of damage or security breaches to your primary server or local device.

    What differentiates VaultPress Backup from other offsite backup solutions?

    VaultPress Backup stands out from other solutions due to its seamless integration with WordPress, user-friendly management dashboard, high-grade security, and exceptional support. 

    One of the key highlights is that all backups are taken in real time, so every single change that happens on your website — from updated pages to published posts and customer orders — is always available in case of emergency.

    How secure are my backups with VaultPress Backup?

    VaultPress Backup uses state-of-the-art security measures to protect your backups. From encrypted transmission to secure storage, Jetpack goes the extra mile to ensure your backups are secured from threats. Your WordPress backups are safe with Jetpack VaultPress Backup.

    How frequently should I schedule offsite backups?

    For maximum data protection, you should create offsite backups in real-time. VaultPress Backup makes this possible, ensuring that every change you make to your site is immediately backed up.

    Where can I find more resources or support for using VaultPress Backup?

    For more resources or support on using VaultPress Backup, you can check out the comprehensive support documentation or reach out to Jetpack’s expert support team who are always ready to help.

    laptop sitting on a table

    Jetpack VaultPress Backup: Real-time, offsite backups for WordPress

    In an ideal world, you’d never need to restore a backup. But the reality is that there are a variety of reasons you might have to, from a hacked website to a coding mistake.

    Jetpack VaultPress Backup was designed to offer real-time, offsite backups for WordPress sites. So, whether you own a small business, an ecommerce store, a blog, or an enterprise company, VaultPress Backup provides a secure, easy-to-use, and robust offsite backup solution that gives you peace of mind.

    From disaster recovery to easy data retrieval and beyond, offsite backups are not just a good-to-have feature for businesses; they’re an absolute necessity. It’s the digital safety net that keeps your business running smoothly, safeguards your website content and data, and keeps you sleeping well at night.

    So, take the leap towards securing your website’s future with offsite backups. 

    Discover the full list of benefits VaultPress Backup offers here: https://jetpack.com/upgrade/backup/

  • 7 Best Local WordPress Development Environments in 2023

    In many cases, a local WordPress development environment is a better choice than paying a hosting provider when starting a new WordPress project. Local WordPress development environments enable you to set up as many websites as you need on your computer, all for free.

    These environments are perfect for developing new projects and for testing purposes. Depending on what tools you use, you can launch new WordPress sites in a matter of minutes, and loading times should be near instant. Plus, no one will be able to access your local projects until you’re ready to share them.

    development team working on computers

    In this article, we’ll break down how local WordPress development environments work and how to choose one. Then we’ll introduce you to seven top picks. 

    What is a local WordPress development environment?

    A local development environment is a set of tools you can use to set up and host websites on your computer. In this scenario, the computer acts as the server. It’s also a kind of ‘sandbox’ where you can experiment with, create, and refine websites without worrying about paying for WordPress hosting or breaking anything important.

    local development site with the name "Test Site"

    Normally, WordPress runs on a web server on the internet, and you interact with it via a web browser. If you use a local WordPress development environment, you can still access the sites you set up via a browser, but they’re not accessible to people outside your local network, as every element of the site, from its files to the database, is hosted on a local machine — your computer.

    The tools that allow you to do this are called local development, own virtual machine environments, or localhost environments. Some popular examples include MAMP and XAMPP, although there are many others.

    two developers working side by side

    What are the benefits of a local development environment?

    If you work with WordPress, you probably have access to hosting where you can launch new websites and test projects. Using a local WordPress development environment requires you to customize your computer to be able to host sites (i.e., turn it into a server).

    That process is much simpler than you might expect, thanks to local WordPress development software. The most popular options will set up all the tools you need to host a WordPress site, from PHP to server and database software.

    There are a number of reasons why it makes sense to do this instead of using a typical hosting environment. Some of the benefits include:  

    A safe development environment

    With a local environment, you have the liberty to experiment without the fear of breaking your live website. Any mistakes remain confined to your local server setup, and can be easily rectified without impacting online visitors.

    Near-instant loading times

    Local environments are faster, since you don’t have to constantly upload or download files from the server. Changes are instantaneous, leading to a more efficient development process.

    Offline access

    Since the entire setup resides on your machine, you can work on your website even when you’re offline. This independence from internet connection and connectivity can be a boon for developers on the move, and those with unreliable internet connections.

    black and white image of a man working on a laptop

    Learning and testing

    These tools provide a safe platform for beginners to learn WordPress, or for more seasoned developers to try out new plugins, themes, and updates before implementing them on live websites.

    The final benefit of a local environment is that it’s free. A lot of hosting plans limit the number of websites you can set up. Instead of paying for more expensive plans, you can host sites locally. This is useful if you’re working on a lot of simultaneous projects, or if you simply like testing the limits of what WordPress can do.

    How to choose the right local WordPress development environment

    Choosing the right local development environment depends on your specific needs, skill level, and comfort. Here are some key factors to consider:

    • Ease of use: If you’re a beginner, you might prefer an environment that’s easy to set up and use. Some local development environments provide more user-friendly interfaces and straightforward setup processes, whereas others are focused on advanced users (some rely entirely on the command line, for example).
    • Compatibility. As a first step, you’ll want to ensure that the environment you choose is compatible with your operating system. Some environments are designed specifically for Windows, macOS, or Linux, while others are versatile and can operate on multiple platforms.
    • Advanced functionality. Some local environments offer features like Secure Sockets Layer (SSL) support, local email testing, support for multiple versions of PHP, plugins, and more. Pick an environment based on the features you need for your development projects.
    • Access to community and support tools. Look for environments that have strong community support and comprehensive documentation. This can be particularly helpful if you encounter issues or need help understanding certain features.

    It’s also worth noting that not all local environments are designed specifically for WordPress users. A lot of these tools are flexible, which means you can use them to set up any kind of website you want.

    If you work only with WordPress, though, you’ll likely want to opt for a local development environment configured for that content management system (CMS). Typically, this means the software will come with features to make creating and managing WordPress websites easier.

    woman working on a laptop, wearing headphones

    The top seven local development environments for WordPress

    So, how should you get started? The most important step is to choose the tool you’ll use to create your local sites. Below, we’ve included seven top options. For each one, we’ll tell you all about how it works and what WordPress-specific features it offers.

    1. XAMPP (Windows, Linux, macOS)

    XAMPP homepage with download options

    XAMPP stands for Apache, MariaDB, PHP, and Perl. This open-source tool is a wrapper that sets up that entire development stack, and provides you with a minimalist interface you can use to manage it.

    This is not a WordPress-specific local development tool. XAMPP simply sets up the stack for you and enables you to use it in any way you see fit. This approach is perfect if you’re a developer looking for a no-frills environment, but it’s not recommended if you prefer intuitive interfaces.

    Pros:

    • Lightweight software
    • Database and email management tools
    • Local FTP support
    • A Bitnami installer for easy WordPress setup

    Cons:

    • No intuitive interface
    • No WordPress-specific functionality

    Installation and setup process: 

    XAMPP comes with a simple installer for every operating system (OS) it works on. During the setup process, you can choose which components of the stack you want to install. For WordPress websites, you can skip the Perl installation, as the CMS doesn’t require it.

    Ease of use: 

    You can manage XAMPP using a dashboard that enables you to start, stop, and configure each of its components. This dashboard also gives you access to the terminal and a local file explorer for your site’s files.

    XAMPP comes with a Bitnami installer that enables you to set up WordPress without having to do so manually. But aside from a simplified WordPress installation, XAMPP doesn’t offer any extra tools for managing your website (or switching between multiple projects).

    Price: 

    XAMPP is a free open-source tool.

    2. WampServer (Windows)

    WAMP homepage with information about the tool

    WAMP stands for Windows, Apache, MySQL, and PHP. WampServer enables you to set up that full development stack locally, and it provides you with a simple management interface to interact with each component.

    WampServer is fairly similar to XAMPP in terms of functionality and ease of use. The software isn’t designed for WordPress specifically, but the development stack is perfect for the CMS anyway. If you’re a seasoned developer, WampServer’s minimal interface shouldn’t pose a problem while you’re working on WordPress projects.

    Pros:

    • Lightweight software
    • Database management tools
    • Built-in debug tools

    Cons:

    • Only works with Windows
    • Lack of website setup tools
    • No WordPress-specific functionality

    Installation and setup process: 

    WampServer comes with an installer that requires minimal configuration during the setup process. You can’t pick what elements of the stack to install, but all of them are needed to run WordPress locally.

    Ease of use: 

    WampServer sets up a start-tray menu that you can use to manage its components and start and stop the service. On the other hand, it doesn’t include any tools that will help you during the site setup process.

    Installing WordPress with WampServer is a manual process. You’ll need to download the latest version of the CMS, extract the files on the localhost folder WampServer sets up for you, create a database using phpMyAdmin, and run the official WordPress installer tool. This process is not necessarily complex, but it can be overwhelming if you’re used to web hosts that install WordPress for you.

    Price: 

    WampServer is a free tool.

    3. MAMP (Windows, macOS)

    MAMP homepage design with an orange background and elephant logo

    In many ways, MAMP is a more user-friendly version of both XAMPP and WampServer. This software enables you to set up a variable development stack, with the option of choosing between Apache or Nginx, as well as MySQL, PHP, Python, Perl, and Ruby.

    The main downside of using MAMP is that it’s not fully free software. Its free version limits you to a single local website. The premium version of MAMP gives you access to a lot of advanced development features, like cloud backups, support for multiple versions of PHP, mobile testing apps for your sites, and a built-in text editor.

    Both the free and premium versions of MAMP come with WordPress installers. The premium version also includes some Quality of Life (QoL) tools for WordPress, like options for importing sites and pushing them to production (your live WordPress site).

    Although MAMP is available on both Windows and macOS, it’s clearly designed for the latter. When you compare the premium Windows and macOS versions, the former offers less functionality. If you’re primarily a Windows user, this might not be the best option for you.

    Pros:

    • The ability to choose between Apache and NGINX
    • Access to WordPress-specific tools
    • One-click WordPress installation
    • Cloud backups
    • SSL support
    • A built-in text editor
    • Support for multiple PHP versions and extensions

    Cons:

    • Support for just one website on the free version
    • Less functionality included with the Windows version compared to the macOS version
    • No WordPress-specific functionality

    Installation and setup process: 

    MAMP comes with an installer that enables you to choose which components to set up. The software also offers one-click installation options for WordPress in both its free and premium versions.

    Ease of use: 

    The free version of MAMP comes with a management interface that’s similar to XAMPP. This interface enables you to manage and configure all the environment’s elements, including the server and PHP installation. If you use MAMP Pro, you get access to a more comprehensive management dashboard that includes WordPress-specific options.

    Price: 

    Free, with premium versions available starting at $99.

    4. LAMP (Linux)

    LAMP is not a standalone local development environment. It’s the name of a specific software stack that includes Linux, Apache, MySQL, and PHP. In other words, it has all the components you need to run WordPress.

    As the name implies, you need to use a Linux distribution if you want to set up this stack. The process involves using the terminal to install and configure each of the components. This process can be intimidating if you don’t have a background in web development or aren’t familiar with using the command line.

    example of the command line in action

    In practice, there’s little difference between using LAMP or setting up a development stack like XAMPP. The main thing to keep in mind is that, with a self-installed stack, you don’t get access to a management dashboard that enables you to control all components. Instead, you need to use the terminal or access the components through the browser (for example, by using phpMyAdmin) to make changes to the stack.

    Pros:

    • Full control over the WordPress development stack
    • The ability to set up as many local websites as you need

    Cons:

    • Familiarity with Linux and the command line is necessary
    • No central management dashboard for stack components

    Installation and setup process: 

    There’s no hand holding when it comes to installing LAMP. The process requires you to understand how to set up packages using the Linux terminal, and to be comfortable configuring them without a graphic interface. This often involves accessing and editing configuration files using a text editor.

    Ease of use: 

    If you don’t have a background working with Linux or using the command line, LAMP isn’t for you. But if you’re comfortable with both of those aspects, LAMP gives you an unparalleled degree of control over your local WordPress setup.

    You can configure the development stack in any way you need without limitations imposed by software. For a lot of developers, this freedom is much preferable to relying on wrappers like XAMPP or WampServer.

    Price: 

    LAMP is a software stack you can install for free on Linux.

    5. Vagrant (Windows, Linux, macOS)

    Vagrant homepage with the tagline, "development environments simplified"

    One disadvantage of most local site development software is that it doesn’t enable you to set up multiple environments. For example, if you set up a LAMP environment on Linux, you can’t also run an NGINX server simultaneously without things getting complicated.

    This is problematic if you need drastically different environments for WordPress projects. Vagrant solves this issue by helping you create local virtual machines where you can set up any development environments you want.

    Vagrant is incredibly lightweight, and you interact with it via the command line. Typically, virtualization software requires powerful hardware to run multiple machines. Vagrant removes a lot of the overhead for virtual machines and enables you to power them up or down as necessary.

    Moreover, there’s a large library of Vagrant “boxes” you can choose from. These boxes are pre-built environments that you can download and install for rapid WordPress setup. Typically, WordPress boxes include extras like WP-CLI, debugging tools, and more.

    One final pro of using Vagrant is that it’s relatively easy to share config files between members of a team. Virtual environment config files enable you to reproduce exact machine configurations, so you can have coworkers use the same virtual hardware to collaborate on a project. Combine this with Git support, and you have an ideal set of tools for collaborative WordPress development.

    Pros:

    • The ability to set up multiple environments using virtualization
    • Doesn’t require top-of-the-line hardware to run
    • Pre-built WordPress development boxes that make it easy to set up environments
    • The ability to share environment config files easily
    • Git support

    Cons:

    • Works solely through the command line

    Installation and setup process: 

    Vagrant offers installers for all major OSs. Alternatively, you can install the software through the terminal on either macOS or Linux. The installation process is simple, and it doesn’t offer configuration options, as you’re not setting up an entire development environment from the get-go.

    Ease of use: 

    If you’re comfortable using the command line, you’ll feel right at home with Vagrant. The software makes it easy to spin up new WordPress site installations and configure environments. But if you’re looking for a graphical user interface (GUI), you won’t find it here.

    Price: 

    Vagrant is free.

    6. Docker (Windows, Linux, macOS)

    blue background with white text saying "develop faster. run anywhere."

    In terms of functionality, Docker is fairly similar to Vagrant. You can use Docker to set “containers” and configure unique development environments on each of them. That means you can have multiple local WordPress websites, each with a unique virtual server, all cohabitating on the same computer.

    The main difference between Vagrant and Docker is that the latter doesn’t use virtual machines. Containers are standalone executable packages that contain everything you need to run an application. Unlike a virtual machine, containers don’t include a full OS. This makes Docker more flexible, and both tools can cohabitate.

    Docker works through the command line, just as Vagrant does. You can use Docker to create individual “containers”, and set up WordPress development environments by installing the stack you want to use.

    Alternatively, you can download pre-built Docker containers from the developers’ online library. This library includes hundreds of WordPress containers, each of them with a unique configuration. This means you’re free to choose containers based on the type of environment you want to use.

    Pros:

    • The ability to set up multiple development environments using virtual machines
    • Pre-built WordPress development containers that make it easy to set up environments
    • A more lightweight setup than Vagrant in terms of hardware requirements
    • The ability to run services like databases, caching layers, etc. in different containers

    Cons:

    • You need to be comfortable using the command line

    Installation and setup process: 

    Docker offers standalone installers for all the most popular operating systems. Just as with Vagrant, the installation process doesn’t require a lot of configuration. Still, you may need to enable virtualization in your device’s BIOS settings to use Docker.

    Ease of use: 

    Docker is a command line tool without a GUI, so you need to be comfortable working with commands to manage a server. If you don’t have a background as a developer or system administrator, there’s a steep learning curve involved in using this kind of tool.

    Price: 

    Docker offers a free personal version you can use for local WordPress development. Premium versions enable you to set up private repositories for your containers, starting at $5 per month.

    7. Laragon (Windows)

    purple background with white text that says "Laragon"

    Laragon is a project from users who were frustrated with environments like XAMPP and WampServer, due to their perceived lack of user-friendliness. With Laragon, you get a tool that combines command line use with a management dashboard for the development stack.

    Laragon enables you to set up containerized environments (think Docker or Vagrant) with an emphasis on being as lean as possible and easy to customize. Laragon tends to require the least amount of hardware resources when compared to similar tools.

    In terms of friendliness for WordPress sites, Laragon enables you to install popular software and tools with only a single click. You can use the Laragon management dashboard to configure your own development environment and install WordPress locally without needing to use the command line.

    The Laragon dashboard enables you to access any aspect of local WordPress projects, including databases, local files, and even SSH with a single button press. Combine that with command line access, and you have a very versatile tool on your hands.

    Pros:

    • A central management dashboard and terminal access
    • Containerized development environments
    • Configurable environments
    • One-click WordPress installation
    • Lightweight hardware requirements

    Cons:

    • Only available for Windows

    Installation and setup process: 

    Laragon comes with a Windows installer. The installer includes a handful of basic options, but none of them are related to your development environments.

    Ease of use: 

    Laragon offers both a GUI and terminal support, which makes it more user-friendly than most alternatives. You can set up and manage WordPress local websites without touching the command line, which may be a plus depending on your background. The only big downside of Laragon is that it’s only available for Windows.

    Price: 

    Laragon is free.

    Comparison of WordPress local development environments

    If you’re still on the fence about which local WordPress site development environment to use, let’s take a moment to recap all the recommended options. You’ll want to take into consideration each tool’s interface options and ease of use when making a decision.

    OS  Pros Cons Price
    XAMPP Windows, Linux, macOS Lightweight software, includes database and email management tools, local FTP support, Bitnami installer for easy WordPress setup No intuitive interface, no WordPress-specific functionality Free
    WampServer Windows Lightweight software, includes database management tools, built-in debug tools Only works with Windows, lack of website setup tools, no WordPress-specific functionality Free
    MAMP Windows, macOS Choice between Apache and NGINX, access to WordPress-specific tools, one-click WordPress installation, cloud backups, SSL support, built-in text editor, support for multiple PHP versions and extensions Free version supports one website with limited advanced features, Windows MAMP Pro offers less functionality than its macOS counterpart, no WordPress-specific functionality Free, with premium versions available starting at $99
    LAMP Linux Full control over the WordPress development stack. Set up as many local websites as you need. Familiarity with Linux and the command line is necessary, no central management dashboard for stack components Free
    Vagrant Windows, Linux, macOS Set up multiple development environments using virtualization, lightweight, pre-built WordPress development boxes, share environment config files easily, Git support Works solely through the command line Free
    Docker Windows, Linux, macOS Set up multiple development environments using virtual machines, pre-built WordPress development containers, lightweight in terms of hardware requirements, run services in different containers Requires comfort with using the command line Free, with premium versions available starting at $5 per month
    Laragon Windows Central management dashboard and terminal access, containerized development environments, configurable environments, one-click WordPress installation, lightweight hardware requirements Only available for Windows Free

    Ultimately, once you set up a WordPress site in a local environment, it will work just the same regardless of how you created that environment. That means your choice should come down to what tool you feel most comfortable using.

    two female developers working on a desktop computer

    Frequently asked questions about local development environments

    If you still have any questions about creating local websites with WordPress development environments, this section will answer them. Let’s start by talking about alternatives to local environments.

    What are the alternatives to using a local development environment?

    The best alternative to using a local WordPress development environment is to create new sites with your web host or to rely on staging functionality. But the staging functionality only works if you want to test changes to existing websites.

    For new projects, you’ll want to create entirely new websites if your hosting plan allows for it. Still, local development environments are often a cheaper, faster choice.

    Why use a local development environment instead of a live web server?

    In most cases, you shouldn’t use a live server for any significant testing purposes. Testing major changes in a production environment can lead to catastrophic errors and a lot of time spent troubleshooting them.

    Working in a local or staging environment means that if anything goes wrong, no visitors have to deal with it. You get to fix errors knowing that it doesn’t affect your live sites in any way.

    How does a local environment compare to a staging environment on a live server?

    Staging environments are copies of live websites that you can work on without affecting the original environment. With a staging site, you typically get the option to push any changes you make to “production”, which means they go live after you’re sure everything works properly.

    Local environments enable you to test new projects or copies of live websites. On the other hand, most local development tools don’t offer the option to push changes you make to a live site. 

    woman working at a table with a laptop

    Is it easy to move a site from a local environment to a live server?

    The process varies depending on what local WordPress development tool you’re using. Moving to a live server works just like migrating between two web hosts. That means you need to copy the site’s files and database, and make sure everything is pointing to the right addresses. 

    Some local WordPress development tools have partnerships with specific hosting platforms. That means you have the option of pushing local sites to a live server if you have an account with those web hosts.

    Start experimenting with local WordPress development environments

    When you work on a website or a project on a live server, it feels like the stakes are always high. On top of having to pay while testing a project, you also have to keep users away from it. Local environments make for much better testing grounds. They’re usually free (depending on which tool you use), and you can create as many sites as you want.

    Your own WordPress development environment experience will vary a lot depending on what platform you use. Some local development tools rely only on the command line, whereas others offer user-friendly GUIs, and a few are designed for WordPress specifically. It’s best to test at least a few of the options above until you find one you’re comfortable with.