EDITS.WS

Author: Randy A. Brown

  • 8 Best Countdown Plugins for WordPress in 2023

    Countdown timers are a great way to inform your visitors of when an event will take place. They’re great for showing when something will be available, go on sale, or when a website will be ready for all to see. They’re also great for adding urgency to a sale, which is a popular marketing technique. Fortunately, there are several great choices for anyone looking for a WordPress countdown plugin. In this article, we’ll look at the 8 best countdown timer plugins for WordPress.

    Types of WordPress Countdown Plugins

    There are multiple types of countdown timers. They have different purposes and work in different ways.

    First, we have the standard countdown timer. This timer counts down to a specific date or time. It remains the same regardless of who or where the visitors are. The timer shows the same time for everyone.

    Second, we have what is known as an evergreen timer. Evergreen countdown timers provide a specific countdown for each visitor. They’re used for marketing and are great for creating scarcity and urgency to drive sales.

    The WordPress countdown plugin you choose will depend on the type of features you need. I’ve included both types of countdown timers in this best WordPress countdown plugins post.

    8 Best WordPress Countdown Plugins

    Let’s go over the list of best countdown timer plugins, so you can easily find the product that matches your needs the best!

    1. OptinMonster

    OptinMonster banner

    OptinMonster is a popular conversion optimization tool that offers a variety of features to help website owners increase their conversions. One of these features is the Countdown Timer tool, which allows users to create urgency and increase conversions by adding a customizable countdown timer to their website.

    With OptinMonster, you can generate unlimited timers to put on various pages and posts of your WordPress website. The tool provides two types of countdown timers. The first is a static countdown timer that counts down to a particular end date, indicating when an offer expires for everyone. The second is a dynamic or evergreen countdown timer that tailors the countdown to each visitor by allowing you to specify the timer’s length in days, hours, minutes, and seconds instead of an end date.

    OptinMonster settings

    OptinMonster helps website owners increase conversions by creating a sense of urgency among their visitors. The customizable timer design and settings allow users to match the timer to their brand and website design.

    Flexible display options allow users to show the countdown timer in various ways, depending on their website’s layout and user behavior.

    Key Features for OptinMonster:

    • Customizable timer design and settings
    • Flexible display options, including pop-ups, slide-ins, and floating bars
    • Advanced targeting rules to show the countdown timer to specific visitors

    OptinMonster Pricing: $9/month

    Get OptinMonster

    2. Countdown Timer Ultimate

    Countdown Timer Ultimate

    Countdown Timer Ultimate makes it easy to create circle countdown timers and add them anywhere within your content using shortcodes. You have control over the design, the expiry date, and the animation.

    Countdown Timer Ultimate

    The timer is built with an editor that includes sliders and selectors. Change the size of the circle counter and backgrounds with sliders. Set the animation to Smooth or Tick.

    Countdown Timer Ultimate

    Create multiple timers and get a shortcode for each one.

    Features

    • 1 clock design
    • Shortcodes
    • Clock expiry functionality
    • Pro version adds 12 clock styles, extended settings, clock options, template features, CSS, RTL, and more.

    Price: Free, pro version starts at $169/yr

    Get Countdown Timer Ultimate

    3. HurryTimer

    HurryTimer

    HurryTimer provides several settings to create a schedulable countdown, a recurring countdown, or an evergreen countdown. It provides a cookie for your evergreen campaigns. A customizable CTA button provides a link to your sales pages. It integrates with WooCommerce.

    HurryTimer

    The editor includes settings for the schedule, actions, and appearance. Some of the features, such as recurring countdowns and actions, require the pro version, but the others are available in the free version. For the schedule, choose between one-time, recurring, or evergreen.

    HurryTimer

    Appearance shows the timer in real time and provides multiple settings, including general, digits, label, headline, CTA, and several pro features.

    Features

    • Scheduled campaigns
    • Evergreen campaigns
    • Cookie
    • Expiry actions
    • Live design customizer
    • CTA button
    • Integrates with WooCommerce.
    • Pro version adds recurring countdowns, actions, timer block, sticky bar, and custom CSS.

    Price: Free, pro version starts at $39/yr

    Get Hurry Timer

    4. Countdown Builder

    Countdown Builder

    Countdown Builder is a simple countdown timer with several premade timers to choose from. The countdown timers can be added to your content with shortcodes. The timers include several customization features, and you can customize them further with CSS and JavaScript. It also includes a Coming Soon feature. It can be expanded with add-ons.

    Add New Countdown

    The countdown editor provides general and advanced options with a live preview of the timer. The advanced options require the pro version. Settings include fields for custom CSS and JS.

    Countdown Builder

    Once you create a countdown timer, you’re provided with a shortcode that you can place anywhere within your content.

    Countdown Builder

    Choose between multiple countdown types that include a countdown, clock, timer, popup, and more. The free version includes 7 types.

    Features

    • Shortcodes
    • Multiple countdown types
    • Live preview
    • Coming soon feature
    • Pro version adds advanced options, multiple scheduling, a subscription form, a newsletter, a countdown button, a progress bar, styling features, and extensions.

    Price: Free, pro version starts at $23.98/lifetime

    Get Countdown Builder

    5. Sales Countdown Timer

    Sales Countdown Timer

    Sales Countdown Timer was designed specifically for sales countdowns. It’s designed to build urgency for the sale. It also integrates with WooCommerce to create countdowns for products, show upcoming sales, and more. Choose the types of product pages where it will display, make it sticky, and adjust the positioning.

    Sales Countdown Timer

    The editor includes the general settings, design settings, and WooCommerce settings. The general settings include the scheduling options. It includes the shortcode.

    Sales Countdown Timer

    The design settings are extensive and include live previews. Adjust the color, background, padding, radius, and more for the timer and the DateTime values.

    Sales Countdown Timer

    It also includes settings specifically for WooCommerce products. Create a custom message, add the product photo, show an upcoming sale and lots more. Show the countdown on shop pages and category pages. Adjust the position, make it sticky, and more.

    Features

    • Sales countdowns
    • Simple editor
    • Extensive design options
    • Live preview
    • Integrates with WooCommerce.
    • Make it sticky.
    • Pro version adds evergreen, restart after, and a checkout countdown.

    Price: Free, pro version starts at $20/lifetime

    Get Sales Countdown Timer

    6. Evergreen Countdown Timer

    Evergreen Countdown Timer

    Evergreen Countdown Timer lets you create unlimited evergreen timers for your website. Create unlimited countdown timers and add them to your content with shortcodes. You can also disable the evergreen option and set a date for the countdown timer to count to.

    The editor is simple. It lets you choose the date, enable evergreen, choose the detection method, and set the redirect URL. You can also change the colors, labels, and sizes.

    Evergreen Countdown Timer

    The manager provides the shortcode for each countdown timer. You can clone a timer from this screen.

    Features

    • Shortcodes
    • Evergreen and standard countdown options
    • Cookie
    • Customizations
    • Pro version adds a spot countdown, unlimited colors, custom CSS, automatic time reset, and a better cookie.

    Price: Free, pro version starts at $47/yr

    Get Evergreen Countdown Timer

    7. Countdown Timer – Widget Countdown

    Countdown Timer – Widget Countdown

    Countdown Timer – Widget Countdown adds a countdown timer builder to the WordPress editor and provides the same tools in a widget. Set up a countdown timer in a few seconds and built it within the content itself. You have control over the placement, and you can choose which devices to show or hide. You can also choose what happens after the timer expires.

    Countdown Timer – Widget Countdown

    The Gutenberg block opens to show all the settings available. Set the date and time by entering the values into the fields. Choose what happens after the time expires from the dropdown box. Provide a message, redirect the URL, select the timer position, and adjust the size. It also includes lots of pro features.

    Countdown Timer – Widget Countdown

    A button is added to the classic editor that opens the same settings.

    Countdown Timer – Widget Countdown

    The widget includes all the same settings as the WordPress editor.

    Features

    • Build the countdown timer on the page with a Gutenberg block or in the classic editor.
    • Build the countdown timer within a sidebar widget.
    • Set the after-expiration action.
    • Set the position.
    • Pro version adds circle and vertical sliders, 39 animations, buttons, and customizations.

    Price: Free, pro version starts at $29/lifetime

    Get Countdown Timer – Widget Countdown

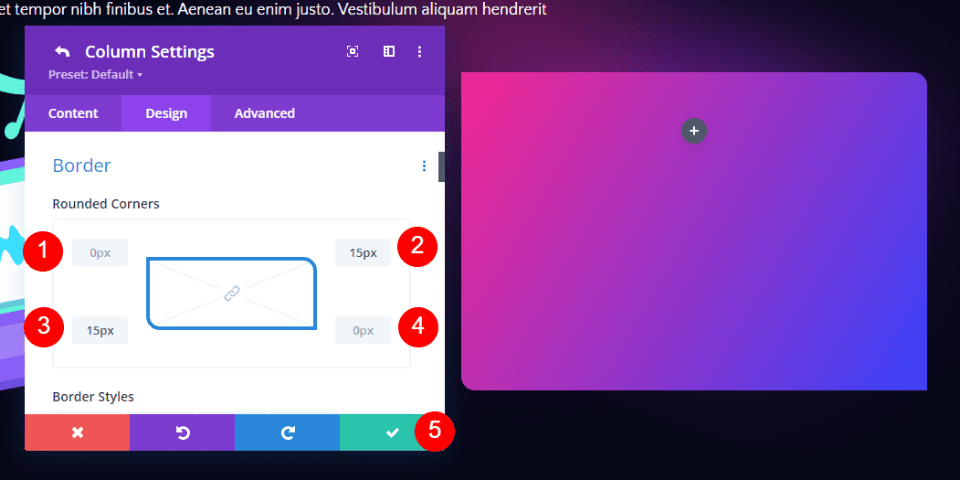
    8. Divi Countdown Timer Module

    Divi Countdown Timer Module

    Divi Countdown Timer Module is available in both the Divi theme and the Divi plugin. The Divi theme has the Divi Builder with all the modules built in. The plugin adds the Divi Builder to any WordPress theme.

    Divi Countdown Timer Module

    Adjust the counter visually with the calendar and slider controls. Click the date for the day the counter will end. Adjust the sliders for the hour and minute. You can also add a title, background, clickable URL, etc.

    Divi Countdown Timer Module

    Adjust the text, numbers, separators, colors, borders, size, box-shadow, and more. All the controls are intuitive. Make selections, use sliders, click elements, etc.

    Divi Countdown Timer Module

    Adjust the timer even further with CSS. Each element of the timer has a targeted field where you can enter the CSS. Also adjust visibility, transitions, position, and scroll effects.

    Features

    • Available in the Divi theme and Divi plugin.
    • Works anywhere in a Divi layout.
    • Select the date and time with visual controls.
    • Style the module with visual controls.
    • Add CSS to style each element.

    Price: $89/yr

    Get Divi

    Which is The Best Countdown Plugin for WordPress?

    That’s our look at the 8 best countdown timer plugins for WordPress. This list includes multiple types of countdown timers in various price ranges and feature sets. OptinMonster is a must for websites that want to take marketing to the next level, and their countdown timer is just one of many tools available. If you’re looking for a great timer-centric plugin, it’s hard to top Countdown Timer Ultimate.

    Plugin Price Free Option
    🥇 OptinMonster $9.00 per month ❌ Visit
    🥈 Countdown Timer Ultimate $169.00 per year ✔️ Visit
    🥉 Hurry Timer $39.00 per year ✔️ Visit
    4 Countdown Builder $23.98 lifetime ✔️ Visit
    5 Sales Countdown Timer $20.00 lifetime ✔️ Visit
    6 Evergreen Countdown Timer $47.00 per year ✔️ Visit
    7 Countdown Timer – Widget Countdown $29.00 lifetime ✔️ Visit
    8 Divi $89 per year ❌ Visit

    No matter what type of WordPress countdown plugin you need, you’re sure to find something on this list to meet those needs.

    We want to hear from you. What’s your favorite WordPress countdown plugin on this list? Let us know in the comments.

    Featured image illustration via garagestock / shutterstock.com

    The post 8 Best Countdown Plugins for WordPress in 2023 appeared first on Elegant Themes Blog.

  • 9 Best WordPress Sitemap Plugins for Busy Site Owners in 2023

    Optimizing your website for organic search traffic is crucial for any website. This task can be time-consuming for busy site owners. Sitemaps are some of the best tools available to improve your website’s SEO.

    They not only provide information about your website to search engines to help them index your site, but they also ping them when you update your website. In this article, we’ll look at the 8 plugins to help you decide which is the best WordPress sitemap plugin for your needs.

    What is a WordPress Sitemap?

    A sitemap is a list made with XML that tells search engines about your content and the structure of your website. They include page URLs, when the content was last modified, the type of content, etc. Post types are identified, and you have the option to keep post types from indexing if you want to keep them private.

    Search engines such as Google can crawl your website on their own, but this takes time. Providing a sitemap ensures that search engines have all the information they need to index your website.

    The XML document can be created by hand, but the best way to create a sitemap is with a WordPress sitemap plugin. Sitemap plugins inform search engines of changes on your website, so their information is always up to date. They’re easy to use, and there are plenty to choose from.

    For this list, I’ve separated them into two types: SEO plugins that include sitemaps and those that are dedicated to sitemaps. I’ve only included plugins that create sitemaps for search engines since our focus is on improving search engine optimization (SEO).

    Subscribe To Our Youtube Channel

    WordPress SEO Plugins with Sitemap Features

    Since sitemaps are an important part of SEO, creating a sitemap is a standard function of SEO plugins. Here are the best SEO-focused WordPress sitemap plugins with awesome sitemap features.

    1. Rank Math SEO

    Rank Math SEO

    Rank Math SEO includes a fast-loading sitemap that works with different post types, including attachments, projects, custom post types, etc. It also creates sitemaps for taxonomies. It includes lots of detailed options for customizing your sitemaps. Generate Locations KML files for local sitemaps.

    It will also create a WooCommerce sitemap. Even though this plugin has a premium version, everything you need for sitemaps is included in the free version.

    Key Features:

    • Fast loading
    • Works with custom post types
    • Local sitemaps
    • WooCommerce sitemaps
    • Include images in your sitemaps
    • Exclude posts
    • Exclude terms

    Price: Free the pro version starts at $59.00/yr

    Get Rank Math

    2. All-in-One SEO

    All in One SEO

    All-in-One SEO  provides several types of sitemaps, including the standard XML map, a news sitemap, a video sitemap, and an RSS sitemap. The pro version adds news, video, and RSS.

    Sitemaps are included in the free version and give you the ability to enable indexes, enter the number of links per sitemap, choose the post types and taxonomies, disable by date, disable by author, enter specific URLs, and set up advanced settings.

    Key Features:

    • Standard XML sitemap
    • News sitemap
    • Video sitemap
    • RSS sitemap
    • Advanced settings for each type of sitemap

    Price: Free for XML sitemaps, $49.50 per year for Pro (adds news, video, and RSS sitemaps)

    Get All-in-One SEO

    3. SEOPress

    SEOPress

    SEOPress creates a sitemap for post types, taxonomies, videos, images, and HTML. The sitemap features are included in the free version. The general XML sitemap and Image sitemap are enabled by default. The settings are simple and you can adjust the general options and options for the post types, taxonomies, and HTML sitemaps independently. You can view the sitemap, ping Google manually, and flush the permalinks.

    Exclude pages, posts, custom post types, or terms from the sitemap. You can also set the sort order and disable the publication date. It’s limited to 1000 posts per post type.

    Key Features:

    • XML sitemap
    • Image sitemap
    • Author sitemap
    • Video sitemap
    • HTML sitemap
    • Independent options for each type
    • Ping Google manually
    • Flush permalinks

    Price: Free, pro version starts at $49.00/yr

    Get SEOPress

    4. Yoast SEO

    Yoast SEO

    Out of all the top WordPress SEO plugins, Yoast SEO is by far the most popular, and it includes a sitemap feature. For this reason alone, it’s one of the best choices to build a sitemap for your WordPress website. It’s available in both a free version and a premium version with expanded features.

    The free version includes sitemap features, which are enabled by default. You have control over the number of sitemap entries. Mark post types that you don’t want to appear in your sitemap. Add an external sitemap if you have sitemaps for other parts of your website.

    Key Features:

    • Automatically generates a sitemap
    • Limit the number of sitemap entries
    • Mark post types as index
    • Add an external sitemap
    • View the sitemap

    Price: Free; premium version starts at $99.00/yr

    Get Yoast SEO

    5. Jetpack

    Jetpack

    Jetpack is a popular plugin from Automattic, the creators of WordPress, and happens to be a good option for a WordPress sitemap plugin. The free version comes with a set of traffic tools that includes sitemap features. It automatically generates a sitemap for your public posts and pages.

    You can enable custom post types. It also generates a sitemap specifically for Google News. If there is another sitemap plugin in use, this feature is automatically disabled. It warns you if you have search engine visibility disabled in your WordPress settings.

    Key Features:

    • Generates sitemaps for your public pages and posts
    • Add new custom post types
    • Creates a sitemap for Google News
    • Automatically disables the sitemap feature if another sitemap plugin is in use

    Price: Free

    Get Jetpack

    Dedicated WordPress Sitemap Plugins

    Dedicated WordPress sitemap plugins have no other features aside from creating a sitemap. Here’s a look at the most popular dedicated sitemap plugins.

    6. Sitemap by BestWebSoft

    Sitemap by BestWebSoft

    Sitemap by BestWebSoft supports standard pages, custom post types, and taxonomies. It can be integrated with your Google Webmaster Tools account. Create sitemaps for your media.

    The pro version adds features that support custom URLs, multisite, exclude posts, and set the frequency of your changes. The free version has tools not found in other plugins, but some of the most common features are only available in the pro version.

    Key Features:

    • Integrates with Google Webmaster Tools
    • Custom post types
    • Creates media sitemaps
    • Compatible with their Multilanguage plugin
    • Pro version supports custom URLs
    • The pro version supports multisite
    • Pro version includes tools to exclude pages and posts

    Price: Free for basic features, $24.00 per year for pro features

    Get Sitemap by BestWebSoft

    7. Google XML Sitemaps

    Google XML Sitemaps

    Google XML Sitemaps is one of the oldest, most popular, and highest-rated sitemap plugins available. It includes multiple languages and it’s compatible with multisite WordPress installations. It calculates the priority of posts based on their number of comments. You can set it to prioritize by comment average or disable the priority feature.

    It also includes filters that allow other plugins to add their pages to the sitemap. Sitemaps include post types, taxonomies, and custom post types. Include or exclude items, change the frequencies, and change the priority of each post type.

    Key Features:

    • Calculates the priority of posts based on comments.
    • Includes multiple translations
    • Compatible with multisite
    • Allows other plugins to add to the sitemap

    Price: Free

    Get Google XML Sitemaps

    8. XML Sitemap & Google News

    XML Sitemap & Google News

    XML Sitemap & Google News creates a standard XML sitemap and a sitemap for Google News. You can control which sitemaps are enabled, which post types and taxonomies are included, how priority is calculated, and who to ping when the site is updated.

    You can also set robots.txt rules, add external pages, and add external sitemaps. It’s compatible with multisite and it’s multilingual-ready. Several one-click tools help you ping search engines, clear cache, etc.

    Key Features:

    • Creates a sitemap for Google News
    • Choose the post types and taxonomies
    • Add external pages
    • Add external sitemaps
    • Multisite compatible
    • Polylang and WPML compatible

    Price: Free

    Get XML Sitemaps & Google News

    9. Simple Sitemap

    Simple site map logo

    Simple Sitemap is a WordPress plugin that helps improve the SEO ranking of a website by automatically generating an HTML sitemap of its content. With the latest version, users can build and preview their sitemap visually directly in the post editor without using complicated shortcodes. The plugin offers standard or tabbed layouts, responsive sitemap tabs, and plenty of flexible customization options.

    One of the standout features of Simple Sitemap is its responsive design. The sitemap is optimized for all devices, including desktops, tablets, and smartphones. This means that your visitors can easily navigate your website and find the content they are looking for, no matter what device they are using.

    Key Features:

    • Allows users to choose the specific post types and taxonomies to include in the sitemap
    • Provides the ability to add external pages to the sitemap
    • Supports the inclusion of external sitemaps
    • Compatible with multisite setups

    Price: Free

    Get Simple Sitemap

    Selecting the Right Sitemap Plugin

    Choosing the right WordPress sitemap plugin is an important step in improving your website’s SEO. The best option for your website will depend on the other SEO tools you need. Be sure to check if the features you need are available in the free version or if the premium version is required.

    Many website owners prefer a one-stop solution such as Yoast SEO or All in One SEO. These are the most popular SEO plugins available, and they’re solid options.

    Plugin Price Free Option
    🥇 Rank Math $59.00/yr ✔️ Visit
    🥈 All-in-One SEO $49.50/yr ✔️ Visit
    🥉 SEOPress $49.00/yr ✔️ Visit
    4 YoastSEO $99.00/yr ✔️ Visit
    5 Jetpack Free ✔️ Visit

    If you need a feature that isn’t provided in the standard SEO plugins, dedicated sitemap plugins might be a better option. Google XML Sitemaps and XML Sitemap, and Google News are excellent choices.

    If you need options for WooCommerce and products, take a closer look at the plugins with options for images. Several of the sitemap plugins throughout this list include options for images.

    Plugin Price Free Option
    🥇 Sitemap by BestWebSoft $24.00/yr ✔️ Visit
    🥈 Google XML Sitemaps Free ✔️ Visit
    🥉 XML Sitemaps & Google News Free ✔️ Visit
    4 Simple Sitemap Free ✔️ Visit

    Ending Thoughts

    That’s our look at the 9 best WordPress sitemap plugins for busy site owners. There are lots of good options available, and many of them are free. In our opinion, you can’t run a successful website without good SEO tools, and Rank Math provides everything you need.  If you’re just looking for a sitemap solution, however, you can’t go wrong with Sitemap by BestWebSoft.

    Whatever your sitemap needs are, you’re sure to find the right plugin on this list.

    We want to hear from you. What’s your favorite WordPress sitemap plugin? Let us know in the comments below.

    Featured image illustration via hanss / shutterstock.com

    The post 9 Best WordPress Sitemap Plugins for Busy Site Owners in 2023 appeared first on Elegant Themes Blog.

  • 7 Best WordPress Live Streaming Plugins and Software in 2023

    Live streaming has become more popular than ever. Many social platforms allow for live streaming, but it’s also possible to live stream from your WordPress website. It sounds complicated, but it’s easier than most realize. In this article, we’ll look at the best WordPress live-streaming plugins and software to help you get started.

    Why Live Stream?

    Live streaming is great for broadcasting events such as sports, weddings, concerts, theater, and more. It’s a great way to build brand awareness and promote products. It’s also a great way to build and engage with your audience.

    A few examples include:

    • Video games
    • Webinars
    • Live coaching
    • Classes
    • Church services
    • Product demonstrations

    What You Need to Live Stream

    There are two types of software you need to create your live stream:

    1. Software to capture your video for the live stream. This is usually done with specialized software.
    2. A way to embed the live stream into your WordPress website. This is usually done with WordPress live-streaming plugins.

    The Best Live Streaming Software

    First, you’ll need to create the live stream. This portion of the list shows the best software for creating the live stream. Of course, you’ll need a camera, microphone, video capture hardware, or any other equipment based on the type of content you’re creating.

    The live stream software will provide you with code to embed within your WordPress website. This code can be embedded using the WordPress live-streaming plugins we’ll discuss in the next section.

    1. XSplit Broadcaster

    XSplit Broadcaster

    XSplit Broadcaster is a live streaming and recording studio designed with gaming and esports in mind. It works just as well for any type of streaming. It integrates with Skype and Zoom video calls, includes desktop sharing, and allows for overlays. Use multiple sources for media and drag or resize them.

    XSplit Broadcaster

    It includes many high-end features to create live streams that look professional. Set up scene presets, chroma key sensitivity, change the camera shape, adjust the audio levels for each scene, enable split-screen, and lots more.

    Features

    • Skype and Zoom integration
    • Desktop sharing
    • Overlays
    • Multiple media sources
    • Drag and resize sources
    • OBS importer
    • Stream to multiple platforms
    • Recording
    • Expandable
    • Green screen
    • Windows and Mac

    Price: $15 per month and up

    Get XSplit Broadcaster

    2. Wirecast

    Wirecast

    Wirecast is professional-grade streaming software that’s used by television broadcasters. It even has production gear available to start streaming from anywhere in minutes. You can stream to unlimited destinations including YouTube and other platforms. The stream can then be embedded into your WordPress website using plugins such as WPStream.

    Wirecast

    Capture multiple sources and edit them live. Add overlays, backgrounds, shots, and lots more.

    Features

    • Windows and Mac
    • Unlimited platforms
    • Stream and record
    • View up to 17 sources per monitor
    • ISO recording can be used for live instant replay
    • Multiple output options
    • Extensive training available

    Price: $599 lifetime

    Get Wirecast

    3. OBS Studio

    OBS Studio

    OBS Studio is a free and open course app with professional-level tools for live streaming and recording. Connect to multiple sources to show your desktop, specific windows, browser tabs, and cameras at the same time. Rearrange the screen to show the exact layout you want. It’s ideal for showing a video source, such as your desktop, while showing a camera capture in the corner. It’s best used with a streaming provider.

    This example shows my browser with an image captured from my webcam in the bottom right corner. I can move the webcam capture anywhere and make it any size.

    OBS Studio

    The live stream output can connect to a streaming service or you can create a custom output for your server.

    Features

    • Professional tools
    • Multiple capture sources
    • Open Source
    • Real-time audio and video capture
    • Output to multiple services
    • Unlimited scenes with transitions
    • Recording
    • Green screen
    • Runs on Windows, Mac, and Linux

    Price: Free

    Get OBS Studio

    4. YouTube Livestreaming

    YouTube Livestreaming

    YouTube has a live stream feature built-in. You just need enough subscribers and content to access it. It gives you the option to go live now or schedule it for later.

    YouTube Livestreaming

    You’ll then have the option to use your webcam or streaming software.

    YouTube Livestreaming

    Go through the process of setting up your live stream.

    YouTube Livestreaming

    It then gives you links that you can use to embed your live stream into your website. Paste the link into your pages, posts, Divi modules, etc., publish the page or post, and you’re live. You can set the live stream to “Public” so anyone on YouTube can see it or set it to private so only those visiting your WordPress website can see it. This might be the simplest method on this list.

    Features

    • Go live or schedule for later.
    • Use webcam.
    • Use streaming software.
    • Publish YouTube streams as public or private.
    • Paste the embed link anywhere on your website.

    Price: Free

    Get Youtube

    Live Streaming Software Comparison Table

    Plugin Price Free Option
    🥇 XSplit Boradcaster $15/mo ❌ Learn More
    🥈 Wirecast $599 lifetime ❌ Learn More
    🥉 OBS Studio Free ✔️ Learn More
    4 Youtube Free ✔️ Learn More

    The Best WordPress Live Streaming Plugins

    Once you have your software, you’ll need a way to embed the live stream into your WordPress website. The easiest way to do this is to use one of the many WordPress live-streaming plugins that are available.

    This list is what I consider the best plugins for embedding your live streams. There are a few popular plugins that I didn’t include due to having a fatal error or having a reputation for publishing content without permission.

    1. WpStream

    WpStream

    WpStream allows you to stream video-on-demand, pay-per-view, and live streams. It requires a WPStream account and limits your streaming bandwidth based on the subscription you choose. It connects to broadcast software and smartphones. Create video channels as custom post types and embed them with shortcodes. It integrates with WooCommerce.

    WpStream

    Settings let you enter video channels to display, set user roles, choose the type of channel, and set the default price. You can also adjust the default channel settings, subscription options and customize the messages.

    WpStream

    Create the channels as a custom post type using the classic editor. It includes categories, tags, actors, media categories, movie ratings, and a featured image.

    Features

    • Connects to popular broadcast software
    • Stream with your smartphone
    • Video channel custom post type
    • Embed with shortcodes
    • 5GB bandwidth
    • 1GB media storage
    • Pay-per-view
    • Video-on-demand
    • WooCommerce integration
    • Pro version adds more bandwidth and storage, content protection, and removes ads.

    Price: Free, the pro version starts at $19 per month

    Get WpStream

    2. Embed Plus for YouTube

    Embed Plus for YouTube

    Embed Plus for YouTube is one of the most popular WordPress live-streaming plugins. It allows you to embed a YouTube video, playlist, channel, gallery, or live stream. Streams are easily embedded into the classic editor using the embed tools and into Gutenberg with the included block.

    Embed Plus for YouTube

    The settings screen gives you lots of control over how the embed works and looks.

    Embed Plus for YouTube

    It adds a new block to Gutenberg called YouTube Wizard. This allows you to embed a live stream or any other YouTube content you want.

    Features

    • Autoplay
    • Looping
    • Annotations
    • Related videos
    • Progress bar
    • Video controls
    • Localization
    • Default “not live” content
    • Gutenberg block
    • Pro version adds customizations, live chat, featured thumbnails, video SEO, and more.

    Price: Free, the pro version starts at $39.99

    Get Embed Plus for Youtube

    3. Bzplayer Pro

    bzplayer website

    Bzplayer Pro is a powerful and customizable video player that allows users to play and stream videos on their websites. With a sleek and intuitive interface, Bzplayer Pro offers a wide range of features and customization options to make the video playback experience as smooth and engaging as possible.

    Features:

    • Support for multiple video formats, including MP4, WebM, FLV, HLS, and MPEG-DASH
    • Customizable player skin with support for multiple color schemes
    • Responsive design to fit any screen size

    BZplayer demo

    Bzplayer Pro’s key features make it a versatile tool for anyone looking to enhance their website’s video playback experience. The support for multiple video formats ensures that users can play any type of video, while the customizable player skin allows them to match the player’s design with their website’s branding. Finally, the responsive design ensures that the player looks great on any device, from desktops to smartphones.

    Bzplayer Pro is for you if…

    • You want to enhance your website’s video playback experience with a customizable and versatile video player
    • You need a video player that supports multiple video formats and can be easily integrated into your website
    • You want a video player with a responsive design that looks great on any device

    Bzplayer Pro Pricing: $21

    Get Bzplayer Pro

    Live Streaming Plugin Comparison Table

    Plugin Price Free Option
    🥇 WpStream $19/mo ✔️ Learn More
    🥈 Youtube Embed Plus $39.99/site ✔️ Learn More
    🥉 BzPlayer $21/site ❌ Learn More

    Which Live Streaming Solution Should You Choose?

    That’s our look at the 7 best WordPress live streaming plugins and software.

    WpStream might be the best solution overall. The stream is hosted on their powerful platform and includes lots of options. WpStream stands out for its robust hosting platform and extensive feature set. This plugin offers a range of customization options, including the ability to embed live streams on your website, add pay-per-view options for monetization, and set up multi-camera live streams.

    Having said that, you can’t go wrong with any of the options on this list. No matter your needs a budget; there’s sure to be something here to get you started with live streaming from your WordPress website.

    We want to hear from you. Have you tried any of these WordPress live-streaming plugins or software platforms? Let us know what you think about them in the comments.

    Featured Image via ingibiork / shutterstock.com

    The post 7 Best WordPress Live Streaming Plugins and Software in 2023 appeared first on Elegant Themes Blog.

  • 8 Best WordPress Wiki & Knowledge Base Plugins in 2023

    Wikis and knowledge bases are some of the most popular methods of providing information. They’re especially popular for the first line of support. Knowledge bases and wikis are great for articles, documents, and FAQs. With the right tools, it’s not difficult to integrate a wiki into your WordPress website. In this article, we’ll look at 8 options to help you decide which is the best WordPress wiki plugin for your needs.

    Why Do You Need a Wiki or Knowledge Base Plugin?

    A knowledge base plugin for WordPress can help you organize information in one central location, provide self-help resources to customers, increase user engagement, improve SEO with quality content, and save costs. It offers an effective way to reduce the load on customer support teams and provides customers with easy-to-find answers to frequently asked questions, improving their overall experience. In short, a knowledge base plugin can improve your website’s functionality and provide a better experience for both customers and businesses.

    The 8 Best Wiki and Knowledge Base Plugins

    Overall, a good wiki and knowledge base plugin should be customizable, easy to navigate, mobile-friendly, and provide useful analytics and feedback to help you continuously improve your content. When building this list, we kept those key points in mind. So without further delay, here are our top picks.

    1. Echo Knowledge Base

    Echo Knowledge Base plugin

    Echo Knowledge Base includes a frontend editor with 26 templates and 500 icons. It has multiple tabs, allowing you to organize the documents by team, product, and service. Create articles that include a table of contents. The search bar provides listed results. Order the articles alphabetically, by time, etc.

    Setting up Echo is a breeze thanks to the easy configuration wizard.

    Echo Knowledge Base configuration wizard

    The plugins let you choose from several basic designs, tabs, or category layouts. The wizard changes the setup based on the type of layout you choose. For example, if you choose a category design, you’ll be given the option of left, right, or top category navigation.

    Echo category navigation

    Once you complete the wizard, you’ll have the option to add new articles to your knowledge base.

    add new articles

    If you are a Divi user, Echo features Visual Builder integration so that you can make your knowledge base articles fully customized.

    Divi integration

    Key Features for Echo Knowledge Base:

    • Frontend editor
    • 26 templates
    • Table of contents
    • Fast search with listed results
    • 500 icons
    • Ordering options
    • 5 levels of hierarchy
    • Pro version adds layouts, widgets, a link editor, ratings and feedback, advanced, search, groups, and more.
    • Divi Visual Builder integration

    Price: Free, pro add-ons start at $46 per year.

    Get Echo Knowledge Base

    2. Heroic Knowledge Base

    Heroic KB plugin

    Heroic Knowledge Base is a powerful plugin that offers an Ajax search feature for answers on the fly. It offers all standard features you’d expect from a wiki plugin such as content categorization, article attachments, widgets for displaying your knowledge base in the sidebar, as well as drag & drop ordering to make building your knowledge base simple.

    That being said, it offers something that others don’t. With Heroic’s KB offering, you can get critical insight into what your users think by making a user feedback section standard. This not only helps you improve your content but also aids in higher customer satisfaction.

    Heroic KB demo

    In addition to those features, Heroic Knowledge Base acts as a table of contents plugin, and gives you the ability to restrict access to your knowledge base to those who are logged in. This is especially useful if you’re building a membership website, or creating online courses.

    To make their product even more attractive, they offer a 30-day money-back guarantee, which is plenty of time to decide if Heroic KB is right for you.

    Key Features for Heroic Knowledge Base:

    • Ajax real-time search
    • Drag & drop content ordering
    • User feedback feature
    • Ability to restrict content to logged-in users only

    Price: Licenses starting at $149 per year.

    Get Heroic Knowledge Base

    3. BetterDocs

    Better Docs plugin

    BetterDocs is a popular WordPress wiki plugin that makes it easy to create a knowledge base to expand your support. It comes with several templates to get you started. A table of contents is created automatically as you type. You can make the TOC sticky. The advanced live search makes it easier for visitors to find what they’re looking for. A pro version is available that adds analytics, and an instant answer bot, and it allows you to create multiple knowledge bases for different products.

    Better Docs activation

    To help you get started, the quick setup option steps you through creating the pages, and content, and customizing it.

    Better Docs settings

    The settings screen gives you lots of control over the docs including the design, layout, and more. Settings are intuitive and simple.

    Key Features for Better Docs:

    • Premade templates
    • Shortcodes
    • Auto table of contents
    • Sticky table of contents
    • Advanced live search
    • Pro version adds templates, advanced search, floating table of contents, instant answers, analytics, and more.

    Price: Free, pro version starts at $69 per year.

    Get Better Docs

    4. BasePress

    BasePress WordPress wiki plugin

    BasePress is a powerful WordPress wiki plugin that lets you build unlimited independent knowledge bases. It comes with three themes and you can customize them with simple adjustments and CSS. It builds an entry page where users can choose the knowledge base they need. The unlimited section hierarchy makes the knowledge bases easy to organize.

    The setup wizard steps you through to get started quickly with easy-to-follow settings screens including general settings, appearance, breadcrumbs, search, comment, and import and export tools.

    BasePress configuration wizard

    Once your custom post type for knowledge bases is created, you can customize your knowledge base with a title, slug, description, and image, as well as section and sub-section styles.

    wiki category styling

    Key Features for BasePress:

    • Theme editor
    • Icon manager
    • Advanced search with live results
    • Breadcrumbs
    • Drag and drop reordering.
    • 4 widgets
    • Pro version adds content restrictions, article voting and user feedback, automatic table of contents, statistics, and lots more.

    Price: Free, the pro version starts at $59 per year.

    Get BasePress

    5. weDocs

    weDocs wiki plugin

    weDocs by weDevs is an excellent choice to create visually stunning documentation for your website. While they don’t have any pre-made templates to choose from, you can use popular WordPress themes such as Divi to create your wikis and knowledge bases.

    Like, other plugins on our list, the knowledge base is created using a shortcode, allowing integration anywhere on your website.

    weDocs settings

    You can also add tags to your documentation pages, making it easy for users to search for specific information. Plus, it also provides a built-in search function to help users find what they need quickly.

    weDocs comes with a simple and clean interface that is easy to use, even for non-technical users. It also includes several customizable options, such as drag-and-drop reordering, the ability to add sections, and breadcrumbs for easy navigation.

    weDocs sections and articles

    Key Features for weDocs:

    • Easy integration with page builders like Divi
    • Style interface with CSS
    • Shortcode to display knowledge base virtually anywhere on your website
    • Breadcrumbs
    • Ability to allow comments on docs
    • Drag and Drop reordering

    Price: Free

    Get weDocs

    6. Yada Wiki

    Yada Wiki

    The Yada Wiki WordPress wiki plugin creates a new post type and provides an index and table of contents, making it easier for users to navigate your content. With customizable shortcodes, you can display categories, indexes, and a table of contents anywhere on your site. Additionally, the plugin adds a convenient wiki listing button that enables users to quickly access this information.

    Furthermore, Yada Wiki includes two sidebar widgets that display activity and the table of contents, providing a user-friendly experience. You can simply enable the features you wish by checking the boxes.

    Yada Wiki options

    To display your wiki, Yada gives you two blocks, the Yada Wiki activity block, as well as the table of contents block. You can embed these in Appearance > Widgets, or by creating a template with the WordPress site editor in a full site editing theme.

    Yada widgets

    Key Features for Yada Wiki:

    • Custom post type
    • Index
    • Table of contents
    • Shortcodes
    • 2 widgets

    Price: Free

    Get Yada Wiki

    7. Encyclopedia / Glossary / Wiki

    Encyclopedia Glossary Wiki

    Encyclopedia / Glossary / Wiki adds a new post type that allows you to label it any way you want. Create an encyclopedia, lexicon, glossary, dictionary, knowledge base, wiki, directory, etc. It will automatically generate an index page with all your items. The index is sorted alphabetically and includes a prefix filter. Every item has its own page. It’s limited to 13 items and many of the settings are locked, so the pro version is the better option.

    Encyclopedia settings

    The settings screen lets you adjust the labels, appearance, and features such as text editor, block editor, excerpt, and custom fields. As previously mentioned, some features such as taxonomies, revisions, comments, and feature images require a premium license.

    Adding entries works much like adding a post in the classic editor. You can add a title, content, excerpt, and tags.

    Encyclopedia entry

    Key Features for Encyclopedia / Glossary / Wiki:

    • Highly customizable
    • Index pages are generated automatically.
    • Automatic cross-linking with selectable content types.
    • Prefix filter
    • 5 widgets
    • Multilingual ready
    • Works with multisite
    • Limited to 12 items
    • Pro version unlocks settings and has unlimited items.

    Price: Free, pro version starts at $55 per year.

    Get Encyclopedia / Glossary / Wiki

    8. Very Simple Knowledge Base

    VS Knowledge Base

    Very Simple Knowledge Base is the simplest WordPress wiki plugin. It displays your content using shortcodes. The shortcode can be placed within your content to create any type of design you want. You can refine the shortcode to include or exclude categories, post types, set the number of columns, sort order, labels, etc. You can also include custom CSS that the shortcode will link to.

    Create a page and add the shortcode based on what you want it to display. Use shortcodes to specify which categories to include, and exclude, the number to display, the order to display them in, etc.

    knowledge base shortcode

    The page then displays articles automatically. The shortcode I’ve used shows all of my categories in a single column.

    Very Simple Knowledge Base display page

    The widget lets you add the title, text to appear above the articles, the number of columns to display, and the attributes to display.

    Key Features for VS Knowledge Base

    • Display with shortcodes within your content
    • Show categories.
    • Set the number of columns.
    • Determine the number and order of posts.
    • Change the labels.
    • Works with custom post types
    • Custom widget
    • Add custom CSS.

    Price: Free

    Get VS Knowledge Base

    WordPress Wiki Plugin Ending Thoughts

    That’s our look at the 8 best WordPress wiki and knowledge base plugins. They include a range of features and most can be expanded with a premium edition.

    Plugin Price Free Option
    🥇 Echo Knowledge Base Free, $46 per year ✔️ Visit
    🥈 Heroic Knowledge Base $149 per year ❌ Visit
    🥉 BetterDocs Free, $69 per year ✔️ Visit
    4 BasePress Free, $59 per year ✔️ Visit
    5 weDocs Free ✔️ Visit
    6 Yada Wiki Free ✔️ Visit
    7 Encyclopedia / Glossary / Wiki Free, $55 per year ✔️ Visit
    8 Very Simple Knowledge Base Free ✔️ Visit

    As for our top pick, we recommend Echo Knowledge Base. Whether you need a simple WordPress wiki plugin, an enterprise-level platform for a complete knowledge base, or integration with Divi, you’re sure to find what you need with Echo.

    We want to hear from you. Have you tried any of these WordPress wiki plugins for your website? Let us know what you think about them in the comments.

    Featured image illustration via artist / shutterstock.com

    The post 8 Best WordPress Wiki & Knowledge Base Plugins in 2023 appeared first on Elegant Themes Blog.

  • Divi Plugin Highlight: Table Maker

    Table Maker is a third-party module for the Divi Builder that does exactly what the title describes- it makes tables. This is a powerful module that simplifies making tables of any size. Add any type of content and style the table with the standard Divi settings as well as settings for each element. The latest version adds even more options. In this post, we’ll take a close look at Table Maker – alongside our Divi Home Remodeling Layout Pack – to help you decide if it’s the right product for your needs.

    Table Maker Module Settings

    A new Module is added to the Divi Builder called Table Maker. Add this module to your Divi layouts as you would any Divi Module. We are using the module to add a pricing table to the Service Page Layout of the Divi Home Renovation Layout Pack.

    Table Maker Module Settings

    The General tab includes submodules for each column. Add as many as you want by clicking Add New Column. It also includes settings for the title, description, columns, rows, making it responsive, adjusting how it scrolls, and adjusting the icons, buttons, and images. The submodules also include settings that override the module settings.

    Table Maker Column Submodule

    Clicking Add New Column creates a column submodule and opens its settings. Add as many columns as you want.

    Adding Content to Table Maker Cells

    Before we see the Table Maker’s settings, let’s see how to add cells and content. We can add lots of different types of content to the cells.

    Adding Content to Table Maker Cells

    Table Maker Column Content

    Within the column submodule, you’ll find the Rows field. This is an HTML editor. You can create the Rows just by entering the content for each row. Each row is numbered. The numbers correspond to a cell, so every numbered line is a new cell. To add content to a certain cell, just add that content to the line that’s numbered for that cell. This includes text, code, links, videos, or anything you want.

    Table Maker Column Content

    Style the Content with Markup

    If you’ve added text to the cells, you can markup the text with HTML. This means you can easily add bold, italics, paragraphs, breaks, headings, links, images, or even an entire layout. Just make sure all the HTML is on a single line.

    For example, I’ve added tags for H2 and bold to a few of the cells in this image.

    Adding HTML Markup

    Adding Escape Characters

    Since the Row editor is an HTML field, there are certain characters that we can’t usually use, such as the ampersand, quote, apostrophe, and great than and less than symbols. Fortunately, these characters can still be used within Table Maker’s fields. Table Maker uses special characters, called escape characters, to tell the cells to display those characters. To use them, add double curly brackets and the abbreviation for the character.

    For example, to show an ampersand, you’d enter {{amp}}, as I’ve done in row 4 in the example below.

    Adding Buttons

    Add a button by entering the button tag to the cell you want to display a button. Once you enter the tag for the button, you’ll see the default button. Add the text you want to display within the tags.

    Add Button to Divi Table Maker

    Customize the Button

    The button can be customized in the Content tab of the Table Maker module’s settings and the individual submodule’s settings. Add the button text, URL, link target, set the button width based on the text or the cell, and use custom styles.

    Customize table button

    Add an Icon to the Table

    Include an icon by entering the icon tag. You can include the icon’s name to display it or select an icon in the Content tab. You can also add as many icons as you want by adding more tags and the icon name within the tag. For example, to add a cross icon, add this code: <icon>cross_alt</icon>. I’ve also added this code to add a different icon: <icon>check_alt</icon>. You can find a full list of available icons on the Divi Table Maker website.

    Add icons to the column

    You can also choose to select a uniform icon choice. To do this, scroll down to Table Icons in the Content tab. Use the Content tab of the module to choose an icon that can be placed in all the cells. There is also the option to choose an icon specifically for that cell. You can also adjust the icon’s size and color, as I’ve done in the example below.

    Customize icons in Divi Table Maker

    Add an Image to the Table

    To add the images to the table, scroll down to Table Images in the Content tab. Add the images as a gallery from the media library. You can also select the image quality, proportion, scale, vertical alignment, and horizontal alignment. You can also access these settings for each cell in the submodules, so you can override the standard module settings.

    Adding table images with Divi Table Maker

    Display the Images

    Display the images by adding the image tag and the image number in the cell. For example, if you want the second cell of your column to display an image, enter the HTML image tag into that cell. Change the number to show a specific image based on the order that it appears in the gallery.

    Ordering table images in Divi Table Maker

    Shortcodes and iFrames

    You can also add shortcodes and iFrames to the cells. Simply paste them on the line for the cell you want. You won’t see a preview of the shortcode in the Divi Builder, but they do run on the website. Paste iFrames the same way as shortcodes. They do show a preview in the Divi Builder, but it might not show the same way that it will on the front end. They do show correctly on the front end.

    Using shortcodes and embed codes within the Divi Table Maker module

    Style the Content with CSS

    You can also style the content with inline CSS. This can be used to control the colors of the text, the size of the text, underline, etc. Simply add the inline CSS as you would in any WordPress content editor. For example, to make the first column heading text white, you can add this CSS:

    &lt;h2 style=&quot;color: white;&quot;&gt;&lt;/h2&gt;

    Adding inline CSS

    Customizing the Table Maker Cell Itself

    You can customize the cell itself using the cell tag and inline CSS. For example, this inline CSS would change the cell’s background:

    &lt;cell style=&quot;background: #0d232d;&quot;&gt;&lt;/cell&gt;

    For our example, we place the heading of the cell – which we had previously styled with inline CSS – within the cell tag.

    Inline CSS for the table cell

    Column Width

    Adjust the Max Width and Min Width of each column independently.

    Adjusting column minimum and maximum widths

    Table Title

    Table Title is a new feature. It’s disabled by default. Enable it and add a title in the field. You can also choose its position. Options include above the table, below the table, and hidden.

    Table Title Feature

    Table Description

    Table Description is another new feature. It’s also disabled by default. Enable it and add the description into the field. You can also choose its position from above, below, or hidden.

    Table description for Divi Table Maker

    Table Columns

    Adjust the Header Count, Footer Count, Max Width, and Min Width. The Header Count and Footer Count lets you choose the number of cells to use for each.

    Table Columsn within Divi Table Maker

    Table Rows

    Table Rows also has adjustments for the Header Count, Footer Count, Max Width, and Min Width. The Header Count and Footer Count lets you choose the number of cells to use for each.

    Table rows in Divi Table Maker

    Table Corners

    Table Corners is another new feature. It’s disabled by default. This lets you style the corner as part of the Row Header or Column Header. Table Corners works with Column Footer and Row Footer. If it’s enabled, you’ll have new settings in Table Corners to style them.

    Adding Content to Table Maker Cells

    Table Responsive

    The responsive features are interesting. You can set the breakpoint based on the device type and have it break by columns or rows. You can also display the cells as blocks or as an accordion. The latest update adds the breakpoints to desktops so you can create accordions on desktops if you want. Your visitors won’t see the full table layout if you use either blocks or accordion for the desktop. This example shows blocks.

    Divi Table Maker Responsive Settings

    This example shows the Accordion. I’ve opened the second accordion to show how the table looks.

    Mobile responsiveness and Divi Table Maker

    Table Scrolling

    Scrolling lets you display a larger table in the same space. You can also make the column and row headers sticky.

    Table Scrolling in Divi Table Maker

    Styling the Tabel Maker Table

    Table Maker has extensive styling options in the Design tab of the submodules and the main module. Adjust the colors, stripes, cells, text, header text, column headers, row headers, column footers, row footers, footer text, and all the standard Divi options. Style all the cells together or each cell independently. Let’s look at a few examples. I’ll describe the settings as we go.

    Table Maker Table Title

    If you have Table Title enabled, you’ll see design settings for the title. The settings include most of the standard text options for fonts, colors, alignment, etc. It adds spacing between the table and the title text. In the example below, I’ve changed the font to match the body font used within our layout pack, Raleway.

    Styling the Table Title

    Table Description

    If you have Table description enabled, you’ll see the design settings for the description text. Settings include most of the text options including size, fonts, wights, etc. It also adds spacing between the table and the description text. In this example, I’ve adjusted font and color to better match our layout pack.

    Table description styling

    Table Accordion

    If you have the Accordion option selected under Table Responsive, you’ll have design settings for the accordion. All accordions are closed by default. You can set a specific toggle to be open if you want. The Toggle Opened option lets you select which toggle to open by default. Set the icon alignment, change the size, choose an open icon, and choose a close icon.

    Styling the mobile responsive accordion

    Table Frame

    The Table Frame options let you add gaps or lines to the cells, choose a border type, change the border color, and change the line width. In this example, I’ve selected the lines style, and changed the color.

    Table frame styling

    Table Stripes

    Table Stripes places stripes behind the odd or even fields and can be horizontal or vertical. You can choose the field types that include the stripes and choose between odd and even rows. Stripes can now be a tint, a blended color (which includes the tint), or regular color options. The responsive size can go in a different direction, or you can disable them. Apply the stripes to the table body, column header, column footer, row header, and row footer individually.

    Table stripes styling

    Table Hover

    Table Hover is a new setting that highlights a row or column as you hover, so they can be horizontal or vertical. The responsive size can have a different direction or none. You can also adjust the color. Choose from tint, blended color, or solid color. In the example below, I’ve selected horizontal and color. I’m hovering over the second row.

    Table Hover styling settings

    Table Text

    Table Text includes all the standard text options and adds a wrap feature, giving you control over how the text behaves. In this example, I’ve set it to wrap, and changed the font family, text color, and font size.

    Styling the table text

    Table Cells

    The settings for Table Cells let you change the background color of the cells, set the text alignment for vertical and horizontal alignment, add padding, customize the border, and add a box shadow.

    Table cells styling

    Table Maker Column Header Text

    Originally, the row and column header text were wrapped in header and bold tags. This did cause problems with accessibility readers. Now, the setting is off by default. You can turn it back on if you have issues with older tables, but it’s better to leave it off and style the text with the settings provided by Divi Table Maker. For this example, I’ve made capitalized the titles, increased the line height, increased the font size and ensured that the inline styling has been removed.

    Column Header Cells

    Column Header Cells adjusts the background color of the heading cells. It includes the standard cell settings. I’ve adjusted the background color in this example.

    Column header cells styling

    Column Footer Text

    The Column Footer Text adjusts the text in the footer. It includes all the standard settings.

    Column footer text styling

    Column Footer Cells

    Column Footer Cells adjusts the cells for the footer. It includes all the standard settings. I’ve adjusted the background color, border color and border style, and border width in this example.

    Column footer cells styling

    Row Header Text

    Like the Column Header Text, Row Header Text also has the heading level disabled by default to improve accessibility. The row header is on the left. It also includes the standard font settings. In this example, I’ve added text wrap, changed the font family, updated the font style, and adjusted the text color and line height.

    Row header text styling

    Row Header Cells

    Row Header Cells controls the background of the cells used for the row’s header. In this example, I’ve adjusted the background color, plus both horizontal and vertical alignment.

    Row header cells

    Row Footer Text

    The Row Footer Text settings adjust the text for the row footer, which is on the right. In our example, the row footer holds the Book Now buttons. So the example of the row footer text would be in the very last cell of this table.

    Row footer text styling

    Row Footer Cells

    The Row Footer Cells settings control the cell used for the footer row. I’ve adjusted the background color, horizontal and vertical alignment.

    Row footer cells styling

    The Updated Layou with Finished Table

    This is the updated Service Page Layout with the fully styled Table Maker module, coupled with the FREE Header and Footer Template for the Home Remodeling Layout Pack.

    Purchase Table Maker

    Table Maker is available in the Divi Marketplace for $39. It includes a 30-day money-back guarantee and one year of support and updates.

    Purchase Table Maker

    Ending Thoughts

    That’s our look at Table Maker for Divi. This is a powerful table-making module. The latest update adds lots of new features. The new accessibility updates allow tables made with Table Maker to pass Google’s Lighthouse accessibility audit. You can make any size table and add just about anything to a cell with tags. Add HTML, CSS, shortcodes, iFrames, and more. Style the cells for the entire table at once or style them individually. The responsive tools make the tables look great on any device. If you’re interested in a powerful tool to create tables in Divi, Table Maker is a great choice.

    We want to hear from you. Have you tried Table Maker for your Divi website? Let us know what you think about it in the comments.

    The post Divi Plugin Highlight: Table Maker appeared first on Elegant Themes Blog.

  • Divi Plugin Highlight: Woo Essential

    Woo Essential is a third-party plugin that adds 8 new Woo Commerce Modules to the Divi Builder. It also adds several features to streamline the shopping process, allowing you to display products and categories in multiple layouts and lots of feature options. In this post, we’ll look at the modules and features of Woo Essential to help you decide if it’s the right product for your needs.

    Woo Essential Divi Modules

    Woo Essential adds 8 modules to the Divi Builder. Some of the features require YITH WooCommerce Compare and YITH WooCommerce Wishlist plugins. The free versions are fine for this. You’ll see a notification if you don’t have these installed. Simply click the notification to install and activate them after activating the Woo Essential plugin.

    You won’t see all the modules in the Divi Builder at first. Instead, you’ll see one module called Woo Essential. Click this module.

    WooEssential

    All the Woo Essential Modules will then display in the modal. You can now add the modules to any Divi layout to display WooCommerce products.

    WooEssential Modules

    Let’s take a closer look at each of the Woo Essential Modules. I’ll show the default settings and then show an example of some of the design features.

    Woo Category Accordion

    The Woo Category Accordion Module displays the images for the product categories. The images expand on hover to show a description of the category and the number of items in that category. It will show the category image if you have one set up.

    WooEssential Modules: Category Accordion

    You have full control over the design for every element. In this example, I’ve added a box shadow, rounded the corners, and changed the font colors and sizes for the category name, count, and description. I’ve also added padding and line height to the description.

    Woo Category Carousel

    The Woo Category Carousel creates a slider complete with navigation and automatic sliding. It has lots of settings to adjust the carousel.

    WooEssential Modules: Category Carousel

    Woo Category Grid

    The Woo Category Grid displays the categories as cards in a grid. The grid is adjustable, so you can change the number of columns.

    WooEssential Modules: Category Grid

    For this one, I’ve added a border, rounded the corners, adjusted the fonts, and changed the grid count and gap settings.

    WooEssential Modules: Category Grid

    Woo Category Masonry

    The Woo Category Masonry Module places the categories within a masonry grid.

    WooEssential Modules: Category Masonry Grid

    In this example, I’ve adjusted the grid number and gap, and changed the fonts.

    WooEssential Modules: Category Masonry Grid

    Woo Product Accordion

    The Woo Product Accordion works like the Woo Category Accordion except it shows the products themselves. It expands on hover to show the product information. Choose which elements to display from the Add to Cart button, price, star rating, description, Featured Product Badge, Sale Badge type, and Sale Badge text. You can also control how the accordion works. All the product modules show the featured image by default.

    WooEssential Modules: Product Accordion

    In this example, I’ve adjusted the content background, changed the font colors, changed the badge color, increased the product name font size, and changed the add to cart button color.

    WooEssential Modules: Product Accordion

    Woo Product Carousel

    The Woo Product Carousel displays the products in one of six layout options. Each includes a different hover effect for the buttons. You can also choose which elements to display, adjust the carousel settings, etc.

    WooEssential Modules: Product Carousel

    You can adjust every element independently. I’ve adjusted lots of the colors, borders, and fonts in this example. I’ve also added arrow navigation. This is Layout 3, which places the cart and other links at the bottom of the image on hover.

    WooEssential Modules: Product Carousel

    Woo Product Filter

    The Woo Product Filter adds a WooCommerce product grid with a customizable filter. You can choose which of the elements to display.

    WooEssential Modules: Product Filter

    You have full control over every element including the filter, grid, fonts, colors, etc. I’ve changed several of the colors, the font sizes, and adjusted the grid count in this example. I’ve also added a box shadow to both the filter and the product grid.

    WooEssential Modules: Product Filter

    Woo Product Grid

    The Woo Product Grid Module displays the products in a grid with a banner that shows the product counts. It has 8 layout options for the grid that changes the size of the image and places the buttons in different locations on hover. You can select the elements that display. This shows layout 8, which places the icons on the right of the image and the Add to Cart button at the bottom of the image on hover.

    WooEssential Modules: Product Grid

    You can add pagination with buttons to each page or a Load More button. I’ve added the Load More button in this example and styled it. This is layout 3, which places the title and price under the image and adds the icons close to the bottom of the image on hover.

    WooEssential Modules: Product Grid

    More Woo Essential Features

    There are lots of features, most included within the modules, that add functionality to the WooCommerce listings. Here’s a quick look at several of those features.

    Woo Essential Woo Mini Cart

    The Mini Cart feature adds a popup menu to the shopping cart. It’s automatically added to the default WordPress header. It only works with the default header, so you won’t be able to add it to headers created with the Divi Builder. This means it’s not as versatile as the other features of this plugin. You can customize all three of its elements independently with the Theme Customizer.

    WooEssential Modules: Mini Cart

    It includes four sections of settings for the main cart settings, cart design, view cart button, and checkout button.

    WooEssential Modules: Divi Mini Cart

    Control how it works and change the size, shape, colors, fonts, icons, etc. Have it open on hover, on click, or slide from the right or left.

    WooEssential Modules: Divi Mini Cart

    The Mini Cart opens a small modal showing the contents of your cart. It can also open a window to the right or left, depending on your settings. This example shows the modal opening on hover. The Fly-In option, which slides from the right or left, gives the modal the full height of the screen.

    WooEssential Modules: Divi Mini Cart

    Woo Essential Quickview Popup

    You can view the item details without leaving the current page. The quick view icon is added to several of the modules. Clicking this icon opens the details in a modal. The popup is fast and makes it easy to see the details of the product without loading another page.

    WooEssential Modules: Quick View

    The details include all the product information such as the description, gallery, Add to Cart button, category, etc.

    WooEssential Modules: Quick View Popup

    Woo Essential Compare Products

    You can compare multiple products by selecting the comparison icon. This process can be a little tricky at first, so many users might not be aware they can compare products.

    WooEssential Modules: Compare Products

    To do the comparison, view the products individually that you want to compare. Then, click the compare icon on one of the products. The comparison modal with open with the products compared in a table. This does work, but it isn’t as intuitive as I like. It did take a little work to figure out. The information I needed was in the documentation. You can scroll through the comparison and close the modal when you’re ready.

    More Woo Essential FeaturesMore Woo Essential Features

    Woo Essential Settings

    Woo Essential adds a link to the WordPress dashboard. Select this link to open the settings. The first page, Home, includes links to the Knowledge Base, Support and Feedback, Feature Request, and the DiviNext YouTube Chanel.

    Woo Essential Settings

    Select Modules to see the second page. Here, you can disable or enable any of the Woo Essential Modules. This is good if you want to restrict the design to just a few modules. All are enabled by default.

    Woo Essential Settings

    Woo Essential Templates

    The publisher’s website contains 8 free starter layouts to help you get started with your designs. They also require another Divi plugin to work, so their usability is limited to those with both plugins. They look great and provide lots of sections to use.

    Woo Essential Templates

    Purchase Woo Essential

    Wii Essential is available in the Divi Marketplace for $79. It includes unlimited usage, a 30-day money-back guarantee, and one year of support and updates.

    Purchase Woo Essential

    Ending Thoughts

    That’s our look at Woo Essentials for Divi. These 8 Divi Modules provide lots of options for product grids and accordions. Display individual products and categories with ease and style them with the Divi Builder. Easily see the content in the cart, the product details, and compare products. I would like to see the Mini Cart as a Divi Module so it can be added to headers created with the Divi Builder. It does work well, though, if you’re using the default WordPress header. If you’re interested in expanding your WooCommerce product pages with lots of interesting grids, Woo Essentials is worth a look.

    We want to hear from you. Have you tried Divi Essentials? Let us know what you think about it in the comments.

    The post Divi Plugin Highlight: Woo Essential appeared first on Elegant Themes Blog.

  • How to Include a Contact Form in Your Divi Footer

    Divi’s footer is a great place to add a contact form. Fortunately, this is easy to do with the Divi Theme Builder. Of course, we don’t want to just add it anywhere as there are a few things to keep in mind for usability. In this post, we’ll see how to include a contact form in your Divi footer. We’ll go through a couple of examples to help you get started.

    Let’s get started!

    Preview

    Desktop Divi Footer Contact Form Example One

    Desktop Divi Footer Contact Form Example One

    Phone Divi Footer Contact Form Example One

    Phone Divi Footer Contact Form Example One

    Desktop Divi Footer Contact Form Example Two

    Desktop Divi Footer Contact Form Example Two

    Phone Divi Footer Contact Form Example Two

    Phone Divi Footer Contact Form Example Two

    About the Contact Form in Your Divi Footer

    Why Include a Contact Form in Your Divi Footer?

    The footer is a location where visitors will look for specific information. This includes ways to contact you. Adding a contact form to the footer not only makes that contact information visual but also simplifies the process.

    Where to Add the Contact Form

    When choosing a location for the contact form, look at the other footer elements to see what would clash for attention.

    It’s best to place the contact form near other contact information, but you don’t want it fighting the email form. Placing two forms next to each other can confuse your visitors. Place the contact form in a different Row or Section from the email form. Add enough whitespace around the contact form so that it stands apart from the rest of the content.

    The example below is from the free Header and Footer Template for Divi’s Stone Factory Layout Pack. This is a great example of how to use a contact form in the footer. This layout includes a contact form and an email form. The contact form is placed with the contact information in a different Row from the links and email form. It’s also a different color than the email form and it’s labeled well, so visitors will know at a glance which form is which.

    Where to Add the Contact Form

    How to Include a Contact Form in Your Divi Footer

    The best way to add a contact form to your Divi footer is by building the footer in the Divi Theme Builder. A contact form can also be added to any existing footer. The process of adding the form is the same.

    Import Your Divi Footer Layout

    In the WordPress dashboard, go to Divi > Theme Builder. Select Add Global Footer if you don’t have a global footer, select Add New Template, or choose the footer template you want to add the contact form to. We’ll import a new footer. For this example, we’ll add a contact form to the Header & Footer for Divi’s Financial Services Layout Pack.

    Select the Portability icon in the upper right corner of the Theme Builder. Navigate to your header and footer template on your computer, select it, and click Import Divi Theme Builder Templates. Save your changes.

    Import Your Divi Footer Layout

    Next, select the Edit icon for the footer template. This will open the footer template in the builder where we’ll make our changes.

    Import Your Divi Footer Layout

    How to Add the Divi Footer Contact Form

    Next, we’ll add the contact form to the footer layout. First, we’ll need to make some adjustments to the layout’s design. We see the layout has two Sections. The top Section has a title to identify that it’s the contact information. This Section includes three types of contact information lined up horizontally.

    We’ll stack the contact information on the right, above the email subscription form. Then, we’ll place a Divi Contact Form Module on the left. This increases the size of this Section and balances the footer with a form on each side.

    How to Add the Divi Footer Contact Form

    Move the Contact Information

    First, drag and drop the Text Modules to the right column. Stack them to show Email on top, Office in the middle, and Phone on the bottom.

    Move the Contact Information

    Adjust the Row

    Next, adjust the Row to show two columns instead of three.

    Adjust the Row

    Add the Contact Form

    Finally, add a Contact Form Module to the left Column.

    Add the Contact Form

    We now have a contact form added to our Divi layout. The contact form balances well with the email form on the other side of the layout. Of course, it works but it won’t fit well with the layout’s design until we style it.

    Add the Contact Form

    How to Style the Divi Footer Contact Form

    Now, let’s see how to style the Divi Contact Form Module to match the layout. We’ll look at two examples, including the one we’ve already started. We’ll use design cues from the layout itself.

    Divi Footer Contact Form Example One

    For this one, we’ll style the form we added in the previous section.

    Text

    Open the Contact Form Module’s settings. Enter the text for the Title and Submit Button.

    • Title: Contact Us Today
    • Submit Button: Get in touch

    Divi Footer Contact Form Example One

    Fields

    Next, go to the Design tab. Change the Fields Background Color to #ffba52 and change the Fields Text Color to #0f1154. Leave the focus colors at their default settings. This allows them to use the same colors as the regular fields.

    • Background Color: #ffba52
    • Text Color: #0f1154

    Divi Footer Contact Form Example One

    Next, change the Fields Font to Montserrat. Set the Weight to Bold and the Size to 16px.

    • Font: Montserrat
    • Weight: Bold
    • Size: 16px

    Divi Footer Contact Form Example One

    Title Text

    Next, scroll down to Title Text. Choose H3 for the Heading Level. The title of this section uses H2, so selecting H3 will build the proper page structure. Select Montserrat for the Font. Select Bold for the Weight and change the Color to #1d4eff.

    • Heading Level: H3
    • Font: Montserrat
    • Weight: Bold
    • Color: #1d4eff

    Divi Footer Contact Form Example One

    Captcha Text

    Next, scroll down to Captcha Text. We’ll make changes to the Captcha Text in this setting, but we’ll also add some CSS to change the field color. Change the Font to Roboto, the Weight to Medium, and the Color to #1d4eff. We’ll add the CSS at the end.

    • Font: Roboto
    • Weight: Medium
    • Color: #1d4eff

    Divi Footer Contact Form Example One

    Button

    Next, scroll down to Button and enable Use Custom Styles for Button. Change the Font Size to 16px, the Font Color to white, and the Background Color to #1d4eff.

    • Use Custom Styles for Button: Yes
    • Size: 16px
    • Text Color: #ffffff
    • Background Color: #1d4eff

    Divi Footer Contact Form Example One

    Set the Border Width and Border Radius to 0px for both. Change the Font to Roboto and the Weight to Medium.

    • Border Radius: 0px
    • Border Width: 0px
    • Font: Roboto
    • Weight: Medium

    Divi Footer Contact Form Example One

    Next, scroll down to Button Padding. Enter 14px for the Top and Bottom Padding and 24px for the Left and Right Padding.

    • Padding: 14px Top and Bottom, 24px Left and Right

    Divi Footer Contact Form Example One

    Captcha Background

    Finally, go to the Advanced tab and scroll down to the Captcha Field. Enter the CSS below into the field. This gives the background a different color from the rest of the form, so users will know it’s different. Now, close the module and save your settings.

    • Captcha Field CSS:
      background-color:rgba(255,186,82,0.2)

    Divi Footer Contact Form Example One

    Divi Footer Contact Form Example Two

    Let’s look at another example. For this one, I’m using the global footer from the free Header & Footer for Divi’s Podcaster Layout Pack. We’ll replace the contact email with a contact form.

    Divi Footer Contact Form Example Two

    Delete Email Text Module

    First, delete the Contact Us and email Text Modules. We’ll replace the title with the one from the Contact Form Module.

    Divi Footer Contact Form Example Two

    Change Row Column Width

    Next, change the column layout to display two equal columns. This gives us more room for the contact form.

    Divi Footer Contact Form Example Two

    Adjust Column

    Next, we’ll change the Background of the column for the contact form. This gives us more control over the form’s design. Open the settings for the right column.

    Divi Footer Contact Form Example Two

    Scroll down to Background and select the Background Gradient tab. Set the first Gradient Stop’s Color to #f52791 and leave it at its position of 0%. Set the second Gradient Stop’s Color to #3742fb and leave its position at 100%. Change the Direction to 120deg.

    • First Gradient Stop: #f52791, 0%
    • Second Gradient Stop: #3742fb, 100%
    • Direction: 120deg

    Divi Footer Contact Form Example Two

    Next, go to the Design tab. Change the Top and Bottom Padding to 40px and the Left and Right Padding to 30px.

    • Padding: 40px Top and Bottom, 30px Left and Right.

    Divi Footer Contact Form Example Two

    Next, scroll down to Border and adjust the Rounded Corners. Set the Top Left to 0px, the top Right to 15px, the bottom Left to 15px, and the bottom right to 0px. Close the Column and Row settings.

    Rounded Corners:

    • Top Left: 0px
    • Top Right: 15px
    • Bottom Left: 15px
    • Bottom Right: 0px

    Divi Footer Contact Form Example Two

    Add a Contact Form Module

    Next, add a Contact Form Module in place of the Text Modules.

    Divi Footer Contact Form Example Two

    Contact form Content

    Add the Title content.

    • Title: Contact Us

    Divi Footer Contact Form Example Two

    Spam Protection

    Scroll down to Spam Protection and disable it.

    • Use Basic Captcha: No

    Divi Footer Contact Form Example Two

    Fields

    Go to the Design tab. Change the Fields Background Color to rgba(255,255,255,0.12) and change the Text Color to white.

    • Fields Background Color: rgba(255,255,255,0.12)
    • Fields Text Color: #ffffff

    Divi Footer Contact Form Example Two

    Change the Fields Font to Sarabun. Set the Weight to Bold, the Style to TT, and the Letter Spacing to 2px.

    • Fields Font: Sarabun
    • Weight: Bold
    • Style: TT
    • Letter Spacing: 2px

    Divi Footer Contact Form Example Two

    Title Text

    Next, scroll down to Title Text. Change the Title Font to Sarabun, the Weight to Bold, the Style to TT, and the Color to white.

    • Heading Level: H3
    • Fields Font: Sarabun
    • Weight: Bold
    • Style: TT
    • Color: #ffffff

    Divi Footer Contact Form Example Two

    Button

    Next, scroll down to Button and enable Use Custom Styles for Button. Change the Font Size to 14px, the Font Color to white, and the Background Color to black.

    • Use Custom Styles for Button: Yes
    • Size: 14px
    • Text Color: #ffffff
    • Background Color: #000000

    Divi Footer Contact Form Example Two

    Change the Border Width to 0px and Border Radius to 50px. Set the Letter Spacing to 2px, the Font to Sarabun, the Weight to Bold, and the Style to TT.

    • Border Width: 0px
    • Border Radius: 50px
    • Letter Spacing: 2px
    • Font: Sarabun
    • Weight: Bold
    • Style: TT

    Divi Footer Contact Form Example Two

    Next, scroll down to Button Padding. Enter 15px for the Top and Bottom Padding and 45px for the Left and Right Padding. Close the module and save your settings.

    • Padding: 15px Top and Bottom, 45px Left and Right

    Divi Footer Contact Form Example Two

    Results

    Desktop Divi Footer Contact Form Example One

    Desktop Divi Footer Contact Form Example One

    Phone Divi Footer Contact Form Example One

    Phone Divi Footer Contact Form Example One

    Desktop Divi Footer Contact Form Example Two

    Desktop Divi Footer Contact Form Example Two

    Phone Divi Footer Contact Form Example Two

    Phone Divi Footer Contact Form Example Two

    Ending Thoughts

    That’s our look at how to include a contact form in your Divi footer. The Divi Contact Form Module is simple to add to any Divi footer layout and it’s easy to style to match any Divi layout. Following a few design principles will ensure you get the most out of the footer’s space.

    We want to hear from you. Do you include a contact form in your Divi footer? Let us know in the comments.

    The post How to Include a Contact Form in Your Divi Footer appeared first on Elegant Themes Blog.

  • Molti – Divi Child Theme Overview

    Molti is a multi-purpose Divi child theme with over 15 pages, 6 headers, 6 footers, and over 50 element designs to create any type of website you need. It’s designed with service-based businesses in mind and includes multiple versions of the design elements to help you create your Divi website. In this post, we’ll take a look at Molti to help you decide if it’s the right Divi child theme for your needs.

    Installing Molti Divi Child Theme

    Molti installs differently than most Divi child themes I’ve used. It’s installed as a plugin. It installs fast and easily. First, upload and activate the plugin.

    Installing Molti Divi Child Theme

    Next, go to Molti Demo Importer in the WordPress dashboard. Select everything you want to import. I recommend leaving everything at their default. Lastly, click Begin site import.

    Installing Molti Divi Child Theme

    Wait for the import to complete. Once it’s finished, you can uninstall the plugin. That’s it.

    Installing Molti Divi Child Theme

    Molti child theme is now the active theme in your WordPress Themes directory. All the pages, templates, menus, and styling are now in place and ready for your content.

    Installing Molti Divi Child Theme

    Here’s the default homepage with menus and a mega menu. This is a demo page with screenshots of the other pages and information about the features. You’ll need to set the actual home page by going to Settings > Reading in the WordPress dashboard.

    Installing Molti Divi Child Theme

    Molti Divi Child Theme Pages

    The 15 pages include a home page, pricing, portfolio, services, about, blog, careers, contact, and more. Some of the pages are built with Divi Theme Builder templates, while most are available as a page. Let’s look closer at a few of the pages and elements.

    Molti Home Page

    The homepage includes 10 sections. They include the hero section, services, about, features, number counters, pricing, testimonials, and a blog. It has a light orange color scheme and dummy images. Each of the elements includes custom styling and animations. They look great. I especially like the blurbs and the blog section. This page is ideal for any type of business and is especially well-suited for a service business.

    Molti Divi Child Theme Pages

    Molti Contact Us Page

    The Contact Us page includes 4 sections with a hero section, contact information, a contact form, and an FAQ. It has lots of whitespace and many of the elements take the full width of the screen.

    Molti Divi Child Theme Pages

    Molti About Us Page

    The About Us page includes 8 sections. It includes a hero section with a CTA, a company history with a CTA, clients with logos, a team section that reveals information on hover, features with blurbs, testimonials, and a hiring section with a CTA.

    Molti Divi Child Theme Pages

    Molti Careers Page

    The careers page includes 4 sections. It includes the standard hero section with a CTA, a benefits section with blurbs, a location section with images, and job openings with blurbs that include a hover animation that covers the blurb with the button’s color.

    Molti Divi Child Theme Pages

    Molti Single Job Page

    The single job page includes 4 sections with the last section only revealed with the application button selected. The hero section shows the job title. The second section uses Text Modules to create buttons to switch between the job information and form. The largest section displays the job overview with Text Modules.

    Molti Divi Child Theme Pages

    Molti Services Page

    The services page contains 8 sections. They include the standard hero section, information with an alternating layout, popular features with blurbs, services with animated blurbs, company logos, testimonials with an interesting image mosaic layout, and benefits of choosing the company with tilted images.

    Molti Divi Child Theme Pages

    Molti Blog Page

    The blog page includes two sections. The first is a unique hero section with a blog search. Second is a blog section with a styled Blog Module that matches the blog on the home page. Blog posts are displayed as cards in three columns.

    Molti Divi Child Theme Pages

    Molti Portfolio Page

    The portfolio page includes 3 sections. The first is the hero section with a CTA to view all the projects. Next is the portfolio with a styled filter. Following this is a CTA.

    Molti Divi Child Theme Pages

    Molti Pricing Page

    The pricing page includes three sections. First is the pricing tables. This section uses CTA Modules, Text Modules, and Blurb Modules to create a unique price table design. A button changes the prices and blurbs to create a table with check marks. Next is the FAQ section. Lastly is a CTA banner.

    Molti Divi Child Theme Pages

    Molti Divi Child Theme Divi Theme Builder Templates

    Molti uses the Divi Theme Builder to create and assign 7 templates. Here’s a quick look at a few of them.

    Molti Divi Child Theme Divi Theme Builder Templates

    Molti Header

    The header includes a standard design for the menu, but then adds a hamburger menu to open a section of Blurb Modules.

    Molti Divi Child Theme Divi Theme Builder Templates

    In the Divi Theme Builder, the header displays two rows with the contact information in the top bar and the logo, menu, CTA, and custom hamburger icon in the second row. It includes a shadow effect to stand apart from the page.

    Molti Divi Child Theme Divi Theme Builder Templates

    The CTA opens to show the blurbs. They include hover effects and a button to see all the services. This is the desktop version.

    Molti Divi Child Theme Divi Theme Builder Templates

    Here’s the phone version. It only displays the regular menu with a hamburger menu icon. The menu shows a custom icon with collapsed submenus.

    Molti Divi Child Theme Divi Theme Builder Templates

    Molti Footer

    The footer includes two sections and four rows. The first section doesn’t contain rows. It’s used to create the divider. The second section contains four rows with lots of Text and Blurb Modules, an Image Module, and a Social Media Follow Module to create all the footer elements.

    Molti Divi Child Theme Divi Theme Builder Templates

    Here’s the desktop version of the footer. The modules create five columns with the email form taking a larger portion of the screen’s width.

    Molti Divi Child Theme Divi Theme Builder Templates

    The phone version places the email form in a single column and sets the links in two columns. All the elements in the bottom row stack in a single column.

    Molti Divi Child Theme Divi Theme Builder Templates

    Molti 404 Page

    The Molti 404 page is simple. It includes a single section with two columns. The first column displays an image, while the second column displays text and a button.

    Molti Divi Child Theme Divi Theme Builder Templates

    It still shows the header and footer on the front end, but you can disable them in the Divi Theme Builder if you want. Here’s the desktop version.

    Molti Divi Child Theme Divi Theme Builder Templates

    Here’s the phone version of the Molti 404 page.

    Molti Divi Child Theme Divi Theme Builder Templates

    Molti Posts

    The blog post layout is extensive. It includes four sections and includes an interesting title, content layout, tags, navigation, comments, newsletter form, and similar blog posts. Here’s the wireframe view.

    Molti Divi Child Theme Divi Theme Builder Templates

    Here’s how the post layout looks on a desktop. This is a clean design.

    Molti Divi Child Theme Divi Theme Builder Templates

    Here’s a portion of the layout for the phone view.

    Molti Divi Child Theme Divi Theme Builder Templates

    Molti Divi Child Theme Elements

    The Molti Divi child theme also includes lots of custom elements. They include a Blog Module, card designs, a content switch, team cards, and more. These elements are used within the pages and they’re available separately as Divi pages so you can easily use them in other pages, posts, and templates. Here’s a look at a few of them.

    Card Designs

    The page for card designs includes six types of cards. They include images, buttons, hover animations, and more. They’re designed to show team members, services, contact information, and CTA’s.

    Molti Divi Child Theme Divi Theme Builder Templates

    Content Switch

    Content switch elements change the content that’s displayed when they’re selected. They include two designs. The first changes the prices in the pricing table from monthly to yearly. The second switches blog posts from featured posts to recent posts.

    Molti Divi Child Theme Divi Theme Builder Templates

    Blog Module Designs

    Blog elements include three Blog Module designs. The first design places the posts in three columns and includes a styled meta and places the date over the image. The second design displays two posts with large images and the title and meta over the image. This one also includes overlays. The third design is similar to a magazine layout with multiple posts on a card and images on the left and the title on the right.

    Molti Divi Child Theme Divi Theme Builder Templates

    Where to Purchase Molti Divi Child Theme

    Molti Divi child theme is available in the Divi Marketplace for $25. It includes unlimited website usage, a 30-day money-back guarantee, and one year of support and updates.

    Where to Purchase Molti Divi Child Theme

    Ending Thoughts

    That’s our overview of the Molti Divi child theme. Molti is easy to use. Installation is the simplest I’ve seen. I was surprised at the design quality. It includes a lot more pages and elements than I expected for its price. The page designs are especially good for businesses with services. If you’re looking for high quality and low-cost business child theme for Divi with a clean and modern design, Molti is a great choice.

    We want to hear from you. Have you tried the Molti Divi child theme? Let us know what you think about it in the comments.

    The post Molti – Divi Child Theme Overview appeared first on Elegant Themes Blog.

  • 8 Best WordPress LMS Plugins in 2023

    Creating and selling online courses can be a valuable business model. An LMS (Learning Management System) plugin can turn your WordPress website into a learning platform. All you must do is create the courses. Fortunately, there are several good LMS plugins to choose from. In this article, we’ll look at the best WordPress LMS plugins to help you decide which is best for your needs.

    What is an LMS Plugin?

    An LMS plugin provides the tools to create, manage, and deliver course content to students. They create post types for courses, lessons, quizzes, students, instructors, and more. You create the course content and set up the LMS. The plugin handles the rest.

    The LMS plugin restricts access to the content based on the rules you set up. You can sell the courses, require prerequisites, monitor progress, create certificates, receive payments, view statistics, and more. You have complete control over your learning platform.

    There are lots of LMS plugins available. Here’s a look at what I consider to be the eight best WordPress LMS plugins available. They’re in no particular order.

    1. MemberPress

    MemberPress

    MemberPress is a powerful learning platform designed to be the easiest to set up and start. It can create courses and membership sites and includes powerful access rules, coupons, forums, drip content, pricing pages, reports, and more. It also integrates with Divi, payment gateways, Zapier, and many other platforms.

    MemberPress

    Divi integration allows you to build the pages with the Divi Builder and then select to control their access under Access Conditions. This example from their website shows it restricting access to a page called Divi Membership, which was created with the Divi Builder.

    MemberPress

    A new tab is added to the builder called MemberPress. It has a set of tools to choose the membership rule and authorization.

    Features

    • Unlimited courses
    • Unlimited memberships
    • Divi addon
    • Integrates with payment gateways
    • Drip content
    • Coupon codes
    • Forums
    • Email automation
    • Content protection
    • Gutenberg blocks

    Price: $279 and up | More Information

    2. LifterLMS

    LifterLMS

    LifterLMS is one of the best WordPress LMS plugins available. It makes it easy to create and sell courses and memberships through your WordPress website. It’s integrated with lots of popular plugins, and it can connect your website to other apps. eCommerce is built-in, so you don’t have to rely on other plugins. Even though it has a lot of features, it’s easy to set up and use.

    LifterLMS

    LifterLMS includes a detailed settings dashboard with settings for courses, memberships, accounts, checkout, engagements, notifications, and lots more.

    LifterLMS

    You can add any Divi modules to the page in the classic editor; alternatively, The Gutenberg editor includes several blocks to build the pages for your courses, lessons, and memberships.

    The course builder includes tools and an outline to get you started.

    LifterLMS

    It adds two widget areas, one for courses and one for lessons. It also adds two widgets, one for the course syllabus and one for the course progress.

    Features

    • Create courses
    • Create membership sites
    • eCommerce built-in
    • integrates with Divi
    • Create badges and achievements
    • Integrates with popular plugins
    • Integrates with other apps
    • Easy to set up and use
    • Gutenberg blocks
    • The pro versions add extensions, marketing, forms, advanced quizzes, groups, eCommerce, and lots more.

    Price: Free, pro version starts at $120 | More Information

    3. LearnDash

    LearnDash

    LearnDash is a comprehensive online learning platform considered one of the most popular and best WordPress LMS plugins available. Create unlimited courses with the drag-and-drop builder, advanced quizzing, flexible prerequisites, and drip content.

    LearnDash

    It comes with five templates to help you get started on your website design.

    The course pages follow a simple structure that looks clean.

    LearnDash

    Learndash’s documentation includes information about using Learndash with page builders such as Divi. The example above is from the Learndash website, showing the Divi Builder as an option on the course pages.

    Features

    • Unlimited courses
    • Unlimited users
    • Content protection
    • Course forums
    • Drip lessons
    • Advanced quizzing
    • Certifications and badges
    • Five templates
    • Integrates with Divi
    • Gutenberg blocks
    • Free and premium add-ons

    Price: $199 and up | More Information

    4. Tutor LMS

    TUTORLMS

    Tutor LMS is a complete LMS with quizzes, lessons, reports, and more. It has some of the most features for a free LMS. It can be expanded with premium add-ons.

    Tutor LMS

    A vast number of settings give you full control over the courses, lessons, students, quizzes, instructors, earnings, and lots more. Several of these elements have management areas on the dashboard.

    The course editor works like the classic editor. It’s intuitive and adds settings for the course, course builder, additional data, and video source options.

    Features

    • Unlimited courses
    • Frontend student dashboard
    • Lesson management
    • Commission allocation
    • Course marketplace
    • Content security
    • Quizzes with timers and attempts
    • Monetization settings
    • Widget
    • Divi Integration
    • Gutenberg blocks for student and instruction registration
    • Integrates with WooCommerce and Easy Digital Downloads
    • Pro version adds all addons including certificates, email notifications, shopping carts, and more.

    Price: Free, pro version starts at $149 | More Information

    5. Sensei LMS

    Sensei LMS

    Sensei LMS is from the makers of WordPress. This is another of the best WordPress LMS plugins available. It includes integration with WooCommerce to sell your courses. It also has editors for courses, lessons, and questions. Learning management tools include analysis, grading, learner management, messages, and tools. You can expand it through free and premium extensions.

    Sensei LMS

    It includes editors for courses, lessons, and questions. The classic version of the courses editor includes access to the Divi Builder, allowing you to add any Divi layout to the course pages.

    Sensei LMS

    Sensei LMS has everything you need to create an engaging curriculum for your users. When combined with Divi, it’s a powerful tool for anyone who is interested in getting started with creating courses.

    Features

    • Courses
    • Lessons
    • Questions
    • Learner management
    • WooCommerce integration
    • Divi integration in the classic editor
    • 4 widgets
    • Gutenberg blocks
    • Free and premium extensions.

    Price: Free, premium extensions start at $29 | More Information

    6. LearnPress

    Learnpress

    LearnPress was designed to work like a learning platform called Moodle. Create unlimited courses with lessons and quizzes. It allows for unlimited students and instructors. Manage everything from the backend. You can expand the free plugin with free and premium add-ons.

    The settings dashboard makes it easy to set up your pages, currency, adjust the courses, profiles, payments, emails, and more.

    LearnPress

    Build the courses with a classic editor. Each includes settings and an area to create lessons. The editor includes tabs for the courses, categories, and tags. The editors for lessons, quizzes, and questions work the same way but include specialized settings.

    LearnPress

    Statistics show an interactive graph with general stats, users, courses, and orders. You can filter it by a date range that you set.

    Features

    • Unlimited courses
    • Unlimited lessons
    • Backend course builder
    • PayPal and offline payments
    • Unlimited instructors
    • Three quiz types
    • Automatic email
    • Multisite
    • Statistics
    • Coupons
    • Lots of free and premium add-ons

    Price: Free, premium version starts at $49 | More Informationmas

    7. Namaste! LMS

    Namaste! LMS

    Namaste! LMS lets you create unlimited courses, lessons, assignments, etc., and you can have unlimited students. You can create extensive rules for the course and lesson access. Base the rules on assignment completion, test results, or the administrator’s approval. It also includes extensive settings for role management. Mark the students’ performance with a grade and point system. Students can earn certificates. It integrates with several other plugins.

    Namaste! LMS

    The settings screen provides lots of options to set up roles, administration, modules, URLs, archive pages, grades, assignments, payment methods (shopping cart requires pro version), and exams.

    Namaste! LMS

    The course editor provides settings for enrollment, access and prerequisites, role restrictions, and course completeness. It also provides shortcodes that you can display prerequisites, status, and more. Lessons work the same but have different settings.

    Namaste! LMS

    Certificates are created with a classic editor.

    Features

    • Unlimited courses and lessons
    • Rules management
    • Roles management
    • Grade points system
    • To-Do items list
    • Certificates
    • Premium extensions available
    • The pro version adds a shopping cart, class assignments, teacher assignments, delayed access, shortcodes, badges, coupons, WooCommerce, a progress bar, and more.

    Price: Free, pro version starts at $67 | More Information

    8. MasterStudy LMS

    MasterStudy logo

    MasterStudy LMS is a powerful and user-friendly learning management system for WordPress. It enables you to create and sell online courses, quizzes, and lessons with ease. With a range of features and customization options, you can design your learning platform to match the look and feel of your website.

    MasterStudy LMS comes with a range of features to make it easy to create and sell online courses. It’s a complete e-learning solution that allows you to create, sell, and manage online courses with ease.

    MasterStudy settings page

    With its course builder, you can quickly add lessons, quizzes, and more. The in-built order system makes it easy to sell courses and accept payments, while customization options ensure that your platform matches the look and feel of your website.

    Features:

    • Drag-and-drop course builder
    • Quiz builder with support for true/false, single-choice, and multiple-choice questions
    • Progress bar to show students their progress
    • Question and Answer system for interaction between students and instructors
    • In-built order system to sell courses and accept payments
    • Customization options to match the vibe of your site
    • Responsive design to look great on all devices
    • Dedicated support team

    Pricing: Free, pro version starts at $59 | More Information

    Ending Thoughts

    That’s our look at the eight best WordPress LMS plugins to turn your website into a learning platform. The LMSs we’ve listed here range in features and price points, so there’s something here for every need. Our top choices are MemberPress or LifterLMS; with these, you simply can’t go wrong!

    We want to hear from you. Have you tried any of the eight best WordPress LMS plugins? Let us know what you think about them in the comments.

    Featured Image Illustration via ivector / shutterstock.com

    The post 8 Best WordPress LMS Plugins in 2023 appeared first on Elegant Themes Blog.

  • 10 Best WordPress Search Plugins in 2023

    One of the most important aspects of a website is its search functionality. A good search function can help visitors find what they’re looking for quickly and easily, while a poor search function can lead to frustration and a high bounce rate.

    In this article, we’ll take a look at some of the best WordPress search plugins to improve your website’s search functionality in 2023.

    Subscribe To Our Youtube Channel

    What is a WordPress Search Plugin?

    A WordPress search plugin is a tool that enhances the built-in search function of a WordPress website. It’s common knowledge that the default WordPress search function leaves much to be desired. That’s why a good search plugin is essential!

    The plugins below can improve the accuracy and relevance of search results, add additional search options, and provide advanced features such as search analytics and customization options.

    1. FiboSearch

    FiboSearch logo

    FiboSearch is an AJAX search for WooCommerce. It provides live suggestions as you type. Search by product title, long or short description, or SKU. Search results can show the product image, price, description, and SKU.

    FiboSearch

    It includes Divi integration. You have the option to replace the Divi search bars. Options also include a search bar, autocomplete, and lots of configurations.

    FiboSearch settings

    FiboSearch makes it simple to include advanced product search functionality on your website, with the ability to search by SKU, filter by category and tags, and integrate it seamlessly into your navigation menu. It even works seamlessly on multilingual stores without any additional setup.

    Features

    • AJAX search for WooCommerce
    • Customize search parameters
    • Integrates with Divi
    • The widget has customizations for both mobile and desktop
    • The pro version adds fuzzy search, more search parameters, synonyms, conditions, etc.

    Price: Free, pro version starts at $49 per year | More Information

    2. Relevanssi

    Relevenssi banner

    Relevanssi replaces the standard search with a new search engine. It includes lots of settings, allowing you to configure it any way you want. The results are automatically sorted by relevance. It will search phrases and quotes, and users can add Boolean search terms. The search results will highlight the search terms in the content. It also includes user and admin search tools in the dashboard.

    Relevanssi settings page

    The settings are detailed and give you a lot of control. It includes search operator settings, synonyms, stopwords, redirects, logging, and more.

    Features

    • New search engine
    • Results sorted by relevance
    • Fuzzy matching
    • Boolean queries
    • Search phrases
    • Highlights search terms in the content
    • Supports bbPress and multisite
    • The pro version adds weight adjustments, restrictions, suggestions, custom post types, etc.

    Price: Free, pro version is $99 per year | More Information

    3. Ivory Search

    Ivory Search Banner

    Ivory Search is a WordPress search plugin that enhances the WordPress search features and allows you to create custom search forms. You can create unlimited search forms and configure each one individually. This allows users to perform different types of searches within your content. Forms can be placed anywhere on the website, including headers, footers, menus, widgets, etc. Search with AJAX or live.

    Ivory Search settings page

    The search editor allows you to exclude, design, use AJAX, and set up options for each form. They also work with custom post types, including WooCommerce.

    Features

    • Unlimited search forms
    • Forms are individually configurable
    • Place forms anywhere
    • AJAX or live search
    • Custom Widget
    • WooCommerce product search
    • The pro version lets you order results, search by author and status, exclude posts, etc.

    Price: Free, pro version starts at $19.99 per year | More Information

    4. Ajax Search Lite

    AJAX lite

    Ajax Search Lite replaces the default search and includes an AJAX search engine with a live search bar. Results can be filtered with category and post types. Search results include WooCommerce. Search results include images. It integrates with Google Analytics and includes caching and multiple performance options.

    Ajax lite settings page

    Setting up the plugin is easy; you can add the search feature to your pages using a shortcode or widget, and it allows you to customize your search results for your users directly from the dashboard.

    Features

    • AJAX search
    • Live search bar
    • Search custom post types, including WooCommerce
    • Drag-and-drop builder
    • 8 templates
    • Integrates with Google Analytics
    • Simple widget
    • Pro version adds more integrations, advanced caching, filters, layouts, 400 admin options

    Price: Free, pro version is $36 | More Information

    5. WP Google Search

    Google logo

    WP Google Search is a simple plugin that allows you to add a customizable search bar to your website, powered by Google’s search engine. This plugin is perfect for sites with a lot of content, as it provides your users with fast and accurate results.

    The plugin also includes a WordPress search widget, which can be used to display the Google Custom Search box in your sidebar or other widget-enabled areas of your site. Additionally, you can also embed the search form using a shortcode.


    WP Google seach settings

    No technical expertise is needed as all you have to do is create a Google Custom Search for your site, copy the search engine ID, and paste it into the plugin’s settings.

    Features

    • Customizable search bar design
    • Powered by Google’s search engine
    • Search results displayed in a grid or list view
    • Option to search specific pages or categories
    • Search results can be displayed with featured images, excerpts, and more

    WP Google Search Pricing: Free| More Information

    6. Search & Filter

    Search & Filter logo

    Search & Filter WordPress search plugin adds features to the WordPress search that lets you search by category, tag, taxonomy, post type, date, and any combination of them. The results are displayed with AJAX. The fields can be displayed as dropdown boxes, checkboxes, radio buttons, or multi-select options.

    Search & Filter settings

    The backend provides examples of Arguments, Public Taxonomies, your Public Post Types, Stylings, etc. It also includes links to see examples and documentation.

    Features

    • Adds search features to WordPress search
    • AJAX
    • Search by category, tag, post types, etc.
    • Display as dropdown, check box, etc.
    • Pro version adds more filters, order results, a drag-and-drop editor, custom templates, integrations, and more

    Price: Free, pro version starts at $20 | More Information

    7. WP Extended Search

    WP Exteneded Search logo

    WP Extended Search is a lightweight WordPress search plugin that gives you lots of search customizations. Choose categories, taxonomies, post types, and more. You can also control the default behavior of the search results. Have it to search in the post title, content, or excerpt. You can also assign different settings to specific search forms.

    WP extended search settings page

    The plugin offers a variety of search combinations and allows full control over the types of content to be searched. It also allows for the exclusion of specific post types from the results page. This allows users to fine-tune their search results and improve the accuracy of their search function.

    Features

    • Lots of search customizations
    • Create custom search forms
    • Choose how the search works
    • Compatible with WooCommerce
    • Select what to include in the search
    • Custom widget

    Price: Free | More Information

    8. Better Search

    Better Search logo

    Better Search replaces the default search with a new search engine. The search results are relevant to the title or content of the posts. You can fine-tune the results to add more weight to the title or content. It can search posts, pages, and custom post types, and you can customize the output. Searches are tracked with a heatmap so you can see the most popular searches. Use filters and actions to extend the WordPress search plugin.

    Better Search Settings page

    The plugin integrates seamlessly with your WordPress theme, and it can also be customized with custom CSS to match the look and feel of your website. Plus, the fact that it’s a free solution doesn’t hurt at all.

    Features

    • Replaces the default search
    • Fine-tune the search results
    • Search custom post types
    • See the most popular searches with a heatmap
    • See popular and daily searches
    • Add styling with CSS
    • Search widget

    Price: Free | More Information

    9. SearchIQ

    Search IQ logo

    SearchIQ is a WordPress search plugin that provides fast search results as you type. It includes real-time analytics so you can optimize your content strategy. The UI is customizable, and you can customize the content that will be included in the search results. You can include custom fields and taxonomies. The AI can handle typos, fuzzy matches, synonyms, and more.

    SearchIQ demo

    SearchIQ offers a range of advanced search features and customization options that make it a powerful tool for improving the search experience on your website.

    SearchIQ settings page

    The plugin’s integration with popular plugins and advanced analytics features make it a great choice for e-commerce, blog, and news websites.

    Features

    • Customizable UI
    • AI can handle typos
    • Real-time analytics
    • Search widget
    • Pro version adds more analytics, white labeling, cross-domain search, CDN for images, more filtering, etc.

    Price: Free, pro version starts at $19 per month | More Information

    10. SearchWP

    SearchWP website

    SearchWP is a professional-level WordPress search plugin that adds high-level search features to your website. It includes multiple engines and customizations for each one. It also has real-time monitoring, multiple content sources, multiple types of content, custom fields, and lots more.

    SearchWP settings

    SearchWP offers advanced search options such as search by custom fields, taxonomies, and post types, as well as the ability to exclude certain posts or pages from search results.

    It also includes customizable search forms, allowing users to adjust the look and feel of their search function. Additionally, it provides search analytics to help website owners understand how their search function is being used.

    Features

    • Multiple engines
    • Search any type of media
    • Integrates with WooCommerce
    • Metrics
    • Related content
    • Redirects
    • Custom results order
    • Extensions available

    Price: $99 | More Information

    Final Thoughts on WordPress Search Plugins

    Choosing the right WordPress search plugin is important to ensure that your website’s search function is accurate, efficient, and user-friendly. The plugins mentioned in this article are all great options for improving site search in 2023. FiboSearch is a must for WooCommerce stores, we also recommend trying free options like Ivory Search before committing to a subscription service.

    We want to hear from you. Have you tried any of these WordPress search plugins? Let us know what you think about them in the comments.

    Featured Image via PureSolution / shutterstock.com

    The post 10 Best WordPress Search Plugins in 2023 appeared first on Elegant Themes Blog.