There are several hosting providers that offer managed hosting, but it could be tough to tell which is best based on their own marketing. Regardless of your WordPress experience, choosing managed hosting can be a minefield.
With this in mind, we’re going to take a look at two giants of managed WordPress hosting and compare Kinsta vs. WP Engine. We’ll pit the two against each other, comparing their pros and cons, in order to help you choose the option that works best.
Regularly publishing fresh, relevant, high-quality content on your website is critical for Search Engine Optimization (SEO). Unfortunately, creating large volumes of content on a consistent basis is challenging. Luckily, you can streamline the content creation process using the best AI rewriter tools. They can help help you create SEO content to improve your website rankings. They are also great for repurposing content in other channels (turning blog posts into Twitter Threads, for instance).
In this post, we’ll take a closer look at AI rewriters and how they work. We’ll also provide you with a list of the best AI rewriters on the market and some tips on using them ethically.
What Is an AI Rewriter?
An AI rewriter tool uses Artificial Intelligence (AI) to understand the original text’s meaning (such as an article) and rewrite that text content based on certain prompts either from the user or built-in to the software. This can be done to help with originality, change tone, and make writing more clear and concise.
AI rewriters can create new versions of existing texts, and some can generate entirely new content from simple prompts. They can be valuable tools for SEO writers, businesses, students, and anyone needing to create fresh content efficiently. In fact, some of the best SEO tools use AI to help optimize your content.
Several different AI rewriters are on the market, each with strengths and weaknesses. The right one for you will depend on your specific needs and requirements. Don’t worry; we’ll point out the standout features of each one we review below.
Some tools are better at preserving the original meaning of a text while changing the text just enough. Others excel at creating a more readable and grammatically correct copy. And many rewriters switch out words with relevant synonyms or paraphrase and rearrange sentences. At any rate, AI rewriters can help enhance and polish your content. For instance, if you’re having trouble articulating a specific idea or want to rephrase and rework the structure of your article, the tool can offer helpful suggestions.
It’s important to note that plagiarizing content is nevera good idea. While AI rewriters can help with many areas of content creation, you shouldn’t entirely rely on them for writing posts. Instead, it’s best to look at them more as an aid for your writing and editing than a substitute. More on that later.
There are a wide variety of AI rewriter tools to choose from. Below are five of the best and most popular options to consider!
1. Jasper
Jasper is a robust, AI-powered rewriter tool that can help you take your content to the next level. It uses cutting-edge AI and NPL to analyze and rewrite your content, making it more engaging and effective. Jasper can also help you improve your writing style and grammar and ensure your content is error-free. It doesn’t only rewrite content; it can also take user prompts to create new content (and it’s one of the best AI writing tools out there).
Key Features:
AI-powered content rewriting and analysis
Writing style and grammar improvements
Plagiarism checker to ensure plagiarism free content
Quillbot, a well-known AI rewriter, was one of the first tools to handle the task well. One of the things that makes Quillbot so popular and impressive is that it is entirely free to use. While paid subscriptions (with more features) are available, the free tool is sufficient for most basic blog and article-writing needs.
Key Features:
Seven article spinning and rewriting modes (two free, five premium)
A Word Flipper feature that lets you control spinning requirements based on word level
A cloud thesaurus to ensure the best synonyms are used
Pre Post SEO is an AI rewriting suite of tools that includes other tools that webmasters may enjoy. The writing and editing tools for Pre Post SEO are separated, making it ideal for batching your rewriting tasks by specific tools.
Key Features:
Plagiarism checker that scours the web for content matches (gives % score and content source like Copyscape)
Paraphrasing tool for pasted text or uploaded documents
Powered by GPT 3 by OpenAI
iOS and Android apps
Best For:
Anyone needing a simple paraphrasing tool and plagiarism-checking abilities
Companies with multiple writers or staff members that need access (unlimited user seats)
Those that are okay with the search query (like a credit) pricing model
Pricing: There is a free plan that is ad-supported and paid plans starting at $12/mo
ChimpRewriter is another popular and highly praised AI rewriter. The downloadable tool is compatible with Microsoft and can easily be used for rewriting articles.
Used across the globe by thousands of SEO professionals, the rewriter uses AI and Natural Language Processing (NLP) technology to spin quick but high-quality content. It can help you research articles and combine them to create unique content. You can even use ChimpRewriter to generate articles in multiple languages.
Key Features:
Automatically adds images and videos in rewritten content
Researches, analyzes, and rewrites content
Integrates with other applications such as WP Robot and RankWyz
Frase is a total AI writing powerhouse but also a perfect rewriting tool. The platform creates a seamless writing workflow starting with content briefs, then moving into content writing tools, optimizing content, and tracking content analytics once your piece is published. Rewriting tools are in the content optimization portion of the tool.
Key Features:
Complete content creation workflow manager
AI writing tools + optimization tools
Addons for SERP data, Keyword volume, and unlimited AI-generated words
Best For:
SEO agencies or businesses performing content at scale
Online collaboration tools for teams
Freelancers who want to add more tools to their creation workflow
AISEO is an SEO AI rewriter with paraphrasing and readability-improving tools baked in. It specializes in making content easy to read and accessible to online audiences. It doesn’t perform as many tasks as other tools on the list but can dramatically help SEO writers with its focused editor and SEO tools.
Key Features:
Readability improver similar to Hemmingway App
One-click paraphrasing tool
26+ supported languages
SEO-focused AI tools
SERP analyzer
Best For:
SEO writers looking for an easy tool that can clean up writing and rewrite it for different content placement
Writers that also need AI writing tools with copywriting templates included
Grammarly is an AI grammar tool that can rewrite sentences that conform to writing and grammar best practices. It’s not a paragraph rewriter, but it analyzes each sentence one by one. It simply helps writers create easy-to-read content. We’ve even noticed that it corrects a lot of AI-generated output, proving that it is a helpful tool no matter how you create content.
Key Features:
Catches spelling mistakes, bad grammar, and improper syntax
It helps you improve your writing by giving you suggestions about tone based on your preferences
Browser extension and desktop applications to improve writing in every document and text box
Best For:
Anyone who writes and wants a simple way to enhance every word and sentence
Businesses that want to ensure employees are communicating effectively, no matter what they are writing (internal emails to external marketing)
Pricing: Free plan that every writer should be using with paid plans starting at $15/mo
Spinner Chief is a solid, free article spinner that works directly in your browser. Paste your content into the text box, configure your settings, and have it paraphrase your content. It comes with other tools but is a simple tool anyone can use. You can also use Spinner Chief online and with its Windows and Mac applications.
Key Features:
Statistical replacement technology and part-of-speech analysis
A bulk or batch article rewriting
Support for 45+ languages
Cloud thesaurus
Expand sentences, shorten content, and restructure copy
Support for all “spintax” formats
Best For:
Those needing a simple and reliable paraphrase tool
Want something that works on your desktop device
You need API access for bulk rewriting tasks
Spinner Chief Pricing: Free plan available (20 “spins” a day) with paid plans starting at $15/mo
WordAi is worth considering if you’re looking for an article rewriter software that produces human-quality content. This tool is easy to use and leverages AI to understand the context of words, concepts, and ideas before rewriting them. Thanks to its ability to incorporate Latent Semantic Indexing (LSI) keywords, WordAI can also make your content more SEO-friendly.
Key Features for WordAi:
Ability to rewrite an article in 1000 different versions
Sentence restructuring, text enrichment, and improved content quality
Perfect Tense tool that includes spelling and grammar checking
HTML or rich text formats
Bulk rewrite of articles via upload or API
Best For:
Those that need a way to rewrite a ton of content on a daily basis
Need content to pass Copyscape with ease
Article Forge users that want an AI rewriter tool that integrates with it
WordAi Pricing: Plans start at $57/mo with 50%+ discounts on annual plans
How to Ethically Use an AI Rewriter to Refresh Your Content
As mentioned, we don’t endorse plagiarism or taking low-quality content from an article spinner and simply copying and pasting it without proofing. However, there are ways to ethically use an AI rewriter to freshen and update your own written content.
For example, an AI rewriter can:
Improve the quality of your existing drafts by discovering new ways to articulate ideas and structure your content
Expand your content by adding relevant information that elaborates on your original statements and ideas
The best practices for you will depend on a handful of factors, including the type of content you want to create and the AI tool you’re using. For this post, we’ll use Jasper.
Using Jasper to Create New Content
First, you must sign up for a paid plan or a short free trial. Then, you can navigate to Templates from the dashboard to select the type of content you want to work on.
Let’s say you want to create a blog post on proper dog nutrition; we suggest working in small sections.
For instance, you can use the Paragraph Generator template in Jasper to create an introduction for your post:
Under What is your paragraph about?, fill in a brief description. This text will give the AI rewriter context. You can also add any keywords to incorporate and your preferred tone of voice.
When you’re done, click on Generate AI Content. By default, Jasper creates three outputs, which you can view in the window to the right:
You can also create a document from scratch. Navigate to Documents, then select New > Start from scratch:
As with the Paragraph Generator template, you can create a title, add a description, and select keywords:
After giving the AI rewriter a paragraph or two, click the Compose button. It will automatically begin writing fresh content:
You can use this content as the basis for your article. However, we recommend editing and proofreading it for flow, tone, etc. It’s also essential to ensure that there isn’t any repetition, which can often happen with an AI tool.
If you highlight any of the text, you’ll find a string of icons along the top of the editor toolbar:
In order of appearance, these features are Rephrase, Fix grammar, and Explain it to a 5th grader. You can also enable Grammarly or purchase the Plagiarism Checker addon.
Using Jasper to Rewrite Old Content
You can also use Jasper or other AI rewriters to update and refresh old content. The easiest way to do that is with the Content Improver template:
Copy and paste the original text in the Content field, select a tone of voice, then click the Generate All Content button. Your new versions will appear in the New outputs window:
Then you can use the icons along the top to Add to Favorites or Copy to Clipboard. These are just a few of the many different ways you can use AI rewriter tools.
Regardless of your chosen solution, we recommend getting to know the interface and various settings. Familiarizing yourself with the full suite of features and options will help you use the software to its full potential.
What’s the best AI Rewriter Tool?
Content is a significant part of online marketing. However, regularly churning out lengthy articles consistently can be challenging. Keeping your entire archive updated and fresh is even more so. Fortunately, you can use an AI rewriter tool to simplify, streamline, and enhance the process.
The hard part when considering an AI rewriter tool is whether or not you are using it ethically. Many websites do not; they steal content from someone else and plagiarise it using these tools. That content is not rewritten. It is stolen.
We highly recommend Jasper for your AI content rewriting needs. It also does an excellent job with new content creation, making it a flexible tool for you to have. For paraphrasing and summarizing already written content, it is hard to beat Quillbot. It’s simply one of the best. Its additional tools, like the citation generator and grammar checker, bring it over the top.
Do you have questions about using an AI rewriter for your site content? Let us know in the comments section below!
Frequently Asked Questions (FAQs)
Before we wrap up, let’s answer some of your most common questions regarding AI rewriter tools. Did we miss one? Leave a question below and we will respond!
What is the best AI rewriter tool?
Jasper is a reliable AI-powered rewriter tool that uses advanced natural language processing technology to rewrite text while maintaining its meaning and context. With a user-friendly interface and customizable settings, Jasper can help users generate unique and engaging content quickly and easily.
What is the best free AI rewriter tool?
Quillbot is a well-regarded free AI rewriter tool that uses natural language processing (NLP) and deep learning algorithms to suggest word choice and sentence structure. Its ability to rewrite sentences in multiple ways is a standout feature, and has a user-friendly interface.
Can AI tools be used for rewriting paragraphs?
Many AI rewriter tools, such as WordAI, use natural language processing (NLP) and machine learning algorithms to rewrite text at a paragraph level. These tools can produce unique, high-quality content that is grammatically correct and optimized for search engines.
What is the AI website that rewords text?
Quillbot is an online website that can reword and paraphrase inputted text. Write out your content, or copy it from your document and have Quillbot rework it for you. It also offers tools for checking for plagiarism and grammatical errors.
Which is the best AI paraphrasing tool?
The best AI paraphrasing tool available is Jasper AI. Employing sophisticated AI algorithms, it meticulously examines the text, comprehends its core meaning, and reconstructs it with original phrasing. Beyond simply paraphrasing content, Jasper AI is highly versatile, effortlessly generating content tailored to user prompts, significantly expanding its range of capabilities.
Can AI rewrite its own code?
AI can generate code through automated methods like genetic algorithms and neural networks, but it cannot modify its code autonomously. It requires human input and programming to make changes to its code. However, ongoing efforts exist to create AI systems to modify and improve their code. AutoGPT is an AI language model trained to generate code.
Can I rewrite long-form content with AI?
AI can generate long-form content through natural language generation (NLG) techniques but cannot rewrite existing long-form content autonomously. AI-based content generation tools can analyze and summarise existing content, but they need more creativity and context to rewrite it meaningfully and coherently.
What factors should I consider when choosing an AI rewriter tool?
When choosing an AI rewriter tool, consider factors such as the accuracy of the output, the ease of use, the supported file formats, the pricing and licensing terms, and the privacy and security of your data. Jasper is a reliable AI rewriter tool because it uses advanced natural language processing technology to rewrite text while maintaining its meaning and context. Its user-friendly interface and customizable settings allow users to generate unique and engaging content quickly and easily.
How much do AI rewriter tools cost?
The cost of AI rewriter tools varies depending on the tool and the pricing model. Some tools are free, while others charge a one-time, monthly, or annual subscription fee. The cost can range from a few dollars to hundreds, depending on the features and the tool’s intended use. Jasper, for example, starts at $29 per month.
Can AI tools be used for boosting SEO?
Chimp Rewriter can help boost SEO by producing unique and high-quality content optimized for search engines. It can automatically spin and rewrite articles to create multiple unique versions that can be used for link-building, content marketing, and other SEO strategies. Chimp Rewriter has a feature that analyses the keyword density of the rewritten text, helping users optimize their content for specific keywords.
Which AI tools can be used for spelling and grammar checking?
WordAI and Chimp Rewriter have built-in grammar and spell-checking capabilities that can help ensure the rewritten text is grammatically correct and error-free.
Which AI tools can be used to rewrite in multiple languages?
Many AI rewriter tools support multiple languages. Spinner Chief, for example, is an AI-powered tool that offers multi-language support, allowing users to rewrite content in various languages. With advanced natural language processing technology and customizable settings, Spinner Chief can generate high-quality content that accurately reflects the original content in multiple languages. Its performance and user reviews make it a valuable tool for businesses and individuals.
Starting a side hustle online can be a great way to boost your income and explore your passion. Plus, since you’ll only need your computer and a WiFi connection, you can do it from anywhere in the world. Still, you might not know how to get started.
Fortunately, there are tons of ways to make money blogging. For instance, you can display advertisements, become an affiliate marketer, or create a membership site.
In this post, we’ll take a closer look at the benefits of starting a blog. Then, we’ll show you how to do this and discuss five ways to monetize your site. Let’s jump right in!
Who Benefits From a Blog?
First, let’s look at some ways that businesses and individuals can benefit from starting a blog.
The Benefits of Blogging for Businesses
A blog is a great addition to any business because it gives you a platform to drive organic traffic to your website. Additionally, since you’re able to target different keywords in each post, you’ll have more opportunities to show up in search engine results.
What’s more, if you answer common questions in your posts, a blog is a quick way to establish your business as an industry leader. That way, readers can come to know you as the authority on a particular topic.
Lastly, starting a blog enables you to establish meaningful relationships with customers. For instance, you might use the platform to share company news, celebrate achievements, or offer a behind-the-scenes look into your business.
The Benefits of Blogging for Individuals
Businesses aren’t the only ones that can benefit from starting a blog. Blogs are also a great way for individuals to establish themselves as content creators or influencers.
That’s because starting a blog enables you to extend your social presence. For starters, you can share your content on different social networks to find new readers:
Eventually, you may want to monetize your blog and start a passive income business. A blog is a great way to support this venture since posts can be discovered long after you publish them. Therefore, you can continue to get views, leads, and revenue.
How to Start a Blog
Now that you know the benefits of blogging, let’s take a look at how to get started.
1. Choose a Niche
The success of your blog can depend largely on choosing the right niche. A niche will determine the type of content you’ll create and the audience you’ll serve.
Therefore, it’s a good idea to avoid saturated niches like fashion, beauty, and fitness. Choosing a more specific niche will make it easier to set your blog apart from the others.
For example, if you want to start a food blog, you might narrow it down to gluten-free baking or family meals:
Once you’ve settled on a niche, you can check whether this type of content is in demand by using Google Keyword Planner:
This enables you to see the popularity of certain keywords and search terms that people are using to find content online.
Typically, it’s best to choose search terms and topics with enough interest. However, you might want to avoid topics that are very popular since they may be difficult to rank for.
2. Install WordPress
WordPress is a free, open-source platform where you can create and publish content. It supports tons of different types of content like pages, blog posts, and digital files. Plus, it’s easy to add videos and images to your blog to make your material more engaging:
What’s more, you can use WordPress themes to get your site looking exactly the way you want. And, you can use plugins to expand the functionality of your site.
If you have some technical knowledge, you might prefer to download WordPress yourself. Otherwise, you can find tons of quality web hosts that include WordPress installations as part of their services.
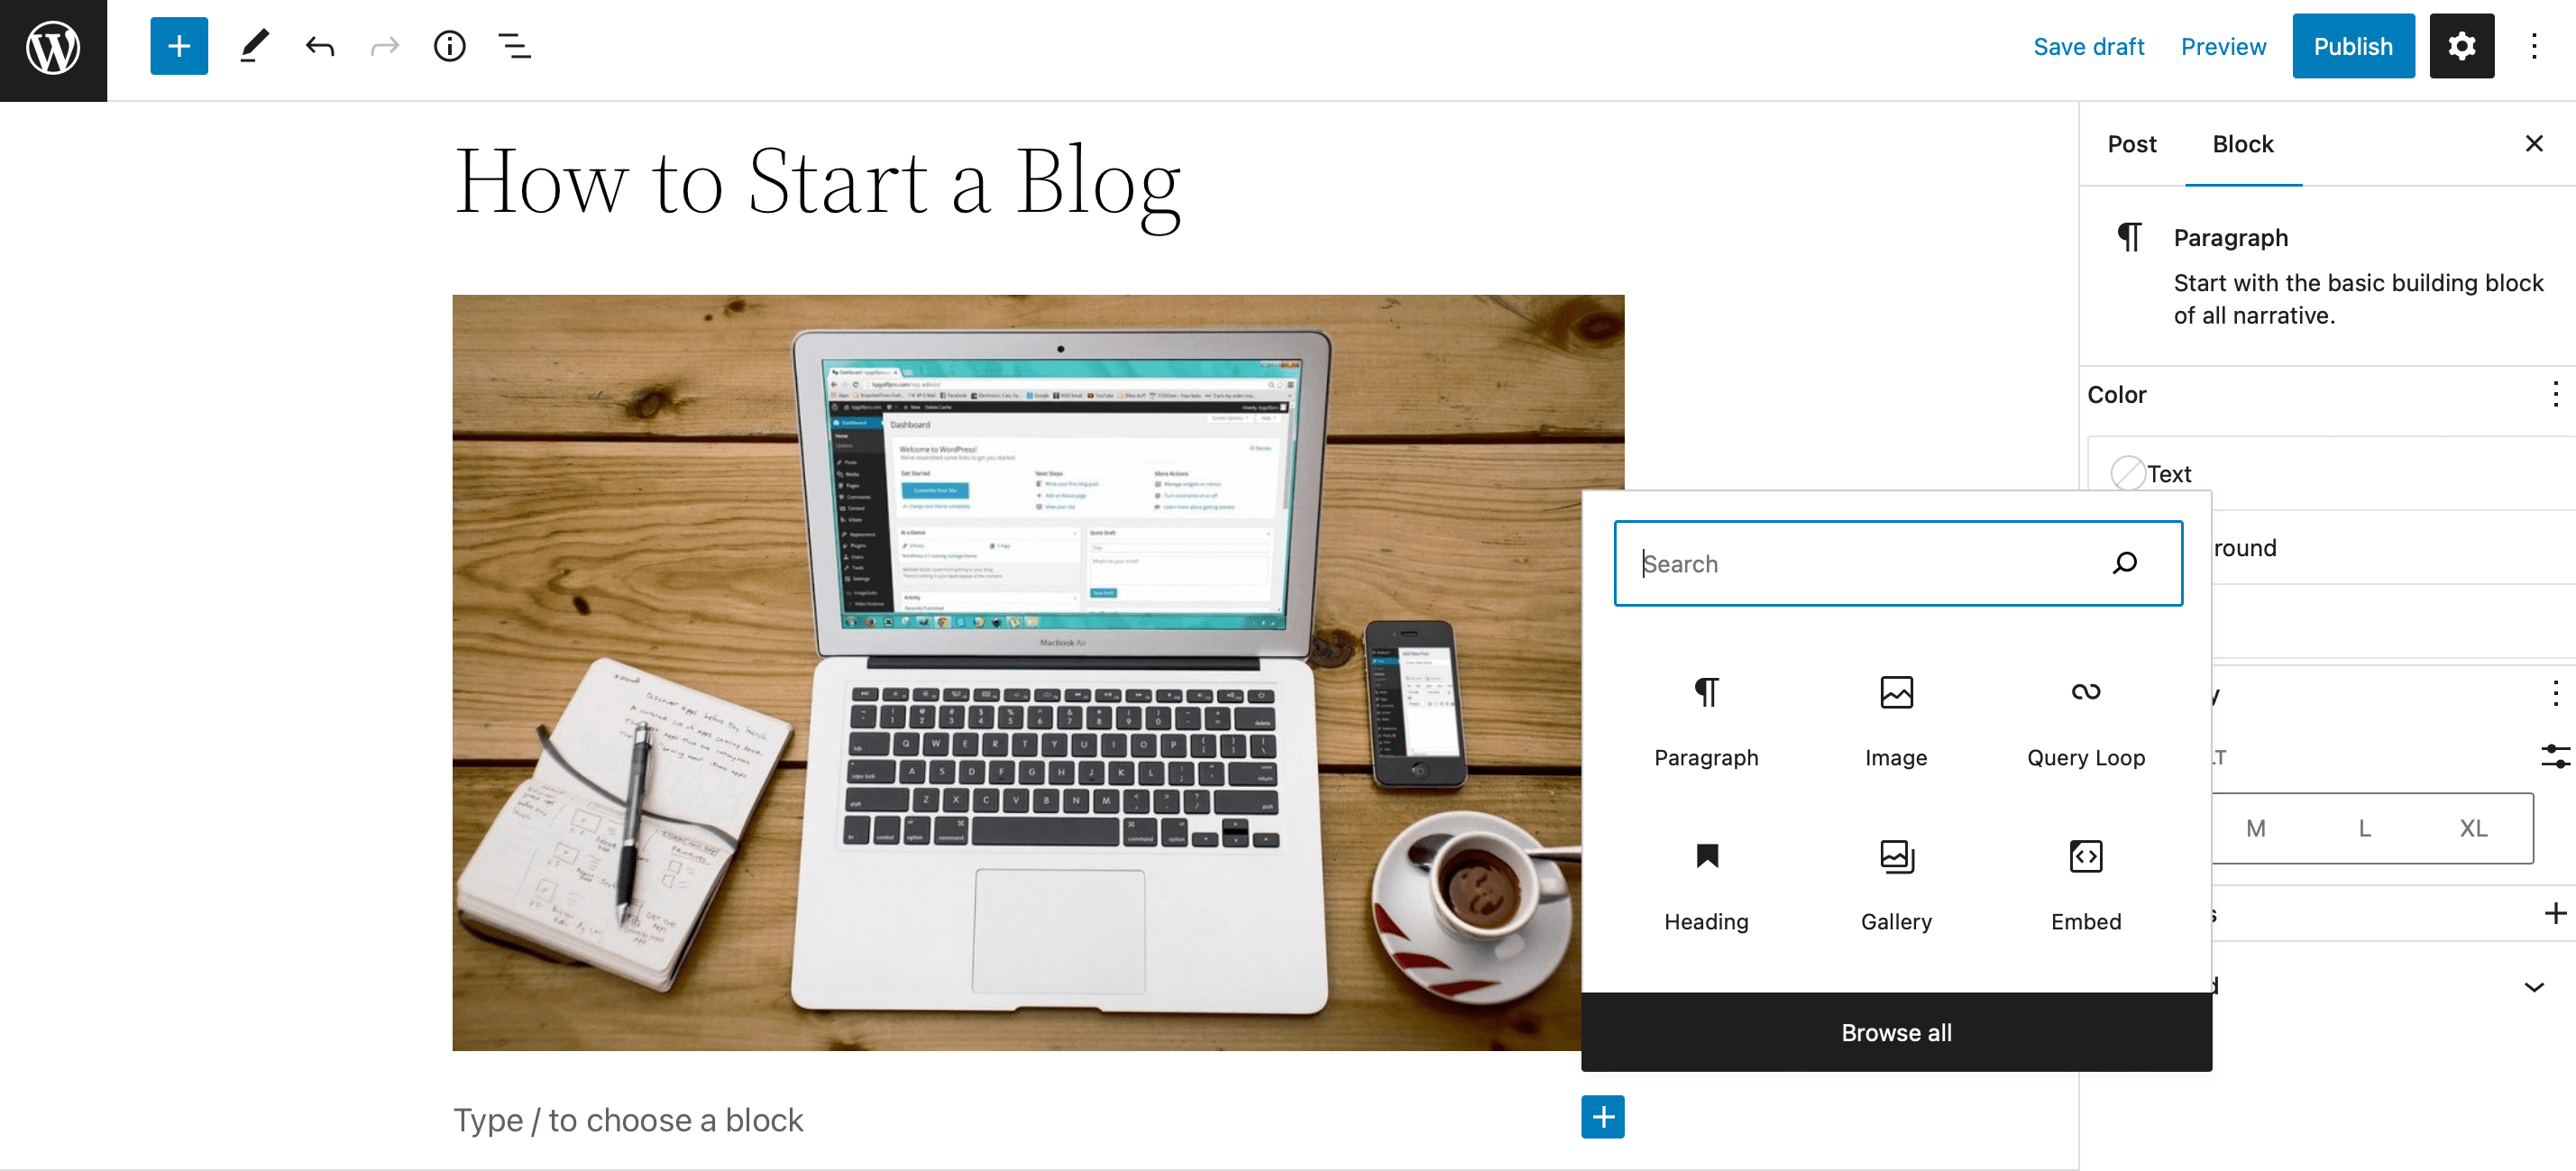
3. Write Your First Post
At this point, you’re ready to start publishing content. With WordPress, you can create your first post directly within the editor. Simply click on the + to add WordPress blocks for text, headings, images, and more:
To increase your visibility online, it’s a good idea to populate your content with keywords. You can find the right keywords for your blog using Google Keyword Planner. Then, you’re able to add these terms to text areas like headings, permalinks, and meta descriptions.
If you’re happy with your post, click on Publish. Or, you can hit Save draft to finish it later.
How to Make Money From Your Blog (5 Ways)
Once you’re posting consistently and you’ve acquired an audience, it might be a good idea to monetize your blog. Here are five ways to get started.
1. Become an Affiliate Marketer
One of the best ways to monetize your blog is with affiliate marketing. This is a great way to earn a passive income. It’s also well suited to blogging because you’ll find plenty of opportunities to include affiliate links in your content.
Affiliate marketing involves partnering with brands or individuals that occupy the same niche or share a similar target audience. For instance, one of the most popular affiliate programs is Amazon Associates which enables you to earn a 10 percent commission on qualifying purchases:
Once you’ve been accepted into your preferred affiliate program, you’ll be given a unique affiliate link to place on your website. This link may lead to the company’s site or to a specific product that they want you to promote.
Typically, if someone clicks your link and then makes a purchase, you’ll earn a commission from the sale. Although, some brands will pay you simply for directing traffic to their pages.
2. Create a Membership Site
A membership website is a great way to monetize your blog. It also enables you to build a community of like-minded people. There are different ways you can execute this strategy.
First, you can make some of your content accessible to visitors and then save your best pieces for members. In this case, users will need to purchase a membership on your site to read your premium posts:
To get started, you’ll need to use a plugin like MemberPress. This enables you to set up multiple membership options. Then, you can use the plugin to protect your premium content with membership rules.
3. Display Advertisements
Advertisements are an easy way to monetize your site since they don’t interfere with your content. However, it’s important to be aware that ads can disrupt the User Experience (UX).
You can sell your ad space directly which gives you more control over the companies you work with. For instance, you’ll be able to set your own rate and determine the position of ads on your pages. But, you’ll need to be comfortable handling negotiations yourself.
If you don’t want the responsibility of finding advertisers, you can sell ads using Google AdSense:
Google AdSense is an ad network that matches advertisers with businesses selling ad space on their websites. It enables you to present more user-friendly ads that are tailored to your visitors.
Every time a user clicks on your ad, you’ll get a percentage of whatever the company pays Google. While this method is much easier, you’ll have to split the revenue with the network.
4. Sell Physical or Digital Products
If you run a business, you might already have physical products to sell. On the other hand, you might be able to make physical products such as personalized items that you see on marketplaces like Etsy.
In this case, you can use a plugin like WooCommerce to transform your blog into an online store:
Then, you can add a payment gateway to your site to accept and authorize payments.
Alternatively, if you don’t want to concern yourself with inventory space or shipping costs, you can always sell digital products. Easy Digital Downloads is a great tool for the job:
For example, you can sell photographs, prints, guides, eBooks, and more.
Then, your blog can function as the perfect platform to promote these products. You can do this directly, by creating fresh posts for new product launches. Or, you can write tutorials, product reviews, or roundups that highlight your items.
5. Accept Donations
The easiest way to make money blogging is to simply ask readers for donations. You might feel uncomfortable doing this at first, but if you’re offering enough value, some visitors will be happy to contribute.
You may not earn lots of revenue this way. However, as a new blogger, it could be enough to cover basic costs like hosting, themes, and plugins.
To get started, you can launch a crowdfunding campaign with a platform like JustGiving:
Alternatively, you can collect donations using a plugin like GiveWP.
It’s also a good idea to maintain transparency when asking readers to make payments. Therefore, you’ll want to tell readers what the money is going towards.
Conclusion
Starting a blog is a great way to generate a passive income so that you can make money even as you sleep. Better yet, there are plenty of accessible and beginner-friendly monetization options.
To recap, here are five ways to make money blogging:
Become an affiliate marketer
Create a membership site
Display advertisements
Sell physical or digital products
Accept donations
Do you have any questions about how to make money from your blog? Let us know in the comments section below!
If you’re launching a business website or looking for a hosting provider, chances are you’ve run into Secure Sockets Layer (SSL) certificates. These certificates use encryption to help secure websites. However, you might be wondering how much it’s going to cost you and if you should even invest in one.
Fortunately, there are trusted Certificate Authorities (CA) that offer both free and premium SSL solutions. Even better, some quality web hosting providers will manage your SSL certificate for you.
In this post, we’ll explain how SSL certificates work. Then, we’ll look at the cost of different SSL certificates offered by some of the top providers. Finally, we’ll show you how to install an SSL certificate. Let’s begin!
What Is an SSL Certificate?
SSL stands for Secure Sockets Layer. This is an internet protocol that encrypts and authenticates data as it travels between a network, browser, and user. This process provides an added layer of security.
Today, you’ll often see the use of the Transport Layer Security (TLS) protocol instead. In fact, the terms SSL and TLS are sometimes used interchangeably. That’s because TLS is just a new and improved version of SSL.
Not using an SSL/TLS certificate on your site can pose several risks to your business, including:
Non-compliance. Many websites manage delicate user data. In certain industries, online privacy laws make SSL/TLS certificates a legal requirement. For instance, the Health Insurance Portability and Accountability Act (HIPPA) and the Payment Card Industry Data Security Standard (PCI DSS) require them.
Losing visitors. While not all websites are required to use an SSL/TLS certificate, some browsers will display a warning to users if your site lacks this added layer of security. This notification usually tells visitors that your site might be dangerous, and if they decide to visit it, their information may be at risk. This could scare off lots of visitors and negatively impact your business.
Increased cyber attacks. As we discussed, SSL certificates provide extra security by using encryption. If hackers try to intercept your users’ data (or your own), this could have lots of repercussions.
Now that you know how the SSL/TLS protocols work and how they can benefit you, you’re probably wondering how much a certificate costs. In this section, we’ll check out the prices for some of the best SSL certificate providers, also called Certificate Authorities (CA). We’ll also look at the prices for popular types of SSL certificates.
Digicert is a highly-respected digital security company that provides solutions for developers, eCommerce websites, and more. SSL/TLS certificates are just one sub-section of its vast offerings.
Single: Starting at $289 per year – Basic SSL plan
Single + Wildcard: Starting at $484 per year – Secure Site SSL plan
Multidomain: Custom pricing to be calculated at checkout
It’s important to note that the Basic SSL plan can be made a ‘wildcard’ to accommodate subdomains. Additionally, for each of these plans, you can customize the type of validation your certificate uses. Depending on your selection, your plan could cost more. However, if you decide to purchase multiple years at a time, you’ll pay less in the long run.
Entrust is another popular choice when it comes to online security. It offers hardware security, electronic signing services, cloud security, and much more.
Single: Starting at $219 per year – Standard Plus OV plan
Single + Wildcard: Starting at $799 per year – Wildcard OV SSL plan
Multidomain: Starting at $429 per year – Multidomain EV SSL plan (two domains)
If you’re interested in Entrust’s multidomain plan, but you’d like more than two, you can add additional domains for $159 each per year. Similar to other CAs, you’ll save money when you purchase multiple years at a time. In this case, the standard plan does not support wildcards.
Sectigo, formerly known as Comodo SSL, is another solid option when it comes to TLS/SSL certificates. The Sectigo Store offers certificates from a variety of different brands, but let’s look at the Sectigo brand options:
Single: Starting at $74 per year – Sectigo SSL Certificate (DV) plan
Single + Wildcard: Starting at $249 per year – Sectigo SSL Wildcard Certificate (DV) plan
Multidomain: Starting at $159 per year – Sectigo Multi-Domain/UCC SSL Certificate (three domains)
As you can see, Sectigo has some of the most affordable plans on the market. Still, there’s plenty of room for customization and upgrades if you need them.
So far, we’ve looked at premium Certificate Authorities (CAs). However, it’s also possible to get an SSL certificate for free. This may be a good option if you need one for a personal website or a small online store.
Let’s Encrypt offers single TLS certificates with Domain Validation (DV). This CA has changed the SSL landscape for the better. In fact, some hosting providers include a Let’s Encrypt certificate in their plans.
Why Should You Pay for an SSL Certificate?
SSL certificates can be expensive, so you might be wondering if you should pay for one. The good news is that you might not need to.
If you have a managed WordPress hosting solution from a quality provider, such as WP Engine, an SSL certificate may be included in your plan:
In fact, some web hosts, including WP Engine, offer both free and premium TLS certificate options. What’s more, if you opt to purchase an SSL/TLS certificate with your hosting provider, you can usually enable it in a few clicks. Your web host will handle the rest.
However, there are some cases in which you may want to purchase an SSL certificate directly from a CA. Primarily, you might want more customization options or added validation.
When you purchase an SSL certificate, you’ll need to verify that you own the domain you want to associate with it. There are three types of validation:
Domain Validation (DV). This is the lowest form of verification. It can usually be completed via email within a few hours.
Organizational Validation (OV). This involves the CA getting in touch with the organization requesting the certificate. It can take a few days and is more secure than DV.
Extended Validation (EV). This is the most rigorous form of validation. The CA also has to confirm that the business requesting the certificate is legitimate. This can take days or even weeks.
In a nutshell, you may want to pay for an SSL certificate if you run a larger eCommerce business or enterprise. This way, you can select a plan with the most secure validation. You’ll likely also have access to additional upgrades to further secure your site.
How to Install an SSL Certificate on a WordPress Site
With managed WordPress hosting, you can likely reach out to your provider and ask them to install a free or premium SSL certificate (if they haven’t already). Alternatively, you may be able to consult your web host’s documentation to find out how to do this yourself.
However, if you’ve determined that you don’t need to pay for an SSL certificate, but your web host doesn’t include this service, you’ll need to add a free one yourself.
Without a WordPress plugin, installing an SSL certificate can be complicated. Therefore, we recommend using Really Simple SSL:
This free plugin uses a free TLS certificate provided by Let’s Encrypt. To install it, simply go to your WordPress dashboard and navigate to Plugins > Add New. Then, search for Really Simple SSL:
Click on Install Now followed by Activate. Once the plugin is active, it should automatically launch the Let’s Encrypt Wizard.
Simply follow the prompts to complete the setup. You’ll have to provide your domain and email as well as some basic information about your web host, including the credentials to access your control panel.
Without experience in web security, determining the appropriate cost of an SSL certificate may seem daunting, especially if you’re on a budget. However, this is an essential safety precaution that you wouldn’t want to skip. The good news is that there are both free and premium options to choose from.
If you’re running a relatively simple website and you handle minimal user data, you can use a free SSL certificate from Let’s Encrypt. This might even be included with your hosting plan. Meanwhile, higher-risk sites may want to pay for a premium SSL certificate from a service like Sectigo or DigiCert. These plans can range from around $70 to as much as $800 per year.
Do you have any questions about the cost of an SSL certificate? Let us know in the comments section below!
Translating a website is not a small task. Depending on the size of the site, the process can take anywhere from hours to weeks or even months. That’s without factoring in the technical aspects of translation, such as how to guide users to translated pages.
Fortunately, with WordPress, translating websites is much simpler from a technical standpoint. That’s because translation plugins for WordPress enable you to easily create new versions of your site in other languages. Plus, most plugins will take care of technical elements like language switchers.
In this article, we’ll discuss how translation plugins work and why you should use one. Then, we’ll introduce you to five of the best (and latest) translation plugins for WordPress. Let’s get to it!
What Is a Translation Plugin?
A WordPress translation plugin is an extension that helps you create a multilingual website by translating your content into different languages. These plugins can drastically simplify the process of translating your material. Many offer automatic translation, manual translation, or a combination of both.
If you’re not sure what the difference is between manual and automatic translation, here’s a quick breakdown of how each method works:
Manual translation. Some plugins allow you to manually translate your content by creating separate posts, pages, or custom post types for each language. This method gives you greater control over translations and usually results in higher-quality translations (since they are done by humans). However, manual translations can be time-consuming and may require hiring professional translators.
Automatic translation. Some translation plugins connect your site to machine translation engines such as Google Translate or Microsoft Azure Translator. These plugins detect your website’s content and automatically translate it into the languages you select. While automatic translations are quick and easy, they may not always be accurate or convey the intended meaning.
Combination of manual and automatic translation. With some plugins, you can leverage a combination of both manual and automatic translations. This approach allows you to use machine translations as a starting point and then manually edit and refine them as needed.
Your choice of WordPress translation plugin will likely come down to two factors. These are the type of translation you want to use and the user experience you’re looking for. Now, let’s discuss why you may want to use a translation plugin for WordPress.
Why Sites Use Translation Plugins
The primary goal of using a translation plugin is to make your site available in other languages. Generally speaking, this makes it more accessible and allows you to reach a larger audience. Using a WordPress translation plugin comes with its own set of benefits, including:
Improving the user experience. Offering content in a user’s native language significantly enhances their browsing experience. This can lead to better engagement and increased trust in your website.
It’s cost-effective. Compared to building a separate website for each language or hiring professional translators for each piece of content, using a translation plugin is often more cost-effective and time-efficient.
Access to language switchers. Most translation plugins include a language switcher feature. This makes it simple for users to toggle between languages on your website.
You don’t need to use a plugin to translate your WordPress website. However, using one can certainly help streamline this process. Even if you have the budget to pay for a developer and translators, a plugin still may be worth it – for simplicity’s sake.
5 Cutting Edge Translation Plugins for Your WordPress Site
Next, we’re going to discuss some of the best and latest WordPress translation plugins. We’ll tell you what makes each plugin unique. This way, you can get a sense of which option is the best fit for your website.
First, let’s discuss Translate WordPress with GTranslate. This is a popular WordPress plugin that uses Google Translate to automatically translate your website content into multiple languages. It offers a customizable language switcher which can be added as a widget, shortcode, or menu item.
The plugin has both free and premium versions, with the paid option offering additional features. For instance, the paid plugin includes neural machine translations, search engine indexing, manual translation editing, and URL translation.
Keep in mind that this version doesn’t come with a yearly license (as most premium WordPress plugins do). Instead, you’ll need to pay for a monthly subscription to use the plugin’s premium version.
Pricing: Translate WordPress with GTranslate is free. However, you can get the premium version with advanced features starting at $9.99 per month.
TranslatePress is a user-friendly WordPress translation plugin that enables you to create a multilingual website with ease. One of its main selling points is the ability to translate content directly from the front end. Plus, it uses a visual translation interface, allowing you to see changes in real-time.
The plugin supports both manual and automatic translating, integrating with Google Translate for machine translations. Furthermore, TranslatePress is compatible with various themes and plugins, including certain page builders and WooCommerce. This helps ensure seamless integration with your website.
Additionally, with TranslatePress, you get access to SEO-friendly features. You’ll be able to translate metadata, URLs, and create separate sitemaps for each language. With the free version, you can translate your website into one additional language. Meanwhile, the premium version offers support for unlimited languages and additional features like translator accounts and automatic user language detection.
Pricing: TranslatePress offers both free and premium versions. Prices for paid plans are only listed in euros on the company’s site and start at €7.99 per month ($8.50 USD at the time of writing).
WPML (WordPress Multilingual Plugin) is a powerful and widely-used WordPress plugin for creating and managing multilingual websites. Its main selling points include support for manual translations and integration with professional translation services.
Additionally, the plugin offers advanced translation management, allowing you to assign translation roles and track translation progress. What’s more, it provides extensive translation options, supporting the translation of custom post types, custom fields, widgets, and menus.
WPML is also SEO-friendly, enabling the translation of metadata, permalinks, etc. It also generates language-specific sitemaps. Even better, the WPML plugin offers a user-friendly interface and a dedicated support team to ensure a smooth user experience.
This WordPress translation plugin doesn’t offer a free version. Still, its features and compatibility make it a popular choice for those looking to create a professional, multilingual website with high-quality translations.
MultilingualPress is a unique WordPress translation plugin that leverages the WordPress Multisite feature to create separate sites for each language. This option enables you to manage translations independently for each site, gain greater control over the translation process, and avoid any performance loss.
By creating separate sites, MultilingualPress ensures that each language version functions independently, reducing the risk of compatibility issues with themes and plugins. The plugin also supports automatic hreflang tags, which improves SEO by informing search engines about the available language versions of a page.
MultilingualPress offers a user-friendly interface for connecting translated content across sites. This makes it easy to manage and navigate your multilingual website. The plugin may require more initial setup due to the WordPress Multisite configuration. However, its unique approach to handling translations offers a flexible and efficient solution.
Pricing: MultilingualPress licenses start at $99 per year.
Last but not least, let’s discuss Google Website Translator. This WordPress plugin utilizes Google Translate’s machine translation service to instantly translate your website content into multiple languages. Its main selling points include ease of use, quick setup, and broad language support.
Additionally, the plugin offers a customizable language switcher, allowing users to choose their preferred language from a dropdown menu or widget, which can be placed anywhere on the site. It also supports inline language switchers, enabling language selection within the content itself.
Another key feature of the Google Website Translator plugin is its ability to preserve the original formatting and layout of your website during translation. This helps provide a consistent user experience across different languages.
Keep in mind that the plugin relies solely on machine translations. If you want to edit translations, you’ll need to pay for a premium license.
Translating a website takes a lot of work. However, if you’re a WordPress user, you get access to plugins that can simplify this process. Some plugins make it easier to translate content manually. Other options leverage automatic machine translations. Meanwhile, some tools combine both approaches.
What approach you choose to use will depend on the languages you want to target and whether you want to review translations manually. With that in mind, here are our top plugin suggestions:
TranslatePress: This solution supports both manual and automatic translations, and it works seamlessly with WooCommerce.
WPML: With this plugin, you can get access to professional translators and assign team members specific tasks. It’s the perfect tool for translating a website as part of a team.
MultilingualPress: This plugin lets you leverage WordPress Multisite to set up multiple independent sites in different languages.
Google Website Translator: You can use this plugin to translate your site using Google Translate. It’s a great option if you’re prioritizing speed.
Do you have any questions about translation plugins for WordPress? Let’s talk about them in the comments section below!
There’s no shortage of managed WordPress hosting companies on the market. However, features and prices vary significantly from one web host to another. If you haven’t used managed hosting before, it can be hard to determine which companies offer the best services for your money.
In this post, we’ll introduce you to some of the best managed WordPress hosting companies. We’ll discuss the features they offer, their prices, and why you should consider using each host. Let’s get to it!
What is Managed WordPress Hosting?
Before we get to business, let’s briefly recap what managed WordPress hosting is. Managed hosting plans offer in-house services to maintain, optimize and secure your website for better performance.
With most managed hosting plans, you get access to features such as:
Those are just some of the features that most managed WordPress web hosts offer. Some companies might provide you with more advanced functionality and performance, usually at higher prices.
Overall, managed WordPress hosting focuses on giving you the best possible performance for the CMS (content management system). If you’re a WordPress enthusiast, you can optimize and maintain your websites yourself on any sort of host out there. However, managed plans take care of most maintenance and security tasks and let you focus on growing your site.
7 Best Managed WordPress Hosting Companies
This section will introduce you to the best managed WordPress hosting companies on the market. We’ll evaluate each company according to its performance, features, and price. We’ll break down what makes each web host unique and who should consider using it!
1. SiteGround
SiteGround is well-known for offering some of the cheapest managed WordPress hosting plans. It has packages starting at $3.99 per month, drastically lower than what most competitors offer.
Although SiteGround tends to score well in performance, it has mixed reviews for WordPress support. If you can look past that or have experience fixing issues with WordPress, SiteGround offers an impressive list of features for its price point.
SiteGround is another one of the web hosts that we recommend for Divi users. That means you can sign up for a plan and launch WordPress websites with Divi pre-installed.
Key Features for SiteGround:
Base plans start with 10 GB of storage space and unmetered* traffic
*We do want to note that there’s usually no such thing as unmetered traffic. There are always bandwidth restrictions (even if they’re not explicitly laid out).
SiteGround is for you if…
You want to test what a managed WordPress hosting service can offer before committing to a lengthy contract.
You’re on a budget.
You’re comfortable troubleshooting WordPress issues on your own.
Flywheel offers several types of WordPress plans, including managed options. With Flywheel, you can choose from various packages geared toward personal projects, business websites, and web development/design agencies.
One of Flywheel’s key selling points is its fantastic hosting control panel. In our experience, the Flywheel admin dashboard is one of the most user-friendly options available. That feature can be handy if you manage a large number of sites.
When it comes to agencies, Flywheel offers intuitive tools for handing off websites and billing clients directly for hosting. You can even create WordPress “blueprints,” which are backups for spinning up new websites.
Flywheel is one of the web hosts we recommend for Divi users. With Flywheel, you can launch new WordPress sites with Divi pre-installed and connected to your Elegant Themes account. That way, you can get right to work on building your next website.
Flywheel also offers one of the best local WordPress development tools. Local by Flywheel is free to use, and it can connect with your Flywheel account (if you have one).
Key Features for Flywheel:
Base plans start with 5 GB of storage and 20 GB of bandwidth
One of the biggest challenges of using Virtual Private Servers (VPSs) is that, usually, they’re not very user-friendly. Configuring a VPS can be challenging if you don’t have server management experience. That applies even to providers that offer one-click setup options for WordPress and other software.
With a Cloudways plan, you get expert WordPress support, automatic backups, easy scaling options, and server optimization. Plus, you won’t have to interact with VPSs using the command line since Cloudways offers a user-friendly hosting control panel.
If you want to use Divi with Cloudways hosting, you can easily. Our partnership with Cloudways means that you can create WordPress websites with Divi in a matter of minutes.
Key Features for Cloudways:
Base specifications vary depending on which cloud provider you use
Automated backups
Custom caching configuration
Staging functionality
Team management tools
Application monitoring
CDN add-on available
Free migrations
Cloudways is for you if…
You like the fantastic performance that VPSs offer but are not comfortable with server management.
You’re on a budget.
You value high performance.
Price:Cloudway prices vary depending on which VPS provider you use alongside the platform. For Digital Ocean, Linode, and Vultr, you have plans starting at $12-13 per month that offer 1 GB of RAM, 1 core CPU, 32 GB of storage, and 1 TB of bandwidth.
If you want an AWS or Google Cloud server, base prices rise to around $33-36 per month for roughly double the resources (2 GB of ram, 1 core CPU, 20 GB of storage, and 2 GB of bandwidth).
Pressable is run by Automattic, the same company behind WordPress. It’s worth noting Pressable isn’t the only WordPress hosting venture by Automattic, as the company also created WordPress VIP.
With Pressable, you can host your WordPress website on the same servers that support WordPress.com. That means you get access to top-of-the-line performance without the limitations of using self-hosted WordPress.
On top of all the perks that managed web hosts usually offer, most Pressable plans come with a premium Jetpack license. That means you’ll get automated plugin updates, malware scans, backups powered by VaultPress, and more.
Pressable is a Divi partner. That means you can launch WordPress websites with Divi pre-installed, and you get discounts if you sign up through our Pressable partner page.
Key Features for Pressable:Â
Base plans start with 5 GB of storage and support for 5,000 visitors
Free Jetpack premium license (starting with the Personal plan)
WP Engine isn’t only the most popular managed WordPress hosting platform globally. It also owns Flywheel. Whereas Flywheel is geared toward agencies and personal projects, WP Engine focuses on medium and large business solutions.
With WP Engine, you’ll get some of the best WordPress performance that you can find. The platform also offers many plans, with regular and “plus” managed hosting categories. WP Engine also provides “security-enhanced” and e-commerce-managed plans.
One downside to WP Engine is that its plan selection can be confusing. However, picking the right WP Engine subscription shouldn’t be a problem with the proper guidance.
Key Features for WP Engine:
Base plans offer 10 GB of storage and 50 GB of bandwidth
Custom caching configuration
Free CDN integration
Free migrations
Daily backups
Free SSL certificates
Staging functionality
Automated plugin updates*
Automatic roll-backs if the platform detects security issues*
*These features are only available with the Managed Hosting Plus and Secure Hosting tiers.
WP Engine is for you if…
You plan to host multiple WordPress websites.
You have a larger budget.
Your business is medium to large.
Price: If you look at WP Engine’s plans, you’ll notice they’re divided into four categories. Starting at $20 per month, the base managed hosting plans don’t offer the functionality we like to see in a provider at this price point.
Kinsta is a managed WordPress web host that uses the Google Cloud infrastructure for client websites. With Kinsta, you get access to some of the best-managed hosting performance on the market.
One of the most significant selling points of using Kinsta is that every plan can access the same features. You get all of the perks of managed WordPress hosting and integration with Cloudflare Enterprise. Kinsta also offers its own local WordPress development tool, called DevKinsta.
Kinsta’s prices are on the expensive end. The web host offers a “budget” option for personal and small business sites. However, most of Kinsta’s plans are geared toward enterprises, and they offer ten different tiers and custom options.
Key Features for Kinsta:
Base plan offers 10 GB of storage and support for 25,000 visits
Free integration with Cloudflare Enterprise CDN
SSL setup
Staging functionality
Free migrations
Automatic daily backups
Malware removal
White-labeled caching plugin
Kinsta is for you if…
You plan to host multiple WordPress websites.
Your budget is larger.
You run a large business or enterprise.
Price: Kinsta’s Starter plan costs $30 per month. If you plan on hosting a single website, there are far cheaper options available that offer similar features and performance.
WPX is a managed WordPress hosting provider known for its exceptional speed and reliability. The company offers a range of plans tailored to different needs, including shared and dedicated hosting options.
One of the standout features of WPX is its lightning-fast load times, thanks in part to its use of the latest hardware and software technologies. The platform also includes free CDN integration and custom caching configuration, which further boosts website speed and performance.
WPX offers several hosting plans to choose from, with the most affordable starting at $20.83 per month. Despite its low cost, this plan includes unlimited storage and bandwidth, making it a great option for small to medium-sized websites.
One potential downside of WPX is that it does not offer a separate e-commerce hosting plan, so businesses with online stores may need to look elsewhere.
Key Features for WPX:
Fast and reliable WordPress hosting
Great support, 99% of chat requests are answered within one minute
Free website migration
Lightning-fast CDN
WPX is for you if…
You need a fast and reliable WordPress hosting provider for your website.
You want a provider that offers easy website migrations and backups.
You have a budget that can accommodate a slightly higher price point for premium features and excellent customer support.
Comparing Our Top 3 Picks for Managed WordPress Hosting
Picking a web host isn’t easy. Hosting providers constantly try to outdo each other with prices and promises. With managed WordPress hosting, you have many options, all claiming to offer the best performance on the market. Let’s compare our 3 top picks below.
Whether you choose SiteGround, Flywheel, or Cloudways, chances are high that you’ll enjoy their hosting environment. In the end, it comes down to what your specific criteria are and how your budget aligns with those criteria.
Final Thoughts on the Best Managed WordPress Hosting
If you’re having a hard time choosing between the best managed WordPress hosting options, here are our thoughts on the top six providers:
Flywheel:Â This is a fantastic web host if you’re a solo developer or a WordPress agency.
SiteGround:Â With SiteGround, you get some of the cheapest managed WordPress hosting plans on the market.
Pressable:Â With Pressable, you can host your site on WordPress.com servers and take advantage of managed functionality.
Cloudways:Â If you want to use a VPS with managed hosting functionality, Cloudways enables you to choose from the best providers.
WP Engine:Â With WP Engine, you get top-of-the-line performance and features, but it’s not a cheap option.
Kinsta: This web host offers some of the best performance on the market and a sizable collection of enterprise plans.
WPX: WPX is an excellent choice if you prioritize website speed and uptime. Their plans are affordable and come with top-notch customer support.
More Hosting Reviews
While those are our top picks, we have reviewed several other managed WordPress hosting companies as well. If you would like to learn more about other hosting companies, take a look at the following reviews.
HostGator WordPress Hosting Review – HostGator’s biggest edge is its pricing. Their WordPress hosting is very affordable, but that affordability comes with some tradeoffs.
Bluehost WordPress Hosting Review –Â Bluehost is a staple of the WordPress community and is very active within the ecosystem. Their hosting panel is easy to use, but from our experience, their hosting performance doesn’t match up to our top hosting picks.
GoDaddy WordPress Hosting Review – GoDaddy’s hosting quality seems to vary. It has gotten better over the years and the company continues to double-down on the WordPress ecosystem. They are building back their reputation.
WooCommerce is a user-friendly e-commerce tool, but setting up product pages isn’t enough to boost sales. To maximize conversions, store optimization is essential. Here are five simple ways to achieve this.
If you don’t find ways to optimize your workflow, your web development projects could suffer. You may end up facing unexpected delays or poor results. Essentially, without the right project management software, you’ll likely struggle to effectively schedule tasks or communicate with your team.
Fortunately, you can easily find project management tools designed specifically for development. Options like Wrike, Monday.com, and Zoho Projects can help you centralize team-wide communication and streamline your development projects.
In this post, we’ll discuss the benefits of using project management software. Then, we’ll show you three of the best options for developers. Let’s get started!
The Benefits of Using Project Management Software
As a developer, you might rely on your technical skills to succeed in your profession. However, it’s important to stay organized as well. That’s where project management tools come in.
Put simply, project management software helps track, organize, and execute professional work projects. In this type of workspace, teams can collaborate on tasks and execute work more efficiently.
As a result, you can optimize your workflow and complete projects faster (and better). That means you’ll likely be able to increase your client base.
One of the key benefits of using project management software is its communication channels. Instead of relying on multiple third-party tools, your entire team can discuss projects in one place. This can help you clearly establish your project expectations and increase transparency.
Whether you’re a part of a freelance development team or an agency, you can benefit from a project management tool. Here are some features developers should look for:
Project planning
Task management
File sharing
Invoicing
Bug and error tracking
Time tracking
Analytics
Keep in mind that each developer and team will have a unique set of needs, but these are just the essentials you’ll probably want to look for. Crucially, your project management tool should give you access to organized records of your work. So, when you need to refer to a previous task, you can easily browse through stored information.
3 Best Project Management Tools for Developers
Now that you’re familiar with project management software for developers, let’s discuss some of the best options available. This way, you can make an informed decision, and start optimizing your projects!
One of the best project management tools for developers is Wrike. It is used by over 20,000 organizations, including Google and Lyft. Wrike’s universal work management process includes everything you need to create and structure development tasks.
What’s more, with Wrike, you can use pre-built templates to instantly add work requests, weekly to-do lists, project risk analyses, and much more. Then, Wrike enables you to structure work with Gantt charts and calendar views.
Furthermore, as you develop your projects, you’ll receive real-time reports that help keep track of your budget, resources, and digital performance. Plus, Wrike will secure your workspace with Single Sign On (SSO) and Two-Factor Authentication (2FA).
Key features:
Shared team calendars
Visual workload views
Instant file access
Cross-channel insights
Real-time reports
Integrates with Bitbucket, MySQL, and other developer tools
Pricing: Wrike has a completely free starter plan that supports task management, custom work views, and email integrations. If you’d like to create unlimited projects with custom workflows, the premium subscriptions start at $9.80 per user every month.
Next up on our list is – Monday.com. This is a versatile project management software well-suited for marketing, sales, and development teams. No matter your goals, Monday.com can help you centralize projects all in one place. Using visual boards, views, and dashboards, this software makes it easy to manage and customize your work.
In addition to basic project management, Monday.com has features for developers. For example, it enables you to create a visual timeline for product development projects. Then, you can plan sprints to streamline changes using Monday.com’s scrum framework.
Key features:
Calendar, timeline, and chart views
200+ templates
Bug tracking
Backlogs
Product roadmaps
Integrates with software development tools like GitHub, Jira, and PagerDuty
Pricing: Like Wrike, you can start using Monday.com for free. However, this plan is best for smaller teams. To access Gantt views, time tracking, and multi-level permissions, each team member’s seat starts at $8 per month.
Last up on our list is Zoho Projects. If you’re looking for a budget-friendly but feature-packed project management tool, you can’t go wrong with this option. This cloud-based tool is used by Stanford University, Airbus, and other major companies.
With Zoho, you can record new issues and assign them to your team members as you’re working on projects. Additionally, you’ll be able to create dependencies and track your progress with Gantt charts. Plus, Zoho includes user-friendly communication tools to optimize team collaboration.
Even better, using Zoho Projects, you can access the entirety of the Zoho app suite. Along with some third-party integrations, you’ll be able to use Zoho’s software for Customer Relationship Management (CRM), invoicing, analytics, and much more.
Key features:
Portfolio dashboard
Custom templates for projects, tasks, and task lists
Document sharing
Task timers, timesheets, and invoicing
Issue reports
Integrates with GitHub, Bitbucket, Basecamp, and more
Pricing: Zoho Projects is free for up to 3 users. To start building unlimited projects, the premium subscriptions start at $5 per user per month.
Conclusion
Currently, your development team could be wasting time better spent onboarding new clients. Therefore, you may want to consider using project management software to make sure your projects are set up for success. These tools should include features to manage tasks, share files, track errors, and more.
To review, here are some of the best project management tools for developers:
Wrike: A popular tool for tracking work requests, budgeting, resources, and team-wide performance.
Monday.com: A versatile project management software with custom visual timelines and sprints.
Zoho Projects: A budget-friendly and cloud-based tool with a full suite of built-in apps.
Do you have any questions about which project management software you should use? Ask us in the comments section below!
Facebook boasts over 2.8 billion monthly active users, which is to say that nearly everyone uses it. By integrating WordPress and Facebook, you can share audiences between your website and social media profiles. The best way to achieve that integration is by using Facebook plugins for WordPress.
In this article, we’ll introduce you to the nine best Facebook plugins for WordPress, and discuss when to use each of them. Let’s get to it!
A Facebook plugin can be beneficial for website owners in several ways. It can allow users to easily share content on their Facebook profiles, leave comments using their Facebook accounts, and like or recommend content. Additionally, Facebook plugins can integrate your website with your Facebook page, allowing you to promote your social media content and display your page’s feed on your site. Overall, a Facebook plugin can help increase engagement, visibility, and traffic to your WordPress website.
9 Best Facebook Plugins for WordPress
For this roundup, we’re focusing on Facebook plugins that add useful new functionality to your website. There is a mix of free and paid options here, and they’re all regularly updated and have strong reviews. With that in mind, let’s start by talking about feed integration.
1. Social Post Feed
First up, the Social Post Feed plugin provides you with a simple way to embed Facebook feeds anywhere on your site, as well as in individual posts. You can pull feeds from pages or groups, and the plugin doesn’t limit how many elements you can embed on your website:
Thanks to this plugin, visitors will be able to like posts within embedded feeds. However, if they want to leave comments, they’ll be redirected to Facebook.
Social Post Feed also includes a feature that can make your embedded feeds compliant with the General Data Protection Regulation (GDPR). Moreover, since it doesn’t use IFrames for embedding content, search engines will be able to crawl those elements on your website, giving you a boost in SERPs.
Key Features for Social Post Feed:
Displays unlimited posts and feeds
Lets you customize the look of embedded content so it matches your site
Supports Facebook pages and groups
Social Post Feed is for you if…
…You want to add a lot of Facebook content to your website, or you’re trying to ensure GDPR compliance.
Price: Free, with a premium version starting at $49 per year.
Creating a custom login screen is useful for your subscribers and can make your membership website easier to log in to. After all, if you want users to register for your website, you need to make that process as easy as possible. The default WordPress registration system works, but it also forces users to remember yet another set of credentials.
A fantastic alternative is to enable users to register and log in using their social media accounts. The Nextend Social Login and Register plugin adds that functionality to your website.
The free version of the plugin adds support for Facebook, Twitter, and Google registration and logins. Plus, users will be able to use their social media profile pictures on their WordPress accounts.
Key Features for Nextend Social Login and Register:
Enables users to register for and log in to your site using Facebook and other social profiles
Connects users’ social accounts to their WordPress accounts
Displays users’ social profile pictures as their WordPress account avatars
Nextend Social Login and Register is for you if…
…You want to streamline the login process for your users or encourage them to connect their Facebook accounts to your site.
Price: Free, with the premium version starting at $49 (one-time fee).
Next on our list is 10Web Social Post Feed. This plugin enables you to embed Facebook feeds on your WordPress website, as well as specific publications.
One new feature this plugin brings to the table is the ability to add feeds to your website using widgets. With this approach, you can use your Facebook feed as a sidebar without it distracting from the rest of your page’s content.
The plugin also includes lightbox functionality, multiple feed layout styles, and pre-made templates to choose from for each element. By using 10Web Social Post Feed, you can embed an unlimited number of Facebook feeds on your website.
Key Features for 10Web Social Post Feed
Enables you to display unlimited feeds on your posts and pages
Lets you choose what types of content you want to display in your feeds
Provides an exceptional amount of customization options
10Web Social Post Feed is for you if…
…You want ultimate control over how your Facebook feeds appear.
Price: Free, with a premium version (in a bundle) starting at $85 for six months.
Social Warfare is a lightweight, robust social sharing plugin that adds sharing buttons for Facebook, Twitter, Pinterest, LinkedIn, and others. With various placement options, you have the freedom to place social sharing buttons anywhere on your site.
Additionally, users have the option to float the buttons on the page so that buttons follow readers as they advance throughout the page. This makes it easier to share your content with their followers, increasing the likelihood of readership. Additional features include the ability to style how your posts look on social media platforms, with options for thumbnail and text size, custom visual themes, and custom date ranges.
Key Features for Social Sharing Plugins – Social Warfare:
Post display options
Multiple placement options
Various social media platforms included
Click to tweet quotes
Shortcode support
Content hijacking protection
Social Sharing Plugins – Social Warfare is for you if…
…You want to give your site’s visitors the ability to share your content with their followers and need custom post display capabilities.
Price: Free, with a premium version starting at $29 per year.
Social proof is one of the most powerful ways to encourage new visitors to trust your site’s content, service, and product recommendations. If you have a Facebook page for your website that includes ratings, The WP Review Slider plugin enables you to display them in WordPress.
Serving as both a review plugin and Facebook plugin, this tool can retrieve review data from your Facebook page, import it into WordPress, and display it using a custom slider style. It can also import text-only tweets and display them as part of your carousel:
In addition, WP Review Slider lets you customize your slider to show a specific number of reviews, show or hide ratings, display multiple rows, and more. You can even use custom CSS to tweak your review slider’s style.
The free version of the plugin only works with Facebook page reviews. If you pay for the premium version, you’ll also be able to import reviews from Yelp, TripAdvisor, Google, and many more platforms.
Key Features for WP Review Slider:
Helps you display Facebook reviews and positive tweets on your WordPress site
Provides you with a highly-customizable slider feature for showing off reviews and feedback
Lets you determine display placement using shortcodes, templates, or widgets
WP Review Slider is for you if…
…You want to show off Facebook reviews on your website and get a high level of control over their appearance and placement.
Price: Free, with a premium version starting at $29 per year.
We already recommended a great Facebook feed plugin for WordPress. However, Easy Social Post Feed is worth looking at as well, since it brings several unique features to the table.
For one, this plugin doesn’t work with just Facebook, as it also enables you to embed Instagram feeds, making it a good general social media plugin. Plus, it gives you full control over how you display feeds from either social media platform, and includes several built-in “skins” or templates that you can choose from.
What’s more, Easy Social Post Feed lets you feature a Load More button, which enables visitors to keep scrolling through your feed without leaving your website. However, it’s worth noting that the free version of this tool only enables you to embed a single social media feed at a time.
Key Features for Easy Social Post Feed:
Lets you embed a fully-customizable Facebook feed on your WordPress site
Includes a “PopUp†feature so users can view content more closely without leaving your site
Enables you to feature Instagram feeds on your website, as well as customize them extensively
Easy Social Post Feed is for you if…
…You want to feature both your Facebook and Instagram content on your site and like the idea of an all-in-one solution for the two platforms.
Price: Free, with a premium version starting at $39 per year.
Enabling users to share your WordPress blog posts via social media is a great way for your content to find new audiences. To implement that feature, you’ll need to use the right Facebook plugin for WordPress.
With Social Media Share Buttons, you’ll be able to add sharing icons to your website for over 200 platforms, including Facebook, Pinterest, Instagram, Twitter, and more.
This plugin also includes features that enable you to customize each social media icon’s actions. For example, you can configure your Facebook icons so that instead of sharing content, users will like your page or be redirected to it:
In addition, you can decide precisely where social media icons will show up on your website, and choose from a broad range of button styles. Keep in mind that if you share blog content on Facebook, you may want to use the platform’s OpenGraph Debugger to ensure that it displays correctly.
Key Features for Social Media Share Buttons:
Lets you add icons for Facebook and many other popular platforms to your site
Provides multiple design options for your social icons, and permits custom designs
Offers control over where your icons lead and what actions they prompt
Social Media Share Buttons is for you if…
…You want to encourage website visitors to share your Facebook content and check out your other social platforms as well.
Price: Free, with a premium version starting at $29 per year.
If you want to run a popular Facebook page for your website, then it needs to be active. That means publishing new content often, and engaging with members so they’ll want to keep checking for new updates.
The WP2Social Auto Publish plugin enables you to auto-publish the content that you upload to WordPress on Facebook. This means that if you publish a blog post, you can automatically share it on your Facebook page as well, saving you from having to do so manually. What’s more, you can decide what kind of content you want to auto-publish on Facebook and what elements will be ported over to the social media platform.
Key Features for WP2Social Auto Publish
Enables you to automatically publish your blog posts on Facebook
Gives you multiple options for how your posts are displayed on the social platform
The default WordPress comments system works just fine for many users. However, there are a lot of alternative solutions that add more functionality to your comments section.
One such tool is the Fancy Facebook Comments plugin. This solution enables you to add a Facebook-powered comments section to your posts and pages. If visitors are logged into Facebook, they’ll be able to leave comments on your website without needing to sign up for an account.
You get some control over your Facebook comments section’s style as well, including which pages it appears on, what fonts it uses, and more:
Fancy Facebook Comments also works with BuddyPress, BBPress, and WooCommerce, and it’s compatible with multisite setups.
Key Features for Fancy Facebook Comments:
Lets visitors leave comments on your website using their Facebook accounts
Enables visitors to easily sort and search comments based on various factors
Helps you choose where Facebook comments will be displayed, and integrate them with third-party solutions
Fancy Facebook Comments is for you if…
…You’d like to drive engagement on your site without requiring users to sign up for new accounts.
Price: Free, with a premium version starting at $11.99 per year.
It shouldn’t come as a surprise there are a lot of fantastic Facebook plugins for WordPress, considering this social media platform’s popularity. A lot of those tools implement similar features, but some solutions provide more unique and must-have functionality. For the top pick, we choose Social Post Feed, primarily due to having the ability to embed multiple Facebook feeds, as well as styling options to match branding.
Whether it’s embedding feeds, social sharing, or even using Facebook’s commenting system, there’s a lot that the tools listed above can offer to your WordPress site. By integrating Facebook with WordPress using these solutions, you can offer a stronger user experience and leverage the platform to grow your website.
Do you have any questions about Facebook plugins for WordPress? Let’s talk about them in the comments section below!
Featured image illustration by V3rc4 / shutterstock.com
Thanks to WordPress’ multisite option, you can create a network of sites using a single WordPress installation. It’s a fantastic feature that powers some of the biggest sites in the world, including WordPress.com, Reuters blogs, and BBC America.
In this article, we’ll introduce you to some of the best WordPress multisite plugins that you can use to take your network to the next level. Let’s get to it!
What are the Benefits of a WordPress Multisite Plugin?
Multisite plugins offer numerous benefits, with centralized management being one of the most significant advantages. By installing plugins that simplify your workflow, you can manage all your sites effortlessly. For instance, using a cache plugin can be a game-changer since it enables you to flush the cache across all sites at once, eliminating the need to repeat the process per site.
Another example is a Google Analytics plugin that works seamlessly with multisite environments, allowing you to monitor all your site’s pages in one place. Lastly, user role plugins make it possible to establish specific roles across the network, which saves you time and effort. Overall, multisite plugins can help you streamline your workflow and achieve better management of your WordPress sites.
7 Best WordPress Multisite Plugins
As we curated this list of top multisite plugins, we had a few key considerations in mind. Foremost, we prioritized compatibility, only featuring plugins that not only work with WordPress multisite but excel at it. Moreover, we weighed up reviews, number of installs, support, and ease of use, recognizing that you need plugins that simplify your workflow, not complicate it. So, without further ado, let’s dive into our top picks.
1. Monster Insights
Monster Insights is one of the best analytics plugins for WordPress. It’s especially effective in a multisite environment. You’ll have easy access to reporting for all subsites in one convenient location, allowing you to monitor each site’s performance collectively.
Another key feature is the ease of use. With the easy setup wizard, you’ll have your Google Analytics properties set up within a matter of minutes. Once the setup is complete, you can create customized dashboards for each of your sites, so you can choose the most important metrics to track.
Additionally, Monster Insights allows you to set up role-based access, so you can control who can access your analytics data on a site-by-site basis. Lastly, it offers the best tracking capabilities of any GA plugin including enhanced e-commerce tracking, form conversion tracking, landing page redirect tracking, and file download tracking. This allows you to gain deeper insights into user behavior on your sites, so you can optimize your content accordingly.
Key Features for MonsterInsights:
Easy setup wizard
Centralized analytics
Customizable dashboards on a site-by-site basis
Role-based access
Advanced tracking metrics
Monster Insights is for you if…
…you want both simplicity and advanced features for tracking Google Analytics on your multisite environment. With Monster Insights’s ease of use and incredible tracking features, it’s a great addition to your WordPress multisite network.
Price: Free, with premium licenses starting at $99.50 per year.
This WordPress multisite plugin helps you keep track of everything that happens on your network. WP Activity Log sets up a log that keeps records of events such as new sites on your network when users register, when you change their user roles, when plugins are updated, and much more:
It wouldn’t be an exaggeration to say that few things get past WP Activity Log. You can even use it to monitor attempts to log into your website, which can help you figure out if someone is trying to force their way through the WordPress login page.
Key Features for WP Activity Log:
Monitor activity within your multisite network (as well as individual sites)
Track almost any event that happens on each website, from plugin activations to new user registrations and logins
WP Activity Log is for you if…
…you want to know everything that happens on your network and you don’t mind navigating logs. If you run a multisite network without user registrations or too many sites, you might not need an activity log, but it’s still not a bad idea to have one in place.
Price: Free, with premium licenses starting at $99 per year.
Leveraging browser caching is a key step to optimizing WordPress sites. However, not all WordPress caching solutions offer multisite support. LiteSpeed Cache is one of the few plugins that do, and it provides you with a broad range of network-wide options for WordPress optimization.
With this plugin, you can enable browser caching across your entire network with a click. LiteSpeed Cache also lets you configure the cache to purge when you update plugins, themes, or WordPress itself across the network.
You’ll also get access to a variety of other useful features. That includes tools to “clean” each site’s database within your network:
You can also use the plugin to automatically convert images to the .webp format as you upload them, which can help lower loading times even further. However, not all browsers are compatible with .webp, so we recommend using that setting on a site-by-site basis.
Key Features for LiteSpeed Cache:
Enable caching for all the sites in your network
Configure cache purging options for your multisite network
Convert new images to the .webp format after uploading them
Clean the databases for each site in your network
LiteSpeed Cache is for you if…
…you want to enable browser caching across your multisite network using a plugin. You can also do so manually, but that means configuring settings for each site individually.
Custom user roles play a significant role in many WordPress websites. If you have one site on your network that serves as a store and another designed for blogging, you’re going to want different user roles for each project. Entering each site to manage individual roles can take up a lot of time, however, particularly as your user base grows.
With User Role Editor, you can create custom roles and tweak permissions and capabilities for existing ones. This plugin also enables you to configure the default roles for new users across the entire network:
If you use the premium version of User Role Editor, you’ll be able to edit user roles for the network from your multisite admin dashboard. You can also export and import user roles from one website to another within the network.
Key Features for User Role Editor:
Add custom user roles to your WordPress installations
Tweak the permissions and capabilities for existing user roles
Set a default user role for sites within the multisite network
Edit user roles across the entire network
Import and export user data across websites
User Role Editor is for you if…
…your multisite network includes a broad variety of website types, and you’re looking to use a wide range of user roles.
Price: Free, with premium licenses starting at $29 per year.
User Switching can be a lifesaver if you have a lot of registered users across multiple websites. With this plugin, you’ll be able to switch to other user accounts with a single click of a button from the Users tab in your dashboard. The plugin works with multisite, which means you can use it to switch to user accounts throughout your entire network from the admin area.
This plugin can help immensely when it comes to troubleshooting errors for specific users. You can also switch to other accounts to test new features on your website, and make sure everything is working correctly.
It’s worth noting that only administrators or super administrators have the option to switch to other user accounts. This plugin lets you change back to your original account at any time, and it doesn’t reveal passwords (so it doesn’t interfere with users’ privacy).
Key Features for User Switching:
Switch to other user accounts within your multisite network
Only enable administrators or super administrators to access other user accounts
User Switching is for you if…
…you want to troubleshoot errors or bugs across your entire multisite network. In many cases, errors will only appear for specific user roles, which makes User Switching an invaluable tool. You can also use this WordPress multisite plugin to determine whether specific features are working correctly on one of your sites.
If you want to run a multisite network that includes multilingual websites, Multisite Language Switcher will come in handy. This WordPress multisite plugin enables you to set default front-end and admin languages for each site. You can also display a language switcher widget or block that visitors can use if the content they’re seeing is available in more than one language.
Keep in mind that you’ll need to translate content on your own for the language switcher to work. Moreover, the plugin doesn’t offer configuration options within the multisite admin area. Instead, you can decide which languages to use and how to display the switcher on a site-by-site basis.
Key Features for Multisite Language Switcher:
Enable multilingual support for all the sites within your network
Add a language switcher to each website using blocks or widgets
Set default font and admin languages for each website
Create different versions of each page or post in multiple languages
Multisite Language Switcher is for you if…
…you want to add multilingual support for all of the sites in your network. The plugin is also perfect if you want to use different languages for each site, as it gives you full control over each project’s settings.
Let’s start by saying that there are no free options when it comes to migrating multisite networks with plugins. You can always migrate a network or export individual sites manually. However, WordPress migration plugins such as All-in-One WP Migration only offer multisite support as a paid add-on.
With All-in-One WP Migration’s multisite extension, you’ll be able to move your network from one web host to another. The plugin also lets you export individual or multiple sites in one go. The same system can be used to import sites from one network to another.
All-in-One WP Migration also includes a cloning feature that lets you duplicate sites within a network, which can come in handy for staging purposes. If you use that extension as part of a network, it offers support for unlimited sites.
Key Features for All-in-One WP Migration:
Migrate multisite networks from one web host to another
Import and export individual or multiple sites from a network
Clone websites within a network
All-in-One WP Migration is for you if…
…you don’t want to migrate your network manually, and your new web hosting provider doesn’t offer that service. If you need to use a migration plugin for multisite networks, this is the best option available.
Price: Free, with premium licenses starting at $319 per year.
WordPress multisite already offers a powerful toolset on its own. Using it, you’ll be able to set up an entire network of websites with just a single WordPress installation. However, running a lot of sites at once brings its own set of challenges, which is where WordPress multisite plugins come in.
Monster Insights and WP Activity Log are two of the best WordPress multisite plugins due to their exceptional features and functionality. Monster Insights offers a robust analytics platform that delivers deep insights into your audience’s behavior, allowing you to optimize your sites accordingly. It’s easy to set up and use, making it an ideal solution for beginners and experts alike.
On the other hand, WP Activity Log offers a comprehensive suite of site activity monitoring tools, including user role management, file changes, and site-wide activity tracking. This plugin provides an unparalleled level of control over your multisite network, ensuring that all changes are tracked and logged in real-time. Overall, both plugins are highly effective, and user-friendly, and offer a range of features that can help streamline your management process and improve your site’s performance.
Do you have any questions about how to manage a WordPress multisite network? Let’s talk about them in the comments section below!
Featured image illustration via filborg / shutterstock.com