You’ve undoubtedly heard this advice time and time again. But when you’re running a business, the urgent often supersedes the important. You’re busy grappling with day-to-day challenges and this crucial advice goes ignored.
It’s not until disaster strikes — a malware attack, a server crash, or even simple human error — that the hard truth sinks in.
Imagine losing all your website data and content in a single swoop. All the blood, sweat, and tears poured into creating your unique online presence, gone. It’s not just about the time, energy, and resources you’ve invested; it’s about your reputation, customer trust, and business continuity.
Enter Jetpack VaultPress Backup, a powerful, intuitive, and automated solution designed to safeguard your site against this kind of catastrophic event. With VaultPress Backup, you don’t just get an important business tool; you get peace of mind and the ability to bounce back, even in the face of disaster.
What are automatic website backups?
Automatic website backups are your website’s safety net. They’re essentially a complete copy of your website, including your database, themes, plugins, posts, comments, and everything in between. In the case of VaultPress Backup, the files are stored in a secure, off-site location.Â
The “automatic” part is crucial here, as it means that these backups are created without any manual intervention and are ready to be restored at a moment’s notice.
What are the benefits of automatic backups?
1. Reduced liability
At first glance, backups might just seem like an additional expense. But when you factor in the potential cost of data and content loss — the time spent reconstructing your site, the loss of customer trust and potential business, and the technical expertise needed for recovery — the investment in an automatic WordPress backup solution like VaultPress Backup is a drop in the ocean.
2. Convenience
With automatic backups, there’s no need to mark your calendar or set reminders. Once VaultPress Backup is configured, every update or change is saved in real time, without any effort on your part. It’s all the convenience of “set it and forget it.”Â
3. Enhanced security
Website security is an ongoing battle. Despite your best efforts, threats can find a way through your defenses. Automatic backups ensure that even if your site is compromised, you can quickly revert to a secure, uncompromised version.
4. Protection from data loss
From human errors and hardware failures to cyberattacks and natural disasters, data loss threats are varied and unpredictable. Automatic backups offer a robust safety net, protecting against these scenarios.
5. Reliability
With an automatic backup solution like VaultPress Backup, you get consistent, reliable backups. There’s no risk of forgetting a backup or a manual process failing.
6. Fast disaster recovery
The faster you can get your site back up and running after a disaster, the less damage done to your business. With an automatic backup, you can quickly restore your site to its pre-disaster state.
7. Scalability
As your website grows, so does the amount of data and content you’re storing. An automatic backup solution can easily scale with your needs, ensuring all your information is protected.
8. Regulatory compliance and legal protection
In many sectors, maintaining regular backups is not just best practice; it’s a legal requirement. Automatic backups can help you meet these requirements with minimal effort.
9. Peace of mind
There’s a tranquility in knowing that your data is safe no matter what. With automatic backups, you have that peace of mind.
How do automatic backups differ from manual backups?
With a manual backup process, you’re in the driver’s seat. You decide when to back up your data, what to back up, and where to store it. On the surface, it might seem like a good thing — after all, who knows your website better than you? But we’re human, and with our human tendencies come oversights, procrastination, and plain old forgetfulness.
Here’s where automatic backups swoop in to save the day. With a tool like VaultPress Backup, your site is backed up regularly, without any work on your end. It’s a hands-off approach that offers a higher degree of consistency, accuracy, and reliability. While you’re focusing on growing your business, your backup solution is quietly working in the background, securing your website data and content.
Common misconceptions about automatic backups
1. “I don’t need backups; my host provides them.”
It’s true that many web hosts provide backups. Unfortunately, these are typically infrequent and may not cover your entire site. Plus, in many cases, backups are stored on the same server as your site. This means that if your site is compromised due to a hack, your backups could be, too. Not to mention, restoring these backups can be complicated and time-consuming.
2. “My site is too small for backups.”
No website is too small for backups. If it’s important to you or your business, it’s worth protecting.
3. “Backups are too complicated for me.”
With an intuitive solution like VaultPress Backup, setting up automatic backups is a breeze. It’s designed to be user-friendly, even for those with minimal technical knowledge.
4. “Backups slow down my website.”
A well-optimized backup solution won’t hinder your website’s performance. VaultPress Backup, for instance, is designed to work quietly in the background, without diminishing your site’s speed or user experience.
How to choose the right backup solution
The right solution for your business should include several features: real-time backups, full-site coverage, off-site storage, easy restoration, and a secure environment. Beyond these, you should consider factors like scalability, cost, customer support, and compatibility with your website platform.
Introducing Jetpack’s VaultPress Backup plugin
VaultPress Backup, developed by the trusted team behind WordPress.com, is designed with these factors in mind. It’s more than just a backup tool — it’s a comprehensive security solution for your WordPress site.
Features and benefits of VaultPress Backup
VaultPress offers real-time backups, ample storage space, and easy restoration. It can also be bundled with WordPress security features like malware scanning, spam protection, and brute force attack protection. The plugin also provides a seamless experience for WordPress users.
How VaultPress Backup works
VaultPress Backup runs in the background, automatically backing up your website data every time something happens on your site — an update to a page, a new order, a new comment, and more. It stores these backups securely off-site, ready to be restored whenever needed. And with Jetpack’s team of Happiness Engineers, you’re never alone in your data protection journey.
How to set up up automatic, real-time backups with VaultPress Backup
Setting up VaultPress Backup is straightforward. Once you’ve purchased a plan, you’ll need to install and activate the plugin, connect to your WordPress.com account, and activate VaultPress. It’s a set-and-forget solution — the plugin will automatically start backing up your site. Here’s a step-by-step walkthrough of the easy setup procedure:
1. Go to Plugins → Add New in your WordPress dashboard.Search for “Jetpack VaultPress Backup†and click Install Now → Activate.
2. There, you’ll see a prompt to set up Jetpack VaultPress Backup. Click Set up Jetpack.
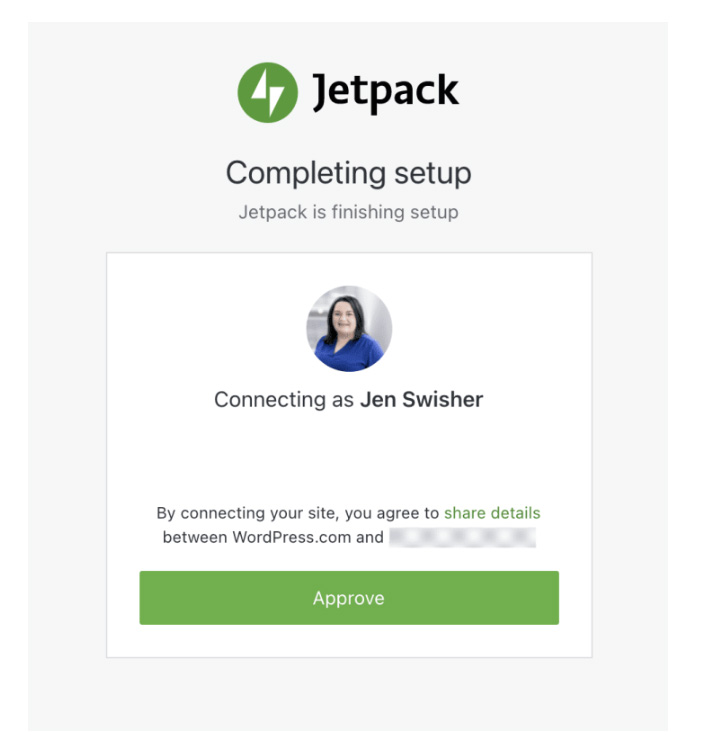
3. Click Approve to connect your site to WordPress.com. There, you can log into an existing account or create a new one.
4. There will now be a table with several options for plans. Choose the one that best fits your needs and continue through the checkout process.
And that’s all there is to it! Once VaultPress Backup is set up, your backups will start running automatically.
How to quickly restore a backup with VaultPress Backup
With VaultPress Backup, restoring a backup is as easy as creating one. Simply choose the time to which you want to revert, and click Restore. VaultPress will take it from there, restoring your site to the state it was in when the backup was created. Here’s a step-by-step walkthrough of the restore procedure:
2. Now, you can filter by activity type or date range to find a specific restore point.
3. Click Actions → Restore to this point.
4. You’ll see a list of items that you’d like to restore. In most scenarios, you should leave them all checked. Click Confirm Restore.
And your backup will start! Keep track of the restore progress on this same page, or just wait for a notification when the restoration is complete.
Best practices for website backups
1. Create backups in real time
In the digital world, a lot can happen in a short span of time. That’s why real-time backups, like those offered by VaultPress Backup, are crucial. They ensure that even the most recent changes to your site are saved and protected.
2. Store backups offsite for disaster recovery
Storing backups on the same server as your website is a risky move. To ensure your backups are safe from server crashes or data breaches, it’s crucial to store them offsite, just like VaultPress Backup does.
3. Store backups in an ultra-secure environment
Your backups are only as good as the security protecting them. With VaultPress Backup, your site’s files are stored in a secure environment, protected against threats and breaches.
4. Have a fast backup restoration procedure
When disaster strikes, every second counts. An efficient, straightforward restoration procedure can make the difference between a minor hiccup and a major catastrophe. VaultPress Backup’s one-click restore feature ensures that you’re back in business in no time.
Frequently asked questions about automatic WordPress backups
What is the difference between manual backups and automatic backups?
Manual backups involve a hands-on approach where you’ll manually create a copy of your site’s data and store it yourself. This process might involve navigating your site’s control panel, finding the appropriate option to download your site data, and saving it to a secure location of your choice.
In contrast, automatic backups, like those performed by VaultPress Backup, happen without any intervention on your part. Once set up, they automatically save a copy of your site data at regular intervals or in real-time, depending on the tool you choose. You won’t need to remember to back up your data or worry about storing it securely.
How often should I schedule automatic website backups?
The frequency of your backups will largely depend on how often your website changes. However, most sites should opt for real-time backups so that every change is saved as it happens, and you never lose a moment on your site.
For less frequently updated sites, daily backups might suffice. But remember, more frequent backups provide a more up-to-date safety net in case of data loss.
How long does it take to restore a backup using VaultPress Backup?
The duration of restoring a backup using VaultPress Backup depends on the size of your website and the speed of your server. However, VaultPress Backup aims to make this process as swift and seamless as possible. Once you initiate a restore, it goes to work immediately. For an average-sized website, the restoration can typically be completed within minutes.
What happens if my website is compromised or hacked? Can I restore a clean backup?
Yes, VaultPress Backup has you covered. If your site is compromised or hacked, you can select a backup version from before the breach occurred and restore your site to that state. By doing this, you’re essentially turning back the clock to a point when your site was safe and clean, thus eliminating any malicious alterations made by the hackers.
Can I use VaultPress Backup with non-WordPress websites?
VaultPress Backup is tailor-made for WordPress sites. It’s designed to work seamlessly with the WordPress ecosystem, backing up everything from posts, comments, and media files to your themes, plugins, and settings. As such, it does not support non-WordPress sites.
How secure is the backup data stored with VaultPress Backup?
Security is at the core of VaultPress Backup. Your data is stored on servers that are highly secure and monitored 24/7. These servers are designed to protect against unauthorized access and are equipped with multiple layers of protection to safeguard your data.
Are there any known conflicts between VaultPress Backup and other plugins or themes?
VaultPress is developed by the same team behind WordPress.com, and is designed to work seamlessly with most plugins and themes. However, if you encounter any issues, Jetpack’s Happiness Engineers are ready to assist you.
Who created VaultPress Backup?
VaultPress Backup was created by Automattic, the same experienced team behind WordPress.com, WooCommerce, Jetpack, and many other widely-used WordPress products. The team’s in-depth experience with WordPress allows them to create a backup solution that integrates seamlessly with WordPress, providing a smooth and reliable experience.
VaultPress Backup: Real time, automated backups for WordPress
Data protection should not be an afterthought — it’s an essential part of running a successful website.
VaultPress Backup offers WordPress site owners a powerful, convenient, and reliable solution for data protection. Whether you’re a small business owner managing a single site, or a larger organization overseeing multiple WordPress sites, VaultPress is ready to safeguard your online presence.
Remember, there’s no such thing as a small disaster when it comes to data loss.
VaultPress Backup is more than just a backup solution. It’s a commitment to protect the website that represents your business, your livelihood, and your passion. With the Jetpack team standing by to support you, you’re never alone in this journey.
You have the power of automatic backups, real-time updates, and the peace of mind that comes with knowing your website data is safe, secure, and ready to be restored at a moment’s notice.
So take the leap. Leave behind the uncertainty and stress of manual backups, and step into the future with VaultPress Backup.Â
If you take a moment to think about the websites you visit these days, you might be amazed at how many features even the ‘simplest’ have. In the past, if you wanted to create a professional-looking website, you needed at least some basic coding skills. Now, anyone can build a site that looks great and functions well, with zero coding required.
That is possible thanks to content management systems (CMS) and website builders. These types of tools democratize web development and enable you to create the exact type of website you want. All you need is to be willing to learn how they work, and put in a little time and effort.
In this article, we’ll discuss exactly what it takes to build a website from scratch. We’ll guide you through the process step by step, so you know everything you’ll need to get started.
What is needed to create a website from scratch?
If you want to create a website without coding, you’ll need the right tools for the job. At a minimum, you’ll want:
A website building platform. The website builder or CMS you use should offer all the features you need to design and publish as many pages as you want. That includes tools to create and design pages and content, sell products online (if relevant), manage users, and anything else you require.
Access to hosting. Every website needs hosting. This involves paying for a server that’s configured to store your files and make your website available to the public.
A domain name. This is how people can access your website (outside of finding it in search engines). A great domain name can make or break a site.
If you’re thinking about creating your first website, these elements might sound intimidating. You have a nearly infinite number of choices and combinations for which website builder and web host to use (not to mention domain names!).
In particular, your choice of a website building platform will determine how complicated it will be to get your site ready. That’s where WordPress.com comes in.
WordPress.com: The best way to build your website
Since you need a website builder, hosting, and a domain to create a site, it makes sense to opt for a solution that offers all three components. That’s precisely what WordPress.com does.
You’re probably familiar with WordPress. It’s the web’s most popular CMS and blogging platform. But what you may not know is that you can use it to create almost any type of website you can imagine. A lot of its features are designed with blogging in mind, but the CMS is incredibly customizable.
There’s a reason WordPress powers around 43% of allwebsites. That’s billions of sites, and includes major brands like Slack, TIME Magazine, CNN, and many more.
With WordPress, you get access to an intuitive system that includes tools for content creation and management, style customization, user management, ecommerce, and more. Add plugins into the mix, and you can transform WordPress into the perfect platform for almost any type of project.
Unlike ‘self-hosted’ WordPress, WordPress.com includes hosting and a free domain (depending on which plan you choose). The CMS comes pre-installed with every plan, so you can get right to work after signing up for an account. Plus, WordPress.com offers a lot more protection and optimization than most other web hosts.
How to build a website from scratch (in 7 steps)
If you’re excited to get started, you’ve come to the right place. In the following sections, we’ll take you through the entire process of creating your new website with WordPress.com!
Step 1: Create a WordPress.com account
The first step is the easiest. WordPress.com offers a variety of plans, so you should be able to find something that fits your budget. Every plan gives you access to the full version of WordPress (aside from plugin support, which we’ll discuss shortly).
The free WordPress.com plan doesn’t place any limits on the amount of traffic your site can get, and you receive 1 GB of storage. That’s enough for a small blog, if you don’t mind having your website display ads.
Premium plans progressively add more functionality and an ad-free experience. From the Personalplan onward, you also get a free domain for one year and a secure sockets layer (SSL) certificate, as well as automatic HTTPS (which helps protect your site and visitors).
The real magic of WordPress unlocks with the Businessplan. This is the option that includes support for installing plugins. You can use plugins to add all kinds of new features to your website — everything from contact forms to online courses.
Finally, if you want to use WordPress to launch an ecommerce store, you’ll need the Commerceplan. This is the most exhaustive plan that WordPress.com offers, but it translates to top-of-the-line security and performance for an online store.
Take some time to consider what plan you want to use. If this is your first time with WordPress, it might be best to take the free plan for a spin first. That way, you can get familiar with the platform and figure out what more advanced features you want.
Step 2: Pick and register a domain name
Next, you’ll need a domain name. This forms the basis of your website’s URL (e.g. jetpack.com).
If you choose one of the WordPress.com plans that come with a free domain name registration, this process is quick. You can use a third-party domain registrar instead, but that comes with its own additional costs.
On average, .com domains cost around $10 per year. That cost can vary depending on the domain, though, and prices are not the same for every top-level (.com vs .net vs .org) domain.
For your first website, it’s typically best to stick with .com, since it’s a safe and well-known option. All you need to do is figure out the perfect name for your website.
This step is very personal, and it will vary depending on what goals you have for your website. With that in mind, here are some quick tips to remember when choosing your domain:
Keep it simple. You’ll want your domain name to be easy to remember and type.
Either make it unique, or clearly connected to your business/brand. If you’re struggling to find a unique name, stick with terms and keywords that relate to your business or brand. For portfolios and personal websites, you can use variations of your own name instead.
Avoid generic domains. Although it’s best for your domain to be simple and clear, you don’t want it to be easily confused with other brands. A domain like cheaptents.com may get the point across, but it doesn’t contribute to unique brand recognition.
If you’re struggling to come up with a name, there are a lot of domain name generator tools you can use. These tools will take in keywords and generate hundreds of potential domains (and even show you which ones are available). Even if they don’t suggest any options you like, they can be great for brainstorming.
Step 3: Choose a theme to customize your site’s look
Once you sign up for WordPress.com, you’ll get access to your new dashboard right away. There, you’ll be able to see your website and start making changes to it. Right now, your website should be pretty empty, with only the default pages your theme sets up for you.
A WordPress theme is a collection of templates with unique styles. Themes enable you to change your website’s design easily. There are even themes designed for specific types of websites, like blogs or online stores.
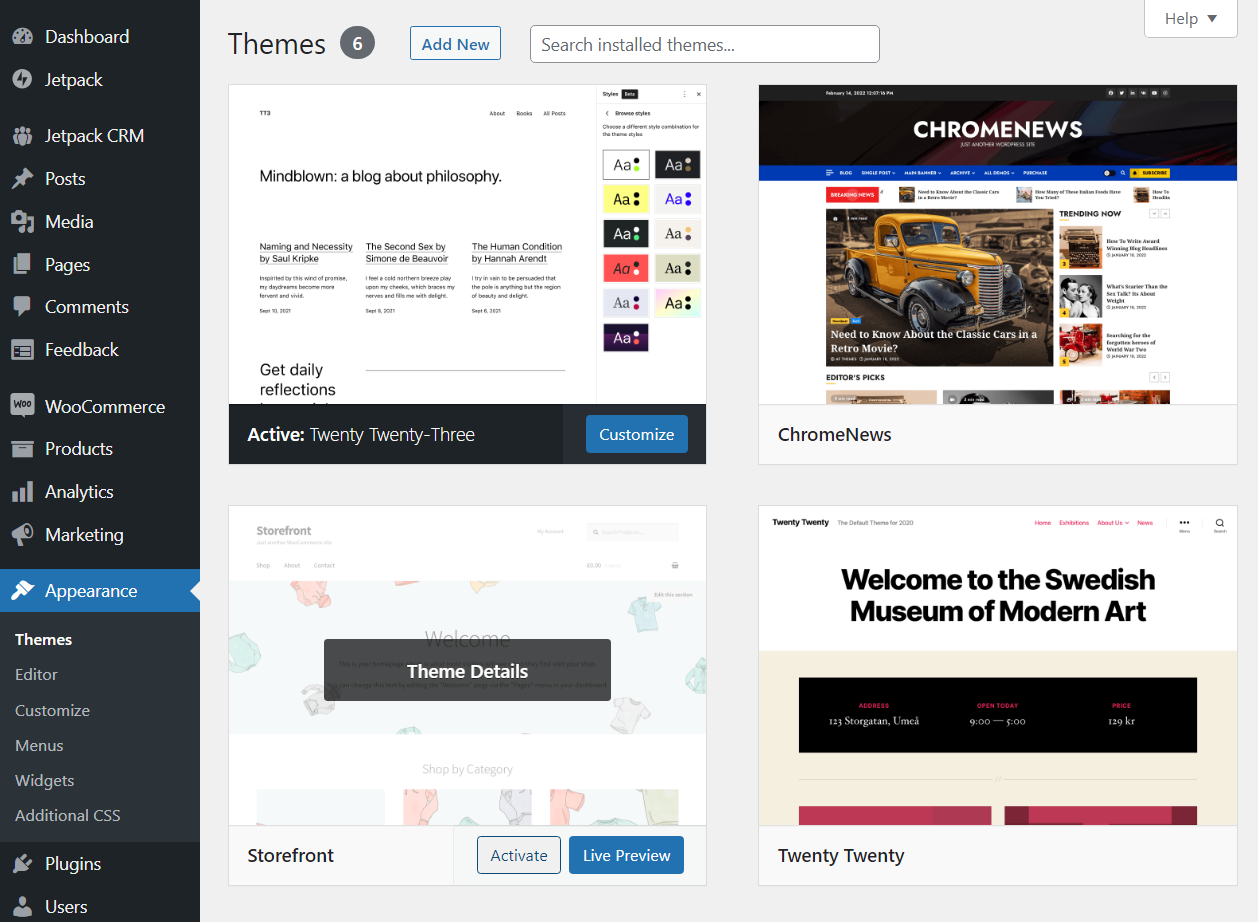
The design you see right away will be determined by WordPress’ latest default theme. To change it, go to the Appearance → Themes page. There, you’ll see an overview of all the themes installed on your website.
You can change themes by selecting one and clicking the Activate button. To find new options, select Add New. This will open the WordPress theme repository without leaving the dashboard.
From here, you have access to all the free themes available for WordPress. If you see one you like, mouse over it to get a preview, or go right ahead and click on Install.
WordPress will download the theme in the background, and when it’s ready, you’ll be able to activate it. Once you do, check out how your website looks using the new theme.
It might take a few tries to find the perfect theme. There are thousands of free options available, so be patient until you find a design that fits your vision for your site.
Note that some WordPress.com plans also give you the option to upload themes. That’s so you can use themes that you download or buy from third-party websites and marketplaces.
Premium themes can be very useful, but it may be best to not spend money on them until you’re more familiar with how WordPress works. That way, you’ll know exactly what you want when you do start browsing third-party marketplaces.
Step 4: Design your site with the drag-and-drop editor
Once you’re happy with your theme, it’s time for the real work to begin. That means creating a homepage for your website. For that, you’ll use the WordPress drag-and-drop editor, also known as the Block Editor.
To get started, go to the Pages section of your dashboard and select Add New. This will launch the Block Editor. When you’re starting with a blank page, the editor will look something like this:
The plus sign button that you see in the middle of the screen enables you to add blocks to the page. Blocks are pre-built elements that can be almost anything, from paragraphs to lists, images, forms, and more. WordPress comes with dozens of blocks, including every element you need to design a website.
After adding a block, you can click on it, and the menu to the right of the screen will show you its customization options. You can also add basic text blocks, like the Paragraph and List options.
At this stage, we recommend that you play around a bit and familiarize yourself with the blocks that the editor offers. Don’t worry if you’re not sure where to start. Simply learn how the editor works, try using different blocks, re-arrange them by dragging and dropping, and see what customization options are available.
You can click on the Preview button at the top of the screen at any time to see what your design will look like once you publish it. If you’re not happy, you can always continue to tinker with it, as every page in WordPress is fully customizable.
If you’re not sure what kind of design you want to use, you can go into the Patterns menu by clicking on the blue plus sign at the top of the screen. This menu will show all blocks in a sidebar, as well as a category labeled Patterns.
Patterns are pre-designed page sections that you can use as starting points. Selecting a pattern will add it to the page, and you’ll be able to edit its components (they’re all blocks) to customize them to your liking.
Using patterns is a great shortcut, giving you excellent designs as starting points. Every pattern is free to use, so go ahead and experiment with them.
When you’re happy with the page’s design, click on the Publish button. WordPress will save your progress as a “draft†while you edit a page or a post. It doesn’t actually publish the page (make it visible to visitors) until you click on the Publish button.
Before you start working on other pages, you’ll also want to learn how to edit WordPress menus and how to set a homepage. This will enable you to customize your site’s navigation in any way you want.
Creating one page is a great start, but it doesn’t make a full website. Depending on what idea you have in mind, you’ll probably need to design multiple pages.
You may also want to create posts, if you plan to set up a blog, news feed, or similar feature. WordPress will display your latest posts on the Blog page by default.
The process of creating and publishing posts works just the same as with pages. Go to the Posts screen and click on Add New. This will launch the editor with a blank slate.
How you structure your site’s content is up to you. Still, every post will likely need text, images, and sometimes video. You can add any of those elements by selecting the option to place a block on the page.
To add images or videos, you’ll first need to upload them to WordPress. To do this, select either the Image or Video option from the block menu and click on Upload.
You’ll get the option to select a file from your local device and upload it to the website. Once the upload is done, you’ll be able to select the image and place it on the page or post.
Keep in mind that you might have storage limits, depending on which WordPress.com plan you use. The platform also doesn’t support every image or video format, but it works with all the major options. If you plan to feature a lot of media, you can get video hosting with Jetpack.
As with pages, when you’re done working on your latest piece of content, you can choose to publish it or save it as a draft. After you hit the Publish button, visitors will be able to see the content on your website.
Step 6: Add products, payment, and shipping (if applicable)
This step only applies if you’re building an online store, and if you opt for a WordPress.com plan that enables you to publish and sell products using WooCommerce. If you’re not already familiar with it, WooCommerce is an ecommerce plugin for WordPress. It adds all the features you need for a storefront.
Once you have WooCommerce installed, you can start adding products to your website using the Products → Add New option. This will launch a simple editor where you can set the product’s title and price, add a description, and specify what kind of item it is (physical or virtual).
The WooCommerce editor doesn’t use blocks. It’s more like a series of forms that you fill out to add product information.
With WordPress.com, there’s no “launch†button or anything you have to click on for your website to go live. As soon as you hit the Publish button for a page or a post, visitors will be able to see it. All you have to do is actually attract those visitors.
If you want to rely on search engines, you’ll need to learn about search engine optimization (SEO). You can also use social media or paid ads to drive traffic to your website, depending on your audience and budget.
Whatever route you choose, keep in mind that building an audience can take a while. No website launches and gets thousands of visitors overnight (unless you’re famous), so be patient and keep publishing new content.
Examples of websites built with WordPress.com
Even with a beginner-friendly platform like WordPress.com, building an entire website can seem intimidating. You might not be sure what you want it to look like, or what it should include. If that sounds familiar, this section is for you.
The best way to start is by exploring existing websites built using WordPress.com. This will give you an idea of what’s possible, and help you figure out what you do and don’t like.
For example, Kiss My Spatula is a food blog, featuring stories of people eating around the world. Posts are categorized by continent, along with showcasing a list of travel tips.
WordPress isn’t just the home of blogs. Major corporations and news outfits also rely on WordPress.com. For instance, FiveThirtyEight is one of the most popular opinion poll analysis and politics sites in the US.
For a lot of big companies, using WordPress makes sense because it’s a tested, business-ready website builder that offers everything you’ll need to grow your brand. The Meta Newsroom focuses on publishing news about all the companies under its umbrella.
This website is powered by WordPress VIP (owned by Automattic, just like WordPress.com), which caters to enterprise-level websites. If your website grows enough, you might end up using those services at some point!
Frequently asked questions
By now, you’re ready to begin building your own website with WordPress.com. Before you go, let’s clear up any lingering questions.
How much does it cost to create and host a website?
The cost of creating and hosting a website will depend on what type of site you want to create and the hosting platform you choose. If you want to hire a developer, for example, your website can end up costing thousands of dollars.
WordPress.com gives you a lot of options that adapt to different budgets. There’s even a free plan that includes both the website builder and hosting. It does include ads, but it doesn’t limit traffic in any way.
You can also opt to start with an ad-free plan from the beginning. WordPress.com offers a great starting plan called Personal, which costs $4 per month and includes a free domain.
Do I need coding skills to create a website?
If you want to create a completely custom website from scratch, you’ll need to know how to code. The alternative is to hire a web developer or an agency to do it for you (which can be expensive).
Want to take this route? Built by WordPress.com can take care of everything for you. Created by WordPress.com Happiness Engineers, you’ll be sure to get a quality site in as little as four days.
For everyone else, WordPress.com offers a visual website builder experience that lets you create a unique website without knowing anything about code. Even if you do have web development experience, WordPress.com enables you to launch websites faster and easier than ever.
How long will it take to create a website from scratch?
How long it takes to create a website depends on how familiar you are with the process, the tools you’re using, and the scope of your project. WordPress.com is remarkably user-friendly. Still, you do need to familiarize yourself with how the platform and the Block Editor work.
Once you understand how to use the Block Editor, you can design multiple pages in just a few hours. If you’re building a relatively small website, you should be able to put everything together in a couple of days.
Will the website be secure and safe for visitors?
One of the disadvantages of having to shop around for a web host is that security falls largely in your hands. Some hosts offer decent security features, but the responsibility for protecting your website is ultimately yours.
WordPress.com does things differently. The platform is designed to offer a secure hosting experience out of the box. Every plan comes with a free secure sockets layer (SSL) certificate included, as well as the Jetpack plugin. That means you get access to built-in security, real-time backups, speed optimizations, and more.
Will the website be mobile-friendly?
The WordPress Block Editor is very mobile-friendly. You can use the editor to preview how your site will look at different resolutions, including on mobile devices.
It’s also worth noting that some themes are more mobile-friendly than others. It’s best to test multiple options before making a decision, so your site looks and functions well for all visitors.
Build a website without coding thanks to WordPress.com
Whether you know how to code or not, using WordPress.com to build your website is a smart choice. This website builder offers all the tools you need to create professional-looking pages, and you don’t need any special technical expertise.
On top of that, WordPress.com plans bundle everything you’ll need, including hosting and a domain name. You also get access to Jetpack, which means free automated backups, speed optimizations, malware scanning, and much more!
As a website owner welcoming people to your site, you have not only a responsibility to provide a warm greeting and relevant information, but to protect users and their information. Most visitors don’t keep web security on the top of their minds, but you should.
Thankfully, you don’t need a full time team of security experts constantly on guard. A few basic steps and tools can take care of the majority of potential threats for the average website and its visitors. Today we’ll talk about two.
The first is an SSL certificate — a non-negotiable tool that can encrypt information sent between your site and users.
The second is a WordPress security plugin that provides everything from spam protection to site backups, malware scans, and more. Â
What is an SSL certificate?
An SSL (Secure Sockets Layer) certificate is a tiny bit of code that provides security for online communications. Think of it as the lock on your front door. It secures the information that travels from your computer to the site you’re visiting and back.
An SSL certificate enables an encrypted connection. It does this by establishing a ‘handshake’ between the user’s browser and the server. When this handshake is complete, a padlock or a green bar will appear in the browser’s address bar, signifying a secure connection.
The different types of SSL certificates
1. Domain Validated (DV) certificates
Domain Validated Certificates are the ‘entry-level’ option. The verification process is quick and relatively easy, requiring only a check that the applicant owns the domain for which they’ve applied for the certificate.
These certificates are a good fit for small websites or blogs where financial transactions or the transfer of sensitive data don’t occur. However, their simplicity is also their limitation; DV certificates only certify domain ownership, not the legitimacy of the organization behind the website.
2. Organization Validated (OV) certificates
Here, the validation process is more stringent, requiring verification of the business’s existence and legitimacy. This can include things like checking the business’s registration, physical location, and the authority of the applicant.
OV certificates enhance your website’s credibility, making them ideal for businesses that require more trust from their visitors. The catch? The verification process takes a bit longer, and they’re more expensive than DV certificates.
3. Extended Validation (EV) certificates
For those who want the most stringent level of validation, Extended Validation (EV) Certificates are the answer. The process to obtain an EV certificate is rigorous, including all the checks of an OV certificate, plus some additional steps.
One key benefit of an EV certificate is the visual cues it provides, such as the green address bar. These cues offer immediate trust to visitors and are particularly valuable for websites dealing with sensitive information or financial transactions.
4. Wildcard and Multi-Domain certificates
Think about Wildcard and Multi-Domain Certificates as the jack-of-all-trades in the SSL world. A Wildcard SSL certificate secures your main domain and an unlimited number of its subdomains, while a Multi-Domain SSL Certificate allows you to secure multiple distinct domains with a single certificate.
These are particularly handy for businesses with multiple subdomains or completely separate domains, offering a cost-effective, streamlined way to manage SSL certificates.
Why SSL certificates are essential for site security
1. Encryption and data integrity
SSL certificates turn your sensitive information into an unintelligible series of characters that can only be returned to a readable format by the intended recipient. This ensures data integrity by protecting it from being tampered with or intercepted during transmission.
2. Authentication and trust
Think of a handshake when you first meet someone. The handshake isn’t just about being polite, it’s also about building trust. SSL certificates do just that for your website, assuring visitors that they’re interacting with the authentic website and not a malicious clone.
The trust seal or green bar that appears in the browser is akin to a digital signature. It tells your visitors, “You can trust us. We’re not imposters.”
3. SEO and trust signals
It’s not just about trust between you and your visitors, it’s also about trust between your site and search engines. SSL certificates are considered trust signals, and search engines like Google favor websites that are secure. As a result, having an SSL certificate can give your site a slight SEO boost.
4. Machine-in-the-middle attack mitigation
In a machine-in-the-middle attack, a cybercriminal intercepts, and can potentially alter, the communication between two parties. SSL certificates help prevent these attacks by ensuring that communication between your site and its visitors is encrypted and secure.
5. PCI compliance
If your website accepts credit card payments, you need to be PCI compliant. One requirement of PCI compliance is having an SSL certificate. It’s a fundamental box to tick, the equivalent of making sure your car has an engine before you try to drive it.
How to get an SSL certificate
1. Choose the right SSL certificate for your site
Just like you wouldn’t use a sledgehammer to crack a nut, you need to choose the right SSL certificate for your needs. Use DV for small, non-commercial sites, OV for businesses requiring more trust, and EV for websites dealing with sensitive data. Multi-domain or wildcard certificates are your go-to if you’re juggling multiple domains or subdomains.
2. Find a provider
Many hosting providers offer SSL certificates as part of their plans or for a small additional fee. If that’s the case, they’ll usually also install them on your behalf. Bluehost, Pressable, and A2 Hosting, among others on our recommended WordPress hosting list, include SSL certificates at no additional cost.
You’ve chosen your certificate. Now, it’s time to install it. This process will vary based on the provider you choose, but each one should provide detailed documentation. Once installed, you’ll need to update your site to use HTTPS instead of HTTP. Most content management systems, like WordPress, offer tools to simplify this process.
Best practices for using SSL certificates
1. Choose the right SSL certificate for your needs
Choosing the right SSL certificate is not just about ticking a box. It’s about understanding the different types of certificates, their strengths, and their limitations. By selecting the most appropriate certificate for your needs, you’re signaling to your visitors that you value their security and trust.
2. Renew your SSL certificate
It’s simple: a lapsed SSL certificate equates to an unsecured website. This can lead to warning messages appearing in users’ browsers, deterring them from visiting your site. It can also cause search engines to lose trust in your website, and could even cause hackers to gain access to user data.
Most SSL certificate providers will email you when your term is about to lapse, while others have auto-renewal set up, so you don’t have to do anything. Make sure to know what the process is for your certificate and always stay on top of it.
3. Ensure full website compatibility with SSL
Every part of your website must align with SSL encryption. All your site’s elements, including images, videos, scripts, and CSS files, need to be served over HTTPS to avoid mixed content issues. Mixed content can undermine your site’s security and result in warnings being displayed in visitors’ browsers.
Tools like Why No Padlock? can help you debug and troubleshoot mixed content warnings.
4. Enhance security with SSL and other security measures
Securing your website isn’t a one-time process. It takes continual monitoring and adjustments to stay ahead of threats. SSL certificates are just one part of site security.
This is where Jetpack Security shines, offering a comprehensive suite of WordPress security features that go hand-in-hand with your SSL certificate, like automated backups, malware scanning, and spam protection.
Frequently asked questions about SSL certificates
What is an SSL certificate, and why do I need one for my website?
An SSL certificate encrypts the data between your website and its visitors, ensuring it can’t be intercepted or tampered with. In today’s digital age, an SSL certificate is an essential component of any website, not just those that handle sensitive information.
What is HTTPS, and how does it relate to SSL certificates?
HTTPS stands for Hypertext Transfer Protocol Secure. It’s essentially the secure version of HTTP, and it’s enabled by installing an SSL certificate on your website. When your website uses HTTPS, it assures visitors that their connection is secure.
How does an SSL certificate work to secure data transmission?
An SSL certificate encrypts data in transit between your website and its visitors. It does this by creating a secure, encrypted tunnel through which data can safely travel. Without an SSL certificate, data is sent in plain text, making it easy for cybercriminals to intercept.
What are the different types of SSL certificates available, and how do they differ from one another?
There are several types of SSL certificates, each offering a different level of validation:
Organization Validated (OV) certificates provide an extra layer of trust by verifying the organization behind the domain.
Extended Validation (EV) certificates undergo a stringent validation process and offer visible cues, like a green address bar, to visitors.
Wildcard certificates secure a domain and its subdomains, while Multi-Domain certificates secure multiple separate domains.
How can I obtain an SSL certificate for my website?
You can obtain an SSL certificate from a certificate authority (CA). There are many CAs to choose from, and they all offer different types of certificates to cater to varying needs. Some hosting providers include SSL certificates in their plans or for an additional fee, while there are also external providers, like Let’s Encrypt.
Can I use a free SSL certificate instead of purchasing one?
Yes, you can. Free SSL certificates, like those provided by Let’s Encrypt, offer the same level of encryption as paid ones. However, they often lack some of the extras that come with paid certificates, such as warranties and the higher trust level offered by OV and EV certificates.Â
What is the process of installing and activating an SSL certificate on my website?
Installing an SSL certificate involves several steps. First, you need to generate a Certificate Signing Request (CSR) on your server. You then submit this CSR to a Certificate Authority when you apply for your certificate. Once the CA has validated your details, they’ll send you your SSL certificate, which you then install on your server.
In most cases, your hosting provider will take care of all these steps for you, automatically.
How often should I renew my SSL certificate, and what happens if I let it expire?
Most SSL certificates need to be renewed every 1 to 2 years, although the exact timeline can vary. SSL For Free, for example, requires a renewal every 90 days.
If you let your SSL certificate expire, your website data will become unsecured and visitors will be greeted with warning messages.
Can I use the same SSL certificate for multiple websites or subdomains?
If you have a Wildcard SSL certificate, you can use it for one domain and all its subdomains. If you want to secure multiple separate domains with one certificate, you’ll need a Multi-Domain SSL certificate.
Are SSL certificates compatible with all web browsers and devices?
Yes, most SSL certificates are compatible with all major web browsers and devices. That said, the visual indicators of the website’s security (like the padlock icon or green address bar) can vary between browsers.
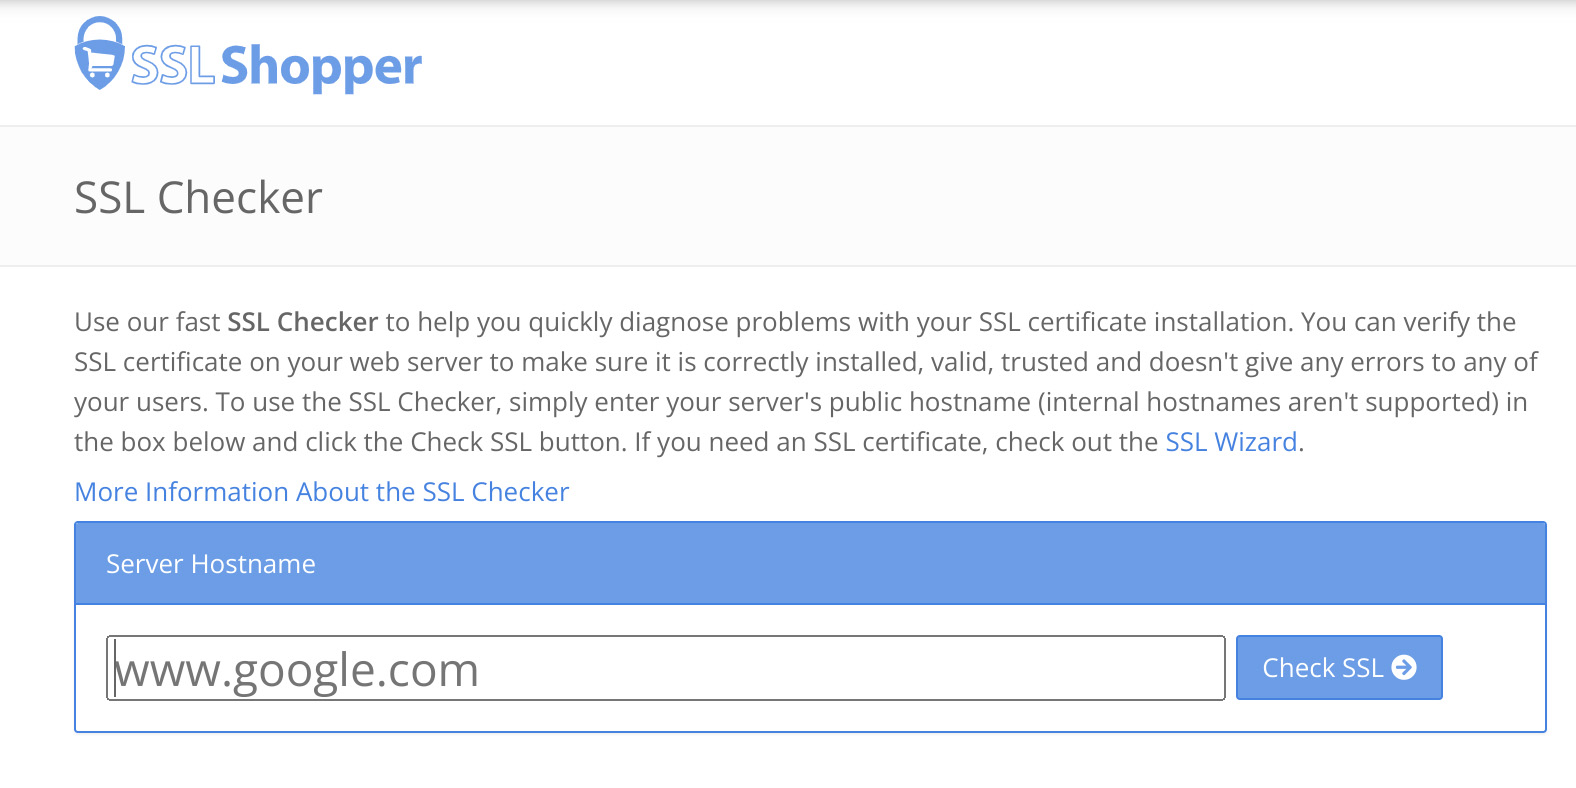
How can I verify if my SSL certificate is properly installed and working correctly?
You can use an SSL Checker tool, which will analyze your SSL certificate and report on its status, expiration date, and any potential issues.Â
What is mixed content, and why is it important to address it for a secure website?
Mixed content occurs when a secure (HTTPS) webpage includes unsecured (HTTP) elements. This can create a weak spot in your website’s security, allowing hackers a chance to exploit it. It’s like having a fortress with one unguarded door — the entire fortress becomes vulnerable.
How can I fix mixed content issues on my website?
To fix mixed content issues, you need to ensure all elements of your website are served over HTTPS. This might involve updating links in your website’s code or configuring your server to automatically redirect HTTP requests to HTTPS.
Are SSL certificates only necessary for websites that handle sensitive information?
While it’s especially critical for websites handling sensitive information, such as payment details or personal data, every website will benefit from the added security and trust an SSL certificate provides. An SSL certificate tells your visitors that you care about their safety and is important from an SEO perspective as well.
Some browsers will even display a warning for users who try to visit sites without an SSL certificate. So, for all intents and purposes, SSL certificates are required for every site regardless of its size or purpose.
Can I transfer an SSL certificate from one hosting provider to another?
Transferring an SSL certificate between hosts can be technically challenging and is often unnecessary. Instead, it’s usually easier to simply apply for a new SSL certificate from your new host or a third-party CA.
What are some common SSL certificate errors, and how can I troubleshoot them?
Common SSL certificate errors include an expired certificate, a domain name mismatch (where the domain name in the certificate doesn’t match the domain it’s installed on), or a certificate that’s not trusted (usually because it’s self-signed, or the CA isn’t recognized). Troubleshooting these errors usually involves renewing, reissuing, or replacing your certificate.
Can I have multiple SSL certificates on my website for different purposes?
Yes, you can. For instance, if you operate an ecommerce store with a blog, you might use an EV SSL certificate for the store and a DV SSL certificate for the blog. This allows you to tailor your security measures to the specific needs and risks of different parts of your website.
Jetpack Security: a full security suite for WordPress sites
Now that we’ve gone through the nitty-gritty of SSL certificates, let’s take a moment to switch gears. Because while SSL is vital for site security, it’s not the only tool in the toolbox. You need a comprehensive workshop to create and maintain a secure environment for your site and its users.
That’s where Jetpack Security comes in. It’s the all-in-one security solution that takes care of your WordPress site’s security needs.Â
While SSL certificates secure the transmission of data between your site and its visitors, Jetpack Security focuses on protecting your site itself. It offers a suite of powerful security tools that can help you fend off attacks, monitor your site’s health, and recover quickly if things do go wrong.
For instance, Jetpack Security’s automated real-time backups ensure you always have a safe point to revert to, should the worst happen.Â
The WordPress malware scanning feature performs regular checks to sniff out any potential security threats. It’s your dedicated security guard, keeping an eagle eye on everything that’s happening on your site.
The spam protection feature is like your personal doorman, keeping out any unwanted, spammy “visitors” that might try to wreak havoc in your comments section or contact forms.
The activity log allows you to keep an eye on everything that happens on your site and even restore a backup to a specific point in time.
Last but certainly not least, the downtime monitoring feature keeps tabs on your website’s availability. It’s the equivalent of a neighbor keeping an eye on your house while you’re on vacation, alerting you if something seems amiss.
As we’ve shown, security is not a one-and-done deal. It’s an ongoing commitment that requires attention to many different facets. SSL certificates are a cornerstone of that commitment, providing a critical layer of protection for the data traveling between your website and its visitors. But they’re just one part of the picture.
By using SSL certificates in conjunction with a comprehensive security solution like Jetpack Security, you’re doing your part to build a safer, more trustworthy internet.
So tighten the bolts, check the locks, and turn on the alarm. Welcome to Jetpack Security. Start your journey by discovering more here: https://jetpack.com/features/security/
WordPress has built a strong reputation of trust, ease, and adaptability, cementing its role as the backbone of countless websites. But even the most stable platforms aren’t immune to issues.
The reality is that site owners can make mistakes, websites can be hacked, and servers can crash. And if any of these things happen, you could experience downtime, hassle, stress, compromised data, lost sales, and more.
But this is where a WordPress backup service can save the day. While insurance can help compensate you for a loss, it can’t change whatever hiccup caused the damage. The right WordPress backup plugin allows you to essentially go back in time and return things to the way they were before, before anything went wrong.
But how do you choose the best solution?
The importance of a reliable WordPress backup service
We often get caught in a false sense of security — the “It won’t happen to us!” mentality. That is until, of course, it does.
A server crash, a cyberattack, or a simple error can turn your busy WordPress site into a ghost town. But when something goes wrong, a WordPress backup service allows you to roll back the clock, restoring your site to a time when all was well.
A reliable backup service isn’t just a contingency plan; it’s your peace of mind. It safeguards your hard work, your customer data, and your digital presence. It’s your assurance that, despite what may come, your website will endure.
Key considerations for choosing a WordPress backup solution
When it comes to choosing a WordPress backup solution, your unique requirements need to guide your decision-making process. But how do you know what to look for? We’ve organized the myriad of factors into eight key considerations that should help.
1. Backup method: automated vs. manual
You might think you’re saving money by opting for manual backups, but they’re not worth the savings. Manual backups require your time, and time, as you know, is money. Moreover, they demand constant attention and, if missed, can leave your site vulnerable.
On the other hand, an automated backup solution ensures your site is backed up regularly without your active involvement. This allows you to focus on what really matters — growing your business.
If you almost never create new posts or pages, accept form submissions, or update content, you may be okay to choose a manual method. For the majority of sites, however, automatic WordPress backups are the way to go.Â
2. Backup frequency: real-time vs. scheduled vs. manual
The frequency of backups is a vital aspect to consider. Are real-time backups necessary for your business, or would daily or weekly backups suffice? Real-time backups mean that your site data is backed up immediately whenever changes are made, ensuring you never lose a bit of your work. These are absolutely critical for any website that regularly publishes blog posts, receives form submissions, or accepts ecommerce orders.
Scheduled backups — whether daily or weekly — provide a regular snapshot of your site. If your site isn’t updated frequently, this might be an acceptable solution. Manual backups, on the other hand, give you full control but demand the highest level of attention and are completely dependent on how often you’re available to perform the task.
For the majority of websites, real-time backups will be the best and most secure option to safeguard your hard work.
3. Data storage location
The location of your backup storage can make all the difference when disaster strikes. Backups stored on your server are certainly better than nothing, but they share the same risks as your website. If your server goes down or is compromised, you lose your backups.
Cloud storage, on the other hand, provides an extra layer of security by storing your backups offsite. Traditionally, the choice came down to a trade-off between convenience and security. But recent tools like Jetpack VaultPress Backup are so easy to integrate that you can benefit from convenience without sacrificing security.
4. Storage security and data encryption
Not all storage is created equal, especially when it comes to security. A backup solution that doesn’t offer robust security measures is like a bank without vaults. It’s essential to ensure your backup tool offers solid security measures, including data encryption, to keep your files and data away from prying eyes.
5. Ease of restoring a backup
When your site goes down, time is of the essence. You need a backup solution that makes restoring your site as easy as possible. Some options can get you back online with a single click, while others might require you to go through complex procedures, often under stressful circumstances. You don’t want to be waiting through a long support chat queue while your site’s in distress.
6. Scalability for growing websites
As your presence grows, your website will too. You’ll add more content, get more traffic, or expand your commerce activities. It’s important to choose a backup solution that can grow with your site so, once it’s set up, you don’t have to ever worry about it again.
7. Compatibility with WordPress versions and plugins
Imagine buying a jigsaw puzzle only to discover the pieces don’t fit together. That’s what it’s like when your backup solution isn’t compatible with your WordPress version or the plugins you use. Ensuring compatibility is crucial to avoid unexpected surprises down the road.
For example, if you’re running WordPress Multisite, verify that the backup plugin you choose is compatible with that type of installation.
Review the popularity, update frequency, and reviews of potential backup plugins. This should give you an idea of how reliable the solution is and how attentive its developers are to potential conflicts between software versions.
Some backup solutions require a level of technical expertise that goes beyond the reach of most website owners. These solutions might offer more customizability, but they could also leave you reliant on a developer for setup and management.
Conversely, user-friendly solutions are designed with the average person in mind, making it easy to set up and manage backups without a costly developer.
So, what’s the best WordPress backup solution?
An ideal backup solution is one that combines the best of these features — a solution that offers automated, real-time backups. One that stores your data securely offsite, yet allows for easy restoration. One that’s built by reliable developers who support integrations with the majority of popular plugins and can quickly troubleshoot and resolve issues.
Enter Jetpack VaultPress Backup: real-time, disaster-proof backups
From the people behind WordPress.com comes a backup solution built with the same philosophy of simplicity, accessibility, and reliability — VaultPress Backup. Picture this: your own personal vault, tucked safely away in the digital clouds, holding all of your precious website data, ready to be unlocked at a moment’s notice. That’s the essence of VaultPress.
Overview of Jetpack VaultPress Backup
Jetpack developed VaultPress Backup with every type of WordPress site owner in mind. The goal was to provide a way to easily safeguard your WordPress site and restore it without any advanced technical knowledge.
VaultPress Backup saves every single change that happens on your site in real time, keeping it safe on secure cloud servers, and making it readily available if you ever need to restore a backup.
It even has an activity log, so you can identify the exact point in time that issues occurred and restore to just moments before that action took place.
Features and benefits of Jetpack VaultPress Backup
1. Real-time backups
VaultPress Backup captures every change on your site as it happens. So whether you’re updating a post or adding a new product, you can rest easy knowing that every change is safely stored.
This even includes WooCommerce orders. And, if you have to restore a backup, all of your orders will be saved — no matter when they took place — so things can keep running smoothly.
2. Ultra-secure offsite cloud storage
With VaultPress Backup, your files aren’t just stored anywhere. They’re tucked away in secure, offsite cloud storage. The digital vault is armored against threats, ensuring your data is safe and sound.
3. A one-click restore process
If you ever need to restore your site, VaultPress Backup makes it as simple as a mouse click. VaultPress Backup’s one-click restore feature is your express ticket back to normalcy, minimizing downtime and keeping your digital presence intact. You can even restore a backup if your site is completely down, and take advantage of the Jetpack mobile app if you’re on the go.
4. Cost-effective pricing options
Jetpack believes that peace of mind shouldn’t break the bank. That’s why pricing plans were crafted with small- and medium-sized organizations in mind. With VaultPress Backup, you’re not just buying a service, you’re investing in reliability, security, and peace of mind.
5. Built by leading WordPress experts
Who better to trust your site with than the folks who know WordPress inside out? VaultPress Backup is built by the same team behind WordPress.com, ensuring seamless integration, top-notch compatibility, and continued updates.
6. Easy and fast to set up
With VaultPress Backup, you won’t need to hire a developer or spend hours reading through a complex manual. The setup process is straightforward and user-friendly. And if you ever need assistance, Jetpack’s customer support team is always ready to help.
How to set up VaultPress Backup on your WordPress site
Setting up VaultPress Backup is a breeze. It’s a matter of a few clicks and entering a bit of information. Here’s a simple step-by-step guide:
1. In your WordPress dashboard, go to Plugins → Add New. Search for “Jetpack VaultPress Backup,†then click Install Now → Activate.
2. A new screen will appear asking you to set up Jetpack VaultPress Backup. Click the Set up Jetpack button.
3. On the next screen, click Approve to connect your site to an existing WordPress.com account or create a new one.
4. Then, choose a VaultPress Backup plan based on the needs of your site. Complete the purchase process. Your first backup will begin automatically.
It’s as simple as that. No coding, no complex configuration — just straightforward, reliable backups.
Comparing VaultPress Backup to other WordPress backup solutions
In the sea of backup solutions, VaultPress Backup shines like a lighthouse, guiding you safely through the storm. But don’t just take our word for it. We invite you to compare it to other WordPress backup solutions.
You’ll find that when it comes to real-time backups, secure offsite storage, one-click restoration, scalability, and overall reliability, VaultPress stands tall and proud. For a detailed, side-by-side look, check our comprehensive post: A Comparison of the Best Backup Plugins for WordPress.
Frequently asked questions about WordPress backup services
What is Jetpack VaultPress Backup, and why choose it as my WordPress backup service?
VaultPress Backup is a real-time backup and security scanning service designed and built by Automattic, the same people who are behind WordPress.com and contribute to the WordPress open source project. Choosing VaultPress Backup means investing in a reliable, comprehensive, and easy-to-use backup solution for your WordPress site.
How does VaultPress Backup differ from other WordPress backup solutions?
VaultPress stands out with its real-time backup capability, secure offsite storage, one-click restore feature, and seamless WordPress integration. It’s a robust, reliable, and comprehensive solution for WordPress site backups.
Is VaultPress Backup suitable for small and large WordPress sites?
Absolutely. VaultPress is built to scale with your site, whether you’re running a small blog or a large ecommerce store. Jetpack offers plans that cater to different needs, ensuring you pay only for what you use.
It’s important to note, however, that Jetpack VaultPress Backup does not currently support WordPress Multisite.
How often does VaultPress Backup back up my WordPress site?
Jetpack VaultPress Backup performs real-time backups, meaning it records changes to your site as they happen. You can rest easy knowing that every update, every post, every comment, and every order is backed up immediately.
What does “real-time backups” mean?
“Real-time backups” means that Jetpack VaultPress Backup saves changes to your site as they happen. Whether you publish a new post or receive a new comment, it’s saved immediately.
Are my backups secure and protected with VaultPress Backup?
Yes. VaultPress Backup stores your backups in secure, offsite cloud storage. Additionally, the storage system is built to be resilient against hardware faults and cyber threats.
How long does VaultPress Backup store my backups?
VaultPress Backup stores your backups based on the plan you’ve chosen, and the storage space used by your site. You can choose a plan that stores for up to 30 days or even a full year. For more information, check out our detailed documentation.
How do I restore a WordPress backup created by VaultPress backup?
Restoring your site from a VaultPress backup is as simple as clicking a button. You can restore your site to the time of a particular event in the activity log or to a specific day. Either way, it just requires clicking a button and waiting for the restore process to complete. You can view the full documentation here.
Does Jetpack VaultPress Backup save only my database or files as well?
VaultPress Backup saves both your database and the files that make your site unique. This includes everything necessary to restore your website in case you ever need to. Learn more about what VaultPress Backup does and does not save.
Will using VaultPress Backup slow down my WordPress site?
VaultPress Backup is designed to work in the background, saving copies of your site without impacting its performance. However, to make the most of the tool, make sure that you add server credentials to your settings. This allows your backups to run as efficiently as possible, plus ensures that you’re ready to restore a backup the second you need to.
Can an agency use VaultPress Backup to back up its clients’ WordPress sites?
Jetpack VaultPress Backup: The most proven backup service for WordPress
The value of your WordPress site extends beyond the bits and bytes that form its digital structure. It’s a collection of your hard work, dedication, creative expression, and professional growth. It’s your digital home. Safeguarding it should be a priority.
VaultPress Backup offers real-time, cloud-based backups, making sure that every change, every update, every comment, and every order on your site is immediately backed up. And in the event of a site crash, the one-click restore feature enables you to get your site up and running again in no time.
VaultPress Backup is the most proven WordPress backup plugin, with over 269 million backups over the last ten years. If you want the best for your website and business, then you’ll love what VaultPress Backup has to offer: https://jetpack.com/upgrade/backup/
Last week, the Jetpack team joined the WordPress community for WordCamp US 2023. It was exciting to be so close to our nation’s capital in a picturesque setting like National Harbor. As Super Admin sponsors, we were honored to contribute to this unforgettable celebration of the open source project. It’s one of our favorite events of the year — an opportunity for us to connect with friends and colleagues in the community and share the latest exciting developments in Jetpack.
The Jetpack booth. Photo: Kelly Hoffman
Empowering WordPress Agencies
We were thrilled to show off our new Pro Dashboard and Agency program at WordPress US. Our mission is to democratize multi-site management, enabling WordPress agencies to remove the tedium and focus on what they do best — providing excellent service to their clients.
We spoke to agencies that manage hundreds of WordPress sites, as well as freelancers who maintain just a handful. The response was rewarding to experience in person. We gave demos of the dashboard and showed off the power of bulk managing plugin updates, uptime monitoring, malware threats, backups, and stats. You can see what they saw and try it for free right now.
Showing off our Agency and AI tools. Photo: Kelly Hoffman.
Using AI to Enhance Your Productivity
AI has been the buzz for the last year and it wasn’t any different at WordCamp US. To complement an excellent workshop on using AI to enhance the creative process, Jetpack presented its AI tools that help people improve their productivity.
We’ve previously announced that the Jetpack AI Assistant can help you improve your writing directly in the WordPress editor. Change your tone, get suggestions to improve your writing, translate to other languages, and more.
And as a first step in automating site building, now the AI Assistant can help you build custom forms quickly for even the most specific use case.
Personalized Swag
The only thing better than WordCamp swag is personalized WordCamp swag. We had people on site to engrave power packs. Wherever you go, this little Jetpack will make sure you don’t run out of juice.
The WordCamp concluded with a social event at the magical Smithsonian Museum of Natural History. It was amazing to be surrounded by such natural beauty along with so many of our friends and colleagues.
Social Event at the The Smithsonian Museum of Natural History. Photo: Mindy Postoff
Our Jetpack is Fueled by the People
Beyond showcasing what’s new in Jetpack, WordCamp US 2023 was an opportunity for us to listen, learn, and engage with the WordPress community. The conversations were truly inspiring, and we are grateful to everyone who took the time to connect with us.
We left National Harbor with a sense of excitement and gratitude. Being part of WordCamp US 2023 reminded us once again of the incredible power of WordPress and the remarkable community that supports it. As we return to our homes across the globe, fueled by the energy you can only find at WordCamps, we’re more committed than ever to create innovative solutions that empower website owners, agencies, and developers worldwide.
What was your favorite part of WordCamp US? Let us know in the comments!
Choosing the right web host is one of the most important steps when launching a site. If you plan on using WordPress, you’ll want to opt for a service that’s tailored to this platform.
Fortunately, there are many companies that offer top-notch managed WordPress hosting. When you sign up for this service, the web host will handle all essential tasks for you, including updates and software configuration. This leaves you with more time to work on your passion.
In this article, we’ll go through a managed WordPress hosting comparison and the service works. We’ll also show you how to pick the right web host and review some of the best providers on the market. Let’s get started!
What is managed WordPress hosting?
Managed WordPress hosting is a service that’s designed to offer a VIP experience. With this plan, the provider takes care of tasks that are typically handled by the website owner.
Some hosting providers focus specifically on WordPress websites. This means they provide features that are unique to the content management system (CMS).
Typically, they offer some or all of the following services:
Increased security. Your hosting provider will handle some aspects of WordPress security to ensure that your site is protected from hackers and malware. This can include scanning for vulnerabilities and providing regular updates and patches.
Performance optimization. Managed hosting providers tend to use server-level caching and content delivery networks (CDNs) to enhance website performance.
Managed updates. Some providers take care of WordPress updates for you. This ensures that the site is always running the latest and most secure versions of software.
Automatic and on-demand backups. Most managed hosts will create backups of your site on a regular basis.
Expert WordPress technical support. This type of hosting usually comes with access to premium support from WordPress experts. They can assist with technical issues and provide guidance on best practices for WordPress sites.
Access to staging environments. Many managed hosting providers offer staging environments where you can test changes or updates to your site before they go live.
Increased scalability. Managed hosts typically handle traffic spikes better than unmanaged hosts. Depending on the plan you choose, you might get access to a virtual private server (VPS) or a dedicated server. That means that you’ll either share resources with fewer websites, or even have them all to yourself.
The primary goal of the best managed WordPress hosting companies is to offer a hassle-free server environment. This enables you to focus on growing your business. It’s an ideal choice if you want to offload technical site tasks.
The importance of choosing the best WordPress managed hosting provider
If you don’t research web hosting providers, you might end up stuck with a poor hosting service. Of course, you could always migrate to a new web host, but this can be a time-consuming process.
When it comes to choosing a WordPress hosting provider, you’ll want to look at as many reviews as possible. While doing so, try to pay special attention to the following:
Server performance. Site speed is critical to your website’s success. Your web host should offer top-of-the-line performance.
Uptime guarantee. These days, any decent web host offers near-perfect uptime. That means that uptime averages above 99% and, typically, close to 100%.
Security practices and tools. You’ll want to choose a provider that offers a variety of security measures to help protect your site against common threats.
Backups and recovery solutions. Your managed hosting provider should offer automated and on-demand backups. Moreover, you should be able to restore your website from a backup directly from your hosting account.
Expert WordPress support. If you use a managed web host that specializes in WordPress, their support system should reflect that. Agents need to be trained in the CMS, so they can help you troubleshoot any technical issues that may arise.
Scalability. The web host should have several plans you can upgrade to as your site grows. Managed web hosts tend to cater to sites with higher performance needs.
Price is also an important factor when choosing a hosting provider. With that in mind, we decided to review managed WordPress hosting options that offer great plans at decent starting prices.
The best managed WordPress hosting providers (10 options)
Now, let’s look at some of the best managed WordPress hosting companies on the market. We’ll discuss the key features, pros and cons, and pricing of each one.
1. Bluehost
Bluehost is one of the most popular hosting providers. The company offers a large selection of hosting plans, ranging from shared to dedicated options. You can also use Bluehost to register domains, host your email account, and find web design and development professionals to help you with your projects.
On top of its regular plans, Bluehost offers a variety of WordPress-specific options. You have basic WordPress shared hosting, hosting for WooCommerce sites, and managed plans.
If you sign up for a long-term contract, you’ll benefit from very good prices. This is a common practice among hosting providers, but Bluehost offers some of the best deals on the market.
Bluehost’s managed WordPress plans come with a free content delivery network, a collection of professionally-built WordPress themes, automatic updates, round-the-clock phone support, and free Secure Sockets Layer (SSL) certificates. Some of these plans also include automatic daily backups and malware-scanning tools.
Key Features
Support for multiple websites (on some plans)
Free CDN integration
Free SSL certificate (limited to one year free for the Basic managed plan)
Around-the-clock phone support
Automatic daily backups (not available on all plans)
Malware scanning tools (not available on all plans)
Bundled premium WordPress themes
Bundled ecommerce plugins (with the Online Store plan)
Free WordPress migration
Pros and cons
Bluehost’s main selling point as a managed WordPress hosting company is its prices. Depending on the length of your contract, you can end up paying as little as a couple of dollars per month for hosting (due annually). Plus, you’ll get freebies like bundled premium WordPress themes and ecommerce plugins.
On the other hand, its managed hosting features can feel pretty basic. If you’ve just launched a website, this may not be an issue for now. But if you want top-of-the-line performance or advanced security, you may need to look at other options.
Bluehost is one of the few web hosts on the market that offers real, around-the-clock phone support. If you want to be able to get someone on the phone at any time, this can be a good option for you.
Pricing
With Bluehost, you can get some of the best managed WordPress hosting deals, with plans starting at just $2.95 per month. The downside is that you only get these low prices if you lock yourself into a multi-year hosting contract.
2. DreamHost
DreamHost’s line of managed WordPress hosting plans is called DreamPress, and it offers three options. In terms of pricing, DreamHost is in the middle of the pack, neither a budget option nor a super-expensive one.
Every DreamPress plan comes with a trove of WordPress features. You’ll get a free domain, a pre-installed SSL certificate, unlimited email hosting, on-demand backups, and staging functionality. DreamPress will also set up Jetpack on your WordPress website.
If you plan on using a website builder, DreamHost offers its own custom solution. It also comes with a massive library of ready-to-go themes that you can use for your website.
In terms of support, DreamPress enables you to talk to agents through chat or email. The highest tier of DreamPress plans also offers priority support, which means faster responses.
Key Features
Support for one website (on all plans)
One-click staging sites
Built-in caching
CDN integration
Free WordPress migrations
Custom drag-and-drop builder
Free SSL certificate
Free domain registration
Automatic WordPress updates
Free Jetpack integration
Automated and on-demand backups
SFTP, SSH, and WP-CLI support
Pros and cons
DreamPress offers a comprehensive set of features with its managed WordPress plans. If you want a host that comes with plenty of site templates and integrations, DreamPress is one of the few providers that offer these tools.
There are a few downsides to using DreamPress. First, you don’t get access to phone support (although callbacks are available).
Additionally, the basic tier doesn’t offer CDN integration, and some Jetpack Security features, like malware scanning, are only available with the more expensive plans.
Finally, each plan is limited to a single website. This means DreamPress can be an expensive option if you’re looking to host multiple sites.
Pricing
DreamPress plans start at $19.95 per month and go down a bit if you pay yearly. There’s also a big difference in price between the Plus and Pro plans.
The DreamPress Plus plan offers the best value for money. It gives you access to all managed hosting features. This starts at $24.95 per month when paid yearly.
3. A2 Hosting
A2 Hosting offers almost every type of hosting plan imaginable. The company’s managed hosting service is among the best in the industry in terms of features and price-to-performance ratio.
Although A2 Hosting’s plans aren’t exactly budget-oriented, they’re still among the best you can find. Moreover, some of these plans support unlimited websites.
With A2 Hosting’s managed WordPress plans, you get automated daily backups, Jetpack integration, around-the-clock support, automatic updates, site staging, and more. When it comes to support, A2 Hosting offers phone, chat, and email access to specialized agents.
Key Features
Support for one or more websites
Jetpack integration (with more advanced tools available on the higher plans)
Support via phone, chat, and email
Daily website backups
Daily malware scans (available through the Jetpack integration)
Staging sites
Automatic WordPress updates
Pros and cons
One of the main advantages of using A2 Hosting is that you’ll find managed plans for nearly every price point. Moreover, the web host is very generous about the number of websites you can host on a single plan.
The company’s marketing can be a little confusing, though. All the managed plans offer what’s called “Turbo Serversâ€, but also “A2 Optimized WordPressâ€. Unless you dig into the documentation, it can be hard to understand exactly what these optimizations are and how they benefit you.
Pricing
A2 Hosting’s prices for managed WordPress hosting vary depending on the number of websites you want to set up. More expensive plans offer support for unlimited websites as well as better Jetpack integrations and site optimizations.
Plans start at $11.99 per month. You get the best value for money with the Jump plan, which supports up to five websites and costs $18.99 per month.
4. Liquid Web
Liquid Web is one of the most developer-friendly hosting providers you can find. Unlike most other web hosts that offer managed plans, Liquid Web gives you full access to the server. This means you can make any changes you want to its configuration.
This web host focuses on providing excellent performance. On top of configuring your server for optimal speed, the company also installs several plugins that can help improve your site’s performance. Among them, you have options for plugin monitoring and image optimization.
If you use WooCommerce, Liquid Web can also set up automatic daily testing for you. This feature will help you identify any issues with your store, and you can have the support team fix any problems that come up.
Aside from those features, you also get some of the basic perks you can expect from most managed web hosts, including free SSL setup, staging sites, automatic daily backups, and developer tools like WP-CLI support.
Key Features
Support for large numbers of websites (basically unlimited)
Full access to the server
Performance optimization plugins
Automatic daily testing for WooCommerce stores
Free SSL setup
Staging sites
Automatic daily backups
WP-CLI support
Pros and cons
Liquid Web is a fantastic option if you want a managed WordPress hosting service that gives you full control over the server. This can be a double-edged sword unless you have experience with server management, as you might undo some of the optimizations by mistake.
You can get the most out of Liquid Web’s managed WordPress hosting if you run a WooCommerce store. The company’s automated daily testing is a fantastic tool that helps ensure your store is running perfectly at all times.
Another perk is that all the plans offer the same features, aside from the amount of storage and bandwidth you get. This makes it easy to select a plan as you’re not compromising on features if you opt for a cheaper option.
Pricing
Liquid Web’s pricing is very straightforward. Plans start at $19 per month with support for one website. More expensive plans offer additional resources and provide support for more sites, but the managed features you get are the same on every plan.
5. MilesWeb
MilesWeb offers managed WordPress hosting on top of your favorite cloud service provider. The platform integrates with DigitalOcean, Vultr, Amazon Web Services (AWS), and Linode. You can choose which cloud service you want to use, and MilesWeb will set it up for you, including access to a custom hosting dashboard.
Prices can vary depending on the cloud provider you want to pair with MilesWeb (although not by a lot), but you get the same features with any of them. These include staging sites, automatic backups, free SSL setup, a dedicated firewall, and support for unlimited websites.
In terms of security, MilesWeb offers a tool that enables you to check the integrity of your site’s files. This can help you detect malicious changes to core files, and if you spot any, the support team will clean up your WordPress site for you. You can reach out to them at any time via chat, email, or phone.
Key Features
Managed hosting service compatible with DigitalOcean, Vultr, AWS, and Linode
Support for unlimited websites
Staging sites
Automatic backups
Free SSL setup
A dedicated firewall
File integrity checks
Website cleanup services for hacking or malware removal
Support via chat, email, and phone
Pros and cons
If you want to use a cloud hosting service while also enjoying the benefits of a managed WordPress hosting provider, MilesWeb could be the right choice. The company offers support for most of the popular cloud hosting services on the web. Plus, it offers similar pricing for all of them.
On the other hand, if you’re not interested in the cloud stack your WordPress web host uses, you’re probably better off with another provider. This is because selecting a MilesWeb plan requires you to have an idea of the kind of resources your website will need, including the number of virtual CPUs, RAM, storage, and bandwidth.
Pricing
MilesWeb prices vary depending on which cloud provider you want to use and the resources you need. Prices start at around $52-56 per month for every provider, which puts MilesWeb among the most expensive managed WordPress hosting providers on the market.
6. EuroDNS
EuroDNS offers an eclectic combination of services, ranging from domain name system (DNS) management to domain registration and managed WordPress hosting. The company’s managed hosting services are designed to be accessible for any kind of use. It offers two main plans to make your choice simpler: Basic and Advanced.
The bulk of EuroDNS’s managed WordPress hosting perks relies on Jetpack. Thanks to its Jetpack integration, you get access to automatic backups, malware scanning, automatic WordPress updates, and CDN integration.
EuroDNS offers support through phone and email. Your account also entitles you to priority support from Jetpack if you experience any issues.
Key Features
Support for one website
Jetpack integration
Automatic backups
Malware scanning
Automatic WordPress updates
CDN integration
Support via phone or email
Pros and cons
EuroDNS makes your life easy by only offering two managed WordPress hosting plans. The downside is that the WordPress Basic plan offers a meager 1GB of storage, which is not enough for many sites.
The main draw of using EuroDNS is its integration with Jetpack. If you’re a fan of Jetpack and its many features, EuroDNS enables you to get hosting for a cost that’s similar to a premium Jetpack license.
Pricing
As you might guess from the name, EuroDNS prices are in Euros. Prices start at €5.99 per month for the WordPress Basic plan, but you’re better off paying for the Advanced plan if you want more features and storage. This will cost €11.99 per month.
7. IONOS
IONOS is one of the cheapest managed WordPress web hosts on the market, with prices starting at $1-2 per month. On top of that, IONOS offers a unique onboarding experience.
When you sign up for an IONOS account, the company’s WP Assistant will guide you through a series of questions to help you find the right theme and connect your domain and email with the service. This works because IONOS provides free domain registration and email hosting with all its accounts.
With IONOS, you get to enjoy backups through Jetpack. Plans come with 12 free months of Jetpack Complete, which includes backups, daily malware scanning, CDN integration, and many other features.
Depending on the plan you choose, you’ll also get access to a caching plugin and repairs in case of malware infections. If you find yourself in a technical bind, you can contact IONOS support through phone, chat, or email.
Key Features
Support for one website
Jetpack integration with access to the entire suite of tools and a one-year free subscription
Automatic backups
Malware scanning and cleanup (the latter is only available with the Boost plan)
Free domain registration
Website configuration wizard
A caching plugin
Support through chat, email, and phone
Pros and cons
Low prices are the company’s main selling point. Few web hosts can compete with the kind of pricing IONOS offers.
Like many providers, IONOS offers promotional pricing during the initial contract, then raises the fees upon renewal. But even the renewal prices are competitive. When you add the complimentary domain to the mix, you get a real bargain.
The IONOS WP Assistant tool is also a big plus if you’re working on your first WordPress project. The assistant will walk you through some of the most difficult parts of setting up a website.
IONOS doesn’t offer many perks outside of the many features available through the integration with Jetpack.
Pricing
As we mentioned earlier, IONOS prices are incredibly reasonable. The basic plan starts at $2 per month and goes up to $4 after the initial contract. Meanwhile, the Grow option costs $1 per month and goes up to $8 after that contract expires.
8. Pressable
In terms of performance, few hosting providers can match Pressable. This managed WordPress host focuses on providing the best possible service and combines top-of-the-line security and advanced WordPress features.
This hosting platform is owned by Automattic (the people behind WordPress.com). When it comes to features, Pressable offers just about anything you expect from a managed service, including free SSL certificates, automatic backups and updates, a web application firewall (WAF), malware scanning, hack recovery assistance, and more.Â
Pressable also integrates with Jetpack Security. This gives your site protection against brute force attacks and spam.
Additionally, Pressable is very flexible in terms of pricing. You can choose your plan based on the number of sites you need to host, or how many visitors you expect to receive.
Key Features
Support for as many websites as you need
A free SSL certificate
Automatic backups
A web application firewall
Malware scanning
Hack recovery assistance
Integration with Jetpack Security
Pros and cons
Pressable is possibly the best managed WordPress hosting company if you want to get the best possible performance for your website. The web host offers a fantastic collection of managed features and some of the best support in the business.
The only downside of using Pressable is that it’s not the best option for small projects. The pricing is flexible, but it’s geared toward websites with high traffic and is priced accordingly.
Pricing
Pressable offers a broad range of plans. Prices start at $19 per month for one website with support for up to 5,000 visitors per month. The company also offers custom options for those who have very specific needs.
9. InMotion Hosting
InMotion Hosting offers all kinds of plans, including managed WordPress hosting options. These are designed to provide the best possible performance and offer many developer-friendly features.
One of the company’s standout features is the option to create WordPress “snapsâ€. These are blueprints of plugin and theme combinations that you can reuse across different websites. This is particularly useful if you want to deploy multiple WordPress projects with similar functionality.
InMotion Hosting comes with automatic daily backups, staging functionality, and a custom WordPress hosting dashboard that makes it easy to manage multiple websites. Additionally, the managed plans offer direct billing to customers. If you run an agency and use InMotion Hosting to create and host WordPress websites, you can have clients pay for their hosting directly.
Key Features
Unlimited WordPress websites
Free SSL setup
Automatic backups
Staging environment
DDoS protection
A web application firewall
Customizable WordPress updates
“Snaps†of themes and plugins for re-use on other sites
Caching plugin integration
Direct client billing
Pros and cons
InMotion Hosting offers one of the only managed WordPress hosting services geared towards agencies. If you run an agency or work with clients on WordPress websites, this can be a fantastic option for you.
Meanwhile, the service can be a bit much for small or hobbyist websites. Most of its features are geared towards agencies and developers. If you run a personal website, you might be better off looking elsewhere.
Pricing
InMotion Hosting offers yearly and monthly pricing plans. Prices don’t vary whether you pay by month or by year, which is a welcome bonus.Â
Plans start at $15 per month, and they vary in terms of the resources you get. But they all provide access to the same set of managed WordPress features.
10. WPWebHost
WPWebHost bills itself as a beginner-friendly managed WordPress web host, and that label holds true. The company offers a simple selection of managed plans, all at reasonable prices and with most of the features you expect from this kind of service.
With WPWebHost, you get automatic daily and on-demand backups, support for multiple websites (on some plans), staging sites, automatic update management tools, DDoS protection, malware scanning, and more.
A lot of these features are powered by Jetpack Personal and Professional, which come for free with most of the WPWebHost plans. You also get a free domain with no upkeep costs for as long as you maintain your WPWebHost subscription.
Key Features
Support for multiple WordPress websites (on some plans)
Jetpack integration (Personal or Professional plans)
Automatic backups
Staging functionality
WordPress update management
Malware scanning
DDoS protection
A free lifetime domain (as long as your WPWebHost subscription is active)
Pros and cons
WPWebHost is a relatively budget-friendly managed WordPress option. The company caters to beginners with simple WordPress projects, but it still offers a solid selection of managed hosting plans.
Just like with IONOS, most of WPWebHost’s perks come from its Jetpack integration. This means you get a good bargain if you sign up for one of its cheapest plans.
Pricing
WPWebHost plans start at $3 per month and those numbers don’t go up upon renewal, which is great news. If you want the Jetpack integration, you’ll need to sign up for the WP Lite plan or above, which costs $7 per month. This plan comes with a Jetpack Personal license.
Comparison of the top managed WordPress hosting providers
Bluehost
DreamHost
A2 Hosting
Liquid Web
MilesWeb
EuroDNS
IONOS
Pressable
InMotion
WPWebHost
Number of websites
Multiple (on some plans)
One website
Multiple (on some plans)
Multiple websites
Unlimited websites
One website
One website
Multiple (on some plans)
Unlimited
Multiple (on some plans)
Starting prices per month
$2.95
$19.96
$11.99
$19
$52-56
€5.99
$1
$19
$15
$3
Automatic backups
On some plans
Yes
Yes
Yes
Yes
Yes
Yes
Yes
Yes
Yes
Free SSL certificate
Yes
Yes
Yes
Yes
Yes
Yes
Yes
Yes
Yes
Yes
Jetpack integration
No
Yes
No
No
No
Yes
Yes
Yes
No
Yes
Automatic WordPress updates
Yes
Yes
Yes
Yes (for plugins)
Yes
Yes
Yes
Yes
Yes
Yes
CDN integration
Yes
Yes
No
No
No
Yes
Yes
Yes
No
Yes
Staging functionality
Yes
Yes
Yes
Yes
Yes
No
No
Yes
Yes
Yes
Firewall and DDoS protection
No
Yes
Yes (on some plans)
No
Yes
No
Yes
Yes
Yes
Yes
Malware scanning
On some plans
Yes
Yes
Yes
Yes
Yes
Yes
Yes
No
Yes
Support options
Phone
Email and chat
Phone, chat, and email
Phone, chat, and email
Phone, chat, and email
Phone or email
Phone, chat, and email
Chat
Phone, chat, and email
Email
Frequently asked questions
Do you still have questions after reading this managed WordPress hosting comparison? Let’s answer some of them.
Is managed WordPress hosting worth it?
Whether managed WordPress hosting is worth it or not depends on your budget and technical expertise. If you don’t mind troubleshooting technical issues, optimizing website performance, and tinkering with security settings, you don’t need managed hosting.
If you don’t want to deal with WordPress site maintenance tasks on your own, managed WordPress hosting can be worth it. With this type of hosting, you’re paying a premium for a more VIP level of service.
Managed hosting is also a smart investment if you can do these tasks on your own but want to spend your time focusing on other aspects of your website. WordPress maintenance and security can eat up a decent amount of time, so there’s no shame in delegating that work if you have the budget for it.
How does managed WordPress hosting differ from regular shared or VPS hosting?
Managed WordPress hosting plans don’t have anything to do with the kind of server setup that you get. Some managed providers might offer plans on shared servers (although this is very uncommon), a virtual private server (VPS), or even dedicated hardware.
What sets managed hosting apart is the level of service and additional features that you get. Typically, when you pay for a hosting plan, you’re just about on your own. With managed hosting, you can get access to a better support system and have several maintenance and security tasks taken care of for you.
If a hosting provider offers both managed and unmanaged plans, we recommend comparing the features they offer. You’re likely to find that the managed option includes a lot more perks.
Do managed WordPress hosting providers keep backups of my site?
Most managed WordPress hosting providers offer automatic backups. Plus, a lot of them handle backups through their hosting control panels. This means you have access to these copies even if you get locked out of WordPress.
The frequency of backups will vary depending on which hosting provider you choose. Some might also offer on-demand backups, which you can use to create copies of your WordPress site before making significant changes to it.
Top WordPress experts agree, however, that you should keep off-site backups in addition to those stored by your host. This protects your site in case an issue spurs from the host itself.
What should I look for when choosing a managed WordPress hosting provider?
The perks you get will depend on the web host you choose. Not all of them offer the same level of features. Moreover, prices can vary a lot from one web host to another.
Your choice should be based on your budget and the features you want. Before settling on a provider, you should compare multiple hosting companies and look for an option that fits your specific needs.
It’s important to make sure that your chosen provider can perform regular backups for you (preferably in real-time). You’ll also want to choose a company that takes security seriously. For example, it should provide features like malware scanning and protection against brute-force attacks.
Switch to managed WordPress hosting
If you use WordPress, you might want to consider opting for managed hosting. There are a lot of managed WordPress hosting providers that offer competitive prices and give you access to a much better quality of service than with most non-managed options.
With managed hosting, your web host will take care of a variety of security and performance tasks, so you can focus on growing your website.
Many reputable WordPress providers will automatically install Jetpack to help boost security on your website. Learn more about Jetpack Security!
Does your agency handle multiple clients, and as a result, multiple websites? Managing plenty of sites can be time-consuming. For example, setting up Jetpack alone — an essential step in making a website more functional and secure — isn’t exactly simple.
Thankfully, there’s now a way to streamline the process of configuring a site for each client you serve. You can just do the initial setup for one website and just deploy the same configuration across all the other sites you will make, thanks to InstaWP. This not only makes the repetitive task faster but also ensures consistency in all your projects.
In this post, we’ll show you how to do exactly just that.
Why install Jetpack?
You might be wondering why you should install Jetpack in the first place when setting up a site. Well, Jetpack provides a variety of features for WordPress sites, such as better site security and site performance, as well as backups. You don’t have to turn on everything — Jetpack offers plugins that allow you to install only what you want and need.
Ultimately, it really depends on you and/or your client. But it is highly recommended if you want to improve your site’s security, performance, and speed. Jetpack can help you attract more traffic.
The question is, how do you make sure that you only set up Jetpack once and just copy your settings to every website you make? This is where InstaWP comes in with its test site/sandbox feature.
What is InstaWP, and why use it?
InstaWP is a tool to create a WordPress Sandbox Environment. It lets you spin a test environment for your website in a few seconds. You can use it to make a completely new test website or a clone of your current website and test out plugins and configurations. You’ll get to do this all without affecting your original website’s settings and without fear of breaking your site!
Plus, you don’t have to worry about things like your local storage, setting up DB, or even using a third party paid cloud hosting service. InstaWP handles all that, even with their free plan. And you can also use InstaWP in various ways, like building sites for your clients or developing and testing WordPress sites and products.
But one of the best features of InstaWP is the ability to create a website template with your preferred themes, plugins, and settings. That means you no longer have to do time-consuming setups for each new website you make. Instead, you can make one website as a base and start from there.
How do you use InstaWP to generate a test WordPress site?
Go to InstaWP and sign up for an account. Alternatively, use this link for quick onboarding.
Once you sign in, you will see this screen:
Click Add New + or + New Site to make this pop-up menu appear:
You can customize your WP version, PHP version, and site configuration, whether you want your website to be a default WordPress site, a WooCommerce site, or a multisite. When you’re done, press the Create Site button.
This screen will appear:
Click on the Magic Login button. It will take you to your WordPress test site instantly.
How do you install the Jetpack Plugin on your InstaWP test site?
When you have a test site ready, install the Jetpack plugin by following any of these procedures.
Via the test website dashboard
From your Dashboard, hove over Plugins and click Add New. On the next screen, type Jetpack in the search bar.
When you see Jetpack, press Install Now.
After installation, don’t forget to press the Activate button.
Once you activate the plugin, the Jetpack button will appear on your dashboard menu. Set it up according to your preferences.
Via InstaWP’s Chrome Extension
If you have the InstaWP Chrome Extension, an InstaWP account, and a ready test site, follow these steps. On WordPress, hover your cursor over the Download & Extend sectionthen click Plugins.
Input Jetpack in the white section next to the magnifying glass, then click on it when it appears.
You’ll see this appear on the next screen:
Click Launch to install it on your current test website on InstaWP.
If you have two or more test websites on your InstaWP account, click the arrow on the right of the button. That will make a dropdown menu appear. You can then choose the site for plugin installation.
A check will appear if you have installed Jetpack successfully.
And when you go to your test site, the Jetpack button will be on the left-hand menu:
What features of Jetpack should you activate?
As mentioned earlier, Jetpack has plenty of features that will benefit your website and keep it safe, but you don’t have to turn them all on. If you feel confused about what to activate, here are some of our recommendations:
Brute Force Attack Protection – This feature will protect your site from brute force attacks when a hacker tries to guess your login credentials by repeatedly using diverse username-password pairs until they succeed. If a hacker ever attacks your site, Brute Force Attack Protection will limit the number of login attempts from the hacker’s IP address. And if the hacker keeps trying, the feature will temporarily block that IP address so that no new attempts can be made.
Downtime Monitoring – With this feature, Jetpack will continuously monitor your site and let you know if any downtime is detected. You’ll get notified via email.
Jetpack Scan – Anything that involves security, you can now view it in one location. You can also fix problems and restore backups. You’ll be notified via email.
VaultPress Backup – Whatever changes you make on your website, you can save them. And if your site gets broken for whatever reason, you can restore the original site in one click, even if you’re offline.
Activity Log – Get a complete record of everything that happens on your website. This is especially important if you have a team with multiple people working on it. This is a clear way to monitor changes and remove the guesswork from the equation.
What if you prefer using Jetpack CLI?
Jetpack CLI is a command-line interface (CLI) tool for managing and deploying WordPress sites when you use Jetpack. It is used to make WP-CLI feature-rich and powerful.
You can configure Jetpack offline to your preference from the command line, making it easier to automate tasks and streamline your workflow.
The question is, what if you want to edit Jetpack using this option? Is it possible with InstaWP? Yes – you can access InstaWP using SSH, and from there, access Jetpack CLI.
You first need to go to the rightmost part of your test website and press the three-dot menu.
A drop-down menu will appear. Scroll down and click on the SFTP/SSH option.
On the next screen, make sure to enable SSH and follow the instructions.
Once this is set up, you can run Jetpack CLI commands like the example below.
Whatever changes you make here will be carried out on the InstaWP test site, such as:
wp jetpack disconnect – Disconnect Jetpack from WordPress.com, or unlink any user’s account from their WordPress.com connection.
Use wp jetpack disconnect blog to disconnect Jetpack from WordPress
Use wp jetpack disconnect user <id|email|username> to unlink a user account from WordPress
wp jetpack reset – This command resets the Jetpack environment and brings it back to the starting default states. You can either reset all current options or simply revert to default active module settings.
Use wp jetpack reset modules to return modules to their default active state
Use wp jetpack reset options to go to the very initial Jetpack settings that you find upon getting started with it. This also resets all modules to default.
wp jetpack options – This command is for you to manage various available options. List them, their values, fetch separate option values, and update or delete them.
Use wp jetpack options list to get all your options and their values related to the Jetpack configuration
Use wp jetpack options get <option_name> to fetch a specific option’s value.
Use wp jetpack options update <option_name> <option_value> to update an option’s current value to a new value. Take note that it only works for strings.
Use wp jetpack options delete <option_name> to delete any option – but only ones that are not important for keeping you connected with WordPress.com.
Template Creation With Pre-Configured Jetpack Settings
When you’re done setting up your Jetpack on the test site, here’s what you do next. At InstaWP, click on Templates.
Click Add New + or the +Add Template.
When this popup appears, click on your created site, then Next.
You’ll see this next:
Name your template, describe it, and set it as a shared or private template. Since you’ll be doing this template for your agency, making it a shared one might be better.
Using this template to make an entirely new site
Return to the Sites page and hit the Add New + button.
Instead of making a blank website and starting over, click From Template. You’ll see your freshly-made template.
Select it, then press Create Site. InstaWP will make a site based on the template. The settings you configured on Jetpack earlier will be there. Do this whenever you need to create different websites with the same settings for your convenience.
Take The Website Live
The great thing about InstaWP is that you can make many different websites from a template and take all those websites live if you want to. Go to your Sites page, look for the site you want to make live, click the three vertical dots adjacent to this site’s name. Select Migrate:
Choose the hosting server you prefer. InstaWP can migrate to the following hosts:
Enter the important details and sit back, as InstaWP will handle the entire process. Read this comprehensive checklist before you go live, though, to have a launch, as smooth as possible.
Conclusion
To sum things up, installing Jetpack on any WordPress site you plan to make is recommended because of its many benefits. And by using InstaWP, you only need to configure Jetpack once and deploy it across all your sites, and you’ll save valuable time and resources.
By doing so, you’ll not only have more protected and more efficient websites, you’ll have a better workflow and get to focus on delivering top-quality sites for your clients. Sign up at InstaWP today to get started.
Looking to save time when creating forms? Seeking actionable feedback on your posts? With Jetpack 12.5, our AI Assistant delivers solutions tailored to your needs, whether you’re new to WordPress or a seasoned vet.
Create and Customize Forms with Ease
New AI-powered functionality for the Forms Block empowers you to create and customize forms effortlessly. With a user-friendly interface and intelligent guidance, Jetpack AI Assistant turns form creation into a smooth and efficient process:
Creating a registration form for a global event? When you need a dropdown list of countries, Jetpack AI Assistant can populate all countries automatically for you.
Need to gather feedback for your newly launched product? Tell Jetpack AI Assistant your key questions, and it will design a comprehensive feedback form for you.
Hosting a workshop? Ask Jetpack AI Assistant to create a form with fields like ‘Preferred Session,’ ‘Dietary Preferences,’ and ‘Contact Info’ to streamline your attendee management.
Planning an event and need to know who’s attending? Simply ask Jetpack AI Assistant to prepare an RSVP form that includes options for meal preferences, attendance status, and plus-ones.
Just add a Jetpack Form Block and prompt the AI Assistant to create any type of form for you.
Introducing Smart Feedback for Your Posts
Jetpack AI Assistant doesn’t stop at forms. Now you can analyze your entire post before publishing it, offering insights and suggestions tailored to your content:
Posting a guide on creating handmade jewelry? The AI Assistant can help optimize your tutorial steps for clarity and user engagement.
Detailing your adventures from a recent trip? Get suggestions on clarity, ensuring all the beautiful spots and experiences stand out for readers.
Introducing a feature for your app? It will ensure your announcement is persuasive and error-free.
From tone adjustment to spelling corrections, learn how to elevate your content to perfection in just three steps:
Click Publish to open the pre-publish menu.
Click on the AI Assistant section.
Click Generate Feedback.
How to get started
Update Jetpack to the latest version and head to the editor within your wp-admin.
Simply add the AI Assistant Block to any page or post and tell Jetpack AI what to do. Pro-tip: type “/ai†to use the block shortcut.
That’s it. Jetpack will take it from there!
And More
This release also includes various other enhancements and fixes to improve the experience of Jetpack.
We’ve made My Jetpack the page you see when you click the Jetpack main menu. This is where you’ll see key information about the products and features you have available on your site. You can easily navigate around and install new features to your site from here.
We’ve elevated the Newsletter settings to their own tab to make it easier to find. We’ve also made some small improvements to the subscribe content wall, which helps you grow subscribers to your site.
A big thank you to everyone who contributed to this release!
The world of business is continuously in motion, ever evolving, always changing, and it’s essential for us to adapt and grow with it. The way we perceive social media today, as a quintessential tool for business growth, was not even a blip on the radar two decades ago. Now, it’s almost unimaginable to run a business without some kind of social media presence.
Today, we’re going to explore the six best social media platforms that can effectively contribute to business growth in 2023. We’ll explain each of these platforms and their potential, and provide you with strategies and best practices to guide your success. Finally, we’ll show you how the Jetpack Social WordPress plugin can streamline your efforts.
1. Facebook
Facebook: As relevant as ever in 2023
Despite new platforms taking their share of the spotlight, Facebook remains the most popular global social network with nearly three million active users each month. It has continued to evolve over time to hold relevance and — despite many flashy, new platforms — remains the standard go-to for many people’s social media identity.Â
The benefits of using Facebook for business growth
1. A large user base and diverse demographic reach
Facebook’s vast user base is like a treasure trove for businesses. It’s a melting pot of diverse demographics, giving companies the opportunity to reach a broad spectrum of potential customers.
2. Advanced targeting options for advertising
Facebook’s ad targeting options are a marketer’s dream. Target customers based on demographics, interests, behavior, and more, taking the guessing game out of advertising.
3. Facebook Pages and Groups for brand visibility and engagement
Creating a Facebook Page or Group for your business provides a place where customers can engage, ask questions, and form a community.
4. Messenger for customer service and communication
Messenger isn’t just for chatting with friends. It’s become a valuable customer service tool where businesses can provide immediate assistance and communicate directly with shoppers.
Best practices and strategies for leveraging Facebook’s potential
1. Create engaging content that resonates with your audience
Content is the key to Facebook engagement. When crafting posts, ensure that they spark conversations and connect with your followers.
2. Use Facebook Ads Manager for effective advertising campaigns
The Ads Manager is a sophisticated tool that can help you create targeted ad campaigns. Learn to navigate its complexities, and it can provide an incredible ROI and opportunities for smaller brands to test campaigns with small budgets.
3. Leverage Facebook Insights for data-driven decision-making
Facebook Insights provides a wealth of data about your page’s performance. Use it to analyze trends and behaviors and to make winning business decisions.
2. Instagram
Instagram: A popular choice for business growth
In the world of social media, Instagram is like the chic, trendy celebrity that everyone wants to befriend. With its visual-centric approach and growing user base, it continues to be a lucrative platform for business growth.
The benefits of using Instagram for business growth
1. Visual storytelling and brand identity building
Instagram’s visually-rich platform allows businesses to tell their stories, evoke emotions, and build a distinct brand identity using a variety of tools.
2. The ability to engage with your audience through images, videos, and Stories
The platform’s various formats like posts, Stories, and IGTV provide multiple avenues to engage with your audience and build a loyal following.
3. Instagram Shopping and product tagging for ecommerce businesses
The Instagram Shopping feature has transformed the platform into a digital storefront, making it a great opportunity for ecommerce businesses.
4. Influencer marketing opportunities
Instagram has birthed a new league of celebrities: influencers. They carry clout, and partnering with the right ones can give businesses the boost they need in visibility and credibility.
Best practices and strategies for maximizing Instagram’s impact
1. Craft an attractive and cohesive Instagram aesthetic
Remember, on Instagram, visuals speak volumes. Take time to create an aesthetic that’s distinct and represents your brand effectively.
2. Optimize hashtags and strategically use Instagram’s algorithm
Instagram isn’t a dump-and-run platform. Master the art of using hashtags and understand the platform’s algorithm to ensure that your content is seen and engaged with.
3. Collaborate with influencers and leverage user-generated content
Engaging influencers for collaborations and encouraging user-generated content can have a ripple effect on your reach and engagement.
4. Use Instagram analytics tools for measuring performance
Utilize Instagram’s built-in analytics or third-party tools to gauge your performance and adjust your strategy accordingly.
3. LinkedIn
LinkedIn: The leading professional networking platform
We all know LinkedIn as the go-to platform for professional networking, but it’s more than a digital resume or job-hunting site. It’s a vibrant community where professionals connect, learn, and grow.
The benefits of using LinkedIn for business growth
1. Professional connections and networking opportunities
LinkedIn is a gold mine for forging professional connections that can lead to mutually beneficial collaborations and opportunities.
2. Opportunities to demonstrate thought leadership and industry expertise
By sharing insightful content, businesses can assert their industry expertise, build credibility, and establish themselves as thought leaders.
3. Targeted advertising options for B2B businesses
LinkedIn’s advertising options are especially potent for B2B businesses, allowing them to directly reach decision makers.
4. Recruitment and talent acquisition capabilities
In need of talent? LinkedIn’s recruitment features make it a leading choice for businesses looking to onboard skilled professionals.
Best practices and strategies for effective LinkedIn utilization
1. Optimize personal and company profiles for maximum impact
An incomplete profile on LinkedIn is a missed opportunity. Ensure that your personal and company profiles are fully optimized and professional.
2. Share valuable content and engage in relevant discussions
LinkedIn’s community thrives on insightful discussions and valuable content. Make it a point to share content that sparks conversations and showcases your industry knowledge.
3. Use LinkedIn Groups and Pulse articles for exposure
LinkedIn Groups and publishing on LinkedIn Pulse can amplify your visibility and establish your brand as an industry authority.
4. Leverage LinkedIn Ads for targeted marketing campaigns
LinkedIn Ads can be a strong tool for targeted marketing campaigns. With detailed targeting options, you can reach the right people at the right time.
4. Tumblr
Tumblr: a unique, fan-first platform and user base
Tumblr is the unsung hero of social media platforms. It might not have the same name recognition as others, but it shines bright with its fan-first culture and active user base.
The benefits of using Tumblr for business growth
1. The ability to engage with a creative and niche community
Tumblr houses a hotbed of creativity and niche communities. Businesses can engage these passionate groups with thoughtful content and genuine interactions.
2. The opportunity to build brand personality and authenticity
Tumblr’s laid-back vibe provides businesses with an opportunity to let their hair down, showcase personality, and build authenticity.
3. The chance to take advantage of visual storytelling through multimedia posts
Whether it’s GIFs, images, or short video clips, Tumblr’s multimedia options offer opportunities for dynamic storytelling.
4. A fair shot at viral content and community interactions
The right content on Tumblr can spread quickly across the platform, offering vast exposure.
Best practices and strategies for leveraging Tumblr’s potential
1. Understand Tumblr’s user culture and etiquette
Each social media platform has its culture, and Tumblr is no different. To thrive, brands need to understand and respect the platform’s unique culture and etiquette.
2. Create visually appealing and shareable content
Tumblr is all about the visuals. Stand out by creating content that’s not just attractive, but also shareable.
3. Utilize tags and explore relevant communities
Tags are the lifelines of Tumblr. Use them wisely to get discovered, and don’t forget to interact with relevant communities to boost your presence.
4. Engage with Tumblr users through reblogs, likes, and comments
Interaction is key on Tumblr. Engage with your audience by reblogging their content, liking their posts, and replying to their comments.
5. TikTok
TikTok: rapid growth and popularity
There’s a new kid on the block, and they’re disrupting the social media scene. TikTok offers businesses a unique and exciting platform for their social media strategy.
The benefits of using TikTok for business growth
1. The opportunity to reach younger demographics and capture Gen Z’s attention
If your business wants to connect with younger audiences, particularly Gen Z, there’s no better platform than TikTok.
2. The potential for rapid content discovery
With the right content, you can go viral on TikTok overnight. Its unique algorithm allows for rapid content discovery.
3. The ability to utilize influencer marketing and brand collaborations
TikTok houses its own set of influencers. Collaborating with these powerful individuals can skyrocket your reach and visibility.
4. Creative opportunities for showcasing products and services
TikTok’s short-form video format and creative tools provide businesses with unique ways to showcase their products and services.
Best practices and strategies for leveraging TikTok’s power
1. Understand TikTok’s algorithm and trends
To get ahead on TikTok, you need to understand its algorithm and stay on top of the trends.
2. Create entertaining and authentic content that aligns with the platform’s culture
TikTok’s culture thrives on authenticity and entertainment. Make sure your content mirrors this culture.
3. Engage with the TikTok community through challenges and duets
Engage with the TikTok community by participating in trends, challenges, and duets.
4. Collaborate with TikTok influencers to expand reach and credibility
Collaborating with TikTok influencers can give your brand a significant boost in credibility and reach.
6. YouTube
YouTube: dominance in video content consumption
YouTube is the leader of video content consumption. With billions of logged-in users per month, it’s a platform that businesses can’t afford to ignore.
The benefits of using YouTube for business growth
1. High engagement and reach through video content
Video is one of the most engaging forms of content, and YouTube is the leading platform for video consumption. The engagement and reach potential is massive.
2. Monetization opportunities through the YouTube Partner Program
With the YouTube Partner Program, businesses can monetize their content and earn revenue directly from the platform.
3. The ability to establish brand authority through tutorials, demos, and vlogs
YouTube is a fantastic platform for businesses to establish their brand authority through tutorials, demos, and vlogs.
4. The opportunity to leverage YouTube SEO and discoverability
YouTube is the second largest search engine, making YouTube SEO an important consideration for businesses.
Best practices and strategies for YouTube success
1. Create high-quality and valuable video content
The key to success on YouTube is creating high-quality, valuable video content that resonates with your audience.
2. Optimize video titles, descriptions, and tags for search rankings
Just like Google SEO, YouTube SEO involves optimizing your video titles, descriptions, and tags to improve your search rankings.
3. Encourage user interaction and engagement through comments and subscriptions
Encourage your viewers to interact with your videos by liking, commenting, and subscribing to your channel. These actions not only increase engagement but also signal to YouTube that your content is valuable.
4. Review YouTube analytics to optimize your content strategy
YouTube analytics provides invaluable insights into your content’s performance. Use this data to optimize your content strategy.
How to choose the right social media platforms for your business
1. Assess your target audience. Which platforms do they prefer?
Not all social media platforms are created equal. Each one serves a different purpose and attracts a unique audience demographic. To choose the right social media platforms for your business, start by assessing your target audience.
Who are they? How old are they? Where are they located? What are their interests? And crucially, which social media platforms do they prefer? By understanding your target audience, you can make an informed decision about the platforms to pursue.
2. Understand your objectives. Do they align with the platform features?
Next, clarify your social media objectives. What do you want to achieve? Are you looking to increase brand awareness? Generate leads? Drive website traffic? Your objectives will influence your choice of social media platforms.
If you want to drive website traffic, a platform like Facebook, which allows clickable links in posts, might be a good choice. On the other hand, if you’re aiming to build brand awareness through visual storytelling, Instagram and Pinterest could be your best bet.
3. Analyze your competitors. Which platforms are working for them?
A competitive analysis can provide valuable insights into which platforms could work best for your business. Look at what platforms your competitors are using and how they’re engaging with their audience.
How to make the most of your social media growth strategy
1. Focus on consistency
Consistency breeds familiarity, familiarity breeds trust, and trust breeds loyalty. Being consistent in your social media presence not only increases your brand’s visibility but also strengthens your relationship with your audience.
2. Create a content calendar and schedule posts in advance
Planning and organizing your content in advance can significantly improve your social media management. A social media content calendar helps you maintain consistency, ensure a diverse mix of content, and stay on top of important dates and events.
3. Tailor content to specific platforms and audience preferences
Each social media platform is unique in its user behavior, culture, and content formats. Therefore, it’s crucial to tailor your content to suit each specific platform and audience preferences.
4. Recycle and repurpose content from one platform to another
While you should create unique content for each platform, you may not have the bandwidth to do this every single time. One way to maximize your content’s reach and lifespan is by recycling and repurposing it across different platforms between publishing uniquely-created posts.
How Jetpack Social helps you manage your social media accounts
With multiple social media platforms to manage, it’s easy to feel overwhelmed. That’s where Jetpack Social comes in. It’s a social media sharing plugin for WordPress that helps you manage your accounts effectively and efficiently.
1. Save time by scheduling your posts in advance
With Jetpack Social, you can schedule your social media posts in advance. This not only saves you time, but also helps with consistency in your social media presence.
2. Automatically post your content on social media
Managing multiple social media platforms can be a daunting task. But with Jetpack Social, you can manage all your platforms from one place, simplifying your social media management process.
In conclusion, social media is an indispensable tool for businesses of all sizes. It can help increase brand awareness, drive website traffic, generate leads, and much more. But managing social media effectively can be challenging, especially for small and medium-sized businesses with limited resources.
Tools like Jetpack Social can make the process much easier. By providing simplified scheduling, automatic sharing, and convenient management, Jetpack Social can help you get the most out of your social media strategy.
WordPress is one of the safest content management systems (CMS) you can use to run a website. Still, every software comes with vulnerabilities and security issues, most of which are dependent on user behavior. If you don’t know what these issues are or how to prevent them, even the most secure software might not be able to safeguard your website from attacks.
The good news is that protecting WordPress sites is easier than with other systems because you have access to powerful security plugins. Combine that with safe credentials and all but the most sophisticated attacks won’t stand a chance of breaching your site.
In this article, we’ll talk about the importance of prevention when it comes to keeping WordPress secure. Then, we’ll discuss the most common types of issues WordPress site owners may encounter and what types of attacks websites fall prey to most often.
From your first initial WordPress installation to managing a bustling, successful site, we’ve got you covered.
The importance of closing all potential security vulnerabilities
The concept of keeping your website “safe†can be a bit nebulous. When people talk about protecting your site, they’re usually referring to keeping unauthorized WordPress users from making changes to it, preventing malicious files from getting uploaded, or reducing the chances of data breaches.
Failing to protect your website from potential security breaches can affect you in a multitude of ways, even if you’re not dealing with a large amount of sensitive user information. For instance, if you run a small but established online business, security issues can negatively impact the way customers perceive you.
To understand how important it is to preventsecurity issues, let’s elaborate on whythey can be so damaging:
Unauthorized access. Many updates for WordPress sites contain patches for security vulnerabilities that have been discovered since the previous version was released. If your website isn’t updated, it’s at risk of being accessed and exploited by hackers who are aware of these vulnerabilities.
Loss of confidential information. If your website gets compromised, malicious actors can gain control of your site and sensitive data, including user information and other confidential materials. If you’re running an online store or any other type of site that handles private user data, this could have serious implications, both legally and in terms of your reputation.
Poor website performance. If someone gains access to your website, they can modify how it works and negatively impact its performance. In some cases, attackers might not even need to gain entry to bring a website “downâ€, like with Direct Denial of Service (DDoS) attacks.
Breach of compliance. In certain industries, failing to secure user data can put you in breach of regulatory compliance. For example, in the healthcare and financial sectors, companies are required to use up-to-date software to ensure the highest level of data security. And sites that accept credit card payments must comply with the Payment Card Industry Data Security Standard (PCI DSS).
If you run a WordPress website, security is of the utmost importance. Shoring up your website from the very beginning will prevent the most common types of issues and help you keep user data safe.
How to uncover security vulnerabilities on your WordPress site
Unfortunately, it’s possible to use an infected computer without knowing it. In a lot of cases, devices end up riddled with malware and users are none the wiser.
The same can happen with a website. Your WordPress site might be vulnerable to attacks, or it could already be infected with malware. Unless the attackers make it obvious, or you have access to the right tools, this can be hard to spot.
Just as you have antivirus software for computers, there are also security scanners for WordPress. Tools like Jetpack Security can scan your website for WordPress security vulnerabilities and let you know if there are any issues or irregularities you need to fix.
Jetpack Security’s Scan tool relies on the WPScan vulnerability database, which is used by enterprise companies. That means the database is very comprehensive, and has the ability to identify the most common vulnerabilities your site may face.
Plus, Jetpack Security is an easy-to-use security plugin developed by Automattic, the company behind WordPress.com. In addition to Jetpack Scan, it includes VaultPress Backup and Akismet. So, when you opt for this tool, you’ll be able to protect your site from vulnerabilities as well as spam, and you’ll get advanced backup features, too.
The 20 most common WordPress security issues and vulnerabilities
In this section, we’ll focus on the most common security issues seen in WordPress sites. Every single one of these issues can lead to vulnerabilities that attackers can exploit.
This can be a lot of information to digest, so don’t be overwhelmed. We’ll tell you what you need to know about each security issue, and provide some additional resources to learn more about them and how to fix them.
1. Lack of WordPress security plugins
Security plugins are among the most popular WordPress tools. Depending on which plugin you use, it may be able to scan your website for malware, set up a firewall, help you create backups, prevent spam, and more.
You can do everything that a security plugin does manually. But, that typically involves customizing many aspects of your site on the back end. For instance, editing core files to block suspicious IPs. As you can imagine, manually securing your site can be very time-consuming.
The beauty of security plugins is that they can save you a ton of time and hassle. What’s more, they can act as all-in-one solutions for a lot of the more common WordPress vulnerabilities.
WordPress plugins offer different functionality, so we recommend opting for a tool that covers as many vulnerabilities as possible, like Jetpack Security.
As we mentioned, Jetpack Security can help you automate backups, keep security logs for your site, set up a firewall, scan your site for malware, and more. Plus, it integrates with Akismet to help you prevent spam in comments and forms on your site.
2. Lack of regular site scans
Regular scans are like health check-ups for your website. They help you identify threats like malware infections, security loopholes, and unusual activity.
To put it simply, if you’re not running regular scans on your WordPress website, you’re leaving it vulnerable to security threats. This can lead to a compromised site, loss of sensitive data, damaged search engine rankings, and a loss of trust from visitors.
Site scan tools typically run in the background without affecting any functionality. So, if you have a security plugin or scanning tool, it’ll usually run automatically every so often and only alert you if it finds anything wrong with your website.
Think about site scanners like antivirus tools for your website. Every modern operating system (OS) comes with built-in malware scanners and removal tools, even if you’re not aware, they’re running in the background. These tools help keep your computer safe and, without them, your experience would be a lot worse.
3. Lack of regular site backups
Backups act as a safety net, preserving your site’s data in case of technical mishaps or security breaches. Without regular backups, you could lose all website content and user data.
Perhaps the biggest advantage of regular site backups is that they provide you with restore points in case you run into any issues. Instead of spending hours or days troubleshooting security breaches, you can simply revert your site to a previous state without losing critical data.
Ideally, backups should be automatic, and you shouldn’t let too much time go between them. Plugins like Jetpack Security include backup tools that enable you to save your website’s information to the cloud. With VaultPress Backup (which is part of Jetpack Security), you’ll get access to real-time backups any time you make changes to your website.
4. Outdated WordPress versions or plugins
Keeping your WordPress core and plugins updated is crucial for your site’s security and functionality. That’s because outdated software versions tend to have known vulnerabilities that hackers can exploit.
On top of that, they may cause compatibility issues affecting your website’s performance. This could lead to compromised data, loss of site functionality, and a poor user experience.
If your WordPress website has a bunch of pending updates, then it’s time to get to work on updating all of its components. You can also enable automatic updates for WordPress core directly from the Dashboard → Updatesscreen.
5. Outdated PHP version
Hypertext Preprocessor, or PHP, is the backbone of WordPress. It’s one of the main programming languages that the CMS is built on. Using an outdated version of PHP can lead to WordPress security issues and compatibility issues.
Newer versions of PHP also improve performance drastically. Typically, your web host will update your server to use newer versions of PHP as they come out. If you want to double-check what PHP version you’re using, you can do so directly from WordPress.
6. A hosting environment that’s not secure
Your hosting provider’s job is to help you build a website by providing you with the best resources possible. That means a stable server with decent hardware, an easy-to-use hosting management dashboard, and solid security measures.
If your web host doesn’t provide you with basic security settings, it’ll impact the way you run your website. Basically, you’ll have to spend a lot more time working on covering basic WordPress security vulnerabilities instead of working on your site.
A secure WordPress hosting provider will offer features like automated backups, Web Application Firewalls (WAFs), automatic blocking on known-malicious IPs, DDoS mitigation, and more. If you’re using a web host that doesn’t offer decent WordPress security measures, we recommend switching to a higher-quality WordPress hosting provider.
7. Weak password and login credentials
Using weak passwords and login credentials is probably the most common security issue with WordPress websites. In fact, this is a massive problem for any site or software that requires you to log in.
It’s important to note that this doesn’t just include the WordPress admin login page. Weak web hosting and File Transfer Protocol (FTP) credentials can also lead to vulnerabilities.
Simply put, most users don’t like the hassle of complicated, unique passwords for every application they work with.
Although weak and recycled passwords may be easier to remember, they can put your site at risk. That’s because they make it much easier for attackers to brute force their way into websites or use leaked credentials to gain access to accounts on other platforms.
If you want to keep your site safe, anyone with access to critical tools will need to learn how to use secure credentials, only creating strong passwords and usernames. Additionally, adding support for Two-Factor Authentication (2FA) can help you further secure your site.
8. Lack of 2FA
Two-Factor Authentication, or 2FA, adds an extra layer of security by requiring a second verification step during the login process. This makes unauthorized logins significantly harder, since attackers would alsoneed access to your email account or phone, depending on which type of 2FA you configure for your site.
There’s no reason not to offer 2FA as an option on your website. Implementing the system is remarkably easy and there are a lot of WordPress plugins, including Jetpack, that can set up 2FA for you.
9. Insecure login data storage
Storing login data insecurely, like in plaintext (or using a Post-it), is akin to leaving your bank details out in the open. Poor storage practices make it easy for attackers to obtain these details if they gain access to the location. This can lead to unauthorized access, data breaches, and potential loss of website control.
As a rule of thumb, don’t store login information anywhere where other people might get access to it, be it physically or digitally. If you have to store login credentials, use a password storage tool, like 1Password, that can encrypt that data for you.
10. Mismanaged and undefined user roles
Poorly managed user roles can lead to users having more permissions than they need, which creates security risks. This can result in unauthorized or accidental changes to the site, data leaks, or a misuse of resources.
Ideally, the Administrator should be the only person with full access to the WordPress backend. For every other user role, accounts should be granted the bare minimum permissions needed to perform their duties.
The good news is that WordPress gives the Administrator full control over user role assignments. Plus, each role comes with a defined set of permissions to match their duties. And, if you want to create additional roles or modify their permissions, you can do so using WordPress plugins.
11. Insufficient monitoring of user logins and activities
Without adequate monitoring, you may miss suspicious behavior or malicious activities on your site. This lack of visibility can lead to unauthorized changes, data breaches, and system misuse — all of which can harm your site’s functionality.
Out of the box, WordPress core doesn’t offer any security log functionality. But, you can use plugins like Jetpack with its activity log feature to keep track of what’s happening on your website (and who’s accessing it).
Some WordPress web hosts also give you access to activity logs at the server level, which enables you to monitor if anyone makes changes to its configuration.
When using this type of tool, it’s best to configure notifications for specific types of activities, like failed login attempts. That way, you’ll get a heads-up if anything sketchy is going on without having to read through dozens of pages of logs.
12. Themes and plugins containing vulnerabilities
WordPress themes and plugins with security vulnerabilities are often targeted by hackers. If they manage to exploit these vulnerabilities, it can lead to unauthorized access, data breaches, and more.
These free versions can include code that enables attackers to gain access to your site. So, unless you’re regularly scanning for vulnerabilities, it’s best to avoid this.
Still, there are plenty of quality plugins and themes that are also free. So, if you need to install one, it’s best to read through user comments on sites like WordPress.org before downloading them. A lot of users will share their stories of problems or WordPress security issues, which can help you make an informed decision.
13. Misconfigured WordPress database
A misconfigured database can leave your site’s data exposed, making it susceptible to SQL injection attacks and/or data breaches. One of the most common types of misconfigurations is using the default prefix for databases in WordPress (wp).
This makes it easy for attackers to identify the database and try to access it. Likewise, using weak credentials at the database level can leave it vulnerable.
Keep in mind that WordPress stores all your site’s content in a unique database. That means if someone gains access to the database, they can see everything on your website and modify critical settings.
14. A misconfigured content delivery network (CDN)
If your audience is spread around the world, implementing a Content Delivery Network (CDN) can be a great way to improve its performance for visitors who are further away from your servers. But, a poorly configured CDN may lead to security gaps.
Attackers could exploit these vulnerabilities to launch DDoS attacks, manipulate content, or gain unauthorized access to sensitive data. By misconfiguration, we mean human error in terms of what content the CDN caches, problems with the SSL/TLS configurations, or exposing the site’s original IP address.
Configuring a CDN can be tricky with some providers. If you’re looking for a straightforward option, Jetpack’s CDN is super easy to set up and use. There’s no configuration required, so you don’t have to worry about user error!
15. Insecure file and directory permissions
File and directory permissions determine who can read, write, and execute files on your WordPress website. These permissions are crucial for maintaining the security and integrity of your site.
If they’re insecure or misconfigured, they can leave your site vulnerable to various threats like attackers being able to upload malware or getting unauthorized access to files.
Unsecure files also open you up to potential data breaches. If the permissions aren’t set correctly, attackers will be able to read or modify the contents of files, which means they can steal or erase critical data.
16. Unrestricted public-facing file uploads
A lot of WordPress websites enable users to upload files through forms. This can be useful if you want people to be able to submit files for you to review, attach images to comments, and more.
Any form that enables users to upload and submit files to your site needs to be tightly secured. That means full control over what type of files people can upload, so they can’t use the forms to get malware on your server.
If you use a WordPress security plugin that offers real-time malware scanning, it should detect any malicious files that make it past your form’s security. Without security scanning, you may end up hosting malicious files that can give attackers access to your site.
17. Insecure third-party services and integrations
As you may already know, it’s common practice to use third-party services and integrations in WordPress. This can help you add new functionality. But, if you connect your website with a service that isn’t secure, you may end up with additional vulnerabilities on your website.
For example, if a third-party service provides an unsecure API for integration, it can serve as a gateway for attacks. Hackers can exploit weak API security to perform actions like injecting malicious code, stealing data, or disrupting your site’s functionality.
Third-party services with low-security standards can also compromise your credentials, which can give attackers access to your website if you’re not using 2FA or additional protections. In a nutshell, you should never connect your website with any third-party service unless you’re sure it’s reputable.
18. Unauthenticated AJAX actions
AJAX (Asynchronous JavaScript and XML) is a technique used to create dynamic, responsive web applications by sending and retrieving data from a server asynchronously. That means the sending and retrieval process doesn’t interfere with the page loading.
As far as WordPress goes, it’s common to use AJAX to handle data submission and retrieval in the background. For example, a lot of plugins use AJAX to power “infinite†loading of content. It’s also frequently used to enable instant search functionality on ecommerce sites.
Every AJAX action needs to follow security and authentication guidelines to keep your site safe. Without proper user verification, attackers can “trick†your website into performing actions that retrieve sensitive information from the database.
19. Misconfigured web servers
A web server that isn’t properly configured can be vulnerable from a security standpoint. By “server configurationâ€, we mean implementing basic security and access rules to protect it from attackers.
To give you an example, a secure server won’t allow visitors to execute code because they don’t have the right permissions. Likewise, a good security configuration will prevent known malicious IPs from interacting with the server using tools like a Web Application Firewall (WAF).
Unless you have direct access to the server, this security depends on your web host. Some web hosts take WordPress security issues more seriously than others, so it’s essential that you choose the right provider for your website.
20. Zero-day exploits and unknown vulnerabilities
There will always be new WordPress exploits and vulnerabilities that attackers will seek to use to damage your website.
Zero-day exploits and unknown vulnerabilities refer to security holes in software that are not known to the developers until they are exploited by attackers. The good news is that once attackers start targeting new vulnerabilities, developers usually patch them pretty quickly.
In theory, it’s impossible to prevent zero-day exploits because we don’t know what they are. Still, you can drastically mitigate the risk they pose by using a robust WordPress security plugin like Jetpack Security. Since Jetpack Scan (powered by WPScan) uses a comprehensive database that’s updated regularly, it will be able to quickly catch the newest WordPress security issues as they emerge.
The main types of security threats WordPress sites face
So far, we’ve focused on specific security vulnerabilities in WordPress and how they can affect your website. But, it’s important to understand what an “attack†or “breach†on your website can look like in real life.
Unlike in the movies, attackers usually aren’t typing away at a screen with neon letters to hack your website. In reality, “hacking†is a lot more interesting and attacks can come in many forms. So, let’s take a look at some of the most common WordPress security issues.
1. Malware and virus infections
You’re probably familiar with the terms malware and viruses. In the context of a website, malware (short for malicious software) and viruses are types of malicious code that can harm your site or its visitors.
Malware is typically inserted into your website, and can cause a wide range of issues. For instance, it can be used to deface your site, steal data, or even spread malware to its visitors.
Types of website malware can include backdoors (allowing unauthorized access), drive-by downloads (automatically downloading harmful software to a user’s device), and defacement (changing the visual appearance of your website).
2. SQL injection attacks
An SQL Injection is a type of attack that enables someone to interfere with the queries that an application makes to its database. In this case, the queries that WordPress submits to the database. The aim of this type of attack is to gain unauthorized access to information or to the site itself.
Here’s how it works: When WordPress takes user input, it structures it in Structured Query Language (SQL) to fetch the corresponding information from the database. If the query isn’t “sanitized†first, an attacker can modify it. These statements can manipulate the original intent of the query, leading to unauthorized data exposure, data modification, or even data deletion.
3. Cross-Site Scripting (XSS) attacks
Cross-Site Scripting, or XSS attacks, occur when an attacker manages to inject malicious scripts into web pages viewed by other users. These scripts are usually written in JavaScript and execute in the user’s browser.
Once an XSS attack is successful, the attacker can steal sensitive data (like session cookies) and impersonate the user. Depending on how much access the user has to the site, they can wreak a lot of havoc.
4. Cross-Site Request Forgery (CSRF) attacks
Cross-Site Request Forgery (CSRF), also known as XSRF, is a type of attack that tricks the victim into submitting a malicious request. It exploits the trust that a site has in a user’s browser, essentially using the identity and privileges of the victim to “infiltrate†it.
Suppose a user is logged into a web application where they can perform certain actions, like changing their email address. A CSRF attack could involve the attacker sending the user an email with a link or embedding a link on another website.
If the user clicks the link, it triggers a request to the web application that utilizes the user’s already authenticated session to perform the action — in this case, changing their email address to one controlled by the attacker.
5. Brute force attacks
A brute force attack involves trying multiple credential combinations until the right one is found. Attackers typically use bots or software to do this. Meaning, if your website doesn’t lock them out of the login screen, they may be able to try thousands of combinations.
These attempts can be random, but more often, attackers use a dictionary of commonly used passwords or employ more advanced methods like using lists of breached credentials from other sites.
6. DDoS attacks
Distributed Denial of Service (DDoS) attacks involve multiple computers connecting to a website at the same time to try and overload it. This is possible because every server can only handle so much traffic before it starts to drop requests or goes down temporarily.
Typically, attackers use a network of compromised computers to carry out DDoS attacks. Depending on how protected your site is, this type of attack can result in prolonged downtime.
7. Malicious redirects
A “redirect†is when you visit a URL and your browser sends you to a different address. This happens because the server you’re trying to access has instructions to redirect all or some traffic to that location.
There are a lot of reasons to use redirects. For instance, if you change domain names or want to avoid users visiting pages that no longer exist. But, if attackers have access to the server, they can set up malicious redirects sending users to dangerous websites instead.
8. File inclusion attacks
A file inclusion attack happens when an attacker manages to trick your website into including files from a remote server that they control. This type of attack typically exploits poorly validated or unsanitized user inputs.
Properly sanitizing inputs can help you prevent file inclusion attacks as well as SQL injections and other types of vulnerabilities. Another way to prevent this is by using a WAF and keeping your site updated to avoid holes in its security.
9. Directory traversal attacks
Directory or path traversal attacks involve attackers manipulating a URL in such a way that the server executes or reveals the contents of files located anywhere within its file system.
The goal of this type of attack is to gain access to files you don’t have permission to see or modify. The best way to prevent this type of attack is by configuring secure file and directory permissions.
10. Remote code execution attacks
A remote code execution attack happens when someone can execute harmful code remotely. For websites, this means attackers being able to execute malicious scripts on your hosting server.
This type of attack can happen if your server is vulnerable. Depending on the type of access attackers get, they could potentially run any command they want on the server.
11. Session hijacking and fixation attacks
A “session hijacking†is a type of attack that exploits the mechanisms that sites use to help you remain logged in across multiple visits. Typically, websites use cookies to store information about each session. If an attacker can “steal†these cookies, they can hijack the session.
In practical terms, this means the website will enable the attacker to use your account without having to go through the login process. Depending on what permissions the account has, someone can do a lot of damage with a hijacked session.
12. SEO spam
In terms of search engine optimization (SEO), spam can refer to reusing keywords, sharing the same links multiple times, and otherwise trying to game the algorithms that determine site rankings in results pages.
A lot of times, attackers will try to gain access to websites and use them to improve their own rankings. They can do this by using your site to excessively link to their own.
Depending on how aggressive the spam is, it can affect your own search engine rankings and lead to penalization. It can also erode the trust of your users because they might think you’re the one spamming them.
13. Phishing attacks
You’re probably familiar with phishing attacks. They involve pretending to be someone from an organization or a website to try and obtain login credentials or other critical information from a specific user.
For a WordPress website, this could look like a fake email asking users to reset their credentials and directing them to a page that saves their inputs. A lot of non-tech-savvy users fall for phishing attacks, so it’s important you try and educate your visitors about official communications from your site.
Frequently asked questions
If you have any questions left about WordPress vulnerabilities or the types of attacks you might run into, this section will hopefully answer them.
Is WordPress secure?
The short answer is yes. By design, WordPress is a secure CMS. What’s more, its core software is regularly updated for maintenance and security purposes.
But, just as with any other software, its security depends on how you use it.
If you don’t update WordPress and its components regularly and use weak login credentials, you’re exposing your site to a lot of risks.
What are signs a WordPress site has been hacked?
Sometimes, it can be hard to spot if a WordPress website is compromised. Still, there are a lot of telltale signs of attacks that can tip you off. For one, you may notice changes in key pages or differences in links.
If the site is hacked, some search engines will also outright warn visitors when they try to access it. Running into one of these security notices is a solid indicator that you should scan your website for malware and look into ways to remove it.
How can you remove malware from a WordPress site?
The easiest way to remove malware from WordPress is by having access to backups. If you use a malware scanner like Jetpack Scan, it can detect changes to your server files as well as harmful code.
You can purchase this tool on its own or get it as part of the Jetpack Security bundle.
This scanner may be able to clean your website by removing the malware or restoring a backup from when the server wasn’t infected.
How can you prevent brute force attacks on WordPress?
You can prevent brute force attacks on your website by using a firewall to block connections from known malicious IPs. Plugins like Jetpack enable you to do this and help protect your login page from repeated attempts to breach it.
What is Jetpack Security?
Jetpack Security is a service that includes VaultPress Backup, Jetpack Scan, and Akismet in one package. That means it helps you automate backups, set up regular malware scans, and protect your website from spam, all in one plan.
What is the WPScan vulnerability database?
WPScan is a database of WordPress vulnerabilities maintained by experts in the CMS and security professions. The database gets constant updates, and you can access it via WP-CLI if you’re a developer. Jetpack Protect uses the WPScan database to identify any potential WordPress security vulnerabilities or malware on your website.
Jetpack Security: Your WordPress site’s shield against vulnerabilities
No matter what type of WordPress site you run, it’s best to be proactive about protecting it from security threats and vulnerabilities. Otherwise, your website’s performance could suffer, and sensitive user data could fall into the wrong hands. As a result, your business or reputation could suffer.
The easiest way to prevent this is to tighten things up with a WordPress security plugin like Jetpack Security. This powerful tool enables anyone to quickly tackle the most important tasks for more secure WordPress sites, including generating real-time backups, running automatic vulnerability and malware scans, and filtering spam.