EDITS.WS

Category: jetpack.com

  • What is the Easiest & Best Way to Back Up a WordPress Site?

    You’ve heard the phrase, “Better safe than sorry”, right? It doesn’t just apply to double-checking that your car is locked or going the extra step with home maintenance. The same holds true in our digital lives as well, particularly if you run a website. 

    When you pour your heart, soul, and a great deal of time and resources into building and maintaining a WordPress site, losing it is unthinkable. But, without a backup, it really is a possibility. It could be gone in a flash.

    Fortunately, you don’t have to live with that worry. Hope exists in the form of Jetpack VaultPress Backup, a top-tier solution designed specifically for WordPress sites. When activated, it serves as a virtual time machine, giving you the ability to turn back the clock on any disaster. It reliably goes to work in the background with robust protection that you don’t have to even think about unless you need it.

    Let’s learn a bit more about WordPress backups. 

    WordPress Developer wearing a black shirt with the WordPress logo

    Why backing up your WordPress site is essential

    You wouldn’t buy a house without insurance, would you? A backup is kind of like insurance, but instead of simply compensating you for your loss, the right backup solution can actually make it like the issue never even happened. A website — whether it’s for personal use or professional — is a crucial asset that needs protection.

    1. Loss of data

    Have you ever experienced that gut-wrenching feeling of losing a document or photo? Now multiply that feeling by a hundred — that’s what losing a website feels like. And World Backup Day reports that 21% of people have never backed up their data, which is a startling statistic.

    2. Potential downtime

    Downtime is the stuff of nightmares for any online business. It can cost small businesses a few hundred dollars per hour (or more!) and larger organizations millions. That’s a steep price to pay for not having a reliable backup system in place.

    3. Financial implications

    The financial implications of a website crash can ripple out beyond just the cost of downtime. There’s the lost revenue from halted operations, not to mention the money needed to repair and restore the site. In some cases, businesses have had to start over entirely, an expense nobody is eager to pay.

    4. Loss of customer trust

    Imagine being a regular visitor to a site, only to find it vanished one day, with no explanation. You’d lose trust, wouldn’t you? Data from a survey conducted by KPMG showed that 19% of consumers would completely stop shopping at a retailer after a breach, and 33% would take a break from shopping there for an extended period.

    frustrated developer working on a laptop

    Traditional ways of backing up a WordPress site

    When it comes to protecting your WordPress site, there are a few traditional routes that developers have used time and again. They include manual backups using cPanel, FTP, and phpMyAdmin. While these methods are better than no backup plan at all, they do have their pitfalls.

    Manual backups, for example, can be labor-intensive and time-consuming. They require meticulous attention to detail. If one file is missed, the entire process could be worthless.

    cPanel backups come with storage issues, as they’re typically stored on the same server as the website. This means that if the server is compromised due to a hack or other cause, the backups could be lost too. FTP and phpMyAdmin have their merits but require a certain level of technical knowledge to use correctly, which can be daunting for many users.

    Plus, manual backups require you to remember and dedicate time to performing them. If you have an active site, this will need to be every single day. Even then, there could still be a gap in between your last backup and whenever an issue occurs. Any work, updates, new user activity, orders, etc. in between those times will be lost.

    The need for automated, real-time, off-site backups

    With an increasing reliance on digital platforms, automated, real-time, off-site backups are the new standard. You shouldn’t accept anything less. They provide peace of mind, doing all the heavy lifting while you get on with your day.

    Real-time means that your backup is always current, up to the last second. Automated means that you’re not required to constantly monitor your website and manually initiate backups. Off-site means that your backups are stored away from your primary server, shielding them from any server-wide damage or data loss.

    A trio of scalability, security, and convenience, these features are a must-have for businesses of all sizes. Why? Here are a few reasons:

    • Automated backups are scalable because, as your site grows, the backup system keeps pace, saving every bit of new data.
    • Off-site backups provide an extra layer of security, preventing a single server issue from wiping out both your site and your backups.
    • Real-time backups ensure you don’t lose recent updates or changes if disaster strikes.

    And all of this happens with little to no effort on your part.

    If you put traditional methods and automated, real-time, off-site backups side by side, the choice is as clear as day. Traditional methods might get the job done, but they can’t hold a candle to the efficiency, comprehensiveness, and peace of mind provided by their modern counterparts.

    Introducing Jetpack VaultPress Backup, the leading WordPress backup solution

    Jetpack VaultPress Backup was designed with WordPress sites in mind, boasting all the necessary features for an automated, real-time, off-site backup solution.

    VaultPress Backup sets itself apart through a variety of unique benefits. One of them is its subscription-based model, which includes not only the backup service but also access to an activity log to help you pinpoint issues and restore to the exact right moment in time. 

    Plus, if you subscribe as part of Jetpack Security, you also get a variety of the best WordPress security tools to help prevent issues in the first place and protect your users and digital assets.  

    But the real beauty of VaultPress Backup is its simplicity. It takes the complexity out of backing up a WordPress site, turning a potentially arduous process into a matter of a few clicks. Whether you’re a small business owner with no coding experience or a medium-sized company with a dedicated IT department, VaultPress Backup is crafted for your convenience.

    How to set up VaultPress Backup for your WordPress site

    Taking your first steps with VaultPress Backup is simple and straightforward. Here’s how you can set it up for your WordPress site:

    1. In your WordPress dashboard, go to Plugins → Add New. There, search for “Jetpack VaultPress Backup” and click Install Now → Activate.

    Install and activate Jetpack VaultPress Backup from the WordPress plugin repository.

    2. You’ll now see a prompt to set up Jetpack VaultPress Backup. Click the Set up Jetpack button.

    Next, setup VaultPress - Click the Set up Jetpack button.

    3. Click Approve to connect your site to WordPress.com — you can either log into an existing account or create a new one. 

    4. You’ll now see a table with several plan options. Choose the one that best fits your needs and proceed through the checkout process.

    Choose the one that best fits your needs and proceed through the checkout process.

    And that’s it! Your first backup will begin automatically.

    Once VaultPress is set up, you don’t need to worry about anything. Everything happens in the background, in real-time, and your backups are automatically stored in the ultra-secure Jetpack Cloud.

    Restoring your site with VaultPress Backup

    Nobody likes to think about worst-case scenarios, but they do happen. In such cases, VaultPress Backup is your best friend. It allows you to restore your WordPress site in a few straightforward steps:

    1. Start by going to https://cloud.jetpack.com and find your Activity Log.

    2. Here, you can filter by date range or activity type to find a specific restore point.

    You can filter by date range or activity type to find a specific restore point.

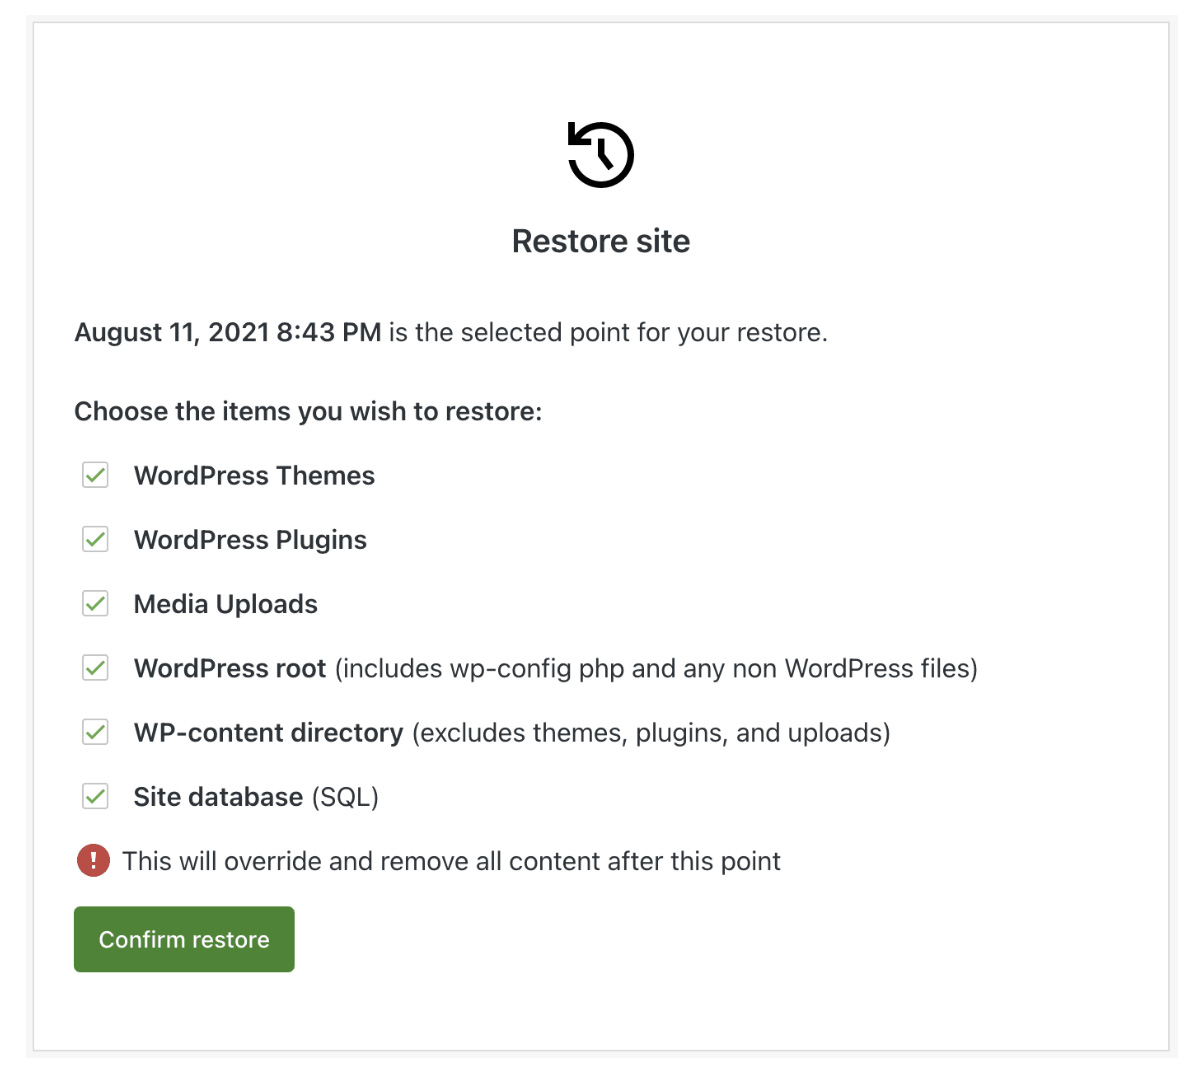
    3. Choose Actions → Restore to this point. 

    Choose Actions → Restore to this point.

    4. You’ll see a list of items that you’d like to restore. In most cases, you’ll leave them all checked. Click Confirm Restore.

    Select the components of your site that you'd like to restore.

    Now, all you have to do is wait! You can keep track of the restore progress on the same page, and you’ll also receive a notification when your site is restored.

    Whether your site has been hacked, was infected with malware, or experienced some other issue, VaultPress Backup ensures you’re never more than a few clicks away from getting things back to normal.

    Comparison of VaultPress Backup to other backup solutions

    There’s no shortage of WordPress backup solutions out there, but VaultPress Backup stands head and shoulders above the rest. This comparison of the best backup plugins puts it all into perspective.

    This comprehensive comparison clearly shows that VaultPress Backup excels in all key areas, including real-time backups, off-site storage, automated backups, ease of use, and support.

    VaultPress Backup is also part of Jetpack Security

    VaultPress Backup is also included in Jetpack Security. a complete security suite for your WordPress site. Picture a fortress, solid and impenetrable, protecting your WordPress site from threats of all kinds. That’s Jetpack Security for you.

    By opting for Jetpack Security, you get VaultPress Backup along with a web application firewall (WAF) working round the clock, automated daily malware scans, one-click fixes for most security issues and vulnerabilities, activity monitoring with a 30-day log, and robust anti-spam protection for WordPress forms and comments. It’s like having an expert security team watching over your website, every minute of every day.

    The reliability and resilience of Jetpack Security speaks for itself. More importantly, it’s a cost-effective solution for your business. With Jetpack Security, you’re not just buying a backup solution; you’re investing in the safety and longevity of your business.

    Frequently asked questions about WordPress backups

    What is Jetpack VaultPress Backup, and why choose it for my WordPress backups?

    Jetpack VaultPress Backup is a leading backup solution for WordPress sites. It offers automated, real-time, off-site backups, making it a secure and convenient choice for businesses of all sizes. 

    How does VaultPress Backup differ from other WordPress backup solutions?

    VaultPress Backup stands out with its comprehensive backup features, ease of use, and exceptional support services. You can use it as a standalone plugin, or as part of the Jetpack Security suite, which offers enhanced security and protection for your site.

    Is VaultPress Backup suitable for a small business WordPress site?

    Absolutely. VaultPress Backup is designed with companies of all sizes in mind, including small businesses. Its simple setup, automated backups, and affordable plans make it a great choice for small businesses.

    How often does VaultPress Backup back up my site?

    VaultPress Backup provides real-time backups, so every change you make on your site is instantly saved.

    What does “real-time backup” mean?

    Real-time backup means that VaultPress Backup constantly monitors your site and backs up any changes as they happen. So, every updated page, new blog post, comment, order, and more is available if something goes wrong.

    Are my backups safe with VaultPress Backup?

    Yes, VaultPress Backup stores your files off-site on secure servers. This means that, even if something happens to your primary server, your backups are safe.

    What is the process to set up VaultPress Backup on my WordPress site?

    Setting up VaultPress Backup on your WordPress site is a breeze. You just need to install the plugin, connect your website, choose a plan, and VaultPress Backup starts doing its magic automatically.

    How do I restore my WordPress site with VaultPress Backup?

    VaultPress Backup offers a simple restoration process. You just log into your dashboard, select the backup to restore, and click Restore to this point. VaultPress Backup takes care of the rest.

    Does VaultPress Backup save my database or files?

    VaultPress Backup saves both your database and your files. This includes posts, comments, media, and more.

    Will using VaultPress Backup slow down my WordPress site?

    VaultPress Backup operates in the background and doesn’t impact your site’s performance.

    Does VaultPress Backup provide support in case I encounter an issue?

    Yes. VaultPress Backup prides itself on its stellar customer support. As a subscriber, you’ll have access to expert help whenever you need it.

    How secure is my data with VaultPress Backup?

    Your data is very secure with VaultPress Backup. Not only are your backups stored off-site on secure servers, but the infrastructure employs strict security protocols to ensure your data’s safety.

    Can an agency use VaultPress Backup to back up its clients’ sites?

    Yes, and we encourage it. VaultPress is a great tool for agencies to provide secure and reliable backups for their clients’ WordPress sites. For more information, visit our Jetpack for Agencies program at https://jetpack.com/for/agencies/

    VaultPress is a great tool for agencies to provide secure and reliable backups.

    VaultPress Backup: Simply the best backup solution for WordPress

    So, there you have it. We’ve walked through the importance of WordPress backups, the pain points of traditional backup methods, the need for automated, real-time, off-site backups, and how VaultPress Backup is a solution that ticks all those boxes.

    Are you still wondering, “Is VaultPress Backup really the best backup solution for WordPress?” 

    Without a hint of hesitation, the answer is “Yes!”

    Remember, your WordPress site is like a vital organ of your business. You wouldn’t entrust the health of your heart to just anyone, would you? So, why should your WordPress site be any different?

    The beauty of VaultPress Backup lies in the incredible simplicity of use despite robust features. It doesn’t just provide a backup solution; it gives you peace of mind. You can sleep easy knowing that even if the unthinkable happens, you have a reliable recovery system at your disposal. 

    That’s the power of a solid backup solution. It does more than just store copies of your data. It guarantees that your business can bounce back from any setback, at any time. 

    In the end, what matters is not just having a backup solution, but having the right backup solution. And, as we’ve shown, VaultPress Backup is the right backup solution for WordPress.

    Are you ready to safeguard your WordPress site? Ready to trade worry for assurance? If so, then it’s time to choose VaultPress Backup. It’s time to choose peace of mind.

    Get started with VaultPress Backup today.

  • What is a Social Media Kit? Definition and How to Build Yours

    On the internet, it’s increasingly difficult to make a lasting impression. But for business owners, it’s absolutely critical to turn passersby into regular followers and, eventually, loyal customers.

    You can’t just create a bunch of stale social media profiles and expect success. You have to cook up an entire experience to be remembered. One of the key elements to create this experience is a social media kit. 

    So let’s roll up our sleeves and delve into the world of social media kits together.

    Crowd of people using mobile devices.

    What is a social media kit?

    A social media kit is your brand’s superhero costume. It’s what makes you recognizable in the sea of digital noise. More specifically, it’s a collection of brand assets, guidelines, and tools that define how your brand should appear and communicate on social media.

    It’s the blueprint for your online identity. It contributes to consistency, clarity, and cohesion across all social media platforms — and in the digital world — that’s no small feat. 

    What does a social media kit include?

    Think of your social media kit as a well-stocked toolbox. It holds everything necessary to build and maintain your online brand image. It includes items like your brand story, visual identity (logos, colors, fonts), social media bio templates, content guidelines, and so much more.

    But it’s not just a static collection of brand elements. It also includes guidelines for engagement, content planning tools, and key performance indicators. It’s a dynamic system that evolves with your brand and keeps your online presence sharp and engaging.

    Google Drive is a great solution for compiling assets and sharing them with the right people. You can determine permissions ideal for your organization — such as granting “read only” access to contractors, but allowing edit permissions for your main team.

    A social media kit can include, but isn’t limited to: 

    • Stats about your company, stakeholders, and leadership team
    • Quotes from leadership or endorsements 
    • Approved logo and graphic files in every possible format
    • Approved photos and videos (raw and edited) that can be shared at will by the social team
    • Pre-made graphic templates for each social platform 
    • Instructions for engagement with comments 
    • Brand voice and editorial guidelines  
    • Examples of successful posts and ideal language
    • Your social media and marketing editorial calendar
    • KPIs (key performance indicators) by which success can be measured

    What are the benefits of having a social media kit?

    1. Brand uniformity and consistency

    Your social media kit is the thread that ties your online presence together. With it, your brand can project a united front, a consistent image across various platforms. 

    Imagine your brand as a choir. Without direction, each singer might still sound good, but they’re all singing different tunes. With your social media kit as the conductor, each platform is singing in harmony, creating a melodious brand symphony.

    2. Efficiency in content creation

    With a social media kit on hand, your content creation process becomes streamlined and efficient. You’re no longer starting from scratch each time, but building upon a well-structured foundation. This also saves you valuable time when training or working with new team members.

    Spontaneous photograph of food for Social Media.

    3. An enhanced business image

    A well-crafted social media kit helps you build a strong, professional business image. It shows that your brand is organized, forward-thinking, and attentive to detail. It sends the signal that you’re serious about your digital presence, and that you value the experience of your online community.

    4. Clear communication of brand values

    Your social media kit helps articulate your brand values, mission, and unique selling proposition. It tells your audience not just who you are, but also why you exist and why they should care. It gives your brand a voice and an identity that goes beyond logos and color schemes.

    5. Improved crisis management

    No brand is immune from a social media crisis. But with a social media kit, you’re better prepared to handle it. You have guidelines on how to respond, how to communicate with your audience, and how to maintain your brand integrity, even in the face of controversy.

    6. Enhanced content strategy

    Your social media kit is the compass that guides your content strategy. It helps you plan and develop content that aligns with your brand identity and resonates with your audience. It’s the roadmap that directs you towards content that not only drives engagement but also builds brand trust and loyalty.

    Your social media efforts should aid the ROI of your content marketing program by promoting new posts and reviving old, still-relevant content. The social media team should also be in tune with the broader marketing and editorial schedule so that posts can go out in a way that supports and adds value to the overall marketing team.

    7. Better team collaboration

    A social media kit isn’t just for your audience; it’s also a guide for your team. It ensures everyone is on the same page, working towards the same goals. It fosters effective communication and collaboration within your team, leading to a stronger, more unified brand presence.

    8. Effective measurement of success

    Your social media kit also helps you define key performance indicators (KPIs), setting benchmarks for success. Understanding this information helps you make strategy decisions moving forward, and ultimately helps you find more success.

    How to create a powerful social media kit in 15 steps

    1. Define your target audience

    Creating a social media kit starts with understanding your audience. Who are they? What are their interests, needs, and challenges? Where do they spend time online?

    Once you find your target audience, you can direct all of your social media content to meet their specific needs. You can use language and imagery that appeals to them. And you can focus your efforts on the platforms they actively use.

    Here’s a guide on how to find your audience

    2. Create memorable personas of your ideal customers

    Beyond demographics, it’s important to delve into the psychographics of your target audience. Create customer personas, detailed profiles of your ideal customers that help you visualize and empathize with them.

    This also helps keep your entire team informed about who they’re communicating with and directing their posts to. And use images in your personas, even if they’re just stock images — faces go a long way!

    3. List your company’s values, mission, and USP

    Your social media kit needs to reflect who you are as a brand. Your values, mission, and unique selling proposition (USP) should be clearly articulated. It’s the heart and soul of your brand, the core of your brand narrative. And, ultimately, it should be considered with each social media post.

    Spontaneous photograph of city mural.

    4. Ensure your brand positioning and audience are in sync

    The magic happens when your brand positioning aligns with your audience’s needs and wants. Your social media kit should reflect this alignment, creating a bridge between your brand and your audience.

    5. Build a captivating brand narrative for your bios

    Your bio is more than just a few lines about your brand. It’s a micro brand story that should captivate and connect with readers. It should be consistent across platforms, yet tailored to each one’s character limits and tone.

    6. Develop a recognizable visual identity

    Visual identity goes beyond logos. It involves colors, typography, graphic styles, profile pictures, cover images, post templates, and more. Visuals are a language that speaks volumes about your brand, even before a single word is read.

    In your social media kit, define these elements. Include specific HEX codes for your brand colors. Add examples of stock images and graphics that fit with your story. If you have existing social media posts, you can even include some of them as a guide for team members to go by.

    7. Establish a unique brand tone and voice

    Your brand tone and voice set the mood for your social media presence. They should reflect your brand personality, resonating with your audience and differentiating you from competitors.

    Include examples of phrases and words you do and do not use, to avoid any confusion.

    8. Build your social media copy templates

    Having ready-made copy templates saves you time and ensures consistency. They’re like the quick-start guides for your social media posts, giving you a base to build upon.

    For example, if you run an ecommerce store, you might have a template for new product announcements, one for customer testimonials, and one for flatlays of existing items. When you’re ready to post something from one of these categories, you can just pull the template, switch out the text and imagery, and you’re good to go! 

    9. Decide on social media management tools

    Navigating the social media landscape without the right tools can be daunting. Social media management tools help you schedule posts, engage with your audience, track analytics, and more.

    Jetpack Social provides you with a suite of tools that help you manage your social media presence.

    This is where Jetpack Social comes into play. Designed specifically for WordPress, Jetpack Social provides you with a suite of tools that help you manage your social media presence efficiently and effectively.

    Automatically share new content, send posts to multiple platforms at the same time, schedule posts in advance and more. 

    10. Assemble a list of relevant and important hashtags

    Hashtags are signposts that guide people to your content. A list of relevant hashtags is a must-have in your social media kit, helping you maximize your content’s reach. 

    However, you won’t use every hashtag every single time because each one’s relevancy will vary by post. Likely, though, there will be at least a few that work for almost every post. 

    You can research the best hashtags in a number of ways. Look at what competitors are using. Which hashtags are trending? What do your ideal influencer partners use? 

    You can start typing hashtags into platforms like Instagram and get some instant data on the number of times it’s been used. You want a variety of highly-used and moderately-used hashtags. The popularity is an indication of how often people use that term to find posts. 

    You want enough popularity that it stands the possibility of driving traffic, but not so much that your post is just a tiny blip on your audience’s radar. 

    11. Establish guidelines for user-generated content

    User-generated content (UGC) is a powerful tool for brand engagement and trust-building. Your social media kit should include guidelines on how to encourage, manage, and use UGC effectively.

    This might include photos of people using your products, testimonials from clients, or links to followers’ blog posts that were inspired by you.

    12. Decide on key performance indicators (KPIs)

    To know if your social media efforts are paying off, you need a yardstick. That’s where KPIs come in. They could range from engagement metrics — including likes and comments — to more complex ones, like conversion rates and customer lifetime value. Decide on the KPIs that matter to your brand and include them in your kit.

    13. Create a social media policy

    This is a blueprint for your team, partners, and contractors. It’s a clear policy on what to post, how to engage, and how to handle sensitive situations. This isn’t just a guideline; it’s your brand’s rule book for social media conduct.

    14. Explain how to handle negative comments and reviews

    Not every interaction on social media will be roses and rainbows. You need a plan on how to handle negative comments and reviews. How do you respond? When do you intervene? When do you step back? This is crisis management in action, and it needs a dedicated section in your social media kit.

    15. Append your content calendar to your media kit

    A content calendar is your social media strategy at a glance. It shows what, when, and where you’ll post, helping you maintain a consistent presence. Your content calendar should be a living document, continually evolving with your brand.

    Make your mark

    A social media kit isn’t just a document. It’s a statement that says you’re here to make a mark, to engage, to resonate, and to build a brand that’s loved and remembered. It’s a toolkit for training, consistency, and success. 

    So, get out there and start crafting your social media kit. And remember, Jetpack Social is here to make your journey smoother, easier, and more successful.

    Social Media image gallery on a mobile device.

    Frequently asked questions about social media kits

    1. Why is a social media kit important for my business?

    To win customers online, you must first gain attention. A social media kit helps you stand out. It ensures consistency, boosts efficiency, enhances your brand image, and allows for effective crisis management, to name a few benefits. 

    2. How often should I update my social media kit?

    Your social media kit isn’t a set-and-forget it tool. As your brand evolves, so should your social media kit. As a rule of thumb, revisit your kit every six months, or whenever there’s a significant change in your brand or market. 

    3. What is a social media content calendar, and how do I create one?

    A content calendar is your posting plan. It shows what content you’ll share, when, and on what platform. Creating one involves understanding your audience’s content preferences and behavior, defining content categories, choosing a posting frequency, and scheduling posts ahead of time. For a more in-depth understanding, see our detailed guide on how to create a winning social media content calendar.

    Create a social media content calendar.

    4. What types of content should I post on my social media accounts?

    Regardless of the type of social media content you create, the golden rule of content creation is this: offer value. 

    This could be in the form of information, entertainment, inspiration, or a combination of these. Your content should align with your brand identity, resonate with your audience, and spur engagement. If you’re looking for inspiration, here’s a collection of social media post ideas every business can use as a baseline.

    5. Can I use tools to streamline content scheduling and posting?

    Absolutely! Social media management tools like Jetpack Social can do the heavy lifting for you. They allow you to schedule posts, engage with your audience, and more. It’s your faithful companion in the bustling social media landscape.

    6. What is Jetpack Social, and how can it help my business?

    Jetpack Social is a WordPress plugin that offers a suite of social media management tools. It’s designed to streamline your social media efforts, saving you time and boosting your efficiency. Jetpack Social is your one-stop solution for effective social media management.

    Jetpack Social: Elevate your brand with automated social media posting

    Jetpack Social takes the guesswork out of social media management. With its scheduling feature, you can plan your posts ahead of time and publish them when your audience is most active. You can share your content across multiple platforms, broadening your reach without additional effort.

    More importantly, Jetpack Social integrates seamlessly with WordPress, making it an excellent choice for businesses running their websites on this platform. With Jetpack Social, you don’t need to jump between your website and multiple social media platforms; you can manage everything right from your WordPress dashboard.

    Jetpack Social integrates seamlessly with WordPress.

    Imagine you’ve just published a blog post. You’re thrilled about it and can’t wait to share it with your audience. Without a tool like Jetpack Social, you’d have to manually log in to each of your social media platforms, create a post, and hit publish — and do it all over again for every new piece of content.

    But with Jetpack Social, you can automate this process. It lets you share your new posts to your social media accounts simultaneously, right from your WordPress site. This means less time spent on repetitive tasks and more time creating amazing content and engaging with your audience.

    And that’s not all. Jetpack Social also comes with an auto-post feature that lets you automatically share your posts on social media whenever you publish new content. There’s no need to set reminders or worry about missing out on peak engagement times. Jetpack Social handles it all for you.

    In a nutshell, Jetpack Social is an all-in-one solution for your social media needs, designed to make your life easier and your social media efforts more effective. Learn more about Jetpack Social here: https://jetpack.com/social/

  • Social Media for Photographers: 8 Best Platforms and Content Ideas

    In an increasingly disjointed world, photographs are the currency of human connection. They invite us to see the world from a unique perspective. They share moments, create emotions, and let us tell our stories without a single uttered word. For photographers, each image is a work of art, an expression of creativity, a narrative waiting to be shared. 

    But what is art without an audience? 

    Social media platforms have opened a world of opportunities for photographers, democratizing the art and business of photography. They offer a stage to present to a global audience, garner instant feedback, and build a community.

    camera taking a photo of a busy, lit-up street

    At the same time, the vast landscape of social media can be overwhelming. From Instagram to Flickr, each platform has its own best practices and unspoken rules. Choosing the right platform and curating the right content can be daunting. 

    But this is where we step in to provide you with a detailed roadmap to navigate the journey — a roadmap tailored for photographers.

    The eight best social media sites for photographers

    Before diving into the platforms, let’s consider the key factors that should guide your choice of social media platforms. It’s not about being in every place; it’s about being in the right place. 

    You want to choose platforms where your target audience is most active, that align with your style of photography, and that cater to your business goals. Also consider the ease of use, the tools and features available, and how well you can integrate the platform into your existing workflows.

    1. Instagram

    Instagram and photography go together like the lens and the shutter. Born as a photo-sharing app, Instagram has become a go-to platform for photographers.

    Advantages for photographers

    Instagram’s visually-driven nature is ideal for photographers. It offers various features such as filters, stories, reels, and IGTV that are perfect for showcasing and experimenting with your work. Its user-friendly interface and vast user base provide an opportunity to reach a global audience.

    woman scrolling through her Instagram feed

    Best practices and strategies

    Use hashtags intentionally to increase your content’s discoverability. Engage with your followers by responding to comments and messages. Make the most of Instagram’s multiple post formats — photos, carousels, stories, reels, and IGTV. 

    Content ideas

    Post a mix of your best shots, behind-the-scenes glimpses, and your creative process. Use stories for interactive content such as polls and Q&As. Share a photo series on IGTV or reels to showcase your editing process.

    2. Tumblr

    Tumblr’s blogging format is a unique choice, and an effective one for photographers.

    Advantages for photographers

    Tumblr’s emphasis on community and sharing makes it a great platform to build a dedicated fan base. Its blog-like nature allows for more in-depth captions, offering you a chance to delve deeper into your creative process.

    Best practices and strategies

    Regularly interact with the community by reblogging other people’s posts, responding to messages, and participating in discussions. Customize your Tumblr page to reflect your photography style.

    Content ideas

    Share photo essays, series, or narratives. Use the platform to provide insight into your artistic process or to discuss photography techniques.

    3. Behance

    Behance is like a virtual exhibition for photographers, where you can showcase your work in a professional format.

    Advantages for photographers

    Behance’s focus on creative portfolios makes it a perfect platform for showcasing your best work. The network of professionals on Behance can provide valuable connections and feedback.

    Best practices and strategies

    Keep your portfolio updated with your latest and best work. Engage with the Behance community through comments and appreciations. Make sure your profile is complete and represents your personal brand.

    photographer setting up a shot on a mountain

    Content ideas

    Showcase your best work, highlight your creative processes, and share your experiences in your industry. 

    4. Pinterest

    Pinterest, the digital vision board, is an underexplored gem for photographers.

    Advantages for photographers

    The platform’s emphasis on visuals and discovery makes it a treasure trove for photographers. It’s a perfect place to not just showcase your work but also to discover new inspiration and trends.

    Best practices and strategies

    Use SEO-friendly descriptions and hashtags to enhance discoverability. Create various boards for different types of work or inspirations. 

    Content ideas

    Share your photography, behind-the-scenes, photography tips, mood boards, and inspirations. 

    5. Facebook

    Despite the rise of new platforms, Facebook remains a behemoth and a necessary platform for photographers.

    Jetpack's Facebook page

    Advantages for photographers

    Facebook’s vast user base and versatile post formats make it a must-have platform for photographers. It’s excellent for community building, client engagement, and event promotion.

    Best practices and strategies

    Make use of Facebook groups to connect with other photographers and potential clients. Regularly engage with your followers through likes, comments, and shares.

    Content ideas

    Share your latest work, behind-the-scenes, photography events, client testimonials, and promotions.

    6. YouTube

    In the era of visuals, YouTube’s focus on video content presents a unique opportunity for photographers.

    Advantages for photographers

    YouTube can enhance your brand through the power of video, enabling you to present your work, personality, and knowledge in a dynamic format. It’s also a great platform for monetization.

    Best practices and strategies

    Consistency is key on YouTube. Regularly upload videos, engage with comments, and promote your channel on other platforms. 

    Content ideas

    Share photography tutorials, gear reviews, vlogs, project walkthroughs, and time-lapse videos of your editing process.

    photographer taking nature pictures in a field

    7. TikTok

    The rising star, TikTok, is not just for dance routines and lip-syncing.

    Advantages for photographers

    TikTok’s emphasis on short, creative videos makes it a fun and refreshing platform for photographers. Its algorithm also provides a fair chance for your content to go viral.

    Best practices and strategies

    Keep videos short and entertaining. Make use of trending songs and hashtags. Engage with the community through challenges and duets.

    Content ideas

    Share quick photography tips, behind-the-scenes videos, the editing process, photo challenges, and humorous content related to photography.

    8. Flickr

    Flickr, the old faithful, continues to be a beloved platform among photographers.

    Advantages for photographers

    Flickr’s emphasis on high-quality images and its supportive community make it an excellent platform for serious photographers. 

    Best practices and strategies

    Regularly participate in groups and discussions. Make use of tags and descriptions for better discoverability.

    Content ideas

    Share your best work, participate in photo challenges, and engage in critique groups.

    Compelling content ideas for photographers on social media

    Having touched on some content ideas while discussing individual platforms, let’s delve deeper into what kind of content photographers can share on social media. Remember, content’s most important, but it can’t go very far without engagement. Your posts should not just showcase your work but also engage your audience, inspire conversation, and build community. 

    1. Showcase your portfolio and latest work

    Your social media platforms serve as a dynamic portfolio of your work. This is where you can show the world what you’re capable of and how your work evolves. 

    Behind-the-scenes content

    People love to see a peek into what goes on behind the camera. It adds a layer of authenticity and relatability to your work. From setting up the shot to post-processing, your audience will appreciate seeing what goes into making that perfect image.

    Before and after shots

    Before and after shots, especially of your editing process, can be quite engaging. It helps your audience appreciate the amount of work and skill that goes into each shot.

    several camera lenses on a table

    Photo series and projects

    Sharing a series of photos around a particular theme or a long-term project can make for compelling storytelling. It keeps your audience engaged and coming back for more.

    2. Share photography tips and tutorials

    Sharing knowledge not only positions you as an expert in your field, but also builds trust and engagement with your audience.

    Editing techniques and software recommendations

    Many aspiring photographers and hobbyists follow professionals for tips and learning resources. Sharing your favorite editing techniques and software can be immensely helpful for your followers.

    close-up of a camera lens

    Lighting and composition tips

    Lighting and composition are the backbone of a good photograph. Sharing your expertise in these areas can help others improve their photography and appreciate your work better.

    Gear reviews and recommendations

    Share your insights and experiences with various photography gear. This could range from detailed reviews of the latest camera models to tips on choosing the right lens for a particular type of photography.

    3. Feature client stories and testimonials

    Nothing speaks louder than the words of a happy client. Client stories and testimonials provide social proof, build trust, and can often lead to new client referrals.

    4. Highlight industry events and exhibitions

    Are you attending a photography workshop? Participating in an exhibition? Or just visiting a photography fair? Sharing these experiences keeps your content fresh and interesting while also showing your active participation and engagement in the industry.

    5. Explore photography-related topics and trends

    Stay relevant and engaging by discussing current topics and trends in photography. This could range from the ethical aspects of certain genres to the impact of smartphone cameras on professional photography.

    6. Incorporate visual storytelling through captions

    While a picture may be worth a thousand words, a well-crafted caption can add depth and context to your image. Use your captions to share the story behind the photo, the thoughts it evokes, or simply the technical details of the shot.

    photographer taking a photo in a street

    7. Engage with followers through interactive posts

    Engagement is key to building a loyal, active, and growing social media following. Content like polls, Q&As, and contests can boost engagement and make your followers feel part of your photography journey.

    Polls and surveys

    Use these tools to gather feedback, understand your audience’s preferences, or simply have fun and create engagement.

    Q&A sessions and live videos

    Regularly engage with your audience through Q&A sessions or live videos. This makes your followers feel valued and heard, and strengthens your connection with them.

    8. Collaborate with other creators for cross-promotion

    Collaboration is a powerful tool in the social media world. By collaborating with other creators, you can tap into their audience, bring fresh perspectives to your work, and add variety to your content.

    9. Collaborate with brands and clients for sponsored posts

    As your following grows, you may find opportunities to collaborate with brands and clients for sponsored posts. While this can be a great source of income, always ensure that the collaborations align with your brand and resonate with your audience.

    Frequently asked questions about social media for photographers

    As you start working with social media, you may have several questions and concerns. Let’s address some of the most common ones we’ve heard from photographers about social media.

    Does it help to have an official website for my photography business?

    Absolutely. While social media is great for visibility and engagement, an official website acts as a central hub for your online presence. It’s where potential clients can find detailed information about your services, browse your full portfolio, read client testimonials, and reach out to you for bookings. Having a website also adds credibility to your business. With the right tools, you can even sell your photographs or photography services online directly through your site.

    Which platform is easiest to set up and manage a photography website?

    This is subjective and depends on your specific needs and technical skills. However, WordPress has proven to be an excellent platform for photographers. It’s easy to use, highly customizable, and comes with a range of plugins, like WooCommerce for selling functionality and Jetpack to enhance security and performance.

    Can I schedule social media posts directly from my WordPress site?

    Yes, you certainly can, and it’s a real game changer! With Jetpack’s social media sharing plugin, Jetpack Social, you can schedule and share posts on your social media channels directly from your WordPress site. It saves you time and helps you maintain consistency in your social media posting.

    How often should I post on social media to maintain engagement with my audience?

    man taking a photo of a city at night

    Quality always trumps quantity. It’s better to post fewer high-quality posts than bombard your audience with sub-par content. That being said, consistency is still key.

    As a general guideline, aim for at least one to two posts per week on platforms like Facebook, Instagram, and LinkedIn, and regular pinning on Pinterest. However, these are just guidelines. Experiment, track your engagement, and find what works best for you.

    What are effective ways to incorporate video content into my social media strategy?

    Video content is highly engaging and versatile. You can use it to share photography tutorials, gear reviews, behind-the-scenes snippets, or time-lapse videos of your editing process. Live videos and Q&A sessions can be great for engagement. Platforms like YouTube, Instagram (IGTV and Stories), and TikTok are excellent for sharing video content.

    Jetpack Social: Automated social media posting for WordPress sites

    All the social media platforms and content ideas we’ve discussed might seem overwhelming. Managing multiple social media accounts while running a photography business is no walk in the park. But there are powerful tools, like Jetpack Social, that can help.

    Jetpack Social homepage

    Jetpack Social, part of the Jetpack suite of plugins for WordPress, lets you automate your social media posting. Imagine creating a new post on your WordPress site and having it shared across all your social media platforms, instantly or scheduled, without lifting another finger. Sounds like a dream, doesn’t it? 

    Jetpack Social supports many major social media platforms, including some of the ones we’ve discussed in this article. This ensures that your amazing photographs and the captivating stories behind them get the online exposure they deserve. 

    Not only does this feature save you time, but it also ensures consistency in your social media presence, which, as we’ve emphasized, is crucial for growing and maintaining your online following.

    What’s more, with Jetpack’s optional built-in performance and security tools, you can have peace of mind knowing your website is safe, secure, and performing at its best. So, while Jetpack takes care of your website and social media management, you can focus on what you do best — creating stunning photographs.

    A world of opportunities

    Social media has helped even the playing field for photographers across the globe. You can showcase your work, connect with an interested audience, and grow your photography business. With the right platforms, engaging content, and handy tools like Jetpack Social, your social media journey can be a truly rewarding one.

    Learn more about Jetpack Social today

  • Redesigned Editor in the Jetpack Mobile App

    As we’ve been busy adding blocks and functionality to the mobile editor in the Jetpack mobile app, the fundamental design was overdue some love. We’ve started a refresh with modern styles, streamlined writing, and closer alignment to the experience on the web.

    Let’s take a look at the changes coming to you with version 22.9 on iOS and Android.

    Fresh styles and colors 

    We’ve banished the blues for a bolder black and white design. There’s higher contrast and legibility, and more familiarity with what you see on the web. 

    The top navigation bar is tidied up and adds a border to separate your content. We’ve replaced your site title with your site icon, which navigates back to your site. We used the extra space to surface undo/redo at the top.

    The editor before and after, with blues changing to black, less complex UI, and more consistent spacing.

    Media shortcuts 

    When you have no block selected, we added icons to quickly add an image or video without opening the full block list.

    Next to the button to add blocks, icons to directly add popular media blocks are displayed.

    Streamlined writing and a Unified Toolbar

    Writing felt clunky with a border and controls surrounding your text. 

    A before and after image showing the blue text and icons have been removed when you're typing.

    We’ve removed the blue box to give your words space to breathe. Those actions all moved to the toolbar, so any action you need to take on a block can be found in one place.

    An isolated image of the block toolbar, showing all of the controls available: add blocks, block settings, specific block formatting, move block up/down, more options.

    The settings icon moves to the start of the toolbar, while the arrows to move blocks up and down are at the end. And even better, you can drag and drop blocks directly.

    An image showing where the up/down arrows can be found on the toolbar to move blocks up and down, and another showing that drag and drop can be used too.

    More to come

    Stay tuned: we’ve got exciting things lined up for the mobile editor experience. Any feedback you have is welcome to help us continue to improve the Jetpack mobile app.

    Don’t have the Jetpack mobile app yet? Download it today!

  • How to Make Automatic WordPress Backups on the Cloud

    Backing up your site can be an effective way to keep your content safe. But unless you remember to take a manual backup consistently, and storing copies in a secure environment, you may be lulled into a false sense of security. 

    The good news is that you can use a powerful tool, Jetpack VaultPress Backup, to easily set up automated backups and store a copy of your WordPress site on a secure cloud platform. 

    In this post, we’ll discuss the importance of making off-site WordPress backups. We’ll also look at some cloud-based backup solutions for WordPress. Finally, we’ll show you how to automate things with one of the best WordPress backup plugins.

    The importance of off-site WordPress backups

    You’re probably already familiar with backups. These are copies of your site that are stored online or on a local device.

    For example, you might use a WordPress backup plugin to download your content to your computer. Some hosting providers may also perform backups of your WordPress site and store them on their servers. 

    There’s just one big problem with these solutions: if the server or computer gets hacked, you could lose your backups. 

    Additionally, if your server malfunctions due to a host-based or user error, you may be unable to access your content. For instance, your host’s site might be down due to a problem with its server, and you won’t be able to log into your hosting account to restore a backup until the issue is resolved.

    A cloud WordPress backup can offer more reassurance. That’s because you’ll be storing your content off-site, typically on a secure platform that’s independent of your host’s servers. 

    This means you’ll be able to access your backups even if your site or server is down. Plus, if the server gets hacked or a user makes an unauthorized change, your content won’t be impacted. 

    A closer look at cloud-based backup solutions for WordPress

    Looking for the best WordPress backup plugin? There are several tools that you can use to create WordPress backups on the cloud. For example, UpdraftPlus enables you to store copies of your site on Dropbox, Google Drive, Amazon S3, and other platforms.

    Another option is Duplicator, which lets you migrate, copy, or move a site from one location to another. Like UpdraftPlus, it offers cloud storage on Dropbox, Google Drive, and Amazon S3. But you’d need to purchase the premium version to access this feature.

    However, site owners looking for the easiest, most reliable solution for WordPress can’t help but consider Jetpack VaultPress Backup. In fact, made by the expert team behind WordPress.com, millions of sites already have Jetpack tools installed. 

    Jetpack.com - the best real-time WordPress backup plugin.

    With this plugin, you’ll be able to save every change you make in real-time and store copies on your site on a highly secure cloud. This also means that you’ll be able to restore your WordPress site without any issues, even if your host server is down. 

    Plus, copies of your site are saved on multiple servers across the world for added reliability. The backups are also encrypted to keep your content secure. 

    And the best part is, the process is completely automated. Once installed, the plugin will create an automatic backup every time you make a new change on your site.

    As you can see, VaultPress Backup is one of the most secure and reliable backup plugins on the market. You can get it as a standalone plugin, or part of the Jetpack Security bundle. Either way, it’s very easy to set it up. 

    How to automate your cloud-based WordPress backups

    Now, let’s look at how to automate your cloud-based WordPress backups with VaultPress Backup. To get started, you’ll need to purchase a Jetpack plan that includes the backup tool.

    The standalone Jetpack VaultPress Backup plugin plan comes with 10GB of storage.

    Or if you have the free Jetpack plugin installed on your site for its many other security and performance tools, you can upgrade to a premium plan, which starts with 1GB of storage.

    Pricing tiers for off-site backups using Jetpack Vaultpress.

    If you have a large site, you may want to subscribe to Jetpack Security, which gives you 10GB of storage space in addition to other premium security features.

    How to install and activate the Jetpack VaultPress Backup plugin

    Once you’ve purchased a plan, you can install and activate VaultPress Backup through your WordPress dashboard.

    Install and activate Jetpack Vaultpress from the WordPress plugin repository.

    Click on Install Now followed by Activate. You’ll then be prompted to purchase the plugin or sign in with an existing plan.

    After activation, purchase the plugin or sign in with an existing plan.

    Next, you’ll need to enter your license key to activate the plugin. If you’ve purchased a subscription, this will be sent to your inbox.

    You’ll need to enter your license key to activate the plugin.

    You may also need to connect VaultPress Backup to your WordPress.com account. Simply follow the prompts to complete the process.

    Connect VaultPress Backup to your WordPress.com account.

    If you don’t already have a WordPress.com account, you can create one for free. 

    Once you’ve set up the plugin, you can access it by navigating to Jetpack → VaultPress Backup in your dashboard. As you can see, the plugin will automatically perform the first backup of your site.

    Access Vaultpress by navigating to Jetpack, then Vaultpress Backup from the WordPress dashboard.

    You won’t need to configure any settings or enable automated backups. Jetpack will automatically create a restore point with every edit you make. 

    You can view the latest backup within your WordPress dashboard.

    You can view the latest backup within your WordPress dashboard.

    To access your site copies, simply click on See backups in the cloud. You’ll get an activity log that lets you see every change made to your site. This can be particularly useful if you have multiple users contributing to your blog. 

    Frequently asked questions

    As we have seen, VaultPress Backup makes it super easy to make complete WordPress backups on the cloud, but you may still be wondering how it works. In this section, we’ll try to answer some of the most common questions about the best WordPress backup plugin. 

    Is Jetpack VaultPress Backup easy to install and configure?

    Yes, VaultPress Backup is very easy to set up. The only thing you’ll need to do is purchase a Jetpack plan that includes the tool.

    Once that’s sorted, you can simply install and activate the plugin on your site, and it will generate the first backup for you. From then onwards, VaultPress Backup will automatically create a backup every time you update your site. This includes backups of your files as well as your databases. 

    At what intervals are backups performed?

    With VaultPress Backup, copies of your site are made in real-time every time you work on it — a much better solution than scheduled backups. For instance, if you create a new post today or customize your theme, the plugin will instantly make a backup to save those changes. 

    This system is a lot more effective than weekly or monthly backups, as you don’t need to worry about potentially losing a day’s worth of work if something goes wrong within that time frame. 

    Thanks to the real-time backup method, you can rest assured that every change you make on your site is stored in a secure location. 

    Does VaultPress Backup offer secure backup storage?

    VaultPress Backup makes redundant copies of your WordPress site on multiple servers across the globe. This way, should one server fail, you’ll still have access to your backups. 

    Plus, it creates off-site backups, independent of your hosting server. That means there’s no load on your server, and you can still access your content if your site is down. 

    It’s also worth noting that your backups are encrypted. This makes it even more difficult for malicious third parties to intercept your site and manipulate your content. 

    How can I restore a backup? Is it easy to do so?

    Yes, when you use VaultPress Backup, you can restore a copy of your site in just a few clicks. 

    First, you’ll want to log into your Jetpack account and click on Activity Log. Here, you can use the filters to search for the backup by Date range or Activity type

    Restore a backup from your Activity Log in your Jetpack account.

    Then, select the Actions button and click on Restore to this point to open the Restore Site dialog box.

    Select the Actions button and click on Restore to this point to open the Restore Site dialog box.

    Next, you can use the provided list to deselect any items that you don’t want to restore, like plugins and themes. If you want to restore everything, leave all boxes checked and click on Confirm Restore.

    Jetpack will then restore your site according to your selections. Once the process is complete, you’ll see a success message. That’s it! 

    If you have a WooCommerce site, VaultPress Backup enables you to restore your WordPress site to any previous state without losing your most recent orders and products. You’ll also be able to create custom WooCommerce table backups. 

    Note that you also have the option to download backups to your computer. You can then upload them to another storage device of your choice, like Google Drive. 

    Make WordPress backups a breeze with VaultPress Backup

    Performing backups can help ensure that you always have a copy of your site to restore should anything go wrong. But, if you’re storing these copies on your server or local device, you risk losing your content in the event of a cyberattack or hardware malfunction.

    For extra peace of mind, you’ll want to save your backups off-site. With VaultPress Backup, you can make cloud backups in real time. The plugin will automatically generate a copy of your site every time you modify your content, and store it in a highly secure location. 

    Are you ready to automate the backup process? Get started with VaultPress Backup today!

  • Introducing Backup File Browser: Access, Preview, and Download with Ease

    We are thrilled to introduce the latest addition to Jetpack VaultPress Backup – the backup file browser! Say goodbye to full backup downloads and welcome a seamless way to access and manage your backup files.

    It’s not just about accessing backups—it’s about exploring them. The backup file browser transforms backups from mere archives to detailed landscapes, allowing you to dive deep into the specifics of your stored data.

    Seamless Access

    Effortlessly navigate through your backups using an intuitive interface. No more waiting for full backups to download – instantly find and access the files you need.

    You can access the files of any backups in Jetpack Cloud by clicking on the `Actions` menu and then on `View files`.

    Files Preview

    Curious about the content of a specific file? With the backup file browser, you can preview images, videos, audio, texts, and other supported file types before downloading them, ensuring you get the right files every time.

    Download Individual Files

    No more downloading entire backups just to retrieve a single file. Choose individual files, plugins, themes, or database tables, and download them directly to your local storage.

    Dive into the New Landscape of Your Backups!

    Already with us? Experience the power of the backup file browser today! Navigate through your backups, preview files, and download what you need with ease. Take control of your backups and get started now.

    Not yet a part of the Jetpack VaultPress Backup experience? Discover the depth of our backup capabilities. Get started here.

  • What are Offsite Backups & Why Use Them? (12 Advantages)

    In the world of business, particularly in the digital realm, we’re not just storing office supplies and paper files. We’re guarding treasure chests full of digital data, sensitive information that forms the bedrock of our enterprise.

    But, just as you wouldn’t bury treasure in your backyard, you shouldn’t store critical data only on your primary server. This is where the principle of offsite backups comes in.

    What is an offsite backup?

    In a world that’s rapidly going digital, data is the new gold. An offsite backup, then, is essentially a safe deposit box. It’s a copy of your data stored at a different location from your primary server. It could be another physical location, or, increasingly, it’s in the cloud.

    Unlike the more traditional onsite backup, which replicates your data on a local server or device, an offsite backup ensures that a version of your data is stored at a different geographical location, safe from any calamities or security breaches that could affect your primary server.

    Your WordPress site has a hosting provider that may offer backups. However, these are considered on-site since they’re hosted at the same place as your regular website files. If something happens, all of your data may be irrecoverable — your fortune gone. 

    Why offsite backups are essential

    Now you might wonder why you should even bother with offsite backups. You’ve got a reliable host and a strong password. Isn’t your data safe enough? 

    Well, as we’re about to delve into, there are numerous reasons why this belief is, not only flawed, but potentially dangerous.

    The digital landscape is fraught with risks, from natural disasters that can wipe out physical servers to cyber-attacks that can compromise your data integrity. These dangers pose a significant threat to your business continuity, especially if your primary server is your only line of defense.

    Think you’re not a target? Cybercriminals often aren’t individually selecting which sites to attack. Instead, they use automated programs that look to exploit any weak site, and they use economies of scale to penetrate just a few of thousands of attempts to make massive gains. 

    The role of offsite backups in a disaster recovery plan

    A sound disaster recovery plan is like a well-rehearsed fire drill. You hope you’ll never need it, but when disaster strikes, you’ll be glad you took the time to prepare. For websites, one of the central tenets of a good disaster recovery plan is offsite backups.

    If your primary server is compromised, you can lean on your offsite backups to restore your website and ensure that your operations continue as smoothly as possible. It’s the digital equivalent of having a fireproof safe to protect your most important documents from a blaze.

    The risks associated with a lack of offsite backups

    Imagine you’re a skilled acrobat, performing breathtaking stunts high above the ground. Now imagine doing so without a safety net. Sounds terrifying, right? That’s what running a business without offsite backups is like.

    The consequences could range from the inconvenient, such as delays in accessing your website, to the catastrophic, such as halted operations or a significant loss in revenue.

    What does the ideal offsite backup solution look like?

    We’ve established that offsite backups are crucial. But how do you choose an ideal solution for your business? The best offsite backup solution should offer you secure and robust storage, easy retrieval of your data, real-time updates, and scalability. Additionally, it should also offer remote management of your backups and a simplified process of restoring your data. Sound like a tall order? 

    Jetpack VaultPress Backup plugin homepage

    Let’s make it easier. Introducing Jetpack VaultPress Backup — a premier backup solution designed for WordPress sites. With VaultPress Backup, not only are you getting the peace of mind that comes with knowing your data is safe and secure, you’re also getting a solution that’s specifically designed to meet the unique needs of your WordPress site. 

    12 key advantages of using offsite backups

    1. Peace of mind — Your data is safe in case of an onsite disaster

    You’ve heard the stories. A server crash that wipes out months of hard work. A devastating natural disaster that destroys local data storage. Cybercriminals breaching defenses and holding valuable data for ransom. This stuff of nightmares is, unfortunately, a very possible reality in the digital world today.

    But with offsite backups, you don’t have to worry. It’s a safety net that stands ready, offering assurance that should the worst happen, your data will be safe. With tools like VaultPress Backup, every change you make is stored in a safe location, ready to step in if disaster strikes.

    2. Security — Keep your backups away from potential breaches

    Cybersecurity threats are a significant concern in today’s digital landscape. The security of your data shouldn’t be something that keeps you awake at night. Offsite backups provide an extra layer of protection, ensuring that even if your primary systems are compromised, your data remains secure. VaultPress Backup, for instance, encrypts your data during transmission and stores it in secure offsite locations, far from the prying eyes of cybercriminals.

    3. Safeguard your data — Protect against accidental deletions

    Ever deleted a file accidentally and wished you had a time machine? We’ve all been there. Accidental deletions are more common than you might think, and they can have catastrophic consequences. Offsite backups are like a digital time machine, enabling you to recover accidentally deleted data and get back on track. VaultPress Backup provides real-time backups, meaning every change is recorded — even those accidental deletions.

    4. Easy retrieval — Access and restore backups from anywhere

    You’re on vacation, and you get an urgent call — the website’s down, and they need it restored immediately. Is your day away ruined? Not if you have offsite backups. They can be accessed from anywhere, allowing you to retrieve and restore data whenever you need to.

    option to restore a backup with Jetpack VaultPress Backup

    5. Accessibility — Retrieve data even if the primary server is down

    Imagine your primary server is down, and nobody can access your WordPress site. What do you do? With offsite backups, you’re covered. Even if your primary server faces downtime, you can access your offsite backups and retrieve the necessary data. A plugin service like VaultPress Backup ensures that your data is always available when you need it, irrespective of what happens to your primary server.

    As a bonus, Jetpack’s full suite of WordPress tools include a downtime monitoring feature. So, you’ll know as soon as something is wrong and have the power to fix it from anywhere with just a few clicks. 

    6. Time efficiency — Offsite backups can be performed automatically

    Running a business is a juggling act, and time is one of the most valuable resources you have. Offsite backups can be set to run automatically, eliminating the need for manual backups that take up precious time. VaultPress Backup, for example, provides real-time automated backups. You set it up once, and it takes care of the rest, leaving you free to focus on growing your business.

    7. Peaceful updating/testing — Confidently experiment with changes

    Innovation is key to success in today’s fast-paced business world, but making changes to your website or testing new features can be risky without a safety net. Offsite backups allow you to confidently experiment and innovate, knowing you can restore your site to its previous state if necessary. VaultPress Backup keeps a detailed log of all changes, making it easy for you to undo any that don’t work out as planned.

    activity log showing all the actions on a site

    8. Scalability — Expand storage without affecting the primary server

    As your business grows, so does your data. Offsite backups are an efficient way to manage this growth. They allow you to quickly and easily scale your storage capacity. 

    9. Regulatory compliance — Meet data protection requirements

    Many industries are required by law to have a certain level of data protection in place, which often includes offsite backups. By ensuring your data is securely backed up offsite, you can work towards maintaining compliance with these regulations.

    10. Customer trust — Demonstrate reliability and show your clients their data is safe

    A slow website annoys visitors and potential customers. A site that’s completely down? It wreaks of incompetence and not much sends them to a competitor faster. Be there when customers are looking for you with a continuity plan that includes easily-recoverable offsite backups.

    Plus, having robust offsite backups in place, shows customers that you take their data security seriously, which builds trust in your business.

    11. Business continuity — Keep your business running smoothly

    In the event of a disaster, having offsite backups ensures that your business can continue to function. You can minimize downtime and disruption to your business operations. VaultPress Backup makes WordPress site recovery simple, fast, and efficient. 

    12. Easy migration — Simplify website transfers to new environments

    Picture this scenario. You’re poised to make a leap, set to transfer your website to a new hosting provider or perhaps a new domain. But the thought of the potential headaches involved makes you hesitate. We’ve been there. The truth is, migrating a website can be a daunting task, filled with uncertainties.

    But with offsite backups, this process becomes a walk in the park. Your website’s data, safely stored in an offsite location, can be easily moved and re-deployed in a new environment, significantly simplifying the process. It’s like packing up your belongings from your old house (your existing server) that have been carefully cataloged and stored away, ready to be set up in your new home (the new server) — except all the heavy lifting has been taken care of for you. 

    A deeper dive into VaultPress Backup

    As a part of the Jetpack suite of plugins for WordPress sites, VaultPress Backup fills the universal need for a robust, easy-to-use offsite backup solution. 

    Features and benefits of VaultPress Backup

    VaultPress Backup is more than just an offsite backup solution. It’s a comprehensive WordPress site recovery tool that offers:

    • Real-time and automated backups.
    • Easy restoration of your site — even if you can’t access your dashboard.
    • A centralized place to manage backups.
    • Premium support from a team of WordPress experts.
    • High-grade security to protect your backups from threats.

    How to configure VaultPress Backup on your WordPress site

    Setting up VaultPress Backup on your WordPress site takes just a few simple steps:

    1. In your WordPress dashboard, go to Plugins → Add New. Search for “Jetpack VaultPress Backup” and click Install now → Activate.
    2. In the new window that pops up, click Set up Jetpack.
    3. You’ll be prompted to connect to a WordPress.com account. You can either create a new one, or log into an existing profile. 
    4. Then, choose a VaultPress Backup plan based on your needs and set up your payment information.
    Jetpack set up screen

    And that’s it! Once VaultPress Backup is set up, you don’t need to worry about anything. Everything happens automatically, in real-time, and your backups are stored off-site in an ultra-secure cloud. And the Jetpack support team is always on standby to help you out.

    Frequently asked questions regarding offsite backups

    Onsite vs offsite backups — what’s the difference?

    Onsite backups involve storing copies of your data on your local devices or server, while offsite backups store copies of your data at a different location from your primary server. In other words, offsite backups shield your data even if something happens to your primary server, giving you an additional layer of protection.

    Why are offsite backups important for my website?

    Offsite backups are vital for your website because they protect your data and content from a multitude of risks, including physical damage to cyber threats. Having a copy of your website stored off site ensures that you can get it back up and running quickly if your server is ever compromised.

    How do offsite backups help in a disaster recovery scenario?

    In a disaster recovery scenario, offsite backups act as your fail-safe. They allow you to restore your website quickly and continue operations, minimizing downtime and data loss. 

    What key advantages do offsite backups offer compared to onsite backups?

    Offsite backups offer several advantages over onsite backups, including added security, accessibility, scalability, and help to comply with regulatory standards. They also provide a safety net in case of damage or security breaches to your primary server or local device.

    What differentiates VaultPress Backup from other offsite backup solutions?

    VaultPress Backup stands out from other solutions due to its seamless integration with WordPress, user-friendly management dashboard, high-grade security, and exceptional support. 

    One of the key highlights is that all backups are taken in real time, so every single change that happens on your website — from updated pages to published posts and customer orders — is always available in case of emergency.

    How secure are my backups with VaultPress Backup?

    VaultPress Backup uses state-of-the-art security measures to protect your backups. From encrypted transmission to secure storage, Jetpack goes the extra mile to ensure your backups are secured from threats. Your WordPress backups are safe with Jetpack VaultPress Backup.

    How frequently should I schedule offsite backups?

    For maximum data protection, you should create offsite backups in real-time. VaultPress Backup makes this possible, ensuring that every change you make to your site is immediately backed up.

    Where can I find more resources or support for using VaultPress Backup?

    For more resources or support on using VaultPress Backup, you can check out the comprehensive support documentation or reach out to Jetpack’s expert support team who are always ready to help.

    laptop sitting on a table

    Jetpack VaultPress Backup: Real-time, offsite backups for WordPress

    In an ideal world, you’d never need to restore a backup. But the reality is that there are a variety of reasons you might have to, from a hacked website to a coding mistake.

    Jetpack VaultPress Backup was designed to offer real-time, offsite backups for WordPress sites. So, whether you own a small business, an ecommerce store, a blog, or an enterprise company, VaultPress Backup provides a secure, easy-to-use, and robust offsite backup solution that gives you peace of mind.

    From disaster recovery to easy data retrieval and beyond, offsite backups are not just a good-to-have feature for businesses; they’re an absolute necessity. It’s the digital safety net that keeps your business running smoothly, safeguards your website content and data, and keeps you sleeping well at night.

    So, take the leap towards securing your website’s future with offsite backups. 

    Discover the full list of benefits VaultPress Backup offers here: https://jetpack.com/upgrade/backup/

  • 7 Best Local WordPress Development Environments in 2023

    In many cases, a local WordPress development environment is a better choice than paying a hosting provider when starting a new WordPress project. Local WordPress development environments enable you to set up as many websites as you need on your computer, all for free.

    These environments are perfect for developing new projects and for testing purposes. Depending on what tools you use, you can launch new WordPress sites in a matter of minutes, and loading times should be near instant. Plus, no one will be able to access your local projects until you’re ready to share them.

    development team working on computers

    In this article, we’ll break down how local WordPress development environments work and how to choose one. Then we’ll introduce you to seven top picks. 

    What is a local WordPress development environment?

    A local development environment is a set of tools you can use to set up and host websites on your computer. In this scenario, the computer acts as the server. It’s also a kind of ‘sandbox’ where you can experiment with, create, and refine websites without worrying about paying for WordPress hosting or breaking anything important.

    local development site with the name "Test Site"

    Normally, WordPress runs on a web server on the internet, and you interact with it via a web browser. If you use a local WordPress development environment, you can still access the sites you set up via a browser, but they’re not accessible to people outside your local network, as every element of the site, from its files to the database, is hosted on a local machine — your computer.

    The tools that allow you to do this are called local development, own virtual machine environments, or localhost environments. Some popular examples include MAMP and XAMPP, although there are many others.

    two developers working side by side

    What are the benefits of a local development environment?

    If you work with WordPress, you probably have access to hosting where you can launch new websites and test projects. Using a local WordPress development environment requires you to customize your computer to be able to host sites (i.e., turn it into a server).

    That process is much simpler than you might expect, thanks to local WordPress development software. The most popular options will set up all the tools you need to host a WordPress site, from PHP to server and database software.

    There are a number of reasons why it makes sense to do this instead of using a typical hosting environment. Some of the benefits include:  

    A safe development environment

    With a local environment, you have the liberty to experiment without the fear of breaking your live website. Any mistakes remain confined to your local server setup, and can be easily rectified without impacting online visitors.

    Near-instant loading times

    Local environments are faster, since you don’t have to constantly upload or download files from the server. Changes are instantaneous, leading to a more efficient development process.

    Offline access

    Since the entire setup resides on your machine, you can work on your website even when you’re offline. This independence from internet connection and connectivity can be a boon for developers on the move, and those with unreliable internet connections.

    black and white image of a man working on a laptop

    Learning and testing

    These tools provide a safe platform for beginners to learn WordPress, or for more seasoned developers to try out new plugins, themes, and updates before implementing them on live websites.

    The final benefit of a local environment is that it’s free. A lot of hosting plans limit the number of websites you can set up. Instead of paying for more expensive plans, you can host sites locally. This is useful if you’re working on a lot of simultaneous projects, or if you simply like testing the limits of what WordPress can do.

    How to choose the right local WordPress development environment

    Choosing the right local development environment depends on your specific needs, skill level, and comfort. Here are some key factors to consider:

    • Ease of use: If you’re a beginner, you might prefer an environment that’s easy to set up and use. Some local development environments provide more user-friendly interfaces and straightforward setup processes, whereas others are focused on advanced users (some rely entirely on the command line, for example).
    • Compatibility. As a first step, you’ll want to ensure that the environment you choose is compatible with your operating system. Some environments are designed specifically for Windows, macOS, or Linux, while others are versatile and can operate on multiple platforms.
    • Advanced functionality. Some local environments offer features like Secure Sockets Layer (SSL) support, local email testing, support for multiple versions of PHP, plugins, and more. Pick an environment based on the features you need for your development projects.
    • Access to community and support tools. Look for environments that have strong community support and comprehensive documentation. This can be particularly helpful if you encounter issues or need help understanding certain features.

    It’s also worth noting that not all local environments are designed specifically for WordPress users. A lot of these tools are flexible, which means you can use them to set up any kind of website you want.

    If you work only with WordPress, though, you’ll likely want to opt for a local development environment configured for that content management system (CMS). Typically, this means the software will come with features to make creating and managing WordPress websites easier.

    woman working on a laptop, wearing headphones

    The top seven local development environments for WordPress

    So, how should you get started? The most important step is to choose the tool you’ll use to create your local sites. Below, we’ve included seven top options. For each one, we’ll tell you all about how it works and what WordPress-specific features it offers.

    1. XAMPP (Windows, Linux, macOS)

    XAMPP homepage with download options

    XAMPP stands for Apache, MariaDB, PHP, and Perl. This open-source tool is a wrapper that sets up that entire development stack, and provides you with a minimalist interface you can use to manage it.

    This is not a WordPress-specific local development tool. XAMPP simply sets up the stack for you and enables you to use it in any way you see fit. This approach is perfect if you’re a developer looking for a no-frills environment, but it’s not recommended if you prefer intuitive interfaces.

    Pros:

    • Lightweight software
    • Database and email management tools
    • Local FTP support
    • A Bitnami installer for easy WordPress setup

    Cons:

    • No intuitive interface
    • No WordPress-specific functionality

    Installation and setup process: 

    XAMPP comes with a simple installer for every operating system (OS) it works on. During the setup process, you can choose which components of the stack you want to install. For WordPress websites, you can skip the Perl installation, as the CMS doesn’t require it.

    Ease of use: 

    You can manage XAMPP using a dashboard that enables you to start, stop, and configure each of its components. This dashboard also gives you access to the terminal and a local file explorer for your site’s files.

    XAMPP comes with a Bitnami installer that enables you to set up WordPress without having to do so manually. But aside from a simplified WordPress installation, XAMPP doesn’t offer any extra tools for managing your website (or switching between multiple projects).

    Price: 

    XAMPP is a free open-source tool.

    2. WampServer (Windows)

    WAMP homepage with information about the tool

    WAMP stands for Windows, Apache, MySQL, and PHP. WampServer enables you to set up that full development stack locally, and it provides you with a simple management interface to interact with each component.

    WampServer is fairly similar to XAMPP in terms of functionality and ease of use. The software isn’t designed for WordPress specifically, but the development stack is perfect for the CMS anyway. If you’re a seasoned developer, WampServer’s minimal interface shouldn’t pose a problem while you’re working on WordPress projects.

    Pros:

    • Lightweight software
    • Database management tools
    • Built-in debug tools

    Cons:

    • Only works with Windows
    • Lack of website setup tools
    • No WordPress-specific functionality

    Installation and setup process: 

    WampServer comes with an installer that requires minimal configuration during the setup process. You can’t pick what elements of the stack to install, but all of them are needed to run WordPress locally.

    Ease of use: 

    WampServer sets up a start-tray menu that you can use to manage its components and start and stop the service. On the other hand, it doesn’t include any tools that will help you during the site setup process.

    Installing WordPress with WampServer is a manual process. You’ll need to download the latest version of the CMS, extract the files on the localhost folder WampServer sets up for you, create a database using phpMyAdmin, and run the official WordPress installer tool. This process is not necessarily complex, but it can be overwhelming if you’re used to web hosts that install WordPress for you.

    Price: 

    WampServer is a free tool.

    3. MAMP (Windows, macOS)

    MAMP homepage design with an orange background and elephant logo

    In many ways, MAMP is a more user-friendly version of both XAMPP and WampServer. This software enables you to set up a variable development stack, with the option of choosing between Apache or Nginx, as well as MySQL, PHP, Python, Perl, and Ruby.

    The main downside of using MAMP is that it’s not fully free software. Its free version limits you to a single local website. The premium version of MAMP gives you access to a lot of advanced development features, like cloud backups, support for multiple versions of PHP, mobile testing apps for your sites, and a built-in text editor.

    Both the free and premium versions of MAMP come with WordPress installers. The premium version also includes some Quality of Life (QoL) tools for WordPress, like options for importing sites and pushing them to production (your live WordPress site).

    Although MAMP is available on both Windows and macOS, it’s clearly designed for the latter. When you compare the premium Windows and macOS versions, the former offers less functionality. If you’re primarily a Windows user, this might not be the best option for you.

    Pros:

    • The ability to choose between Apache and NGINX
    • Access to WordPress-specific tools
    • One-click WordPress installation
    • Cloud backups
    • SSL support
    • A built-in text editor
    • Support for multiple PHP versions and extensions

    Cons:

    • Support for just one website on the free version
    • Less functionality included with the Windows version compared to the macOS version
    • No WordPress-specific functionality

    Installation and setup process: 

    MAMP comes with an installer that enables you to choose which components to set up. The software also offers one-click installation options for WordPress in both its free and premium versions.

    Ease of use: 

    The free version of MAMP comes with a management interface that’s similar to XAMPP. This interface enables you to manage and configure all the environment’s elements, including the server and PHP installation. If you use MAMP Pro, you get access to a more comprehensive management dashboard that includes WordPress-specific options.

    Price: 

    Free, with premium versions available starting at $99.

    4. LAMP (Linux)

    LAMP is not a standalone local development environment. It’s the name of a specific software stack that includes Linux, Apache, MySQL, and PHP. In other words, it has all the components you need to run WordPress.

    As the name implies, you need to use a Linux distribution if you want to set up this stack. The process involves using the terminal to install and configure each of the components. This process can be intimidating if you don’t have a background in web development or aren’t familiar with using the command line.

    example of the command line in action

    In practice, there’s little difference between using LAMP or setting up a development stack like XAMPP. The main thing to keep in mind is that, with a self-installed stack, you don’t get access to a management dashboard that enables you to control all components. Instead, you need to use the terminal or access the components through the browser (for example, by using phpMyAdmin) to make changes to the stack.

    Pros:

    • Full control over the WordPress development stack
    • The ability to set up as many local websites as you need

    Cons:

    • Familiarity with Linux and the command line is necessary
    • No central management dashboard for stack components

    Installation and setup process: 

    There’s no hand holding when it comes to installing LAMP. The process requires you to understand how to set up packages using the Linux terminal, and to be comfortable configuring them without a graphic interface. This often involves accessing and editing configuration files using a text editor.

    Ease of use: 

    If you don’t have a background working with Linux or using the command line, LAMP isn’t for you. But if you’re comfortable with both of those aspects, LAMP gives you an unparalleled degree of control over your local WordPress setup.

    You can configure the development stack in any way you need without limitations imposed by software. For a lot of developers, this freedom is much preferable to relying on wrappers like XAMPP or WampServer.

    Price: 

    LAMP is a software stack you can install for free on Linux.

    5. Vagrant (Windows, Linux, macOS)

    Vagrant homepage with the tagline, "development environments simplified"

    One disadvantage of most local site development software is that it doesn’t enable you to set up multiple environments. For example, if you set up a LAMP environment on Linux, you can’t also run an NGINX server simultaneously without things getting complicated.

    This is problematic if you need drastically different environments for WordPress projects. Vagrant solves this issue by helping you create local virtual machines where you can set up any development environments you want.

    Vagrant is incredibly lightweight, and you interact with it via the command line. Typically, virtualization software requires powerful hardware to run multiple machines. Vagrant removes a lot of the overhead for virtual machines and enables you to power them up or down as necessary.

    Moreover, there’s a large library of Vagrant “boxes” you can choose from. These boxes are pre-built environments that you can download and install for rapid WordPress setup. Typically, WordPress boxes include extras like WP-CLI, debugging tools, and more.

    One final pro of using Vagrant is that it’s relatively easy to share config files between members of a team. Virtual environment config files enable you to reproduce exact machine configurations, so you can have coworkers use the same virtual hardware to collaborate on a project. Combine this with Git support, and you have an ideal set of tools for collaborative WordPress development.

    Pros:

    • The ability to set up multiple environments using virtualization
    • Doesn’t require top-of-the-line hardware to run
    • Pre-built WordPress development boxes that make it easy to set up environments
    • The ability to share environment config files easily
    • Git support

    Cons:

    • Works solely through the command line

    Installation and setup process: 

    Vagrant offers installers for all major OSs. Alternatively, you can install the software through the terminal on either macOS or Linux. The installation process is simple, and it doesn’t offer configuration options, as you’re not setting up an entire development environment from the get-go.

    Ease of use: 

    If you’re comfortable using the command line, you’ll feel right at home with Vagrant. The software makes it easy to spin up new WordPress site installations and configure environments. But if you’re looking for a graphical user interface (GUI), you won’t find it here.

    Price: 

    Vagrant is free.

    6. Docker (Windows, Linux, macOS)

    blue background with white text saying "develop faster. run anywhere."

    In terms of functionality, Docker is fairly similar to Vagrant. You can use Docker to set “containers” and configure unique development environments on each of them. That means you can have multiple local WordPress websites, each with a unique virtual server, all cohabitating on the same computer.

    The main difference between Vagrant and Docker is that the latter doesn’t use virtual machines. Containers are standalone executable packages that contain everything you need to run an application. Unlike a virtual machine, containers don’t include a full OS. This makes Docker more flexible, and both tools can cohabitate.

    Docker works through the command line, just as Vagrant does. You can use Docker to create individual “containers”, and set up WordPress development environments by installing the stack you want to use.

    Alternatively, you can download pre-built Docker containers from the developers’ online library. This library includes hundreds of WordPress containers, each of them with a unique configuration. This means you’re free to choose containers based on the type of environment you want to use.

    Pros:

    • The ability to set up multiple development environments using virtual machines
    • Pre-built WordPress development containers that make it easy to set up environments
    • A more lightweight setup than Vagrant in terms of hardware requirements
    • The ability to run services like databases, caching layers, etc. in different containers

    Cons:

    • You need to be comfortable using the command line

    Installation and setup process: 

    Docker offers standalone installers for all the most popular operating systems. Just as with Vagrant, the installation process doesn’t require a lot of configuration. Still, you may need to enable virtualization in your device’s BIOS settings to use Docker.

    Ease of use: 

    Docker is a command line tool without a GUI, so you need to be comfortable working with commands to manage a server. If you don’t have a background as a developer or system administrator, there’s a steep learning curve involved in using this kind of tool.

    Price: 

    Docker offers a free personal version you can use for local WordPress development. Premium versions enable you to set up private repositories for your containers, starting at $5 per month.

    7. Laragon (Windows)

    purple background with white text that says "Laragon"

    Laragon is a project from users who were frustrated with environments like XAMPP and WampServer, due to their perceived lack of user-friendliness. With Laragon, you get a tool that combines command line use with a management dashboard for the development stack.

    Laragon enables you to set up containerized environments (think Docker or Vagrant) with an emphasis on being as lean as possible and easy to customize. Laragon tends to require the least amount of hardware resources when compared to similar tools.

    In terms of friendliness for WordPress sites, Laragon enables you to install popular software and tools with only a single click. You can use the Laragon management dashboard to configure your own development environment and install WordPress locally without needing to use the command line.

    The Laragon dashboard enables you to access any aspect of local WordPress projects, including databases, local files, and even SSH with a single button press. Combine that with command line access, and you have a very versatile tool on your hands.

    Pros:

    • A central management dashboard and terminal access
    • Containerized development environments
    • Configurable environments
    • One-click WordPress installation
    • Lightweight hardware requirements

    Cons:

    • Only available for Windows

    Installation and setup process: 

    Laragon comes with a Windows installer. The installer includes a handful of basic options, but none of them are related to your development environments.

    Ease of use: 

    Laragon offers both a GUI and terminal support, which makes it more user-friendly than most alternatives. You can set up and manage WordPress local websites without touching the command line, which may be a plus depending on your background. The only big downside of Laragon is that it’s only available for Windows.

    Price: 

    Laragon is free.

    Comparison of WordPress local development environments

    If you’re still on the fence about which local WordPress site development environment to use, let’s take a moment to recap all the recommended options. You’ll want to take into consideration each tool’s interface options and ease of use when making a decision.

    OS  Pros Cons Price
    XAMPP Windows, Linux, macOS Lightweight software, includes database and email management tools, local FTP support, Bitnami installer for easy WordPress setup No intuitive interface, no WordPress-specific functionality Free
    WampServer Windows Lightweight software, includes database management tools, built-in debug tools Only works with Windows, lack of website setup tools, no WordPress-specific functionality Free
    MAMP Windows, macOS Choice between Apache and NGINX, access to WordPress-specific tools, one-click WordPress installation, cloud backups, SSL support, built-in text editor, support for multiple PHP versions and extensions Free version supports one website with limited advanced features, Windows MAMP Pro offers less functionality than its macOS counterpart, no WordPress-specific functionality Free, with premium versions available starting at $99
    LAMP Linux Full control over the WordPress development stack. Set up as many local websites as you need. Familiarity with Linux and the command line is necessary, no central management dashboard for stack components Free
    Vagrant Windows, Linux, macOS Set up multiple development environments using virtualization, lightweight, pre-built WordPress development boxes, share environment config files easily, Git support Works solely through the command line Free
    Docker Windows, Linux, macOS Set up multiple development environments using virtual machines, pre-built WordPress development containers, lightweight in terms of hardware requirements, run services in different containers Requires comfort with using the command line Free, with premium versions available starting at $5 per month
    Laragon Windows Central management dashboard and terminal access, containerized development environments, configurable environments, one-click WordPress installation, lightweight hardware requirements Only available for Windows Free

    Ultimately, once you set up a WordPress site in a local environment, it will work just the same regardless of how you created that environment. That means your choice should come down to what tool you feel most comfortable using.

    two female developers working on a desktop computer

    Frequently asked questions about local development environments

    If you still have any questions about creating local websites with WordPress development environments, this section will answer them. Let’s start by talking about alternatives to local environments.

    What are the alternatives to using a local development environment?

    The best alternative to using a local WordPress development environment is to create new sites with your web host or to rely on staging functionality. But the staging functionality only works if you want to test changes to existing websites.

    For new projects, you’ll want to create entirely new websites if your hosting plan allows for it. Still, local development environments are often a cheaper, faster choice.

    Why use a local development environment instead of a live web server?

    In most cases, you shouldn’t use a live server for any significant testing purposes. Testing major changes in a production environment can lead to catastrophic errors and a lot of time spent troubleshooting them.

    Working in a local or staging environment means that if anything goes wrong, no visitors have to deal with it. You get to fix errors knowing that it doesn’t affect your live sites in any way.

    How does a local environment compare to a staging environment on a live server?

    Staging environments are copies of live websites that you can work on without affecting the original environment. With a staging site, you typically get the option to push any changes you make to “production”, which means they go live after you’re sure everything works properly.

    Local environments enable you to test new projects or copies of live websites. On the other hand, most local development tools don’t offer the option to push changes you make to a live site. 

    woman working at a table with a laptop

    Is it easy to move a site from a local environment to a live server?

    The process varies depending on what local WordPress development tool you’re using. Moving to a live server works just like migrating between two web hosts. That means you need to copy the site’s files and database, and make sure everything is pointing to the right addresses. 

    Some local WordPress development tools have partnerships with specific hosting platforms. That means you have the option of pushing local sites to a live server if you have an account with those web hosts.

    Start experimenting with local WordPress development environments

    When you work on a website or a project on a live server, it feels like the stakes are always high. On top of having to pay while testing a project, you also have to keep users away from it. Local environments make for much better testing grounds. They’re usually free (depending on which tool you use), and you can create as many sites as you want.

    Your own WordPress development environment experience will vary a lot depending on what platform you use. Some local development tools rely only on the command line, whereas others offer user-friendly GUIs, and a few are designed for WordPress specifically. It’s best to test at least a few of the options above until you find one you’re comfortable with.

  • Introducing Jetpack Newsletter: Your Ultimate Growth Engine

    Despite all of the technological advances over the years, the newsletter is still one of the most powerful ways to reach your audience. You may not know this, but Jetpack already gives you the power to send your posts as an email. We’ve helped creators reach millions of their fans over the years. Now we’re taking it one step further with Jetpack Newsletter, enabling you to grow and better engage with your fans.

    Write once, reach all

    The magic of Jetpack Newsletter lies in its ability to let you ‘write once and reach all.’ No need to juggle rewriting for different platforms. Publish your blog, and voilà – your content is instantly converted into a newsletter. The content delivery is immediate, landing straight in your subscribers’ inboxes and the WordPress Reader.

    Attract and grow your subscribers

    Jetpack Newsletter integrates effortlessly within your WordPress website. You can insert our super-simple signup form at any point on your site using the subscribe block. You’ll love watching your subscriber list grow from our intuitive stats dashboard.

    Unleash Your Content to Millions

    WordPress Reader – Your content can appear here.

    As your newsletter shoots into the WordPress Reader, your content opens up to a world teeming with millions of potential subscribers. Jetpack Newsletter presents you with a golden opportunity to significantly expand your reach and make your brand stand out.

    Your Content, Their Way 

    We value choice and know your subscribers do too. With Jetpack Newsletter, they have the power to personalize their email settings. They can opt for immediate updates, or choose daily or weekly round-ups for a less cluttered inbox. Your content delivered their way – a surefire strategy for an enhanced reading experience.

    Easy Subscriber Import and Free Access

    Whether you’re starting from scratch or switching from another email list, Jetpack Newsletter has got you covered. The importing of your subscribers into our system is as easy as pie. Import using CSV or one by one.

    Create an Exclusive Club for Premium Content

    Subscribe form for paywall content

    But that’s not all! You can also set up paid subscriptions with Jetpack Newsletter, which allows you to offer something extra to your loyal followers. This feature gives you the chance to cultivate a community of eager readers and add an exciting new dimension to your blog.

    Jetpack Newsletter

  • Changes to Jetpack Stats for Commercial Sites

    Following the release of the all-new Jetpack Stats, we’re continuing to build new paths to get you all the data you need to strengthen your business and site. To support the sustainability of our new product team, we’re introducing some changes to how commercial sites are charged.

    Going forward, commercial sites will pay for Jetpack Stats based on the amount of traffic they receive. This has been established as the standard for Stats products, and we think it is the most equitable, ensuring that you only pay more if your site grows. Personal sites will remain free.

    Introductory rate for 2023

    To smooth the transition, we are offering the lowest tier of $10 per month for all commercial sites throughout 2023. We hope this will allow ample time to adjust to the changes.

    What is a commercial site?

    In its simplest terms, a commercial site is one that you try to make money from. This most commonly includes selling a product or service or showing ads or affiliate links. For more detail, check out our support page.

    Personal sites are still free

    We’re excited to share that personal sites are staying free. If you don’t attempt to make money from your site, continue using Jetpack Stats for free as you do today.

    Collection of UI images from Jetpack Stats

    If you get value from Jetpack Stats, feel free to pay any amount to unlock upcoming advanced features and priority support. We’ve used this pricing structure with Akismet, and based on our experience, we believe this is the fairest way to provide our products to the world while limiting paid plans to those with more ability to pay.

    Thank you for your continued support and trust in Jetpack Stats. We believe that these changes will enable us to provide a better Stats experience while preserving the values that make the open web so exceptional.