EDITS.WS

Category: jetpack.com

  • WordPress REST API: How to Access, Use, & Secure It (Full Tutorial)

    If you’re planning to become a WordPress developer, you’ll come across something called ‘REST API.’ This is an interface that expands the functionality of WordPress and enables you to connect the platform with other applications. Some developers find it really helpful as part of their process — especially if they’re looking to implement advanced functionality. 

    Fortunately, you don’t need to be an experienced developer to gain expertise with the WordPress REST API. Once you have a solid understanding of the interface and how it works, you can easily implement it into your web-building projects.

    In this post, we’ll provide an in-depth guide to the WordPress REST API. We’ll discuss what it is, how to use it, and how to protect it against threats. We’ll also show you how to fix common REST API errors, how to use the interface with other frameworks, and how it compares to other WordPress API solutions.

    What is the WordPress REST API?

    To understand the WordPress REST API, we’ll need to break down its various components. Let’s start with an introduction to APIs.

    What is an API?

    An application programming interface (API) is a program that enables two applications to communicate with one another. It serves as an intermediary between two pieces of software, facilitating a seamless collaboration. 

    For example, if you wanted to display a Google product on your site, like maps, you’d need to use the Google Maps API.

    Google Cloud API library

    This enables your WordPress site to communicate with Google Maps, so it can pull all the relevant data and features needed to display those maps. 

    Like Google, other companies have APIs and provide them to web developers. These products can be very appealing, as they eliminate the need to code a feature (like a map) from scratch. Instead, you can use third-party software and connect it to your site via API.

    What is REST?

    Representational State Transfer (REST) is a set of guidelines that developers must follow when creating APIs. Therefore, a REST API is an interface that was built with these standards in mind.

    Typically, a REST API follows these principles:

    • Client-server separation: The API should enable the client (or website) and the server to remain separate from one another and continue functioning independently of each other.
    • Caching: REST APIs should use cacheable data, when possible, to improve performance and let the website know which information can be cached.
    • Statelessness: REST APIs can’t store any information about the website they’re connected to on their server, and only the information needed to process a request should be provided.
    • A uniform interface: Requests for resources should be processed in the same way, regardless of their origin. 
    • Layered architecture: REST APIs are built around a layered system, with each layer fulfilling a specific role and working separately from others. This makes the API more secure and easier to update.

    Since a REST API meets these standards, it can provide more security and efficiency. 

    What does the WordPress REST API do?

    WordPress has its own REST API. This enables the platform to communicate with almost every other web application and website, regardless of the programming language they use.  

    With this API, a third-party app will be able to access your WordPress database and pull data from it. In fact, most WordPress plugins and themes use the platform’s REST API to function properly. 

    The WordPress REST API was released as part of the core software in version 4.7. Before then, it was only available as a plugin.

    While the WordPress software is built with PHP, the REST API sends and receives data as JSON (JavaScript Object Notation) objects, which opens up new possibilities for developers.

    What are the most common REST API commands?

    REST APIs are designed to receive and respond to particular requests via HTML commands. 

    The most common commands you’ll use are:

    • GET: You can use this command to fetch a particular resource from the server, like a post or piece of data. 
    • POST: This command lets you modify a resource on the server by adding code.
    • PUT: With this command, you can edit a resource that’s already on the server.
    • DELETE: This command removes a resource from the server.

    These commands are followed by a line that gives more information about the request. These are known as endpoints.

    For instance, if you wanted to retrieve a list of published posts on your site, you would use the following endpoint:

    GET http://mysite.com/wp-json/wp/v2/posts/?status=published

    Let’s look at another example. If you want to add a new page, you would use the following command:

    POST http://mysite.com/wp-json/wp/v2/posts/page

    There are many things you can do with these four commands. You can find a list of endpoints on the WordPress Developer Resources page. 

    Real-world examples of the WordPress REST API

    Now that you have a basic understanding of how the WordPress REST API works, let’s look at some real-life examples, starting with WordPress.com.

    The WordPress.com admin dashboard (called “Calypso”) is built entirely in JavaScript through the REST API.

    WordPress Calypso dashboard, which uses the REST API

    Calypso is a web and desktop app that enables users to add new content, edit existing posts, and more. It uses the REST API to access the data on your WordPress.com site. 

    Another example is the Block Editor. In self-hosted WordPress, the Block Editor uses the REST API to interact with your database and create blocks.

    Many online publications like USA Today also use the WordPress REST API. This enables them to automatically publish articles on other news apps, like Apple News. 

    How to enable and disable the REST API in WordPress

    You don’t need to do anything to enable the REST API — it comes built into WordPress. Later in the post, we’ll show you how to access it.

    While the REST API is a powerful tool for building apps with WordPress, it can make your site susceptible to Distributed Denial-of-Service (DDoS) attacks and malware. Plus, hackers might be able to access your data through the connection with other apps. 

    Disabling the WordPress REST API is not recommended. That’s because doing so can lead to issues with the Block Editor and any plugins on your site.

    If you still want to go ahead and disable it, the easiest way to do this is with a plugin like WPCode.

    WP Code homepage image

    Once you install and activate the plugin on your site, navigate to Code Snippets → Library in your WordPress dashboard.

    WPCode snippets library

    Here, look for an option called Disable WordPress REST API. When you find it, hover over it and select Use snippet.

    using the "disable REST API" snippet

    This will launch a page with a preview of the code.

    editing the WPCode snippet

    If you scroll down to the Insertion box, you can select the Auto-Insert option so that the plugin will automatically apply this code to your site.

    using the auto insert functionality

    Then, scroll back to the top and move the toggle switch from Inactive to Active. Finally, click on Update to make these changes live. 

    How to use the WordPress REST API

    Now, let’s look at how to use the WordPress REST API. We’ve already covered some examples above, but in this section we’ll show you exactly how to access and fetch data. 

    Step 1: Access the REST API

    If you want to fetch data from a live WordPress site, you can access the REST API straight from your browser. All you have to do is enter the following address into the search bar (substituting in your own domain name and extension):

    mysite.com/wp-json/wp/v2

    This will bring up the JSON file of your WordPress site.

    viewing the REST API

    You can then add elements to this URL to access specific data, as we’ll show you in the next step.

    Step 2: Make requests to the REST API

    As we mentioned earlier, you can use endpoints to access particular data on your site. If you want to retrieve a list of all your posts, simply add the endpoint /posts to your address:

    mysite.com/wp-json/wp/v2/posts 

    If you want to retrieve a specific post, you can just add its ID (you’ll find this on the Posts page in your WordPress dashboard):

    mysite.com/wp-json/wp/v2/posts/4567

    Meanwhile, if you want to fetch data about your users, you would use the following request:

    mysite.com/wp-json/wp/v2/users

    These are just simple examples, but there’s a lot more you can do. For instance, you can fetch posts that contain specific terms, change a post’s status from “draft” to “publish,” and more. 

    Step 3: Authenticate your requests

    The WordPress REST API enables you to fetch any type of data on your website, but not all of it is publicly available. In some cases, you’ll need to authenticate your request. 

    To make authenticated requests to the WordPress REST API, you’ll first need to obtain an API key. To do this, navigate to Users → Profile in your WordPress dashboard.

    Then, scroll down to the Application Passwords section. Here, you’ll need to enter a name for your password (for reference) and click on Add New Application Password.

    creating an Application Password in WordPress

    This will generate an API key for you, which you’ll need to use in your requests. For instance, if your API key is “1234567890,” you can include it in an Authorization header like this:

    https://mysite.com/wp-json/wp/v2/posts?Authorization=Bearer1234567890

    Remember to replace the code 1234567890 with the API key you’ve copied and remove any spaces. 

    You can also retrieve a list of posts written by a particular author, with their user ID. You can find their ID by going to the Users section in your WordPress dashboard and clicking on the author’s name. The ID will be displayed in the URL of their author page.

    Let’s say an author’s name is “Joe” and their ID is “123.” In this scenario, you can use the following URL to retrieve a list of all posts written by Joe:

    https://mysite.com/wp-json/wp/v2/posts?author=123&Authorization=Bearer1234567890

    If you can’t find the user’s ID, their profile might have been modified in such a way that the ID is no longer displayed. In this case, you can retrieve a list of all posts written by the user using their login name or email address instead of the ID.

    To do this, you’ll have to use the “slug” parameter instead of the “author” parameter in your request:

    https://mysite.com/wp-json/wp/v2/posts?slug=joe&Authorization=Bearer1234567890

    The “slug” parameter enables you to specify the user’s login name or email address. The WordPress REST API will return a list of all posts written by the user.

    When to use the WordPress REST API

    The WordPress REST API can be used for a wide range of projects. Here are a few examples:

    • Integrating a WordPress site with a mobile app. If you’re a developer, you can use the REST API to retrieve and edit data on a WordPress site from a mobile app. This enables you to build custom apps that interact with your site.
    • Creating custom integrations. Using the WordPress REST API, you can create custom integrations with other software like CRM tools.
    • Building custom scripts. You can use the REST API to automate certain tasks on your WordPress site, like scheduling posts or updating user profiles.

    As you can see, the REST API enables you to integrate WordPress with apps or sites built on other platforms. 

    When not to use the WordPress REST API

    While the WordPress REST API can be a powerful tool, it may not always be the right one for your project. Let’s look at a few reasons why you might not want to use it. 

    As you may recall, the WordPress REST API is built with JavaScript. Therefore, if you’re developing an app that doesn’t support JavaScript, it won’t function properly if you’re using the REST API. 

    Additionally, apps built on JavaScript may not be very accessible. For instance, the way it renders dynamic content may be incompatible with screen readers. As a result, it could make your content inaccessible to users with visual impairments.

    How to secure the WordPress REST API from exploits

    As mentioned earlier, using the WordPress REST API can make your site vulnerable to threats. The API acts as a bridge between two platforms, and hackers may find a way into your website through this connection.

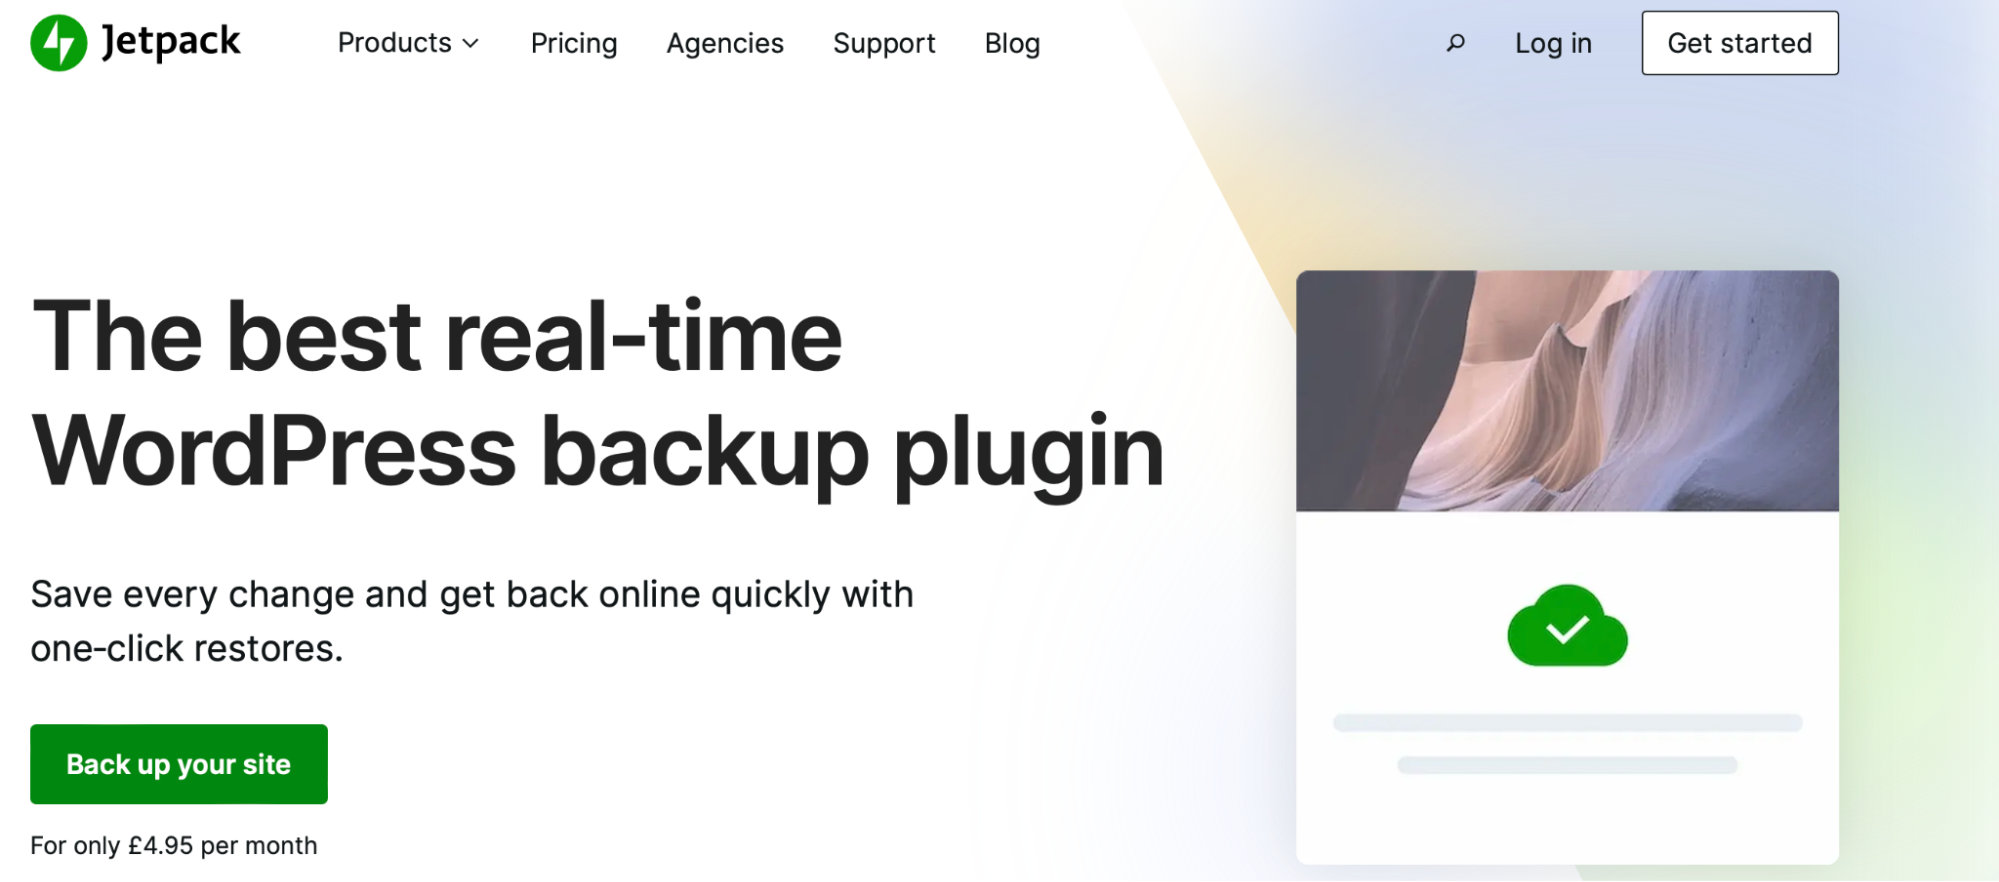
    As such, before you start using the WordPress REST API, it’s important to create a backup of your WordPress site. This way, if something goes wrong, you can restore a recent version of your content. 

    Additionally, you’ll want to make sure that you have sufficient security measures in place. This means using a tool like Jetpack Protect.

    Jetpack Protect homepage

    This plugin comes packed with security features, including malware scanning, vulnerability scanning, and a web application firewall (WAF).

    Furthermore, it’s a good idea to use the REST API on a WordPress staging site before making your changes live. This way, if you accidentally break your website, it won’t affect the user experience on the front end. 

    How to fix common REST API errors and issues

    You may run into some errors when using the WordPress REST API. So, let’s look at some of the most common issues and the steps you can take to resolve them.

    Slow response times and timeouts

    When calling the WordPress REST API, you may encounter slow response times and timeouts. These issues are usually caused by the following factors:

    • Insufficient server resources. Your server might not have enough resources to handle requests made through the REST API. In this case, you’ll need to upgrade to a more powerful WordPress hosting plan.
    • Plugin or theme conflicts. WordPress plugins and themes can sometimes conflict with the REST API. When this happens, try disabling all plugins and switching to a default theme to see if this resolves the issue. If it does, you can reactivate your plugins one at a time to identify the culprit.
    • Size of data. Large data transfers during API calls can cause timeouts. To prevent this, you can try reducing the number of items displayed per page (we’ll show you how to do this later in the post).
    • Database issues. If your WordPress database is not optimized, it can lead to slow response times and timeouts when calling the REST API. You can optimize it by removing unnecessary data and installing an optimization plugin.

    Additionally, you may want to track the performance of your API with a tool like Google Cloud’s operations suite (formerly Stackdriver) and Microsoft’s Application Insights. These tools can provide insight into the performance of the WordPress REST API and help you identify the causes of slow response times.

    403 Forbidden error when calling the REST API

    The 403 Forbidden error is an HTTP status code indicating that the client is not authorized to access the requested resource. Let’s look at some common causes of this error and potential solutions:

    • Incorrect API Key. If the request requires an API key, make sure that the key you’re using is valid and that it’s being passed in the request headers correctly.
    • Invalid nonce. A ‘nonce’ is a random number used once to prevent request forgery. If it’s invalid, it may result in a 403 forbidden error.
    • User permissions. You’ll also want to make sure that you have the necessary permissions to access a specific API endpoint. If you’re not the owner of the website, you may need to ask the administrator to give you the right permissions. 
    • Security plugins. Security plugins can block an API call because it sees it as a security threat. You can whitelist the API endpoint in your plugin settings to resolve this type of issue.
    • Firewall. You might be using a firewall that’s blocking the API request. Make sure that the firewall is set up correctly, or try to disable it while using the API.
    • Server configuration. Some servers are not configured to handle certain API calls, so you might want to reach out to your hosting provider for assistance.

    You can also use your browser’s developer tools to inspect the network requests and request headers. If you use Chrome, simply press Ctrl+Shift+C to open DevTools.  

    Additionally, you can check your server logs for more information about the error. You should be able to access them through your hosting account. If not, you can ask your hosting provider for help. 

    REST API encountered an unexpected result

    The “REST API encountered an unexpected result” error is a common issue. It’s typically caused by the following factors:

    • Permissions. You might not have the right permissions to access the requested resource. If that’s the case, you’ll need to contact the site’s administrator. 
    • URL configuration issue. This error can occur if the API endpoint URL is configured incorrectly. Double-check the URL to ensure that it is correct and that all necessary query parameters are included.
    • Incorrect command. You may be using the wrong command (e.g. GET, POST, PUT, DELETE) for the request. Check the API documentation to make sure that you’re using the correct command for the specific endpoint.
    • Incorrect request format. Make sure that you’re using the right format in your request. In the WordPress REST API, data must be sent as JSON.
    • Wrong endpoint. You might be trying to call an endpoint that doesn’t exist. In this scenario, double-check the endpoint URL to make sure it’s correct.
    • Server-side issues. Your server might be experiencing issues. This is more common with shared hosting plans. If this happens to you, it may be time to upgrade to a server with more resources.

    You may also want to disable your plugins to see if the issue is resolved. As mentioned earlier, some tools may cause compatibility issues with the WordPress REST API. 

    rest_api_init not working

    The “rest_api_init not working” error is another common WordPress REST API error. It’s usually caused by plugin and theme conflicts, as well as limited server resources.

    Still, there are other factors that can lead to the WordPress REST API not working, like:

    • Custom REST API endpoints. If you’re making requests with custom endpoints, make sure that you’re using the correct hooks and functions.
    • .htaccess file. You may need to check your .htaccess file to ensure that it’s set up correctly.
    • CORS error. If you’re trying to make Cross-Origin Requests (CORS) and the WordPress REST API is not working, it might be that the server is not configured to accept them. You may want to contact your hosting provider to see if the server accepts CORS.

    Additionally, you could be using an old WordPress installation that doesn’t support the API. If so, it’s important that you upgrade to the latest version.

    Basic authentication not working

    The “Basic authentication not working” error may occur when trying to call the WordPress REST API using Basic Authentication. Basic Authentication is a simple authentication scheme built into the HTTP protocol. It utilizes a username and password to authenticate someone. 

    Here are some common causes of this error (and how to resolve them):

    • Incorrect credentials. Check the username and password in the request headers to ensure that they’re correct.
    • Secure Sockets Layer (SSL) issue. Make sure that you have a valid SSL certificate installed and that it’s configured correctly. If it isn’t, take a look at our step-by-step guide on how to get a free and valid SSL certificate.
    • HTTP to HTTPS redirects. Some websites are configured to redirect HTTP requests to HTTPS. If the browser is trying to authenticate on HTTP, you might run into this error. Therefore, you’ll want to make sure that you’re running a request on an HTTPS endpoint.

    Like other REST API issues, this error can also be caused by theme and plugin conflicts. Once again, you’ll want to switch to a default theme and deactivate your plugins to troubleshoot the issue.

    If that doesn’t help, you might want to disable your firewall temporarily. This could be blocking your authentication request. 

    If you’re making a CORS, your server may not be configured to accept them. It’s worth checking with your hosting provider to see if there’s anything they can do on their end. 

    Finally, if you’re not the admin of the site, you may not have the correct permissions or role to complete the request. In this case, you’ll need to reach out to the owner of the website. 

    Advanced use cases of the REST API

    Thanks to the WordPress REST API, you can retrieve data from your site using popular frameworks and other programming languages. Let’s take a look at a few examples. 

    How to use the WordPress REST API with React

    React is a popular JavaScript library for building user interfaces. You can use the Node-WPAPI client to make HTTP requests to the WordPress REST API. 

    For instance, to retrieve a list of posts on your WordPress site, you would need to enter the following into Node-WPAPI:

    import WPAPI from 'wpapi';
    
    const wp = new WPAPI({ endpoint: 'http://example.com/wp-json' });
    
    wp.posts().then(posts => {
    
      console.log(posts);
    
    });

    For more information on using the WordPress REST API with React, you can check out the Node-WPAPI documentation.

    How to use the WP REST API with Angular

    Angular is a JavaScript framework for developing web applications. To use it with the WordPress REST API, you’ll need to use the @angular/common/http module.

    For instance, you can input the following code to retrieve a list of posts:

    import { HttpClient } from '@angular/common/http';
    
    @Injectable()
    
    export class PostService {
    
      constructor(private http: HttpClient) {}
    
      getPosts(): Observable<any> {
    
        return this.http.get('http://mysite.com/wp-json/wp/v2/posts');
    
      }
    
    }

    You can check out the Angular documentation for more information on using its HttpClient to make requests to the WordPress REST API. 

    How to use the WordPress REST API with Python

    You can also use the WordPress REST API with Python. This is a popular programming language that can be used to build web applications and other software. 

    To get started, you’ll need to use the Requests library. If you wanted to fetch a list of your WordPress posts, you would enter the following:

    import requests
    
    response = requests.get('http://example.com/wp-json/wp/v2/posts')
    
    posts = response.json()
    
    print(posts)

    You can read the Requests library documentation for more detailed instructions.  

    How does the REST API compare to other WordPress API solutions?

    You may be wondering how the REST API differs from other WordPress API solutions. To give you an idea, we’re going to compare it to some of the most popular alternatives. 

    WordPress REST API vs. AJAX

    The WordPress REST API provides an efficient way to access WordPress data. It enables developers to build custom applications and integrations with WordPress.

    Meanwhile, the WordPress AJAX API is an older method of accessing WordPress data. It was introduced in WordPress 2.0 and enables developers to make asynchronous requests from the front end of the site, using JavaScript. 

    The WordPress AJAX API can be a bit restrictive in terms of functionality, so it’s not recommended for use in complex projects.

    WordPress REST API vs. WPGraphQL

    WPGraphQL is a GraphQL implementation for WordPress that provides an alternate way to access WordPress data. GraphQL is a query language for your API. It enables clients to request exactly the data they need, and nothing more. 

    Unlike the WordPress REST API, WPGraphQL requires a separate application password to be generated for each user who needs access. Plus, it can be a bit slow in delivering content because it uses a more complex query language.

    WordPress REST API vs. XML-RPC

    Introduced in WordPress 1.5, the WordPress XML-RPC API enables you to make remote requests to WordPress using the XML-RPC protocol. 

    XML-RPC is simple and lightweight, and can therefore deliver results faster. The problem is, that like Ajax, it has limited functionality compared to the WordPress REST API. 

    Frequently asked questions about the WordPress REST API

    In this guide, we’ve covered most of the essentials when it comes to the WordPress REST API. But, just in case, let’s look at a few frequently asked questions regarding this powerful tool. 

    Does the WordPress REST API have a return limit?

    By default, the WordPress REST API has a maximum return limit of 100 items per page. That means, if you make a request to an endpoint that returns a list of items (like posts, pages, or users), the API will only display a maximum of 100 items in the response. 

    Fortunately, you can use the “per_page” parameter to increase the limit to a maximum of 500 items per page.

    For example, if you want 200 items per page, you can use the following:

    https://mysite.com/wp-json/wp/v2/posts?per_page=200

    Keep in mind that you can also decrease the number of items displayed per page.

    Can I use the REST API with WooCommerce?

    WooCommerce has its own REST API. The WooCommerce REST API enables you to access and modify data from your WooCommerce store. This includes information on products, orders, and customers. Plus, you can use the WooCommerce REST API to integrate WooCommerce with other ecommerce platforms.

    Get started with the WordPress REST API

    The WordPress REST API enables you to integrate your site with other apps and third-party tools. Web developers can use it to fetch data for single-page applications, connect WordPress to a mobile app, and much more.

    Additionally, you can use the WordPress REST API with other frameworks and programming languages, including React, Angular, and Python. Although the WordPress REST API is a powerful and dependable tool, it’s still important to back up your site and use a security tool to prevent attacks through these connections.

    With Jetpack Protect, you can secure your WordPress site against malware and hackers, and use the WordPress REST API in a safer environment. 

  • How to Add & Use jQuery Scripts in WordPress

    Interactive page elements like dynamic search bars, advanced product filters, and sliders can make your site more user-friendly and engaging. But it’s impossible to create any of these features without using JavaScript or installing WordPress plugins.

    Luckily, you can easily create JavaScript design elements by using jQuery in WordPress. You can do this manually or use a plugin to speed up the process.

    In this post, we’ll introduce you to jQuery and discuss why you may want to use it. Then, we’ll show you two ways to add custom jQuery scripts to your WordPress site and review some frequently asked questions. 

    What is jQuery? (and why you may want to use it)

    Before you learn how to add jQuery scripts in WordPress, you’ll need a baseline understanding of jQuery itself. 

    In a nutshell, jQuery is a lightweight, open-source JavaScript library that simplifies the way you can write and use this coding language.

    jQuery code homepage with information about the language

    It enables you to easily modify and enhance WordPress themes and plugins using JavaScript. This feature can be extremely helpful since JavaScript is essential for many features. 

    For example, you need JavaScript for Ajax, event handling, and DOM transversal/manipulation. Ajax functionality, in particular, is practical and popular. Web developers use it to create instant search loading and advanced ecommerce product filtering.

    Robert August website showing product filters that are triggered using jQuery

    An action from the user, like a click or a search, often triggers these JavaScript features. You also need jQuery to create additional client-side features like sliders, lightbox pop-ups, and more.

    Is jQuery included in WordPress by default?

    jQuery is such a useful and popular resource that comes included in your WordPress installation by default. You just need to know how to use it! In the next sections, we’ll teach you how to do this. 

    What to do before adding jQuery scripts to WordPress

    We’ll soon explain how you can add jQuery scripts in WordPress. But first, you should do a few things to safeguard your website before attempting to modify its core files.

    Most importantly, it’s always recommended to create a backup of your site. That’s because even the slightest coding error to critical website files can do serious harm. When you make backups, you can easily restore your site to its previous state in an emergency.

    If you’re not sure how to back up your WordPress site, or you’re just looking for a tool to streamline the process, Jetpack VaultPress Backup is an excellent option.

    Jetpack VaultPress Backup landing page

    Jetpack VaultPress Backup automatically saves every change on your site. Then you can use one-click restores to recover your content quickly. Jetpack even allows you to restore your site from the Jetpack mobile app. Furthermore, if you run into any issues, you can get assistance from the best-in-class customer support — Happiness Engineers! 

    To further protect your website, it’s also worth creating a WordPress staging site. Then, you can test your changes before pushing them live.

    How to add custom jQuery scripts to WordPress

    Now that you know more about jQuery and preparing your site for major changes, let’s discuss two ways to add custom jQuery scripts to WordPress!

    Method 1: Add jQuery manually

    First, we’ll show you how to add jQuery to WordPress manually. This method might be for you if you have some development experience and want full control over the process. 

    It’s worth using a child theme so that any changes you make won’t be overridden when you update your theme. 

    Step 1: Go into Compatibility Mode

    One of the great things about jQuery is that it allows you to use some familiar shortcuts when coding. Most notably, you can use the $ symbol to represent jQuery. This can save you a lot of time, but some other libraries use this shortcut to represent something different.

    Therefore, you’ll want to go into Compatibility Mode and create a unique alias for jQuery. This way, you will avoid conflicts with other libraries. 

    You can do this using the following code:

    <!-- Putting jQuery into no-conflict mode. -->
    
    http://prototype.js
    
    http://jquery.js
    
    <script>
    
    var $j = jQuery.noConflict();
    
    // $j is now an alias to the jQuery function; creating the new alias is optional.
    
    $j(document).ready(function() {
    
        $j( "div" ).hide();
    
    });
    
    // The $ variable now has the prototype meaning, which is a shortcut for
    
    // document.getElementById(). mainDiv below is a DOM element, not a jQuery object.
    
    window.onload = function() {
    
        var mainDiv = $( "main" );
    
    }
    
    </script>

    When you action the above script, you’ll be able to use $j as a shortcut instead of $. Alternatively, you could use the following:

    <!-- Loading jQuery before other libraries. -->
    
    http://jquery.js
    
    http://prototype.js
    
    <script>
    
    // Use full jQuery function name to reference jQuery.
    
    jQuery( document ).ready(function() {
    
        jQuery( "div" ).hide();
    
    });
    
    // Use the $ variable as defined in prototype.js
    
    window.onload = function() {
    
        var mainDiv = $( "main" );
    
    };
    
    </script>

    This code snippet will simply prevent any conflicts. Still, you’ll need to use the full name, jQuery, instead of a shortcut.

    Step 2: Make a script file

    Now that you have the code you need, you’re ready to make a script file. Create a file and give it a descriptive name like “my_new_script_file.js”. Make sure to use the .js extension and add your preferred compatibility code snippet at the top.

    At this point, you’ll need to access and edit your theme files, which have their unique folders within your website files. 

    Start by connecting to your website using your file manager or a free File Transfer Protocol (FTP) client like FileZilla.

    FileZilla homepage

    Then, open your root directory. This should be named something like public_html or simply public. Alternatively, it could just be your website’s name.

    Next, locate your active theme’s folder and create a new subfolder. Call it /js/. 

    Finally, add your new script file to this subfolder. Its contents will differ depending on the feature you’re trying to implement. 

    Step 3: Add a jQuery script to your functions.php file

    Next, you’ll need to locate your theme’s functions.php file. Both parent and child themes should have one. This is where all manual customizations happen.

    Since JavaScript requires enqueuing, you’ll need to use the wp_enqueue_script() function. Your code might look something like this:

    function my_theme_scripts() {
    
        wp_enqueue_script( 'my_new_script_file', get_template_directory_uri() . '/js/my_new_script_file.js', array( 'jquery' ), '1.0.0', true );
    
    }
    
    add_action( 'wp_enqueue_scripts', 'my_theme_scripts' );

    Make sure to substitute the name of your unique script file and add it to functions.php. This will tell your theme file to use the script file you created in the previous step.

    Method 2: Add jQuery with a WordPress plugin

    As we have just seen, adding jQuery manually can be time-consuming and a bit risky, especially if you’re not familiar with editing code in WordPress. So, now we’ll show you how to add jQuery with a WordPress plugin.

    Step 1: Install a jQuery plugin

    First, you’ll need to choose a jQuery plugin. Two of the most popular options are Simple Custom CSS and JS and Advanced Custom Fields.

    Advanced Custom Fields plugin page

    For this tutorial, we’ll use Advanced Custom Fields. This tool helps you create engaging, interactive features with custom block types

    The free version has plenty of useful block types for adding elements like button groups, Google Maps, color pickers, oEmbed, and much more. If you want all 30 custom blocks, though, you’ll need to upgrade to the paid version of Advanced Custom Fields. 

    Once you’ve selected your preferred plan, simply install and activate the plugin as you usually would. Add any license keys under your plugin settings.

    Step 2: Create a new custom field

    After you’ve installed and activated the plugin, go to Custom Fields → Add New.

    adding a new custom field

    Here, you’ll need to create your first field group. Give it a title next to Add New Field Group. Then, click on Save Changes.

    Now, you can start editing the new field. You can expand the options by clicking on Edit below the label.

    adding a new field group

    First, open up the dropdown menu for Field Type, and select one.

    selecting a field type

    Then, fill in the Field Label, Field Name, etc. If you continue to scroll down, you can modify additional settings like Location Rules and Presentation.

    setting location rules for a field

    Depending on the location you select, you’ll be able to view your new custom block there. In the Block Editor, you can identify the block by the label you designated under Field Label.

    When you’re finished, click on Save Changes. You can select the + Add Field button and repeat this process. After that, simply go to one of the locations you chose for your field and start customizing it! 

    How to defer jQuery in WordPress

    As we’ve discussed, there are plenty of reasons to use JavaScript and jQuery in WordPress. In fact, they’re crucial for certain interactive features that many users take for granted.

    But the downside is that these sophisticated client-side elements might slow down your website. So, you may want to automatically defer JavaScript (and, by extension, jQuery) when your WordPress site loads. 

    By deferring JavaScript, all the main elements on your site will load before the less critical JavaScript features. Of course, your site visitors probably won’t notice this happening, but it will likely improve their user experience (UX) because the page will appear to load faster.

    If you want to automatically defer jQuery on your website, you can use Jetpack Boost to do so.

    Jetpack Boost homepage

    This plugin can drastically improve your website’s performance overall. As a result, you’ll be able to maintain all your preferred JavaScript features without compromising page speed.

    In addition to deferring non-essential JavaScript, Jetpack Boost can optimize CSS loading and apply lazy image loading (among other performance optimizations). Using this tool, you can improve your Core Web Vitals scores and boost your site’s visibility in search results.

    Frequently asked questions about jQuery in WordPress

    Hopefully, we’ve clarified most of your doubts about jQuery in WordPress. Still, if we missed something, here are some frequently asked questions!

    Can you change the jQuery version used in WordPress?

    Sometimes themes and plugins can replace or add jQuery versions to your site. Therefore, it’s important to ensure that your version is always up-to-date. You can easily do this using a plugin like jQuery Updater or Version Control for jQuery.

    Where can I check the jQuery version on my WordPress site?

    You can usually check your jQuery version in a browser. In Google Chrome, simply navigate to your website on the front end. Then, go to View → Developer → JavaScript Console.

    Enter jQuery.fn.jquery, and the console should return your site’s current version. 

    Can you completely remove jQuery from WordPress?

    The short answer is: yes. If you discover that using JavaScript on your site negatively impacts its performance, you may want to remove or ‘deregister’ jQuery. 

    To do this, simply add the following code to your functions.php file:

    // Remove jQuery
    
    function vpsb_remove_jquery() {
    
        if (!is_admin()) {
    
            wp_deregister_script('jquery');
    
            wp_register_script('jquery', false);
    
        }
    
    }
    
    add_action('init', 'vpsb_remove_jquery');

    Keep in mind you should only completely remove jQuery from your site if it’s drastically slowing down your pages. This likely won’t happen, though, since jQuery already optimizes heavier JavaScript code.

    If your site’s speed has deteriorated after adding jQuery, a better alternative would be to use a solution like Jetpack Boost. It can defer non-essential JavaScript.

    Can you replace jQuery with vanilla JavaScript?

    It is possible to replace jQuery with vanilla JavaScript. But, it might prove challenging if you don’t have much development experience. So, you should consider hiring a developer if you need to do this.

    Once again, it’s worth noting that replacing jQuery with vanilla JavaScript is probably unnecessary because jQuery already provides optimal JavaScript code. Most of the time, the minor performance effects of jQuery are usually worth the trouble, and deferring is typically a better option.

    If you decide to go this route, it’s worth checking out this guide to adding JavaScript to WordPress. It can help you with the process.

    Using jQuery in WordPress

    Using complex JavaScript for engaging features on your site can drastically improve the UX and advance your goals. Unfortunately, you may not have the time or development skills to create these interactive elements from scratch. The good news is that you can use jQuery scripts to make this process easier.

    To recap, there are two ways you can add jQuery to WordPress. First, you’re able to do this manually by going into Compatibility Mode and creating a script file. Then, add your new script to your functions.php file. Alternatively, you could use a plugin like Advanced Custom Fields to speed up the process and eliminate the need for manual coding.

    When you use jQuery to add sophisticated design elements to your website, you can improve the UX and impress your visitors. But multiple interactive features could harm the performance of your web pages. Fortunately, Jetpack Boost can help optimize your site’s speed.

  • How to Edit & Customize Your WooCommerce Shop Page

    WooCommerce is a plugin that adds a store to your WordPress website. Owned by Automattic, the people behind WordPress.com, and supported by more than 300 employees, it’s considered the top option for aspiring ecommerce store owners and existing enterprise-level ecommerce operations alike. 

    Building your site with WordPress and WooCommerce gives you complete ownership over your store, with a flexible framework for building a system and design that’s as unique as your dream. 

    Today we’re going to talk about the WooCommerce Shop page, why you may want to build one, and how to customize it. 

    New to ecommerce? Learn more about WooCommerce

    What is a WooCommerce Shop page?

    The WooCommerce Shop page is included by default, and is the archive page for the product post type. This simply means that it will show all of your published products for visitors to scroll through. It’s essentially your online showroom, where visitors view your catalog. You can display items individually, by category, or both, with categories and products on a single page. 

    Why build a custom WooCommerce Shop page?

    The default WooCommerce Shop page is a good option for many stores, and helps you get up and running quickly. But customizing this page provides a curated experience for buyers that can lead to more sales for you and a more streamlined journey for your shoppers.

    So let’s begin with reasons you may want to customize your Shop page.

    1. Make it quick and easy for shoppers

    The faster your visitors can find what they’re looking for — and get the information they need to feel comfortable making a purchase — the better. A well-organized store keeps shoppers from feeling overwhelmed.

    In this example from The Hidden Grounds, there’s a category filter list on their sidebar so shoppers can quickly jump to any category. The Quick View and Select Options buttons make it easy to learn more, choose variations, and add to cart without leaving the Shop page.

    Hidden Grounds Shop page with Quick View options

    Greene King lets shoppers choose quantities and add items to their cart directly from the Shop page. They also added content sections to the Shop page that promote their personalization options.

    Greene King Shop page with options to add directly to cart

    2. Provide an experience tailored to your products and audience

    What you’re selling — and who you’re selling to — affects the amount and type of product information your customers need to make a decision. The approaches below let you provide an experience tailored to your audiences and their needs.

    For well-known brands and products, shoppers may not need to know anything more than item availability and price. In this case, the faster someone can find and add items to their cart, the better. A customer may want to add multiple products to their cart without leaving the Shop page, then proceed directly to checkout. 

    For new and unfamiliar items — or product categories where shoppers need detailed information like food ingredients or accessory specifications — you may want to display information right there on the Shop page. 

    Here are some examples of how you might modify your shop page based on the products you sell or your audience:

    • Add filters for large catalogs of products, or items that get very granular. Perhaps you sell replacement parts that shoppers need to find based on their size, color, SKU, etc.
    • Focus on images if you sell items that are more visual. Clothing stores, for example, might want to showcase larger photos or allow people to scroll through an image carousel directly on the Shop page.
    • Present products in a table. If you sell items that aren’t reliant on visuals, you may want to take images out of the equation entirely. Instead of a more traditional product grid, use a table presenting key information. This is a particularly good setup for service-based businesses or wholesale stores with customers who add a lot of items to their cart at once.
    • Include badges specific to your products. For example, if you sell food, you might have badges for “vegan” or “nut-free.” This helps shoppers immediately see what fits their needs (and what doesn’t.)

    This example from My LAB BOX uses a mix of tables categorized by type of test so visitors can quickly scan options and add them to their cart. Bonus: They also use badges to highlight special attributes (“new”, “popular”).

    MyLabBox products listed in a table

    3. Highlight featured products and promotions

    Editing your WooCommerce Shop page lets you grab your customers’ attention and direct their interest towards featured products and categories, promotional offers, and things like free shipping or satisfaction guarantees.

    Block themes really shine in this case. Use the Top Rated Products block to put your best foot forward, the On Sale Products block to highlight discounted options, or the Hand Picked Products block to have a section of items you can quickly swap out based on the season, current events, or other situation. 

    4. Reflect your brand and personality

    The default Shop page template has a clean and professional appearance, so many site owners choose to use it without any personalization. 

    That’s fine, but customizing your Shop page can help you stand out from competitors, present a unified look across your site and other company profiles, and build confidence by featuring reviews and other trust symbols.

    Daelmans’ Shop page is an excellent reflection of their brand design. Every detail — even the red bar that appears when someone hovers over a product — perfectly fits the style of their entire site.

    Daelman's Shop page, customized to meet their specific brand design

    And The Kind Pen added stars below each product to show how well-reviewed they are. Plus, there’s a slick little callout to the left where curious shoppers can click to read even more reviews to ease any hesitation they may have. 

    The Kind Pen shop page, with green stars underneath each item

    See more examples of what WooCommerce store owners have done with their Shop pages on the WooCommerce Showcase.

    How to customize your WooCommerce Shop page

    Okay, so how do you make changes to your Shop page? There are several options that you can choose from, depending on how your site is built and your experience level.

    1. Customize your Shop page using the WooCommerce Customizer

    The WooCommerce section of the Customizer includes tabs for Store Notice, Product Catalog, Product Images, and Checkout. This is the simplest way to make basic changes to your Shop page.

    To find it, go to Appearance → Customize → WooCommerce.

    making Shop page changes in the Customizer

    Customize the WooCommerce Store Notice

    The Store Notice appears to site visitors in an overlay bar at the very bottom of your site (some themes may place it at the top). The bar appears sitewide with an option to dismiss it. The feature is a great way to let visitors know about a current promotion, a featured product category, an upcoming event, or a storewide policy like free shipping for orders over a certain amount.

    The Store Notice tab has a field for you to enter text and HTML tags for formatting and linking. Click the Enable Store Notice checkbox to activate the feature.

    turning on the WooCommerce store notice

    Customize the WooCommerce Product Catalog

    The Product Catalog tab has dropdown menus for managing aspects of your Shop and Product Category pages.

    WooCommerce Product Catalog settings

    If you have a large number of items in your store, a single Shop page can be overwhelming to visitors. Use the Shop Page Display menu to select what should appear on the page — categories, products, or both. The Category option will display a grid of thumbnails representing the categories available on your store. 

    Use the Default Product Sorting menu to manage the display of items on the Shop page. It defaults to Custom ordering + name, but you can also sort by:

    • Popularity (sales)
    • Average Rating
    • Most Recent
    • Price (ascending)
    • Price (descending)

    To set a custom order for the default option, go to Products → All Products. Then, click the Sorting tab at the top.

    Next, select a category, product type, stock status, or any combination of the three. Click Filter. Now you can drag and drop products however you’d like.

    Customize the WooCommerce Shop page product images

    The Product Images tab lets you customize the size and display of product images on the Shop page. There are three options:

    • 1:1 (cropped to a square)
    • Custom aspect ratio
    • Uncropped (displayed using the aspect ratio in which images were uploaded)

    When you publish your changes, thumbnails in the new image sizes are generated automatically.

    Product Image options in the Customizer

    2. Customize your Shop page using the Gutenberg Block Editor

    If you’re using a block theme, you can edit and customize your WooCommerce Shop page with the Site Editor. Always back up your WordPress site before making edits to your Shop page template.

    To customize your page, go to Appearance → Editor and choose Browse all templates from the dropdown menu at the top center of the page. 

    template options in the Site Editor

    Click to edit the Product Catalog template.

    selecting the Product Catalog template

    The Product Catalog template consists of the header, the footer, and the body area. Click into the header or footer areas to edit their contents and add new blocks as desired, like an image or paragraph block.

    By default, the body of the page simply has the Product Grid block, which will display the product image, title, price, etc. 

    WooCommerce Product Grid block displayed by default in the Site Editor

    Add blocks above and below the Product Grid block to customize your shop page template. You can use any block type, including 20+ WooCommerce Blocks, located in a dedicated section of the Block Inserter for easier browsing.  

    Use the Best Selling Products and Top Rated Products blocks to promote your most popular items. Use the All Reviews block to include customer testimonials on the page.

    WooCommerce block options

    The custom Shop page below uses a Columns block to create the content area and sidebar layout. An All Products block loads the catalog into the main area, while filter blocks in the sidebar let the customer quickly find what they’re looking for.

    custom Shop page design

    The All Products block settings — accessed via the gear icon at the top right — include tools for adjusting the grid layout, hiding the sorting dropdown, and setting the default product ordering.

    options for customizing product display

    You can edit the All Products block to customize your WooCommerce Shop page further. Click on the block, then on the Edit icon. 

    To manage their settings, you can then click on elements within the example product — like Product Image and Product Title.

    settings for individual product displays

    You can rearrange the contents displayed for items in the grid. For example, you can move the Add to Cart button above the product ratings. Click to select an element, then use the up/down arrows to move its placement in the layout.

    moving a green Add to Cart button

    Learn more about WooCommerce Blocks.

    3. Customize your shop page using WooCommerce extensions

    Extensions are types of plugins created specifically for WooCommerce stores. You can use them to improve the shopping experience and enhance your Shop page’s content and features. 

    We’re going to go through a few examples. For more extensions, visit the extension library.

    Product Filters for WooCommerce

    With Product Filters for WooCommerce, you can allow customers to filter your products based on several criteria, including the category, price, average rating, and stock status. 

    Filters make a catalog of thousands of items accessible, since shoppers can use them to get relevant results quickly and easily. The extension uses AJAX to update results without the need for visitors to refresh the page. 

    Filtering options can display in multiple ways — checkboxes, radio buttons, price sliders, size charts, and color lists. They can be based on tags, allowing you to create custom filters like “Staff favorites.”

    Product Filters with a variety of options

    Learn more about Product Filters for WooCommerce

    WooCommerce Quick View

    WooCommerce Quick View lets your shoppers learn more about products, choose between variations, and add items to their cart without leaving the main Shop page. 

    The extension adds Quick View buttons to your Shop page that will trigger a pop up window when clicked. The window contains essential product information, plus the ability to choose between variations and add items to their cart. This speeds up the shopping experience, as visitors can compare products and make selections without having to load multiple new pages. 

    Quick View buttons in action on a product page

    Learn more about WooCommerce Quick View

    WooCommerce Advanced Product Labels

    WooCommerce Advanced Product Labels adds visual flair to your shop page to catch customers’ attention. You create custom labels to showcase new products, sale items, bestsellers, and more.

    various colored labels on top of product listings

    Labels can be applied globally, to a specific product, or a group of items based on conditions.

    You can set a wide variety of conditions for each label. Add a “New” label for all items added within the last two weeks. Display a “Sale” label for discounted items. Or showcase the items that shoppers purchase the most with a “Bestseller” label.

    Conditions include product category, type, price, stock status, popularity, shipping class, featured status, and more. You can even create conditions based on tags for flexible custom groups.

    There are six label graphics to help your shoppers browse visually, or you can upload your own label images. Select from a predefined color palette or apply custom colors to match your brand. A live preview option lets you see how labels will look to shoppers.

    Learn more about WooCommerce Advanced Product Labels.

    Product Tables for WooCommerce

    Product Tables for WooCommerce lets you display your catalog in a table format for easy reference and comparison on a single page. The column titles are customizable, and you can select a default sort order.

    The extension supports variable products, with dropdown menus to select variations. Each row has an Add to Cart button and a checkbox for adding multiple items to cart simultaneously. 

    example of a product table with a list of items

    Shoppers can use the fields above the table to filter their results based on category and price range. They can also filter by variation attributes like size or color. The filtering is done via AJAX, so it’s quick, with no page refresh required.

    filter and search options for product tables

    You can create as many customized product tables as you want, and use shortcodes to add them to your Shop page. Choose how much product data to display and configure options down to each individual table. 

    This extension is excellent for any store where customers choose multiple items from a list — like a B2B wholesaler or restaurant displaying menu items for online ordering.

    Learn more about Product Tables for WooCommerce.

    4. Customize your Shop page manually (using code and hooks)

    Hooks allow you to customize templates — like the Shop page — without any of the risks that come with editing core files. WooCommerce uses the template file archive-product.php for the Shop page. You can find a list of available hooks on the WooCommerce Action and Filter Hook reference page.

    Always back up your site before making any changes — when you modify site code, even one mistake can cause major problems. Jetpack VaultPress Backup is an excellent option, because it saves your site each time a change is made. Then, if your site is down, you can quickly and easily restore a version from right before you made your edits. 

    Also, never edit the plugin files directly, since future updates will overwrite your work. Instead, add your custom code to your child theme’s functions.php file or use a plugin like Code Snippets

    Here are some customizations you can make to your Shop page using hooks and code:

    Hide the shop page result count and default sorting dropdown menu

    These page elements are convenient for shoppers but aren’t very useful for stores with only a few items. Add this code to hide them from your Shop page. 

    // Hide the shop page result count
    
    remove_action( 'woocommerce_before_shop_loop', 'woocommerce_result_count', 20 );
    
    // Hide the shop page default sorting menu     
    
    remove_action( 'woocommerce_before_shop_loop', 'woocommerce_catalog_ordering', 30 );
    
    You can also hide these elements using CSS code. Go to Appearance → Customize → Additional CSS and add the following code:
    
    .woocommerce-result-count {
    
    display: none;
    
    }
    
    .woocommerce-ordering select {
    
    display: none;
    
    }

    Change the number of products per row on your Shop page.

    Use this code to override the default number of products per row. Set a higher number to increase the number of products visible on the page without scrolling. Set a lower number, and each product’s image will appear larger for a more detailed view. 

    In this example, we set the number to two items per row:

    // Change the number of products per row on the shop page
    
    add_filter('loop_shop_columns', 'loop_columns', 999);
    
    if (!function_exists('loop_columns')) {
    
        function loop_columns() {
    
            return 2; // 2 products per row
    
        }
    
    }

    Move the product titles above the product images on your Shop page.

    Use this code to move your product titles from below each row of product images to above them. This layout change gives you a design option to stand out from other stores and puts your titles higher on the page, so shoppers see them without scrolling.

    // Move the product title above the product image
    
    add_action( 'woocommerce_before_shop_loop_item', 'woocommerce_template_loop_product_title', 10 );
    
    remove_action( 'woocommerce_shop_loop_item_title', 'woocommerce_template_loop_product_title', 10 );

    Make your prices stand out. 

    Make your prices stand out to shoppers by adding the following code to the Additional CSS field in the Customizer. This style change is helpful if the price point is important to your customers. In this example, the price is bolded and set to the color blue.  

    .wc-block-grid__product {
    
    font-weight: bold;
    
    color: blue;
    
    }

    Add some color to your product image borders.

    This code adds a colored border to your product image. Here the border is set to 2px wide and the color is orange.  

    .wc-block-grid__products .wc-block-grid__product-image img {
    
    border: 2px solid #f27c21;
    
    }

    Frequently asked questions about customizing the WooCommerce Shop page

    What is the WooCommerce shop page?

    When you install WooCommerce, it creates several pages by default, including Shop. The default URL is /shop/, but you can choose a different option via WooCommerce → Settings → Product → General. For example, if you’re selling memberships, you could change the default Shop page to one titled “Memberships.”

    WooCommerce uses your Shop page name in the URL path for your products: yoursite.com/shop/product-category/product-name/. Go to Settings → Permalinks to customize the URL structure for your Shop and products. 

    permalinks settings in WordPress

    What is the best way to customize a WooCommerce Shop page?

    The best way for you to customize your Shop page depends on considerations like your budget for extensions, your comfort level with coding, and your familiarity with blocks and the Site Editor. 

    You can use the WooCommerce documentation library and blog to enhance your knowledge of WooCommerce and how to customize it.

    Should I back up my site before editing the Shop page template?

    WordPress does not store a revision history of templates like it does pages and posts. For this reason, you should always back up your site before editing the WooCommerce Shop page template.

    Jetpack VaultPress Backup is a real-time, automatic backup solution for WordPress that lets you restore your site without losing crucial customer and order data. It saves to the cloud every time you make a change to your site, so you can restore it even if your dashboard becomes inaccessible. 

    Learn more about how to back up your WooCommerce store.

    How do I boost my Shop page’s loading speed?

    Jetpack Boost is the speed optimization plugin for WordPress that beat five top performance plugins in a head-to-head test

    It specifically targets key areas related to the user experience. These are some of the same things measured by Google when determining site rankings, so an improvement in this area might also help you attract more traffic. 

    Jetpack Boost can defer the parsing of JavaScript that’s not essential, optimize CSS delivery, and implement lazy loading on your site.

    Simply install and activate the plugin, then go to Jetpack → Boost. You can see your performance scores and toggle acceleration features for debugging and speed-testing purposes from one convenient screen.

    Jetpack Boost dashboard and settings

    For more ways to speed up your Shop page, check out Nine Ways to Speed Up a WooCommerce Store.

    What else can I do to enhance my WooCommerce Shop page?

    Below are more ways you can enhance and optimize your WooCommerce Shop page. 

    Customize your Shop page’s “Add to Cart” behavior

    Speed up the shopping process for your customers by allowing them to add items to their cart directly from the Shop page and then immediately redirecting them to the cart page. You’ll do this through the options found by going to WooCommerce Settings → Products → General.

    Check Enable AJAX add to cart buttons to display on archives to display Add to Cart buttons on the main Shop page. 

    Check Redirect to the cart page after successful addition, and shoppers will go directly to the Cart page after adding an item. This option is great for stores where customers generally don’t need to stay on the Shop page to add more items. 

    Set a custom product placeholder image 

    If WooCommerce doesn’t have a photo for one of your SKUs, it will use a default placeholder image.

    You can update the Placeholder image to use a custom graphic like your logo. This way, if there’s ever a product without a picture in your store, WooCommerce will show your branded image vs. the default placeholder.

    Go to WooCommerce Settings → Products → General and enter the image URL or attachment ID into the Placeholder image field. Save your changes to update the default image.

    Improve the speed of your WooCommerce store

    A one-second delay in mobile loading times can reduce conversion rates by 20%. So improving your site speed can have an immediate impact on sales. 

    Jetpack Boost is the fastest and most convenient WordPress speed solution, with a simple dashboard for monitoring your site’s performance and enabling speed tools. Install the plugin, review your mobile and desktop speed reports, then measure the difference after activating the one-click optimization features.

  • A Comprehensive Guide to the WordPress theme.json File

    Making custom stylistic changes to your WordPress site generally means editing multiple files manually. Plus, if you switch themes, you’ll have to reconfigure all these settings from scratch. This can be a time-consuming process. 

    Fortunately, when WordPress launched version 5.8, it introduced a new theme.json file. This is a dedicated space for styling the block editor (and individual blocks) on the front and back end. As a result, it’s much easier to manage styles for your website.

    In this post, we’ll take a closer look at the theme.json file. Then, we’ll run through some key considerations before we show you how to edit your theme.json file. 

    What is theme.json in WordPress?

    The theme.json file is a mechanism that enables you to configure the Block Editor with greater control. It’s useful for making site-wide stylistic changes, since you can assign default styles to all (or some) of your blocks.

    Essentially, theme.json is a solution that enhances the capabilities of the Block Editor API. For instance, with theme.json, you’ll gain the ability to control the editor programmatically. Plus, you can integrate a block style system. This facilitates how you manage user, theme, and core preferences.

    The theme.json file was introduced at the same time as the Site Editor. In conjunction, theme.json is one of the first major steps to managing styles for future WordPress releases. It’s a great way to gain more control over your theme (and site) so that you can make changes to your menus, headers, and footers.

    example of the Site Editor in action

    In short, the Site Editor enables you to make tons of global stylistic changes while theme.json is the mechanism that lets you configure custom options for your blocks.

    For example, you can redefine the settings of the Block Editor to hide or show customization options for certain users. Additionally, you can define default colors and font sizes for your blocks while configuring a new width or alignment for the editor.

    Where is the theme.json file located?

    You can find your theme.json file inside the root of your theme directory. If you’re using the Site Editor, and you’ve activated a block-based theme like Twenty Twenty-Three, then you’ll definitely have access to a theme.json file.

    But, if your chosen theme doesn’t come with a theme.json file, you can either switch themes or create your own file. It’s important to note that some themes come with very specific CSS or style blocks that might be incompatible with changes that you make in theme.json. For instance, the dark mode in Twenty Twenty-One cannot be overridden by stylistic changes added in theme.json.  

    What to do before editing your theme.json file

    Now that you know a bit more about the theme.json file, let’s take a look at some important factors to consider before making your edits.

    1. Back up your site

    Before making any significant change, it’s important to make a backup of your site. That way, if something goes wrong, you can recover your website and start over again. 

    Using the Jetpack VaultPress Backup plugin is one of the easiest ways to back up your site.

    Jetpack VaultPress Backup homepage

    This Jetpack tool creates real-time, cloud-based backups and stores them on WordPress.com’s secure server network. Plus, the restoration process is quick and simple. 

    You’re able to take advantage of one-click restores from the mobile app, even if your site is completely down.

    2. Consider using a staging site

    A staging site is a great way to test out changes you want to make without affecting your live website. Essentially, a staging site is a copy of your website that isn’t made available to the general public. Therefore, you’ll gain privacy to test out new features or update your site. 

    This way, you won’t need to worry about things going wrong when you edit the theme.json file. Furthermore, if there’s a problem, you’ll still be able to access your live site. It also means that when you finally push any changes to your live site, you can rest assured that they won’t harm the functionality of your pages. 

    There are a variety of ways that you can set up a staging site. You can ask your web host, set up different subdomains for your site manually, or install a plugin. But it can be easier to opt for a local WordPress development tool.

    How to edit your theme.json file 

    At this point, you’re ready to access and edit your theme.json file! In this section, we’ll show you some useful ways to edit theme.json like creating a color palette and overriding the default font size for your blocks. 

    To get started, you’ll need to reach the root directory of your website. You can do this by using an SFTP client like FileZilla or visiting your File Manager. Then, simply head to the public_html directory. Within that, locate your wp-content folder.

    WordPress files and folders

    Next, go to themes and select the active theme for your site. This is where you’ll find theme.json if your theme has one. 

    1. Create a default color palette 

    You might want to establish a set color palette for the Editor. That way, you can access your colors quickly and ensure a consistent visual brand across your pages. 

    Plus, it can be helpful if you have other users who create posts and pages on your site, since they’ll only be able to access the colors that you include within your color repository. Additionally, they won’t have the ability to create their own hues and gradients.

    To get started, locate theme.json following the steps we outlined earlier. There are three factors to take into account to enable this setting:

    1. You’ll need to disable custom gradients
    2. You’ll need to disable custom color options
    3. You’ll need to add a custom palette with your brand colors

    After you’ve connected to your theme files using SFTP or your File Manager, you’ll need to copy the following code and save it in the root directory of your theme: 

    {
    “version”: 1,
    “settings”: {
    “color”: {
    “custom”: false,
    “customGradient”: false,
    “gradients”:[],
    “link”: false,
    “palette”:[
    {
    “slug”: “vivadcyanblue”,
    “color”: “#0693E3”
    },
    {
    “slug”: “vividgreencyan”,
    “color”: “#00D084”,
    },
    {
    “slug”: “white”,
    “color”: “#ffffff”
    }
    ]
    }

    Keep in mind, you’ll need to tweak the above code to reflect your preferences. Here, we’ve disabled the custom gradient and custom color options. 

    Plus, we’ve determined a set color palette of three different shades. Therefore, when users create posts and pages on the site, they’ll only be able to access these shades. 

    What’s great about creating a custom palette in theme.json is that WordPress will also rewrite all the required CSS. This way, any color changes made in the Block Editor will also be reflected on the front end.

    2. Configure custom font sizes

    It can also be useful to configure certain font sizes for the Paragraph block. Of course, the block provides a set of default font sizes, but you can use theme.json to override it with your preferences. 

    Again, you’ll need to find the root directory of your theme by visiting the themes folder in wp-content. Then, locate theme.json. Font sizes are added to theme.json under settings → typography → fontSizes. 

    Then, you’ll need to input your values. You’ll use size to add a valid CSS font size value. Meanwhile, slug is the identifier that WordPress uses in the CSS custom property. You can also add a name, but this is just for your own use since it’s what you’ll see in the editor.

    In WordPress, the default “small” font size has the value 13px, so you can base your values around this. All in all, your theme.json file will look something like this once you’ve added this code to the file:

    add_theme_support( 'editor-font-sizes', array(
    
        array(
    
            'name' => esc_attr__( 'Small', 'themeLangDomain' ),
    
            'size' => 12,
    
            'slug' => 'small'
    
        ),
    
        array(
    
            'name' => esc_attr__( 'Regular', 'themeLangDomain' ),
    
            'size' => 16,
    
            'slug' => 'regular'
    
        ),
    
        array(
    
            'name' => esc_attr__( 'Large', 'themeLangDomain' ),
    
            'size' => 36,
    
            'slug' => 'large'
    
        ),
    
        array(
    
            'name' => esc_attr__( 'Huge', 'themeLangDomain' ),
    
            'size' => 50,
    
            'slug' => 'huge'
    
        )
    
    ) );

    Simply save the changes to update your WordPress block settings.

    3. Create custom templates and template parts

    Another way to edit theme.json is to create custom templates and template parts. Since themes can list the custom templates that are present in the templates folder, you can declare the post types that can use it and the title you show your users. 

    To get started, open theme.json. You’ll need to think of a name, title, and post type, although the last setting is optional. Then, add the following code to the file:

    {
    
    “version”: 1,
    
    “customTemplates”: [
    
    {
    
    “name”: “custom-template-example”,
    
    “title”: “The Custom Template Title”,
    
    “postTypes”: [
    
    “page”,
    
    “post”,
    
    “my-cpt”
    
    ]
    
    }
    
    ]
    
    }

    At this point, you’ve created a template for your pages, posts, and custom post types. You can go one step further and create template parts for your theme. 

    This way, you can configure theme.json to declare the area term for a template part, like a header or footer block. By defining this in theme.json, you can ensure that the setting is applied across all uses of that template part entity rather than just a single block. 

    Before you get started, you’ll need to consider the name, title, and area of your template part. It’s important to note that if you don’t specify an area, it will be set to “uncategorized” and trigger no block variation. 

    To create a template part for your theme, add the following code to theme.json

    {
    
    “version”: 1,
    
    “templateParts”: [
    
    {
    
    “name: “my-template-part”,
    
    “title”: “Footer”,
    
    “area”: “footer”
    
    }
    
    ]
    
    }

    Then, be sure to save your changes before exiting theme.json. 

    Frequently asked questions about theme.json in WordPress

    Now you know how to edit theme.json, but you may still have a few doubts about it. That’s why we’ve answered some of the most common theme.json questions below!

    When was theme.json first introduced in WordPress? 

    The theme.json file was first introduced with the release of WordPress 5.8. This is when Full Site Editing (FSE) was launched, along with the ability to use block-based themes. 

    This release indicated a huge shift for the platform, since users gained the ability to make site-wide changes and got more control over stylistic settings. Later, with WordPress 5.9, theme.json evolved to a second version. 

    What can you do with the theme.json file? 

    In short, theme.json enables you to change and apply new style-related settings to all of your WordPress blocks. Therefore, you gain a finer level of control over stylistic changes. Plus, it means you can avoid the need to configure these changes individually at the block level. 

    For example, you can edit theme.json to disable/enable features like drop cap, padding, margin, and custom line-height. Additionally, you’re able to add multiple color palettes, duotones, and gradients to make it faster to apply your brand colors to elements on your page.

    What’s more, you can specify exact font sizes and apply this across your site. Or add default widths for your content and assign template parts to template part areas.

    What are the prerequisites to using the theme.json file? 

    Editing theme.json is an easy way to make site-wide stylistic changes. But, unfortunately, it isn’t an option for all users.

    First off, you’ll need to use the Block Editor. If you prefer to use page builders, you won’t be able to take advantage of this functionality. On top of that, you’ll need to have some understanding of CSS and feel comfortable editing your site files. 

    Lastly, you’ll need to be able to access theme.json. As we discussed earlier, not every theme has a theme.json file. Plus, the settings of some themes will override any changes that you make in theme.json

    If your theme does have theme.json, you’ll be able to find it in the root directory of your site. You can locate this using SFTP or visiting your File Manager. Then, find the themes folder within wp-content. This is where theme.json resides. If your theme does not have theme.json, you can either switch themes or create a theme.json file yourself.

    Use the WordPress theme.json file for streamlined web design

    Making custom, site-wide changes often means editing numerous files or completing lots of manual tasks. But, with theme.json, you’ll get a dedicated space for controlling and managing all the stylistic settings for your site.

    The theme.json file is located in the root directory of your site from WordPress 5.8 onwards. You can edit the file to make sweeping changes like apply a custom color palette to your site and override the WordPress default font sizes. 

    Before you edit your theme.json file, it’s important to make a backup of your site. Jetpack VaultPress Backup is an easy-to-use plugin that enables you to restore your site even when you’re offline. Plus, it backs up all your files, WooCommerce data, and your database!

  • 12 Ways to Increase Sales on Your WooCommerce Store

    Do you ever feel like you’re just waiting for the phone to ring? Or, these days, waiting for your next order notification? You hear stories about store owners who are so overwhelmed with orders that they can barely keep up. And… you want to be overwhelmed, too. 

    Well, if you want to increase sales, revenue, and profits, it’s time to get moving. There are very specific, proven steps you can take to increase sales in your WooCommerce store, and we’re going to show you the 12 that will make the greatest impact.

    Whether you sell physical products, digital products, or both, the ecommerce strategies in this article apply to almost every WooCommerce store. 

    And the best news is, you can start working on all of these right now. Even better, since there are twelve, you’ve got a plan you can use as a roadmap for improvement over the next year. Focus on one strategy per month, and this time next year you might just be one of those store owners overwhelmed with orders. 

    Let’s get to it.

    1. Boost your page loading speed

    There’s a direct link between page loading speed and sales. Why? Because if your pages take too long to load, potential customers will abandon your site before they interact with your content. If they don’t use your site, they can’t buy anything. 

    So it’s in your interest to make sure your site is running quickly. If your pages take more than three seconds to load, 40% or more of visitors will simply give up. 

    But how do you boost your site’s speed? Even if you’re a relatively new store owner or aren’t familiar with the technical aspects of WordPress, there are some simple steps you can take to help your site’s performance.  

    First, you can test your current site speed using a variety of free online tools like GTmetrix and Google PageSpeed. These tools will not only tell you how quickly your site loads, they’ll also show you specific ways you can improve.

    Your next step is to install Jetpack Boost, a free plugin you can use to optimize your core web vitals. These metrics are a good indication of the experience that people have with your store, measuring things like loading performance, visual stability, and interactivity. Additionally, Google factors them in when determining where to rank your sites on search engine results pages. 

    settings in Jetpack Boost

    Jetpack Boost will allow you to optimize your CSS loading, defer non-essential Javascript, and implement lazy image loading. And you can turn on each of these features with a simple toggle.

    Then, give Jetpack CDN a try. This is a free content delivery network that loads your website from super-fast servers located around the world. This means that every individual visitor will get the best possible experience based on their location.

    Jetpack CDN also has extra speed-boosting powers like image optimization based on the device each visitor is using to access your website. You can get both things in one place, along with additional security, performance, and marketing tools through Jetpack Complete

    Looking for more tips? See 9 Ways to Speed Up Your WooCommerce Store.

    Pro tip: Hosting isn’t the best place to try and save a few dollars per month. Even a perfectly-optimized site will run slowly if its hosting service is subpar. Your host provides the foundation for everything else needed to run and deliver your site to visitors. Learn how to choose a host for your WooCommerce store, or look through our recommended WordPress hosts

    2. Improve the checkout process

    No matter how many ads you run, blog posts you write, or referrals you receive, the checkout page remains one of the single most important points in the sales process. Despite getting so close to the finish line, many potential customers abandon their cart during these final steps. 

    So improving this single point in the process could have an immediate, profound impact on your sales. 

    Think about it: Every abandoned cart represents someone who found your site, chose one or more products, and at least began the process of making a purchase. But something held them back from completing it. And this happens way more often than any of us like to admit — about 69% of shopping carts are abandoned. 

    So how do you improve your checkout process?

    Start with the easy stuff — remove unnecessary fields. Only keep the ones you need in order to complete the sale. If you want, you can provide opt-ins for joining your email list and other incentives and optional items, but don’t overdo it and be sure they don’t interfere with simply completing the purchase. 

    Also, don’t require customers to log in or register just to buy something. In most cases, you won’t need to do this, and customers can always return later to create an account if they want to make another purchase. If creating an account is absolutely necessary, you should at least allow people to log in using their social media accounts to offer a more frictionless experience.

    Next, allow multiple forms of payment. Credit cards are the baseline, but many people also expect to be able to pay using things like Venmo, Paypal, and Apple Pay. And, for many stores, the time is right to start offering the ability to pay with cryptocurrencies.  

    WooCommerce Payments homepage design

    WooCommerce Payments makes it easy to accept payment in multiple forms and in many different currencies. The best part? It’s completely free.

    3. Consider offering free shipping

    While consumers always love free shipping, you can’t afford to simply give everything away. For most merchants, fulfilling and delivering orders is a major expense. But, if done correctly, it might just turn into an advantage. Here are a few factors to consider about free shipping on your ecommerce store:

    • The weight of your products
    • The shipping providers you’re using
    • Packaging
    • Distance to customer
    • Speed of shipping
    • Cost of the product or order
    • Profit margins

    If offering free shipping eats up all your profits, it’s a bad deal. Some businesses include shipping in their prices. This means they charge higher prices up front, but then there’s no shipping charge added on the checkout page. 

    You can also offer free shipping if the order size is above a certain amount. And you can hold special free shipping for particular days, events, or promotions. 

    4. Improve the user experience

    Website usability matters no matter what type of site you run. But for ecommerce stores, its importance magnifies. A WooCommerce store that’s hard to navigate will make fewer sales because shoppers will get frustrated and give up. 

    And, the more products you have, the more complicated it becomes to maintain a store that’s easy to use. You need clear product categories, a logical navigation menu, a responsive design, and a functional search feature.

    Jetpack Search makes it easy to add a search feature to your WooCommerce store that allows your customers to find what they’re looking for with minimal hassle. It offers advanced filters, spelling correction, and live results to make the process fast and simple.

    example of Jetpack Search in action

    For more options, check out the best WordPress search plugins

    5. Give the information your customers need

    If all your product pages are looking pretty bare — maybe just a photo, a title, and price — you can increase your WooCommerce sales by making these pages more robust. 

    People have questions. They want to know certain facts about products before buying. If your store has been around very long, you probably already know what people ask. You’ve answered the same questions dozens of times. Don’t make them come to you or your FAQ page — get out ahead of them so they can make a purchase decision right then and there. 

    If you’re not sure what information your visitors might be looking for, go back and look at your customer service communications and make notes. If you get any product returns, find out why. 

    If it’s food, list the ingredients. If it’s clothing, specify the sizes. Describe the materials. Explain the care procedures. If it’s a more complicated product, give some information about how to use it, what it’s made of, things to know, and even directions for use. Include high-quality photos

    And another note about clothing. Sizes are not standardized, especially if you’re selling children’s clothes. If possible, include a size chart with measurements so there’s no room for error.

    Anticipate what a customer might want to know, and put that on the product page.

    6. Use email more effectively

    Once you’ve won a customer or gotten someone to opt into your email list, start sending emails! There are a number of smart ways for WooCommerce stores to increase sales using email, such as:

    • New product announcements
    • First-time customer discounts and rewards
    • Referral rewards
    • Abandoned cart emails 
    • Holiday campaigns
    • Birthday and anniversary specials
    • Segmented emails based upon prior purchases

    Email is an excellent method for following up with potential customers. They cost very little to send and the subscriber list data is yours. You have more control and ownership over this kind of marketing when compared to advertising on social media or search engines. 

    WooCommerce store owners who are new to email marketing should look into MailPoet. It has automations that are built specifically for WooCommerce stores, so it works seamlessly. Plus, you can manage everything directly from the WordPress dashboard. Create promotions for those who ordered from a particular product category. Follow up with people who’ve abandoned a cart, announce your newest product launch, or reward your most loyal customers. 

    There’s a lot you can do, and improving your email marketing is almost guaranteed to help grow your store.

    7. Be available to online store visitors

    When potential customers have questions, they want answers. At the bare minimum, every WooCommerce store should have a phone number and contact page. 

    If you want to increase sales from your WooCommerce store, respond within minutes, if possible, but certainly on the same day. If you wait too long, a shopper might buy from somewhere else or just give up.

    Live chat is even better than contact forms! Customers can get answers more quickly. You can designate an employee to handle requests based on their availability, or if it’s just you, connect a chat program to your phone so you can respond to notifications right away. 

    WooCommerce LiveChat

    WooCommerce has a number of chat extensions that are simple to use. LiveChat and Facebook’s chat integration are both popular options. 

    8. Use coupons strategically

    Coupons make great sales boosters, as long as you’re not giving up too much revenue. Look at it this way:

    Suppose you sell a product for $30, and your profit margin is $10. If you give a 20% off coupon that a customer uses on that item, they’re now buying it for $24. That reduces your profits by 60%! 

    So while coupons can sometimes seem like an appealing strategy for convincing more customers to buy from you instead of the competition, you need to be careful. Here are few ways to use coupons strategically:

    • Offer one-time coupons to encourage new or returning customers
    • Use coupons on specific holidays when competition is more fierce
    • Offer coupons for new or specific products that have a higher dollar value
    • Use dollar-off coupons rather than percentages

    That last one could appeal to customers, increase your order size, and reduce your profit losses. 

    Suppose you offer a deal where the customer saves $20 off a purchase of $100 or more, and $40 off a purchase of $200 or more. Seems like the same thing right? 20% off. But it’s not, because the discount doesn’t increase with the price. How many people will spend exactly $100 or $200 dollars?

    A customer who spends $200 saves $40. But a customer who spends $280 also saves $40. Your profits increase the more they spend. And anyone who spends $180 or more in that scenario will probably try to bump up their order to get over $200. This approach increases order size and doesn’t cut into profits as much as a percentage discount. 

    If you offer a 20% off coupon and a customer spends $280, your profits go down $56 instead of $40, because the percentage increases the amount saved no matter how much is spent.

    Another coupon strategy is to offer an upsell. 

    Suppose the customer is about to spend $50 on an item. Offer them the chance to buy two for $89 before they check out. It saves them $11, but it increases your order size without much effect on profits since shipping one order costs less than shipping two separate ones. Here are more creative ways to use coupons

    9. Nurture your leads

    One of the most effective ways to use email marketing is with segmented and personalized emails. But what does that mean? 

    A large part of it revolves around knowing what your customers have purchased, and communicating with them based on that knowledge. 

    As a simple example, suppose a WooCommerce store sells T-shirts, sweatshirts, and jackets, and also has a business line where companies can create branded versions of those same products. Any business customer should be communicated with as a business, not a person. They’re not going to be ordering a couple shirts here and there. 

    On the other hand, another customer may be ordering kids’ shirts and sweatshirts every couple years. Clearly, this customer is a parent buying for their kids, and their kids are getting older, as kids tend to do. So you would communicate with that customer very differently from a business. 

    How do you keep track of customer purchases at this level? With a CRM (customer relationship management) tool.

    Jetpack CRM enables you to keep track of customer purchases, order sizes, dollars spent, and other information that will help you to nurture and follow up with your customers and leads in ways that are relevant and timely to them. 

    customer profile in Jetpack CRM

    For the family buying ever enlarging kids’ clothes, the best time to send special deals and new product announcements would probably be before school starts, and in the months leading up to the holidays.

    A CRM plugin or tool allows you to keep track of this information and make your marketing more effective. And the best thing about JetpackCRM is that it connects seamlessly with WooCommerce. See how it works

    10. Offer social proof

    One of the greatest barriers to online sales is trust. Can I trust this company and their products? One of the best ways to overcome that is with testimonials and reviews. 

    As you acquire more reviews, post them all over your site. You can integrate reviews from well-known sites like Google, and put them on your own product pages to increase authenticity. 

    And don’t just put all your testimonials on one page, or on the homepage. When you get reviews that mention specific products, put those on that exact product page. If you get a review commending your customer service, put that on your contact page, checkout page, or other relevant page. 

    If you have any reviews on social media, connect people so they can see the reviews on your site. 

    You can’t have too many customer reviews and testimonials. And the more detail you include, the better. Full names are better than first names. Cities are better than states or provinces. For business customers, include company names and the job title of the person leaving the review. Photos are better than just names. Video testimonials are gold.

    See more ways to use reviews to generate sales.

    11. Harness the power of upsells and cross-sells

    One of the most powerful ways to increase WooCommerce sales is with upsells and cross-sells. 

    An upsell could be like the example given earlier, where a customer bought an item for $50, and you offer them the chance to buy two for $89 before they finish checking out. You’re getting them to spend more, but it’s a good deal for them, too. 

    Another common upsell strategy is to offer a bonus item or some other perk such as an event ticket or contest entry. You can also upsell by offering larger quantities. This works great for food and consumable products. 

    Cross-selling, on the other hand, involves recommending other products that relate in some way to the first one. Using the clothing example again, if someone orders a couple t-shirts, you can mention sweatshirts and jackets of a similar color or style as a product recommendation. 

    This is also another place you can use coupons strategically. You could combine the product recommendation with a one-time-only coupon to buy two items and get a third one free. Or, if you have a minimum threshold for free shipping, mention how close the shopper is to reaching that when you recommend other products. 

    Here are five more strategies for upselling and cross-selling.

    12. Increase your marketing efforts

    Even though this is the last tip on this list, if you’re using this article to help plan out your next twelve months, don’t wait until the 12th month to start this one. Marketing is a continuous process and many of these methods begin with a slow build. So start early, and keep building on it as you implement other strategies on this list.

    Online marketing requires online traffic. How do you get traffic? In general, there are two ways:

    1. Attract the traffic organically
    2. Pay for the traffic

    You can attract online traffic from social media and from search engine optimization (SEO). Social media sites such as Facebook and Pinterest offer ways to showcase products, post comments and updates, get feedback, and interact with customers. You can also use social media to send people to your site. 

    For many WooCommerce stores, Pinterest can be particularly helpful because it’s a visual showcase. With the free Pinterest for WooCommerce extension, you can link your online store to your Pinterest page and put your entire product catalog on display. 

    SEO is how you attract online traffic organically, through search engines like Yahoo, Bing, and Google. SEO relies on having high quality content on your website that uses keyword terms that your ideal customers might be searching for. This is another reason why having quality product pages with lots of helpful information should be a high priority. Your SEO also improves with well-organized and clearly-defined product categories and site architecture that’s easy to navigate. 

    And you can greatly improve your SEO by writing helpful high-quality blog posts, which offer a natural way to answer questions often asked by customers, and provide solutions to common problems. 

    With paid online ads, you can more directly attract people who are searching for your products, and leapfrog ahead of the organic listings in search engines. The downside is that you’ll pay for every click and, if you stop paying, the traffic stops flowing. That said, it can still be a great way to generate profitable traffic and learn what terms your audience uses most. 

    The Google Listings & Ads extension, another free download for WooCommerce, makes it easier to run ads that sync with your specific product pages. 

    Frequently asked questions about increasing sales on WooCommerce

    1. How can I analyze my WooCommerce sales performance?

    The simplest way to begin is with the site stats you can see through Jetpack. This is a free feature that shows where your traffic is coming from, and your most popular pages. Next, review the built-in stats that come with WooCommerce. You’ll see which products are most popular along with everything from gross and net sales to average order size, taxes, shipping, refunds and more with WooCommerce Analytics

    And if you want more data, you can use Jetpack to connect WordPress with Google Analytics for an advanced view of site stats and marketing performance.

    2. Which metrics or KPIs should I focus on, in priority? 

    For most WooCommerce stores, your key metrics will include total sales, average order size, returns, and discounts. There’s a lot more depth within each of these such as date ranges, categories, coupons redeemed, and more. All of these metrics and much more can be found within WooCommerce Analytics. See what else WooCommerce Analytics can show you

    3. How can I see where my sales come from?

    The best way to see which of your marketing sources are producing the most sales is to connect Jetpack with Google Analytics. Here’s how to set it up. This will show you geographical data, but also which paid ads, blogs, social media sites, emails, and other marketing channels are producing your sales and converting your customers. 

    When you’re ready to get more detailed, you can learn about advanced analytics and marketing performance tracking for WooCommerce

  • MainWP Partners with Jetpack for WordPress Security

    Managing multiple WordPress sites can be stressful. With the average WordPress site running 22 plugins, it’s crucial that every vulnerability is accounted for. That’s why we’re thrilled to announce our partnership with MainWP, bringing you two new Jetpack extensions in the MainWP marketplace. With this new agreement in place, managing multiple WordPress sites has never been easier.

    Jetpack has a full suite of single-purpose plugins designed to protect websites. MainWP has now integrated two Jetpack extensions into their marketplace:

    • Jetpack Protect – a free plugin for malware prevention.
    • Jetpack Scan – a premium plugin that includes automated daily scanning, one-click fixes for most issues, and a WAF (web application firewall).

    Jetpack Scan will review all the files on your site, looking for any plugin or theme that our research team has flagged for vulnerabilities, so you can take action immediately. Jetpack Scan will further fix issues for you with your one-click approval.

    Jetpack Scan image for MainWP partnership.

    Why MainWP?

    The MainWP WordPress Manager Dashboard plugin allows you to control multiple WordPress websites (including sites on different hosting platforms) from your own private, self-hosted WordPress website. MainWP is free with the option to upgrade to a premium version.

    Privacy is what differentiates MainWP from other options on the market. The MainWP plugins come with their own privacy policies to ensure that any personally identifiable information (PII) is not collected.

    MainWP Customers Can Access a Jetpack Scan Discount with a Coupon

    To make it even more affordable for agencies to protect their sites, MainWP has enabled couponing, which allows clients to enable Jetpack Scan at a discount. 

    Button to get Jetpack Coupon on MainWP extension

    They can then claim and apply the coupon:

    Claim Coupon at MainWP for Jetpack extensions

    Why MainWP + Jetpack?

    MainWP provides a WordPress management dashboard that is self-hosted, open source and used by more than 10,000 agencies and builders to manage over 600,000 WordPress sites. 

    For agencies and builders, there is nothing more mission-critical than steering your sites to safety past WordPress vulnerabilities. Jetpack’s Protect and Scan plugins are built on WPScan, the most trusted WordPress vulnerability service. The MainWP team is thrilled to partner with Automattic’s Jetpack to make it simple for MainWP clients to protect their sites.

    Dennis Dornon, Co-Founder of MainWP

    We hear from agency clients over and again that MainWP is critical for their business. This is an exciting launch for us as we are confident that almost every MainWP client can benefit from protecting their sites with Jetpack Protect or Jetpack Scan.

    Mike Bray, Head of Partnerships and Business Development at Jetpack

    Check out the two new Jetpack extensions in the MainWP marketplace for yourself!

  • Jetpack 11.9 – Improvements for Social Sharing Buttons and Form Block

    This month we have worked on several improvements to enhance your Jetpack experience, including further enhancements to the Social Sharing Buttons and Form Block.

    Share your blog posts on Mastodon with improved Jetpack Social Sharing Buttons

    We made some design and performance updates on our Social Sharing Buttons for a better user experience, including a new sharing button for Mastodon.

    You can customize your Social Sharing Buttons by following these steps:

    • Go to the Jetpack dashboard in WP Admin.
    • View the Settings menu and click on Sharing page.
    • Enable Add sharing buttons to your posts and page option.
    • Click on Configure your sharing buttons.

    Once you’ve activated the Sharing feature, you can also go to  Settings > Sharing to enable a sharing button:

    As you can see in the video above, the button does a few things:

    1. You can pick between just the icon, icon + text, text only, or a button with a colorful logo and the text.
    2. When sharing, your visitors will first have to enter the Mastodon instance where they’d like to share the post.
    3. You can edit the message, but by default, the message will include the post title and URL, and tags will be added as hashtags at the end.

    Field style syncing for the Form Block

    We introduced a new Sync Fields Style option for the Form Block to provide you greater flexibility in customizing your forms’ designs. You can enable this option from the block settings in your editor:

    Updated Stats dashboard design

    We are now defaulting to an updated modern design for the Jetpack Stats dashboard to help provide valuable insights and grow your site.

    If you have feedback on the updated design, please share your thoughts on this survey. And if you prefer to continue using the traditional stats for now, there is a toggle in the Traffic section of the Jetpack settings.

    Automattic Certified as a Most Loved Workplace

    Our parent company Automattic has been certified as a Most Loved Workplace by Best Practice Institute research and analysis. The Most Loved Workplace validation provides the most comprehensive look at workplace sentiment for organizations today. To learn more about Automattic’s certification and read why folks love working here, visit our page on Most Loved Workplace.  

    We continue to grow and have some exciting open positions at Automattic, including in Engineering, Product, Marketing, Business Development, HR, Customer Support, and more. Work for us, from anywhere: https://automattic.com/work-with-us/.

    A big thank you to everyone who contributed to this release:

    Adnan Haque, Adrian Moldovan, André Kallehauge, Antony Agrios, Artur Piszek, Bogdan Nikolic, Brad Jorsch, Brandon Kraft, Christian Gastrell, Clemen, Damián Suárez, Daniel Bachhuber, Daniel Post, Dave Martin, Douglas Henri, Dylan Munson, Fernando Fernandes, Francesco Bigiarini, Gergely Márk Juhász, Grant Kinney, Ian Ramos, Igor Zinovyev, Jason Johnston, Jason Moon, Jasper Kang, Jeremy Herve, Jeremy Yip, John Caruso, Karen Attfield, Kevin L, Kosta, Kuba Birecki, Linas Valiukas, MILLER/F, Matias Ventura, Matthew Reishus, Miguel Torres, Nate Weller, Nauris Pūķis, Osk, Peter Petrov, Piotr Stankowski, Rafael Agostini, Renato Augusto Gama dos Santos, Robert Felty, Rustam Shaikh, Samiff, Sergey Mitroshin, Sérgio Gomes, Siobhan Bamber, Steve D, Tom Rhodes, Vishnu Gopal, bindlegirl, dkmyta, gogdzl, jcheringer, nunyvega, ouikhuan, simonktnga8c, thingalon, vikneshwar

  • WordPress Search: How it Works & How to Enhance It

    If you manage a site with lots of content or information, it’s crucial to organize it all in a way that makes sense to visitors. A well-thought-out navigation menu and intuitive design is a good start, but it’s not always enough. 

    To go the extra mile, you can turn to the WordPress search function to increase your site’s user-friendliness and navigation. You can add this feature to almost any design, or create a dedicated page for it. Then, you can customize it to meet your unique needs, and use tools like Jetpack Search to enhance its functionality.

    In this in-depth guide, we’ll talk more about WordPress search and discuss how you can add this vital function to your website. We’ll also explore some troubleshooting tips and frequently-asked questions. Let’s get started!

    What is WordPress search?

    Before we can discuss how to leverage WordPress search on your website, it’s best to have a basic understanding of what this feature is and how it works. Of course, you’ve probably used plenty of search engines before, like Google. 

    This type of search engine enables you to look for specific content anywhere on the web, using sophisticated algorithms and vast databases.

    WordPress search lets you conduct the same type of inquiry, but it targets the content on a single website. 

    example of search bar on Jetpack's website

    Typically, the search function is represented by the familiar magnifying glass symbol and is often found in the sidebar or website header. But it’s important to note that you can add a search bar virtually anywhere on your WordPress site.

    How does WordPress search work?

    WordPress search works like a search engine, only on a smaller scale. It’s included in WordPress core by default, and some themes may style it to match the rest of your theme settings. You can add it to your site using a Search block or widget, depending on the theme you’re using.

    When it was first introduced, the standard search tool simply returned results based on the terms users input. Users could then click on the links in those results, and go directly to the pages that contained the specific content they were looking for.

    Similar to the larger-scale search engines, though, WordPress has evolved its search function over the years. Initially, it could only return results that contained specific search terms, and in chronological order. Now, it can do a better job of understanding what users are looking for, and return results based on their relevance.

    Furthermore, these days, adding a WordPress search bar to your website is easier than ever. You can add one to your pages and posts using the Search Block and the Site Editor. We’ll show you how to do that shortly.

    What are the limitations of WordPress search?

    While the default WordPress search option is very useful, it does have its shortcomings. First of all, it can only scan content from “the titles and the bodies of your posts and pages.” This includes:

    • Page titles
    • Media titles (images, videos, GIFs, etc.)
    • Alternative text (alt text)
    • File names
    • Single image captions
    • Paragraph text

    This may seem like a lot, especially since it includes some elements that aren’t even visible to most users (like alt text and file names). But the fact is that this search still excludes lots of important information, including content contained in the following page and post elements:

    • Widgets
    • Comments
    • Categories
    • Gallery captions
    • Tags 

    As you can see, a portion of your site is entirely ignored when you’re using the default functionality. In particular, if you run an ecommerce store, this means that some information from product pages could be completely left out.

    Additionally, if your website contains a lot of content, it could take longer for search results to display. This may lead to a poor user experience (UX) for the searcher.

    Fortunately, there are many ways you can customize and improve the WordPress search function. But first, let’s talk a little more about why this feature is so important.

    Why should I use the WordPress search feature?

    If you’re not familiar with web design or development, you may want to keep your website as simple as possible. So you might be wondering if using the WordPress search feature is really worth it.

    The answer will depend on a few factors that are unique to your audience and content. But in most cases, you’ll likely benefit from using the WordPress search function. In particular, it can be very useful for sites with a lot of content that’s difficult to navigate, like blogs with extensive archives.

    Cookie + Kqte website, showing the search results page

    Ecommerce sites with lots of product pages and categories can also benefit from adding a search feature. This will likely result in an improved UX, and can even lead to a boost in conversions. 

    Alternatively, if your website features an extensive customer support or knowledge base page, it might be useful to add a search element there.

    Dreamhost search bar in their knowledge base

    This way, you can provide answers more quickly, and reduce the number of customers reaching out directly to your support team. As a result, customer support representatives will have more time to work on trickier cases and improve satisfaction overall.

    It’s important to note that there are some cases when you may not need to add an internal search feature to your site. For example, it might not be necessary for one-page websites and other sites with very limited content. For most websites, though, this particular function is essential.

    How to add search functionality to your WordPress site

    Now that you know a bit more about how WordPress search works and why you may want to take advantage of this feature, we’re going to show you how to add it to your site!

    1. Start by adding the default search functionality

    If you don’t need premium search capabilities, you can use the default WordPress search functionality. As we discussed, this might not be ideal since it excludes key information from elements like comments, widgets, and more. Plus, if you have a lot of content to search, it might return results rather slowly.

    However, even if you do plan to use the amazing benefits of Jetpack Search, you’ll start with this step as Jetpack Search essentially builds upon the default capabilities. 

    For this tutorial, we’ll be adding a search bar to the navigation menu in our global header. But keep in mind that the process is similar, no matter where you add your search bar, as long as you’re using WordPress blocks.

    To begin, navigate to your WordPress dashboard. Go to Appearance → Editor, and select the page element you’d like to modify. In our example, it’s the menu within the header.

    Then, click on the plus symbol (+) to find and add the Search block.

    adding a search bar to the header

    In this example, since we’re adding it to our header, you’ll find it under the Transform submenu. After you’ve added the search bar, simply save your changes or publish your page. Here’s what the final result looks like:

    example of a WordPress search bar in the header

    As you can see, by default, the search block shows a brightly-colored magnifying glass and an empty field for inputting a query. These default appearance settings might not be ideal for your site’s color scheme or theme. But don’t worry; we’ll show you how to customize these elements later.

    2. Now, install Jetpack Search for enhanced capabilities

    As we discussed, the native WordPress search function comes with its limitations, so you may want a more powerful internal search option. If that’s the case, your best choice is Jetpack Search

    Jetpack Search homepage with the text, "Help your visitors find what they need."

    This powerful tool will help you take your website’s search feature to the next level. It’s highly customizable and optimized for speed.

    Jetpack Search uses “instant search” (a.k.a. AJAX search) to deliver results as fast as possible. Thanks to its real-time indexing, users can see results as they type. 

    Plus, it allows for advanced filtering, so your visitors can find exactly what they’re looking for in record time. Jetpack Search comes in both free and premium versions. Or you can purchase it as a part of a package with other performance tools.

    Before you get started, make sure your site meets the minimum requirements for installing Jetpack Search. These are pretty straightforward. For instance, you’ll need the latest version of WordPress, a WordPress.com account, and a publicly-accessible site.

    Then, simply navigate to your WordPress dashboard. Go to Plugins → Add New and input “Jetpack Search.”

    Click Install now → Activate. 

    Jetpack Search in the WordPress plugin repository

    You’ll then be directed to a screen where you can select either a free or premium plan. 

    Next, click Approve to connect your site to WordPress.com, then complete the checkout process. 

    Another great thing about Jetpack Search is that it’s pre-configured. That means it will be ready to go after you choose your plan. You’ll be taken straight to the Customizer screen, so you can confirm that everything is working properly.

    How to improve and customize WordPress search

    After you’ve added the WordPress search function to your website, you can then customize it to your liking. Continue reading to learn how!

    1. Editing the default search functionality

    Earlier, we showed you how to add the default WordPress search function to your site. Now, here’s how you can customize your search bar using this standard feature.

    Return to the Site Editor or the page or post you want to work with. Then, select the search bar element. Make sure to highlight the embedded Search block and not the parent block, which in our example is the Navigation element.

    When you select the Search block, you should see its unique toolbar.

    toolbar for the Search block

    From left to right, you have a search tool, a drag feature, and arrows to move the search element. Then you have three more icons you can use to make adjustments. You can use the first icon to add a label to your search bar.

    Alternatively, you can modify the location of your search button.

    settings for the Search block

    Finally, you can change the magnifying glass symbol to text if you prefer.

    Next, you can explore additional settings in the Block menu on the right. For instance, you may want to change the background color of your button.

    changing the search button background color

    If you continue to scroll down, you can change other display settings like width, typography, and more. Just keep in mind that while you do get a decent level of control over your search bar’s appearance, you won’t have the ability to change how results are displayed.

    2.  Advanced customizations with Jetpack Search

    At this point, you’ve already modified the search bar to match the look of your site. Now, if you’re using Jetpack Search, you can take things a step further by customizing the user experience of search results.

    Customizing the Jetpack Search experience for advanced design and functionality is pretty straightforward. There are a few ways you can go about this, but the easiest approach is to navigate to your WordPress dashboard and go to Jetpack → Settings → Performance.

    settings for Jetpack Search

    Make sure that both of the toggle buttons are enabled (this is recommended), and then click on Customize your Search experience.

    customizing search results

    Under the Options tab, you’ll see that you can customize the Styling, Result Format, and Search settings. When it comes to Styling, you can opt for Light or Dark. You can also display images in results, modify the background color for your search field, and choose from different Overlay Trigger options.

    Further down, in the Options menu, you can exclude post types and disable additional settings like infinite scroll and the “Powered by Jetpack” message. As you can see, Jetpack Search allows you to personalize almost every detail of your search bar.

    If you want to offer your users the best search experience possible, you might consider creating a dedicated search page. Alternatively, you could include the search element on every page, as we did in our example by modifying our site-wide header. Even better, you may want to provide both options! 

    What if WordPress search isn’t working as intended? 

    Once you’ve added and customized your internal WordPress search bar, chances are you won’t have to worry about it any further. But occasionally, your WordPress search tool may not work as intended. 

    In case this happens to you, let’s go over some common issues and how to resolve them. 

    1. WordPress search is not returning any results

    When you use the native WordPress search function, you may occasionally encounter a 404 error. That means your searches won’t return any results.

    If this happens, you may need to regenerate your site’s permalink structure. Fortunately, this can be done in just a few steps within your WordPress permalink settings.

    2. WordPress search is not showing all possible results

    As we’ve discussed previously, when you add the default WordPress search bar to your site, it only scans certain types of content.

    This means that some relevant content may not show up in the search results. You can avoid this by upgrading to Jetpack Search, so visitors can find what they need, no matter where it’s located.

    3. WordPress search is very slow

    Unfortunately, another common issue with WordPress search is results that take a long time to display. This most often affects larger websites with lots of content and pages, like blogs with lots of posts and sizable online stores. 

    If this occurs, you can use a WordPress search plugin instead of the default functionality. Jetpack Search is designed for speed, and uses real-time search that allows users to view results as they type.

    Frequently asked questions about WordPress search 

    Hopefully, by now you have a good understanding of WordPress search. But just in case you still have lingering questions, we’re going to cover some frequently-asked questions about this feature.

    Why is internal search important for a website?

    As we discussed previously, internal search can greatly benefit most websites. This is particularly true for larger sites with lots of information. 

    For example, blogs with extensive archives and ecommerce sites with many product pages will definitely need a search tool. Otherwise, visitors may wind up frustrated when they can’t find what they want quickly, and could abandon your website as a result.

    While robust and user-friendly navigation menus can help organize larger sites, the WordPress search feature greatly enhances UX and ultimately boosts your business goals.

    How can I make WordPress search faster?

    While WordPress search can be a valuable tool, if your website houses lots of content and you’re using the default functionality, your users could end up waiting longer than they need to for results. 

    To make WordPress search faster, you can install and customize a plugin specifically designed for this purpose, like Jetpack Search. Additionally, you may want to implement a caching solution.

    Can I customize WordPress’ default search options?

    The short answer is yes: you can customize WordPress’ default search options. There’s a lot you can do to alter the search bar’s appearance. If you want more advanced customization options, though, you’ll need to upgrade to a WordPress search plugin.

    What is the best plugin to improve WordPress site search?

    There are a handful of high-quality WordPress search plugins that you might want to consider. But if you’re looking for a trustworthy, all-in-one solution, Jetpack Search is hands-down the best option. 

    It comes with advanced filtering, real-time search, and performance optimization. Plus, you can easily pair it with other Jetpack tools to ensure that your WordPress site is always functioning as it should.

    Elevate your website with WordPress search

    If you manage a large WordPress website with lots of valuable content, you may struggle to present it to visitors in an accessible way. While proper site structure and robust navigation can help with this, they might not be enough. That’s where the WordPress search function comes in handy.

    You can easily add a WordPress search bar almost anywhere on your site. You can use the Search block to access the default functionality. But this basic feature may not be ideal for some sites, as it can’t scan certain page elements like widgets, comments, categories, and more. To ensure that your users get lightning-fast results, you can upgrade to Jetpack Search. This tool also unlocks advanced features like powerful filters to help people find what they’re looking for more easily.

    Are you looking for additional ways to improve your site’s performance and security? Check out the rest of the Jetpack products!

  • SQL Injection Discovered And Fixed In Slimstat Analytics and Paid Memberships Pro

    During an internal audit of the Slimstat Analytics and Paid Memberships Pro plugins, we uncovered two SQL Injection vulnerabilities that could allow low-privileged users like subscribers to leak sensitive information from a site’s database.

    If exploited, the vulnerability could grant attackers access to privileged information from affected sites’ databases (e.g., usernames and hashed passwords).

    We reported the vulnerabilities to the plugin’s authors, and they recently released Slimstat Analytics version 4.9.3.3 and Paid Memberships Pro version 2.9.12 to address them. We strongly recommend that you update affected plugins to their respective latest version, and have an established security solution on your site, such as Jetpack Security.

    Subscriber+ SQL Injection in Slimstat Analytics

    Plugin Name Slimstat Analytics
    Plugin URI https://wordpress.org/plugins/wp-slimsta
    Author https://wp-slimstat.com
    Affected Versions Every version between 4.1 and 4.9.3.3
    CVE-ID CVE-2023-0630
    WPScan ID b82bdd02-b699-4527-86cc-d60b56ab0c55
    CVSSv3.1 7.7
    // Init the database library with the appropriate filters
            if ( strpos ( $_content, 'WHERE:' ) !== false ) {
                $where = html_entity_decode( str_replace( 'WHERE:', '', $_content ), ENT_QUOTES, 'UTF-8' );
            }
            else{
                wp_slimstat_db::init( html_entity_decode( $_content, ENT_QUOTES, 'UTF-8' ) );
            }
    
            switch( $f ) {
                case 'count':
                case 'count-all':
                    $output = wp_slimstat_db::count_records( $w, $where, strpos( $f, 'all') === false ) + $o;
                    break;
    

    The slimstat shortcode allows users to add some filtering logic in the form of SQL WHERE statements by looking for a “WHERE:” token inside the shortcode’s content. This functionality is a problem since, as we’ve reported in another vulnerability advisory before, any users logged onto a site, like subscribers, can render shortcodes in WordPress.

    A proof of concept exploit for this vulnerability will be available on this vulnerability’s WPScan entry.

    Subscriber+ SQL Injection in Paid Memberships Pro

    Plugin Name Paid Memberships Pro
    Plugin URI https://wordpress.org/plugins/paid-memberships-pro/
    Author https://www.paidmembershipspro.com/
    Affected Versions Every version between 1.5.5 and 2.9.12
    CVE-ID CVE-2023-0631
    WPScan ID 19ef92fd-b493-4488-91f0-e6ba51362f79
    CVSSv3.1 7.7
    if($hasaccess && !empty($delay))
        {        
            //okay, this post requires membership. start by getting the user's startdate
            if(!empty($levels))
                $sqlQuery = "SELECT UNIX_TIMESTAMP(CONVERT_TZ(startdate, '+00:00', @@global.time_zone)) FROM $wpdb->pmpro_memberships_users WHERE status = 'active' AND membership_id IN(" . implode(",", array_map( 'esc_sql', $levels ) ) . ") AND user_id = '" . esc_sql( $current_user->ID ) . "' ORDER BY id LIMIT 1";
            else
                $sqlQuery = "SELECT UNIX_TIMESTAMP(CONVERT_TZ(startdate, '+00:00', @@global.time_zone)) FROM $wpdb->pmpro_memberships_users WHERE status = 'active' AND user_id = '" . esc_sql( $current_user->ID ) . "' ORDER BY id LIMIT 1";
    

    While, at first sight, it may look like the `membership` shortcode properly escapes the $levels variable before concatenating it to an SQL query, the content it adds is not inserted in the context of a string. This effectively means an attacker can abuse that feature to inject SQL statements, so long as they don’t contain any quotes.

    Since shortcodes can be rendered by any logged-in users, like subscribers, this enables low-privileged attackers to leak sensitive information from the database, like usernames and hashed passwords.

    A proof of concept exploit for this vulnerability will be made available on this vulnerability’s WPScan entry.

    Conclusion

    We recommend that you check which version of the plugins your site is using, and if they are within the affected ranges, update them as soon as possible! 

    At Jetpack, we work hard to make sure your websites are protected from these types of vulnerabilities. We recommend that you have a security plan for your site that includes malicious file scanning and backups. Jetpack Security is one great WordPress security option to ensure your site and visitors are safe.

    Credits

    Original researcher: Marc Montpas

    Thanks to the rest of the WPScan team for feedback, help, and corrections.

  • 23 Social Media Post Ideas for Businesses Looking to Stand Out

    Social media has become an integral part of modern business. It provides an unprecedented opportunity for businesses to connect with their customers and build a loyal following. However, with so many competing voices on social media, it’s harder than ever to stand out.

    In this article, we’ll share 23 social media post ideas that can help your business stand out on social media. First, we’ll cover some basics by defining the different types of social media posts. Then, we’ll highlight the importance of automation before sharing two dozen social media post ideas you can use right away!

    The different types of social media posts

    There are a variety of types of social media posts that businesses can use to engage their audience and stand out on social media. These include text, image, video, live video, and more. Each type of post has its own unique strengths and can be used in different ways to stand out on social media:

    • Text posts are a great way to share information and updates with your audience. They’re quick and easy to create, and you can use them to share news, updates, and other important information.
    • Image posts allow you to share visual content with your audience. They can be used for product images, infographics, and other types of visual content.
    • Video posts can be used to share product demos, tutorials, and other types of promotional content.
    • Live video posts let you connect with your audience in real time. They can be used to host live Q&A sessions, product demos, and other types of live content.

    The importance of automation in a social media posting strategy

    Managing and maintaining a consistent presence across multiple platforms can be a daunting task. This is where automation comes in. Automating certain aspects of your social media strategy can not only save you time and energy, but also help you reach a wider audience and increase engagement.

    One of the best ways to automate your social media strategy is through the use of social media sharing plugins. Jetpack Social is a great option for businesses running their sites on WordPress.

    settings for Jetpack Social

    With Jetpack Social, you can easily share your content across multiple platforms, including Facebook, Twitter, and LinkedIn with just one click. Additionally, Jetpack Social allows you to schedule posts in advance, so you can create a content calendar and ensure that your accounts are always active, even when you’re not. This allows you to focus on other important tasks while still maintaining a strong social media presence.

    Overall, automation is a key component of any successful social media strategy. By using a plugin like Jetpack Social, businesses running their sites on WordPress can easily automate their social media efforts, save time, and increase engagement. To learn more about Jetpack Social, visit Jetpack.com/social/

    Stand out on social media with these 23 post ideas

    1. Share your blog’s content on autopilot

    One of the easiest ways to keep your social media accounts active and engaging is by maintaining an active blog. By consistently creating valuable and relevant content on your blog, you’ll have a steady stream of new material to share across your social media channels.

    Each time you publish a new blog post, you can share it on your social media accounts, along with a brief summary and a call-to-action to encourage readers to visit your website.

    By using a solution like Jetpack Social, you can automatically share your blog content across multiple social media platforms, saving you time and effort.

    2. Show your product in an unexpected situation

    Showing your product in an unexpected situation can help to create a sense of intrigue and interest around your brand. For example, showcasing your outdoor gear in an urban setting or your fashion brand on a hiking trail can be a great way to stand out.

    3. Launch a recurring series (daily, weekly, etc.)

    Launching a recurring series can be a great way to build an audience and keep them engaged. This can be a daily or weekly series of posts that provide valuable information, tips, or entertainment, such as a “Tip of the Day” or “Throwback Thursday.”

    4. Make a meme your audience will relate to

    Memes are a great way to connect with your audience and build a feeling of community. By creating a meme that your audience can connect with, you can create a sense of connection and engagement.

    When crafting your meme, however, make sure to consider your audience. Are they likely to understand the joke? Could it be offensive in any way? Memes tend to have a short shelf life. So jumping on a trend that’s several years old may not get you the attention you anticipate. 

    Pro-tip: You don’t need a background in graphic design to create this kind of post. Use an online meme generator like this one to save time!

    5. Share customer interviews and testimonials

    Sharing customer interviews and testimonials is a great way to showcase your brand’s value. It helps to build trust and credibility with your audience and can be a powerful way to stand out on social media.

    6. Answer commonly-asked questions

    Posting frequently asked questions (FAQs) and answering them is a great way to provide value to your audience. This can help overcome sales objections and customer service questions before potential people even reach out, saving staff and employee time and bolstering the confidence followers have in your brand.

    FAQ section on Heggerty's YouTube channal

    But what questions do you ask? If you have a customer service or support team, find out what they encounter most often. Check your contact form submissions, social media comments, and direct messages. You can even send out a survey via email or ask social media followers what they’d like you to answer. 

    7. Share behind-the-scenes content

    Sharing behind-the-scenes content can help to give your audience a glimpse into the inner workings of your business. It’s a clever way to highlight the processes, ingredients, and quality of care that set you apart. It also humanizes your brand when people get to know the team behind the products or services you offer. This is particularly helpful for premium brands who may need to justify why their offerings cost more than competitors. 

    8. Post product demos and tutorials

    Product demos are an excellent way to show all the different use cases for your items. Perhaps they can be used in unexpected ways, opening the possibilities up to a whole new audience! 

    They also provide valuable content for those who have already purchased. Perhaps someone bought your espresso maker and can’t quite figure out how to use one specific feature. If you share a video walking them through the steps, it might keep them from returning it while simultaneously showing potential customers how easy your product is to work with. Plus, it provides opportunities to present new options — like espresso beans — to existing customers for recurring business. 

    There’s a reason there are so many late-night infomercials with product demos — they work! And social media is a great place for the modern day equivalent without the need to purchase expensive air time. 

    9. Showcase user-generated content

    User-generated content (UGC) is a great way to relate to a variety of potential customers. These days, people are hyper-vigilant, and even resistant to advertising. They know about stock footage and aren’t as impressed by models. 

    Instead, when you highlight content created by real users, authentic fans of your brand, people are often much more receptive. Plus, you can save significantly on production costs and potentially turn the contributor whose content you used into a super-fan or brand ambassador for life. 

    user-generated content on Veer's Facebook page

    Here are some ways to encourage UGC for your brand. 

    10. Align yourself with a cause that’s important to your audience

    Supporting a cause that your audience can identify with helps you connect with them and build a sense of community.  You can contribute to a fundraiser and ask others to do the same. Highlight the work your staff is doing as volunteers. Organize a fundraiser or open your doors or resources for use by like-minded members of your audience. There are all kinds of ways to contribute positively to the world, help or encourage others to do the same, and improve your brand positioning. 

    Pro-tip: Find something you and members of your team are truly passionate about. Don’t come across as braggadocious and don’t only support causes for the publicity. Followers can tell, and it can do more harm than good. 

    11. Run exclusive promotions (only for your social media audience)

    Exclusive promotions act as a reward for your social media followers, letting them know that you appreciate them and building engagement at the same time. You might offer free shipping, throw a freebie or sample into orders placed by followers, or share a special discount code for a percent off their next order. And setting a time limit for promotions harnesses the power of urgency to drive sales quickly. 

    12. Host a contest or giveaway

    Hosting a contest or giveaway can be an exciting way to encourage comments and shares on your posts (some of the most important forms of engagement) without appearing desperate. In fact, it’s usually a super-fun process for both you and your followers. This often works best when the giveaway is something from your brand (not an unrelated, random prize) so that it serves as an advertisement for one of your most popular products. Those who don’t win might actually end up purchasing it for themselves, or as a gift, later on.

    Make sure to check with any rules for the social media platform you choose, but many contests involve having followers like, comment, tag a few friends, and share your post as a method of entry. You can then use an app or even a random number generator to select the winner. 

    13. Conduct polls and surveys

    Polls and surveys help you accomplish two things: increase engagement and learn what your followers are interested in. While you can publish polls on any platform, you’ll often see quick polls in Instagram stories. Sometimes these are fun — Pineapple on pizza: yes or no? — and other times they more directly ask for feedback — What flavors do you want to see on our Spring menu? 

    Regardless, these are excellent opportunities to find out what your followers want to see more (or less!) of on your account or in your products or services.

    14. Create infographics and data visualizations

    There are a number of programs with pre-built templates you can use to create fun graphics out of almost any fact or stat about your brand. One idea is to do a year in review. How many customers did you serve last year? How many different recipes did you try to find the perfect one? How many miles did your delivery trucks accrue? How many customer service requests did your team respond to?

    Quickly browse your site to find any numbers or facts. Even if they’re kind of random or simple, it’ll look more interesting in graphic form and can be a fun way to fill in gaps on your content calendar.

    15. Publish holiday-themed content

    People love the holidays! And we don’t just mean Christmas and New Years. You can also create fun and relevant content around Arbor Day and even National Pancake Day. 

    There are lots of ways to be creative here. Share how kids can create holiday crafts using your items. Showcase your products in holiday-themed decor. Or tie the holidays into a promotion or giveaway. 

    16. Share event and conference coverage

    Conferences and events bring together people from all over to learn about an industry or topic and connect with like-minded individuals. But not everyone can attend every conference! 

    So if you’re attending an event that you think your audience would find valuable, share what you’re learning with them. Live Tweet valuable quotes, take pictures, and post quick videos, as long as you stick to the recording/publishing rules of the convention. This will provide value, establish you as an expert, and show customers and clients that you’re investing in your growth.

    17. Virtual tours and 360-degree videos

    Virtual tours and 360-degree videos are a powerful way to showcase the features and benefits of your products. Of course, this will be somewhat industry-dependent. 

    Are you a realtor? Do you sell renovated camper vans? Do you offer staging services? Virtual tours are perfect. 

    If you sell complicated or custom products, 360-degree videos might also be an excellent option. Or, you could even share virtual tours of your workspace or warehouse.

    18. Podcasts and audio content

    ​​If you host a podcast — or were a guest on one — share intriguing clips on social media! You can also turn these into videos by simply overlaying the audio on top of a brand-related image or even just your logo. 

    The goal here is to reuse content in as many ways as possible. Yes, you want to encourage people to download and listen to your podcast, but pulling short clips for social media posts gives you another way to take advantage of the work you’ve already done.

    19. How-to guides that demonstrate expertise

    How-to guides help you share information, updates, and tutorials with your audience. Typically, you’d want to create guides on your website first, either as a blog post or as a digital download like a PDF. 

    What would make the most sense for your business? Perhaps it’s a digital cookbook of recipes that use your handcrafted spice blends. Maybe it’s an eBook about creating a household budget. Or perhaps it’s simply an instruction manual for assembling your product.

    Style Girlfriend free guide on their website

    Then, share these resources on social media and encourage followers to read them. You can also tie this into an email marketing strategy by asking for an email address to access the guide.

    20. Live video content (live streaming)

    With live video, you can connect with your followers in real time, making yourself and your business much more relatable. Host live Q&A sessions, demonstrate your products, or show a behind-the-scenes look at your process. When possible, announce your upcoming livestream ahead of time so that people can add it to their calendar.

    21. Employee spotlights

    Employee spotlights put a face and name behind your brand. Depending on the number of employees you have, you could turn this into a series, highlighting a different one every week or month. Share pictures and videos, ask questions, and even conduct a full interview if it makes sense for your business.

    22. Company milestones and updates

    You know those little celebrations you have in the office? The literal bulletin boards with media placements you’re proud of? The announcement at your founders meeting that you finally broke a huge sales goal? 

    Many of the things that are exciting to you, will be exciting to followers — especially those who are most connecting with and truly championing your brands. 

    No, you may not want to share that, “It’s been 4 days without an accident!” But did you just hit order number 1,000? Shout it out! 

    23. Breaking industry news

    This is, perhaps, one of the easiest ways to fill a content calendar. Since it’s not original content, it likely won’t have as far of a reach as other kinds of posts, but it keeps you on the minds of followers and maintains an active account. Set up Google Alerts with keywords related to your company (put your company name itself in there, too, so you can find out how folks are talking about you). Then, as particularly compelling stories come out, share them to your feed with a sentence or two about your thoughts.

    Frequently asked questions about posting on social media

    How can I make my social media posts stand out?

    To make your social media posts stand out, you can:

    • Use high-quality images and videos
    • Use engaging captions and calls-to-action
    • Use relevant hashtags and keywords
    • Engage with your followers and respond to comments
    • Use a consistent brand voice and aesthetic
    • Use different types of content, such as images, videos, and GIFs
    • Use interactive features, such as polls and quizzes
    • Use social media tools like Jetpack Social for scheduling, analytics, and tracking

    How often should a business post on social media?

    The frequency of social media posts will vary for each business depending on the industry and target audience.

    However, it’s generally recommended to post at least once a day on platforms like Facebook and Instagram, and more frequently on platforms like Twitter and TikTok. It’s also important to consider the engagement level, and adjust your posting frequency accordingly.

    Jetpack Social: the well-known secret to automating social media posts on WordPress

    Jetpack Social is a powerful plugin that enables businesses to share their website content on all of their social media channels from one place, through an automated “set it and forget it” system that’s easy to set up.

    Jetpack Social saves you time and effort by automating your social media sharing, so you can focus on creating high-quality content.

    Whether you’re a blogger, a merchant, or a small business owner, Jetpack Social is the perfect solution for automating your social media posting on WordPress.

    So, why wait? Try Jetpack Social today and take the first step towards building a stronger, more engaged social media presence.