EDITS.WS

Category: wp-rocket.me

  • Why Page Size Is Important For SEO And Performance

    Large page sizes can affect SEO and performance and cause search engines to rank your website lower. As such, now is the time to start understanding page size because, in the digital world, it matters. So, if you’re looking to improve your website performance, this post is for you.

    Essentially, the “heavier” your page size is, the slower it’ll take to fully load and be ready to be consumed by site visitors. When your web page has a slow response time, it ultimately affects the overall website performance and user experience – two of the most important SEO factors. 

    In this article, we’ll delve deeper into what page size is and the factors that affect it. We’ll also talk about what role it plays in your overall SEO strategy. By the end of this, you’ll know methods you can apply to your website to ensure it’s not dragged down the rankings and keep your best chances of ranking on top.

    What Is Page Size And What Contributes To It?

    A web page’s size is a measure of how much data it contains. It’s the total amount of data that is sent from the server to the browser when a visitor requests a page. This includes all elements on the page, such as images, text, scripts, internal links, and external links.

    To measure it, you can use developer tools in the browser or online website analysis tools. For instance, Google Chrome and Mozilla Firefox come with built-in developer tools. You can also use: 

    • Google PageSpeed Insights
    • WebPageTest
    • GTmetrix
    • Pingdom

    There are two things you need to keep in mind when looking at performance reports: the size of each asset and the number of assets on the page.

    Leverage webpage compression tools to optimize page speed
    Leverage webpage compression tools to optimize page speed – Image Source

    The size is measured in kilobytes (KB), and the higher the number, the larger the page. To optimize your site for search engines, you need to keep this number as low as possible and make sure that your site loads quickly and efficiently. 

    Factors that contribute to a page’s size include:

    1. Images

    Using images on your website helps capture the attention of your audience and make your page visually appealing. Not to mention, they’re easy to incorporate. Just one Google Image search and you’ll get what you need. However, image size can be the cause of slow response times and high page sizes.

    As such, you need to understand image file types, compression techniques, and other strategies for reducing the size of images without sacrificing quality. Fortunately, there are several image optimization practices, but more on that later. 

    If you want to know the size or weight of your image, you need to look at its pixels. It’s usually measured in bytes, KB, or MB. For instance, if you’re using a Windows system, simply select the photo, right-click, and choose properties. All the information regarding that photo will be shown, including the image dimensions and size. 

    Additionally, can use tools to check or measure your photo size to ensure you have properly size images like: 

    • Image Measurement
    • Omni Calculator
    • Posterburner

    To make this easier, you can get a virtual assistant (VA) to help research the tools you can use, look for image optimization services you can hire, or even assist you in applying image compression techniques. This is especially helpful if your regular content includes many images. Plus, a VA can free your schedule to focus on other responsibilities, while they do image searches for your content.

    2. Videos

    Although video guides are great for making websites interactive, they can also be a major contributor to page size and affect the load speed of the website. These are large files that take a long time to load, which is especially problematic for those who don’t have a good internet connection.

    Embedding videos from YouTube is a great way to reduce page size, while still providing an engaging and interactive experience for website visitors. By using YouTube’s embed code, you can easily add videos to your website without having to host them on your server.

    Embedded video example
    Embedded video example – Image Source

    A great example of this is a blog post about web design principles. If you look at it, the content has a lot of videos but all are embedded on Youtube. So despite being visual-heavy content the videos won’t have a huge impact on increasing the page size.

    3. JavaScript

    JavaScript is a pretty amazing tool for building websites. It can do everything from making your website interactive to allowing it to function in any way you want it. 

    But here’s the catch. It has a bad rap as being “bloated,” meaning it can slow down a website’s load time and eat up more bandwidth.

    There are two main reasons why this happens: first, when you use JavaScript code that isn’t optimized for performance (or is written poorly), it will be slower than if it were written well.

    The second reason is because of how browsers handle JavaScript files. They load them sequentially instead of loading them all at once (like CSS files), meaning they take longer to download and render on your screen. 

    4. Custom Fonts

    Fonts with too much weight or boldness will have a larger impact on page size than those with lighter weights because they take up more space in pixels than others. This is because custom fonts require additional requests to the server, resulting in slower response times and increased data usage. 

    As a result, custom fonts increase the file size of your web pages. With a longer load time, you can be sure it’ll lead to poor user experience, which is a big NO for Google Search or other search engines. To ensure better performance and user experience, it’s important to avoid using custom fonts whenever possible.

    5. Advertising

    Ads are an important source of revenue for many websites, but having too many ads on a page can hurt page size and user experience. 

    Nowadays, advertisements use high-quality photos, GIFs, or videos, all of which can slow down the loading time of that page, leaving the readers annoyed. Not to mention, it also affects the overall design of the website, making it look cluttered and unprofessional.

    Additionally, having too many ads can make it difficult for users to find the content they are looking for. All of these factors can lead to a poor user experience and ultimately hurt the website’s reputation in the long run.

    With that, we’ll move to the discussion of website performance, since page size affects it the most.

    Why Does Page Size Matter For SEO and Performance?

    Page size matters when it comes to SEO because it affects the speed of your site, which in turn affects the speed at which your users can access information. The bigger it is, the longer it takes for your users to download all of its elements (images, videos, etc.) and for their browser to render them into a readable format.

    When a user has a good experience on your site, they’re more likely to take action. So if you want an SEO-friendly website that converts well, consider the loading speed.

    How loading time affects conversion rate
    How loading time affects conversion rate – Image Source

    Slow loading pages makes it difficult for customers to find what they’re looking for. The visibility of content is reduced and customers are unable to find what they are looking for quickly. 

    In addition to being frustrating for visitors, this can also hurt you in Google’s eyes. So you want to guarantee yours load quickly enough so that people don’t bounce off of them before reading any content.

    Bounce rates can help you understand how the users are interacting with your website. It’ll help you identify any issues that may be causing visitors to leave the page quickly. Additionally, it can give you insights into the good and bad pages you have.

    Overall, by monitoring the bounce rate, you can make adjustments to your website design and content to improve user engagement and meet the search intent. To help you further, you can do a business assessment. With that, you can gain insights about what you need to do better for greater website performance. 

    What’s more, having a lower search ranking can have a significant impact on your site’s visibility. Search analytics is a great way to track and analyze your website’s performance and visibility on search engines. For instance, you can use Google Analytics to identify areas to improve or optimize for your website. 

    What Is The Ideal Page Size For Your Website?

    The good news is, there’s no wrong answer. The key to optimizing your page size is balancing three factors: speed, design, and user experience.

    Graph for the ideal page size for best performance
    Graph for the ideal page size for best performance – Image Source

    In the image above, you can see that the average page weight or size between 2017 to January 2023 has grown significantly. In May 2017, the average page weight was 1376.2 KB for desktop and 1223.7 KB for mobile. Fast forward to February 2023, and the average page weight is now 2324.8 KB for desktop and 2037.3 KB for mobile.

    That data gives you a great benchmark of the page size. However, you have to remember that the data is the overall average size of web pages. Some websites are heavier, while others weigh less.

    So, when we talk about the ideal page size, we’re saying that the best fit for your site is whatever works best for what you want people to see when they come there. Plus, how they want to interact with your site once they are there should also be considered.

    Moreover, your page size would depend on what business you run or what industry you’re in because the type of content you’re producing is likely reliant on that. 

    For example, if your business is about creating logos, you’ll need to display your work on your website to foster trust and authority. That means plenty of high-res images and graphics on your page. So, you’ll need to apply techniques, such as using vector images, to lower image file sizes to decrease your page size. 

    In contrast, if your homepage is like Career Sidekick, wherein the content is mostly text, the page size would surely be smaller. If you look at the website, the design is minimalistic with very simple graphics, low-res thumbnails to present their content, and some blog post excerpts.

    Following this, it’s time to move on and discuss what you can do to improve your website’s performance without compromising on your content quality.

    6 Ways To Reduce Your Website’s Page Size 

    With the right strategy and methods, you can act on improving the performance of your website and reduce your website’s page size. As such, you can rest easy about not putting your website at risk of being dragged down on search engines.

    1. Compress Images

    When you’re working on a website, one of the first things you’ll want to do is compress your images. It can help lower the page size and improve the overall performance of your website. Additionally, it helps speed up image delivery, reduces bandwidth costs, and decreases response times.

    Lossless vs lossy
    Lossless vs lossy – Image Source

    For now, we’ll discuss image manipulation techniques to help you: lossless and lossy

    The former is an image processing technique used to reduce the size of larger images without losing any detail or information, making them smaller in size while preserving their original resolution. It’s useful for applications like web design and digital photography where it’s important to maintain the highest possible quality of an image.

    The latter is another image processing technique that involves removing some of the data from an image to make it smaller in size and easier to store or transfer. The most common type of lossy image processing is JPEG compression, which can significantly reduce the file size of an image while still preserving its visual quality. 

    You can use many tools for compressing images, including Imagify, which can help you optimize and compress them, even the double-sized images. This tool is especially useful if your content relies heavily on visuals. 

    For example, a best-of blog post like this guide to podcast software means including many images to demonstrate the products. Imagify can help ensure that your page size is not ballooning by compressing the images without losing quality. That means you’ll still produce top-notch content by clearly displaying the numerous podcast software on the blog.

    Another option is to utilize CSS Sprite. It works by combining multiple images into one image, which is then served from the content server. This reduces the number of requests that the browser needs to make to get the content, thus reducing page size and improving page load time.

    2. Code Clean-Up

    The code size on the page can impact your overall website performance. The more code there is, the longer it takes to load. This is because there’s more work for browsers and servers to do to process everything that needs to be downloaded before they can display anything on the screen.

    As such, you must keep your code clean and up-to-date to ensure your website runs smoothly and quickly. You can use performance plugins or tools to help you reduce page size by minifying JavaScript and optimizing CSS files, including:

    • WP Rocket
    • Closure Compiler
    • YUI Compressor

    Plus, there’s an excellent guide for developers created by Screaming Frog that discusses universal analytics, content server, link metrics, link types, JavaScript rendering mode, and many more. It’s a great help for those with technical knowledge.

    3. Update Your CMS

    A content management system (CMS) is the software that powers your website, like WordPress. It’s what allows you to change the text on pages, add new pages, and make other changes to the structure of your site.

    Hence, having an up-to-date CMS is essential for optimizing page size and improving user experience. To help you further, you can leverage search analytics data to identify the most important content on a page and reduce the number of unnecessary elements.
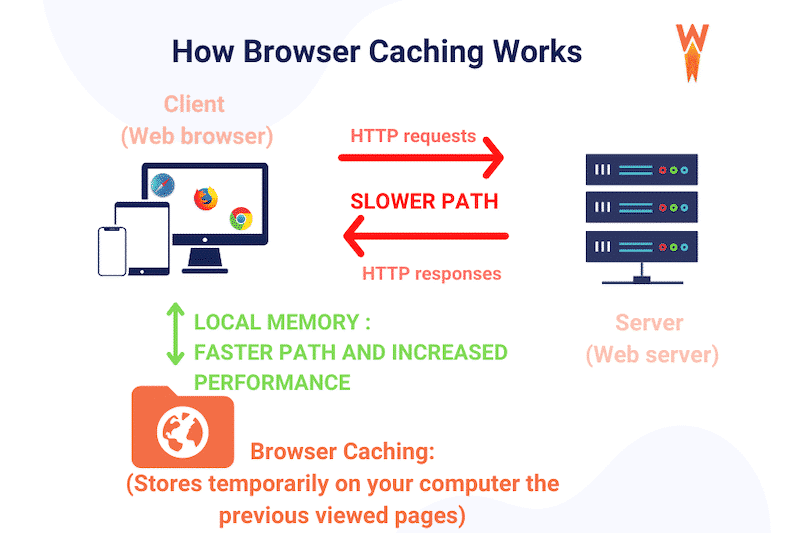
    4. Enable Caching

    Caching is a way to store frequently-used data so that it doesn’t have to be re-loaded each time you look at the site. This can significantly reduce the amount of processing required to generate a page, which means you can serve more pages per second and less bandwidth is used.

    Caching
    Caching – Image Source

    It helps to improve the load speed of your website because it can just load the previously stored version from its cache. Also, caching is great for reducing page size because it means you don’t need to include everything on every page of your site. 

    There are tools you can use to employ this strategy. For instance, you can use WP Rocket as a WordPress caching performance plugin. You won’t need to worry about the configuration option since it’s easy to install and be activated. And in no time, it can optimize your page thanks to its powerful options, including caching, that are automatically activated right upon activation.

    5. GZIP Compression

    WP Rocket automatically  enables the GZIP compression after activation to reduce the size of your website’s data. This is a process where the size of your website’s data is reduced. It’s a technique used to compress files for faster transmission over the internet. It takes an uncompressed file and reduces its size by removing redundant information, making it easier to download and store.

    This helps improve the load speed of your site, as well as reduce your bandwidth usage and page size. That’s because when the server sends your content to the browser, it will compress it before sending it over the wire.

    6. Optimize Your Content For Mobile

    With all the different types of phones, operating systems, and screen sizes available today, it can be difficult to develop a website that works well across all devices. But companies don’t have a choice because smartphones are the norm. Hence, making your content mobile-friendly is a must.

    This means using responsive design techniques to ensure that your content looks good no matter what device it’s being viewed on. Plus, it helps ensure that users have a great experience no matter their device.

    Mobile compatibility updates to take note – Image Source

    This strategy is becoming increasingly important in the world of SEO. Search engines take into account how well a site is optimized for mobile when ranking websites in search results. Just take a look at Google’s stance on the image above. It rewards those who have mobile-optimized content. 

    A great example of a blog post that needs to be mobile-friendly is this article about the best digital marketing websites. It has a lot of tables to accommodate its 100+ list, and they don’t render well on some smartphones. This could affect user experience and can affect the brand’s mobile SEO.

    Wrapping Up

    Many factors contribute to the success of SEO, and one of them is the page size. It impacts the overall performance of your website, which in turn affects other elements like user experience. Ultimately, it can be one of the factors on whether your website goes up or down in search rankings. Would page size or website performance be easy to monitor, especially if a website has hundreds of web pages? 

    Well, that depends. If you have an expert performance optimization service helping you, then the process of analyzing data, optimizing your content, and identifying speed opportunities becomes seamless.

    With WP Rocket, the gold standard is what you’ll get. You can integrate it into your WordPress-powered website, and it’ll do the heavy lifting to reduce your website page size and boost performance.

    The post Why Page Size Is Important For SEO And Performance appeared first on WP Rocket.

  • The 10 Fastest WordPress Themes in 2023 (Free and Paid)

    Are you looking for a fast WordPress theme to start your next project? We did the heavy lifting for you and ran some speed tests on the most used WordPress themes. In this guide, we share the performance of lightweight and more customizable themes such as Divi or Avada. We also show you how to optimize your theme and make your website faster, which should help you to choose the right tools for your next development project. 

    For our analysis, we have selected the most popular themes on the market (free and paid), and here’s our shortlist below: 

    5 Lightweight Themes 

    1. Hello
    2. Astra 
    3. OceanWP
    4. GeneratePress
    5. Kadence

    5 Themes That Come With a Page Builder

    1. Avada (Fusion builder)
    2. Divi (Divi Builder)
    3. BeTheme (BeBuilder)
    4. The 7 (Elementor page builder)
    5. Salient (WPBakery page builder)

    Let’s review and go over the performance results for each theme:

    The 10 Fastest WordPress Themes + Test Data

    1. Hello

    A plain vanilla free theme developed by Elementor and tailored for their page builder. It takes up just 6kb of memory resources, so as a result, the customization options are limited if you use the theme alone. 

    Hello theme - Source: Elementor
    Hello theme – Source: Elementor

    Performance results for the Hello theme:

    • PageSpeed mobile score: 90/100
    • First Contentful Paint: 3.1s
    • Largest Contentful Paint: 1.8s
    • Cumulative Layout Shift: 2.9s
    • Speed Index: 1.4s
    • Time To Interactive: 1.4s
    • Total Blocking Time: 0 ms
    • Total Loading time: 2.2s
    • Total page size: 990 KB
    • HTTP requests: 13

    2. Astra

    Astra is one of the most popular free WordPress themes due to its lightweight code, user-friendly features, and thousands of ready-to-use templates.

    Astra theme - Source: WordPress.org
    Astra theme – Source: WordPress.org

    Performance results for the Astra theme:

    • PageSpeed mobile score: 91/100
    • First Contentful Paint: 2.1s
    • Largest Contentful Paint: 1.9s
    • Cumulative Layout Shift: 2.8s
    • Speed Index: 1.3s
    • Time To Interactive: 1.4s
    • Total Blocking Time: 0 ms
    • Total Loading time: 2.1s
    • Total page size: 890 KB
    • HTTP requests: 12

    3. OceanWP

    Lightweight and highly extendable, it will enable you to create almost any type of website. It’s a fully responsive theme that looks great on mobile and has its own translation tools. It has many templates built with Gutenberg (the WordPress editor) and popular builders like Elementor or Beaver Builder.

    OceanWP - Source: WordPress.org
    OceanWP – Source: WordPress.org

    Performance results for the OceanWP theme:

    • PageSpeed mobile score: 88/100
    • First Contentful Paint: 1.1s
    • Largest Contentful Paint: 2.9s
    • Cumulative Layout Shift: 1.8s
    • Speed Index: 2.3s
    • Time To Interactive: 1.4s
    • Total Blocking Time: 0 ms
    • Total Loading time: 3.2s
    • Total page size: 996 KB
    • HTTP requests: 13

    4. GeneratePress

    GeneratePress is a lightweight theme built with a focus on usability and speed (a fresh GeneratePress install adds less than 10kb to your page size). The theme takes full advantage of the block editor (Gutenberg), which gives you more control over creating your content. 

    GeneratePress theme - Source: WordPress.org
    GeneratePress theme – Source: WordPress.org

    Performance results for the GeneratePress theme:

    • PageSpeed mobile score: 86/100
    • First Contentful Paint: 3.3s
    • Largest Contentful Paint: 1.7s
    • Cumulative Layout Shift: 2.8s
    • Speed Index: 1.3s
    • Time To Interactive: 2.5s
    • Total Blocking Time: 0 ms
    • Total Loading time: 3.1s
    • Total page size: 890 KB
    • HTTP requests: 12

    5. Kadence

    Kadence Theme is a lightweight yet full-featured WordPress theme for beautiful fast-loading sites. The developer made the demos accessible and built a drag-and-drop header and footer builder to build any type of header in minutes. The multi-purpose template library has different designs that can fit hundreds of projects.

    Kadence theme – Source: WordPress.org

    Performance results for the Kadence theme:

    • PageSpeed mobile score: 89/100
    • First Contentful Paint: 3.1s
    • Largest Contentful Paint: 1.9 s
    • Cumulative Layout Shift: 2.9s
    • Speed Index: 1.3s
    • Time To Interactive: 1.7s
    • Total Blocking Time: 0.3 ms
    • Total Loading time: 2.8s
    • Total page size: 898 KB
    • HTTP requests: 10
    ⚠ Important: The next themes are coming with their page builder (or are bundled with Elementor or WP Bakery). That’s why they are in a separate section, and the results are from a new test site with similar elements across the page builders.

    6. Avada (+ Fusion Builder) 

    The #1 selling theme on Envato for years. There are thousands of easy-to-customize templates in the library. It’s a website builder that allows you to build your site from the header to the footer, thanks to the powerful Fusion Builder. Avada is 100% maintained in-house by the same team and is not reliant on third-party tools. 

    Avada theme - Source: Themeforest
    Avada theme – Source: Themeforest

    Performance results for the Avada theme:

    • PageSpeed mobile score: 87/100
    • First Contentful Paint: 3.1s
    • Largest Contentful Paint: 1.5s
    • Cumulative Layout Shift: 1.7s
    • Speed Index: 1.5s
    • Time To Interactive: 2.4s
    • Total Blocking Time: 0 ms
    • Total Loading time: 2.4s
    • Total page size: 998 KB
    • HTTP requests: 12

    7. Divi (+ Divi Builder)

    Divi is a powerful theme thanks to its visual page builder. Elegant Themes was among the first companies to bring the WYSIWYG to WordPress. You can build everything visually using the Divi framework without ever touching a single line of code (and without installing and configuring any plugins to bring additional features). 

    Divi – Source: Elegantthemes.com

    Performance results for the Divi theme:

    • PageSpeed mobile score: 84/100
    • First Contentful Paint: 4.1s
    • Largest Contentful Paint: 1.1s
    • Cumulative Layout Shift: 1.8s
    • Speed Index: 1.4s
    • Time To Interactive: 1.1s
    • Total Blocking Time: 0.1 ms
    • Total Loading time: 3.1s
    • Total page size: 1.2 MB
    • HTTP requests: 14

    8. BeTheme (+ BeBuilder)

    BeTheme is a multipurpose website builder and best-selling WordPress theme with 650+ pre-built websites (with very modern and trending designs). Their BeBuilder is also fully compatible with WooCommerce, and they recently launched a query builder to build dynamic websites. 

    BeTheme theme -  Source: themuffingroup.com
    BeTheme theme –  Source: themuffingroup.com

    Performance results for the BeTheme theme:

    • PageSpeed mobile score: 80/100
    • First Contentful Paint: 4.1s
    • Largest Contentful Paint: 2.9s
    • Cumulative Layout Shift: 3.8s
    • Speed Index: 1.9s
    • Time To Interactive: 1.4s
    • Total Blocking Time: 0.2 ms
    • Total Loading time: 4.1s
    • Total page size: 1.4 MB
    • HTTP requests: 15

    9. The7 (+ Elementor)

    It’s the #1 selling Elementor themes that offer a lot of customization from the WordPress dashboard. The7 has 60+ prebuilt dummy websites with exclusive templates for Elementor, WPBakery Page Builder & Slider Revolution.

    The 7 - Source: the7.io
    The 7 – Source: the7.io

    Performance results for The7 theme:

    • PageSpeed mobile score: 81/100
    • First Contentful Paint: 2.4s
    • Largest Contentful Paint: 1.8s
    • Cumulative Layout Shift: 2.9s
    • Speed Index: 1.1s
    • Time To Interactive: 1.2s
    • Total Blocking Time: 0 ms
    • Total Loading time: 3.8s
    • Total page size: 1.1 MB 
    • HTTP requests: 16

    10. Salient (+ tailored version of the WPBakery Page Builder)

    Salient offers access to a library of professional templates with over 400 to choose from. They have taken the WP Bakery Bakery page builder as a base and added some extra features to it. Finally, Salient has an average rating of 4.8 out of 5 based on 5700 ratings on Themeforest.

    Salient theme- source: themenectar.com
    Salient theme- source: themenectar.com

    Performance results for the Salient theme:

    • PageSpeed mobile score: 82/100
    • First Contentful Paint: 2.5s
    • Largest Contentful Paint: 1.7s
    • Cumulative Layout Shift: 1.8s
    • Speed Index: 1.9s
    • Time To Interactive: 1.2s
    • Total Blocking Time: 0.35 ms
    • Total Loading time: 3.8s
    • Total page size: 987 KB
    • HTTP requests: 13

    Table of the Test Results

    Below you’ll find a summary of the performance results for each theme. We used the “PageSpeed mobile score” KPI to rank them, but the total loading page metric is also important, so don’t forget to look at that row.

    Lightweight themes

    KPIs #1 Astra #2 Hello #3 Kadence  #4 OceanWP #5 Generate Press
    PageSpeed mobile score 91/100 90/100 89/100 88/100 86/100
    First Contentful Paint 2.1s 3.1s 3.1s 1.1s 3.3s
    Largest Contentful Paint 1.9s 1.8s 1.9s 2.9s 1.7s
    Cumulative Layout Shift 2.8s 2.9s 2.9s 1.8s 2.8s
    Speed Index 1.3s 1.4s 1.3s 2.3s 1.3s
    Time To Interactive 1.4s 1.4s 1.7s 1.4s 2.5s
    Total Blocking Time 0 ms 0 ms 0.3 ms 0.2 ms 0 ms
    Total Loading time 2.1s 2.2s 2.8s 3.2s 3.1s
    Total page size 890 KB 990 KB 898 KB 996 KB 890 KB
    HTTP requests 12 13 10 13 12

    Themes That Comes With a Page Builder

    Similarly, the ranking is based on the PageSpeed mobile score.

    KPIs #1 Avada #2 Divi #3 Salient #4 The7 #5 BeTheme
    PageSpeed mobile score 87/100 84/100 82/100 81/100 80/100
    First Contentful Paint 3.1s 4.1s 2.5s 2.4s 4.1s
    Largest Contentful Paint 1.5s 1.1s 1.7s 1.8s 2.9s
    Cumulative Layout Shift 1.7s 1.8s 1.8s 2.9s 3.8s
    Speed Index 1.5s 1.4s 1.9s 1.1s 1.9s
    Time To Interactive 2.4s 1.1s 1.2s 1.2s 1.4s
    Total Blocking Time 0 ms 0.1 ms 0.35 ms 0 ms 0.2 ms
    Total Loading time 2.4s 3.1s 3.8s 3.8s 4.1s
    Total page size 998 KB 1.2 MB 987 KB 1.1 MB 1.4MB
    HTTP requests 12 14 13 16 15

    Key takeaways:

    • All the themes go from acceptable to very good for their grade on PageSpeed Insights. There are either in orange or in green, there are none in red in terms of performance. 
    • Astra seems to be the fastest of the lightweight themes, with a 91/100 on mobile and a 2,1 s page load. 
    • Avada (with its own builder) also makes it to the top of the list with an 87/100 on mobile and a 2,4s page load. 


    How We Tested the Themes 

    Our selection was based on 2023 popularity, high numbers of downloads or sales on Envato, and quality reviews. Then we run an audit through the following performance tools:  

    Powered by Lighthouse, PageSpeed Insights, and GTmetrix, both analyze the performance and the user experience of your website. The most important KPIs are the Core Web Vitals which come with a detailed report about how your pages perform and what are areas for improvement. That’s why we have included the 10 following metrics in our tests – measured on mobile

    From PageSpeed Insights:

    • PageSpeed mobile score 
    • First Contentful Paint
    • Largest Contentful Paint
    • Cumulative Layout Shift
    • Speed Index
    • Time To Interactive
    • Total Blocking Time

    From GTmetrix:

    • Total Loading time
    • Total page size 
    • HTTP requests

    Then, we chose 10 themes that we divided into two categories: 

    #1 The free and lightweight themes that come with a minimalistic approach and are more like a basic canvas to start a website:

    • Hello
    • Astra 
    • OceanWP
    • GeneratePress
    • Kadence

    #2 The other category contains the “heavier” themes that come with their own page builder. We thought comparing Avada (and its Fusion builder) with a lightweight theme like Astra would be unfair. So the themes for the second category are the following:

    • Avada (Fusion builder)
    • Divi (Divi Builder)
    • BeTheme (BeBuilder)
    • The 7 (Elementor/WP Bakery page builder)
    • Salient (WPBakery page builder)

    The Testing Sites

    For the first category, we built a realistic test site using the WordPress Editor, and we used the blocks to create a hero banner with a button, 5 testimonials with pictures, 1 call to action (full section with an image), 4 icons and text, 2 titles and 2 subtitles and 8 services with pictures.  

    Example of a test site build with Astra and the Block Editor - Source: WP Rocket
    Example of a test site build with Astra and the Block Editor – Source: WP Rocket

    For the second category, we made sure every time to build a page with similar elements present in each builder: a hero banner with an image and a button, 3 services with icon and texts, 2 images (we re-used the same), 2 text elements, 3 icon lists, and a call to action section with a header, sub-header and button (full section). 

    Example of Avada testing
    Example of Avada testing

    By following the same testing scenarios and the same content for each theme, we could conduct a fair performance comparison analysis. We did a new installation for each theme and used the same server for each theme’s speed testing. 

    âš  Important: Those tests have been performed on a server based in France, and we built each page ourselves. The results we have presented are from our own experience, and the results may differ according to the size of the images you upload, the amount of content you use, or even your location around the world.

    Give an Extra Performance Boost with WP Rocket

    WP Rocket is one of the best caching plugins for WordPress that can optimize any theme in a few clicks. It also improves the performance of your site and your Core Web Vitals

    To understand the large impact of WP Rocket on speed, let’s see it in action with BeTheme, which was the “slowest” theme in our tests. 

    For the record, there were a few issues flagged by Lighthouse, listed under the “Opportunities” tab: 

    Lighthouse recommendations to optimize my files on my site built with BeTheme - Source: PageSpeed Insights
    Lighthouse recommendations to optimize my files on my site built with BeTheme – Source: PageSpeed Insights

    The recommendations include using caching, enabling text compression, reducing unused CSS/JS, and deferring offscreen images.

    We activated WP Rocket on that test site, and we noticed a huge improvement:

    BeTheme test site - audit passed with WP Rocket - Source: PageSpeed Insights
    BeTheme test site – audit passed with WP Rocket – Source: PageSpeed Insights

    All our performance KPIs also improved thanks to WP Rocket which also improved the PageSpeed Insights score (my site moved to the green with a 98/100) score. 

    WP Rocket also boosted the Core Web Vitals score and decreased the total loading time (from 4.1s to 2.1s). WP Rocket also reduced the page size and the number of HTTP requests:

    Performance KPIs BeTheme Score (no WP Rocket) BeTheme Score (WP Rocket) 🚀
    PageSpeed mobile score 80/100 98/100
    First Contentful Paint 4.1s 2.1s
    Largest Contentful Paint* 2.9s 1.8s
    Cumulative Layout Shift* 3.8s 1.1s
    Speed Index 1.9s 1s
    Time To Interactive 1.4s 1s
    Total Blocking Time 0.2 ms 0 ms
    Total Loading time 4.1s 2.1s
    Total page size 1.4 MB 780 KB
    HTTP requests 15 8

    *Core Web Vitals

    To fix all the PageSpeed Insights warnings and boost the performance KPIs, we activated the following WP Rocket features:

    • Implement caching and text compression upon activation of the plugin:
    WP Rocket applying caching and text compression automatically - Source: WP Rocket
    WP Rocket applying caching and text compression automatically – Source: WP Rocket

    You can also tweak your own options from the cache tab in the WordPress admin:

    Caching and advanced optimization features - Source: WP Rocket
    Caching and advanced optimization features – Source: WP Rocket
    • The file optimization tab to reduce unused CSS (amongst other CSS optimization features):
    CSS optimization - Source: WP Rocket
    CSS optimization – Source: WP Rocket
    • A dedicated subsection to optimize JS:
    JS optimization - Source: WP Rocket
    JS optimization – Source: WP Rocket
    • The lazy-load feature to defer offscreen images (and load only the images located above the fold):
    LazyLoad feature - Source: WP Rocket
    LazyLoad feature – Source: WP Rocket

    Which is the Best Theme For You?

    It’s almost impossible to suggest you one single theme as it depends on your specific needs and your client brief, but here are a few takeaways:

    • If you have a client willing to take over his website, update the content, and access the WordPress dashboard, then choosing a theme with a page builder may be easier (like BeTheme or the 7).
    • If you are a freelancer looking for a theme with greatly designed demos for different industries, then Divi and BeTheme may be your best choices. 
    • If you plan on creating an advanced WooCommerce site with thousands of products, a lightweight theme like Astra may be wiser. Plus, it comes with advanced WooCommerce features. 
    • If you need to create your own forms, and product layouts and add dynamic data to your website, then a theme bundled with Elementor Pro is a great option. Elementor was one of the first companies to launch the WooCommerce builder, allowing you to build your own product template and shop page in no time. 
    • If you are hesitating between a few themes, install one of their demos and look at them on mobile. Responsiveness should be essential when building a website.
    • If you are a web and design agency, Divi offers the Divi Cloud, where you can easily store your project and share it with the team. The collaboration and potential modifications can be done faster from everywhere.

    Finally, choose a theme with fast support, recent updates, and accurate documentation. For example, OceanWP has an academy that offers webinars and tutorials to use the theme to its fullest. 

    Wrapping up

    Now, you should be able to decide and choose the right WordPress theme for your next project. And remember, no matter which theme you choose for your next project, WP Rocket is the easiest way to improve the speed of your WordPress site and pass the performance audits on PageSpeed Insights. 

    The post The 10 Fastest WordPress Themes in 2023 (Free and Paid) appeared first on WP Rocket.

  • 7 Tips for Using a Cache Plugin on Your WooCommerce Site

    Do you need to implement caching on your WooCommerce site? Read our tips before diving into it, we will show you how you can enable caching easily and give an extra speed boost to your e-shop. 

    Why Caching is Essential for WooCommerce

    Caching improves the speed and performance of your WordPress site built with WooCommerce. It helps your e-shop to load more quickly by reducing the amount of data transfer between the browser and the server. Caching saves a static version of your site so it can be displayed faster on each subsequent visit.

    According to Google, site speed is a top priority for online shoppers: every second delay in mobile page load can make conversions fall by up to 20%. 

    Mobile shoppers and performance -Source: ThinkwithGoogle
    Mobile shoppers and performance -Source: ThinkwithGoogle

    Another research conducted by Portent a few years ago says that the highest e-commerce conversion rates occur on pages with load times between 0-2 seconds. 

    Page load speed and conversion rates - Source: Portent
    Page load speed and conversion rates – Source: Portent

    E-commerce sites are often the slowest on the web because they contain many images, videos, products, payment gateway, API connections, etc. Implementing caching ensures that the pages load faster, resulting in a better user experience. 

    The last reason you should improve your page speed with caching is to boost your SEO rankings. The quicker your page loads, the higher it’ll rank in Google search results, meaning more visitors (and sales) will come your way!

    Now that we’ve discussed the importance of caching let’s see how to implement it on your WooCommerce site.

    How to Enable Cache on WooCommerce

    WooCommerce does not cache content out of the box, but you can install a WordPress cache plugin that will do the job for you! For example, you have WP Rocket, one of WordPress’s best caching plugins, enabling caching automatically upon its activation. Of course, more options are available in our guide listing the best caching plugins for WordPress.

    Step 1: Exclude the dynamic pages 

    When you implement caching on your WooCommerce site, the content is saved and served in the same way to visitors every time. As a result, there are pages you should not cache, such as: 

    • The Cart page – or the users may end up with products they never added.
    • The Checkout page – this is the crucial page where users add their credit card information, so you don’t want any problems in that part of the purchasing process.
    • My account – this involves a login and a password with probably private data that should be cached.
    Example of dynamic pages - Source: WooCommerce
    Example of dynamic pages – Source: WooCommerce
    • Other pages to consider excluding – the custom “thank you” and confirmation pages.
    • Any other widgets, custom post types, or custom pages that handle adding to cart, account, or checkout options. 

    Step 2: Exclude WooCommerce Cookies and Sessions From Caching

    WooCommerce cookies such as “items recently viewed” are useful for the user experience, and some others help the whole purchasing process to be seamless. That is why the following cookies should be excluded from your caching strategy:

    • The “woocommerce_cart_hash” and the “woocommerce_items_in_cart” – ensure that the cart reflects the correct items. Otherwise, you may still see some products in the cart after removing them.
    • The “wp_woocommerce_session” — helps WooCommerce to find the shopping cart data in the database for each visitor/customer.
    • The woocommerce_recently_viewed  — pops up to help the customer find a previously seen product.

    WooCommerce explains the different types of cookies, their purpose, and their ideal duration very well. You can read more about WooCommerce cookies directly on their website.

    Cookies that should not be cached - Source: WooCommerce
    Cookies that should not be cached – Source: WooCommerce

    Most caching plugins have a tab to exclude any scripts of your choice. Simply scroll to the exclusion fields and add the cookies mentioned above. 

    How to Clear Cache on WooCommerce

    No matter which cache plugin you choose for your site, you will always be able to clear the cache on WooCommerce directly from your WordPress dashboard. They all have the feature from their options panel. 

    For example, with WP Rocket, you can navigate to WP Rocket Dashboard > Quick Actions > Clear and Preload cache.

    Clearing cache on WooCommerce from the Quick Actions of WP Rocket - Source: WP Rocket
    Clearing cache on WooCommerce from the Quick Actions of WP Rocket – Source: WP Rocket

    Another way to clear the cache of your WooCommerce site is to use the top bar in your WordPress admin directly. For instance: WP Rocket > Clear and preload cache.

    Clearing cache on WooCommerce from the top bar with WP Rocket - Source: WP Rocket
    Clearing cache on WooCommerce from the top bar with WP Rocket – Source: WP Rocket
    💡It’s a good idea to clear the cache on your WooCommerce site because it prevents you from showing outdated content and products to users.

    7 Tips to Make the Most Out of Caching

    Caching may seem daunting at first, but it can be much easier with the right tools and guidance. Here are 7 tips to make the most out of caching on your WooCommerce.

    1. Enable Page and Browser Caching

    As seen in the first section, page caching stores a page’s HTML on the initial page load to serve the same static content for the next visits. As a result, every visitor will notice a significant increase in the site’s speed. 

    WP Rocket is one of the best WordPress caching plugins that will automatically enable page caching to WooCommerce. WP Rocket does the heavy lifting for you, and no actions are required from you to activate the cache. 

    2. Enable Object Caching

    To unload the server and the database, you can implement object caching on WooCommerce using Redis or Memcached. Those tools are very popular and store the loaded query results. Therefore, the next time they’re needed, they can be loaded from the cache instead of the server. That reduces the round-trip time between the server and the data meaning better performance for your WooCommerce site.

    3. Include Opcode Caching

    According to php.net, OPcache improves performance by storing PHP in shared memory, removing the need for PHP to load and parse scripts on every request. If you optimize your PHP, you also optimize your page speed overall, as WordPress and WooCommerce are built on this code.

    4. Setup Varnish Cache

    Varnish cache is an HTTP reverse proxy that makes page load time 300–1000 times faster. It’s a piece of software you put in front of your server to reduce the loading times of your website by caching the server’s output. The only inconvenience is that to install it, you need to be familiar with the configuration files and command lines of your terminal. 

    5. Reduce or Cache API calls

    Your WooCommerce site may need to call third-party apps like Facebook, YouTube, or Paypal, which could impact its loading speed. To reduce those API calls, you can use the WP Rocket helper API plugin or the WordPress Transients API.

    6. Optimize CSS and JS files

    Another performance optimization along with caching it to minify, defer and reduce unused CSS and JS files. While you can conduct these code improvements manually, you can also use the File Optimization tab from a caching plugin like WP Rocket. 

    From your WordPress dashboard, go to Settings > WP Rocket > File Optimization You’ll find all the options needed to optimize your code:

    Example of CSS optimization - Source: WP Rocket
    Example of CSS optimization – Source: WP Rocket
    âš  Important: WooCommerce does not recommend minifying JS, so we suggest you exclude WooCommerce scripts from the minification process.

    Thankfully, most caching plugins allow you to easily exclude WooCommerce scripts when you select the minify JS option. For instance, here’s the option that WP Rocket offers:

    Example of JS optimization (and exclusion option) with WP Rocket - Source: WP Rocket
    Example of JS optimization (and exclusion option) with WP Rocket – Source: WP Rocket

    7. Use a CDN

    CDNs also use caching to distribute content faster to users located around the world. They use edge servers to cache the data, store it temporarily and display it to the closest international visitors. That results in a faster site because the content does not need to come from the origin server. There are many CDNs available in the market, but if you want one fully integrated with WordPress that does the configuration for you, try RocketCDN.

    A content delivery network (CDN) using caching – Source: RocketCDN
    A content delivery network (CDN) using caching – Source: RocketCDN

    How to Enable Cache on WooCommerce with WP Rocket

    After its installation, WP Rocket automatically enables cache, excludes the dynamic pages from the process, and allows you to do your own page/cookie exclusions. 

    Let’s go over each feature:

    • Enabling caching with WP Rocket

    WP Rocket does the heavy lifting for you and applies caching on your WooCommerce site as soon as it’s installed. More than 80% of web performance good practices automatically upon its activation!

    WP Rocket applying caching automatically - Source: WP Rocket
    WP Rocket applying caching automatically – Source: WP Rocket
    • Excluding scripts and pages of your choice with WP Rocket

    To exclude cookies from the cache with WP Rocket, go to Settings → WP Rocket → Advanced Rules and enter the values of the cookies in the “Never Cache Cookies” field:

    • woocommerce_cart_hash 
    • woocommerce_items_in_cart  
    • wp_woocommerce_session 
    • woocommerce_recently_viewed 
    • (…)
    Excluding WooCommerce Cookies easily with WP Rocket - Source: WP Rocket
    Excluding WooCommerce Cookies easily with WP Rocket – Source: WP Rocket
    🚀 Good to know: WP Rocket automatically excludes the “Cart”, “Checkout”, and “My Account” pages from the cache.

    Performance test with and without WP Rocket 

    Additionally, the plugin helps improve your Lighthouse performance score and boost your Core Web Vitals, partly thanks to its advanced JS and CSS optimization features. 

    PageSpeed Insights recommends implementing caching to boost the speed of your WordPress site. As you can read in the screenshot below, a long cache lifetime can speed up repeat visits to your page:

    Lighthouse recommending caching - Source: PageSpeed Insights
    Lighthouse recommending caching – Source: PageSpeed Insights

    I ran a performance test using PageSpeed Insights, sharing my results with and without caching (using WP Rocket).

    Performance without caching (No WP Rocket)

    My performance score on mobile is 74/100. One of my Core Web Vital, the Cumulative Layout Shift (CLS), is in red, while the Largest Contentful Paint (LCP) is in orange. 

    Performance results without WP Rocket - Source: PageSpeed Insights
    Performance results without WP Rocket – Source: PageSpeed Insights

    Lighthouse also recommends implementing caching:

    Lighthouse recommendation to use caching - Source: PageSpeed Insights
    Lighthouse recommendation to use caching – Source: PageSpeed Insights

    And also to optimize CSS and JS files:

    Lighthouse recommendation to optimize my files - Source: PageSpeed Insights
    Lighthouse recommendation to optimize my files – Source: PageSpeed Insights

    I followed the PSI’s suggestion and activated WP Rocket. Then I opened the file optimization tab, applied a few options on my JS and CSS files, and here’s what happened.

    Performance with caching (WP Rocket):

    My performance score went to 99/100, and my Core Web Vitals are in the green:

    Performance results with WP Rocket - Source: PageSpeed Insights
    Performance results with WP Rocket – Source: PageSpeed Insights

    All the previous performance issues related to caching and files optimization are now in the “passed audits” section:

    Passed audits with WP Rocket - Source: PageSpeed Insights
    Passed audits with WP Rocket – Source: PageSpeed Insights

    Wrapping Up 

    Our tips will certainly help you in your caching journey and give an extra speed boost to your WooCommerce site! WP Rocket helped us pass the PageSpeed Insight audit on caching and code optimization. So if you need to quickly implement caching on your WooCommerce site, then why not give WP Rocket a shot? Run your own before/after an audit on PageSpeed Insights to compare your performance results!

    The post 7 Tips for Using a Cache Plugin on Your WooCommerce Site appeared first on WP Rocket.

  • How to Clear Your Plugin Cache in WordPress

    Do you want to know how to clear your plugin cache on WordPress? Caching allows your website to load faster and enhances the overall user experience. This article explains what WordPress caching is, why you should clear your plugin cache and how to do it quickly.

    Why Caching is Essential for Your Site

    Caching on WordPress means creating a static copy of your content and providing that content to your visitors faster than loading all the queries from scratch. The goal is to store the data in a cache to get fewer roundtrips to and from the database. 

    Introduction to WordPress caching - Source: WP Rocket
    Introduction to WordPress caching – Source: WP Rocket
    📖If you are unfamiliar with caching, we encourage you to read our guide about WordPress page caching explained in plain English.

    There are three good reasons why you should use caching for your WordPress site:

    #1 – Improve the page loading speed by unloading the server

    #2 – Boost the user experience by optimizing the Core Web Vitals

    #3 – Rank higher on Google

    💡Hint: Do you want to improve your speed and rank better on Google? A cache plugin is the easiest to implement caching on your website!

    What’s WordPress Object Caching

    WordPress has a built-in object cache (the WP_Object_Cache class) that stores any content from the database in the PHP memory. It’s a type of server-side caching, meaning the cache is stored on the server, not on the user’s browser. As a result, it prevents repeated and unnecessary calls to the database. 

    To summarize how caching works on WordPress, you can look at our figure below, which shows how caching is correlated with performance.

    • Page caching makes your website load faster as it significantly shortens the path from the user to the content.
    • Object cache is the WordPress default cache that helps the content loading faster, but the user-content roundtrip is slightly longer than page caching.
    • Without caching (the database column), the content would take even longer to be displayed on the user’s screen because it’s coming from the database. There is no cache “shortcut”.
    WordPress caching explained - Source: WP Rocket
    WordPress caching explained – Source: WP Rocket
    📖Learn more about the different types of caching by reading our dedicated guide.

    Now that we have gone over the concept of WordPress caching, we will explain why it’s crucial to clear your cache every so often. 

    Why You Should Clear Your Plugin Cache

    Clearing your plugin cache is essential to serve up-to-date content to visitors and for debugging purposes. 

    There are three popular situations when clearing your plugin cache is recommended:

    1. When you’ve updated your website’s content and want to push this fresh content to visitors. For example, If you have designed and uploaded a new promotion banner, you want all your clients to be able to see it instead of serving outdated content. 
    2. When you need to troubleshoot one of the WordPress errors.  Clearing your cache is always a good start when debugging a WordPress-related issue such as error 403. 
    3. When you are experiencing performance issues. Sometimes, your cache may store outdated content and files that trigger issues and prevent you from loading a page or accessing your WordPress admin. Clearing your cache may solve this type of issue.

    How to Clear Your WordPress Plugin Cache 

    Clearing your WordPress cache can be easily done with WP Rocket, one of the best caching plugins on the market. The powerful extension gives an extra speed boost to your WordPress site. The main features are: caching, delaying and deferring JS, removing unused CSS, and even lazy loading your images.

    Clearing your cache using WP Rocket can be done directly from the WordPress dashboard. Simply go to: 

    Settings > WP Rocket > Dashboard > Quick Actions and press the Clear and preload cache button. 

    Clearing the WordPress cache in one click -Source: WP Rocket
    Clearing the WordPress cache in one click -Source: WP Rocket

    The WP Rocket plugin is easy to install and will cache your WordPress content as static files. These files – that contain media, texts, and code –  are directly served to users, reducing the load on the server and improving performance. 

    Clearing Cache on a Multilingual WordPress Site Using WP Rocket

    WP Rocket allows you to clear the cache for a specific language, which is very handy when building a multilingual WordPress site. WP Rocket will detect your language configuration file and cache/purge/preload the content for a specific language (or all of them simultaneously).

    Finally, with WP Rocket, you can also set your cache lifespan: files older than the specified duration will be automatically deleted. 

    Customizing the cache lifespan - Source: WP Rocket
    Customizing the cache lifespan – Source: WP Rocket

    If WP Rocket detects some activities on your WordPress site that may affect the front end, then one of the solutions offered is to clear the cache in one click:

    WP Rocket warning suggesting to clear the cache  - Source: WP Rocket
    WP Rocket warning suggesting clearing the cache  – Source: WP Rocket

    Other WordPress caching plugins allow you to clear the cache, such as WP Super Cache, W3 Total Cache, and WP Fastest Cache. You only need to find the button about “Empty/Delete cache”.

    💡 Looking for the right tool? Read our article listing all the best caching plugins for WordPress.  

    Wrapping Up

    Using a WordPress cache plugin is crucial for performance, but don’t forget to clear the cache from time to time. This will avoid serving outdated content to users, which might be a great start when debugging an issue. 

    With WP Rocket, you can combine caching, GZIP file compression, JS, and CSS optimization to reduce your page load time and significantly boost the performance of your website. Try WP Rocket today and provide your visitors with a better user experience! No risks are taken thanks to the 30-day money-back guarantee.

    The post How to Clear Your Plugin Cache in WordPress appeared first on WP Rocket.

  • How To Clear Browser Cache and Cookies on Major Browsers (and Mobile)

    Do you want to know how to clear your browser cache and why it’s important? Hint: If you have encountered an issue with your WordPress site, one of the easy solutions may be to clear your cache! In this guide, you’ll learn more about browser caching and how to clear each browser’s cache (and cookies). 

    Let’s dive in!

    What’s Browser Cache?

    A browser cache stores files and resources downloaded directly from a website, such as media assets, text, and coding files (HTML, CSS, and JavaScript). Built into your web browser, the cache is a database that “memorizes” web content. 

    Browser caching explained - Source: WP Rocket 
    Browser caching explained – Source: WP Rocket 

    Why Browser Cache Is Important

    Browser cache allows content to be served faster to users that have already visited your website. It saves users time and reduces page loading time and web server bandwidth.

    This is crucial for performance and the user experience because cached content loads faster than regular content: your browser doesn’t have to load everything from scratch.

    For example, the server could tell the browser to store the payment method images and not download them when a user returns: 

    Payment method images that could be cached - Source: Unicart
    Payment method images that could be cached – Source: Unicart

    Those images are unlikely to change daily so you could cache them for at least a week.  

    💡 Browser cache is only a part of caching. You can learn more about the different types of caching by reading our in-depth guide.

    Using WP Rocket to Enable Browser Cache

    To enable browser caching, you can use WP Rocket – one of the best caching plugins for WordPress. The plugin requests the browser to save the frequently used (but rarely updated) files in its local cache memory, resulting in a faster experience for visitors. 

    All you need to do is to install and activate the plugin. WP Rocket will do the heavy lifting and smartly set expiration lengths on the less updated files. 

    📖 You can read more on WordPress page caching by reading our easy-to-follow guide.

    You’ve learned the meaning of browser caching and how to implement it, let’s explain why it’s important to clear your browser cache as a user. 

    Why You Should Clear Your Browser Cache

    It’s important to clear your browser cache to avoid seeing outdated content and to solve most of the common problems on the internet – for instance, “issue 403”, nonce issues, and any development made in a local environment (if you don’t clear your cache, you may not see the updated content when you push it from the development environment to production).

    We can take the example of a new banner you added but can’t see this change on the front end yet. That’s because your browser is still showing the cached version of the page with the old banner. By clearing your cache, you’ll finally see it when refreshing the page. 

    Remember that a browser stores the cached content for a limited time or until it’s full. After that, the cache is cleared, and the browser will serve the updated content on the next visit.

    💡Clearing the browser cache won’t always fix the issue, but it’s a good starting point for debugging.

    You can also clear your cookies on a computer to protect your privacy and avoid third-party tracking.

    The next section shows you how to delete cookies and clear your cache from the major browsers.

    How to Clear Cache and Cookies on Your Browser

    You can clear your browser cache and cookies manually on every major browser. To help you with this process, we have put together some easy tutorials for the most popular ones.

    How to Clear Cache on Google Chrome

    To clear the cache on Google Chrome, click the three dots icon in the top right corner of the browser window, then open the More Tools option and select Clear Browsing Data from the submenu. 

    Clearing cookies and cache on Google Chrome - Step 1 - Source: Chrome Settings
    Clearing cookies and cache on Google Chrome – Step 1 – Source: Chrome Settings

    You can choose to clear the basic tab with the browsing history, cookies, cached images, and files by clicking on the Clear data button.

    Clearing cookies and cache on Google Chrome - Basic Tab - Step 2 - Source: Chrome Settings
    Clearing cookies and cache on Google Chrome – Basic Tab – Step 2 – Source: Chrome Settings

    If you want to go further, you can open the Advanced tab and check the boxes of your choice. Note that if you decide to clear the cache of the Passwords and other sign-in data categories, then you will lose all your saved password for each website you have an account for. That may hurt your user experience for future purchases and connections.

    Clearing cookies and cache on Google Chrome – Advanced Tab – Step 3 – Source: Chrome Settings

    When clearing your cache, you can also decide if you want to clear what happened in the last hour, 24 hours, 7 days, 4 weeks, and All time. If you want to clear everything since the beginning of your browsing history, click on “All time”. 

    Time range for clearing on Google Chrome -Source: Chrome Settings
    Time range for clearing on Google Chrome -Source: Chrome Settings

    To clear cookies and other site data, you can go to Google Chrome Settings > Privacy and Security > Cookies and other site data:

    Clearing third-party cookies on Google Chrome - Step 1 - Source: Chrome Settings
    Clearing third-party cookies on Google Chrome – Step 1 – Source: Chrome Settings

    In this section, you can define your preferred settings for cookies. You can decide to allow them on some websites only. It’s a customizable experience. 

    Clearing third-party cookies on Google Chrome - Step 2 - Source: Chrome Settings
    Clearing third-party cookies on Google Chrome – Step 2 – Source: Chrome Settings
    Pro Tip: I use the Chrome extension called “Clear Cache” which allows you to conveniently clear your cache in one click. 
    Clear Cache extension for Google Chrome - Source: Google Chrome
    Clear Cache extension for Google Chrome – Source: Google Chrome

    How to Clear Cache on Safari

    To clear the browser cache (including cookies and web data) on Safari is pretty straightforward. Simply go to Safari > Clear History.

    Clearing the cache and cookies on Safari - Source: Safari
    Clearing the cache and cookies on Safari – Source: Safari

    Then you can decide for which amount of time you want to clear your history, by selecting your preferred option from the drop-down menu. When you have chosen the duration, click on the Clear History button.

    Clearing the cache in Safari - Source: Safari
    Clearing the cache in Safari – Source: Safari

    If you follow those steps, you’ll delete all the history and cookies from your browser. If you need more customizations with your settings, navigate to 

    Safari > Preferences

    From the General tab, you can choose the time length of your history items:

    History items will be removed after the period of your choice - Source: Safari
    History items will be removed after the period of your choice – Source: Safari

    Then go to the Privacy tab and select how you want to manage the cookies and website data: 

    Managing website data - Source: Safari
    Managing website data – Source: Safari
    Pro Tip: to easily empty the caches, go to Develop > Empty Caches.
    Emptying caches on Safari - Source: Safari
    Emptying caches on Safari – Source: Safari

    How to Clear Cache on Firefox

    To clear the browser cache on Mozilla Firefox, click on the Hamburger icon in the top right corner of the window, and select History > Clear recent history.

    Clearing cache and cookies with Firefox - Step 1 -  Source: Firefox
    Clearing cache and cookies with Firefox – Step 1 –  Source: Firefox

    You can select the elements you want to clear and indicate your preferred time range:

    Clearing cache and cookies with Firefox - Step 2 - Source: Firefox
    Clearing cache and cookies with Firefox – Step 2 – Source: Firefox

    You also have a dedicated Privacy & Security tab accessible from the following address in the search bar:

     about:preferences#privacy

    In that section, you can decide which cookies and data you want to clear. 

    Privacy & Security section - Source: Firefox
    Privacy & Security section – Source: Firefox
    Pro Tip: I use the Clear Cache Firefox extension to clear the browser cache in a few seconds. 

    To download an add-on for browser caching, go to the add-ons window and search for the extension of your choice:

    Clear Cache add-ons - Source: Firefox
    Clear Cache add-ons – Source: Firefox

    How to Clear Cache on Opera

    To clear the browser cache on Opera, click on the History icon (that looks like a clock) on the lower left side menu and press the Clear Browsing Data button.

    Clearing browsing cache with Opera - Step 1 - Source: Opera
    Clearing browsing cache with Opera – Step 1 – Source: Opera

    You have both a basic and advanced tab that allows you to select the content you want to clear the cache for, including cookies. Make up your selection and click on the Clear data button.

    Clearing browsing cache with Opera - Step 2 - Source: Opera
    Clearing browsing cache with Opera – Step 2 – Source: Opera

    Opera also has a dedicated section for choosing which cookies to delete or block, accessible from the easy setup button > Privacy & security > Cookies and other site data.

    Advanced clearing browsing cache with Opera - Source: Opera
    Advanced clearing browsing cache with Opera – Source: Opera

    How to Clear Cache on Microsoft Edge

    To clear the browser cache on Microsoft Edge, click on the three dots in the top right of your browser window and select History > Clear Browsing Data:

    Clearing cache and cookies on Microsoft Edge - Step 1 - Source: Microsoft Edge
    Clearing cache and cookies on Microsoft Edge – Step 1 – Source: Microsoft Edge

    Select the time range and check the boxes of the content you want to clear the cache from, including the cookies:

    Clearing cache and cookies on Microsoft Edge - Step 2 - Source: Microsoft Edge
    Clearing cache and cookies on Microsoft Edge – Step 2 – Source: Microsoft Edge

    If you are looking to do more advanced caching navigate to the three dots icon > Settings > Privacy, Search and Services and then press the Choose What to Clear button:

    Advanced caching from the Settings - Source: Microsoft Edge
    Advanced caching from the Settings – Source: Microsoft Edge

    Regarding the cookies, Microsoft Edge has a dedicated Cookies and Site Permissions panel that allows you to allow or forbid sites to save the cookies data.

    Cookies management from the Settings - Source: Microsoft Edge
    Cookies management from the Settings – Source: Microsoft Edge

    How to Clear Cache on Internet Explorer

    Internet Explorer is now discontinued so we don’t encourage you to use it for your research on the web. Since 2022, Microsoft has been encouraging their customers to move to Microsoft Edge, which is safer and provides support for modern websites and apps. 

    How to Clear Browser Cache on Mobile

    To clear the browser cache on iPhone and Android, simply open your browser’s settings by default and navigate to the history and website data. The process is similar for every major web browser, but there is a little difference between iOS and Android. Let’s look at how to clear the cache for those two operating systems. 

    Clearing Browser Cache on iOS 

    To clear the browser cache on iOS go to your iPhone Settings and scroll down to the app. We are taking Safari as our example.

    Opening Safari settings on iPhone - Step 1 - Source: iOS
    Opening Safari settings on iPhone – Step 1 – Source: iOS

    Then, tap Clear History and Website Data and confirm. This will remove history, cookies, and other browsing data. 

    Clearing cache and cookies on iPhone - Step 2 - Source: iOS
    Clearing cache and cookies on iPhone – Step 2 – Source: iOS

    Clearing Browser Cache Android

    To clear the browser cache on Android, launch your browser app and open the three dots icon on the top right of the screen. We are taking Firefox as our example.

    The three dots icon – Step 1 – Source: Firefox

    Then, navigate to the Settings submenu:

    The settings submenu - Step 2 - Source: Firefox
    The settings submenu – Step 2 – Source: Firefox

    Tap the Delete browsing data option:

    Delete browsing data section - Step 3 - Source: Firefox
    Delete browsing data section – Step 3 – Source: Firefox

    Finally, tick the boxes of your choice and press the Delete browsing data button:

    Clearing cache and cookies - Step 4 - Source: Firefox
    Clearing cache and cookies – Step 4 – Source: Firefox

    Wrapping Up 

    It’s important to clear the cache of your browser but make sure you find the right balance between privacy and user experience. Having your sign-in and password saved in Google Chrome can be very handy to accelerate your online shopping experience.

    A browser cache takes content such as text and images from the websites you visit and saves them in a database for your next visit. As a result, browser caching improves your page load times and enhances the user experience. 

    If you want to implement browser caching and speed up your site, try WP Rocket! You don’t take any risks with the 30-day money-back guarantee. And the best part is: you just need to install the plugin as no extra configuration steps are required to set up the cache. 

    The post How To Clear Browser Cache and Cookies on Major Browsers (and Mobile) appeared first on WP Rocket.

  • Server Cache vs. Browser Cache vs. Site Cache: What’s the Difference?

    In case you might be questioning yourself:

    “I want to cache my WordPress site. What type of caching should I use for it?”

    The answer involves many options, depending on the nature of your website and what you want to achieve from it.

    There are several types of caching, each of which is different from the others and useful in different circumstances. So it’s essential to comprehend the kinds of data they store and the levels of control they provide you.

    In this article, we’ll discuss different types of web cache in detail, how they work, and their differences.

    Then we’ll look at various types of content that can be cached and how you can cache your WordPress site in the most efficient way possible! 

    What Are The Caching Types?

    There are two types of caching options you can go with:

    1. Server-side Caching
    2. Client-side Caching

    Although both of them cache your website differently but has one similar goal:

    Making your website load blazing fast without loading the entire site files again.

    Let’s take a closer look at both of them. 

    What’s Server-Side Caching?

    Server-side caching temporarily stores web files and data on the server for later use, effectively reducing the server’s load and latency.

    Here’s how it works:

    1. When the user visits a website and requests the web page, the website retrieves data from the server, generates that webpage, and displays it to the user.

    2. After the response has been sent back to the user, the server creates a copy of the webpage and stores it as a cache.

    The result? 

    The next time a user revisits the website, instead of going through the whole process again, it displays the already saved (or cached) copy of the webpage – thus making the website load faster!

    Illustration of how server-side caching works - Source: Medium
    Illustration of how server-side caching works – Source: Medium

    What’s Client-Side Caching?

    Client-side caching, often called browser caching, temporarily stores the copy of a webpage in the browser’s memory (a folder created by the browser). 

    So, the next time a user revisits a website with client-side caching enabled, it won’t make a call to the server for the data. Instead, it will fetch it from the browser cache folder located on the user’s device.

    Illustration of how client-side caching works - Source: Medium
    Illustration of how client-side caching works – Source: Medium

    Server-Side Caching vs. Client-Side Caching

    The type of caching you choose significantly improves the overall user experience and usability of your WordPress site. So it’s always better to understand which type goes well with your website beforehand.

    Let us help you figure that out with an example:

    Suppose you run an online retail site.

    Because of the nature of the business, the type of content on your website is dynamic (i.e., users see recommended products, emails about abandoned carts, or ads for similar/relevant products).

    Due to this, users access your website smoothly whenever there’s a new update. 

    If your website takes longer to load, it will urge the users to move on to another site even before the content fully loads. Hence, resulting in increased bounce rates and, most importantly, a negative first impression on a visitor landing on your website.

    Now, consider the above example:

    • If you use server-side caching:

    When the user requests a web page, the website retrieves data from the server. But before that, it checks if a copy of that web page is cached. If it’s cached, it serves the cached copy of the webpage.

    There are three main scenarios:

    1. If your website’s content is static, it does require any accommodation.
    1. If the content is dynamic within a time frame (short-lived content), it requires cache renewal after a certain amount of time or “ajaxifying” the dynamic content.
    1. On the other hand, if your website’s content is dynamic with a short time frame and is user-specific (logged-in experience, for example), it requires bypassing the cache.

    By default, and if the webpage is cached, it will be served from the cache as long as there is no instruction to bypass it (i.e., adding items to the cart in some specific cases).

    But there’s one problem.

    It displays the cached version as if the content on the website is static!

    Due to this reason:

    Server-side caching is the best choice for websites with static content and short-lived cache, as it significantly reduces the number of operations on the server – without having it reconstruct the entire content per user request. On the other hand, a highly dynamic server cache is still possible using advanced technologies like Edge Side Includes (ESI) or Ajax (Asynchronous JavaScript and XML).

    • Let’s try it out with client-side caching:

    When you use client-side caching, the website’s copy is stored in the browser’s cache. So when the user requests a web page, it displays the cached version stored in the browser instead of requesting it from the server.

    For this example, since your website has dynamic features, your preferred method will be using JavaScript (JS). It operates on the browser’s side, so you can rely on it by running the scripts within the browser to handle the dynamic needs of your website in real time.

    Due to this reason:

    For dynamic websites, client-side caching solves both latency and server cache problems by reducing the server load.

    Now, if we categorize it further, some of the types of web cache include:

    • Site (Page) Cache
    • Server Cache
    • Proxy Cache
    • Browser Cache

    However, there’s also a different type of caching unrelated to the other four types mentioned above, known as Object Cache.

    Object Cache is a process that stores database query results so that they can be accessed easily the next time a user requests it. The cached object will be served instantly from the cache without needing to query the database repeatedly.

    If you want to learn more about Object Cache, check out What is Object Caching and How to Use It With WordPress.

    What is Site (Page) Cache?

    Site cache, also known as HTTP or page cache, temporarily stores the content on your website the first time you visit it. 

    So the next time you visit that website, it fetches the stored data from the site cache to display static web content faster than it would with a new request.

    In addition to that:

    All the data is stored in the server’s hard disk or memory (RAM), and you, as a website owner, can determine how much time a file stays in the site cache. 

    If elements of your website are static, you can set a file’s expiry date for longer. However, dynamic elements of a website have much shorter expiry dates. These brief expiry dates tell the website when to refresh the files stored in your device’s site cache.

    What is Browser Cache?

    Browser cache stores cached versions of the specific web pages a user browses. It is built into your web browser – enabling the website to load faster in order to provide you with a better user experience.

    Browser caches work by temporarily saving copies of a website’s files, such as:

    • HTML pages
    • Multimedia content and images
    • CSS stylesheets
    • JavaScript scripts

    When the user revisits your website, their browser will fetch the cached files and use them to assemble your website’s content to create a smooth browsing experience. Cached content loads faster because your browser doesn’t have to load everything from scratch to display them.

    Usually, a browser stores its cache for a limited time or until it is full. After that, it automatically clears out the cache and displays the updated website’s content on the next visit.

    The silver lining is:

    You can also delete your browser cache by manually clearing your browsing data if it takes up too much space – and that’s one of the key features of this type of cache!

    In Google Chrome, you can do this by clicking:

    Settings > Privacy and security > Clear browsing data

    How to clear browser data in Google Chrome
    How to clear browser data in Google Chrome

    When you visit a website after clearing browser data, it will load everything from scratch.

    What is Server Cache?

    Server cache is also the type of web caching over which the end users don’t have any control and is fully administered by the server.

    (Note: There are mainly four types of web servers – Apache, IIS, Nginx, and LiteSpeed.)

    This type of cache is mainly used to reduce server loads.

    When a user visits a website and requests a web page from the server, the server scans the cache and displays the stored content immediately. This helps decrease the processing time and return web pages faster, which is especially beneficial for websites with high traffic.

    Server cache can be considered an umbrella term for many types of caches. The most common are:

    • Object cache – stores database queries in a server-side cache for quick retrieval and prompter page loading without querying the database repeatedly.
    • Opcode cache – store precompiled PHP code for speedier execution.

    What is Proxy Cache?

    Proxy cache stores content on the proxy server, allowing web services to share those resources with more users. The proxy server coordinates with the origin server to cache website data such as files, images, and web pages.

    When a user opens a web page, the proxy checks whether it has a recent copy of that web page and its assets. 

    If a copy exists, it immediately displays that web page or resource to the user. On the other hand, if the web page is old or missing, it fetches a new copy from the source, caches it to the proxy, and delivers it to the user.

    Once a proxy updates a web page, it resets the webpage’s expiration date to prevent it from being labeled as outdated. The webpage will be delivered until a specific time passes, after which the proxy server will re-check the source.

    Besides that, the proxy cache also has a type known as:

    Content Delivery Network (CDN) cache – a cluster of servers located at different geographic locations. The server closest to the end user will return cached content to load content faster.

    Site Cache vs. Browser Cache vs. Server Cache vs. Proxy Cache

    Now that we know about each type of cache – let’s understand the differences between them:

    Site Cache:

    • Saves content like web pages, images, text, etc.
    • Serves content much quicker after the first visit.
    • Ideal for websites with static content.

    Browser Cache:

    • Stores limited data types like HTML pages, CSS stylesheets, JavaScript scripts, Images, and other multimedia files.
    • Files are heavier and take time to load – thus, stored in the computer.
    • Controlled by the user’s browser.
    • Serves web pages directly without processing from the server.

    Server Cache:

    • Saves content, code, queries, and similar data on a server.
    • Type of server-side caching.
    • Controlled by the server.
    • Administered by website owners without any input from end-users.
    • Best for high-traffic websites that need to reduce server strain.

    Proxy Cache:

    • Allows web services to share resources with multiple users
    • Saves bandwidth and decreases the loading time
    • It might help in more complex scenarios, such as handling dynamic or frequently-updated resources (but only when using geotargeted content where the country/region-specific content is stored separately).

    What Content Can Be Cached?

    There are various types of content that website owners frequently cache. However, some can be cached, but many site owners do not cache them as it seems “risky”. And lastly, there are some which should not be cached at all.

    Let’s look into all of them.

    Files that can be cached but rarely cached include:

    • Pages with dynamic content
    • Ajax/REST requests if their cache is purged
    • Other code that needs to change less frequently

    Files that are frequently cached and should be cached include:

    Pages with static content or types of content that remain the same for all users and don’t often change, such as

    • Static images
    • Logos and assets
    • CSS stylesheets
    • Downloadable files or other content

    Files that should not be cached include:

    • Dynamic content, or in simpler terms, personalized data using conditions to be displayed
    • Any sensitive data (such as credit card information)

    Caching with WP Rocket

    WP Rocket is the most beginner-friendly and easiest plugin to quickly improve your WordPress website’s speed and performance! 

    Here’s how it works:

    It caches your web pages by creating static HTML files and making them readily available for future visits. In addition, it applies browser caching, requesting the browser to save the frequently used but rarely updated files in its local cache memory.

    One of the things which makes it the best caching plugin for WordPress is that when you install WP Rocket on your WordPress site and activate it, it automatically applies 80% of web performance best practices right away! 

    Furthermore:

    WP Rocket can be set to bypass or store dynamic cache depending on query strings and cookies.

    Also, it has a system to help refresh the cache in any timeframe requests to help serve a fresh version of the website.

    Page caching, browser caching, and GZIP compression are some of the default features that WP Rocket enables for you. But if you don’t settle for the standard settings, WP Rocket also includes advanced features such as:

    • Minify CSS and JavaScript files – removes whitespaces and comments to reduce the file size.
    • Remove Unused CSS – eliminates render-blocking CSS on your site for faster load time. You can either load CSS asynchronously or remove unused CSS files (the preferred method).
    • Load JavaScript deferred – eliminates render-blocking JavaScript to improve load time.
    • Delay JavaScript execution – improves performance by delaying loading JavaScript files until the user interacts with the website, i.e., via scroll or click.
    • Optimize Google Fonts – combines, preloads, and loads the Google Font file asynchronously (i.e., without render blocking).

    With all these features, you can get a blazing-fast website in the blink of an eye, which eventually results in:

    Great first impressions, better SEO ranking, & more conversions! 🚀

    Most importantly, it helps improve the PageSpeed Performance Score and metrics, including the Core Web Vitals grades.

    P.S: To set up caching in WP Rocket, go to:

    Settings > WP Rocket page > and click on the ‘Cache’ tab. 

    Cache tab using the WP Rocket plugin
    Cache tab using the WP Rocket plugin

    WP Rocket already enables page caching by default, but you can tweak additional cache settings from this page. 

    Wrapping up

    The boost in the performance of your website after implementing caching is simply irresistible. If done right, it can unlock a whole new level of user experience, search engine rankings, and revenue by optimizing your WordPress site for performance. 

    However, with so many caching options available, it seems scary to understand which one suits your website well.

    But now, as you’re well aware of all the types of caching out there and how they work – it’s time to get cached up! (no pun intended)

    The post Server Cache vs. Browser Cache vs. Site Cache: What’s the Difference? appeared first on WP Rocket.

  • The 7 Best WordPress Caching Plugins (Free and Premium)

    Are you looking for the best WordPress cache plugin to boost the performance of your website? Caching is one of the most powerful ways to improve page speed and gain a few extra positions on Google. 

    In this guide, you’ll learn what a caching plugin is and why you need it to make your site faster. We also compare the top caching plugins available on the market to make you choose the best one for your needs. 

    What’s a Caching Plugin and How it Works

    A caching plugin creates an HTML (static) version of your web page to deliver it faster to your future visitors. Usually, a page request implies PHP processing, fetching data from the database, and much more time- and resource-consuming tasks on the server side. But thanks to a caching plugin, you can get rid of unnecessary data roundtrips and improve your page loading speed.

    How a caching plugin works - Source: WP Rocket
    How a caching plugin works – Source: WP Rocket

    What’s Caching and What Happens When it’s Enabled

    Web caching means storing data such as images or a web page for future reuse. The first time a user visits the page, this data is cached (or stored). The second time a user requests the content, the cache will serve the copy, preventing the data from being downloaded from the origin server again. 

    Caching in a nutshell - Source: WP Rocket
    Caching in a nutshell – Source: WP Rocket

    When a visitor attempts to access a web page, it first checks the cache. If the data is found there, that is referred to as a cache hit, and the content will be displayed much faster. 

    What a Caching Plugin Does

    A cache plugin makes it easy for returning visitors to access your website content faster by eliminating the many steps a browser takes to generate pages dynamically. It stores data so future requests can be served faster and prevent the origin server from overloading. As a result, it makes your site faster by removing unnecessary requests to the database and saving the content to HTML files. The ultimate goal is to save some loading time for the next user thanks to that stored content. 

    Each cached page on your site has the cache files in a dedicated folder. Most of the time, you can find them by following the path: /cache/name-of-the-plugin/your-domain.com/.

    What Happens When You Update a Page

    Say you update the image in the header of your homepage but don’t make any other changes on your site. A caching plugin will delete the cached version of your homepage and save a new version. The updated page will be served to visitors, but the rest of the pages on your site remain unchanged in the cache.

    Pro tip: When you update your page by adding an image or more text, set up your plugin’s expiry time properly. You need a smart tool that updates the cached files as often as you post updates.

    Why You Need a Caching Plugin to Make Your WordPress Website Faster

    A caching plugin is one of the best ways to boost performance, make your site load faster, improve conversion and enhance the whole user experience. Let’s go over each benefit, and you’ll understand why you need one.

    Benefit #1 – Optimize Performance and SEO

    When someone visits your website, many processes start automatically in the background: reading the CSS files, loading and executing JavaScript, pinging the database, etc. All of these background tasks are necessary to display the website correctly, but they also require a certain amount of waiting time for the user. 

    Thankfully there is a solution recommended by Google PageSpeed Insights to reduce this loading time: caching plugins.

    PageSpeed Insights recommends using caching in the performance report - Source: PageSpeed Insights
    PageSpeed Insights recommends using caching in the performance report – Source: PageSpeed Insights

    If this loading time is too long, it will have a negative impact on the Core Web Vitals (user experience) and the ranking of your page by Google (SEO). For example, when SmartFurniture decided to speed up its website, the company saw 3 main benefits: 

    • A 20% increase in organic traffic 
    • 14% more page views
    • Gained 2 positions in the search engine rankings.
    Caching boosting performance and SEO - Source: convert.com
    Caching boosting performance and SEO – Source: convert.com

    Benefit #2 – Improve Conversions

    Caching makes your page load faster and leads to increased sales and conversions. An interesting case study about mPulse mobile shows the impact of load time on the conversion rate. As you can see below, the faster the site loads, the better the conversion rate is (around 2% for a page that loads in 2.4s). On the contrary, a slow page that loads in 5.7s brings down the conversion rate to 0,6%.

    Loading time and conversion rate - Source: convert.com
    Loading time and conversion rate – Source: convert.com

    Benefit #3 – Enhance the User Experience (Especially on Mobile)

    Caching is one of the most effective performance techniques for having fast pages and improving loading speeds on mobile. The infographic shows that 64% of smartphone users expect pages to load in less than 4 seconds. 

    Speed and mobile users - Source: convert.com
    Speed and mobile users – Source: convert.com
    💡Hint: when choosing your plugin, make sure that there is a mobile cache option.

    A caching plugin also reduces the load on the server and bandwidth consumption by minimizing the database queries. This saves some server memory, making caching suitable for WordPress site owners with limited web hosting plans.

    Caching Plugins vs. Hosting Caching Option

    You may also have heard of “hosting caching” which is another way of caching your content. Some hosting providers like Kinsta have their own caching options – they implement and manage full-page caching for all sites server-side. 

    While the hosting cache comes before the plugin cache, they are complementary – in other words, you can use both. For instance, the plugin implementation should be able to clear the server cache.

    A caching plugin also differs from a hosting caching option because the hosting cache might not be configured to accommodate specific use cases that a plugin cache can address — separate mobile cache, cookie-based cache, and query-strings-based cache. Exceptions like these arise more often than you expect, so addressing them is important.

    We suggest checking with your host what their cache options are and their compatibility with the caching plugin you want to use. 

    Before we compare the best caching plugins to speed up WordPress, let’s go quickly over the best features you should look for when picking a cache plugin. 

    What’s Important When Choosing a Caching Plugin?

    When choosing a caching plugin, there are 9 important criteria to consider. We share our checklist below: 

    1. Speed – you should measure your page load before and after activating the plugin. When caching is enabled, you should see an improvement in your performance score measured by Lighthouse.
    2. Ease of use – choose a plugin with a lean interface that’s easy to understand and configure. 
    3. Exclude pages from being cached – stay in control of the pages you want to see cached or not (e.g., dynamic pages).
    4. Compatibility – pick-up a tool compatible with your web hosts and the rest of your WordPress theme and plugins. 
    5. CDN support – the plugin should support the Content Delivery Network you are using and not create any issues. 
    6. Minification – ​​this option is important to compress your static files and save valuable space on your server (and lower bandwidth costs). 
    7. Support – it’s always crucial to have some technical help and efficient support if things get complicated. 
    8. Updates – stay away from plugins that have not been updated for 2 years. Instead, opt for a plugin with more frequent updates, meaning that a team is actively working on it. 
    9. Price – you have free options and more premium ones. If you are working on a complex site for a client, you may want access to fast support and advanced performance features. 

    Choosing the best caching plugin comes down to understanding your performance needs. Do you need more speed for desktop or mobile users? How often are you updating your website? Are you also looking to optimize your code and your images? Are you an advanced developer, or are you looking into a one-click installation solution? 

    In our next section, we have put together a list of 7 caching plugins you can use to speed up WordPress. Let’s go over them. 

    Best Free and Premium Caching Plugins for WordPress 

    1. WP Rocket

    WP Rocket is a powerful plugin that applies caching in one click. It comes with many features, such as CSS/JS optimization and lazy-loading, which further boost the performance of your WordPress site. 

    It’s perfect for beginners because WP Rocket does the heavy lifting for you. The installation requires no coding skills, and no configuration is needed to start seeing results. Upon its activation, the cache feature is automatically activated.
    It’s also compatible with most tools, from hosting to other plugins.

    All-in-one plugin for caching and advanced optimization features - Source: WP Rocket
    All-in-one plugin for caching and advanced optimization features – Source: WP Rocket

    Key features

    • Caching of all the pages, for mobile visitors and for logged-in users (apply optimal browser caching headers)
    • Preloading the cache of pages
    • Decreasing bandwidth usage with GZIP compression
    • Minification and combination of JavaScript and CSS files
    • Remove unused CSS
    • Deferred loading of images (LazyLoad script on images)
    • WebP compatibility (next-gen format created by Google to serve smaller images)
    • Deferred loading of JS files and Delay JavaScript Execution
    • Database optimization
    • DNS prefetch
    • CDN integration with RocketCDN and Cloudflare

    Pricing

    WP Rocket starts at $49/year, including support, updates, and a license for one WordPress site. 

    2. W3 Total Cache

    W3 Total Cache enhances your site’s user experience by improving server performance, caching every aspect of your site, and reducing load times. 

    It’s one of the most popular free cache plugins for WordPress.

    While being an excellent choice for your site, you’ll need to have some technical expertise and go through 16 pages of settings to configure the plugin.

    Setting up W3 Total Cache - Source: W3 Total Cache
    Setting up W3 Total Cache – Source: W3 Total Cache

    Key features (free – no support included) 

    • Mobile support: respective caching of pages by referrer or groups of user agents and accelerated Mobile Pages (AMP) support
    • Caching of (minified and compressed) pages and posts, CSS and JS
    • Caching of feeds (site, categories, tags, comments, search results) in memory or on disk or on CDN
    • Caching of search results pages (i.e., URIs with query string variables) in memory or on disk
    • Caching methods include local Disk, Redis, Memcached, APC, APCu, eAccelerator, XCache, and WinCache
    • Minify CSS, Minify JavaScript, and Minify HTML with granular control
    • Defer non-critical CSS and Javascript 
    • Defer offscreen images using Lazy Load
    • Browser caching using cache-control, future expire headers, and entity tags (ETag) with “cache-busting”
    • Leverage our multiple CDN integrations to optimize images
    • Caching statistics for performance insights of any enabled feature
    • Image Service API extension provides WebP image format conversion from common image formats (on upload and on demand)

    Key features (premium – support included)

    • Full Site Delivery via CDN
    • Lazy Loading for Google Maps
    • Fragment Caching
    • WordPress Rest API Caching
    • Eliminate Render Blocking CSS

    Pricing 

    To access more optimization features and customer support, you have to upgrade to Premium and pay $99/year for one website. W3 Total Cache premium is only available from within the admin interface of the plugin (not the WordPress one).

    🚀 See how W3 Total Cache compares to WP Rocket.

    3. WP Super Cache

    Owned by Automattic (the creator of WooCommerce and WordPress.com), it’s also one of the most popular cache plugins, with more than 2 million installs. It’s a performance plugin that helps customers manage caching directly inside the WordPress Dashboard.  

    It’s a free and powerful plugin, but its installation takes some time; you will have to review 20 different options manually.

    It doesn’t have a premium version, and it doesn’t provide a dedicated support team. 

    Main caching features - Source: WP Super Cache
    Main caching features – Source: WP Super Cache

    Key Features

    • Dynamic caching
    • Expiry time & garbage collection
    • Possibility to exclude pages that you don’t want to cache
    • The plugin serves cached files in 3 ways (ranked by speed):
      • Expert -using Apache mod_rewrite (or whatever similar module your web server supports) to serve “super cached” static HTML files.
      • Simple – PHP can serve super cached static files.
      • WP-Cache caching – mainly used to cache pages for known users, URLs with parameters, and feeds.
    • Serves static HTML files to the vast majority of your users: users who are not logged in, have not left a comment on your blog, and have not viewed a password-protected post.
    🚀 See how WP Super Cache compares to WP Rocket.

    4. WP Fastest Cache

    WP Fastest Cache is a freemium WordPress caching plugin that is easy to install, but the interface is not that user-friendly. Each setting can be tweaked by checking a box, as shown in the image below: 

    Interface and main features (premium features in gray) - Source: WP Fastest Cache
    Interface and main features (premium features in gray) – Source: WP Fastest Cache

    There is a free version that offers basic features. For additional options, you’ll need to upgrade to Pro:

    Key Features (free) 

    • GZIP compression
    • Browser caching
    • Clean-up – all cache files are deleted when a post or page is published
    • Preload Cache – create the cache of all the site automatically
    • Exclude pages 
    • Admin can delete all cached files from the options page
    • Block cache for specific pages or posts with a shortcode
    • Cache Timeout: All cached files are deleted at the determined time (and for specific page)
    • Enable/Disable the cache option for mobile devices and logged-in users
    • CDN + Cloudflare support
    • Minify HTML and CSS
    • Combine CSS/JS

    Key Features (premium)

    • Image optimization
    • Convert WebP conversion
    • Cache statistics
    • Widget cache
    • Mobile cache
    • Delete cache logs
    • Google fonts async
    • Lazy load script
    • Database Cleanup

    Pricing

    WP Fastest Cache is based on a one-time fee package. The price varies according to the number of licenses you need and goes from $49.99 (1 license) to $300.00 (10 licenses). Important: neither the free nor the premium version offers customer support.

    🚀 See how WP Fastest Cache compares to WP Rocket.

    5. Hummingbird

    Hummingbird was created by WPMUDEV developers who are well-known in the WordPress ecosystem. The plugin is now active on more than +1 million sites. It’s easy to install and makes your website faster with fine-tuned performance controls. 

    It offers good overall speed optimization but doesn’t address some PageSpeed recommendations that significantly affect the score.

    Caching settings - Source: Hummingbird
    Caching settings – Source: Hummingbird

    Key Features 

    • Scan and fix capability. in one click, the plugin scans your site to detect any performance issues and then tries to fix them automatically
    • Full caching suite: including full-page, browser, and Gravatar cache.
    • Gzip compression
    • Uptime monitor
    • CDN – 45 worldwide locations and Cloudflare integration
    • Database cleanup
    • Lazy load script on images
    • Performance reports (integrated with PageSpeed Insights)
    • Combine and minify files 
    • Defer/inline assets
    • Critical CSS 
    • Google fonts optimization

    Pricing

    It’s a freemium plugin, and the Pro version starts at $7.50/month, giving you access to all the pro plugins of WPMUDEV (SEO and image optimizations, etc.), plus ticket support.

    🚀 See how Hummingbird compares to WP Rocket.

    6. LiteSpeed

    LiteSpeed is an all-in-one performance plugin featuring a collection of optimization features. This plugin is intended to be a server-level caching plugin. As a result, its caching benefits are only available to LiteSpeed server users. 

    Advanced performance dashboard - Source: LiteSpeed
    Advanced performance dashboard – Source: LiteSpeed

    Key Features

    • Built-in page cache (LSCache)
    • Free QUIC.cloud CDN Cache
    • Image Optimization (Lossless/Lossy)
    • Minify CSS, JavaScript, and HTML
    • Minify inline & external CSS/JS
    • Combine CSS/JS
    • Automatically generate Critical CSS
    • Lazy-load images/iframes
    • Load CSS Asynchronously
    • Defer/delay JS loading
    • Database Cleaner and Optimizer
    • DNS Prefetch
    • Cloudflare API integration
    • Single Site and Multisite (Network) support
    • Lean interface
    • WebP image format support

    Pricing 

    It’s a free plugin, but a LiteSpeed server is required for the cache features, and fees are associated. 

    🚀 See how LiteSpeed compares to WP Rocket.

    7. NitroPack

    With NitroPack, you get many performance features in one place: caching, image optimization, and a CDN that is ready to go out of the box. You’ll need technical knowledge to ensure some features aren’t faulty on your website.

    Minimalistic settings in the WordPress admin - Source: NitroPack
    Minimalistic settings in the WordPress admin – Source: NitroPack

    Key Features 

    • GZIP and Brotli compression
    • Smart cache invalidation
    • Automatic cache warmup
    • Device and cookie-aware caching
    • Browser and session-aware caching
    • Built-in global CDN
    • Advanced image optimization (WebP support, Lossy, and lossless image compression, preemptive image sizing)
    • Lazy loading (including background images defined in the CSS)
    • HTML, CSS, and JS minification & compression
    • Deferred JS  Loading
    • Critical CSS, DNS prefetching, and preloading
    • Deferred loading of fonts 

    Pricing

    The plugin itself is free, and you can also create a free account for one website, 5,000 page views, and 1.00GB CDN bandwidth per month.

    A monthly subscription starts at $17,50 per month for one website, 50,000 pageviews, and 25GB CDN bandwidth and includes customer support.

    🚀 See how NitroPack compares to WP Rocket.

    Now that we’ve been over WordPress’s most popular caching plugins let’s see how to install and set them up. We’ll take WP Rocket as an example. 

    How to Install a Caching Plugin

    Follow our easy tutorial below to understand how to install a caching plugin like WP Rocket. The installation process is pretty much similar for each plugin. For some of them, you may need to generate an API key and manually register your site from your account. 

    Step 1 – After buying WP Rocket, go to your account and download the plugin.

    WP Rocket account > sites - Source: WP Rocket
    WP Rocket account > sites – Source: WP Rocket

    Step 2 – From your WordPress dashboard, install the WP Rocket plugin from Plugins > Add New. Remember to activate the plugin.

    Installing the plugin - Source: WP Rocket
    Installing the plugin – Source: WP Rocket 

    Step 3 – Your site is automatically added to your account:

    WP Rocket account > sites registration – Source: WP Rocket

    🚀And that’s it! WP Rocket automatically applies more than 80% of web performance good practices upon its activation. Page caching, browser caching, and GZIP compression are completely automated and work out of the box! 

    WP Rocket applying caching automatically - Source: WP Rocket
    WP Rocket applying caching automatically – Source: WP Rocket

    Wrapping Up

    Using a caching plugin will help improve the performance of your website, your ranking on Google, and your sales. 

    Without caching, visitors would have to download web pages whenever they visit your website. This is time-consuming and very inefficient for serving a fast WordPress site. 

    With a top cache plugin such as WP Rocket, you can enjoy additional features like CDN integration, GZIP compression, and CSS/JavaScript optimization – which further boost your WordPress site performance. If you try WP Rocket today, you take zero risks:  we’ll gladly provide a refund if you request it within 14 days of your purchase. 

    The post The 7 Best WordPress Caching Plugins (Free and Premium) appeared first on WP Rocket.

  • Announcing WP Rocket’s New Pricing

    At WP Media – the company behind WP Rocket, Imagify, and RocketCDN – we care about transparent communication. That’s why we want to announce we’ve decided to increase the license prices for WP Rocket.

    This change will be effective in the upcoming days, impacting new licenses and upgrades.

    An important note: All existing customers are being grandfathered and will keep their renewal price.

    Agathe Medvedieff, Chief Marketing Officer, explains why current customers won’t see an increase in their renewal prices:

    Grandfathering our existing customers despite the inflation pressure was essential to us. They trusted us for a while now and helped us shape a great product with their feedback and encouragement.

    Let’s see in detail how the new prices work.

    What Are the New Prices?

    New customers will pay their licenses as follows:

    • Single license (one website): $59/year. 
    • Plus license (three websites): $119/year.
    • Infinite license (unlimited websites): $299/year.
    The new prices for licenses
    The new prices for licenses

    The prices of upgrades have also changed as they are the difference in price between the current license and the one customers are upgrading to. Here are the new prices: 

    • Upgrade from Single to Plus: $60/year.
    • Upgrade from Single to Infinite: $240/year.
    • Upgrade from Plus to Infinite: $180/year.

    Why We Increased Our Pricing

    There are two important reasons why we decided to increase the price for all the licenses.

    The first and most important one is related to our plugin’s quality. If you’re already a customer, you know how easy and powerful WP Rocket is to speed up a website’s performance, optimize key metrics such as Core Web Vitals, and improve the PageSpeed performance score. 

    The last time we increased WP Rocket’s price was in February 2019. Since then, we have released game-changer performance features that dramatically improved thousands of websites’ loading times. 

    The typology of our features has also evolved to offer cloud-based options like the Remove Unused CSS, which is crucial to enhance performance – and we aim to add more cloud-based solutions in the future.

    You can see how the price increase reflects the tremendous evolution of the plugin and will help its future growth.

    It’s not only about the features, though. WP Rocket also provides top-notch support – the TrustPilot reviews speak for themselves. Customer support is made up of highly professional and passionate people that ensure a fast and effective response, which is why it’s very much appreciated and praised. 

    Agathe says:

    As a customer, seeing a price increase is always frustrating. But we believe setting a fair price/performance ratio for our product is key for both our users and the company. Providing a great value proposition in a sustainable way is part of our core commitments.

    Another reason involves the rising cost for our company. Worldwide inflation isn’t a secret and has impacted us on two levels.

    On the one hand, we’ve been affected by higher prices for maintaining our technology infrastructure and the server-based features to ensure all WP Rocket features work efficiently. 

    On the other hand, our employees have also been affected by a rising cost of living. For this reason, we decided to increase salaries to help everyone working at WP Media keep up with the inflation rate. The salary increase is not the only perk and benefit of working at WP Media – if you want to take advantage of working at a full-remote company that takes care of their employees, check out our job openings.

    Wrapping Up

    Announcing a price increase is tough. We hope you understand why we made this decision and how we wanted to take care of the Rocketeers who have trusted us so far. 

    We believe WP Rocket continues to offer great value to everyone wanting to speed up their websites easily. We hope to see your website in orbit soon, alongside other 2,8 million ones!

    The post Announcing WP Rocket’s New Pricing appeared first on WP Rocket.

  • Caching for WordPress: What It Is and How It Works

    “What’s caching? And what does this mean for my WordPress site?”

    As an amateur site owner, you’ve most likely stumbled across the word “cache/caching” or the phrase “use a caching plugin” and found yourself scratching your head over the exact same question.

    (Trust us – we know the feeling!)

    You see:

    One of your primary goals as a website owner is to drive traffic to your site. But if your visitors experience slow page speeds or your website takes more than 4 seconds to load, they will most likely click out without even reading the content. 

    And the result? 

    Increase in bounce rate and all your hard work going in vain.

    Luckily, this is exactly where website caching comes to the rescue! 

    Caching is one of the most powerful tools to improve performance, even if you have yet to start using it. 

    In simple words, caching can make your WordPress website fast. Like, really fast.

    OK, we know what you’re thinking:

    If website caching is this powerful, it must surely be a complex technical task to do, right?

    Turns out, it’s not as complicated as you may have thought.

    In this post, we’ll take a closer look at what caching is, how it works, its benefits, and how you can enable it on your WordPress site – and a lot more!

    What is WordPress Caching?

    Let’s break down the idea of caching in WordPress this way:

    Imagine someone asking you a difficult math problem, like: “What’s 9895357 times 8975?”.

    You will look around all confused and won’t be able to answer the question immediately. 

    Suddenly, the idea of bringing out a calculator hits you. 

    And a few minutes later, after doing the math, you get to know the correct answer and respond back.

    Now, if that person asks you the same question again, you will reply at that very minute. That’s because the time-consuming process and hard work had already been done thanks to the calculator. 

    And that’s it! That’s caching in a nutshell.

    If we apply it to the context of your WordPress website:

    1. A user visits your website and makes a request.
    2. Your web server takes some time to process.
    3. And finally, after a few seconds, it responds to the request by delivering the page.

    And it doesn’t stop there.

    The server saves a copy of that webpage so that when another visitor makes the same request, it can skip the initial time-taking process and provide the web page much faster.

    So, What Does Caching Mean?

    If we sum up the whole scenario:

    Caching is the storing of frequently used data so it can be accessed faster if someone needs it again. It also prevents the browser from utilizing its resources to load the entire site files again.

    It’s simple, isn’t it?

    Now before we go any further, let’s discuss the types of caching first.

    Types of Caching 

    Three of the most common types of caching are:

    1. Site Cache (Page Caching)

    A site cache, also known as page cache, temporarily stores website data (such as images, webpages, files, and similar multimedia) the first time a web page is loaded. So whenever a user revisits your website, saved elements are quickly retrieved and displayed to them.

    However, site caching is a type of client-side caching. This means that all the stored data is controlled by the end user. And as a website owner, your only authority is to specify how long content remains in the cache.

    Site caching is perfect for sites with a lot of static content. Because when your website rarely updates, visitors will be able to continue loading your web pages fast while still seeing the latest version of your site. 

    On the other hand, it isn’t well-suited for dynamic websites where content frequently updates, such as e-commerce pages with shopping carts.

    So, what’s the magic formula?

    Consider using a WordPress plugin to take full benefit from site caching. 

    There are various caching plugins, like WP Rocket, that you can use to control WordPress site caching. 

    WP Rocket is a straightforward caching plugin used to take care of caching across different devices, optimize your files, and improve your website’s performance.

    (P.S: We’ll discuss more of the caching plugins in the upcoming sections)

    2. Browser Cache

    Like site caching, browser caching also happens on the client’s end. 

    It works the exact way as site caching but is a cache system built into a web browser. The browser temporarily saves copies of a website’s files, including:

    • HTML code
    • CSS stylesheets
    • JavaScript scripts
    • Images

    These files are known as “static assets” because they don’t change between visits.

    It all boils down to this:

    When the user revisits your website, their browser will fetch the cached files and utilize them to assemble your website’s content. And because of this, it doesn’t have to load everything from scratch.

    Typically, a web browser will keep its cache for a limited time or until it is full. After that, it will automatically flush out the old content and save the updated one in its place.

    However, as a user, you can also manually clear out your browser’s cache whenever you want.

    3. Server Cache

    Server caching is also similar to site caching, but instead of saving the content on the client’s end, it keeps the content on a site’s server. 

    This type of caching is administered on the server without any input from the end user.

    For example:

    Your server stores HTTP files of your website’s content and serves them immediately when the visitor requests. That way, it doesn’t have to render a new HTTP file every time a user visits the site, reducing the load.

    Some of the types of server caching include:

    • Object Caching – stores database queries in a server-side cache so that the next time a visitor requests content, the server can deliver it immediately without having to query the database repeatedly.
    • Opcode Caching – occurs when the PHP file loads on a web page for the very first time. It stores the results of the PHP script for faster loading instead of executing every single time your website receives a request.
    • CDN Caching – A Content Delivery Network (CDN) is a system of servers located worldwide. When a user visits your website, the CDN will serve cached files from the server closet to them in order to reduce loading times.

    Why Does Caching Seem To Break Stuff?

    – Want to know the scary part? 👻

    Caching works flawlessly with web pages having static content (content that doesn’t change unless you change them), such as text, photos, and videos.

    But nowadays, websites have a lot of content or features that update automatically or adjust differently for each user looking at the page.

    Let us give you some examples:

    One example could be an online streaming site. Dynamic entertainment websites (like Netflix) allow their content to be displayed according to a user’s location, watching activity, preferences, and subscription. 

    This is an example of dynamic content because content adjusts according to who is looking at the page.

    Another example is an e-commerce site.

    These websites contain a shopping cart icon on every page, telling customers the total number of items available in their shopping cart. This feature varies for each customer because everyone has a different number of items in their cart. Therefore that number is dynamically generated for each customer.

    This type of content needs special care with caching. You need to code things correctly – and if you don’t do that and use a caching plugin, you’ll notice that the website won’t respond as usual (considering the above example: the customer’s cart won’t be able to display the accurate number of items available).

    Now, in case you might be wondering:

    The main culprit here is PHP!

    If the dynamic features present on your website are coded in PHP for output retrieval, they won’t work with caching.

    Remember what we discussed at the beginning? Caching stores a copy of your webpage, so the server doesn’t have to load it again when requested. 

    Basically, PHP is part of the time taking work that gets neglected when you use caching.

    So when you want your website to have dynamic features, you need to use another programming language called JavaScript (JS). JS operates on the browser’s side, so when your page is cached, and PHP is sitting idle, you can rely on JS and AJAX (Asynchronous JavaScript and XML) to handle the dynamic needs of your website.

    Can a Caching Plugin Help, and How?

    Good news:

    The easiest solution for all this is to use a caching plugin on your WordPress site!

    A caching plugin is a holy grail for eliminating some of the various steps taken by a browser in generating dynamic web pages. By using a caching plugin, you can achieve various server-side caching benefits (including page caching and object caching). 

    Moreover, these plugins also know to offload their cache and renew it whenever a fresh piece of content is published or existing content is updated on your site.

    And what’s even better:

    With top caching plugins, like WP Rocket, you can also get added performance optimization features that significantly help improve the Lighthouse Performance Score and metrics – including Core Web Vitals – of your WordPress site!

    How Caching Works in WordPress

    Here’s how caching works:

    A cached page will be created for each web page, and when a visitor visits your website, they will be delivered the cached (static) version of each page. 

    Within a matter of seconds, WordPress caching plugins minimize the amount of data transmitted between the visitor’s browser, the WordPress database, and the web server, keeping visitors engaged with your site with faster loading times.

    How caching works  – Source: Kinsta

    How a Caching Plugin Works?

    There are many types of caching plugins available for WordPress that make caching a very easy process.

    Let’s take WP Rocket as an example:

    Using the WP Rocket plugin, you can instantly cache your website by just activating it . In addition, you can enable caching for mobile devices and logged-in WordPress users and specify the time after which the cache will be cleared. 

    Cache tab using the WP Rocket plugin

    What’s the catch?

    It’s the simplest caching plugin that works straight out of the box and doesn’t require technical knowledge! 

    It applies 80% of performance best practices right upon activation – including site (page) cache and cache pre-loading.

    All these features make WP Rocket the most beginner-friendly caching plugin to take care of your WordPress caching and make your website blazing fast! 🚀

    A word of caution: If you’re planning to install more than one caching plugin, thinking it will make your site faster, stop there! Installing more than one plugin won’t make your site any faster. Instead, it’ll make your site slower or even break it. 

    Why Is Caching Important for Your WordPress Site?

    Whether you want to start today or in the future – you’ll always need caching for your website. 

    Here are some of the other benefits of caching for your WordPress site:

    1. Makes Your Site Faster 

    Speed is crucial for a website. If your site takes too long to load, not only will your website users abandon it, but Google will also penalize it leading to lower rankings. 

    That is why one of the primary benefits caching offers is improved site speed!

    This results in much faster, easy-to-crawl websites and has a significant impact on your Core Web Vitals grades and the PageSpeed Insights performance score. 

    Why is it important? 

    Because Core Web Vitals metrics are part of Google’s Page Experience Update – the latest ranking factor launched by Google in 2021. 

    Core Web Vitals combined with a better PageSpeed Insights performance score may positively affect your website’s organic visibility and give visitors a hassle-free experience while browsing your page.

    2. Improves User Experience 

    A fast website = a great UX!

    Faster websites are known for reducing bounce rates, as users are not interested in waiting for a website that takes 10 seconds to load. So when the website moves faster for visitors, they will love browsing through it. 

    Most importantly, it will put a great first impression on a visitor landing on your website. One glimpse can turn someone into a customer or urge them to move on to another website. So first impressions matter the most when it comes to a website. 

    3. Helps Improve Conversions

    Faster-loading websites help in higher rankings, and higher rankings mean more traffic!

    When you combine it with a good user experience, it will turn all your visitors into actual customers and improve your conversion rate.

    4. Reduces Server Load

    As caching displays a static copy of the requested webpage, it puts less of a strain on your server and lowers server load by up to 80%. This is especially beneficial when it comes to highly dynamic sites or during traffic spikes.

    5. Improves Time to First Byte (TTFB)

    Caching is probably one of the easiest ways to lower your Time to First Byte globally. Once your website is cached, resources don’t need to be downloaded every time from the server – leading to reduced server processing time!

    How to Enable Cache in WordPress

    Here’s how you can manually enable caching on your WordPress site:

    Step 1: Open the wp-config.php file, which you will find in the root folder of your website.

    If you don’t know where exactly the wp-config.php file is located:

    1. Log into your hosting account.
    2. Go to cPanel.
    3. Click on the ‘File Manager.’
    4. Locate the ‘public_html’ folder.

    You will find the wp-config.php in this folder.

    Step 2: Edit the line that says 

    define ('WP_CACHE', false);

    And change it to:

    define('WP CACHE', true);

    Step 3: Create a file named “advanced-cache” and place it within the wp-content directory, just like this:

    /wp-content/advanced-cache.php/

    How to Enable a WordPress Caching Plugin

    Now, if you want to save time by not doing the technical work, then caching plugins offer a quick and easy way to enable caching on your WordPress site!

    But unfortunately, most caching plugins come with features that require technical expertise and can easily confuse a user who is not a developer.

    However, this is not the case with WP Rocket. 

    Installing WP Rocket is the easiest way to enable caching in WordPress. One of the features that makes it the best caching plugin for WordPress is that once you activate it within just a few clicks, you’re already set up and ready to go.

    Here’s how you can do it:

    • First, you need to install and activate the WP Rocket plugin.
    • Once activated, the WP Rocket plugin will automatically turn on the page and browser caching with optimal settings for your site.
    • You can see your site’s caching status by visiting the WP Rocket dashboard under the WordPress Settings » WP Rocket page.
    WordPress Admin page – Settings Section

    Once you land on the Dashboard tab, you’ll get this message:

    WP Rocket dashboard – Congratulations message

    As for the caching tab, you can find the settings under Settings » WP Rocket » Cache.

    In addition to automatically enabling page and browser caching, WP Rocket will activate by default Mobile Cache and Cache lifespan (10 hours). In this tab, you can tweak the settings according to your needs.

    Cache tab using the WP Rocket plugin
    Cache tab using the WP Rocket plugin

    Moreover, the plugin includes other crucial features, such as the ones to optimize CSS and JS files, that go beyond caching and make WP Rocket the easiest and most powerful solution to improve your website performance. 🚀

    Wrapping up

    *sigh* – that surely was a hell of a ride.

    We hope you find this article helpful!

    Website caching is the best way to speed up your WordPress website without sacrificing content or other performance factors. It doesn’t have to be technical or complex. When properly implemented, it will result in much faster load times for your users while decreasing overall server load.

    If you’re not caching your WordPress website already, it’s time to get started. You can never go wrong by caching your WordPress site. In fact, it could be one of the biggest ways to your online success.

    The post Caching for WordPress: What It Is and How It Works appeared first on WP Rocket.

  • Using WP Rocket as a Secret Weapon for Our WordPress Agency

    What if I told you that you could create fast and efficient WordPress websites that score over 90% on PageSpeed Insights? Better yet, what if I told you that you could get those impressive scores for mobile devices and pass Core Web Vitals for every project? 

    We do this consistently for client projects using fast themes, good hosting, and most importantly, WP Rocket. Using WP Rocket is our WordPress agency’s secret weapon! 

    But what if you inherit a project from another developer or agency and need to improve performance? In this article, we review some common performance bottlenecks and suggest improvements you can make with WP Rocket to get awesome results. 

    Our Background and WordPress Experience

    Our agency, Clio Websites, has been helping clients launch beautiful new websites since 2007. 

    We have been working with WordPress since 2013 and have seen and resolved pretty much everything that can hurt website performance. From inefficient themes to large image files and multiple builders on the same website. 

    One of our core offerings is helping clients improve their website performance, and WP Rocket plays a key role in that. We have used WP Rocket for projects that use custom themes, block editor (Gutenberg), and popular page builders like Elementor and WP Bakery and got excellent results. This is why we refer to WP Rocket as our WordPress agency’s secret weapon. 

    Caching, Minification, and Asset Delays – The Key to Achieving Great Website Performance 

    Due to its out-of-the-box architecture, WordPress requires a little bit of extra love when it comes to performance. Vanilla WordPress implementations frequently access the SQL database to look up information which causes frequent roundtrips to the server when users are interacting with the website. 

    The dynamic nature of this setup, which is the biggest advantage of WordPress as a content management system (CMS), is also it’s the biggest drawback. 

    How Caching Works

    Caching plugins like WP Rocket create a static version of your website and display it to visitors instead of making round trips to the database and backend servers. 

    When you make changes to your website or add new content, WP Rocket caches that version and shows the most up-to-date files to your users. To find out more about how this magical plugin works, check out the WP Rocket features

    How Minification Can Improve Performance

    Minification is another important feature that makes websites perform better. This process removes all unnecessary characters and spaces from website files, making them readable to humans and creating more efficient versions of those files. 

    Since computers don’t need space to open and display files, it’s much faster to read and render them. Minifying files can help improve website speed but also has to be tested thoroughly because it can sometimes cause issues (which we will cover in future sections of the article). 

    What Are Asset Delaying and Deferring?

    Delaying website assets from loading until needed is exactly what it sounds like. Using WP Rocket, you can delay or defer loading a file or image until a user scrolls to that section or starts interacting with a website feature. This can significantly improve website performance because you can force the website to only load the initial portion that a visitor needs to see when they land on your website. 

    Now that you know a bit more about caching and minification let’s jump into common issues we see when working with clients and show you how to fix them using WP Rocket. 

    4 Common Website Performance Issues 

    We have a lot of experience building and helping clients improve the performance of websites. 

    The most common issues we see when working with websites that we inherited from other developers are the following:

    1. Large and uncompressed images
    2. Misconfigured caching plugins, or no caching plugins
    3. Uncompressed assets (CSS and JavaScript files) with no delay or defer features
    4. Inefficient themes and plugins 

    How to Identify Performance Issues

    There are a number of free tools that you can use to diagnose and resolve website performance issues. Our favorite tools are PageSpeed Insights, GTmetrix, and WebPageTest

    Don’t be afraid to use all three because they offer unique insights and suggestions on resolving issues. PageSpeed Insights is the most important and reliable tool, in our opinion. This is the Google recommended tools for troubleshooting and fixing performance issues identified in the Google Search Console.

    In the next few sections, we will dig into the most common performance issues and how to fix them. 

    1. Uncompressed Images

    Using large and uncompressed images is the most common issue that negatively impacts website load speeds. The average website size in 2022 is around 2.3MB for desktop and around 2MB for mobile versions. 

    Source: HTTP Archive
    Source: HTTP Archive

    If your website uses several high-quality images, you can quickly exceed the average website size and slow it down. This would cause the website to load slower and the pictures to load after the text, which gives websites that mid-1990s vibe. 

    Compressing images prior to uploading them to your site is key. You can automate this process by using tools like Imagify. Check out this article for other suggestions on how to compress and serve images on websites. 

    2. Misconfigured or Missing Caching Plugins

    Since WordPress uses a client-server architecture, enabling and configuring caching is a must. Using a caching plugin can resolve many performance issues that WordPress website owners experience. 

    We encounter a lot of sites that completely miss this step. This can cause websites to take forever to load, especially on mobile devices, which are even less forgiving than desktop devices when it comes to website performance.

    Caching plugins tend to be complicated and easy to misconfigure. This is another reason why we prefer WP Rocket. It’s really easy to configure, and it is set up in order to get great results in no time. 

    3. Uncompressed Assets with no Delay Features

    Compressing other website assets like CSS and JavaScript (JS) files is easy with the right tools and can generate great results. In the next section, we will show you how you can do that to improve your website performance. 

    These same assets can also be combined, delayed, and deferred in order to improve performance further. These issues can be a bit harder to troubleshoot, but this is where tools like GTmetrix come in handy. 

    GTmetrix Waterfall Chart
    Source: GTmetrix Waterfall Chart

    GTmetrix has a waterfall chart that can show you all assets that are being loaded by your website. Without compression and delay, you will see more and bigger CSS and JS files being loaded.

    A word of caution: enabling compression and delay settings can sometimes break certain sections and features of your website. Make sure that you are testing them thoroughly each step of the way.

    4. Inefficient Themes and Plugins

    Inefficient WordPress themes can include a lot of scripts, bloated assets, and bad programming practices, which can significantly impact web performance. We recommend working with themes that are primarily fast and efficient (like Hello Elementor, GeneratePress, and Astra). 

    While tools like WP Rocket can help alleviate issues caused by bad themes, it’s easier to avoid these entirely by using fast themes when building new projects. 

    Avoiding unnecessary plugins is another great idea when focusing on performance and troubleshooting slow sites. Installing a lot of plugins can slow down a website significantly. 

    While there is no hard and fast rule when it comes to the number of plugins you should use, we recommend not using any more than you have to. Not all plugins are created equally, and some are definitely better than others. When we work with clients looking to improve their website performance, we try to eliminate as many unnecessary plugins as possible. 

    How We Use WP Rocket to Achieve >90% Scores

    Nobody enjoys using a slow website. Especially not on their mobile devices. 

    After you identify performance issues experienced by your clients’ websites, you can resolve them using WP Rocket and score over 90% on mobile. 

    What This Means for Your Clients and for Your Agency

    We recently helped a client improve performance from 54% to 97% on mobile just by installing and configuring WP Rocket:

    We have seen performance improve conversions, SEO, and visitor satisfaction for our client websites. In fact, according to research, over half of the visitors will abandon a website that takes longer than 3s to load

    Google has also indicated that fast load speed is a ranking factor, meaning that if your website is faster than the competition, it will rank higher on the Google search. 

    In another example, we used WP Rocket to improve mobile performance from 24% to over 90% and help them pass Core Web Vitals (see screenshot below). Shortly after performance issues were resolved and Google Search Console slowness errors cleared, we saw their SEO traffic jump by 55%.

    As an agency, we use the WP Rocket Infinite plan and install WP Rocket on all of our client websites in order to improve performance. We use this as a benefit of using our agency over others which may force you to purchase your own premium plugins. 

    Our clients enjoy the benefits of having access to some of the best plugins in the market (such as Imagify and WP Rocket). WP Rocket also makes it super easy to manage sites in their platform and remove them if necessary. All the websites using your license will show up in your account, and you can easily remove or even ban sites where you no longer want to use your license. 

    In the next section, we go through the common WP Rocket features we use on WordPress websites to improve performance and score over 90% on mobile. 

    1. Cache Settings

    We always turn on “Enable caching for mobile devices” in the WP Rocket Cache section. Since Google judges the speed performance based on how your website performs on mobile devices, this setting is a must. 

    We prioritize performance improvements for mobile devices because they are harder to achieve. If you achieve great results on mobile devices, you will also experience great performance on desktop devices since they are a bit more forgiving (due to faster home internet and desktop speeds). 

    Cache settings - WP Rocket
    Cache settings – WP Rocket

    The “Cache Lifespan” setting is also something that we typically increase in order to improve performance. The default is 10 hours, meaning that every 10 hours, the website cache will be completely deleted. 

    This is unnecessary, and we usually increase this setting since the updated pages will automatically be regenerated and preloaded by WP Rocket. 

    2. File Optimization Settings

    The File Optimization section is one of the most important and impressive sections of WP Rocket. But with great power comes great responsibility. 

    We recommend that you enable these settings one by one and test thoroughly in Chrome Incognito with browser caching turned off to make sure that your website doesn’t break. If it does break, you can revert or troubleshoot the particular setting.

    CSS Optimization

    The section on the top handles modifications and improvements for CSS files, and the section on the bottom handles JavaScript file improvements. 

    CSS Optimization tab - WP Rocket
    CSS Optimization tab – WP Rocket

    Turning on the “Minify CSS files” feature will remove all spaces and unnecessary characters from your website’s CSS files and make those assets quicker to load. We usually turn on this setting. 

    We usually leave combining CSS and JS files off because most of our sites are hosted on servers that support HTTP2, and it can be more efficient to load the files separately instead of combined. 

    Optimizing CSS delivery is also a great feature that you can try if you see warnings in PageSpeed Insights. As you can see in our example above, we don’t have this setting turned on and are still getting 97% on mobile for this particular client site. 

    Turning on this setting can be beneficial if you are looking for further improvements. This setting will remove all of the unused CSS from your website and make it more efficient because your website won’t need to load and execute as much code. 

    Remove Unused CSS - WP Rocket
    Remove Unused CSS – WP Rocket

    As you can see in the above example, testing this feature thoroughly is recommended, but it can yield some impressive results. 

    JavaScript Optimization

    The JavaScript optimization section has similar options and features. 

    We recommend turning on JavaScript minification but leaving “combine” off if you are running servers that utilize HTTP2.

    JavaScript optimization tab - WP Rocket
    JavaScript optimization tab – WP Rocket

    Delaying and deferring JavaScript execution will also significantly improve website performance. In fact, most websites will experience the biggest impact by loading a lot of JavaScript files that are not deferred and delayed.

    Deferring and delaying JS - WP Rocket
    Deferring and delaying JS – WP Rocket

    The defer and delay sections can cause certain features to break and stop working, so turn these on one by one and test your website. If you do experience issues, there are ways to troubleshoot. 

    Some popular themes and plugins tend to break when this setting is turned on. One of the most common examples is Elementor Pro. WP Rocket has you covered if you experience an issue similar to this. Check out their JavaScript exclusions troubleshooting guide for more details and add their recommended scripts to this section.

    For example, for Elementor Pro websites, you can find the scripts that should be excluded and add them to this section and still benefit from this feature for the rest of the websites’ JavaScript files.  

    Delay JavaScript execution - WP Rocket
    Delay JavaScript execution – WP Rocket

    3. Media Options and Tuning

    Another common issue that we see is uncompressed images and a lack of lazy loading. 

    Uploading untuned images can impact performance significantly, so tune and compress your images before uploading them to your website. You can also use a plugin like Imagify in order to compress them automatically after the fact. We utilize this method for our client sites because we want to automate this part and sustain good performance for our clients. Imagify integrates well with WP Rocket as it is developed by the same team. WP Rocket will recognize and utilize Imagify if installed on the same website. 

    We recommend turning on all of the features under the Media tab in order to enable LazyLoad for images and videos. This will ensure that images are only loaded once a visitor scrolls to that section. 

    You can exclude images like your logo or your main hero section image by adding them to the “excluded images or iframes” section.

    Media tab - WP Rocket
    Media tab – WP Rocket

    Adding missing image dimensions is also recommended as good web development and accessibility practice. Since some themes and developers miss this step, WP Rocket can help you by automating this for images that don’t have dimensions. We always use this setting when working on client websites.

    4. Preloading 

    Preloading in WP Rocket is turned on by default, and we recommend leaving it on. It simulates a website visitor accessing your site and generates a cached version of your website so that the cache is already present when an actual visitor arrives.

    Preloading tab – WP Rocket

    Preload links are also a cool feature that starts loading a site when a user hovers over a hyperlink. Once the user clicks on the link, the page will be almost instantly loaded. 

    5. Other WP Rocket Settings

    Another very useful but optional feature is “Database cleanup”. We run this feature on sites that have had a lot of post revisions and spam comments to speed things up. There is also an option to automate this cleanup and run it every once in a while. We typically recommend doing this step manually after taking a backup of the database, just in case something goes wrong. 

    We also recommend leaving the default “Control Heartbeat” option turned on under the Heartbeat section. The heartbeat is a default WordPress scheduled task that helps by autosaving a post revision while a user is writing it. It’s a very useful feature but can cause unnecessary use of server resources. 

    Heartbeat tab - WP Rocket
    Heartbeat tab – WP Rocket

    WP Rocket will automatically reduce this activity from 1-minute to 2-minute intervals in order to preserve server resources and help with performance. 

    Other Add-On settings include turning on Varnish caching (automatically detected by WP Rocket), and WebP compatibility.  

    You can further help improve website performance on the server side by using Varnish. If your hosting provider uses Varnish, turn this setting on if it’s not automatically recognized. 

    WebP is a relatively new image compression standard and file extension that all modern browser support. For better performance, an image compression plugin like Imagify can automatically convert your png and jpg images to WebP. WP Rocket can automatically serve these images from the cache for you.

    As an agency, one of our favorite features is exporting and importing settings from one site to another. Since most of the settings and tools we use are similar across projects, exporting and importing settings into another site saves us a lot of time! 

    Wrapping Things Up

    By turning on these settings and testing your website thoroughly, you can get impressive results for your client websites. WP Rocket makes enabling and testing these features super easy and offers awesome troubleshooting tips if you run into issues. 

    Sustaining Performance Results After Tuning

    Once you launch a fast and efficient website, your work doesn’t end there. It’s easy to add the bloat back into the website but introducing unnecessary plugins, uploading large images or videos, not keeping your database clean, and not keeping your website up to date (plugins, core, and PHP versions). 

    We always test website performance once a month using PageSpeed Insights and GTmetrix to ensure that the website continues to load quickly. It’s also recommended to keep an eye out for new WP Rocket features and updates that can help improve things further. WP Rocket is always improving and adding new functionality that can help users increase their website performance. 

    Adding WP Rocket to your agency arsenal can help you create super fast websites and help you improve website speeds for existing clients. We hope this article has helped encourage you to add WP Rocket as your WordPress agency’s secret weapon. 

    The post Using WP Rocket as a Secret Weapon for Our WordPress Agency appeared first on WP Rocket.