Do you want to update WordPress but don’t know where to start? Often beginners are afraid that an update may break their website.
This fear is understandable. However, it’s important to use the latest version of WordPress for the best website security and performance.
In this beginner’s guide, we will show you how to safely update WordPress like a pro without breaking your website.
Upgrading your WordPress website is a regular maintenance task. We have created an easy-to-follow infographic that you can use as a reference guide.
Just click on the image below to view the full infographic, or continue reading the text instructions.
Why Should You Always Update WordPress?
Leading WordPress security research shows that the majority of WordPress websites that get hacked have outdated WordPress core, plugins, or themes.
WordPress is actively maintained by developers from all over the world. These developers find and fix bugs, add new features, and hunt down security vulnerabilities on a regular basis. These changes are then released in a new WordPress version.
If it is not a big release, then WordPress can automatically update itself to the newer version. For major releases, unless you are on managed WordPress hosting, you will have to manually initiate the update yourself.
You need to update to make sure that your website has the latest security patches, the newest features, and the best speed and performance.
Even if you have an automated WordPress backup plugin set up like Duplicator, you still need to create a new backup and store it safely in a remote location, such as your computer or cloud storage like Google Drive.
Once you have created a complete backup and stored it remotely, then you can move on to the next step.
Updating WordPress to the Latest Version
There are two easy ways to upgrade your WordPress site to the latest version. One is automatic, and the other one is manual. We will show you both of them.
Method 1: Updating WordPress Using the Built-in System (1-Click)
This method is easier and is recommended for all users.
First, log in to the admin area of your WordPress website and go to the Dashboard » Updates page.
You will see the notice that a new version of WordPress is available. Now you just need to click on the ‘Update to version X.X.X’ button to initiate the upgrade.
WordPress will now fetch the latest version of the software and install it for you.
You will see the update progress on your screen. During the upgrade, WordPress will put your site into maintenance mode.
Your site will still be visible to users, but you can’t install plugins or themes while the update is underway.
Once the update is over, you will be redirected to the WordPress welcome screen. Depending on each release, you may see a page explaining what’s new in WordPress and the features you should try.
That’s all; you have successfully upgraded WordPress to the latest version.
First, you will need to download the latest version of WordPress. Head over to the WordPress download page and click on the ‘Download’ button.
Your browser will now download WordPress in a zip file. Once downloaded, you need to extract the zip file.
Inside you will see a wordpress folder. This folder contains all the WordPress files you need for the update.
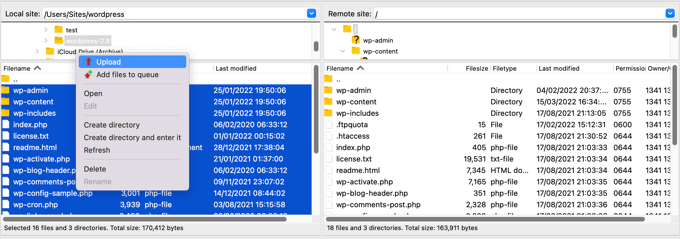
Next, you need to open your FTP client and connect to your website. Once connected, go to the wordpress folder you just extracted from the zip file in the local files column.
In the remote files column, go to your website’s root folder. This folder could be public_html or named after your website’s domain name. Inside this folder, you will see your WordPress files and folders.
You should select all files inside the wordpress folder on your computer and then right-click to select ‘Upload’.
Your FTP client will now start uploading WordPress files from your computer to your website.
However, your website already has older versions of the files with the same name. You will be asked what you want to do with those files. You need to select ‘Overwrite’ and check the box next to ‘Always use this action’.
This will ensure that all WordPress files on your website are replaced by the newer versions.
Once the upload is finished, you need to go to the admin area of your WordPress site. This step is necessary because sometimes, a newer version of WordPress may also need to update your WordPress database.
In that case, you may see a page mentioning that a database update is required. Simply click the ‘Update WordPress Database’ button to continue.
That’s all; you have successfully updated your WordPress website.
Things to Do After Updating WordPress
Once you have upgraded WordPress on your website, you need to make sure that everything is working as expected. Simply visit your website in a new browser window and review the settings in the WordPress admin area.
If you come across any issues, then take a look at our list of common WordPress errors and how to fix them. If the issue you are facing is not listed there, then follow the steps in our WordPress troubleshooting guide to figure out the problem and apply a solution.
If you liked this article, then please subscribe to our YouTube Channel for WordPress video tutorials. You can also find us on Twitter and Facebook.
Are you looking to use a geolocation plugin on your WordPress website?
Finding where your visitors are coming from can help you create personalized experiences. You can show marketing campaigns to people from specific countries, boost engagement, and increase conversions.
In this article, we will take a look at the best WordPress geolocation plugins.
Why Use a WordPress Geolocation Plugin?
Geolocation plugins can help you learn about your visitors’ physical locations so that you can create custom user experiences. By using geotargeting in WordPress, you can show relevant and location-specific content and products to people.
As a result, you will see an increase in engagement, build trust with your audience, and get higher conversions on your WordPress website.
There are several ways to use geolocation plugins. For instance, you can create marketing campaigns in your eCommerce store and show discounts and shipping offers to customers from specific countries.
If you have a physical store, then tracking geolocation can help you get more customer reviews for your business. You also display map pins to users that are in your region and direct them to your business.
Similarly, you can showcase your best content to users from different locations. Let’s say you have a food blog with an article on the best places to eat in Indonesia. Using geotargeting, you can display this content as a popup to people from that region.
Another advantage of using a geolocation plugin is content locking and preventing unwanted access to your site. With geolocation, you can restrict access to articles or parts of your website to users from different countries.
If you are running an affiliate website, then geotargeting can also help you show the correct affiliate links or products to visitors based on their location.
That said, let’s see which is the best geolocation plugin for WordPress.
OptinMonster is the best lead generation and conversion optimization software for WordPress websites. It helps you grow your email list, get more leads, and boost conversions.
OptinMonster offers a drag-and-drop campaign builder and dozens of beautiful templates for your marketing campaigns. You can create popups, floating bars, fullscreen messages, slide-in popups, and more.
The best thing about using OptinMonster is that it offers powerful display rules. For example, you can use the Physical Location display rule to geotarget your campaigns to users from different countries.
The Physical Location rule lets you show relevant content, discounts, and other campaigns to the right audience.
You can also translate your targeted message into different languages and then display it to users from a particular country.
Here’s a preview of a campaign by Sportique, where customers in San Fransico get free delivery for orders over $80.
OptinMonster also lets you combine geolocation targeting with other display rules.
For example, you can use its Exit-Intent technology to show a popup to users who are about to leave your site. Or you can schedule location-based campaigns and display offers to visitors in a particular timezone.
Besides that, OptinMonster easily integrates with leading email marketing software. Plus, there are lots of customization options in the campaign builder.
WPForms is the best contact form plugin for WordPress. It is a beginner-friendly plugin that offers a drag-and-drop form builder, tons of form templates, customization options, and more.
WPForms has a Geolocation addon that helps you collect location information with form submissions. You can find out which country, state, and city your users are from.
This helps you better understand your audience by tracking their journeys and providing personalized experiences. You are able to show targeted messages based on the user’s location and turn leads into customers.
Using the WPForms Geolocation feature, you can also embed Google Maps into your forms. The feature can autocomplete form entries, making it easier to enter an address quickly. Users can even adjust the location pin on the map to enter their location.
Besides that, WPForms lets you accept file uploads, create multi-page forms, offer user registrations, set up surveys, capture partial form entries, make conversational forms, and more.
Alternatively, if you need an advanced form plugin that offers the geolocation feature, you might want to consider Formidable Forms.
MonsterInsights shows important data using analytics reports inside your WordPress dashboard. For example, you can use its Top Countries report to see where your website visitors are coming from.
Using this data, you can better understand your audience and create content or offers for users from different locations.
Aside from that, MonsterInsights also helps set up advanced tracking on your website. For example, you can track eCommerce performance and see which products drive the most sales. Similarly, the plugin also helps track form conversions in WordPress.
Other features offered by MonsterInsights include link and button click tracking, custom dimensions, site notes and annotations, top keywords, and more.
GeoDirectory is the next WordPress geolocation plugin on our list. If you have a directory website and want to show global listings, then this is the right plugin for you.
It works with popular WordPress themes and page builders. You can easily create business directories with maps, locations, reviews, and addresses using GeoDirectory.
The plugin also offers different addons. For instance, you can use the location manager to add unlimited locations, easily switch between other locations, add smart search on your website, and more.
GeoDirectory includes other features, including a powerful events manager, automated business owner claims, spam protection, and integrations with WordPress backup plugins.
Push notifications are short messages that appear in your user’s browser. They have a high open rate since people already opt-in to view these notifications.
Using PushEngage, you can create personalized messages based on the user’s geolocation. The plugin lets you segment your subscribers based on their region. This way, you can send targeted notifications to users from specific regions.
With PushEngage, you can also A/B test your messages, create automated drip campaigns, send offline notifications, set up smart triggers to send messages, and more.
GeoTargetingWP is another geolocation WordPress plugin that helps you show content and products to users based on their location.
The plugin is a great solution for affiliate marketers because you can show country-specific offers. For example, the plugin lets you display particular affiliate products and links based on the user’s location.
With GeoTargetingWP, you can also restrict access to different content or parts of your website based on geolocation.
Similarly, you can also use GeoTargetingWP in your WooCommerce and Easy Digital Downloads store. The plugin will let you restrict access to your products based on the customer’s location. This feature is really helpful if your products can’t be shipped to certain areas.
Other than that, the plugin will auto-detect the user’s location and help you set up geotargeting based on country, city, state, zip code, or radius. It can also create geotarget menus and widgets for WordPress blogs.
The plugin uses the fear of missing out (FOMO) effect to display user behaviors on your website as social proof. This helps build trust with your visitors and increase sales.
With TrustPulse, you can use geolocation to show a recent purchase to users from specific locations.
For example, let’s say someone from Boston buys a product on your site. You can then show this notification to other visitors from Boston as social proof.
TrustPulse can also help show live notifications for demo registrations, survey completions, email signups, and more based on the user’s location.
The plugin is super easy to use, and you can set up targeted notifications in no time. It also offers different customization options, conversion rate tracking, analytics reports, and more.
Geolocation is a free WordPress geolocation plugin that allows you to add geotags to content on your website. Using the plugin, you can add a location or address to any blog post or landing page.
Once you have added the geo-information to your content, visitors will see a short description before, after, or at a custom location within the blog post or page.
Geolocation also lets you add a map with a pin to content on your site. You can use a shortcode to display this map. The plugin works seamlessly with Google Maps and Open Streetmaps.
CloudGuard is another free WordPress geolocation plugin that uses the power of the cloud and a content delivery network (CDN) to restrict access to the login page.
The plugin adds an extra layer of security to your WordPress website. It helps protect unwanted login attempts from specific locations. You can select which countries users can log in from and block access from other regions.
CloudGuard is a lightweight plugin because it uses Cloudflare’s free geolocation service. This means that you won’t have to worry about your website being slowed down by the plugin.
The plugin also helps you monitor login attempts in your WordPress dashboard. It even displays a world map showing where the unauthorized logins have occured.
What Is the Best WordPress Geolocation Plugin?
If you want to run targeted campaigns based on the user’s location, then OptinMonster is the best WordPress geolocation plugin in our experience. It offers powerful display rules and multiple campaign types to choose from. Plus, you can combine different targeting rules to show your campaign to the right audience at the right time.
On the other hand, if you are looking to learn more about your visitors and find out where they are coming from, then WPForms and MonsterInsights are the perfect plugins for the job. They will help you see the top countries that drive traffic and track user journeys across your WordPress forms.
Besides that, you can use GeoDirectory to show global listings on your directory website. Or PushEngage can help you send targeted push notifications to users based on their location.
If you liked this article, then please subscribe to our YouTube Channel for WordPress video tutorials. You can also find us on Twitter and Facebook.
Are you trying to decide between Magento vs WooCommerce for your online store?
Magento and WooCommerce are two popular eCommerce platforms on the market. Both offer multiple features for creating an online store and making money online.
In this article, we will compare Magento vs WordPress and explain their pros and cons, so you can choose the best platform for your needs.
Overview: Magento vs WooCommerce
Before we get into details, let’s take a quick look at both popular eCommerce platforms and what makes them stand out.
What is Magento
Magento, now also known as Adobe Commerce, is an eCommerce platform that allows businesses to create online stores, accept payments, and manage products.
It has an open-source community edition available for free download. It also has paid solutions that come with additional features, cloud hosting, and support.
It allows you to easily create an online store, accept payments, manage inventory, and more. It runs on top of WordPress, which gives you access to thousands of WordPress plugins and themes to grow your eCommerce business.
Both platforms are open-source software and can be extended with extensions, and utilize templates for design. However, they both have different pros and cons which make them unique.
What to Look for in Your eCommerce Platform?
If you are just starting out, then you would want to keep a few things in mind when choosing a platform. These basic factors are crucial when deciding which eCommerce solution will be better for your business.
Budget – Cost of starting your store and recurring expenses that would affect your business.
Ease of Use – How easy is it to use for beginners
Payment Methods – It should support multiple payment gateways. If you require certain payment methods, then you need to make sure that it supports them.
Scalability – Your eCommerce platform should be able to scale with your growing business needs
These are just some of the basic things you need to look at. Depending on your business, you may also want to consider how the platform does other things like inventory, taxes, invoices, and more.
That said, let’s compare Magento vs WooCommerce. You can click the links below to jump ahead to any section:
For most startups, the cost is one of the most significant factors in decision-making. When starting your eCommerce website, you need to evaluate the cost while factoring in how those costs will grow as you need more resources, add-ons, and other services.
Cost of Magento Ecommerce Platform
Magento offers 2 different versions. First, you have a Magento open-source version, also known as the community edition.
You can download and install this yourself on any hosting provider. It does not include all features, and it does not come with any support.
Second, you have Adobe Commerce which includes 2 paid plans. The Commerce Pro plan includes Adobe application, support, deployment tools, CDN, 50GB of testing, DDoS protection, WAF, and more.
On the other hand, there is a Manager Services plan which offers additional features like designated cloud infrastructure, custom site monitoring and personalized run book, go-live process coaching, dedicated escalation management, and more.
To find out the prices for each of these plans, you’ll need to get in touch with the sales team and request a quote.
Having that said, even the Magento community version is not cheap. The core software you can download for free, but you will need at least a VPS hosting plan or a cloud host like Amazon Web Services to run it.
This means even though you will be using the free version, your hosting bill will still be quite higher than a shared hosting plan.
If you purchase paid extensions and themes, or hire a developer to work on your Magento store, then all these will significantly increase your costs.
Cost of WooCommerce
WooCommerce is available as a free software that anyone can download and install. It runs on top of WordPress which means you can install it on any WordPress website.
WooCommerce itself is free. However, you will need to register a domain name, ensure you have a SSL certificate, and purchase WordPress hosting to start your WooCommerce store.
Normally, you can buy a domain name for $14.99 / year, an SSL certificate for $69.99 / year, and hosting for $7.99 / month. This is cheaper than the self-hosted Magento community edition, but still, it is a lot of money for a startup.
Bluehost, an officially recommended WooCommerce and WordPress hosting provider, has agreed to offer WPBeginner users free domain names, SSL certificates, and discounts on hosting.
This offer will help you start your online store for as low as $9.95 / month.
The cost of starting a WooCommerce store is a lot lower than the Magento community edition. There are a lot more choices available for WooCommerce hosting plans than Magento, which helps you choose a plan that fits your budget.
Apart from hosting, using paid extensions and themes for WooCommerce will also affect your costs. However, WooCommerce gives you access to more than 60,000+ WordPress extensions and thousands of free WordPress themes.
You can easily find free WooCommerce plugins as alternatives to paid extensions. There are also tons of free WooCommerce themes that you can use to further reduce your costs.
With affordable hosting plans, and an abundance of low-cost free extensions and themes, WooCommerce is clearly less costly than Magento.
Winner: WooCommerce
Ease of Use: Magento vs WooCommerce
Most folks starting an eCommerce business are not programmers or web developers. They need a platform that they can use easily without paying someone a fortune to help them do basic things.
Even experienced users prefer an easy-to-use platform that helps them focus on growing their business instead of struggling with software.
Let’s take a look at Magento and WooCommerce to see which one is more easy to use.
Magento – Ease of Use
Magento is a powerful eCommerce-specific platform, packing tons of built-in features that work out of the box. It comes with an advanced setup process that can be complicated for new users.
It is not easy to install, and most hosting companies do not offer pre-configured installers for Magento. The installer language is very developer-centric which may leave beginners a bit clueless about several important settings.
After the setup, you will have to spend some time learning the basics. Installing extensions or customizing themes is not always easy, and you may need to seek help to set them up.
You can find tutorials and documentation online, but most often they are written for developers and not for DIY users.
Overall, Magento is extremely powerful and comes packed with a ton of features, but it is not the easiest-to-use eCommerce platform.
WooCommerce – Ease of Use
WooCommerce is a little easier to use compared to Magento. The installation is simple as many WooCommerce hosting providers will automatically install it for you along with WordPress.
Since WooCommerce is a WordPress plugin, you will need to install WordPress first. Even if your host doesn’t automatically install WordPress, chances are that there would be an auto-installer that would let you do it with just a few clicks.
WooCommerce comes with a setup wizard that will walk you through the initial setup like creating pages, setting up payments, choosing the currency, set shipping and tax options.
Once you are up and running, you will find plenty of help to do almost anything. WooCommerce themes and plugins are easy to install and come with their own settings.
WooCommerce still has a bit of a learning curve, but overall it is far easier to use than Magento.
Winner WooCommerce
Payment Methods: Magento vs WooCommerce
As an eCommerce store, you will accept online payments on your website. There are many payment gateway companies that allow you to take credit cards and other services, like PayPal or AliPay.
Some payment gateways may not be available in all regions. You need options that are available for both you and your users.
Let’s see what payment options are available to Magento and WooCommerce stores.
Magento – Payment Options
Magento comes with PayPal, Authorize.net, cash on delivery, bank transfer, and purchase order payment methods by default. It also has extensions available for many popular payment gateways including Stripe, 2Checkout, Braintree, WePay, Google Checkout, Skrill, Venmo, and more.
Magento’s APIs allow developers to easily integrate payment gateways. If the payment gateway you are looking for is not yet available, then you can hire someone to create a custom extension for that.
WooCommerce – Payment Options
WooCommerce offers PayPal and Stripe payments by default. It also supports all major payment gateways through extensions and addons.
WooCommerce even supports many regional and lesser-known payment companies. Since it is so easy to extend, any payment company can create an add-on for WooCommerce support.
We feel that both Magento and WooCommerce do an equally great job in terms of payment support. Both platforms have options for multiple payment choices.
Winner: Tie
Extensions and Integrations: Magento vs WooCommerce
There is a limit to the features your eCommerce platform can add to the core software. This leaves room for third-party extensions, tools, and integrations to extend the platform by offering additional features.
Both Magento and WooCommerce have extensions, themes, and support offered by third-party integration providers.
Magento Extensions
Magento has an active community of developers, agencies, and freelancers. There are plenty of free and paid third-party extensions available for Magento that you can use.
These extensions allow you to easily add new features and integrate other tools and services into your online store.
Currently, Magento Marketplace has 3,783 extensions. Out of those 1,071 were available for free. That’s a decent amount of extensions considering that Magento has a lot of functionality in the core software.
WooCommerce Extensions and Addons
Since WooCommerce runs on top of WordPress this gives you access to more than 60,000 free WordPress plugins and thousands of paid plugins.
Whether you want to add contact forms, lead generation forms, Google Analytics, or any other feature imaginable, chances are that there is already a plugin available that you can use.
A large number of extensions means you can connect your WooCommerce store to any third-party service like your email marketing company, payment gateways, CRM software, and more.
Winner: WooCommerce
Scaling Your Business: Magento vs WooCommerce
Growing your eCommerce business comes with its own challenges. As your website traffic and sales grow, you will need more server resources to keep up with your business goals and growth trajectory.
Both Magento and WooCommerce can handle large eCommerce stores with huge spikes in traffic. However, they are two different platforms which affects their scalability and infrastructure requirements.
Let’s take a look at how Magento and WooCommerce handle scalability on large eCommerce websites.
Scaling Magento
Magento is designed from the ground up to be a robust eCommerce platform. However, when it comes to scaling, your costs and technical challenges will skyrocket.
If you are using the community edition of Magento, then you will have to do it on your own. Magento is a resource-intensive software, which means if you are on a VPS hosting, then you will have to upgrade to a dedicated server and then to a cloud hosting service like Amazon Web Services.
You will also need to optimize your store for caching, manage backups, protect against DDOS attacks by using a website firewall, and more. If you don’t have experience in managing large websites, then you will need to hire Magento specialists.
If your business can afford the growing costs, then the easier option would be to switch to Adobe Commerce plans.
Scaling WooCommerce
WooCommerce stores will face the same technical challenges as Magento. However, the good thing is that you have a lot more options to continue growing while keeping your costs low.
First, you have several easy caching options to improve performance which can be implemented even by beginners. This will keep your server resources low and allow you to continue growing for a while.
Next, you can move to managed WordPress hosting providers like WPEngine or Liquid Web. These WordPress hosting companies allow you to easily scale your website to meet your growing business.
Finding WordPress specialists to help scale your online store is not as costly as Magento. Even at the enterprise level, your eCommerce store would be able to perform well at much lower costs.
Winner: WooCommerce
Magento vs WooComemrce: Which One is a Better E-commerce Platform for You?
Magento and WooCommerce are both full-featured eCommerce platforms that you can use to build any kind of online store. However, it comes down to costs, and your personal skills to choose between them.
WooCommerce obviously has the advantage of a large user base and market share. It runs on WordPress which is already the world’s most popular website builder. WordPress users would feel at home when working on WooCommerce.
It also beats Magento in terms of ease of use, and cost of building and running an eCommerce store at scale.
If you want an easy-to-use, cost-effective, and easy-to-scale eCommerce platform, then WooCommerce is the perfect fit for you.
Magento, on the other hand, is more suitable for enterprise-level businesses with their own development teams or businesses who can spend money on hiring someone.
If you liked this article, then please subscribe to our YouTube Channel for WordPress video tutorials. You can also find us on Twitter and Facebook.
Do you want to know why your website visitors abandon your site?
Ever wished there was an easy way to read your website visitors’ mindsWITHOUT learning telepathy or using an expensive user survey tool that costs a fortune?
If you’re like me and most other smart website owners, then you have at least wished for this solution a couple of times in your WordPress journey.
Today, I’m excited to share the launch of my free UserFeedback plugin, which enables you to collect real user feedback quickly and easily.
We built this tool because we want to know the “why” behind every website visitor’s action that Google Analytics won’t tell you.
When you know the why or the intent behind users’ actions, you can easily figure out why your visitors buy or do not buy your products.
Background Story
In 2016, I acquired a Google Analytics plugin for WordPress, completely revamped it, and launched it as MonsterInsights.
The goal of this plugin was to help users make informed decisions by showing them the data that matters to their businesses.
For example, you can easily see which products or pages are the most popular or where your most profitable traffic comes from.
As the plugin grows, I often get asked by our users: is there a way to understand the intent of every website visitors’ actions?
When you know the intent … the “why” behind users’ actions, you can figure out why customers purchased from you or, better yet, why they did NOT purchase from you.
Unfortunately, Google Analytics only tells you half the story: “What is happening on your website?”. It’s not built to answer the other half of the question: “Why are your visitors doing that?”
In fact, most of the customer feedback tools in the market charge exorbitantly high prices, which aren’t affordable to small businesses.
After a lot of thought and consideration, we decided to release a brand-new plugin called UserFeedback, which enables you to understand user intent by collecting real time feedback from them.
With UserFeedback, you can:
Create a demographic survey to fill out your buyer personas
Ask website visitors to leave their phone number for a callback
Run customer satisfaction surveys to see what buyers think about your products
Run product surveys to find out what buyers are actually using your products for
And so much more
What is UserFeedback?
UserFeedback is a free and powerful WordPress plugin that lets you launch in-the-moment surveys to collect quality feedback from your website visitors.
It comes with built-in templates and questions to make creating feedback surveys quick and effortless, including:
Website feedback/experience
Ecommerce store survey
NPS survey
Post purchase review
Product usage survey
Competitive research
And so much more!
Anything you’ve ever dreamed of being able to easily ask your customers, you can ask with UserFeedback.
In combination with a powerful analytics tool like MonsterInsights, website owners can finally see both the “why†and the “what†of their users’ behavior on their WordPress websites.
When you have direct access to your visitors’ wants and needs, you can make changes that will take your website and business to the next level.
My plan is to continuously add more helpful templates and addons to make UserFeedback even more powerful and essential to understanding your website visitors.
Collect Feedback in Minutes, not Hours
UserFeedback makes it super easy to launch a survey in minutes, not hours. Its 20+ survey templates give you a head start, so you don’t always have to start a feedback survey from scratch.
Each of those templates is pre-designed for different user needs. Based on your requirements, choose the right template, make quick changes, and publish it on your website.
For example, the Website Design Feedback template comes with a star-rating question, whereas the NPS Survey template lets your users grade their loyalty on a scale of 1 to 10.
The best part is that you can build and preview your design within the dashboard.
Get Best Results with Laser Targeted Surveys
UserFeedback enables you to display the right surveys at the right time to the right users. Here are some targeting options you can use for the best results.
Logged in status: Choose to show your surveys only to logged in or not logged in users.
Page URL: Show it only on certain pages
Traffic source: Display it based on the traffic source, like organic traffic, PPC ads, social media, and so on.
Device type: Choose which types of devices the survey should appear
Display timing: Choose the right time to show the survey.
Exit intent / scroll targeting: You can show it to users who abandon the site on desktop or show when a user scrolls halfway down the page.
And much more…
Now that you know how UserFeedback works, let’s take a look at how our customers are using UserFeedback to grow their businesses.
1. Focus on What to Prioritize Next
Are you looking to redesign your website? Wondering how to improve your website copy to boost sales and conversions?
One of the best things about UserFeedback is that it lets you collect feedback score on every page of your site. That way, you can quickly find pages that aren’t resonating well with your audience and prioritize those pages while redesigning.
2. Get Feedback to Validate Your Plans
Pushing out new changes on your site can be intimidating. It’s especially true when you change the pricing plan on your website.
With UserFeedback, you can validate your plans with a survey and learn what users think about your latest plans.
3. Boost Profit by Reducing Customer Churn
UserFeedback comes with several targeting options, including exit intent. This targeting option helps you understand why users are leaving by collecting feedback at the exact moment when people churn.
4. Collect a Constant Stream of Great Suggestions
Do you want to encourage users to provide you with suggestions to improve your product?
One of the reasons most people hesitate to provide feedback is that it’s not easy to do so. With an on-site survey, you can make it convenient for them to send you feedback. Plus, you can collect a constant stream of suggestions to improve your product.
5. Fix the Problems Before They Develop
The biggest benefit of collecting feedback is that it helps you quickly identify problems before they develop. That means you can quickly rectify your problems before your customers start complaining about it.
Get Unlimited Everything – Questions, Responses, and Sessions
A big reason why we built UserFeedack is that most feedback tools are just too expensive. They slow down your site and charge you based on the number of responses and sessions …
Let’s take a look at how UserFeedback surveys compare to another feedback tool, Hotjar.
As you can see while the basic plan is free, it only allows you to get responses for up to 35 daily sessions.
On the other hand, UserFeedback lets you ask unlimited questions and get unlimited responses without a daily session limit!
What’s Coming Next for UserFeedback?
UserFeedback is a great tool that helps you uncover more insights about your website visitors that Google Analytics won’t tell you. I’m extremely pleased with the community response so far, as everyone is loving the new features.
We have lots of great features coming, including:
Customizable survey designs so you can fully tweak them to match your website’s colors, fonts, and personality.
Advanced integrations to automatically let you send a special email, add entries to a spreadsheet, and so on.
Additional prebuilt templates to collect feedback for a variety of additional websites.
We’re truly building something special here. If you have ideas on how we can make the plugin more helpful to you, please send us your suggestions.
As always, I want to thank you for your continued support of WPBeginner, and we look forward to continuing to serve you for years to come.
Yours Truly,
Syed Balkhi Founder of WPBeginner
P.S. Want us to acquire or invest in your WordPress business? Learn more about the WPBeginner Growth Fund.
Do you want to add HTTP security headers in WordPress?
HTTP security headers allow you to add an extra layer of security to your WordPress website. They can help block common malicious activity from affecting your site’s performance.
In this beginner’s guide, we will show you how to add HTTP security headers in WordPress.
What Are HTTP Security Headers?
HTTP security headers are a security measure that allows your website’s server to prevent some common security threats before they can affect your website.
When a user visits your WordPress website, your web server sends an HTTP header response to their browser. This response tells browsers about error codes, cache control, and other statuses.
The normal header response issues a status called HTTP 200. After this, your website loads in the user’s browser. However, if your website is having difficulty, then your web server may send a different HTTP header.
HTTP security headers are a subset of these headers. They are used to protect websites from common threats like click-jacking, cross-site scripting, brute force attacks, and more.
Let’s have a quick look at some HTTP security headers and how they protect your website:
HTTP Strict Transport Security (HSTS) tells web browsers that your website uses HTTPS and should not be loaded using an insecure protocol like HTTP.
X-XSS Protection allows you to block cross-site scripting from loading.
X-Frame-Options prevents cross-domain iframes or click-jacking.
HTTP security headers work best when they are set at the web server level, which means your WordPress hosting account. This allows them to be triggered early on during a typical HTTP request and provide maximum benefit.
That being said, let’s take a look at how to easily add HTTP security headers in WordPress. Here are quick links to different methods so that you can jump to the one that suits you:
1. Adding HTTP Security Headers in WordPress Using Sucuri
Sucuri is one of the best WordPress security plugins on the market. If you are using their website firewall service, then you can set HTTP security headers without writing any code.
First, you will need to sign up for a Sucuri account. It is a paid service that comes with a server-level website firewall, security plugin, CDN, and malware removal guarantee.
During sign-up, you will need to answer simple questions, and Sucuri documentation will help you set up the website application firewall on your website.
Upon activation, you need to go to Sucuri Security » Firewall (WAF) and enter your Firewall API key. You can find this information under your account on the Sucuri website.
After that, you will need to click the green ‘Save’ button to store your changes.
Next, you must switch to your Sucuri account dashboard. From here, click on the ‘Settings’ menu on top and then switch to the ‘Security’ tab.
From here, you can choose three sets of rules. The default protection will work well for most websites.
If you have a Professional or Business plan, then you also have options for HSTS and HSTS Full. You can see which HTTP security headers will be applied for each set of rules.
You need to click the ‘Save Changes in the Additional Headers’ button to apply your changes.
Sucuri will now add your selected HTTP security headers in WordPress. Since it is a DNS-level WAF, your website traffic is protected from hackers even before they reach your website.
2. Adding HTTP Security Headers in WordPress Using Cloudflare
Cloudflare offers a basic free website firewall and CDN service. It lacks advanced security features in its free plan, so you will need to upgrade to its Pro plan, which is more expensive.
Once Cloudflare is active on your website, you must go to the SSL/TLS page in your Cloudflare account dashboard and then switch to the ‘Edge Certificates’ tab.
Now, scroll down to the ‘HTTP Strict Transport Security (HSTS)’ section.
Once you find it, you need to click on the ‘Enable HSTS’ button.
This will bring up a popup with instructions telling you that you must have HTTPS enabled on your website before using this feature.
If your WordPress blog already has a secure HTTPS connection, then you can click on the ‘Next’ button to continue. You will see the options to add HTTP security headers.
From here, you can enable HSTS, apply HSTS to subdomains (if the subdomains are using HTTPS), preload HSTS, and enable no-sniff header.
This method provides basic protection using HTTP security headers. However, it does not let you add X-Frame-Options, and Cloudflare doesn’t have a user interface to do that.
You can still do that by creating a script using the Cloudflare Workers feature. However, we don’t recommend this because creating an HTTPS security header script may cause unexpected issues for beginners.
3. Adding HTTP Security Headers in WordPress Using .htaccess
This method allows you to set the HTTP security headers in WordPress at the server level.
It requires editing the .htaccess file on your website. This server configuration file is used by the most commonly used Apache webserver software.
Note: Before making any changes to files on your website, we recommend making a backup.
Next, simply connect to your website using an FTP client or the file manager in your hosting control panel. In the root folder of your website, you need to find the .htaccess file and edit it.
This will open the file in a plain text editor. At the bottom of the file, you can add some code to add HTTPS security headers to your WordPress website.
You can use the following sample code as a starting point. It sets the most commonly used HTTP security headers with optimal settings:
<ifModule mod_headers.c>
Header set Strict-Transport-Security "max-age=31536000" env=HTTPS
Header set X-XSS-Protection "1; mode=block"
Header set X-Content-Type-Options nosniff
Header set X-Frame-Options DENY
Header set Referrer-Policy: no-referrer-when-downgrade
</ifModule>
Don’t forget to save your changes and visit your website to make sure that everything is working as expected.
Note: Take care when editing code on your website. Incorrect headers or conflicts in the .htaccess file may trigger the 500 Internal Server Error.
4. Adding HTTP Security Headers in WordPress Using AIOSEO
The first thing you will need to do is install and activate the AIOSEO plugin on your website. You can learn more in our step-by-step guide on how to set up All in One SEO for WordPress.
You then need to head over to the All in One SEO » Redirects page to add the HTTP security headers. First, you will need to click the ‘Activate Redirects’ button to enable the feature.
Once redirects are enabled, you need to click on the ‘Full Site Redirect’ tab and then scroll down to the ‘Canonical Settings’ section.
Simply enable the ‘Canonical Settings’ toggle and then click the ‘Add Security Presets’ button.
You will see a preset list of HTTP security headers appear in the table.
These headers are optimized for security. You can review and change them if needed.
Make sure to click the ‘Save Changes’ button at the top or bottom of the screen to store the security headers.
You can now visit your website to make sure that everything is working fine.
How to Check HTTP Security Headers for a Website
Now that you have added HTTP Security headers to your website, you can test your configuration using the free Security Headers tool.
Simply enter your website URL and click on the ‘Scan’ button.
It will then check HTTP security headers for your website and show you a report. The tool will also generate a so-called grade label, which you can ignore as most websites will get a B or C score without affecting user experience.
It will show you which HTTP security headers are sent by your website and which ones are not included. If the security headers that you wanted to set up are listed there, then you are done.
We hope this article helped you learn how to add HTTP security headers in WordPress. You may also want to see our complete WordPress security guide and our expert picks for the best WordPress plugins for business websites.
If you liked this article, then please subscribe to our YouTube Channel for WordPress video tutorials. You can also find us on Twitter and Facebook.
Do you want to write a great blog post, but aren’t sure how to structure it?
You can write a compelling and helpful blog post, but without the right structure, only a few people may read it. The people who do visit your blog might even get lost and give up without finishing the post.
In this article, we will show you how to write a great blog post, even if you’re a beginner.
Why is Structure So Important in Blog Posts?
According to our blogging statistics research, there are over 600 million blogs. With so much competition, you’ll need to do everything in your power to make your blogs stand out, including using the right structure.
A well-structured blog leads the reader from one point to the next in a logical way that’s easy to follow and understand. Many people simply skim blogs, so the right structure also helps people find the parts they’re interested in reading.
A clear structure doesn’t just help visitors understand your content. Search engine bots will also find it easier to crawl your blogs and then show them to the right people. This will improve your search engine rankings and get more visitors to your WordPress blog.
How to Write a Great Blog Post (Structure + Examples)
You might be a world-class writer, but without a clear structure your blog posts may still be difficult to read.
With that in mind, let’s look at how you can write a well-structured blog post, even if you’re a complete beginner. Simply use the quick links below to jump straight to the topic you want to read about.
Your post’s headline is usually the first thing people see. No matter how good your blog’s content is, you’ll struggle to get readers with a boring title.
A compelling headline will catch a person’s attention no matter whether they spot it on social media, an RSS feed, in their search engine results, or some other location.
That said, the headline should describe what the post is about, while also making people want to read it.
With countless blogs on the internet, it’s hard to cut through the noise. While there’s no magic formula for creating the perfect headline, BuzzSumo analyzed over 100 million articles and concluded that the ideal headline length is between 11 words and 65 characters.
If you include numbers in your headlines, then research suggests people prefer to share headlines that have single-digit numbers.
BuzzSumo also found that more people engage with headlines that include the current year.
People are also more likely to share headlines that suggest newness, so you may want to try including phrases like ‘for the first time.’
Another trick is teasing must-have information by saying things like ‘need to know,’ ‘you need to,’ or ‘the best.’
If you’re writing a ‘how to’ post, then think about the problem your blog solves. What might someone type into a search engine when they’re facing this problem? This is often a great starting point for a compelling ‘how to’ headline.
After drafting a title, you can enter it into a headline analyzer such as AIOSEO. This plugin will use real data to score your headline and suggest ways to improve it. In this way, even beginners can write a compelling blog headline.
Every great blog post needs a clear introduction that tells visitors what the post is about. This helps people decide whether they’re interested in the topic.
Just like the headline, it’s not enough to simply state what the blog is about. You also need to make the visitor want to carry on reading.
People don’t want to waste time on blogs they’re not interested in. Having said that, your introduction should be short and to the point. Ideally, you should aim for 1-3 paragraphs.
When it comes to creating a tight, focused introduction, a good trick is to try and include your blog’s keyword as early as possible. By sticking to this goal, you’ll be less likely to go off-topic.
Depending on the kind of blog you’re writing, you may get good results by sharing interesting or surprising statistics in the introduction. This example from MonsterInsights is guaranteed to catch the attention of any online store owner who wants to get more sales.
Another option is to talk about a problem and promise a solution.
This RafflePress post discusses a problem the user may have: promoting your business on Instagram can be expensive and not everyone has a big budget.
It then promises a solution: get noticed on Instagram for free.
Many introductions also use FOMO, or fear of missing out. By adding time pressure, you can make people want to read the post now, rather than risk missing out on a giveaway, event, trip, or anything else the post is talking about.
This travel blog takes a pretty standard ‘Top Places to Visit’ listicle and turns it into a race against time.
We’ve also seen blogs draw the reader in by sharing a humorous personal story. If this anecdote resonates with the target audience, then it can be a powerful hook.
For example, this introduction makes it very clear that the author knows exactly what the reader is going through.
No matter what approach you take, if you’re going to hook your audience, then you need to know all about them. The best way to learn about your audience is by using Google Analytics.
A 2022 study by the Policy Institute and Centre for Attention Studies found that most people feel their attention span is shorter than it used to be.
No matter how good your writing is, all your hard work will go to waste if readers can’t concentrate on more than a few paragraphs.
That’s why we recommend using headings to break your post into bite-sized chunks.
Headings help readers skim the post and find the content they’re interested in reading. It also makes it easier for them to revisit sections they want to read again.
Before you start writing, it’s a good idea to map out all the headings you’ll use and the content you’ll add to each section. This will keep you focused as you write the post.
Ideally, your headings should summarize each major point you want to make. In fact, readers should be able to understand the flow of your blog simply by scanning the headings.
Let’s look at an example. Here, we have some tips on how to store coffee beans correctly. Although each paragraph provides useful extra information, you can get all the tips just by reading the headings.
After creating your headings, organize them so your content flows logically. For example, if you’re writing a fitness blog then you shouldn’t tell readers how many times to repeat an exercise before showing them how to do it.
When it’s time to add these headings to your WordPress website, there are six built-in heading tags that you can use.
Similar to bullet points and numbered lists, you can use these headings to create a nested structure of headings and subheadings.
However, we recommend keeping the heading hierarchy as simple as possible, to avoid confusing your readers. This means using H2 headings for main sections, and then H3 for subsections, and so on.
Add a Table Of Contents
A table of contents lists the post’s main points and provides links to specific sections. This gives visitors an overview of what the blog covers while allowing them to jump straight to the content they’re interested in.
This can keep visitors on your website for longer, even if they’re only interested in part of a blog post.
A table of contents can even improve your WordPress SEO, as Google often uses the table to automatically add ‘jump to section’ links in search results.
The easiest way to add a table of contents to your WordPress blog is by using AIOSEO.
This block saves you a ton of time by automatically generating a table of contents based on the post’s headings, while also allowing you to customize the table.
Imagine opening a blog post just to find a wall of text. Chances are, you’d leave the page immediately. That said, it’s important to break your blog into short paragraphs and sentences. These are easier to skim and look much less daunting, especially on mobile devices.
A good trick is to avoid long and complicated words, intricate metaphors, and flowery language. All of that to say: keep it simple. You’ll lose people if you try to be too clever.
Ideally, you should aim to make a single point per sentence, using as few words as possible.
Often, you can break grammatical rules if it gets your point across in fewer words. This may mean starting sentences with things like ‘Or,’ ‘And,’ or ‘But,’ or using more casual language and fragments rather than full sentences.
You should also organize your sentences and paragraphs to give the reader the most important information first, and then go into finer detail from there. This makes it easier for the reader to skip sections they’re not interested in.
In this TrustPulse blog, the writer starts by explaining what eCommerce email marketing is. Then, they give Mailchimp and ActiveCampaign as examples of popular email providers.
The next paragraph talks about why email marketing is important, before exploring specific features. As you can see, the section starts with the most important point and then gets more and more detailed.
Add Images, Video, and Other Media
Visitors don’t want to feel like they’re reading a novel when they visit your blog. With that in mind, it’s a good idea to add visual content like photos, infographics, screenshots, graphs, and diagrams.
Immediately, this breaks up your text, but it also helps visitors see what each section is about, at a glance. Each piece of visual content is also another opportunity to grab the reader’s attention as they scroll through your post.
It even seems like blogs with visual content are more popular. According to our blogging statistics research, posts with more than seven images get 116% more organic traffic compared to posts that have no images. Similarly, blogs with videos get 83% more traffic than those without video.
If you’re writing ‘how to’ blogs, then images help visitors understand what they need to do. For example, this PushEngage blog uses screenshots to show readers what to click next in order to create a landing page in WordPress.
If you’re promoting an affiliate product, then visuals like images and videos are a great way to show that product in action. This can often get you more affiliate revenue.
Let’s look at an example. This post about soil-less indoor garden kits shows lots of photos of the different kits available to buy on Amazon, complete with Amazon affiliate links.
Just be aware that lots of high-resolution media can add to your site’s loading time, so it’s important to optimize your images and other media. Readers will also need to scroll past any media they’re not interested in, which can be particularly frustrating for smartphone and tablet users.
With that being said, all visuals should add value for the reader.
Wrap Up Blog Posts With a Conclusion
A good conclusion summarizes all the points you’ve made throughout the blog, without introducing any new information.
Depending on the topic, you may sometimes want to suggest an actionable solution or share your top pick of all the products, WordPress plugins, travel destinations, and anything else you’ve compared or reviewed throughout the blog.
However, as a general rule conclusions tend to be pretty short, so don’t worry if your conclusion is one or two sentences.
End With a Compelling Call To Action (CTA)
When the reader reaches the end of the post, you need to tell them what to do next. This should be an action that keeps them engaged with your blog or gets them to convert, which is known as a call to action.
In the following Easy Digital Downloads post, you can see several calls to action on the page.
A good call to action is clear, asks for the user to take a precise action, and has a sense of urgency. For example, you might ask them to download a PDF or subscribe to your email newsletter.
Even if you use the same call to action, it’s a good idea to customize it for the individual post. In the following image, interior design blog Decorilla is using its standard call to action, which encourages readers to schedule a free consultation using a booking form.
However, they’ve tweaked the messaging to suit the blog’s topic, which is how to decorate a child’s bedroom.
If you’re not sure what call to action to use, then ask yourself why you’re writing this blog. If you want to get more comments, then you might ask readers to share their opinion or answer a question by posting it in the comment section.
You might even offer a reward for commenting, such as entering the reader into a giveaway or contest. For example, the example below gives readers a list of books and asks them to comment on which one they want to win.
Another option is to suggest some posts the visitor might want to read next.
For the best results, include links that relate to the current blog in some way, which is exactly what AffiliateWP does on their affiliate marketing blog.
If you liked this article, then please subscribe to our YouTube Channel for WordPress video tutorials. You can also find us on Twitter and Facebook.
Do you want to create WooCommerce product galleries to add to blog posts or pages?
WooCommerce product galleries are an easy way to display your products outside your shop pages. It helps attract more customers and boosts conversions.
In this article, we will show you how to easily create a WooCommerce product image gallery (step by step).
Why Should You Create WooCommerce Product Galleries?
Most WordPress themes for WooCommerce come with default templates for shop and shop category pages. These pages simply list your products using the theme’s style.
What if you wanted to create a product gallery and display it inside a blog post or another page on your site? By displaying your products in your popular blog posts and pages, you can increase your sales and conversions.
Let’s take a look at how to easily create WooCommerce product image galleries with Envira Gallery.
Creating WooCommerce Product Galleries with Envira
The best way to create a WooCommerce product gallery in WordPress is by using Envira Gallery. It is the best WordPress photo gallery plugin and makes it very easy to show products anywhere on your site.
The first thing you need to do is to install and activate the Envira Gallery plugin. For more details, see our step-by-step guide on how to install a WordPress plugin.
Upon activation, you need to go to the Envira Gallery » Settings page to enter your license key. You can find this information under your account on the Envira Gallery website.
Once the license key is verified, you can go to Envira Gallery » Addons to install and activate the ‘Featured Content’ addon.
This addon will allow you to display your WooCommerce products in the Envira galleries. Go ahead and click the ‘Install’ button under the Featured Content Addon.
Next, you need to go to the Envira Gallery » Add New page to create your new product gallery.
From here, you can start by adding a title for the new gallery.
After the title, you need to switch to the ‘External Gallery’ tab and click the ‘Featured Content’ option.
Next, scroll down to the ‘Images’ tab. In the ‘Select Your Post Type(s)’ field, you need to select the ‘Product’ option, which is the custom post type for WooCommerce products.
If you have hundreds of products, then you may want to create multiple galleries.
You can narrow down the gallery listings by selecting taxonomy terms for specific product tags or categories.
Simply repeat this process with different product tags and categories each time you create a new product gallery. The post type will always be ‘Product’ in all your WooCommerce product galleries.
You can also choose a taxonomy term relation to select and display specific products in your galleries.
Once you are done, you can publish your product gallery which will make it available to be added anywhere on your WordPress site.
Adding WooCommerce Product Gallery in WordPress
Next, you can add a new post or page or edit an existing one to display your WooCommerce product gallery.
Once you’re in the content editor, simply click the ‘+’ button and add the Envira Gallery block.
After that, you can select your product image gallery in the Envira Gallery block.
Simply click the dropdown menu and choose the gallery you created earlier.
You’ll now see a preview of your gallery in the block editor. If it doesn’t load, then don’t worry, you can simply preview your blog post or page to see if it’s working properly.
Next, you can save and publish your post. After that, visit your website to see the product gallery in action.
If you liked this article, then please subscribe to our YouTube Channel for WordPress video tutorials. You can also find us on Twitter and Facebook.
Are you looking for the best recipe plugins for WordPress?
Recipe plugins allow you to display recipes on your website in an aesthetically-pleasing way. They can help improve user engagement on your food blog and increase traffic.
In this article, we have hand-picked some of the best WordPress recipe plugins you can use on your website.
Why Do You Need a Recipe Plugin for WordPress?
If you have a WordPress food blog, then using a recipe plugin can help you create a more user-friendly and interactive experience for your visitors.
A plugin can help you create a beautiful layout for your recipes using a recipe card. It contains all the information about the meal, including its ingredients, instructions, cooking time, serving size, nutrition facts, and more.
Recipe plugins can also have optimization settings that improve your website’s SEO by increasing its visibility in the search results.
Moreover, using a recipe plugin can allow you to customize your recipes and insert ads and affiliate links within them to make more profits. This is one of the many ways that you can make money from blogging.
That being said, let’s look at some of the best WordPress recipe plugins that can help improve your WordPress food blog.
WP Tasty Recipes is one of the best WordPress recipe plugins on the market. It allows you to add beautiful and customizable recipe cards to your WordPress website using a ‘Tasty Recipes’ block.
It offers many features that can be added to the recipe cards, including nutritional facts, social sharing buttons, recipe videos, and Pinterest pins.
Additionally, WP Tasty Recipes also allows you to add conversions for ingredients, making it easy for users to adjust the recipe for different serving sizes.
Its other features include pre-made recipe card templates, import/export settings for recipes, a Nutrifox integration, ingredients links, a recipe index, and more.
Pricing: You can get the Basic Tasty Recipes plan for $49 per year and the Pro plan for $199 per year. However, if you want access to all of the WP Tasty plugins, then you can also buy the All Access plan for $299 per year.
Recipe Card Blocks is a well-known WordPress recipe plugin that helps add attractive recipe cards to your website using the block editor.
It comes with customizable pre-made templates, video support, star ratings, a user-friendly interface, and unit conversion features, making it super easy for beginners to use.
It even comes with a Nutrition block that you can add along with your recipe cards to display nutritional information about each meal.
Plus, Recipe Card Blocks optimizes your website and recipes for search engines using schema markup, making it easier for your site to rank and attract visitors.
Some other features offered by Recipe Card Blocks include AMP support, GDPR compliance, social CTAs, comment ratings, and more.
Pricing: Recipe Card Blocks has a free version available. However, you can upgrade to the Professional plan for $79/year to unlock all the features. If you have a large team, then you can switch to the Business plan for $99/year.
WP Recipe Maker is an easy-to-use recipe plugin that allows you to add recipe cards to any WordPress page or post.
You can then customize these recipe cards to your liking using plugin settings or custom CSS.
WP Recipe Maker also comes with a built-in submission form allowing users to submit their recipes on your website. This can help encourage user engagement.
Moreover, the plugin uses JSON-LD metadata to improve your website’s visibility and search engine rankings.
Some of its other features include nutrition labels, conversion tools, video support, import/export functionality, ingredient groups, and more.
Pricing: WP Recipe Maker has a free version. However, you can also upgrade to the Premium Bundle for $49. To unlock all the features, you can buy the Elite Bundle for $149.
Zip Recipes is a popular plugin that is specifically optimized for Google search using JSON LD and microdata. It can help improve your website’s rankings in Google search results.
The plugin has its own editor that you can use to create aesthetically-pleasing recipe cards. Once you have created a recipe, it can be easily integrated into any WordPress page or post using a block.
Zip Recipes lets you add nutrition labels, recipe galleries, ratings, social sharing icons, a metric converter, serving adjustments, and more to your recipe cards.
The plugin also allows you to email recipes to friends or your email list subscribers to increase user engagement.
It offers a built-in search and filter feature that allows users to look for specific recipe types, including dietary requirements, ingredients, cuisine types, and more.
Pricing: You can use Zip Recipes for free. However, you will need to upgrade to the Personal plan for $39/year to unlock more features. If you want to use the plugin on multiple domains, then you can also switch to the Agency plan for $249/year.
Cooked is a powerful WordPress plugin that lets you create and display recipes, including ingredients, directions, nutrition facts, photo galleries, timers, and more. It is also optimized for search engines to increase your website visibility.
With this plugin, you can add a recipe submission form on your website’s front end for users to share their recipes with you.
It even includes social media sharing, recipe reviews, and rating features to improve user engagement.
Additionally, Cooked also comes with a built-in powerful search feature that lets users find recipes based on ingredients, categories, tags, and more.
The Cooked plugin can even integrate with WooCommerce to allow food bloggers to sell the ingredients of the recipes on their websites.
Pricing: Cooked has a free version, or you can buy a single-site license for Cooked Pro for $39/year. If you want to use Cooked Pro on multiple sites, then you can switch to a 5-site license for $99/year.
Delicious Recipes is a schema-enabled and SEO-optimized plugin that lets you create beautiful recipe cards.
It also comes with a recipe library with a searchable database of recipes, including categories like cuisine, meal type, dietary restrictions, and cooking time.
It’s a simple plugin that enables users to register on your website and rate your recipes, save the recipes as favorites, and browse through the content. This feature can help you create an active following and increase user engagement.
Its other features include social media integrations, video support, a recipe submission form, an analytics dashboard, Pinterest pins support, nutrition facts, adjustable servings, and more.
Pricing: Delicious Recipes has a free version and a Pro version that you can switch to for $59/year. You can also upgrade to the Lifetime plan for $199.
Blossom Recipe Maker is another free plugin on this list that lets you create recipes with ease.
It enables you to add ingredients, instructions, cooking time, serving size, and nutritional information to your recipe cards.
The plugin can also automatically suggest ingredient substitutions based on dietary needs or preferences.
For instance, it might suggest using almond flour instead of wheat flour for a gluten-free dessert. This can come in handy when creating a recipe that is suitable for everyone.
Its other features include recipe categorization, social media sharing, recipe feedback, and more.
Pricing: The Blossom Recipe Maker is completely free and doesn’t have a paid version.
RecipePress Reloaded is another free WordPress plugin that creates a new post type for publishing recipe posts on your website.
It lets you group ingredients and instructions, along with nutritional information. You can also add preparation and serving times to create comprehensive recipes.
The plugin is also optimized for SEO, meaning that search engines may rank your recipes higher and increase visibility.
Other than that, RecipePress Reloaded comes with multilingual support, social media integrations, a ratings/review feature, and pre-built recipe templates.
Pricing: RecipePress Reloaded is a free plugin that does not have a premium version yet.
What Is the Best Recipe Plugin for WordPress?
Based on our research, the best WordPress recipe plugin on the market is WP Tasty Recipes because it provides an all-in-one solution.
It is SEO-friendly, comes with pre-made templates, and is super easy to use for beginners.
However, if you are on a tight budget and looking for a plugin that provides basic recipe card features, then WP Recipe Maker and Recipe Card Blocks are also good choices.
These plugins offer free versions with most of the features necessary to create an attractive recipe card.
On the other hand, if you have an online store that sells recipe ingredients, then Cooked is the right plugin for you. It comes with a WooCommerce integration that lets you sell the ingredients for your recipes.
If you liked this article, then please subscribe to our YouTube Channel for WordPress video tutorials. You can also find us on Twitter and Facebook.
After creating a website, the first thing every business owner needs is a professional email address with their business name in it.
A professional email address will help you win trust when dealing with other businesses and customers. Google Workspace (previously known as G Suite) is a productivity suite that allows you to use Gmail with your own professional email address.
In this article, we will show you how to set up a professional, custom-branded email address with Gmail and Workspace.
What Is a Professional Email Address?
A professional email address is one that has your business name in it. For example, john@myphotostudio.com is a professional email address.
Email accounts on free email services like john.photographer@gmail.com are not as good for business because they do not look professional. Your customers and other businesses will find a professional email address more trustworthy.
For a professional email address, you will need a domain name and a website. We have step-by-step guides on how to choose a domain name and how to quickly make a website.
If you already have a domain name and a website, then you are ready to set up your own professional email address.
Why Use Google Workspace for Professional Branded Email Address?
You might be thinking, why use Google Workspace when most WordPress hosting companies offer unlimited email accounts with your own domain name?
Email is one of the most important communication tools for business owners. If you miss an important email, then it can hurt your business.
Many web hosting email servers are unreliable, restrictive, isolated, and less secure. You won’t even know if the email you sent was actually delivered.
Gmail is the industry leader in email, with over 1.8 billion active users. Google Workspace is Google’s productivity app suite for business owners, which includes Gmail and is used by over 6 million businesses.
Google Workspace works with your own domain name, which allows you to use Gmail to create your professional branded email address.
Here are some of the benefits of using Workspace and Gmail for a professional email address:
Professional business email address on your own domain
Gmail’s rock-solid security and spam filters
30GB to unlimited storage
Manage email even when offline using Gmail app on mobile devices
Works anywhere: web, mobile, tablet, you name it
Works great with Outlook and can even sync old Outlook accounts
Each user can have up to 30 email aliases
Use Google Calendar and Google Meet for chat, video, and voice calls using your own business email address
No advertisements and 24/7 professional support whenever you need help
Works seamlessly with your WordPress site
Most important of all: high deliverability, no delays, and no ending up in the spam folder
Now that you know why using Google Workspace for professional emails is important, let’s take a look at how to set up a branded professional email address.
Editor’s Note: We use Google Workspace for all of our professional email addresses and can honestly say it’s the best.
Setting up a Professional Email Address with Gmail (Workspace)
It starts at $6/month for each user, billed annually. Google also offers a free 14-day trial, which allows you to test drive everything before you make up your mind.
Basically, you get all the powerful features you are used to with Gmail, Drive, Calendar, and more, but now they are for your business.
Simply visit the Google Workspace website and click on the Get Started button for the plan you want to use.
Next, you need to enter your business name, select the number of employees, and the country where you are located.
You can choose the ‘Just you’ option for yourself for 1 user account or select the number of employees.
Once you are done, click on the ‘Next’ button to continue.
In the next step, you will be asked to enter your personal contact information, including your name and email address.
After that, you will be asked to choose a domain name. If you already have a domain name, then click on the ‘Yes, I have one I can use’ option.
Otherwise, you must click on ‘No, I need one’ to register a domain name.
For this tutorial, we will use the ‘Yes, I have one I can use’ option.
It’s important to note that if you need to register a new domain name, then you will be charged separately for registering a new domain name.
Next, you will need to enter your business domain name and click the ‘Next’ button.
After that, Google will confirm your domain name.
Go ahead and click the ‘Next’ button.
On the next screen, Google will ask you if you’d like to stay up to date with helpful tips, special offers, and more.
You can click the ‘Ok’or ‘No thanks’ button to move ahead.
After that, you can also choose to send users information about Google Workspace and its features.
If you’d like to opt for this option, then click the ‘Ok’ button.
In the next step, you will be asked to create your Google Workspace user account by entering a username and password.
This username will also be your first professional email address. So, you need to choose a suitable and professional username.
After entering the details, you must check the reCAPTCHA box and click the ‘Agree and continue’ button.
You have now successfully created your Workspace account. You can now click on the ‘Continue to setup’ button.
On the next screen, you will be asked to sign in to your newly created account.
After signing in, you will need to agree to Google services. Simply click the ‘I understand’ button to continue.
You can now follow the onscreen instructions to complete the setup.
Once that’s done, you will see the Admin console.
The next step is to verify your domain.
Verifying Your Domain in Google Workspace
If you registered your domain name elsewhere, then you will now be asked to verify your ownership of it.
From the Admin dashboard in Google Workspace, simply click the ‘Verify domain’ option.
Alternatively, you can also go to Account » Domains » Manage domains from the menu on your left.
From here, simply click the ‘Verify domain’ option.
On the next screen, you will be asked to find the DNS records or settings of your domain host.
For this tutorial, we will be using Bluehost. However, Google will automatically detect your domain host.
You can click the link to open the hosting settings and then click the ‘Next: Go to Step 2’ option at the bottom.
Next, you will need to log in to your hosting provider.
In Bluehost, you can head to Domains » My Domains from the left panel.
After that, simply click the ‘Manage’ button for your domain.
Next, you will need to switch to the ‘DNS’ tab.
From here, you can scroll down to the TXT section.
Go ahead and click the ‘Add Record’ button.
After that, you will need to enter the TXT details.
Here are the details you need to enter:
Host Record: @
TXT Value: Google site verification code
TTL: 4 Hours (min)
You can find the TXT record details in the Google Workspace settings.
Simply switch to the window or tab where you have the settings open, and under the ‘Add verification record’ step, you will see all the details.
Don’t forget to click the ‘Save’ button when you are done.
After you have saved the TXT record in Bluehost, just click the ‘Protect Domain’ option.
It will a take few seconds to verify the details. Once that’s done, you will see a message that your domain is protected.
Go ahead and click the ‘Continue’ button.
You’ll be taken to the ‘Manage domains’ settings in the Admin console in Google Workspace. You should see the status for your domain change to ‘Verified’.
Using Your Professional Email With Workspace and Gmail
Your email account works like any other Gmail account. You can access it by visiting Gmail and signing in with your email address, like john@yourdomain.com.
You can also manage your Google Workspace account by visiting the Admin console.
In the ‘Users’ section, simply click on ‘Manage’. This is where you can add/remove new users to your domain name.
Each of your users will have at least 30GB storage or the storage defined in your pricing plan, along with all the same features. However, they will not have access to the Admin console. You can also remove those users at any time.
Troubleshooting Google Workspace Domain Setup
Your web host may not be using a dashboard like the one we have shown in the screenshots above.
Google Workspace has detailed documentation for many of the popular web hosting and domain registration service providers. Simply visit the activate Gmail for Google Workspace page, and then locate your domain registrar or web host from the list.
If you do not find your service provider in the list, then you can ask them directly to help you set up Google Workspace for your domain name.
If you liked this article, then please subscribe to our YouTube Channel for WordPress video tutorials. You can also find us on Twitter and Facebook.
Are you trying to decide whether to accept guest posts on your WordPress blog?
Publishing guest posts can be a quick and easy way to get new content for your site. However, there are negatives and positives to consider, before deciding whether guest posts are right for your blog.
In this article, we’ll take a look at the pros and cons of accepting guest posts on your WordPress blog.
What Are Guest Posts?
Guests blogs are a type of user-generated content that’s created by people who aren’t officially linked to your website.
Often, guest bloggers have their own products and services that they want to promote via guest blogging. With that in mind, they might feature their product or service in the guest blog, or add a backlink in their author bio.
Other guest bloggers may want to build their reputation as an industry leader by publishing on reputable websites just like yours.
Guest blogging is a very popular marketing and content-creation tactic. In fact, if you type ‘write for us’ into your favorite search engine, then you’ll get a ton of results.
That said, deciding whether to accept guest posts on your WordPress blog is a big decision. To help you make the right choice, let’s look at the pros and cons of accepting guest posts on your WordPress blog.
Pros: Should You Accept Guest Posts on Your WordPress Blog?
Some of the best WordPress blogs accept guest posts, so it’s no surprise there are many benefits. With that in mind, here’s why you may want to accept guest blogs on your WordPress website.
Get A Fresh Point of View
Every author has a unique point of view, and your audience will likely appreciate a change of pace and ideas. This is especially true if you’re a solo blogger or feel that your content is getting stale.
To really catch the reader’s attention, you can encourage guest bloggers to write about their own experiences or talk about a topic that typically generates lots of debate or even controversy. This can get more comments on your WordPress blogs.
Although you want guest posts to stand out, they should still fit with the rest of your content. That said, it’s smart to publish a detailed style guide that guest bloggers can follow.
If you have a ‘wish list’ of topics for guest bloggers, then you can add them to your guidelines.
In this way, you can bring fresh and interesting opinions to your blog, while keeping things consistent for your regular readers.
Connect With a New Audience
Typically, guest bloggers want to promote their own products and services, or grow their reputation as a respected industry figure. With that in mind, guest bloggers will work hard to drive traffic to their blog.
This may mean sharing the link on their social media accounts, adding it to their email newsletter, or even writing about the guest post on their own website.
This is all free promotion for your site and can get you lots of new visitors.
Even better, this is an entirely new audience who may be learning about your site for the first time. If these people like what they see, they may become regular readers or even customers.
That said, it’s a good idea to tell the guest blogger when you publish their post so they can start promoting it right away.
You might even share your Google Analytics data with them, so they know what actions are driving the most traffic to their blog. The guest writer can then fine-tune their actions to get you even more visitors.
Accepting guest posts on your WordPress blog could be the first step to building positive relationships with the wider community including industry leaders.
This networking can lead to all sorts of opportunities, such as a chance to speak at events and conferences. Even if you simply chat with industry figures on social media, this can create a buzz around your business and get you more visitors.
If potential customers see you engaging positively with respected people online, then this also adds to your reputation. This may eventually get you more sales and conversions.
Newer blogs or websites may struggle to get guest blogs from big names. However, there’s always a chance that a smaller guest blogger may go on to do big things. If this happens, then a guest blog you published months or even years ago may suddenly start to get more traffic.
If you’re lucky, then the author will remember you gave them a chance when they were a new blogger. If this happens, then you’ll have a powerful industry contact, which could mean big opportunities for your business.
An Easy Way to Create Content
Creating blog posts takes time and effort. If you’re a solo blogger or a new business, then you may struggle to publish new content regularly.
Guest bloggers can supply you with new and interesting content, and help keep your blog fresh. By regularly publishing guest posts on your website, you can improve your WordPress SEO and keep people coming back to your blog.
Even better, you can do this without having to hire extra writers or taking time out of your busy schedule to blog.
Finding quality guest bloggers and editing submissions can take time, but it’s often much faster than writing the post yourself. There are also ways to effectively attract and manage guest bloggers, which can save you even more time.
To start, you can create a ‘write for us’ page so potential bloggers can read your guidelines, formatting rules, and the kind of content you’re interested in publishing.
This should improve the quality of the guest posts you get, while also helping you avoid answering the same questions over and over again.
The easiest way to create a ‘write for us’ page is by using SeedProd. This WordPress page builder plugin comes with more than 180 professionally-designed templates and ready-made blocks that allow you to create an eye-catching ‘write for us’ page, fast.
After creating this page, you should add it to your site’s main navigation menu so visitors can find it easily.
We also recommend allowing users to submit posts using WPForms. WPForms is the best form plugin for WordPress and comes with a post submission addon that allows guest bloggers to upload content to your blog.
In this way, you can automate the submission process and save yourself a ton of time.
When someone guest blogs for your website, people tend to see it as an endorsement. These guest bloggers are saying they like your brand and want to be associated with you.
In this way, accepting guest posts on your WordPress blog can build your reputation as a respected member of the community. With that in mind, we recommend trying to get guest blogs from industry experts and leaders in your field.
Also note that the endorsement goes both ways. You are also sort of endorsing the writer, too, by having them on your site. So it pays to be mindful of who you choose to write for you.
Plus, according to our blogging statistics report, there are over 600 million blogs online. A steady stream of recognizable guest bloggers can make your site feel more like a professional publication. This immediately makes your blog stand out from the millions of other blogs, which is great for driving more readers to your site.
Cons: Should You Accept Guest Posts on Your WordPress Blog?
It may seem like every WordPress website accepts guest posts, but guest blogging isn’t right for every website.
With that being said, here’s why you might not want to accept guest blogs.
Guest Posts Often Mean More Spam
Spam is a big problem for all websites. If you accept guest posts using WPForms, then you get built-in spam protection tokens, reCAPTCHA and custom CAPTCHAs, and other powerful features that can protect your site from spambots.
However, you may still get unwanted submissions. Some authors submit their posts to every single ‘write for us’ page they find, in the hope of getting at least one positive reply. Sometimes, these people may not even read your ‘write for us’ guidelines.
Reading through submissions takes time and effort, so these spammy posts can slow down your editorial workflow.
Using a plugin with built-in spam protection like WPForms is a great start, and it can protect you from most automated spam and bots. However, you should still expect to get a few ‘spammy’ submissions that aren’t appropriate for your business website or blog.
You May Get Blog Posts Created By AI Content Generators
Some bloggers may be more interested in publishing lots of guest posts, fast, rather than sending you quality content. With that in mind, you may get some guest posts created by AI content generators such as GPT3 (Generative Pre-trained Transformer 3).
Guest bloggers simply need to provide AI or CharGPT writing prompts and the artificial intelligence program will then go through lots of publicly available information to create a guest blog post for your website.
This can be a way to create lots of guest posts quickly, but there are some big problems for website owners. Firstly, there’s no guarantee that all the information these artificial intelligence plugins and tools use is accurate, so you may publish a guest post that includes completely false information.
Many AI-powered tools such as ChatGPT are also designed to be impartial and unbiased. This means the guest post may feel bland and uncreative, with very little passion or enthusiasm for the guest blog’s topic.
As AI generators get more sophisticated you may find it difficult to spot guest blogs that are written by autoblogging tools. However, researchers at Google have worked for years to detect content generated by artificial intelligence tools. In the past, they have penalized websites for publishing AI-generated content.
With that in mind, publishing guest blogs written by artificial intelligence may hurt your WordPress SEO, even if you didn’t realize the post was written by AI.
We feel that artificial intelligence tools like GPT3 can be great writing assistants for guest bloggers. They can be used to quickly create a blog outline, gather information, and suggest some key points for a guest blog. However, websites should be wary about accepting any guest blogs that are written using AI.
You May Get Duplicate Guest Post Content
Guest bloggers often try to promote their products, services, or brand by submitting to as many blogs as possible.
This means you may get a submission that’s already been published elsewhere. You may even publish a guest post, only for that content to appear on another website later.
This isn’t your fault, but the duplicate content can impact your SEO. Search engines such as Google often remove duplicate guest blogs from their search results, so you may struggle to get traffic.
Even if the duplicate content appears in the search results, you’re still sharing visitors with everyone else who’s published the same guest blog.
To avoid duplicate content, you should add an originality clause to your ‘write for us’ guidelines. This section should say you only accept submissions that haven’t been published elsewhere, including on the writer’s own website.
You should also make it clear that once you accept a post, the writer must stop submitting it to other websites.
However, there’s no guarantee that guest bloggers will follow your guidelines. With that in mind, you may want to check whether a submission has already been published. You can simply paste some of the content into a search engine such as Google, and see whether you get any matching results.
After publishing a guest post, you can monitor whether it shows up on other sites. For more on this topic, please see our guide on how to easily find and remove stolen content.
You’ll Need to Edit Guest Blogs
By publishing detailed and helpful guest blogger guidelines, you can often improve the quality of the posts you receive. However, you’ll still need to review and edit all incoming posts.
You can simply type in the keyword you want to rank for, and AIOSEO will analyze the guest post for that keyword. It will then show you a score, and give suggestions on how to improve your ranking for that specific keyword.
You’ll Need to Promote Your Guest Blogging Program
After publishing your ‘write for us’ page and submission form, you’ll need to drive people to those pages. This means promoting your guest blogging program.
There are lots of ways to attract guest bloggers, including posting on social media and writer forums and notifying everyone on your email list.
Once you’ve built relationships with reliable, quality bloggers, you should have no problems getting a steady stream of guest posts for your website. However, finding these people can be a lot of work. You’ll often need to invest time and effort into promoting your guest blogging program before it starts delivering results.
Final Verdict: Should You Accept Guest Posts on Your WordPress Blog?
There are many benefits to accepting guest blogs on your WordPress website. It can be a great way to generate new and interesting content for your blog, without you having to spend time researching and writing yourself.
By publishing guest blogs, you can also connect with other people in your industry. This includes leading industry figures, plus up-and-coming bloggers who may become important contacts in the future.
However, there are some big drawbacks you need to be aware of. In particular, duplicate content and spammy posts can hurt your SEO and your reputation as a respected website.
If you don’t want to allow guest authors to register an account on your site, then consider creating a guest post submission form on your website. It lets guest authors submit their articles directly to your post editor without even creating a user account for them.
Of course, using the right tools can help you avoid many of the drawbacks, while still getting all of the benefits.
If you liked this article, then please subscribe to our YouTube Channel for WordPress video tutorials. You can also find us on Twitter and Facebook.