Do you want to display different sidebars for certain posts and pages on your WordPress site?
A lot of the time, you will want to show the same sidebar across your entire website or blog. However, sometimes you may need to show different sidebar content on some of your posts and pages.
In this article, we will show you how to create and display different sidebars for each post and page in WordPress.
When Would You Need Different Sidebars in WordPress?
Many WordPress themes have a sidebar where you can add useful widgets and content. For example, many sites add a search bar to the sidebar or show a list of recent posts.
If your WordPress theme has a sidebar, then by default, it will look the same on all your posts, pages, categories, and archive pages.
However, you may want to display different sidebar widgets on certain posts and pages.
For example, you might show different content in the sidebar of your most popular posts or display ads that are more relevant to a particular page.
Having said that, let’s see how to create and display a different sidebar for each post and page in WordPress. Simply use the quick links below to jump straight to the method you want to use:
Method 1: Displaying Different Sidebars for Each Post and Page in WordPress (Easy)
If your theme supports sidebar widgets, then you can easily create multiple sidebars using Lightweight Sidebar Manager. This plugin lets you build as many custom sidebars as you want and then assign them to different posts and pages. You can also add them to custom post types or assign a sidebar to all the pages or posts that have a specific category.
The first thing you need to do is install and activate the Lightweight Sidebar Manager plugin. For more details, see our step-by-step guide on how to install a WordPress plugin.
Upon activation, you need to go to Appearance » Sidebars. To create the first sidebar, click on the ‘Add New’ button.
You can now type in a title for the sidebar. This is just for your reference, so you can use anything you want.
With that done, open the ‘Sidebar To Replace’ dropdown menu and choose the location where you want to show the sidebar. The options you see may vary depending on your WordPress theme.
Now, you can control where the sidebar appears by creating inclusion or exclusion rules.
To create an inclusion rule, just open the ‘Display On’ dropdown and choose the pages, posts, custom post types, or categories where you want to use the sidebar.
For example, you might add the sidebar to a specific page, such as your 404 error page or the author archive.
Another option is using the sidebar for a particular page, post, or category by selecting ‘Specific Pages/Posts/Taxonomies.’
This adds a box where you can type in the page, post, or category.
To create more inclusion rules, simply click on the ‘Add Display’ Rule button.
This adds a section where you can create the new inclusion rule.
If you prefer, then you can create exclusion rules instead. For example, you may want to show the sidebar on every page except the homepage.
You can also combine inclusion and exclusion rules to control exactly where the sidebar appears on your WordPress website.
To create an exclusion rule, just click on the ‘Add Exclusion Rule’ button.
In the new ‘Do Not Display On’ section, open the dropdown menu and select the page or post that shouldn’t use this sidebar.
You can also exclude the sidebar from pages that have a specific category by following the same process described above.
After deciding where the sidebar will appear on your WordPress blog, you may want to show different content to different users.
For example, if you have a membership site, then you might use a different sidebar for visitors compared to logged-in members.
To do this, open the ‘User’ dropdown and choose a role from the dropdown menu. Now, only people with this specific user role will see the sidebar.
Finally, you may want to type in an optional description. This will only appear in the WordPress dashboard, so it’s a good way to share information with other admins or users on a multi-author WordPress blog.
If you are going to create lots of sidebars, then you can also use this field to leave yourself notes and helpful reminders.
When you are happy with the information you have entered, simply click on ‘Publish.’
With that done, go to Appearance » Widgets. You will now see all the widget-ready areas that your theme supports by default, plus the new sidebar you created in the previous step.
You can now go ahead and add widgets to the sidebar, just like any other widget-ready area.
SeedProd is the best landing page builder plugin for WordPress. With this plugin, you can create any type of custom page without writing any code. It also has dozens of professional site kits and templates that you can easily edit and fine-tune using the drag-and-drop builder.
When designing a custom page, you can choose a layout that has a sidebar.
You then simply find the blocks you want to show in that sidebar and add them using drag and drop.
SeedProd has all the blocks and features you’d expect from a powerful page builder, such as optin forms, social profiles, countdown timers, contact forms, buttons, various content blocks, and more. This makes it easy to create powerful and unique sidebars for your WordPress blog.
If you liked this article, then please subscribe to our YouTube Channel for WordPress video tutorials. You can also find us on Twitter and Facebook.
Are you trying to decide whether .org vs .com is the better domain extension?
There are many types of domains, but the most popular are .org and .com. While often taken for granted, a site’s domain extension affects how others view your brand and how easy it is for users to find your site.
In this post, we’ll compare .org vs .com and highlight when to use each. That way, you’ll know which domain extension is right for your needs.
What are Domain Extensions, and Why Should You Care?
Domain extensions, also known as top-level domains (TLDs), are the last part of a domain name, appearing after the dot.
Take WPBeginner, which uses the .com extension, while a site like WordPress uses .org. (There is a .com for WordPress, but it is a commercial product, not open source.)
To understand how a domain name works, you have to know how it interacts with the Domain Name System (DNS).
When entering a website address, the DNS looks up the URL (wpbeginner.com) and finds the hosting server’s numerical IP address where the website lives.
We use domain names rather than typing the IP address because they’re much easier for humans and search engines to use and remember. In addition to the domain name itself, the domain extension can tell visitors what your website is about.
For example, .com is designed for commercial websites, while .org is meant for non-profit organizations.
When potential customers see your web address, they might make assumptions about your business based solely on your URL.
With that in mind, we’re going to highlight the differences between a .org and .com domain extension and which is better for your website. Click on any of the links below to jump to a specific section.
The .org extension stands for organization and was created for nonprofit organizations and charities to provide valuable information.
Generally, .org websites are used to raise awareness, accept online donations, and search for volunteers. Thus, when visitors see a .org domain name, that’s what they come to expect.
That said, anyone can register a website with the .org domain extension, even if the website isn’t part of a nonprofit organization.
However, businesses can still benefit from the .org domain when linked to the company’s charitable arm, while other domain names help protect the brand.
What is a .com Domain Extension?
The .com extension is the most popular domain extension and is used by commercial businesses.
Nowadays, .com has become the default domain extension for general-purpose websites, whether or not they have commercial intent.
With that in mind, the idea of .org being only for nonprofits has stuck around a lot more than .com being only for businesses.
Differences Between .org and .com
As we said above, neither .org nor .com has special requirements to register, even though they were both made for different purposes and users expect different things from them.
Still, there are a few major differences between them that we’ll go into below.
Availability
The overwhelming popularity of .com has made it challenging to find and choose the best domain names with the extension. With many desirable domains either in use or parked, some people turn to other domain name extensions to get the URL they want.
Before you jump to other TLDs, you should start by looking at our free business name generator tool. It gives you clever ideas you can use for your domain name. Just make sure your domain name accurately represents your business and what you do.
For instance, let’s say you want to start a recipe blog.
Using our handy business name generator, you can find useful domain names like thedailyrecipes.com.
You can see in the screenshot above, that many simple .com addresses are already taken.
In contrast, far fewer .org domains are taken. In fact, there are 161.1 million .com domains registered compared to only 10.6 million .org registrations.
Because of its lower demand, .org is also much cheaper to get. That’s the opposite of many .com domain names because they are becoming more expensive because of high demand.
Credibility and Trustworthiness
Because the .org extension was intended for nonprofit organizations and is still used by many of the most well-known charities and philanthropic groups, this TLD still elicits a high degree of trust. When applied to the right site, it adds more credibility than the .com extension.
That said, it depends on what your site is used for. If you start an online store using a .org TLD, most people may be confused by your domain extension since visitors may expect to land on a nonprofit site.
This can lead to a high bounce rate and lower engagement, which also hurts your SEO.
If you own a .org site, your website should align with your target audience and their expectations of a nonprofit mission-driven organization.
The .com extension is still a more widely trusted domain than other TLDs because of its familiarity. In fact, .com domains are 33% more memorable, and when people try to remember a URL, they’re 3.8 times more likely to assume it ends in .com.
It’s also important to keep in mind that other factors determine whether a site is credible. For example, a site using HTTPS means it has active SSL encryption, which is more secure for keeping users and their data safe.
Traffic
If you’re looking specifically for branding and discoverability, .com is the best choice. If you want your potential customers to find you, .com is the most natural extension for your visitors to type in. That’s why we use the .com domain extension here at WPBeginner and for our other products.
48% of websites use .com versus only 5% for .org. Consumers view .com as the de facto default extension. Thus, you’re more likely to get people to remember a .com domain, which can increase direct traffic.
Of course, .org domains will likely rank higher for nonprofit-related keywords.
However, some mobile devices include a .com button on their keyboards, which makes them a more mobile-friendly option as well. Users can press and hold the .com button for other extensions like .org to appear.
When Should You Use a .org Extension?
While everyone can register a .org extension, it may not be the best choice for everyone. Here are a few examples of when using .org is the best choice:
Charity, community, and nonprofit organizations: .org domains have historically been linked to nonprofit and humanitarian causes. Internet users have come to associate .org domains with charities and nonprofits. This extension can enhance the credibility of an organization as it signals a commitment to serve others.
Open-source websites: While open-source software companies aren’t generally seen as nonprofits, they commonly use .org extensions. They do so to tell the public their software or user network is available for free. WordPress.org is an example of this.
Informational websites: .org websites are known for providing valuable, unbiased information that helps people learn about important issues.
When Should You Use a .com Extension?
The best domain extension mainly depends on the type of website you plan to create. Here’s a quick look at when to use .com:
Business websites: .com has a wide general appeal and is commonly used for commercial purposes making it the appropriate choice for just about any for-profit business. This works for just about any type of business and includes companies of all sizes, including small businesses and startups.
Ecommerce stores: .com is widely used and trusted, which can instill confidence in shoppers. For example, if given the choice, a user is more likely to purchase from an online store that uses .com than a .xyz or .biz.
Blogs and Personal Brands: .com is simply easy to remember and better for branding, helping you reach a broader audience.
Which Extension is Better
When running a small business, .com will do the trick. The extension generally performs better for SEO and helps to boost your online presence more than other domain alternatives.
It’s also seen as the default domain extension and is the go-to choice for online businesses, personal websites, publications, and blogs.
The only downside to .com is availability. With billions of websites on the internet, your desired URL may not be available in .com.
In that case, you have to weigh your options. Is altering your brand name or adding additional words to get the .com domain extension worth it?
For some, they rather keep their original name or idea and choose .org instead. Some even go for .net as an alternative.
With that in mind, we recommend using domain name generators or a site like Nameboy to help you find the right URL for your business. Since having a .com can affect your audience’s perception of your brand and traffic, it’s a good idea to find a .com URL that works for you.
Of course, there are also other TLD alternatives like .edu, .biz, .gov, and .net. If you’re creating multilingual websites or region-specific websites, make sure to use the right country code, such as .co.uk and .ca.
Ultimately, the choice is yours, but .com is best for most new website owners.
How to Use .org or .com Domain Extensions
Once you’ve decided which extension you’d like to use, it’s time to buy your domain and create your website.
1. Pick a Domain Registrar
You can purchase your domain at a few different places, including:
Domain name registrar: Some companies like Domain.com or Namecheap provide domain registration as their primary service. The best registrars offer low pricing discounts for multi-year registrations and free WHOIS protection (to hide your personal information from domain registries).
Web hosting service: Many hosting services will also register domain names. Sometimes, they’ll give you a great deal for choosing to bundle one with your hosting plan. For example, BlueHost offers a free domain for your first year when you choose to use their hosting services.
Website builder: Some website builders like Squarespace let you buy a domain name, host it, and build your site all in one place.
Use their search tool to find and purchase the perfect domain that aligns with your business.
In this process, you’ll also have to set up your account and provide a form of payment.
3. Choose a Web Host and CMS
Now that you have your domain name, it’s time to connect it to a website. First, you must rent server space from a web hosting provider. For those using WordPress, make sure to get managed WordPress hosting, which you can get from Bluehost.
While there’s a lot that goes into making a website, using a content management (CMS) such as WordPress can make the process much easier.
If you liked this article, then please subscribe to our YouTube Channel for WordPress video tutorials. You can also find us on Twitter and Facebook.
Do you want to make a custom logo for your website?
Maybe you can’t afford a professional designer, but you are worried that your graphic design skills aren’t up to the task. Your logo is a very important part of your brand’s identity. You want it to not only look high quality but also communicate your brand’s identity and values.
In this article, we will show you how to make a logo for your website. We will go through several different solutions so you can pick the one that suits you best.
To help you easily navigate the post, you can click the links below to jump ahead to the section you want to read:
Many people around the world can recognize big-name brands from their logos. When you see the iconic Golden Arches of McDonald’s anywhere in the world, you instantly recognize the brand and know what will be on the menu there.
That’s the power of branding, and a logo plays the most important role in building that reputation.
Whether you are creating a blog, making a website, or starting an online store, having a unique logo makes your brand look legitimate. It helps you build trust, recognition, and promote your business.
Often, when users want to start working on an online business idea, they start by thinking of business names and go straight to designing logos.
But before you do that, you need to make sure that your brand name idea is not already registered by someone else. See our guide on how to check domain name availability.
Once you have ensured that your business name idea is available, make sure to go ahead and register your domain so that no one else takes it (trust us, this happens more often than you think).
After you have registered your domain name, you are ready to start designing your logo. We have some excellent free logo-maker tools for beginners.
Tips for Making a Custom Logo for Your Website
Creating a custom logo for your website requires some understanding of design. However, as a beginner, you can follow these best practices to make sure that your logo looks polished and professional:
Keep your logo design simple and clean. This makes sure that your logo will look good even at a small size. Think how tiny the profile images are in your Facebook or Twitter feed.
Use a transparent background for your logo. That way, you can put it anywhere, not just on a white area of your website.
Get the highest quality file you can for your logo. You want it to look great in a large size or in print, too. You can copy it and make smaller versions for social media, blog posts, and website pages.
Use your brand and website colors in your logo to help it harmonize with the rest of your website.
There are different types of logo designs commonly used by businesses. When making your own logo, you may want to experiment with some of these.
Wordmark Logo
A wordmark logo is a distinctive text-only logo. Your unique brand name set with specific fonts and colors can make an excellent logotype.
If you are making a custom logo for your WordPress website by yourself, this is a great option as it’s simple and straightforward.
Pictorial Mark Logo
A pictorial mark is usually a brand image using an illustration or icon to represent an organization.
Famous examples of this kind of logo include Apple, Nike, Audi, and more.
Combination of Both
These types of logos are the most common ones you will see around. They combine words or letters presented in an iconic layout.
Famous examples of such logos include Dell, Pizza Hut, Doritos, and more.
Choosing the Right Style for Your Logo
If you are making your own logo, then you will need to be realistic about your design skills first. Using a wordmark might seem very simple, but it needs to be unique so that you can easily register your logo as a trademark if needed.
You can also draw an icon to be used as your logo. However, you will need strong design skills to come up with a unique idea for your brand image.
For our own brands, we use a combination of both wordmarks and icons. For example, our sister company OptinMonster’s logo has a mascot placed on a wordmark.
Let’s take a look at a few different ways to create professional-looking logos for your websites (without hiring a designer).
1. Make a Logo Using Tailor Brands (Best for Customization)
Tailor Brands’ Logo Maker is easy and straightforward to use. You also get access to a lot of customization options when creating a custom logo for your website.
It’s one of the best logo makers and is free to use. However, note that you will need to pay to download your finished logo. The minimum you can pay is $9.99 for 1 month.
To begin, go to the Tailor Brands Logo Maker and type in the name of your company. Then, click the ‘Get Started’ button.
Next, Tailor Brands will launch a logo builder that asks a series of questions.
First, you will need to select what your brand is offering. For instance, is your brand selling physical goods, services, technology and software, original content, or other products?
Simply select an option and move to the next step.
After that, you will need to enter some details about your industry. You can start by selecting an industry from the dropdown menu and briefly explaining your business.
Next, Tailor Brands will ask what your biggest motivation is for starting a business.
You can select from the options and add more details.
After that, you will need to select which stage your website or brand is in right now.
For instance, it is just an idea, you are getting ready to launch, or it’s already in business?
In the next step, you can choose which service you’d like to focus on.
Go ahead and select the ‘Logo & Branding’ option.
After that, you’ll need to select what you need for your brand.
Simply select the ‘Logo’ option.
Next, you will need to choose how you discovered Tailor Brands.
You can select any option or simply click the ‘Skip’ button at the bottom.
Tailor Brands will now process the information and show you an option to create your custom logo.
Go ahead and click the ‘Create’ button.
Next, you will need to sign up for a free account.
You can use your Facebook or Google account or simply enter an email address and password to get started.
After creating an account, you can build a new logo.
First, you will need to choose the type of logo you’d like to create. Tailor Brands lets you choose an icon-based, name-based, or initial-based logo.
You can only select one option, although you can always restart the logo maker again if you want to try out other possibilities.
If you select ‘Icon Based’ here, then you will be prompted on the next screen to choose an icon type. You can pick a geometric shape or search for an icon.
For this tutorial, let’s select the ‘Search For Icon’ option.
Next, you can choose up to 5 icons for your logo. There is also an option at the top to search for different icons.
When you are done, simply click the ‘Next’ button at the bottom.
After that, you will need to select 3 styles for your logo.
You can click the ‘Next’ button after selecting the styles you love.
Once you have completed this process, you will see a short animation while your logo is being created.
Next, you will be able to see your logo.
You can click ‘Love it’ to be taken to the pricing plans, ‘Customize’ to start editing it, or you can scroll down the menu on the left-hand side for more logo options.
If you choose to customize your logo, then you can pick from different styles, fonts, layouts, and more.
As you select different options, the logo will update on the right.
There are also options to change the color palette and edit the shape of your logo.
Once you are happy with your logo, you can click the ‘Finish’ button.
A small window will now open where you can review your logo design.
Go ahead and click the ‘I’m Finished’ button.
Once your logo is ready, you will see a download option on the next screen.
You can click on the ‘Download’ button.
Next, you will see a popup asking you to upgrade to a premium plan to download the logo.
Clicking the ‘Upgrade’ button will take you to the pricing page, and you will be presented with a number of different pricing plans.
These plans give you access not just to your logo but also to graphic design and website creation tools. They could be a good option if you want access to things like stock photos.
If you just want the logo, then you can click the ‘1 Month’ tab and select the ‘Basic’ plan. You only need to make one payment for your logo to be yours to keep. You can cancel the plan straight after that.
2. Make a Custom Logo for Your Site Using Looka (Quick and Easy)
Looka is a quick and easy online graphic design tool that allows you to make a logo without any design skills. It was formerly known as Logojoy.
Like Tailor Brands, Looka’s tool is free to use, but you will need to pay to download your logo. Prices start from $20. You don’t get the same level of personalization as you get with Tailor Brands, but it’s a great alternative for creating custom logos.
To get started, simply visit the Looka website and enter your company name in the search box.
Once that’s done, click the ‘Get started’ button.
Next, you need to select your industry from the dropdown menu.
Don’t forget to click the ‘Continue’ button to move on to the next step.
You will then see a number of logos that have been automatically generated for you.
Go ahead and select a few logos you like as inspiration.
Next, you will need to choose some colors that you like. You can pick up to 3 colors and then click the ‘Continue’ button.
After that, Looka will ask you to enter a company and a slogan (optional).
Once you have entered this information, just click the ‘Continue’ button.
In the next step, you will need to select some symbol types for your logo.
For example, we chose different food-related symbols for our food blog logo.
Looka will now start to generate logos for you.
You will then see a bunch of variations that you can use for your website. Simply select a logo to further customize it.
After that, you will see the logo builder offered by Looka.
Using the drag-and-drop logo editor, you can adjust the font size, choose a transparent background, change the font family, add or change your icon, and more.
Feel free to edit the design as much as you like and share it with colleagues for a second opinion. Once you are happy, just click on the ‘Download’ button in the top right corner to purchase and download your logo.
Note that if you want a transparent version of your logo, then you will need to pay $65 for the Premium plan.
3. Create a Custom Logo Using Hatchful by Shopify (Free)
Shopify is a popular eCommerce platform. They also offer a free logo maker tool called Hatchful. It allows you to easily create beautiful logos for your website without any design skills.
Unlike Tailor Brands and Looka, you can download the logo free of cost. Plus, it offers different customization options and will guide you step by step through creating a logo.
First, you need to visit the Shopify Hatchful page and click on the ‘Get Started’ button.
Next, you need to choose your business type.
If you can’t find an exact match, then simply use the closest possible match.
After that, Hatchful will ask you to choose a visual style for your logo.
You need to select a style that matches your business website’s style, look, and industry.
Next, enter your business name and a slogan (optional).
You can skip this step if you want and move ahead.
After that, you will be asked to select where you plan to use the logo.
You can pick the ‘Online store or website’ option to continue.
Finally, the wizard will analyze your answers and show you several logo samples to choose from.
You can select any of these logos to further edit them.
This will launch a simple logo editor where you will see a live preview of your logo with editing tools in the left column.
You can edit the text, add an icon, add symbols, and change the background.
Once you are satisfied with your design, you can click the ‘Next’ button to download your logo files.
You will be asked to create a free account, and your logo files will be sent to your email address. The zip file will include not just your logo but a favicon or site icon and cover images for your social media profiles.
Bonus: Hire Someone to Make Your Website Logo
The online logo maker tools we have covered in this tutorial are made specifically for beginners. You can create a simple and elegant logo for your website using these tools, but they are still limited in design choices.
If you can afford it, the best option is to hire an expert graphic designer to make a logo for your website. There are several places where you can find freelance designers.
There are thousands of people offering graphic design services on these websites. How do you pick the right person for the job?
Sticking to these best practices can help you find the perfect candidate to make a logo for your business.
Look for ratings, reviews, and the number of completed jobs on the designer’s profile. These are good indications of quality services provided to previous customers.
Give a detailed brief to the designer about your specific design requirements.
Set your own price for the logo, but keep in mind that a unique and creative design will cost more than a generic logo.
Make sure that you get the original source files in vector file format. This will allow you to later resize or reuse your logo in other places like business cards, posters, t-shirts, and more.
If you liked this article, then please subscribe to our YouTube Channel for WordPress video tutorials. You can also find us on Twitter and Facebook.
Are you looking to get an email hosting service for your business?
Creating a custom email address for your website or organization with your brand helps build trust and credibility. With the right hosting service, you can easily manage and secure your emails.
In this article, we will show you what email hosting is and how to find the best email hosting service.
What is Email Hosting?
Email hosting is a service you can use to have your own domain names as for email addresses, with storage for email content and attachments. You can create business email addresses by subscribing to an email hosting provider.
The difference between using email hosting vs. free email providers like Gmail or Yahoo is that you get to use your brand name in the email address.
For instance, a free email service will use its own domain name in the email address. It will look like this: john.doe@gmail.com.
On the other hand, you can create branded email addresses using an email hosting service. Your emails will look like this: john.doe@example.com
Why Use an Email Hosting Service?
Using an email hosting service makes your emails look more professional. It helps build credibility and trust with your audience. A branded email address also leaves a lasting impression on your users and creates brand awareness.
Besides that, you get enhanced security with email hosting. Many providers offer 2-factor authentication (2FA), spam protection, anti-phishing and anti-spoofing features, end-to-end encryption, and more.
Another advantage of using an email hosting provider is that you get increased storage capacity. Standard email service would offer limited storage space, which can quickly run out. However, email hosting services can offer extended storage options.
Let’s see what factors you should consider when finding the best email hosting service.
How to Choose the Best Email Hosting Service?
When it comes to choosing the best email hosting provider, you should consider the following things:
Email Storage – Each email hosting service will allot a specific storage space for your mailbox. You should choose a service that offers flexible storage options to store attachments and other email content.
Email Protocols – There are different email protocols like IMAP, SMTP, and POP3. They help with email deliverability and accessing emails on different devices. When you’re selecting an email hosting service, see how the provider supports these protocols.
Email Security Features – One of the advantages of email hosting is the advanced security features it offers. The best services should offer end-to-end encryption, spam protection, scan attachments for viruses and malware, 2-factor authentication (2FA), and anti-phishing features.
Email Aliases – You can create additional email addresses or aliases without creating a new account. This allows you to forward emails addressed to the alias to your main account. When picking email hosting, check if the provider lets you create email aliases.
Pricing – An email hosting service will cost you money, so when deciding on a provider, you should take prices into consideration. Some services offer multiple pricing plans with different features and storage limits. We recommend choosing a host that fits your budget.
Now, let’s look at some of the best email hosting services you can choose.
Finding the Best Email Hosting Service
There are many email hosting providers in the market. Here are some of the best services you can choose from.
Google Workspace, previously known as G Suite, is an email hosting service that offers a lot of value. It offers flexible plans that are great for all types of businesses and enterprises.
The best part about Google Workspace is that you can use Gmail for your custom-branded emails. You won’t have to map Gmail to other email hosting providers, which saves a lot of time and complexity.
At WPBeginner, we use Google Workspace and can honestly say it is the best email hosting provider.
Another benefit of using Google Workspace is that you get to use multiple Google products along with setting up a professional email address in Gmail. For instance, you get Google Drive storage, Google Docs and Sheets access, Google Teams, and more.
With Google Workspace, you get storage space from 30GB going all the way to 5TB. Plus, it offers up to 1000 participants in video meetings. Besides that, you’ll get tons of security features like 2 step verification, phishing and spam protection, an ad-free email experience, and more.
That said, Google Workspace can be expensive for startups or small businesses. It’s more suitable for organizations that don’t have budget limitations and can explore custom plans as well.
Pros:
Use a branded email address with Gmail
Get 30GB to 5TB of storage
Phishing and spam protection
Multiple security features
Access to different Google products
Cons:
Expensive pricing plans, especially for small businesses
It doesn’t offer an unlimited storage option
Pricing: Google Workspace prices start from $6 per user per month, and you get 30GB of storage. There are other plans that offer more storage, security options, and other features.
Hostinger is one of the fastest WordPress hosting services in the market. If you’re just starting a new WordPress website and selecting a web hosting provider, then Hostinger offers free email addresses with each pricing plan.
The best part, you don’t have to pay extra for email hosting, and you get to create up to 100 email addresses. Each mailbox also gets 1GB of storage space.
The web hosting plans also include free domain names, WHOIS protection, free SSL certificates, unlimited bandwidth, website backups, and more. This makes Hostinger great value for money.
That said, Hostinger also offers standalone email hosting plans, which are powered by Titan. This allows you to get more storage space, up to 50GB.
Other features include an inbuilt calendar and contacts, auto-reply, email templates, follow-up reminders, up to 10 email aliases, IMAP/POP3 support, spam and phishing protection, anti-virus and malware checker, and much more.
Pros:
Get free email hosting with web hosting plans
Fast performance and load times
Up to 50GB storage space
24/7 customer support
Free domain name and SSL certificate
Advanced security features
Cons:
High renewal costs
Pricing: Hostinger offers an exclusive 80% discount to WPBeginner users on web hosting plans, with prices starting from $1.79 per month. If you want more email addresses, then consider getting the WordPress starter plan for $2.69 per month.
Bluehost is the largest WordPress hosting company in the world that lets you create professional email addresses. You can use your domain name to set up domain-specific emails.
Just like Hostinger, you get email hosting included in the web hosting plan with Bluehost. Not to mention, you also get a free domain name, SSL certificate, and much more.
Bluehost email hosting offers a custom inbox and calendar. You can also schedule tasks and automatically save contact information. Depending on the plan you get, Bluehost offers up to 80GB storage and 50 email aliases.
Besides that, you get different security features like spam filters, antivirus, safe unsubscribe service, real-time anti-phishing, file encryption, and more. Bluehost also supports different email protocols, including IMAP and POP.
Bluehost is the best solution if you’re looking to purchase a hosting plan or already using Bluehost for your WordPress website. Its email hosting plans are affordable and offer tons of features for businesses of all sizes.
Pricing: Bluehost offers an exclusive 73% off for WPBeginner users on hosting plans, with prices starting from $2.95 per month. You can use our Bluehost discount coupon to get started.
Microsoft 365 offers up to 50GB of storage with each mailbox. Plus, you get advanced security features like spam and malware cloud-based email filtering, multifactor authentication, custom permissions, password policy creation, and more.
Aside from that, you can use other tools like Microsoft Word, Excel, PowerPoint, Teams, OnePoint, Publisher, SharePoint, and more. You also get up to 1TB of cloud storage and real-time monitoring of online threats for your mailboxes.
Microsoft Office 365 is a great solution for sites or organizations that are looking to use Microsoft Suite for their operations. If you’re confused about whether to pick Google vs Microsoft, then please see our comparison between Google Workspace and Office 365.
Pros:
Create branded emails using Outlook
Get 50GB of storage for mailboxes
Access powerful Microsoft tools with a professional email address
1TB of cloud storage
Advanced security features
Cons:
Expensive pricing plans
It can be tricky to use, especially for beginners
Pricing: Mircosoft Office 365 prices start from $6 per user per month. There are higher pricing plans that include more features and advanced security options.
Namecheap is one of the cheapest email hosting providers on our list. It’s also a popular domain registrar and helps you find custom domain names for your business.
With Namecheap email hosting, you get up to 15GB of email storage and up to 30GB of file storage space. It also lets you create unlimited aliases in the highest pricing plan, along with mobile sync support.
Other than that, Namecheap supports SMPT, IMAP, and POP3 email protocols. It also offers decent security features like 2-factor authentication, anti-spam protection, and email storage security.
Namecheap is an excellent option for startups and new website owners who are looking for a cheap email hosting service.
Pros:
Affordable pricing plans
Unlimited aliases with the Ultimate plan
Offers document viewer, calendar, contacts, and other tools
Supports SMTP, IMAP, and POP3 protocols
Mobile sync support
Cons:
Basic security features
Limited storage size, even in the Ultimate plan
Pricing:Namecheap email hosting plans start from $1.24 per month for 1 mailbox. You also get a 60-day free trial to try the service.
Rackspace Email is the next email hosting service on our list. It offers a lot of solutions to SaaS companies, including an email hosting solution for small businesses.
The service offers a 100% uptime guarantee, which means it is highly reliable. It has data centers spread across the world and you get 24/7 support in case anything goes wrong.
Besides that, Rackspace offers 25GB mailbox storage space and up to 30GB file storage space. You also get unlimited aliases, group lists, and email forwarding rules. It even offers free email migration from another provider.
Pros:
A reliable email hosting solution
24/7 customer support
25GB mailbox storage
Easily integrates with Microsoft Office 365 tools
Spam and virus protection
Cons:
Requires a high learning curve to use the service
You’ll need to pay extra for email archiving
Limited additional features
Pricing: Rackspace email prices start from $2.99 per user per month. You also get a 14-day free trial to try the service.
Zoho Mail is one of the most popular email hosting services in the market. It offers a secure platform to host emails and create a branded email address.
With Zoho, you get dedicated apps for desktop and mobile to manage and organize your emails. Other than that, it offers up to 50GB of mailbox storage, domain aliases, email forwarding, and offline access.
One of the standout features of Zoho Mail is its SecurePass email. This allows you to send confidential information over emails using a passcode.
Besides that, it supports IMAP and POP3 protocols, up to 1GB of email attachment options, anti-spam and malware protection, email encryption, and more.
Pros:
Easy-to-use email hosting platform
Dedicated apps for mobile devices
Strong security features
Send password-protected emails with SecurePass
Cons:
Pricing per user can be expensive for small businesses
Integration with third-party tools is tricky
Pricing: Zoho Email prices start from $1 per user per month and you get 5GB of mailbox storage.
Which Email Hosting Service Should You Choose?
After reviewing multiple email hosting services, we believe that Google Workspace is the best solution for your email needs.
For starters, it lets you use Gmail with your custom-branded email domain name. Plus, you get access to other powerful tools included in the Google Workspace suite.
At WPBeginner, we also use Google Workspace and highly recommend it.
That said, if you’re looking for a more affordable email hosting service, then you can give Hostinger and Bluehost a try. Both are perfect if you’re just starting a new website since they include email hosting in their web hosting plans.
If you liked this article, then please subscribe to our YouTube Channel for WordPress video tutorials. You can also find us on Twitter and Facebook.
Do you want to learn how to display post meta data in your WordPress blog posts?
Meta data includes important information about your posts, such as the publication date, the author’s name, and the tags. Sometimes, visitors may need to know this information.
In this article, we will show you how to display post meta data in WordPress posts easily.
Why Display Blog Post Meta Data on Your WordPress Website?
Blog post meta data is information about a post that’s not part of the actual content. It includes things like the publication date, the name of the author if you are running a multi-author WordPress blog, categories and tags, custom taxonomies, and more.
This meta data can appear in lots of different locations, depending on your WordPress theme.
Wherever it appears, meta data can help visitors learn more about your content. It can also help them discover other interesting posts. For example, they may look for more blogs written by the same author.
In this way, post meta data can improve the user experience and may even increase pageviews. Just be careful about displaying too much post meta data, as it can make your site look messy and confusing.
With that being said, let’s see how you can display post meta data in WordPress themes. Simply use the quick links below to jump straight to the method you want to use:
Method 1: Using the WordPress Theme Customizer (Easy)
Some themes allow you to customize the post meta data without writing any code.
To check whether this is the case for your theme, just go to Appearance »Customize, which opens the WordPress theme customizer.
You can now look for any settings that allow you to customize your blog pages. These will typically be labeled ‘blog,’ ‘blog settings,’ ‘posts’ or similar.
For example, if you are using the Astra WordPress theme, then you can simply select ‘Blog’ from the left-hand menu.
After that, click on ‘Blog / Archive.’
Simply scroll to the ‘Meta’ section to see all the different data that you can add or remove.
To add meta data to your site, just click on its ‘show’ icon, which looks like an eye.
To remove a piece of meta data, click on the icon again.
You can also change the order that WordPress shows this meta data to visitors using drag and drop.
As you make changes in the theme customizer, the live preview will update automatically, so you can try different settings to see what looks the best for your WordPress website.
When you are happy with how the post meta data looks, don’t forget to click on ‘Publish’ to make your changes live.
Even if you don’t see any post meta data settings in the WordPress customizer, there may still be a way to add this information without writing code.
With that in mind, we recommend looking at the theme’s documentation. You can also reach out to the theme’s developer for help.
Method 2: Using the Full-Site Editor (Block Themes Only)
If you are using a block-based theme like Hestia Pro, then you can display post meta data anywhere on your website using the Post Meta block.
To get started, just go to Themes »Editor in the WordPress dashboard.
By default, the full-site editor will show your theme’s home template.
To add the meta data to your WordPress blog posts, go ahead and click on ‘Templates’ in the left-hand menu.
The editor will now show a list of all the templates that make up your WordPress theme.
Simply click on the Single template, which controls the layout of your blog posts.
WordPress will now show a preview of the Single page template.
To edit this template, go ahead and click on the small pencil icon.
With that done, click on the blue ‘+’ icon in the top left corner.
In the search bar that appears, type in ‘Post Meta.’
When the right block appears, drag and drop it onto your blog layout.
By default, this block will show the post’s categories, author, and tags.
You may want to edit this meta data. For example, you might delete the tags or change the static text that WordPress shows before the meta data.
The following image shows an example of how the default Post Meta block will look on your WordPress blog.
To change this block, simply click to select it in the full site editor. You can then click on any block within the Post Meta block and make your changes.
Just pay careful attention to whether you are editing the static text that WordPress shows in front of the meta data or the dynamic text that WordPress will replace with real values.
For example, in the following image, we have added some static text to the Post Author section.
However, we haven’t changed the ‘Post Author’ dynamic text.
In the following image, you can see how this will look on your WordPress blog.
You may also want to add more meta data to the Post Meta block.
For example, the full site editor has blocks, such as Post Date and Post Author Biography, that you can easily add to the Post Meta block using drag and drop.
Simply click on the blue ‘+’ button and then find the block that you want to use. You can then drag and drop it onto the Post Meta block.
If you add more blocks to the Post Meta block, then you may need to change its layout.
To do this, simply click on the Post Meta block and then select the ‘Block’ tab.
You can now use these settings to arrange the content in a nice layout. For example, you might change the number of columns or add margins and padding.
When you are happy with how the Single template looks, click on the ‘Save’ button.
Now if you visit your website, you will see the post meta data in action.
After that, you may want to add post meta data to other areas of your website, such as your custom archive page.
To do this, simply open the full site editor by following the same process described above.
You can then select ‘Templates’ from the left-hand menu and choose the template you want to edit.
After that, you can add post meta data following the same process described above.
Method 3: Creating a Custom WordPress Theme (Fully Customizable)
Another option is to create a custom WordPress theme. This is a more advanced method, but it will give you complete control over where the post meta data appears on your website.
In the past, you would need to follow complicated WordPress tutorials and write code to build a custom WordPress theme. However, it’s now possible to create your own themes without writing a single line of code using SeedProd.
SeedProd is the best drag and drop WordPress page builder and also comes with a theme builder. This allows you to design your own themes using a simple drag and drop editor.
After that, you can add post meta data to any part of your WordPress website. Simply find the ‘Post Info’ block in SeedProd’s left-hand menu.
Now, drag and drop the block onto your page layout.
After that, click to select the Post Info block. By default, this block shows the author, date, time, and comments meta data.
However, you can also show the modified date, modified terms, and terms meta data.
To add more information to the block, simply go ahead and click on ‘Add Item.’
This adds a new placeholder item.
Now, go ahead and click on the item to see all its settings.
Now, open the ‘Type’ dropdown and choose the type of meta data you want to display.
Depending on the option you choose, you will get access to some additional settings. For example, if you selected ‘Modified Time’, then you can choose the time format.
You can also change the icon that SeedProd uses for the meta data item. Simply open the ‘Icon’ dropdown and then choose ‘Custom.’
You can then go ahead and click on ‘Choose Icon.’
This brings up the icon library with hundreds of icons to choose from. You can use the search bar to look for a specific icon or browse through the entire list.
When you find an image you want to use, simply hover over it and then click the ‘Plus’ button to add it to your page.
Do you want to remove a meta data item instead?
Then simply hover your mouse over it and then click on the trash can icon when it appears.
Finally, you can change the order of the meta data items using drag and drop.
When you are happy with how the Post Info box is set up, you may want to change how it looks by selecting the ‘Advanced’ tab.
When you are happy with how the page looks, just click the ‘Save’ button and then choose ‘Publish’ to make it live.
Method 4: Editing Your Theme Files (Advanced)
You can also add meta data using code. This method is more advanced, but it allows you to control exactly what meta data WordPress shows to visitors and where that information appears on your site.
If you are creating a custom theme, then you can add or modify the code in your existing theme files.
There are lots of ways to display post meta data in a WordPress theme. Some themes will have simple code that’s located below the post title, as you can see in the following example:
By <?php the_author_posts_link(); ?> on <?php the_time('F jS, Y'); ?> in <?php the_category(', '); ?> <?php edit_post_link(__('{Edit}'), ''); ?>
The code above simply displays the author’s name, post date, and categories.
Other themes may use their own template tags, functions, and classes to show meta data. Then, the theme files that are responsible for displaying posts can use these functions.
Usually, you will find post meta data code in your theme’s index.php, single.php, archive.php, and individual content templates such as single-layout.php.
Now we have covered that, let’s take a look at some examples of how to display different post meta data in your WordPress blog.
How to Display or Hide Post Date in WordPress
To display the post’s publication date, you need to add the following PHP code to your theme:
<p>This article was published on: <?php the_time('m/j/y g:i A') ?></p>
This code simply shows the time and date when you published the post.
Pay special attention to the characters inside the_time function. These are called format characters, and they tell PHP how to format the date and time.
If you want to hide the date meta data at any point, then simply find the code with the_time or the_date functions in your theme files and delete those lines.
How to Display the Last Update Date for WordPress Posts
By updating old articles, you can keep your website fresh and interesting and improve your WordPress SEO.
If you regularly update old content, then you may want to show the date when a post was last updated. This can make your content seem more relevant and interesting to visitors, who may not be interested in posts that were published years ago.
Luckily, it’s super easy to display the last update date for WordPress posts using WPCode. It is the best code snippets plugin that allows you to edit your theme files without writing code.
To display the author name, you need to add the following code to your theme files:
<p>This article was written by <?php the_author(); ?></p>
This code uses the_author tag, which shows the author name only:
Sometimes, visitors may want to read more posts by their favorite author. With that in mind, you can link to the author’s page by replacingthe_author tag with the the_author_posts_link, as shown in the code below:
<p>View all articles by <?php the_author_posts_link(); ?></p>
If you want to hide the author’s name at any point, then simply find the the_author or the_author_posts_link tags in your theme files and delete them.
How to Show or Hide Categories in WordPress Posts
Categories can help readers find related content, which will improve the user experience and keep them on your website for longer.
You can show the categories meta data using the following code:
<p>This post was filed under: <?php the_category(', ') ?></p>
In the following image, you can see how the categories will look to your readers:
As you can see, the code shows all the post’s categories separated by a comma. You can replace the comma with any character you want to use by editing the code snippet above.
If you want to remove category meta data from your WordPress posts, then just find the line with the_category tag in your theme files and delete it.
How to Show or Hide Tags in WordPress Posts
Similar to categories, tags can help visitors find more content they are interested in reading.
To show the tags post meta data, simply add the following code to your theme files:
<p>Tags: <?php the_tags(); ?></p>
This code will show all the post’s tags separated by a comma.
You can replace the comma with any character you want. For example, here, we are showing tags separated by a slash.
<?php the_tags( 'Tags: '/ ', ', '<br />' ); ?>
As you can see, the_tags function accepts three different values, known as parameters.
the_tags($before, $separator, $after)
You can use the before and after parameters to add any text or code that you want to show next to the tags. This allows you to add CSS classes and then use them to change how the tags look on your website.
If you want to hide the tags from your readers at any point, then find the line with the_tags() code in your theme files, and delete it.
If you are comfortable adding custom code to your WordPress website, then you can show a lot more meta data to your visitors.
For example, you can use custom fields to add your own meta data to WordPress posts. Another option is to create custom meta boxes to display the custom fields.
If you liked this article, then please subscribe to our YouTube Channel for WordPress video tutorials. You can also find us on Twitter and Facebook.
Are you wondering how to add ‘how to’ schema in WordPress?
By adding ‘how to’ schema to your content, you can show images, videos, and detailed step-by-step instructions directly in the search results. This can make your content stand out and get you more clicks and visitors.
In this article, we will show you how to add ‘how to’ schema in WordPress.
Why Add ‘How To’ Schema in WordPress?
‘How to’ schema markup is a type of HTML code that’s added to your WordPress website.
Instead of appearing on your site, ‘how to’ schema gives search engines more information about your tutorial articles. This can include detailed step-by-step instructions, a list of tools and supplies the reader will need, and how long the tutorial takes to complete.
This helps the search engines understand your pages and posts and show them to people who are looking for content just like yours.
Even better, search engines such as Google may use the ‘how to’ schema to create rich snippets and results. For example, Google might show your ‘how to’ steps in an ordered list.
Depending on how your schema is set up, search engines may even display this information in the ‘people also ask’ section.
These boxes appear for many search queries and offer a list of additional questions, each linked to a website for more information.
This section appears at the very top of the search results, so they can get you even more clicks and increase your blog traffic.
Some rich results even include useful information, such as a list of required tools or how much money readers need to spend to complete the guide. This can help people quickly decide whether your ‘how to’ guide is right for them, which will improve the user experience.
It’s important to note that adding ‘how to’ schema in WordPress will not guarantee that your content appears as a rich result. However, it will improve your chances, especially if your website is already SEO-optimized.
Google’s ‘How To’ Schema Guidelines
Before adding ‘how to’ schema to your pages and posts, it’s important to understand Google’s content guidelines.
Firstly, you can’t use the ‘how to’ schema for advertising purposes or include any content that’s obscene, explicit, or violent. You also shouldn’t add ‘how to’ schema to any content that promotes dangerous or illegal activities.
You can only use ‘how to’ schema once per page, and all the content in your schema markup must also be visible on that page. This means you can’t type out unique instructions or add images that don’t appear in the actual ‘how to’ guide.
Finally, you can’t use the ‘how to’ schema for recipes. For this type of content, you will get much better results by using the SEO-friendly recipe schema.
AIOSEO allows you to add a growing number of schema types to your pages, posts, custom post types, categories, tags, custom taxonomies, and more. This can help search engines understand your content and increase your chances of getting rich snippets.
Note: There is a free version of AIOSEO that allows you to optimize your site no matter what your budget is. However, you will need the premium version to add ‘how to’ schema in WordPress.
Upon activation, the plugin will run a setup wizard, so simply follow the onscreen instructions. If you need more detailed instructions, then you can see our guide on how to properly set up All in One SEO for WordPress.
Once you have completed the setup wizard, AIOSEO will take you back to the WordPress dashboard. Now that All in One SEO is installed and activated, simply open the page, post, custom post type, or any other content where you want to add the ‘how to’ schema.
After that, scroll to the bottom of the WordPress content editor, where you will see a new ‘AIOSEO Settings’ section.
Go ahead and click on the ‘Schema’ tab.
Here, you will see the schema settings are enabled by default.
To add the ‘how to’ schema, just click on the ‘Generate Schema’ button.
Here, simply find the ‘how to’ option and click on its ‘Add Schema’ button.
This opens a window where you can type in all the information you want to use in the schema.
By default, AIOSEO adds a ‘Post Title’ smart tag to the ‘Title’ field. AIOSEO automatically replaces all its smart tags with real values, so you can create unique markup without having to manually type in all the information you want to use.
If you want to use a different title, then simply delete the ‘Post Title’ smart tag. You can then type in the information you would like to use instead.
Next, you will need to add a description. Search engines like Google typically show the description below the post title and above the list of steps, so it’s a great way to introduce the guide to potential readers.
You can either type this information into the ‘Description’ box or click on any smart tag you want to use. To see the full list of smart tags, click the ‘View all tags’ link.
If the reader needs any specialist equipment or resources to complete the guide, then you should type them into the ‘Supplies’ field.
After each item, press the ‘Enter’ key on your keyboard to add it to the schema.
Similarly, if the reader needs any specialist tools, then just type these into the ‘Tools’ section.
With that done, you can specify how long it will take readers to complete the ‘how to’ guide. Simply type the correct numbers into the fields marked ‘Days’, ‘Hours’, and ‘Minutes’.
Sometimes, you may want to show the finished result. For example, if you are writing about how to create an email newsletter, then you might show a professionally-designed newsletter. If readers like what they see, then they are more likely to visit your website.
Unlike other images that must be unique, you can reuse this image in the final step of your ‘how to’ schema. However, as always, the image must appear somewhere on the page or post.
Simply click on the ‘Upload or select image’ button and then choose an image from the WordPress media library.
Sometimes, readers will need to spend money to complete a ‘how to’ guide. For example, if you are writing a post about how to start a WordPress blog, then readers will need to buy WordPress hosting.
In this case, simply type the total cost into the ‘Price’ field and select the currency.
With that done, you are ready to add each step to the ‘how to’ schema.
According to Google’s guidelines, each step must only include the information readers need to complete that step. With that in mind, you shouldn’t include any non-step data, such as an introduction section or a list of related posts.
To start, type in a title for the step and enter the instructions into the ‘Description’ section.
If this is the case, then you can add the step’s anchor link to the ‘URL’ field.
You may also want to add an image that represents this step. This image must be unique and be visible on the page or post.
According to Google’s guidelines, you should never use images that don’t reflect the step’s content or use the same image for multiple steps.
When you are happy with how the first step is set up, just click on the ‘Add Another Step’ button.
This creates a section where you can add a title and description, plus an optional anchor link and image. Simply repeat this process to add all the steps to your ‘how to’ schema.
When you are happy with how the schema is set up, go ahead and click on the ‘Add Schema’ button.
You can now go ahead and publish or update the page to make the schema live on your WordPress website.
Optional: Create a Reusable’ How To’ Schema Template
If you publish lots of ‘how to’ guides, then you might create your own schema template. You can then apply this template to any page, post, custom taxonomy, custom post type, or other content with the click of a button.
Schema templates tend to work best when you use smart tags. For example, tags can add the post’s title, excerpt, author, publication date, and other content automatically. In this way, you can create unique schema without having to manually type in all the information.
Sometimes, you may even use the same tools, pricing, currency, or other information on all your posts.
For example, if you run a photography blog, then you might always recommend that readers use your favorite camera model or lens. By typing this information into the template’s ‘Tools’ field, AIOSEO will automatically apply this schema to your content, which saves you even more time.
Even better, you can override these default settings every time you use the template, so you can still customize the template for individual pages.
To create a reusable template, you need to open any page or post and then click on the ‘Generate Schema’ button.
In the popup that appears, click on the button next to ‘How to’.
This takes you to a screen where you can build the template. By default, AIOSEO will use the post’s title as the name.
To change this, simply delete the ‘Post Title’ tag and then click on ‘View all tags.’
You can now choose any tag from the dropdown menu.
You can also use a combination of plain text and tags or multiple tags.
For example, you might use ‘Post Title’ and ‘Post Date.’ AIOSEO will then replace these tags with real values every time you use the template.
When you are happy with how the title is set up, you can add a description.
Often, it makes sense to use the ‘Excerpt’ tag so that AIOSEO will use the WordPress post’s excerpt. However, you can use any smart tags you want or even type plain text into the ‘Description’ field.
With that done, you may want to add some plain text to the other fields. For example, there may be some tools and supplies that you use in all your ‘how to’ guides.
Using WPBeginner as an example, it might make sense to add a domain name or Bluehost WordPress hosting to the ‘Tools’ field since most of our ‘how to’ guides require a domain and web hosting.
Remember, you can override these settings each time you use the template.
After typing in any extra information you want to use, it’s time to go ahead and create the template. Simply click on the ‘Save Schema as Template’ button.
You can now type in a title for the schema template. This is just for your reference, so you can use anything that helps you identify the template in your WordPress dashboard.
With that done, click on the ‘Save Template’ button.
To apply the template to your content, simply click on the ‘Generate Schema’ button to open the schema catalog as normal.
Then, click on the ‘Your Templates’ tab.
You will now see the template you created earlier.
If you want to apply the template without making any changes, then click on its ‘+’ button.
However, we recommend customizing the template as it typically creates more SEO-friendly schema. This can improve your WordPress SEO and help you get valuable rich snippets in the search engine results.
To do this, simply click on the ‘pencil’ icon.
You can now make changes or type in any extra information you want to use for this specific ‘how to’ guide.
With that done, click on ‘Add Schema’.
Simply repeat these steps to use the same template anywhere on your online store, website, or WordPress blog.
How to Test Your ‘How to’ Schema in WordPress
Since the ‘how to’ schema doesn’t appear on your website, you will need to test it using a free Google tool.
To check that the schema is formatted correctly, head over to Google’s Rich Results Test page. Here, simply type in the URL where you added the ‘how to’ schema and then click on ‘Test URL.’
Google will now analyze your page for all kinds of schema markup. With that in mind, you may see multiple results if the page uses other kinds of schema, such as local business schema and FAQ schema.
Once the test is complete, click on the section marked ‘How to’.
You should now see all the information you added to this page or post. If this data is correct, then your ‘how to’ schema is working perfectly.
If the information is wrong or it’s formatted incorrectly, then you will need to open that page or post in the WordPress content editor. Then, scroll to the AIOSEO Settings and select the ‘Schema’ tab.
Here, find the ‘how to’ schema you added earlier and click on its pencil icon.
You can then edit the schema by following the same process described above.
When you are happy with the changes you have made, just click on ‘Update Schema.’
You can now re-test the URL using Google’s Rich Results Test page.
If you are still seeing the wrong information, then try clearing your WordPress cache because caching plugins may show an outdated version of your content to Google.
If you liked this article, then please subscribe to our YouTube Channel for WordPress video tutorials. You can also find us on Twitter and Facebook.
Everyone agrees that broken links are bad for user experience. But did you know that broken links can significantly hurt your WordPress SEO rankings?
Yes, it’s proven that having broken internal links on your website negatively impacts SEO.
In this article, we will show you how to easily find and fix broken links in WordPress so that you can improve your user experience and SEO rankings.
What Is a Broken Link?
A broken link, also known as a dead link, is a link that no longer works.
Broken links can happen for many reasons, but the most common reason is when a page is either deleted or moved to a different location, which causes the server to show a ‘404 not found’ error message.
On WordPress sites, broken links typically occur when moving a site to a new domain name or when deleting a post or page without proper redirection.
Sometimes, broken links can also happen due to a typo, and they can go unnoticed for months, if not years.
This is why it’s extremely important to regularly monitor broken links on your WordPress website and fix them so you can keep them from hurting your SEO rankings.
In this guide, we will share the top 5 methods to find broken links in WordPress. After that, we will show you an easy way to fix those broken links.
Method 1: Finding Broken Links in WordPress Using Broken Link Checker (Quick & Easy)
The Broken Link Checker plugin by AIOSEO is an essential tool for making sure all of the links on your WordPress site are functioning correctly.
It regularly scans for broken links on your website, including internal and external links that result in a 404 error.
Unlike some other broken link checker plugins, it’s built as a SaaS service, so it won’t slow your website down. It also won’t be blocked by managed WordPress hosting companies like WP Engine because it uses an external private server to ping for broken links.
Note: The free version of Broken Link Checker allows you to scan up to 200 internal links. You can upgrade to the Pro version to scan more internal and external links.
Upon activation, the Broken Link Checker Setup Wizard will start automatically to help you set up your account.
On the next page, you can choose to create a free account or connect to a plan that you already purchased.
To create a new free account, simply click the ‘Create a Free Account’ button. You will need to fill in your name, email address, and phone number. You will also need to enter your credit card details so you can be upgraded when you go over the free 200 link limit.
If you already purchased the Pro version, then you can click on the ‘Connect to an Existing Account’ button. You will be asked to sign in to your account, and then you can click the ‘Connect’ link next to your plan.
The plugin will now start working in the background to find links in your posts, pages, and custom post types.
You can go to the ‘Broken’ tab to view the full report. The links are categorized into broken, redirects, and dismissed.
If you have been running your WordPress blog for a long time, then this report will include broken links to third-party websites as well.
You can quickly fix any broken links right inside of the plugin by clicking the ‘Edit URL’ link. Or, you can remove the link by clicking ‘Unlink.’ Once you are finished, don’t forget to click the ‘Update’ button.
Broken Link Checker will also give you ‘Status Details’ about each link when you click the Information ⓘ icon.
The information displayed includes how long the link has been broken, its HTTP status code, response headers, and more.
The plugin’s Settings tab lets you control which post types (posts, pages, custom post types) and statuses (published, draft) you want to monitor or exclude.
Broken Link Checker by AIOSEO will automatically scan your site every 3 days, so you won’t have to worry about broken links in the future.
Method 2: Finding Broken Links Using Semrush (Full Site Audit)
Semrush is one of the best SEO tools on the market. It allows you to easily monitor your website’s SEO rankings and overall health.
It also includes a powerful site audit tool that crawls your website to find common errors and prepare a detailed report for you.
It is a paid service, but they offer a limited free account that allows you to crawl up to 100 pages on one domain name. Paid plan limits start from 100,000 pages a month.
Once you are logged in, you need to click on the ‘Site Audit’ link from the left menu.
This will bring you to the Site Audit page. From here, click on the ‘Create project’ button at the top to add your website.
You will be asked to enter the domain name you want to audit, and then you need to click the ‘Create project’ button.
After that, you will be asked to configure the site audit settings.
Semrush will now begin crawling your website for the site audit. This may take a few minutes, depending on how many pages you selected for the crawl.
Once finished, you can click on your domain under the ‘Site Audit’ section to view your report.
Notice that the number of broken links is written in blue. That’s because it’s a link you can click to see more information.
You will see a list of broken links found on the crawled pages of your domain.
You can now click on the ‘Export’ button at the top right corner of the screen to download your crawl report. You will need it when fixing broken links on your website.
Method 3: Finding Broken Links Using Ahrefs (Complete Backlink Profile)
Ahrefs is an excellent all-in-one SEO tool for marketers, businesses, and SEO professionals. It offers detailed SEO insights into your own website or any of your competitors.
You can use it for keyword research, competition analysis, organic and paid keyword ideas, and site health monitoring, including broken links. With the Site Explorer tool, you will get a complete backlink profile of your website.
First, you will need to sign up for an Ahrefs account. Note that it is a paid service.
Once you are logged into your Ahref’s dashboard, you need to enter your domain name into the ‘Site Explorer’ tool.
The Site Explorer tool will now crawl your website to prepare reports. This may take some time, depending on how much content you have on your website.
Once it is finished, you will see an overview of your Site Explorer results. From here, you need to click on the Pages » Best by links menu and then sort your report by 404 status.
You can now export your report in CSV format to find and fix the broken links on your WordPress website.
Method 4: Finding Broken Links Using MonsterInsights (Advanced Tracking)
Using the plugin, you can set up Google Analytics without editing code. It also lets you set up link and button click tracking, eCommerce tracking, author tracking, and more.
To start, you will need to sign up for a Google Analytics account and connect it with your WordPress website using MonsterInsights. For more details, you can follow our detailed guide on how to install Google Analytics in WordPress.
Note: MonsterInsights is a premium WordPress plugin, but we will be using the free version for this tutorial. However, you can upgrade to its Pro version for advanced tracking features, dashboard reports, popular posts features, and more.
Once MonsterInsights is active on your website, the plugin will start to track broken links and show you a report in Google Analytics. However, it might take up to 24 hours before you see any data.
To find broken links, you need to create an Exploration report in Google Analytics. This will take information about your broken links from MonsterInsights and display them in a list.
Once you log in to Google Analytics, you will need to navigate to the ‘Explore’ tab and choose a Blank report.
Now, under Exploration Name, you can type a name for the report, such as ‘Broken Links’.
Next, you need to click the ‘+’ button next to Dimensions.
You will see a full list of the available dimensions for your report.
You need to search for the ‘Page title’ dimension and check its box. After that, you should do the same thing for the ‘Page path + query string’ dimension.
Once you’ve done that, just click the ‘Import’ button at the top right of the screen.
Next, you need to import a metric. This time, you should click on the ‘+’ button next to Metrics and import the Sessions metric.
Now, you can add the items you imported to your report.
First, you need to drag both Dimensions to the Rows box in the second column. After that, drag the Sessions metric to the Values box.
Next, scroll the second column down to the Filters section.
You need to click the box that says ‘Drop or select dimension or metric’. After that, click on ‘Page title’ from the menu.
Now, under Conditions, you need to select ‘contains’ from the dropdown menu and then type the page title for your website’s 404 page, such as ‘Page not found’.
Tip: If you are not sure of the title of your website’s 404 page, then type a random URL after your domain name, such as https://example.com/xyz and then check your browser’s tab for the title.
Once you’ve done that, you can click the ‘Apply’ link.
On the right of the page, you will now see a report of all of the 404 errors that occurred during the report’s time frame. However, in most cases, the ‘Page page + query string’ column will be cut off so that you can’t see the full URL.
To see the URLs, you will need to download the data. Simply click the ‘Download’ icon at the top right of the page.
When you view the downloaded data, you will see that most of the URLs look like this:
The part of the URL that shows your broken links comes after ?page=. In the example above, this is https://example.com/error-page-url.
The part of the URL that shows the page containing the broken link comes after &from=. In the example, this is http://example.com/page/.
You can use this information to fix the broken links. We show you how to do that in the last section of this article.
To see this report in the future, simply visit the ‘Explore’ tab in Google Analytics.
Method 5: Finding Broken Links in WordPress Using Google Search Console (Free)
Google Search Console is a free tool offered by Google to help webmasters manage their sites’ visibility in search results. It also notifies you about errors, including 404 errors that are caused by a broken link.
First, you will need to set up Google Search Console for your website. For step-by-step setup instructions, see our ultimate Google Search Console guide.
After you have logged in to your Google Search Console account, just click on the ‘Pages’ link from the left menu.
Next, make sure the box next to ‘Not indexed’ is checked.
This will make sure that you will see any 404 errors that were encountered by users when visiting your website.
When you scroll down to the section titled ‘Why pages aren’t indexed’, you will see one reason listed as ‘Not found (404)’.
When you click on this item, you will see a list of all broken links that caused a 404 error.
How to Properly Fix Broken Links in WordPress
We have shown you 5 different methods to find broken links in WordPress. Now, let’s talk about how to easily fix broken links in WordPress.
The best way to fix a broken link is to redirect it to another page.
For example, if you moved the contents of an article to a different address, then you will need to redirect it to the newer article.
Similarly, if an article does not exist anymore, then you will want to point users to a similar page that is closely related to the contents of the old article.
You can do this by setting up 301 redirects.
The easiest way to fix broken links and set up redirection is by using the All in One SEO (AIOSEO) plugin for WordPress. It offers a powerful redirection manager that helps you track 404 error pages and create 301 redirects.
Note: We will be using the AIOSEO Pro version because it includes the redirection manager addon and offers multiple types of redirections.
First, you will need to install and activate the AIOSEO Pro plugin. For more details, see our step-by-step guide on how to install a WordPress plugin.
Upon activation, you need to visit the All in One SEO » Redirects page and then click the ‘Activate Redirects’ button.
Next, you will need to go to the ‘Settings’ tab under Redirects and enable 404 logs. You can find the option in the ‘Logs’ section.
AIOSEO will also let you set the time period to record your 404 logs using the dropdown menu. We suggest that you select no longer than one month for smooth and optimal performance.
After that, go ahead and click the ‘Save Changes’ button.
You will now see a ‘404 Logs’ tab appear in the Redirects section in AIOSEO. Go ahead and click on the tab.
When you first enable the 404 logs option, there will be no data on this page. The plugin will only start to monitor and record 404 pages after enabling the settings.
However, once it’s active, AIOSEO will show a list of broken links on your website under the ‘URL’ column. It will also show you how many people visited the link under the ‘Hits’ column and the last accessed date.
You can now click the ‘Add Redirect’ button for any broken link you want to fix. When you click the button, you’ll see redirection options for your 404 error URL.
Simply enter the Target URL where you’d like to redirect your visitors and select ‘301 Moved Permanently’ as the redirection type from the dropdown menu. Once you’ve done that, you should click the ‘Add Redirect’ button.
You can now test this by visiting the old broken link, and you will be redirected to the new page.
Just repeat the process for all broken links on your website.
Now that you have found and fixed the broken links on your WordPress site, you may be wondering about other ways to use internal links to improve your site’s SEO. Here are our best guides on internal links:
If you liked this article, then please subscribe to our YouTube Channel for WordPress video tutorials. You can also find us on Twitter and Facebook.
Do you want to offer installment payments on your eCommerce store?
Offering an installment plan encourages customers to purchase more products or services. It makes it easier for them to buy expensive items and helps boost sales on your WooCommerce store.
In this article, we will show you how to set up installment payments in WooCommerce using different plugins.
Why Set Up Installment Payments in WooCommerce?
Installment payments allow customers to break up the total amount of a product or service into smaller portions. Instead of paying the price in full, users can pay a certain amount upfront and then pay the remaining amount over a period of time.
As a WooCommerce store owner, you can select the timeframe you’d like to offer to customers for repayments. Usually, this depends on the product and niche you’re in, but you can offer anything between 6 to 24 months.
Setting up installment payments in WooCommerce helps provide alternative payment methods to customers. It encourages your visitors to purchase more valuable and expensive items.
You can also reduce cart abandonment by offering an installment payment option. Customers might not purchase products if they don’t have sufficient funds and would exit your site without checking out. With an option to pay in installments, you can motivate them to buy the product and boost sales.
That said, let’s see which plugins are the best for WooCommerce installment payments.
Affirm Payments is a WooCommerce extension that lets you add tailored buy now pay later programs to your eCommerce store. Affirm is a payment service that helps customers pay at their own pace.
The plugin is beginner-friendly to use. Once you install it, you’ll see the Affirm payment option in WooCommerce. Customers can then select a payment plan that works for them.
Affirm offers 4 interest-free payment features, where customers can split the initial cost into 4 installments with no interest. This makes it easier to sell high-ticket items, and customers won’t have any impact on their credit scores.
Besides that, Affirm Payments also allows customers to choose their payment terms. The best part is that it shows the exact amount that needs to be paid every month with the annual percentage rate (APR).
Who Should Use It: Affirm Payments plugin is a great solution for anyone looking to add just a buy now pay later payment option in WooCommerce. The provider helps create installment plans for customers and also offers 4 interest-free installments every 2 weeks.
Pros:
Easily add Affirm as a payment option in WooCommerce
Offer ‘Pay in 4’ plans with no interest (0% APR)
Allow customers to choose their installment plan
Showcase all payment plans in a single view
Cons:
Limited customization options from within the WordPress dashboard
High-interest rate (up to 30%) for some items
Sometimes Affirm may require a credit check before transaction approval
Pricing: Affrim Payments is a free WooCommerce extension.
Klarna Payments for WooCommerce is a free WordPress plugin that adds Klarna payment options to your online store. Klarna is a Swedish fintech company that offers online payment solutions for website owners.
Using the plugin, you can offer customers to pay the full amount at checkout, first try the product and then pay later, or slice the total amount into installments.
It provides customers the flexibility of choosing when they want to pay in the installment plan. There is also an option to provide 4 interest-free payments, so customers can save costs and pay for a product in smaller portions.
The setup process is very easy. First, you’ll need to sign up for a Klarna account. Once that’s done, simply use the plugin to add Klarna as a payment option in WooCommerce. Klarna will then approve your store, and you can start offering installment plants to customers.
The best part about using Klarna is that it easily integrates with WP Simple Pay. You can use it to offer buy now, pay later payment plans in WordPress.
WP Simple Pay comes with a built-in Klarna (Buy Now, Pay Later) Form template. This way, you let customers choose the payback period for a product.
On the downside, Klarna will work with merchant accounts and is only available in selected countries. For instance, it’s available in Sweden, Norway, Finland, Denmark, Germany, Austria, the Netherlands, Belgium, Switzerland, France, Italy, Poland, Spain, Portugal, Great Britain, Hungary, Czech Republic, Slovakia, the USA, and Australia.
Why Should You Use It: If you’re looking for a plugin that offers flexible installment plans for your online store, then Klarna Payments for WooCommerce is perfect. It’s easy to use and also integrates with WP Simple Pay, so you can create payment forms without editing code.
Pros:
A free plugin that lets you add installment plans
Beginner-friendly to use
Offer 4 interest-free installment plans
Let customers choose when they want to pay (up to 24 months)
Easily integrates with WP Simple Pay
Cons:
Only available in limited countries
Not many customization options
Pricing: Klarna Payments for WooCommerce is 100% free to use.
Jifiti Buy Now Pay Later is the next WooCommerce installment payments plugin on our list. It adds a Jifiti payment option to your online store and offers a white-labeled buy now pay later platform for WooCommerce.
Jifiti is a platform that connects lenders, merchants, and customers. With a white-label program, you can use your custom branding while offering installment plans. The service lets you add zero-interest split payments, pay in 3 or 4 installments, and more.
In the background, Jifiti will connect you with leading banks and lenders like MasterCard, Credit Agricole, and Citizens Pay. This way, customers can break large payments into smaller amounts and pay them over a period of time.
What makes this plugin different is that if financing is not approved by one of the lenders, it will automatically pass your customer’s financing application to the next lender in the network. As a result, you’ll see more financing and a boost in sales.
Who Should Use It: The Jifiti Buy Now Pay Later plugin is excellent for users who want to add a white-label installment payment program to their WooCommerce store. You can work with a lender or a bank to add a buy now pay later option on your site and then customize its appearance.
Pros:
Create branded installment payment plans for your store
Offer interest-free installment plans
Work with leading banks and lenders for financing options
Automatically pass the customer’s financing application to the next lender
Cons:
Setting up white labels can be time-consuming
Customers would have to wait for their financing to be approved
Pricing: Jifiti Buy Now Pay Later is a free WooCommerce plugin.
WooCommerce Deposits is a premium plugin that lets you set up installment plans on your online store. The plugin offers flexible payment options and allows you to offer custom schedules based on days, weeks, or months.
You can create multiple payment plans for your WooCommerce store. It also lets you choose variable percentages and intervals for each payment. For instance, you can decide what percentage a customer should pay initially and then over time.
The plugin is straightforward to use and offers a clean interface. You can easily create and manage all your installment payment schedules from the WordPress dashboard.
Who Should Use It: From our testing, WooCommerce Deposits is a user-friendly plugin that’s perfect for creating custom payment schedules. If you’re looking to set up multiple installment plans for your WooCommerce store, then this plugin is for you.
Pros:
Easily create custom payment schedules
Have full control over payment amount and intervals
Very easy to use and setup
Add a description to each payment schedule to guide customers
Cons:
Limited customization options for changing appearance
There is no free version
Pricing: WooCommerce Deposits is a paid extension and will cost you $18.25 per month.
Splitit is the next WooCommerce installment payments plugin on our list. It lets you add installment payments to your online store with ease.
In our experience, what’s different about this plugin is that it allows customers to use their existing debit or credit card to split the total amount into smaller portions. Customers don’t have to get a loan or wait for approval to purchase a product.
As long as a customer has available credit on their card that’s equal to the price of the purchase, they can easily use it to set up installments.
Splitit supports different card network providers, including Visa, MasterCard, American Express, Discover Global Network, and more. The plugin is also easy to use. Simply connect your merchant account and configure the settings in your WordPress dashboard.
Besides that, Splitit also offers a white label buy now pay later feature, supports high-value orders (up to $50,000), allows installment plans up to 24 months, lets you set up interest-free payment plans, and more.
Who Should Use It: If you’re looking for a way to allow customers to use their own credit cards for installment payments, then Splitit is the best solution. Plus, it works with popular payment network partners and also lets you create white-label buy now pay later plans.
Pros:
Allows customers to use debit or credit cards for installment plans
Offers customization options inside the WordPress dashboard
No application or credit checks are needed for customers
Create an interest or fee-free repayment schedule
Cons:
Works with limited payment providers
It doesn’t improve the user’s credit score
Pricing: Splitit is a free WordPress plugin that you can use.
The plugin lets your customers have the flexibility to reserve a product or service and break the total amount into 2 installments. The first installment is at the time of purchase and the second installment is the remaining balance, which customers can pay at a later time.
You can set the deposit amount for all the products in your store. There is an option to choose a fixed amount or a percentage value of the total amount.
The plugin also lets you set up rules and charge different deposit amounts based on the products a user adds to the cart.
Who Should Use It: The plugin is perfect for online stores that require an initial deposit or down payment to book or reserve a product or service. They can then collect the remaining payment on delivery or set it up for an even later time.
Pros:
Simple and clean plugin to use
Easily collect deposits for products and services
Create rules to define the deposit value
Easily manage remaining balances for your orders
Cons:
You can only set up 2 installments
Limited integration options
No free version
Pricing: YITH WooCommerce Deposits / Down Payments will cost you $129.99 per year.
The best part is that it works with all the payment methods that are supported by WooCommerce. You can simply choose the deposit amount or percentage customers will have to pay at the time of purchase.
Besides that, you’ll also see a history of all the partial payments on your WooCommerce store from the dashboard.
While the free plugin is great for collecting deposits, you can unlock more features in its premium version. For instance, you can select the payment term, offer a zero deposit option, set up payment reminders for customers, and more.
Who Should Use It: Deposit & Partial Payments for WooCommerce is a great plugin for anyone looking to set up down payments on their online store for free. You can also create a payment plan and set up installments in WooCommerce. It is also a great alternative to YITH WooCommerce Deposits / Down Payments.
Pros:
Add a deposit or down payment option for free
Get multilingual support
Easily integrate with WooCommerce-supported payment methods
Set up fixed or percentage deposits
Cons:
The free version of the plugin offers limited features
Pricing: Deposit & Partial Payments for WooCommerce is a free WordPress plugin. However, it also offers a premium version with prices starting from $29 per year.
The best part, WP Simple Pay supports buy now, pay later payment plans. You can select different methods, including installment payments. Simply choose the billing time period to accept installments.
It supports 13 payment methods in 135+ currencies from over 45 countries. You can easily add credit/debit cards, ACH debits, Klarna, Afterpay, Apply Pay, Google Pay, and other payment methods in WooCommerce.
WP Simple Pay comes with pre-built form templates. You can simply select the Installment Plan Form template and enter your details.
Next, you can customize the installment plan form according to your requirements.
WP Simple Pay lets you choose the billing period. For instance, there are options to break the actual amount into smaller portions, and you can select the billing period based on days, weeks, months, or years.
Besides that, you can also enable recurring payment options, create customized receipts, set up purchase restrictions, automatically calculate taxes, and more.
Why Should You Use It: WP Simple Pay is best for setting up installment plans and accepting credit card payments without setting up a shopping cart. It’s super easy to use, and you can add a purchase button anywhere on your online store without editing code.
Pros:
Very easy to set up and use
Add a Stripe purchase button without editing code
No need to set up a shopping cart to collect online payments
Offer pre-built payment form templates, including installment plan form
Supports 13 payment methods
Easily integrates with buy now, pay later providers like Klarna
Cons:
The free version offers the installment plan form but has limited features
3% credit card fee per transaction when using the free version
Pricing: WP Simple Pay offers premium plans starting from $44.55 per year. There is also a free version of WP Simple Pay you can use to get started and add installment plans to your WooCommerce store.
Which is the Best WooCommerce Installment Payments Plugin?
After reviewing different plugins, we believe that Affirm Payments is the best WooCommerce installment payments plugin.
It lets you create custom installment plans for customers and also offers a 4-interest-free installment plan feature. Customers can even choose their own repayment plan and break the total amount into smaller portions.
The best part is that you can use Affirm Payments for free.
On the other hand, if you’re looking for a free WooCommerce plugin that lets you add a buy now pay later option, then you can also check out Klarna Payments for WooCommerce.
FAQs about WooCommerce Installment Payments
Here are some common questions users have about setting up WooCommerce installment payments.
1. What is the WooCommerce plugin to pay in installments?
Affirm Payments is the best WooCommerce plugin for setting up pay in installments. It offers multiple payment methods, allows you to add a buy now pay later option, built-in templates, and more.
2. What are the payment options in WooCommerce?
WooCommerce offers multiple payment options. You can allow customers to pay through their credit cards, Stripe, PayPal, Klarna, Apply Pay, and more.
3. How do I add pay later to WooCommerce?
You can use a plugin like WP Simple Pay to add an installment plan and pay later in WooCommerce. Other plugins like Affirm and Klarna Payments in WooCommerce are also great for setting up split payments.
If you liked this article, then please subscribe to our YouTube Channel for WordPress video tutorials. You can also find us on Twitter and Facebook.
Are you looking to add reCAPTCHA to your WordPress comment form?
Spam comments have gotten out of control on many WordPress websites. Instead of turning off the comments, you can add CAPTCHA to the comment form to practically eliminate spam.
In this tutorial, we will show you how to easily add reCAPTCHA to the comment form of your WordPress website.
What Is Google reCAPTCHA?
Comment spam is a problem on many WordPress websites. Akismet, the popular spam filtering service for WordPress, blocks about 7.5 million spam comments every hour.
reCAPTCHA is one of the best ways to fight it. reCAPTCHA is an advanced form of CAPTCHA that can distinguish between robots and human users. In fact, CAPTCHA is an acronym for ‘Completely Automated Public Turing Test to Tell Computers and Humans Apart’.
Google acquired CAPTCHA technology in 2009 and then later rebranded it as reCAPTCHA. They also made it easier for human users to easily pass the test.
To pass the test, users are required to click a checkbox indicating they are not a robot. They will either pass right away or be presented with a set of multiple images where they will need to click on matching objects.
Google has made reCAPTCHA publicly available so that website owners can use it on contact forms, login pages, and comment forms to reduce spam.
It is also super easy to set up and add to WordPress comment forms.
With that said, let’s see how to easily add reCAPTCHA to a WordPress comment form with step-by-step instructions.
Upon activation, you need to visit the Advanced Google reCAPTCHA page to configure the plugin’s settings.
The plugin will ask you to provide Google reCAPTCHA API keys. You can create these keys for free from the official reCAPTCHA website by clicking the ‘register your domain’ link at the top of the screen.
Registering Your Website to Get reCAPTCHA API Keys
The ‘register your domain’ link will take you to the Google reCAPTCHA website, where you can register your site to work with reCAPTCHA.
You will be asked to sign in with your Google account. After that, you’ll see the ‘Register a new site’ page, where you need to provide some basic information to register your site.
First, you need to type your website name or any name of your choice in the ‘Label’ field. This will help you easily identify your site in the future.
Next, you need to select the ‘Challenge (v2)’ radio button. This will open up 2 new options.
Since you want to add the reCAPTCHA checkbox to your site, you need to select the first option, ‘I’m not a robot Checkbox’.
When you scroll down, you will see the ‘Domains’ textbox. This allows you to add the domain name of your website where you would like to add the reCAPTCHA checkbox.
You can also add multiple domains or subdomains by clicking on the plus (+) icon. This will allow you to use the same API keys on different websites.
Once you have filled out the form, you can click on the ‘Submit’ button to register your site.
Google reCAPTCHA will now show you a success message along with the site key and the secret key on this page.
You can now use these API keys in the plugin settings on your WordPress website.
Adding reCAPTCHA to a WordPress Comment Form
Now, you need to head back to the Advanced Google reCAPTCHA page in your WordPress admin area.
On the settings page, you need to paste the site key and the secret key.
Next, make sure that the ‘Enable for Comment Form’ box is checked.
By default, reCAPTCHA will be used on the login page, registration page, lost password page, and comment form. You can check or uncheck the boxes to enable the options you need.
Once you are done, don’t forget to click the ‘Save Changes’ button at the bottom of the page to store the API keys and enable reCAPTCHA.
Congratulations, you have successfully added reCAPTCHA to your WordPress comment form. You can now check the comment section of your blog posts to confirm that it’s working.
Note: The reCAPTCHA checkbox will be displayed only to logged-out users. To preview reCAPTCHA, you will need to either log out of WordPress or open your website in an Incognito window in your browser.
More Ways to Combat Comment Spam in WordPress
reCAPTCHA is just one way to combat comment spam on your website. Here are a few more.
Your first step should be to turn on comment moderation. This will give you the opportunity to view and approve comments before they are displayed on your website.
You can also use the Akismet plugin to automatically catch the most common types of spam comments by checking a global spam database. Akismet comes preinstalled with WordPress, but it is not activated by default.
Better still, the premium Sucuri plugin allows you to block suspicious requests before they even reach your website. This prevents automated bots and scripts from submitting comments at all. We use it on all our websites.
You can also block spam comments using the Antispam Bee plugin. It lets you set rules about which users to trust, such as approved commenters or commenters with a Gravatar. You can also create rules that mark comments immediately as spam, such as when they contain code.
If you liked this article, then please subscribe to our YouTube Channel for WordPress video tutorials. You can also find us on Twitter and Facebook.
With the first 20 years of WordPress history behind us, the platform is already powering 43% of websites. Over the years, WordPress has continued to grow and evolve to meet the changing needs of website owners. But what can we expect in the future?
In this article, we will talk about the future of WordPress and what you can expect.
What Improvements Can We Expect From WordPress in the Future?
WordPress was launched in 2003 by Matt Mullenweg and Mike Little. Now that there are over 20 years of WordPress history behind us, you may be wondering what’s coming next.
The future of WordPress is important because it is the content management system (CMS) behind 43% of all websites, including big-name brands like Sony, CNN, Time Magazine, and Disney.
You can expect WordPress to stay modern and relevant and become even easier to use. WordPress is designed to be simple and adaptable, and WordPress developers are already looking a long way down the road and have a detailed roadmap.
In fact, at a recent WordCamp, WordPress co-founder Matt Mullenweg shared that he expects WordPress to be still going strong a century from now.
I could see WordPress being around—not just around, but core to the fabric of the web—100 years from now, and I would love to attend a WordCamp Asia in my 80s.
Matt Mullenweg, WordPress Co-founder, WordCamp Asia 2023
With that being said, let’s take a look at what to expect in the future of WordPress. You can use the links below to jump to the sections you are most interested in:
WordPress is very popular. It currently powers 43% of all websites, which translates to 810 million websites in total. This number has also grown a lot when you consider that WordPress was used to build only 29% of websites in 2018.
Besides that, WordPress holds nearly 65% of the global CMS market share. The following chart shows every content management system with more than 1% usage. Nothing comes close to WordPress.
These statistics haven’t gone unnoticed. WordPress has been chosen by the most successful companies in the world. In fact, 38% of the top 10,000 websites are powered by WordPress, including big-name brands like Disney, Sony, Facebook, and more.
As you can see, WordPress currently dominates the website market, and this trend will continue in the future.
WordPress market share numbers have been steady for some time, and other CMS options have also remained steady without large spikes of growth. We expect WordPress will remain popular well into the future.
We can be confident because WordPress is built by a community and doesn’t rely on a single company for its success.
The WordPress community is made up of developers, designers, and WordPress enthusiasts who contribute to its core development, plugin creation, and theme design.
As WordPress evolves, so will the community that supports it. This will make sure that the platform remains a powerful and accessible tool for individuals, businesses, and organizations.
Why not become an active part of the WordPress community? You can get started by simply attending WordCamp or a local meetup. To learn more, see our guide on how you can get involved with the WordPress project.
2. The Growth of WordPress for eCommerce
eCommerce is a rapidly growing industry, and the availability of WordPress eCommerce plugins makes WordPress an excellent choice if you are starting an online store.
There are currently more than 5 million websites powered by the WooCommerce plugin. It has a market share of around 39% among eCommerce solutions, above Shopify, Squarespace, Wix, and others.
That makes WooCommerce the most popular eCommerce platform right now, and its market share has had an upward trend over time. This means we can expect more people to keep using it into the future.
Of course, WooCommerce isn’t the only eCommerce solution for WordPress. If you don’t need a full-blown online store, then you can choose a different eCommerce plugin like Easy Digital Downloads or WP Simple Pay.
Overall, we expect to see faster adoption of WordPress for eCommerce in the future. It’s clear that while WordPress is maintaining its position as a leading website builder, it is also expanding its eCommerce market share.
3. More Artificial Intelligence in WordPress
Matt Mullenweg spoke about artificial intelligence during his AMA (Ask Me Anything) at WordCamp Asia 2023. He sees the potential of AI technologies and encourages people to embrace them to create software, websites, and web content.
But he also recognizes the current limitations. He warns that artificial intelligence is still very young and has a lot of room for improvement. We are also not sure how the economic implications of AI will play out in the future.
So you can expect artificial intelligence to be added to the WordPress core eventually, but not until it’s ready.
In the future, we expect artificial intelligence plugins to become even smarter, giving us better AI website builders, new content tools, more intelligent chatbots, and advanced automated workflows.
4. Easy Collaboration on Multi-Author Blogs
WordPress is about to become more collaborative, adding features needed by multi-author blogs and eLearning sites. This is part of Phase 3 of the Gutenberg project, which is in the planning stage as we write.
For example, WordPress will allow multiple authors to work on the same article at the same time. Think of the experience you have using Google Docs but from your WordPress dashboard.
Authors and editors will be able to write notes to each other and suggest potential edits. You will be able to annotate specific blocks or sections of content and take part in threaded discussions right inside the WordPress content editor.
Website owners will also be able to create editorial workflows for their content team and plan upcoming content on a calendar. Content approval workflows will make sure that specific users or roles will need to review and accept posts before they can be published.
Life is going to become much smoother on multi-author blogs.
5. Multilingual Support in WordPress Core
Since WordPress is used on 43% of the world’s websites, these sites and their content need to be accessible to a global audience. And that means WordPress needs to provide support for multiple languages.
Multilingual websites serve the same content in many different languages. You can allow users to choose their preferred language using a dropdown link, or you can automatically change the website’s language based on the visitor’s geographic location.
Currently, you need to use multilingual plugins to achieve this. Unfortunately, not everyone has the time to install and configure these plugins, and they may have some impact on WordPress performance.
Another problem is that the developers need to maintain each plugin independently, support their users, and keep adding more languages. That’s a lot of work, and it makes sense for multilingual WordPress to become a centralized effort within WordPress core.
That’s the goal of Gutenberg Phase 4, which will launch in 2024 or 2025. It will start to add much-needed multilingual features to the WordPress core.
To start with, WordPress will enable you to manually translate your content into languages of your choice and allow visitors to read the content in a language they can understand.
In time, as the technology improves, WordPress will be able to translate your content on the fly so that it will be automatically available to anyone who reads a supported language.
This will make your content accessible to a global audience, significantly improving your reach and bringing more traffic to your website.
It will also continue to make WordPress even more relevant and popular as we move into the future, as it will be available to everyone, no matter what language they speak.
6. WordPress Legacy Websites, Products, and Companies
As we said at the beginning of this article, WordPress co-founder Matt Mullenweg is looking 100 years into the future as he considers where WordPress is heading.
He suspects that website owners may also have long-term goals for their online projects.
For example, business owners may want to keep permanent documentation of their company’s history. Families might be anxious not to lose valuable photographs and stories. Website owners may also value a permanent online home that adapts to the needs of the future.
As a result, WordPress.com is offering a 100-year “legacy” plan that you can purchase with a single payment. It includes domain name registration and web hosting for the next century.
This will allow users to maintain their online histories without worrying about what will happen when they are gone. Legacy plans can also inspire businesses to think in the extended long term, beyond a typical 5 or 10-year plan.
This new plan can set an example for top WordPress hosting providers and plugin developers. They may be inspired to think about marketing their products for very long-term use and building a “legacy”.
It could also change the way that WordPress companies think about their long-term goals. Offering internships and job opportunities to employees’ children and grandchildren could be a more sustainable way to grow a business over time.
FAQs About the Future of WordPress
Before we finish this article, let’s answer a few questions we are regularly asked by our readers about the future of WordPress.
Is WordPress still relevant?
WordPress is now over 20 years old, and new competitors pop up every year. For this reason, some people ask whether WordPress is still relevant.
Since WordPress powers 43% of all websites, it’s more relevant than ever. We hope this article has shown you that it will go on being relevant for decades to come.
With all of its success, some people question how long WordPress can stay on top. There are many rumors that WordPress may die out and stop being popular.
However, when you look at the facts, these rumors are simply not true. There are absolutely no signs that WordPress is dying or its loyal users are about to abandon it.
We have written a detailed guide on the state of WordPress and clearly answered ‘No’ to the question: Is WordPress Dying?
Is WordPress that bad?
You may have heard a tech consultant or a YouTube influencer claim that WordPress is bad.
You might ask, ‘If WordPress is really that bad, then why is it so popular? Why do nearly half of all websites on the web use it?’ The fact is, it’s not bad at all.
That’s why we wrote a detailed guide called Is WordPress Really That Bad? We take a look at common reasons people claim WordPress is bad to help you make the right decision.
What is the future of WordPress careers?
If you are thinking about getting a career in WordPress, then you may be wondering about job security. Will WordPress jobs still be around in the future?
The good news is that the demand for WordPress professionals remains high due to the platform’s popularity and constant growth. Plus, there are lots of WordPress careers for individuals with a wide range of skill sets.
You can learn how to make a living with WordPress in our complete guide to WordPress career options.
If you liked this article, then please subscribe to our YouTube Channel for WordPress video tutorials. You can also find us on Twitter and Facebook.


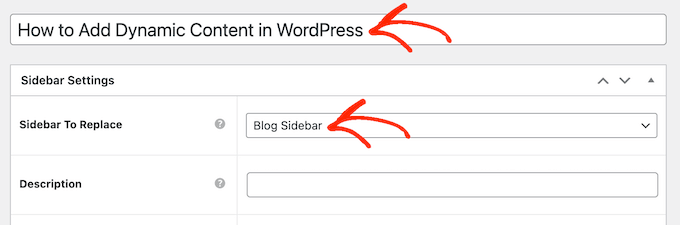


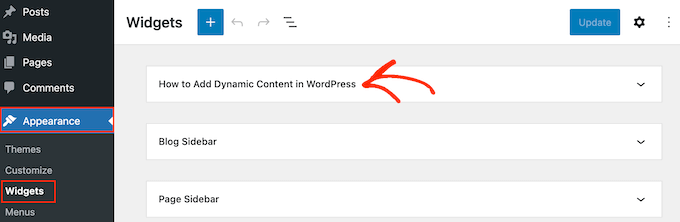


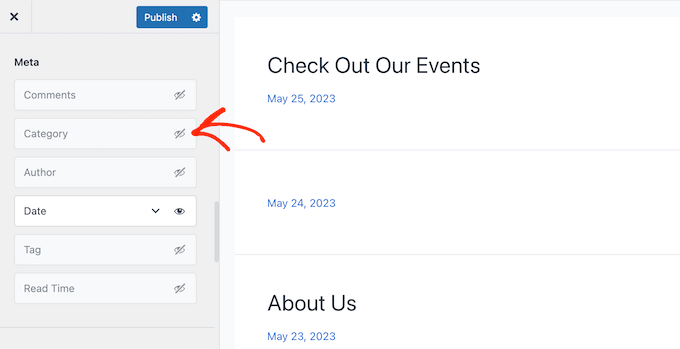


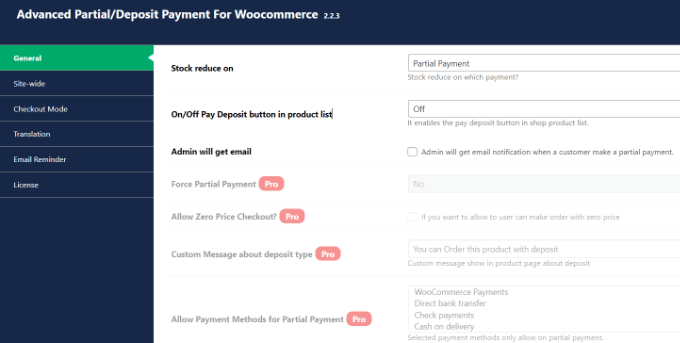


 Matt Mullenweg, WordPress Co-founder, WordCamp Asia 2023


