Growing a website is not an easy undertaking, especially if you are on a budget. While there are plenty of tools out there to help you attract visitors to your site, most of them are paid. So, what are you supposed to do as a startup or small business that is strapped for cash? Use free marketing and traffic growth tools.
In this post, we have compiled a list of useful tools for increasing website visitors and growing your site that you can use without paying a dime. Some are completely free, some are limited free plans of otherwise paid tools.
What they all have in common is that they help you grow your site and improve your content, SEO, social media, and digital marketing. With their help, you can bootstrap your way to more traffic and grow your business for free.
Free Tools for Website Building and Development
We are starting with the most basic thing: building your website. Without one, what are you even going to market? So, let’s take care of that first.
Naturally, our tool of choice for website building is WordPress. It’s a proven, open-source solution that you can download and use for free. Sure, you still need to pay for a domain and hosting to have your site available online, however, the website itself doesn’t have to cost you a thing.
2. Free Code Editors
To make detailed modifications such as working with CSS you need a good code editor. Thankfully, there are plenty of options, including:
When running a WordPress website, more often than not, you will need to access the server at some point. This usually happens via FTP and FileZilla is a popular and free FTP client that allows you to do so. It has everything you need to browse your file system via FTP or its safer cousin SFTP.
Page loading time is an important part of marketing. Visitors don’t like to stick around slow-loading websites and will hit the back button on their browser quickly when they get fed up. In addition, search engines demote you in their rankings for lack of speed.
There are plenty of things you can do to make your site faster but usually the first step is to speed test your website so you know where the roadblocks lie. PageSpeed Insights is a free tool that will give you a lot of information on this topic including your Core Web Vitals.
Content is going to be one of the main pillars of your marketing and for attracting visitors and customers to your site. As a consequence, you can take all the help you can get to make it excellent. Here are some free tools to help you do so.
Grammarly is a really good proofreading and editing tool. Simply input your post and it will correct your spelling, punctuation, and clarity. While you don’t get all the features of the premium version on the free plan, it still does a lot to make your writing better.
Grammarly even has a browser plugin that enables you to use its service in other places, such as directly in the WordPress editor. If you want even more, paid plans start at $12/month.
Having a hard time coming up with topics to write about? Fret not, the topic generator by Hubspot has your back. Simply enter up to five nouns, hit the button, and receive five title ideas that you can flesh out into full articles. If you sign up to their mailing list, you even get 250 title variations to get your creative juices flowing.
This one of those tools that, honestly, I didn’t know about until researching this post. It’s like the normal Google search engine but only for scientific papers and publications. Super useful if you want substantiated sources for your content (good for your E-A-T).
This is a very small tool but one that I use surprisingly often. It does a single thing: turn any text that you feed it into title case.
Not sure what that is?
Look at the headings in this post. Notice how they have all proper nouns and important words capitalized. A lot of blogs and websites do this as part of their style guidelines and this tool really comes in handy if you need to convert a lot of text or find yourself unsure as to whether you are doing Title Case right.
RSS and RSS feeders have fallen out of style a little bit. However, back in the day, they were one of the most popular ways to embed or collect content from all your favorite blogs in one place.
The thing is, you can still do that and it’s a great way to stay up to date with your industry, get content inspiration, and find material to share on your social outlets. There are several options out there but Feedly is one of the most popular and comfortable to use. It’s also free.
Besides written content, visuals are very important for the look, attractiveness, and shareability of your pages. Besides free stock photo sites, you can use the tools below to whip up some images quickly and easily.
Canva is one of the most popular online tools for graphic design, not least because of their generous free plan. It lets you create images, graphs, infographics, visuals for social media, presentations, and much more with just your mouse. There are plenty of templates to choose from, making it easy even for beginners to get started. If you want permanent access to their premium features, the yearly plans are quite affordable as well.
Similar to the title case generator above this is a relatively small tool that, however, provides a very useful service. In this case, it allows you to upload visual assets and have the page spit them out resized to different common sizes.
Examples include Facebook profile pictures, Instagram story images, YouTube banners, TikTok ads, and much more. Custom sizes are also available. Just upload your image or enter a URL, pick the sizes you need, and download them with a single click. You have to create a free account though.
Email continues to be one of the most effective forms of marketing with one of the highest ROI. For that reason, it’s imperative that you start building an email list ASAP. Use the free email marketing tools below to get started.
MailLite is an email marketing service that offers up to 1,000 subscribers and 12,000 emails you can send per month for one website for free. That’s more than fair.
It also comes with a drag-and-drop newsletter editor, offers ten landing pages, A/B split testing, and more. Finally, their paid plans are quite affordable as well for when your site starts to take off.
If you’d rather go for a WordPress-native solution for email marketing, consider MailPoet. The plugin allows you to collect, store, and manage subscribers as well as set up and send out email newsletters from directly inside the WordPress back end. It’s free up to 1,000 subscribers, has templates for emails and subscription forms, offers GDPR compliance, stats, and more.
Sumo is a free list building tool that comes with its own WordPress plugin for easy integration. It gives you several different customizable opt-in options, ecommerce features, and analytics amongst other things. Unfortunately, the Pro features aren’t all that affordable when you want to upgrade but it offers a solid foundation.
Improve Your SEO With These Tools (And Without Paying)
Search engine optimization is the foundation of most websites’ traffic. Whether for keyword research, on-page SEO, or technical SEO, there are many free SEO tools that you can add to your marketing stack.
If you are active in the WordPress sphere, this plugin probably doesn’t need any introduction. It’s the most popular SEO extension in existence due to its ease of use and beginner friendliness. Install it and take advantage of both the SEO analysis and readability indicator to greatly improve your content optimization.
This is a great free SEO tool to quickly collect keyword ideas. It mines Google’s autosuggest function, which means all you have to do is input a seed keyword and it will tell you what users write into the search box in conjunction with it. It also works for YouTube, Bing, Amazon, Instagram, and a bunch of other websites.
SEMrush is one of several full-fledged SEO suites available. What makes it special is that it has a free plan with limited functionality that still offers enough to be useful. You can use it for keyword research, site auditing, backlink analysis, link building, content analysis, and a dozen other things. Unfortunately, it’s quite pricey once you update.
Next we have Google’s free webmaster tools. Connect them to your site and learn everything Google thinks about it. See for what keywords you appear in search and your indexing status, submit a sitemap, learn of problems Google encountered, and check your Core Web Vitals. That’s just the tip of the iceberg, check our detailed article on how to use Google Search Console for the deets.
Trends is another free tool that Google provides to improve your SEO. It allows you to compare the popularity of different search terms and see their trends over time. You can also monitor competitors, see daily search trends, and find related search queries to your keywords. It’s all very useful and I recently wrote an entire article on how to use it that I recommend you check out.
Finally, there is this free SEO tool to crawl your entire website. SEO Spider by Screaming Frog can tell you about broken links, error codes, and the technical optimization of your site. You can use it for free to scan up to 500 URLs and you need to download and install it to do so.
Analytics Tools You Can Use at No Cost
Analytics tell you about what’s going on on your site, such as the number of visitors, the pages they visit, and how they move around on website. Knowing this allows you to make informed decisions about your site content.
Google Analytics is the de-facto standard in web analytics. The free suite can tell you all about the full cycle of visitors interacting with your website. For example, where they come from, how they found you, what they do on your site, from where they leave, and their lifetime value. Check out our Google Analytics 4 tutorial since that version will become the default in summer of 2023. For more similar tools, read up on Google Analytics alternatives.
Hotjar offers a slightly different approach to analyzing visitors. Instead of the usual tracking across your website, it looks at how they interact with individual pages and shows you the results in form of heatmaps. This allows you to optimize your page makeup to make it more engaging. The free plan can capture up to 35 sessions per day and comes with other features to get feedback from visitors.
This is a relatively new tool for audience research and one of my favorites. It allows you to understand who your audience is, what topics they care about, media they consume, people they follow on social, and a lot more. The free plan gives you 50 searches per month.
Free Marketing Tools for Social Media
These days, social media is a part of most marketing strategies. Use the tools below to save time and get better at it.
Buffer allows you to schedule social updates in advance. Simply connect your channels and fill the tank. The tool then publishes your updates according to a pre-configured schedule or exactly at the time you have set. The free plan gives you three channels with a maximum of ten updates per channel that you can schedule ahead.
Pablo is by the same people who make the Buffer app. It’s a useful little tool to quickly make visuals for social media. It has thousands of image options, can add text overlay in different fonts, and offers the right formats. If you have Buffer, you can also directly schedule your creations from Pablo.
This free program by Twitter makes managing your account(s) easier. It lets you arrange all the information you need (your feed, direct messages, notifications, subscribed hashtags, and more) in columns for an easy overview. You can also send updates directly from inside the program.
Video Marketing Tools That Won’t Strain Your Wallet
Video content has seen a dramatic surge in recent years thanks to the success of platforms like YouTube and TikTok. For that reasons, it’s good to have some free video tools at hand in order to be able to take part in this trend.
Storyboarder is a desktop tool you can use on Mac OS, Windows, and Linux. It allows you to easily create storyboards for your video ideas and helps with planning. Plus, the program doesn’t cost a thing, who doesn’t love that?
Another one of those small but super useful free marketing tools, this one for video production. Vidyard helps you figure out how long your video is going to be according to the length of your script. Simply enter the word count or paste the script text, use the slider to choose your delivery tempo, and get your time estimate.
Wistia is a video marketing platform. It allows you to create and edit videos as well as host, manage, and embed them on your website from the platform. They also have engagement tools like annotations, lead capture tools, and analytics. The free plan includes 10 videos and 200GB bandwidth as well as basic analytics.
Growing a website without a budget might seem super difficult at first. However, if you look closely enough, you can see that there are lots of helpful tools out there to help you. Hopefully, you have found a few ideas for your own website and business in the list above. There is no shame in starting off with free software and graduating to paid tools once you have gotten off the ground. After all, that’s what bootstrapping is about.
Do you have additional tips for free marketing tools? Please share with the rest of us in the comments below!
Studying examples of hyperlink design is more significant than you would think. Links are what turn the Internet into “the web” and connect otherwise unrelated pages and websites to each other. They also lead visitors around your site, allow them to discover more of it, and dive deeper into the topics they are interested in. Plus, as backlinks, hyperlinks are desired as an SEO signal.
In short, without links, websites and the Internet wouldn’t be what they are.
We have already talked about how to style links using CSS in a past article. However, just because you know how to apply it, that doesn’t mean you know what styling to give your links. For that reason, that’s what we want to cover in this post.
Below, we will go over examples of how different websites make sure their links are noticeable and good-looking. We will also examine the underlying markup and discuss how they achieved the design for their hyperlinks. Hopefully, together it will give you a good understanding and ideas for the links on your own website.
Let’s first talk about why you should invest in the design of your site’s hyperlinks to begin with. Unless you are in the web design business, you are probably so familiar with using them, that you never really consciously thought the way they look before.
Yet, if you pay attention, you quickly notice that links appear very different from website to website. They use various colors, some are underlined, some not, yet, you still instinctively know that a piece of text is a clickable link. At least, in the best case scenario.
In the worst case, the link design is so bad that you are having a hard time identifying them and that is a problem.
Why?
Because, first of all, few people actually read your entire pages and articles, most of them scan. That means they jump from one anchor point to another to find only the parts of your content that interest and are relevant to them.
Along with headings or images, links are one of those anchors. If you don’t make them stand out and identifiable, it makes your content harder to understand for a large part of your readership. And that’s never a good idea if you want them to stick around.
Of course, you also need to think about link anchor text, which lets them know where the link will take them but that’s a topic for a whole other article.
Aside from that, your links are part of your web design, so you need to make sure they are consistent with the rest of your site.
How to Target Links
As already mentioned in the introduction, we have an entire article on how to style links via CSS that I highly recommended you check out. However, because some of the principles in it are important to understand the examples below, here are the cliff notes.
The first thing that is important to know is that, in HTML, links are created with the a or anchor tag.
<a href="https://torquemag.io/">TorqueMag</a>
As consequence, that’s also how to target their styling in CSS:
a {
	color: #3af278;
}
Secondly, besides simply a, links go through several states when used.
We are starting off with Smashing Magazine. As a well-known web design magazine, you would think their link-design game is on point. For that reason, it’s suprising to see that they pretty much went with the standard option, at least for their in-content links. They are blue, underlined, and they don’t even change when hovered over.
On the one hand, this is really good as it makes sure anyone can recognize them as links. On the other, it’s a bit disappointing because the rest of the website has a lot of microinteractions, but the links don’t.
But fear not, when set to focus, a little playfulness and branding does come through with a dotted line around the link in Smashing Magazine red.
How They Did It
If you want to use a similar outline effect as Smashing Magazine, here’s the CSS markup:
It’s nothing too crazy. A simple dotted outline with a defined width, color (using CSS custom properties), and an offset to make it wider.
TorqueMag
Next up is how we handle link design here on TorqueMag. If you examine any of the links on this or other pages, you will find out the following:
Hyperlinks are blue and underlined in a colorful way
Hovering turns them black and also changes the color of the underscore
When focused or active, a link gets surrounded by a box with a drop shadow
CSS Markup
How is all of this technically achieved? Let’s start with the obvious star of the show, the gradient used for underlining the links, both in their normal state and at hover and active. Below is the code that creates it.
Here’s the breakdown: First of all, the CSS markup eliminates the usual underline (see text-decoration: none;) and then creates a background image with a gradient that uses three colors. This background image is then positioned fully at the bottom and set to repeat. Finally, it receives a size, which is 100% horizontally and 2px vertically.
There is also a transition property that’s needed for the hover effect, which, suprsingly, is achieved by increasing the size of the background image. That way, the colors stretch out, which, together with transition, give it a sense of motion. The latter is amplified by the fact that the hover effect also uses an animation that causes the colors to keep moving while the cursor is on the link.
Lots of stuff going on for a simple link, isn’t there?
In contrast to that, the focus design is quite simple with just an outline and a drop shadow to the outside:
The interesting thing is that they achieve it with the border property. This used to be a thing because it gave you more control over how to style the line. However, today have new CSS features that can target text-decoration properties directly, like text-decoration-offset or text-decoration-thickness, so hacking it via border is no longer necessary.
Notice that the transition effect is part of a catch-all declaration for many site elements, including buttons, etc. It is small but makes a difference.
Focused links on WPKube simply have a dotted line around them.
We have already seen this in another example, so there is no need to go into how to achieve this in CSS again.
Next is one of my favorite fitness websites. They also do a good job making their links stand out by coloring them in the brand’s red.
However, I specifically chose this hyperlink design example because it has a subtle effect for the hover state. The link color becomes slightly desaturated to give users feedback.
Here’s How to Do It
This is a simple effect, so it also doesn’t need a lot of markup to achieve. You simply have a color for the anchor tag and another for a:hover while there is a sitewide transition property to make the change less abrupt.
I included this example to show you that even the biggest companies with basically infinite design budget can go with a very basic approach. On the Apple homepage, links simply appear in blue and become underlined when hovered over (properly, via text-decoration). The outline for the focus state is simply slightly thicker than usual.
The Markup
Here is the code if you want to do a similar thing:
This magazine website brings a new idea to the table. At first, it seems business as usual: links on the page simply have an underline. The only thing that is noteworthy is that the line is slightly thicker than usual.
However, they have a trick up their sleeve for when you hover over the hyperlinks. To signal that, Men’s Health have chosen to use a background color as an indicator. The links turn yellow with just the tiniest of delays. A first among our hyperlink design examples.
CSS Code
The underlying markup for this is also noteworthy for another reason. To achieve the initial line for their links, the site uses the aforementioned and relatively new properties for controlling text-decoration.
a {
    text-decoration: underline;
    text-decoration-thickness: 0.125rem;
    text-decoration-color: #d2232e;
    text-underline-offset: 0.25rem;
    -webkit-transition: all 0.3s ease-in-out;
    transition: all 0.3s ease-in-out;
}
As you can see, both text-decoration-thickness, text-decoration-color, and text-underline-offset play a role in making the design look the way it does.
As for the hover effect, one thing that stands out is that it simply uses yellow as its color denomination.
a:hover {
    background-color: yellow;
    -webkit-transition: all 0.3s ease-in-out;
    transition: all 0.3s ease-in-out;
}
Outside of examples and test websites, this is a very rare way of declaring colors in CSS and it’s funny to see it out in the wild. Aside from that, you naturally find the transition property to make the appearance and disappearance of the hover background less abrupt.
National Geographic is going for a similar effect as Men’s Health, however, they achieve it very differently. Here, too, the hyperlink design is initially simple with thicker underlines. However, on hover, they go on to cover the entire linked word or phrase.
The interesting thing here is that the background appears to grow from the bottom up, so let’s look at how they did it.
How is This Possible?
First of all, here is the markup for the links in their normal state:
As you can see, like in other hyperlink design examples, they achieve it with a simple border-bottom declaration. However, at the same time there is a background image positioned all the way to the bottom but with zero vertical size.
That is actually how they get the impression of growth, as on hover, it goes to 100% vertical size while the ease-in transition takes care of the fact that it appears gradually from the bottom.
For the last examples, let’s look at how two WordPress default themes handle hyperlink design. The first one is Twenty Twenty-Two. There is nothing too spectacular going on, the usually solidly underlined links have a dashed line underneath on hover.
However, we haven’t seen this kind of manipulation yet, so I thought it would be a good thing to cover.
This is How it Works
The theme handles this in the way you would expect. The anchor tags have text-decoration: underline assigned to them and also values for their thickness and offset. Upon hover, it turns to text-decoration-style: dashed. That’s it.
Our final example is Twenty Twenty-One. It has a similar hover effect as its predecessor, however, instead of a dashed line, it uses a dotted one.
But that’s not reason why I’m mentioning it here. Instead, the interesting part is its focus effect. Instead of the usual outline, the designers decided to use a contrasting background color to make it stand out.
The Accompanying CSS
How they achieved it is also interesting. As you can see from the markup below, the background color is basically white, however, it has its opacity set to 90%.
That way, you get this more subtle look that provides a clear contrast but is not too harsh.
Use These Examples for Your Own Hyperlink Design
Without links, what we call the Internet or World Wide Web would not be what it is. For that reason, hyperlinks deserve as much attention in your web design as other elements. After looking at the hyperlink design examples above, let’s summarize what we can take away from them:
Mark your links clearly so that they are easy to recognize, the most common tools for that are colors, underscores, or both.
Use hover effects to make sure that users can see their interaction with your links. There is a wide range of possibilities for that.
Don’t neglect the focus state! Make it easy for users with different abilities to navigate your pages.
That’s it. Now you have a good basis to make design decisions about your own hyperlinks.
Which of the hyperlink design examples above do you like or dislike the most and why? What other design possibilities for links do you enjoy? Tell us in the comments below!
Having a brilliant website isn’t enough. Even if your business came with a substantial, pre-existing customer base (and let’s face it, most don’t), continuing communication is essential for retainment and growth.
Running a successful business means building and maintaining a connection with your clients – existing and potential.
There are, of course, many ways to reach your business prospects in today’s digital world: paid ads, social media, real-time messaging platforms, chat, and more.
But would you be shocked to learn that email – approaching its 45th birthday! – remains the most used, most successful platform for customer engagement?
According to Tom Wozniak, of OPTIZMO Technologies: As audience tracking and targeting become more challenging, the email address will continue to be the most valuable piece of audience identification data. [Forbes]
In this article, we’re going to look at why email is the most effective way to promote, proffer, and position your business for prime growth. Plus, we’ve hand-picked a selection of WordPress plugins that handle the various outreach tasks quite effectively.
Which (Customer Acquisition) Channel is Best to Watch
The ways in which you reach your audience are your customer acquisition channels. They are also the avenues for increasing your customer base.
Though some might rule it out because it’s the oldest, email remains one of the best acquisition channels available. [Lesson: Don’t throw the baby granddaddy out with the bathwater.]
Email is simultaneously simple yet powerful in terms of content that can be delivered. And it’s separate from third-party elements (eg, social media, search, etc); meaning, there’s no algorithm to work around. It’s a straight shot into the hands (ie, inboxes) of your customers.
Here are some telling stats:
By 2025, the number of global email users is expected to reach a total of 4.6 billion [Statista]
When it comes to online advertising, email has seen higher click-through rates than on social media [Statista]
59% of marketers say email is their biggest source of ROI [Sopro]
59% of survey respondents say marketing emails influence their purchase decisions [Sopro]
Email is also extremely cost effective, allowing for a minimal investment in a tool/platform that will likely have most of the important features that mirror its high-end counterparts. It’s also easy to scale as your business grows.
With consumers averaging an online time of 397 minutes daily – giving you a golden opportunity of 6+ hours for engagement – there is simply no better way to speak directly with your customers than email. [Oberlo]
Email topples social media in marketing stats. [Source]
Three more stats on email’s impressive reach: [OptinMonster]
44% of users check their email for a deal from a company they know, whereas only 4% will go to Facebook
60% of consumers state that they have made a purchase as the result of a marketing message they received by email
There are 400 million more email users than social media users
Repeat: Four hundred million MORE. If those numbers don’t convince you, I don’t know what will.
Now that we understand the value of email as a customer acquisition channel, let’s look at the different types of emails you can employ to build relationships and drive sales. Plus, one very important bit of housekeeping that needs attention first.
How to Deliver Successful Results Easily and Reliably
Whether you run a simple website or a large eCommerce store, reliable email-sending is a necessity. As fantastic a CMS as WordPress is, it has multiple limitations when it comes to sending emails.
Because WordPress uses PHP mail functionality to send emails:
you can’t easily build HTML templates, embed images, or add attachments; and
it lacks proper email headers, which often results in delivery impediments, causing emails to land in spam folders (or not get delivered at all)
Simple Mail Transfer Protocol (ie, SMTP) provides an easy way to improve successful sending of WordPress emails, increasing email deliverability by using authentication and assuring that your intended audience receives what you send.
SMTP can be set up manually using the PHPMailer library (more difficult), or connected through the use of a plugin (easier).
SMTP Plugins
There are a number of plugins for setting up SMTP in your WordPress email. After looking at the most popular, here are the five we like best.
This plugin sits at the top of this list, allowing over three million WordPress users to send their emails reliably.
When using one of WP Mail SMTP’s built-in SMTP mail provider integrations (see below), emails are sent using the provider’s direct API. This means even if your web host is blocking SMTP ports, your emails still send successfully, helping you fix the not-sending-email issues that are prevalent in WordPress.
An easy-to-use setup wizard and detailed documentation will guide you through the process, and for most options, you can specify the “from name†and “email address†for outgoing emails.
You can send emails using your own or third-party SMTP email server, or by using integrations with popular email providers, such as:
SendLayer
SMTP.com
Sendinblue SMTP
Gmail SMTP (Gmail, Google Workspace, G Suite)
All Other SMTP
Instead of having to use different SMTP plugins and workflows for different SMTP providers, WP Mail SMTP brings it all into one, providing the ideal SMTP solution for WordPress.
They also offer paid plans, which include additional features (like one-on-one support, white glove setup, and native integrations for Microsoft, Amazon SES, Zoho Mail, etc).
With 700,000 active installs, Easy WP SMTP resolves email deliverability issues using transactional mailers or an SMTP server.
The plugin offers configuration from a number of popular mailers, including SendLayer, Mailgun, Sendinblue, and more.
Easy WP SMTP also allows you to debug events that log any failed email sending attempts and the error that caused them, and the ability to specify a Reply-to or BCC email address.
Premium, paid versions are also available, and add more features (like shopping cart plugins, priority support, and reports).
With active installs at 300,000 and climbing, Post SMTP Mailer is a next-generation WP Mail SMTP plugin that improves email deliverability for your WordPress websites, sending emails to millions of users worldwide.
Post SMTP has a smart setup wizard that covers everything from getting started to sending test emails. It uses a commercial-grade connectivity tester to better diagnose server issues, has a built-in email log that can help with any failed email problems, and uses OAuth 2.0 security to increase the protection of email passwords.
Post SMTP also offers premium upgraded integrations, through a number of pro extensions. These are: Zoho Mail Pro, Mail Control, Twilio, Office 365, and Amazon SES.
WPMU DEV’s Branda plugin, known as the White Labeling wunderkind, also has an easy SMTP tool built right in, and is completely free. Setup is a cinch with our easy-to-understand documentation.
Branda allows you to customize every aspect of WordPress to fit your brand. Transform your dashboard, customize system (default) emails, quickly toggle maintenance mode and “coming soon” landing pages, change every aspect of your login screen, remove or replace logos, create color schemes, and much more. Branda has everything to rebrand WordPress for free without touching any code or hacking modifications.
There is also a pro version of Branda, if you’d like to get the full collection of 30+ modules, along with a membership that includes an entire suite of plugins, premium 24/7 live chat support, and more.
WP Offload SES Lite is trusted by more than 20,000 sites to send their email, with good reason – it works exceedingly well.
This plugin is different in that it’s not sent over SMTP. They believe that going the SMTP route makes you prone to hitting rate limits, and is also missing some key features (like an email queue).
WP Offload SES Lite gives you the high deliverability, powerful managed infrastructure, and low cost of Amazon SES, with the support of a quality WordPress plugin that’s easy to set up and notifies you of sending failures.
Some of WP Offload SES Lite’s top features include:
Effortless configuration with an easy step-by-step setup wizard
Configure the default email address and name that WordPress uses for notifications
Set up a custom “Reply To†and “Return Path†address
View statistics on your Amazon SES send rate
There is also a pro version, which gives you additional features like premium support, open and click reporting, engagement analysis per specific emails, filter/search functionality, and more.
The Marketing Tools and Strategies You Need to Know
With your WordPress email primed and ready for most effective delivery, let’s turn our attention to the best ways to engage with your audience using email.
First, you need to collect that all-important contact information (email addresses and names, at the very least), so you have a concrete way to reach interested parties.
Second, you’ll want to offer something of value, to establish a sense of fairness/generosity and drive interest in what you do. This free offering to potential customers, in exchange for a piece of their personal information (e.g. an email address or social media follow), is a tried-and-true marketing technique.
Common incentives – like a discount coupon, downloadable, or other item of interest – can be offered as compensation for providing an email address, in order to attract potential customers. Hence the name: lead magnets.
Finally, you’ll want to measure and track which campaigns or giveaways get the best results. That will give you a sense of how your site is performing; the number of visitors to your different pages, and where you’re getting conversions from. All of which help you understand which content performs the best.
This is where lead generation tools come in. They are specifically designed to identify, capture, store, and analyze leads – with the goal of turning visitors into paying customers, and paying customers into repeat business.
Lead Capturing Plugins
Employing tools and services specific to lead generation is a great way to collect the desired information, without requiring any manual work on your part. The tools automate the process, allowing you to focus on other areas of your business.
It’s not a bad idea to experiment with different options from the methods above. But for the purposes of this article, our focus will be on-page, opt-in forms, as they are the simplest to employ and incredibly successful.
Why? Well, you’re collecting contact details from people who already have an interest in your business, even if it’s at the most basic level. They’re on your site, and therefore the most likely to provide you with their contact information. After all, they came looking for you, not the other way around.
Additionally, studies have shown that most people are receptive to emails that come from companies they’ve already shown an interest in.
Here are our top 5 picks for lead capturing plugins.
Of course we’re partial to our very own contact form, payment form and custom form builder, Forminator, but it’s more than just us who think so, with more than 400,000 happy users.
Forms, polls, quizzes… nothing’s off limits with Forminator. Create new campaigns in minutes with the easy-to-use, drag-and-drop form builder, using pre-fab templates or starting from scratch – with the ability to customize settings, style, and behavior.
Forminator is the easiest way to create any form, such as a contact form, order form, payment form, email form, feedback widgets, interactive polls with real-time results, Buzzfeed-style “no wrong answer†quizzes, service estimators, and registration forms with payment options.
Speaking of payments… take donations, down payments, full payments, sell merch and more with the included Stripe and PayPal integrations. (No Pro upgrade required!) SCA-compliant Stripe and PayPal come included. Just enter your publish keys to activate the Forminator payment module for both fixed and variable payments.
Forminator comes stacked with crowd-favorite third-party integrations – email services, CRM, storage, and project managers such as HubSpot, Google Sheets, Trello, MailChimp, AWeber, Slack, and any generic webhooks (such as Zapier).
But wait – there’s more! Forminator also has these amazing features:
Gutenberg Block – say goodbye to shortcodes and quickly add forms to posts with the Forminator block for Gutenberg
Email Routing and Pre-Populate – make your site more efficient, from visitor input to email response times; use query strings to pre-fill visitor information and deliver forms direct to specific teams with email routing, auto-response and conditions
User Front End Post Submissions – visitors can submit post ideas from the front end of your site so you can easily curate and publish their thoughts
Captchas – stop the crazy bots without making it hard on your visitors (ie, no more hard-to-read random phrases)
Collect, Track and GDPR ready – store and organize submissions to sort, analyze, and manage responses; all while complying with the GDPR and other legal privacy policies
There is a pro version as well, which contains all the same features as the free version, plus the additional “E-Signature†and “Stripe Subscriptions†features.
Formidable is a solutions-focused WordPress form plugin. Use drag and drop to create a contact form, survey, quiz, registration form, payment form, lead form, or calculator form.
Formidable is 100% mobile responsive, so your forms look great on all devices (desktop, laptop, tablets, and smartphones). It’s also optimized for speed and maximum server performance.
This free version of Formidable comes with a variety of features, like advanced email subscription forms, multi-page forms, a smart form with conditional logic, stack on repeater fields, payment integrations, form templates, relationships, and cascading dropdown fields.
Submissions are stored in your WordPress database so you won’t lose any leads, and quiz and survey entries can be viewed right from your WordPress dashboard. Also, the form generator is GDPR-friendly (even though entries are saved), and you can turn off IP tracking or stop saving submissions entirely.
Create a payment form and accept credit card payments right from your website, with seamless integration with PayPal, Stripe, and Authorize.net. You can even create a WooCommerce form with custom fields.
There is a pro version as well, that includes many more features and functionalities that help you build more powerful and larger applications.
Design beautiful, complex forms with a dedicated support team at your back.
Easy drag-and-drop fields, row and column layouts, multi-page forms, conditional forms… you don’t have to be a designer to create forms that will blend beautifully with your WordPress website.
You can accept PayPal and credit card payments securely and easily from any of your WordPress forms: single payments, subscriptions, fixed, variable, or user entered amounts. Give your customers or donors all the options, or just one with a PayPal form, Stripe form, and more.
Grow your mailing lists and bring in new leads using integration with MailChimp, Constant Contact, Campaign Monitor, Salesforce CRM, Zoho CRM, Insightly CRM, and more.
Ninja Forms is also GDPR compliant, as it doesn’t collect or store personally identifiable information, or any information, from your forms. Easy-to-use templates are included for Right to Be Forgotten and Data Export requests, and tie into native WordPress GDPR features for automated compliance.
Includes pre-built templates for a contact form, registration form, application form, MailChimp form, quote request form, PayPal form, Stripe form, and more. Also mobile responsive and design-adaptable to fit in with any theme or brand.
Ninja Forms offers additional features and upgrades in two ways: per add-on, or through a membership (different tiers vary in the number of allowable sites and add-ons).
At five million+ active installs, Contact Form 7 is the OG WordPress plugin for contact forms.
It has stood the test of time, still able to create simple and multiple contact forms, while allowing for the customisation of the form and the mail contents flexibly with simple markup.
Forms support Ajax-powered submitting, CAPTCHA, Akismet spam filtering, and do not track user data or use cookies. However, activation of certain features may invoke personal data to be sent to service providers (eg: reCAPTCHA, Stripe).
While the plugin boasts massive numbers and is still popular, it is becoming less so as more advanced, feature-rich competitors have become available. Especially since most of these are free to use as well.
Additionally, unlike newer plugins, an additional plugin is needed (they make one called Flamingo) just to save submitted messages from contact forms in the database.
They have also started requesting contributions from users, citing the difficulty in continuing support and development of a free plugin.
Hustle in the ultimate marketing plugin for building a mailing list and converting site traffic.
Incredibly versatile and engaging, Hustle has a myriad of options and customizations.
Easily grow your mailing list or display targeted ads across your site with popups, opt-ins, slide-ins, widgets, and shortcodes.
Build a social following with Hustle’s diverse social sharing capabilities.
Choose colors, animations, layouts, drop shadows, and display conditions for all your marketing modules from easy-to-use design settings. (There’s even CSS if you really want to go all out.) All a cinch with Hustle’s flexible appearance settings.
Default layouts and templates are fully mobile responsive, while allowing for granular adjustments (margins, padding, borders, container sizing) so you can make every module your own.
Target visitors with email opt-ins or ads using Hustle’s behavior and condition settings, and set up intelligent conditions if desired as well (e.g. specific pages/posts, visitor device/browser, country, browser cookie, etc).
Smart triggers allow you to set up a range of options for popups and slide-ins, including time on page, scroll, exit intent, and more.
Schedule when you want your marketing modules to deploy by selecting start/end dates, or show them on specific days of the week, time of day, along with custom time zones.
Easily follow up on user engagement with manual or automated email messages, and build your following on social networks with floating widgets and shortcodes to add followers.
Hustle smoothly integrates with popular form builders (like Forminator), to embed those forms/polls/quizzes into popups and slide-ins for interactive lead generation.
While you’re at it, integrate Hustle with an email service; 19 of the most popular are offered (including AWeber, MailChimp, Sendinblue, MailPoet, Zapier, and more).
Rounding out the additional features you get with Hustle:
Gutenberg WP editor block
ReCAPTCHA spam warrior
Ability to override Ad Blockers that try to prevent popups and slide-ins
Intelligent tracking on each module (including conversion stats, insightful charts, custom dashboard widget)
There is also a pro version of Hustle, which gives you all the same settings and options as the free version does. The difference is, Hustle Pro offers unlimited opt-ins, custom content, and social sharing, whereas the free version allows three of each type (popups, slide-ins, social share bars, and embeds).
Email Campaigns and Analytics Plugins
Once you’ve got those all-important email addresses collected, it’s time to set your sights on the various campaigns you can use to turn casual interest into a revenue stream.
There are a number of ways to use email campaigns to engage your audience and increase sales.
Blog posts can help by specifically targeting your audience, catering your content to them. It’s a proven way to align with your audience by providing (free) information of value to them, while keeping the connection warm. Plus, they can be kept in a devoted section of your website, making it easy for both old and new customers to partake in the historical canon unique to your business.
Newsletters and announcements are great for keeping your audience up to date on any site changes, or to promote particular products or discounts. Announcements could include down-time notices (for example, planned changes where your site will be offline briefly), or information about sales, coupons, special offers, etc – anything that is a change in your ‘norm’ that falls within a specific timeframe.
We looked at some email plugins early on, where the purpose was to improve email delivery by directing through SMTP servers or transactional mailers.
There is another category of full-featured email plugins/services that provide additional marketing, campaigning, and analysis features on top of trustworthy delivery. These can be quite handy if you want to avail yourself of pre-designed email templates, auto sending schedules, and tracking customer journeys.
More than 600,000 websites use MailPoet to keep in touch with their subscribers, delivering 30 million+ emails each month to inboxes, not spam boxes. Enjoy high open rates with their unmatched deliverability rate and rock solid infrastructure.
MailPoet works seamlessly with your favorite CMS so you can start sending emails right away. Quickly add content and images directly from your media library. No need to upload files to third-party services when it’s all right there, ready to use in your WordPress dashboard.
From first hello to loyal customer appreciation, send emails to the right people at the right time. Welcome new subscribers with an automated series of onboarding emails and enjoy open rates of 40% and higher.
Automatically send email updates to let subscribers know about your latest blog posts, in your choice of sending schedule (daily, weekly, monthly) and bring them back to your website.
Create email updates and newsletters your subscribers can’t wait to open with beautifully designed templates you can customize to match your personality (and brand). With plenty of design options and advanced features, you can choose from a template, customize whatever you need, then send it out. Quick previews allow you to always see how your emails look before hitting send.
MailPoet is available via paid plans as well, which add features and functionality like more subscribers, unlimited emails, advanced analytics, the ability to remove branding, priority support, and more.
HubSpot is an extremely popular, all-in-one CRM platform with tools and integrations for marketing, sales, and customer service.
The CRM in HubSpot’s WordPress plugin is your site’s command center, with 360-degree views of your customers, where you can easily:
Manage contacts (CRM)
Engage visitors with live chat and chatbots
Add beautiful forms to pages; create engaging email marketing campaigns
Capture leads with custom or existing forms; send newsletters and automated marketing campaigns
Track site health with easy-to-understand analytics, directly from the dashboard
See a unified timeline of a contact’s page views, past conversations, and more in a WordPress CRM
You’ve also got full-service email, newsletter, and marketing automation software, from which you can build professional emails in minutes, then send them to your entire contact database.
Features here include:
20+ pre-designed email templates to match your campaign goals
(Choose from templates such as newsletters, ebooks, welcome emails, and more)
Drag and drop email builder; adjust typography, designs, colors, and more to create campaigns your subscribers will love
Email automation, tracking, and A/B testing
Send emails anytime someone fills out a form or engages with your live chat/chatbots
Send messages immediately or use email scheduling to send messages later
Email tracking assures all of your emails are logged in your database; measure engagement of each with reports for open rate and click rate
Forms and popups are included, with a variety of templates (contact us, newsletter signup, ebook download, etc) and display options (embed, standalone page, pop-up box, dropdown banner, etc). Choose from a variety of settings, color schemes, and fonts — or start from scratch.
HubSpot also allows for integrations with other WP form builders and lead generators (like Forminator and Hustle ).
And there’s much more, such as:
Live chat and chatbots (with custom styling, real-time messaging, Slack integration, 24/7 live support on autopilot)
Seamless use of more than 1030 integrations – including social media, ads (Facebook, Google, LinkedIn), Hotjar, YouTube, Zoom, Gmail, Hustle, MailChimp, Sendinblue, Shopify, WooCommerce, Forminator, LiveChat… and the list goes on
In addition to their free version, which offers a taste of limited features, HubSpot offers a number of paid version packages – Starter, Starter CRM Suite, Business, Professional, and Enterprise – with many different combinations of features and services to suit all needs.
OptinMonster is a customer acquisition and lead generation plugin. As a SaaS, its use requires an OptinMonster account, but that’s quick to set up.
OptinMonster’s popup maker allows you to create popup campaigns, email subscription forms, sticky announcement bars like hello bar, gamified spin-a-wheel opt-in forms, and other types of interactive popups for your site. Use the drag-and-drop editor to customize the look and feel of your campaigns, or choose from hundreds of templates.
OptinMonster also offers mobile popups so your marketing messages look great on all devices (mobile, tablet, laptop, and desktop). It’s also optimized for both web and server performance.
Popup options include:
Lightbox
Floating Bar
Slide-ins
Fullscreen Welcome Mats
Gamified Spin a Wheel Popup
Countdown Timers
OptinMonster also has targeting behaviors, like page level targeting, geolocation targeting, popup behavior automation, and WooCommerce. Plus trigger behaviors, like exit intent, scroll trigger, and time-on-site popups.
There are also quite a few email and CRM integrations available, such as Constant Contact, MailChimp, AWeber, and more.
A free account includes three campaigns and up to 500 campaign impressions, which never expire.
OptinMonster also offers premium, paid versions which include more features and remove the limits imposed in the free version.
Sendinblue is a powerful all-in-one marketing platform, trusted by more than 165,000 companies around the world to deliver their emails and SMS messages.
Sendinblue optimizes deliverability using a proprietary infrastructure over SMTP, with options that include email, SMS, Facebook, chat, CRM, and marketing automation.
The Sendinblue WordPress plugin uses their own API to synchronize contacts, send emails and get statistics. Synchronization is automatic, so it doesn’t matter whether your lists were uploaded on your WordPress interface or on your Sendinblue account: they will always remain up-to-date on both sides.
Sendinblue’s free account takes less than two minutes to set up, and allows you to send up to 300 emails per day on their free (forever) plan.
Sendinblue integrates with most lead capture and advanced form builder plugins, but also contains their own native subscription forms, with the following features:
Form designer with WYSIWYG and direct HTML, and CSS editing (if desired)
Integration as widget or shortcode
Send a confirmation email – you choose the template and the sender
Use a double opt-in confirmation – you choose the template and the sender
URL redirection
Confirmation / error message customization
The following additional options are included as well:
Transactional emails (with auto replacement of default SMTP)
Statistics (real-time and exhaustive)
Sendinblue offers a free (forever) plan that includes 9000 emails per month and unlimited contacts, with no hidden costs.
They offer premium, paid plans as well, which remove the limits, and include additional features (like removing the Sendinblue logo, A/B testing, marketing automation, priority support, and more).
Follow the Leader to the Very Top
Lead generation is often the difference between the smashing success or abject failure of a business.
And while there are many components that go into lucrative marketing, you can tap into WordPress’s generous supply of free plugins to eliminate the heavy lifting.
As shown in this post, email still holds the #1 spot when it comes to customer acquisition channels, with significant reach and conversion rates.
Determine the plugins that best meets your needs, and get going on cultivating your contact lists, securing good delivery with SMTP sends, and setting up email campaigns that drive customer engagement, traffic, retention, and loyalty.
If you want to really ensure best results, make sure you have trusted, dedicated hosting (we’re a top pick for web developers), speed and SEO optimization (our memberships come with a suite of premium plugins, including performance and security), and world-class, always-on support.
This update marks a huge win for functionality of the plugin and WordPress development as a whole.
Site developers can now register custom post types and custom taxonomies from within the plugin. Having the functionality directly within the ACF dashboard not only saves time, it cuts down on the number of plugins needed to power a site. This exciting update significantly expands the features of both the free version and ACF Pro. All users can enjoy this historic new phase of ACF.
Let’s dive into the exciting new features and see what’s next for the plugin.
Streamlined Workflow
Developers can often lose a lot of time switching between different plugins or command lines. By including custom post types and custom taxonomies directly within the ACF interface, users don’t have the headache of continually leaving and coming back.
This update has been a long time coming. According to the release announcement, users have been asking for this functionality for years, “Registering CPTs and taxonomies has been on our roadmap for quite some time. When Delicious Brains acquired the plugin from Elliot, the first email we sent our users was to ask them the top 3 things they wanted to see in the plugin. CPTs and taxonomies in the plugin was right up there in the top five requests.â€
Eliminating plugins makes your site faster and more secure, and not having to leave the dashboard to register custom post types or taxonomies will save tons of time.
The process is incredibly quick and easy. Post types and taxonomies are right at the top, and you can register them just like you would register fields.
Take a look:
Switching between plugins or command lines can lead to confusion and even errors. Having this functionality directly in the dashboard is going to streamline the development process.
On top of CPT and taxonomies, the update comes with improved test coverage, customized field setting tabs, translations, a security fix, and more.
About ACF
ACF has over 4.5 million active users and has been a pillar in the WordPress community. The plugin along with other Delicious Brains plugins were acquired by WP Engine in 2022, and since then has maintained a commitment to finding powerful ways for WordPress developers to create sites.Â
The release marks a new generation of ACF users. By addressing the huge pain point WordPress development will be even more efficient. Huge shout out to the developers and testers who made this release possible.
In this post, I will review the WordPress block editor, that has found its way into the platform as part of the Gutenberg project. It has been around for four years and was one of the most controversial changes to ever happen to WordPress.
Now that it has had time to mature and because it is a topic laden with such emotions, I thought it would be a good idea for me to weigh in. As a professional WordPress blogger, I spend all day every day not only writing in WordPress but also testing every aspect of the platform over and over again for different articles. Naturally, that includes the block editor and its growing capabilities.
So, what follows is my personal review of the Gutenberg block editor from the perspective of a WordPress power user. I will talk about what I like, dislike, and what I think could be improved.
The WordPress Block Editor: A Definition
Before jumping into the pros and cons, let’s first quickly settle what exactly we are talking about. Because, when it first came out, Gutenberg only replaced the WordPress post and page editor. However, by now it has branched out to other parts of the user interface. So, to make sure we are on the same page, here’s what is part of Gutenberg.
Post/Page Editor
I already mentioned this. This is what you land on when you go to Posts/Pages > Add New or edit your existing content. The original Gutenberg implementation in WordPress 5.0 only exchanged this part of the editing experience by replacing TinyMCE, which is what WordPress was using before. Naturally, this is where you edit the content of your posts and pages but nothing template related.
Site Editor
First introduced as Full-Site Editing (FSE), this part of Gutenberg has now been re-christened to Site Editor. It is accessible via Appearance > Editor, when you are using a block theme like Twenty Twenty-Two or Twenty Twenty-Three. Here, WordPress allows you to edit your entire site architecture, including headers, footers, menus, page templates, widgets, and the homepage.
Template Editor
Something that a lot of people might not be aware of is that Gutenberg also includes a standalone editor for page or post templates. Again, this is only available for block themes. You can access it from the Page/Post Editor when you click on the name of the template used.
From there, you have the possibility to modify your current template or create custom page templates. It has a slightly different interface as the Site Editor but is overall very similar.
Widget Editor
This part is a bit outside of the rest of the block editor but it is officially part of the Gutenberg project, so I have to mention it here. By now, the block editor UI also extends to widget management. You can find it under Appearance > Widgets in classic themes. In block themes, as mentioned, widget handling happens inside the Site Editor.
To be honest, I don’t really have much to say about this. I don’t think it’s necessarily any better or worse than the old menu and it does its job. Therefore, I am not going dicuss the Widget Editor in detail below. If anyone else has strong feelings or opinions about this, I’d love to hear it in the comments!
Reviewing the Gutenberg Post/Page Editor
Now that we have an idea about what encompasses the Gutenberg block editor, let’s review how its various installments are performing. We are starting with the Post/Page Editor.
What I Like About It
First of all, I have to say I generally really like creating content with the block editor. I wouldn’t want to go back to Classic Editor, I am simply too used to the benefits of the new experience by now. Here are my reasons why.
Slick and Modern
All honor to TinyMCE, which is a true workhorse that has served WordPress well for a long time. However, let’s face it, it’s not the most modern-looking piece of software.
The classic editor experience is a bit clunky and constantly seemed stuck in the early 2000s. In contrast to that, Gutenberg or the block editor simply looks more up to date.
It is spacious, minimally designed, and clean. I also find it easy to discover all the important settings and information. I, for one, am not surprised it’s being adopted into other content management systems.
What You See is What You Get
Secondly, I enjoy that the editing experience is much more aligned with the finished result on the page. In TinyMCE, while you had the ability to add editor styles, you constantly had to preview the page to see what the content looks like on your site.
This goes especially for non-typical elements like buttons or forms. In TinyMCE, it was often necessary to add these via shortcodes. Consequently, you sometimes ended up with a document full of brackets for which you needed to know the meaning in order to decode what is going on.
In contrast to that, in the Gutenberg block editor, except for when explicitly using the shortcode block, you usually see the finished elements in the editor. Even if you don’t, at least you have a valid placeholder.
I find this very useful for adding visuals to content. Back in the day, I had to post a lot of things like “[screenshot]” in my articles in order to mark and find the places where I wanted to include images. In Gutenberg, I can simply add image blocks while writing and fill them when it’s time to add screenshots.
This is a great way to construct post content without having to switch back and forth. Of course, it’s not a perfectly parallel experience. For example, you often have to check whether images need a different alignment. But it’s much better than before.
Easy to Navigate
One thing I remember about the Classic Editor is: So. Much. Scrolling.
If I wanted to re-read an earlier passage or make changes to another part of the post, I had no other choice but to use the mousewheel. This made it easy to lose track of the overall content and sometimes hard to find specific locations.
That’s something that is completely different in the block editor. The menu that opens up when you click the little i icon on top left is actually one of the options I use most often.
It lets you review a breakdown of the entire post via its headings and Gutenberg allows you to jump to different sections with a click. This is so incredibly useful, especially if, like me, you tend to write very long pieces.
What Could Be Better
Of course, using the Post/Page Editor is not all roses and butterflies. It, too, comes with shortcomings, some of them I would call serious.
Performance
My main issue is the editor’s sometimes spotty performance. All that JavaScript necessary to run it can really take a toll on your browser.
Case in point, as I mentioned, I tend to write longer articles. On my own blog, posts are usually at least 3,000-4,000 words long, some way beyond that.
I recently upgraded to a new laptop and, I kid you not, one of the main reasons was that the block editor simply became unusable on my five-year old machine after a certain number of words,. It slowed down to a crawl and took so long to perform just normal tasks that I was sometimes forced to copy sections of a post into a new article, edit them there, and then copy them back. I don’t remember ever having to do that in the Classic Editor.
So, this is a serious area for improvement, even if things have already become better. There’s also something to be said about stability but I am getting to that further below.
Missing Keyboard Shortcuts
One of the things I most liked about the Classic Editor was its robust set of keyboard shortcuts. It easily lets you turn text into headings, change headings to a different order, or switch between ordered and unordered list. All without touching the mouse.
This is a part that’s simply missing from the block editor. While there are sensible keyboard shortcuts (find them in the menu in the upper right corner or by pressing Shift+Alt+H), they simply don’t cover as much as TinyMCE does.
Yes, there are slash commands to input any block of your liking (which is great). However, if I want to change existing text to a heading or switch from an h2 to an h3, I usually have to use the mouse.
Maybe that’s a personal pet peeve but it’s definitely something that could be better in my opinion.
Delving Into the Site Editor
Next up in this Gutenberg review, let’s talk about the Site Editor. Here, too, there’s a lot that’s good and some things that could be better. However, keep in mind that this is a project still in development (as exhibited by the beta tag next to its menu item).
Therefore, take some of what I mention below should with a grain of salt.
What the Site Editor Does Well
I am starting off with the things I think the Site Editor already excels at.
Very Powerful
There’s no denying that the Site Editor can do a lot and gives an incredible amount of power into the hands of non-technical users.
Customizing page templates, creating and changing headers, footers, and other site elements — just a few years back you would have to either know PHP, hire someone, or install a page builder plugin for that. Now, with the right theme, it’s a native function of WordPress and that’s simply great. In addition, the ability to change the entire style of your website with a single click is mind boggling.
Both allows non-developers to make very fundamental modifications to their sites and basically create custom themes by themselves. Especially since they can also export their changes to use on other websites. This is definitely progress and fully in keeping with why so many people love WordPress.
Block Patterns and Template Parts
Two tools that most help modify page content in decisive ways are block patterns and template parts. Being able to completely change the layout of a query loop or switch out the header and footer with just a few clicks is pretty priceless.
In addition, something that the developers really nailed is the ease with which you can add block patterns, including from the pattern directory. Simply copy and paste and they are immediately available where you need them. It allows you to build fully fleshed-out layouts in a very short time.
Room for Improvement
At the same time, there is a fair amount of criticism that you can level against this part of the block editor.
Not the Most User Friendly
While I admire the raw power that the Site Editor offers, it doesn’t always make it easy to wield it from the user’s perspective. While the user interface is condensed enough to serve well for editing pages and posts, the higher complexity of customizing your entire site means that you will often find yourself hunting for settings. The number of menus is limited, which means you often need to do a lot of clicks to achieve your goal.
Apart from that, it’s often the small things:
Moving blocks in list view via the mouse is very hard. They often end up where you don’t want them.
Generally, positioning page elements can be a bit of a drag (pun intended).
Finding out where to do what can take a while, even for someone who is used to building websites.
By far the most confusing task is creating menus. To be honest, I’m not even sure I have understood it completely by this point. You sort of do it on the page, but there is also the Manage menus link in the block options that takes you to the old UI where you can’t really do anything.
I can see this causing a lot of frustration among users and find some of the criticism absolutely valid.
Lack of Documentation
This goes hand in hand with the above. While working with the Site Editor, I noticed that it’s very hard to find good help for specific problems, at least on Google. I know that there is the official support page and I don’t want to take away from the support team, who are doing a tremendous job.
However, the fact is that, more often than not, I had to figure out by trial and error how to perform certain tasks, because I couldn’t really find a good resource to fall back on. Especially when looking for help with specific block functions.
Maybe it’s also due to the fact that this is all pretty new but I found a distinct lack of good articles regarding the Site Editor.
Missing Functionality
Another thing that bothers me is that there are some things you simply can’t do with the Site Editor (yet). Examples include setting negative margins or creating box shadows (though it’s on the roadmap).
If I want to take advantage of any of that, I still need to use custom CSS. That’s a) something beginner users do not know and b) kind of defeats the purpose of the editor. At the very least, it forces you into a hybrid approach where you build the basic page structure and broad design strokes with the Site Editor but still have to go back to the style sheet for the final touches.
Of course, you can’t expect the editor to provide every single possible option CSS offers. However, sometimes the feature set still seems a little thin.
On the other hand, that’s simply the difficult position that the Site Editor is in. It’s not quite a page builder because it’s missing certain capabilities but is also far beyond a basic option like the WordPress Customizer. As a consequence, it ends up somwhere in that middle grey area which doesn’t always do it favors.
Stability
Finally, one of the biggest drawbacks of Full-Site Editing and a topic that needs to be part of any Gutenberg review is that of stability. The Site Editor is by far the one that I have seen the most crashes in.
In its defence, so far that has never led to big data loss, meaning, it was always pretty easy and quick do redo what I did before it crashed, which is mostly due to the excellent autosave function.
However, together with aforementioned performance problems, stability is definitely an area that deserves the most attention because it can get annoying really fast.
Template Editor
As mentioned, this is the editor tagged on to the Page/Post Editor. It’s a bit of a pared-down version of the Full-Site Editing experience.
I assume its purpose is to make changes to page templates on the fly, without having to go all the way back to the Site Editor. That’s generally a good idea, though I have to say that this is the part of the block editor that I have used the least. Therefore, my opinion towards it is relatively neutral. However, that doesn’t mean I don’t have one.
Here’s What I Like
Let’s see what the Template Editor has going for itself.
Good for Its Intended Use
If this editor’s purpose truly is changing templates on the go, I think it is doing a good enough job. You can modify the order of the featured image and page title, switch fonts and colors, or even change headers or footers.
So, when you are working on a page or post and notice that something about the template needs changing, you can do it quickly and easily. Alternatively, it’s also possible to create custom page templates right then and there. That way, you can apply changes only to that one page or assign them to other chosen content. Again, there is no code required for something that you definitely used to need a code editor before.
What I Couldn’t Get on Board With
On the other hand, here’s what I didn’t like that much.
Possibly Confusing for Beginners
The main problem I can imagine for the Template Editor is that it’s difficult for beginners, who don’t know that much about website building, to understand where they are supposed to do what. For example, that you are not supposed to fill the page with content in the Template Editor but only make structural changes to the template itself and then add content in the Page/Post Editor.
Here, too, it’s a bit of a question of how to put this much power into users’ hands without properly teaching them how to apply it.
Final Thoughts: Gutenberg Review
So there you have it, a review of the WordPress block editor and implementations of the Gutenberg project from someone who works with the platform professionally on a daily basis.
Even if I had a bunch of criticism, I am generally a big fan of the new editing experience. Especially the block editor for posts and pages is not something I would want to miss. Sure, there is room for improvement, but it is definitely already on a good level.
In addition, the above list is in no way exhaustive. I focused on the most important points that occurred to me in my work. There is more I could talk about both positively and negatively. However, these are the broad strokes. What’s your opinion?
Do you agree with my Gutenberg review? What’s your opinion of the block editor and how it has been implemented? Please share in the comments below!
While using custom web fonts is a great way to make your site more unique and distinguish your branding, it can also come with certain problems — from privacy to performance. The solution: host your fonts locally on your WordPress website instead.
To help you do so, in this post, we will tell you everything you need to know about this topic. Below, we discuss why it’s a good idea to host fonts locally in WordPress in the first place and then give you a rundown of code and no-code solutions to make it happen in both classic themes and WordPress block themes.
Hosting Web Fonts Locally vs Remotely
So, the first thing we probably have to talk about is what hosting fonts locally even means.
These days, a lot of people use so-called web fonts to change the typography on their websites. Those are font files that typically load from a third-party service, the most popular of which is Google Fonts.
It has a huge library of free fonts that you can use on your website by simply adding a special link to it. Then, when someone requests to see your site, they load remotely so that you can display them to visitors. Google Fonts is also integrated into many themes so that users can switch their font face very easily.
In contrast to that, when you host fonts locally, your font files don’t load from a remote server like Google’s but instead reside on your own server and visitors receive them from there. In the end, both achieve the same thing just in different ways.
Why Should You Locally Host Fonts in WordPress?
There are many good reasons to put font files on your own server instead of using a third-party solution:
Privacy concerns — Especially if you are subject to European privacy laws, using web fonts particularly from Google can be problematic. The company collects visitor IP addresses and other information, which you need to mention in your privacy policy if you want to use them. Otherwise, you risk being fined. To avoid issues like this, many people simply opt to host fonts locally instead.
Fond availability — The problem with using third-party hosted fonts is that you make yourself dependent on the service that provides them. If they go out of business, have a server breakdown, or if their URL changes for some reason, all of a sudden your site is without the typeface you chose. While that’s not likely in the case of Google, you never know, and crazier things have happened.
Wider selection — While established libraries offer a wide range of different fonts, there is a lot more available that’s not in web font form. Consequently, knowing how to host fonts locally gives you many more possibilities to purchase and use premium fonts.
Performance — When hosting your own fonts, you have full control over how they load. You can configure their caching and fix any issues on your own server. In addition, hosting your own fonts results in fewer HTTP requests as you don’t need to pull in data from another connection. All of the above is good for site performance.
Disadvantages and Caveats
At the same time, there are also some factors that speak against hosting fonts on your local server:
Performance, again — Google Fonts especially are set up in way that offers high performance. They have a CDN to serve font files from the nearest server. In addition, many of the most popular fonts are already in most browsers’ caches. As a consequence, they load faster than your premium custom font. It’s the same reason why you shouldn’t host your own videos. For all the reasons above, it’s a good idea to use your own CDN if you are going to use local fonts.
Higher complexity — Setting up your font files locally is more difficult than, say, going with the Google Fonts installed in your theme. However, as you will see below, unless you are going the completely manual route, it’s not that much harder. In fact, there are some one-click plugin solutions.
A Quick Word About File Formats
One thing you should know is that fonts are available in different formats, the most common of which are:
TrueType Fonts (.ttf) — This is a font standard developed in the 1980s by Apple and Microsoft. It’s the most common format for operating systems and also usable on the web. While not the recommended file format, it’s a good fallback for older versions of Safari, iOS, and Android.
OpenType Fonts (.otf) — Built on TrueType and developed and trademarked by Microsoft, the .otf format is for scalable computer fonts.
Embedded OpenType Fonts (.eot) — This is a legacy format of OpenType for rendering on the web. It is required by older versions of Internet Explorer.
Web Open Font Format (.woff) — WOFF was explicitly developed for use in web pages. It’s the OpenType/TrueType format with compression and extra metadata. This format is recommended for use by the W3C and supported by all major browsers.
Web Open Font Format 2.0 (.woff2) — An improved version of .woff with better compression for faster download. Developed by Google and compatible with very modern browsers.
SVG Fonts (.svg) — It’s also possible to use SVG shapes for fonts but this method is currently only supported by Safari.
So, which format should you choose? Of course, performance wise WOFF/WOFF2 makes the most sense. However, in order to be compatible with older browsers, including other formats is also useful. Plus, some providers, such as Google Fonts, only provide .ttf or similar formats for download. Luckily, there are ways around that, which we will show you momentarily.
However, keep the above in mind when procuring custom fonts for your website from a provider.
Hosting Fonts Locally in WordPress (Manually, Classic Themes)
At this point, we are finally going to talk about how to practically host fonts locally on your WordPress site. We have a bunch of different scenarios to cover and we are starting off with classic themes and the manual method.
This is the most technical approach, so you’ll learn the hardest method first before we go over easier solutions. Doing the whole thing by hand will help you understand the mechanics behind it and also improves your WordPress skills in the process.
1. Get Your Font Files
The first thing you need to host fonts locally is font files. Google Fonts allows you to download them but, as mentioned above, doesn’t yet provide the latest file formats. While you can theoretically turn their files into your desired format yourself, it’s much easier to use the Google Webfonts Helper instead.
Not only have they done the conversion work for you, the site also provides you with the necessary code for embedding your fonts.
The first thing you need to do here is choose a font of your liking. For that, you can either use the list on the left or the search field above it. When you have found your desired typeface (for this example we going with Advent Pro), it’s time to choose your character set and styles on the right.
First, check if you need Cyrillic, Greek, or Latin Extended characters. Below that, check the boxes for all the font styles you need. Be sure to pick only those you will actually use on your website so you don’t make visitors load stuff that they won’t even see.
Under Copy CSS, you can choose which file formats you will download.
Best Support setting includes .eot, .ttf, .svg, .woff, and .woff2 files while Modern Browsers only include the latter two. It’s usually a good idea to leave it at the default setting.
Once you are happy with your choices, scroll all the way down and click the big blue button to download your files.
2. Upload the Font Files to Your WordPress Site
Once you have the font files on your hard drive, the first step is to unzip them. After that, you need to get them up to your server.
For that, connect to it via an FTP client and navigate to your theme directory (inside wp-content > themes). Here, it makes sense to place the files inside their own directory, e.g. fonts. Therefore, first create the directory, then drag-and-drop your font files into your FTP client to upload them.
The files are small so this shouldn’t take very long and you can move on to the next step.
3. Load the Local Fonts in Your WordPress Theme
Next up, if you want to use the local fonts on your website, you need to load them first. For that, Google Webfonts Helper kindly already provides the necessary markup. You have probably seen it earlier.
At the bottom, you can customize the folder name, in case the one you have placed your files into is not called fonts. You should already have made your choices about whether you are using the code for highest compatibility or only for modern browsers earlier. Therefore, now it’s time to simply click into the field with the markup to mark it all, then copy it with Ctrl/Cmd+C.
After that, go to your theme’s folder on your server and open the style sheet (style.css). Here, paste the markup you copied earlier at its beginning.
Quick note: In order to use relative paths with @font-face, meaning if you want WordPress to access your local font files inside the fonts directory in your theme folder, you need to delete ../ in front of the URLs above. So, in my case, each line would look like this:
url('fonts/advent-pro-v19-latin-regular.woff') format('woff'), /* Modern Browsers */
This is assuming that your style.css file resides directly in your theme folder.
After you have made any necessary changes, save and re-upload the file and you are ready to use your local fonts on your WordPress site.
4. Eliminate Fonts Already Loading on Your Site
This step only applies if your theme already pulls in third-party fonts. You want to eliminate that for the aforementioned reasons as well as in order to not load the same font twice and also see if your local fonts have taken effect.
How to switch off third-party fonts depends on how they load in the first place. Some themes have dedicated options where you can switch to a system font or similar.
If, for some reason, they are hardcoded into your header.php file, you need to remove it from there (use a child theme for that). If they load via functions.php, you can remove the call from there. Do this in a child theme as well.
Finally, there is the Disable and Remove Google Fonts that you can try out. Autoptimize also has an option for removing Google Fonts, you can find it under the Extra tab.
4. Use Your Local Fonts
The last step is to actually assign your local fonts to elements on your site. For example, in the Twenty Twenty-One theme, you can use the following markup:
.entry-title {
	font-family: Advent Pro;
}
This results in your blog post titles appearing in the new Advent Pro font:
Hosting Local Fonts in Classic Themes: Plugin Edition
If the above is too complicated for you and your already have Google Fonts on your website (e.g. through a theme) you can also use a WordPress plugin solution to locally host your fonts. One of the best options for that is the OMGF or Optimize Google Fonts plugin that’s available for free in the WordPress directory. Install it in the usual way via Plugins > Add New.
Once you have done so, you find a new menu item under Settings, called Optimize Google Fonts. Click it to get to this menu:
Usage is pretty simple. In most cases, all you have to do is click Save & Optimize at the bottom. The plugin will then automatically find all Google Fonts style sheets on your site and replace them with local versions. You can see all of them at the bottom of the screen.
Here, you also have the option to configure the plugin not to load some of the fonts or font styles or pre-load them, which is important for typography that appears above the fold. There are some more settings but they are mostly for cases when something is not working.
OMGF also has paid a addon for installing more Google Fonts on your site. It’s very fairly priced and worth checking out. Other plugin options include Perfmatters and the Pro version of the aforementioned Disable and Remove Google Fonts plugin.
Manually Hosting Fonts in WordPress Block Themes
WordPress block themes also allow you to use local fonts. In fact, at the time of this writing, that’s all they do, you currently can not host third-party fonts in a block theme (though an API for that is in the making).
For that reason, the first few steps, acquiring font files and uploading them to your server, is the same as for classic themes. From there, the differences begin.
Loading Fonts Inside theme.json
In block themes, theme.json is the central file for styling and it is there that you set up the fonts. To do so, look for fontFamilies under settings and typography.
In block themes, new fonts are added using the following values:
fontFamily — The name of the new font as it will be used in CSS. That means it can include fallback fonts.
name — Name of the font that will appear in the WordPress back end.
fontFace — This corresponds to the CSS @font-face rule and is what really enqueues the font.
In order to work, fontFace includes several other pieces of information:
fontFamily — The name of the font (again).
fontWeight — A list of available font weights separated by spaces.
fontStyle (optional) — You can set the font-style attribute here, e.g. normal or italic.
fontStretch (optional) — For example, for font families that have a condensed version.
src — Path to the local font file.
You can include several font files in fontFace, e.g. to load different styles. Separate them with curly brackets and a comma to do so. Here’s what this looks like for the same font example as above:
With the Gutenberg plugin active, you can also use wp_register_webfonts() inside functions.php instead, which is a new PHP function for this purpose that is not yet in Core. It takes the same arguments as above but in PHP format.
Local Fonts in Block Themes: Plugin Solution
Finally, it is also possible to locally host fonts in WordPress block themes with the help of plugins. One of them is the Create Block Theme plugin. After you install and activate it, it adds a new Manage theme fonts option to the Appearance menu.
Here, you can preview the font families included in your current theme as well as remove entire font families or single styles.
What’s even more interesting are the buttons saying Add Google Font and Add Local Font at the top. Let’s start with the Google Font option.
Using it is really easy. Click on its button and select your desired font from the drop-down list at the top. After that, tick the boxes for the font weights and styles that you want to add to your theme. Finally, click Add google fonts to your theme at the bottom.
The plugin will then automatically download and embed your chosen fonts so that they are available in the block and Site Editor.
The local font option works very similarly.
The difference here is that you upload a font file from your hard drive and have to provide the font’s name, style, and weight so that the theme knows what’s what (the plugin also automatically tries to recognize this information). That also means you need to upload your font files one by one. However, overall it’s super simple.
Are You Ready to Host Fonts Locally in WordPress?
Custom fonts are a popular way to spruce up your website. However, the ability to locally host them in WordPress is something that’s becoming more and more important because of performance, legal, and other reasons.
Above, we have gone over several ways to do so. You can either achieve it manually or using a plugin. There are also differences when using a block or classic theme though overall the principles are very similar. We hope you now feel up to the task.
How did you choose to locally host your fonts in WordPress? Let us know in the comments section!
WordPress Full-Site Editing, aka the Site Editor, offers a lot of features, not all of which you might be familiar with. That’s because it’s not only a relatively new addition to the WordPress platform but also under constant development with new features coming out regularly. As a consequence, it’s easy to miss out on some things.
In order to help you get the most out of the WordPress Site Editor, in this post we will go over some features you might have overlooked. Some of them are bigger, some smaller. However, all of them can help you build better designs and customize your site more effectively — if you know about them.
1. Change Style Variations
Le’s start off with style variations. While these are a fairly central feature of the WordPress Site Editor, if you are not aware of them, you are missing out big time. Therefore, let’s cover them quickly.
So, what are they? If you open up the Global Styles menu (the black and white circle icon in the upper right corner), you find an option at the top that says Browse styles.
Here, theme developers are able to include one or more style variations for their themes. For example, in the Twenty Twenty-Three theme, you will find a whole list of available variations right there.
Click on one and the site preview on the left will immediately take over its style presets.
We are talking font, font style, background colors — the works. Save it and your site will adopt the same design. Basically, you can change the entire look of your theme with a single click. This gives you great variety for your site, inspriation, and several starting points to add your own flavor.
2. Edit Styles for Individual Blocks
In the Global Styles menu, you also find another option that is sometimes a little neglected. Under Blocks at the bottom, you can make changes to individual types of blocks that will apply sitewide.
That can be anything from changing fonts and font styles, to assigning colors to backgrounds, links, and buttons, and making layout changes.
For example, want to make sure all Post Title blocks on your site use the same font style and color? Nothing easier than that.
First, search for it by name or in the list.
After that, make any changes to the typography and color settings you need. Once done, they will apply wherever this block occurs on your site (unless overwritten on an individual basis).
Beats having to do updates manually across different templates.
3. Work With Page Templates from the Post/Page Editor
This technically doesn’t happen inside the Site Editor but its cousin, the Template Editor. However, the two are so closely related that we will let it slide for the moment.
You might not be aware of it but when editing posts and pages, it’s possible to edit their individual templates or even build custom templates without the need to go back to the main Site Editor.
You find that option when you click on the name of the current page template on the right. It is located under Template in the options menu on the right.
Pick a template from the drop-down menu and click on Edit template at the bottom to make changes to it. Alternatively, there is also the icon in the upper right corner for adding a new custom template. Either of those will take you to the Template Editor below.
It’s a pared down version of the Site Editor, however, equally powerful. You can perform tasks like switching the position of your featured image and title, moving around elements, or even inputting a new header or footer. Upon save, the changes will apply to any page on your site that uses this template.
4. Customize Block Templates
One of the features of the Site Editor, and the WordPress block editor in general, is that they come with a bunch of blocks that, upon further inspection, actually consist of several other blocks. Examples include the Comments or Post Content blocks.
If you look at them in list view, you can see that they actually have many parts.
This gives you the flexibility to determine the order and layout of the elements that. For example, if you want to invert the order of Post Featured Image and Post Title, you can do so in the usual ways (e.g. via drag-and-drop or using the arrow icon).
The powerful thing about this is that, any changes you make here, apply to all site elements built with this block. For example, making changes to one of the articles in your Query Loop block will automatically do the same to the rest of them.
5. Install Blocks on the Fly
Ever found yourself in the Site Editor thinking something like “man, I wish I had an XYZ block”? Maybe you would like a table of contents block, an image slider, or a popular-posts widget.
There are plenty of Gutenberg block plugins to add this kind of functionality to your site. However, WordPress also features a a way to install singular blocks right inside the Site Editor.
For example, say you are looking to add the aforementioned table of contents. For that, go to the block inserter (the blue button with a plus in the upper left corner) and type that keyword into the search field at the top. While you might not find anything available on your site, you will quickly see a section called Available to install at the bottom with relevant block results.
If one of them sounds promising, simply click it to install the block on your site. It also immediately inserts the block into the current page where you can test drive and configure it.
Neat, right? Plus, if it turns out that one or more of the newly installed blocks don’t really do it for you, you can always deactivate and delete them from the plugins menu.
6. Import Blog Patterns via Copy and Paste
A second feature that creates a lot of flexibility is the possibility to easily import block patterns into the editor. We have already written about this in detail in our pattern directory tutorial, so here is the short version.
Go to the WordPress pattern directory and look for a block arrangement that you like. The filters and search field are useful for that.
Once you have found something, click on it to get to the pattern page. Here, simply click the Copy Pattern button at the top.
Then, go back to what you are working on in the Site Editor. Place the cursor where you want the pattern to appear and paste.
That’s it. The pattern is now in your content, complete with any images belonging to it. If you think you will want to use it again later, don’t forget to make a reusable block out of it.
7. Switch Your Post Display Between Grid and List View
This is one of those WordPress Site Editor features that’ really small but is still worth mentioning because a) it makes a big difference in the display of your posts on the page and b) it is easy to overlook.
What am I talking about?
When using the Query Loop block to display a list of content anywhere on your site, you can switch it back and forth between a list and grid design in the top toolbar.
It will either arrange posts as a vertical list or in a pattern next to each other.
A small option that can make a big difference.
8. Show Last Modified Date in the Post Date Block
Another very small option that, however, can have a big impact. It regards the Post Date block, which is most often a default of the Query Loop. What’s easy not to notice is that it also has an option to show the last modified date. You can find it in the settings on the right when the Post Date block is active.
After you switch on the slider for Display last modified date, whenever you update your older content, WordPress will automatically show the new date on the page instead.
This is a great way to signal to search engines that you keep your content fresh. It’s also one less thing to think about when you do.
9. Move the Block Toolbar to the Top
If you have used the Site Editor or even just the Gutenberg post editor before, you are probably familiar with the fact that a toolbar with extra settings appears whenever a block is active.
The problem is that it can sometimes be hard to reach, depending on your scrolling, or get in the way. What typically happens to me is that I double click a word in a paragraph just at top of the screen to mark it. Then the toolbar appears on the first click so the second immediately activates something in it.
Again, not a big thing but it can get annoying. If you find that it interrupts your workflow too much, in the Options menu (the three dots in the upper right corner) there is a menu item called Top toolbar. Click it, and from now on the toolbar of any block you choose will always appear on top of the editor. That way, you always know where to find it.
10. Export Modifications as Custom Themes
The final somewhat hidden because unassuming Site Editor feature is the Export function. You find it in the Options menu.
When you click it, you get a download prompt for your theme files. These include all the modifications you have made to both design and templates. You can use those to install the same theme on any other WordPress website and get the same styling.
While this might just seem like a normal feature, it’s actually a huge deal. It basically means that, with the Site Editor, you now have the possibility to build custom themes visually, without any coding, and make them available for other people. That’s something that, in the past, was purely in the realm of developers. Now, basically anyone can do it.
If want to get more granular about this, check out the Create Block Theme plugin. It allows you to export block themes, child themes, and style variations easily.
What Hidden Site Editor Features Did You Find?
The Site Editor is a powerful piece of software that offers a wide and growing variety of options to make changes to the design and layout of your WordPress site. Because of the amount it has to offer, you can be forgiven if you don’t know every single one of its features.
Above, we have gone over a few that you might not have been aware of before. From instantaneously changing your theme design with style variations, global styles for single blocks, the ability to install blocks on the fly, or simply small things like switching the post display from list to grid view and vice versa — there is a lot to discover.
Hopefully, learning these will motivate you to go spelunking around the available settings by yourself and improve your skills further.
What’s your favorite Site Editor feature that you have discovered? Please let us know in the comments below!
Blog comments are an important way of interacting with readers, collecting feedback, and getting ideas for new topics. However, your comment section can also be overrun by spam and turn into a toxic cesspool of people fighting (you know, like Twitter). In order to avoid that, it makes a lot of sense to set up a blog comments policy.
Creating some rules around comments left on your blog is a great way to set some boundaries and expectations toward your audience. It helps raise the quality of comments you receive and, as such, the quality of your site as a whole.
To help you facilitate that, in this post, we will go over how to create, announce, and enforce an effective blog comments policy. We talk about why you should have one, what rules to include, and how to let readers know about it.
We already alluded to why a blog comments policy is a good idea in the introduction. It sets up a set of expectations as to how people in your comments section should behave – if they want to see their comment on your website. Besides that, it can help with other things, too.
Build a Civilized Community
Building a blog also means building a community. Ideally, there are people who come back to your blog over and over again and regularly comment on your posts. With a blog comments policy, you get to decide what kind of community first timers will find.
Will it be open, prone to interesting discussions, and polite disagreements? Or a bunch of doo doo heads yelling at each other (you know, like Twitter)?
Comment guidelines allow you to weed out behaviors that you don’t want to see in your comments section. It can include things like rude and offensive behavior or spammy comments.
While just setting up a comment policy won’t eliminate all the spam on your blog (if only, unfortunately, most of it is automated), it might discourage some of it and inspire people to leave better comments. It might also deter some users from commenting, however, they are often the ones that the policy is aimed at in the first place.
Set a Precedent
In addition, having a comments policy in place gives you instant justification to delete comments that don’t adhere to it. Nobody can complain that their comment didn’t show up if they didn’t bother to follow the rules.
A blog comments policy is sort of like a “no shoes, no shirt, no service” sign that they have in restaurants sometimes (at least in movies).
You can metaphorically tap it whenever someone complains that their contribution didn’t show up.
This especially applies to news websites. The tone online has become rougher with some people feeling that the anonymity of the Internet allows them to spew every offensive and racist nonsense or conspiracy theory out there without consequence.
A comment policy in place gives you official justification to delete all that drivel.
Note: A Comment Policy Is Not for Censoring
As we have settled so far, a comment policy should be a legitimate guideline to encourage good behavior and fruitful discussions. At the same time, what it should not be is a justification to delete every comment that you don’t agree with or that doesn’t agree with you.
Criticism can be great source of feedback to further improve your writing or clarify your content. It can also be a good start for interesting conversations and exchange of ideas, if it’s constructive. After all, the comment section exists to connect with readers, even those that don’t think the same way as you.
Sure, if you are being brigaded or trolled just for the hell of it (some people just want to watch the world burn) that’s not constructive criticism and you have every right to delete it. Just be aware that the policy should not used to silence dissenting voices but to make sure that the conversations that happen are above board.
What Should Be Part of Your Policy and Rule Set?
Next, let’s talk about what guidelines should be part of your comments policy. Here are things that people commonly include for reader contributions.
Welcome and Encourage
Ideally, your policy shouldn’t just be a list of commandments of everything that is forbidden (“thou shall not spam!”). As all other content, it’s part of your branding, meaning part of how you present yourself and what you stand for. Therefore, you can use it to further show readers who you are and what they can expect from you.
To achieve this, start off by welcoming readers to your blog and encouraging them to take part in the conversation. In addition, set expectations. Again, not just about what’s forbidden, you can also set positive intentions. Say what you expect comments on your site to be like and what kind of discussion you wish to see.
Content Quality Guidelines
Secondly, it’s a good idea to put rules in place to make sure that comments adhere to certain quality standards:
Anonymity — A good way of combating a lot of anonymous contributions is to make the use of an email address mandatory in order to leave a comment. You can do that in WordPress under Settings > Discussion. The menu also has other settings that are useful, such as automatically holding comments in moderation until manually approved.
Relevance — Ask commenters to stay on topic and add input that carries the conversation forward, not simply regurgitates what the article already says. Also ask that members of your audience don’t write anything that is completely off topic, like a personal rant.
No spam — You should already have spam plugin in place to catch genuine junk comments. However, some people still try to use spammy tactics in blog comments that make sense to ban. Examples include the use of a business name or URL as their name, trying to link from inside their comment, or purely promotional content.
Copyright, privacy — If it turns out that something someone posts in the comment section is copyright protected, it will go. Same for private information like phone numbers or email addresses. A comment section is not for a classified ads.
In addition, your comment policy should include whatever is a hard no for you. The type of comments that will never see the light of day on your site and that gets people permanently banned from the comment section.
Hate speech — Sexism, racism, or any of the other -isms aimed at discriminating against individual groups of people should never be tolerated. Same for homophobia, transphobia, or general threats and harrassement against anyone.
Offensive language — Want to ban curse words like the f-bomb in your comment section? Include it in your policy. Same for abusive, threatening, pornographic, misleading, or libelous statements.
Consequences
Finally, once you have established your rules, it’s also important to point out what happens when someone violates them.
Editorial rights — Make clear that you reserve the right to modify comments in order to make sure they adhere to the your policy or simply delete them if they don’t.
Outcomes — Spell out what happens to comments that fail to adhere to the policy, such as that you delete, block, or report them.
Frequently asked questions — It often helps to proactively include answers to questions that come up a lot. For example, why a comment might not be published, how to contact a moderator, etc.
In short, the comment section should be a place where everyone feels welcome and don’t have to fear being harrassed for no reason. Use your blog comments policy to enourage people to be decent to one another and keep out those that refuse to do so.
How to Display the Blog Comments Policy on Your Website
With the above out of the way, the question that remains is where and how to make your comments policy visible on your WordPress site. For that, you have several options.
Publish a Dedicated Page
One of the easiest ways is to create a separate page for your blog comments policy.
This is especially a good option if it has gotten too long to appear directly in the comments section. Just like your privacy policy, you can give it its own page where your audience can read it in its entirety.
The important thing here is that, just like for other policies, you make it findable. A link in the footer is a good solution for that.
Of course, you can also do a hybrid model and add a short version to the comments section that links to the full edition on a separate page.
Include It in the Comments Section via the Site Editor
If you want to link to your policy in your comments section or if it is short enough to post it there, that’s pretty easy to do if you are using a block theme like Twenty Twenty-Two. In that case, first access the Site Editor under Appearance > Editor.
Here, you need to click the logo in the upper left corner to access Templates.
Look for the Single page template.
That’s the one that controls the look of your blog posts. In it, you will find the Comments block that controls the markup of your comments section.
Adding a comments policy is as easy as including a paragraph block wherever you want the policy to appear (using list view makes this especially easy). Then simply paste it there (including any links).
Note that you might have to switch the Comments block into editable mode to make any changes. Once you save the template, the policy should start showing up on your blog as well.
Add the Policy via Code
If you are using a classic theme, you can still incorporate a policy in your blog comments section by using markup. You have three basic options for that:
Edit the template file — WordPress comes with a template file called comments.php. You can edit it and include your blog comments policy there directly to have it show up on the page.
Add it via hook — WordPress has a number of action hooks you can use to show your policy in your comments section such as comment_form_before. More on hooks in this article.
Use a widget area — If you want to be able to change your comment policy from the WordPress back end, adding it via a widget area might be the best idea. In that case, you first need to edit comments.php and create a new widgetized area where you need it. After that, you can add a text widget and edit it to your liking.
For all of the above, it’s best if you have a code editor that you like and that you implement the changes in a WordPress child theme. That way, they won’t vanish at a theme update.
Use a Plugin
As far as I can tell, there is no plugin dedicated to adding a comments policy to your blog section. However, some plugins that enhance or take over your comments have settings that allow you to easily display it. Disqus is one of them.
Thus, if you use a WordPress comments plugin, make sure to check for possibilities like this.
Examples of Blog Comments Policies
In the final part, let’s have a look at some of the commenting guidelines of websites out in the wild. You can use the examples as comment policy templates to come up with your own.
Author Tim Ferris has his blog’s comment rules directly below the comment form.
It’s short and sweet and basically says no rudeness, no personal URLs in comments, and use your real name or initials. That’s pretty much it.
What Will Be Part of Your Comment Policy?
A blog comments policy is an important part of Internet real estate. It’s a great way to put some guard rails up for the discussions below your articles so that they doesn’t veer off track. It also helps to remind people to behave well while interacting with one another.
Above, we have gone over reasons why you should consider putting comment guidelines for your blog in place, what to include, and how to publish them on your WordPress site.
The last thing to keep in mind is that the blog comments policy can (and often should) evolve over time. The rules are not set in stone and you are able to adapt them as needed. If you find that you have forgotten something the first time around or realize that something is not clear enough, feel free to make changes as required.
Do you have an explicitly written blog comments policy? If so, what did you include in it? And how are you making it available to your visitors? Please feel free to share in the comments section below!
The world is learning new ways of moving faster with the help of AI, as the increased availability of the technology is poised to transform the way humans work. Generitive AI is decades old but recent advances and new tools like DALL-E (launched in January 2021) have made AI more accessible to the public.
When ChatGPT arrived in November 2022, it sparked an explosion of tools built to extend its capabilities to nearly every aspect of work. Conversational AI tools can now handle a myriad of mundane tasks like updating your resume, reading and summarizing PDFs, and creating slides for presentations. Yesterday Google announced it is testing Bard, its AI chatbot rival to ChatGPT and Bing AI. In the fast-moving world of companies innovating with AI, GitHub also announced Copilot X, which is powered by GPT-4 and adds Copilot to pull requests, docs, and the command line and introduces chat and voice features for Copilot.
So far developers report having more success with ChatGPT than Bard. In some cases the creation process is incomplete and requires some expertise to ensure the plugin will work, but it’s also opening up the world of plugin development to those who would not be able to create one without hiring a developer.
I have never coded a WordPress plugin in my life
With the help of Chat GPT 4, I just did
In the span of ~30 mins, I was able to work with GPT4 to come up with a solution for my WooCommerce store to add a discount of 1.5% for product quantities above 1 w/ a cap set at 6%
WordPress developers who want to share their AI-assisted creations with the community have also started submitting them to WordPress.org.
After receiving a string of violations, WordPress’ Plugin Team is warning developers that code submitted to the official directory must be GPL compatible.
“There is no guideline AGAINST using generated code,” Plugin Review Team rep Mika Epstein said.
“You’re welcome to use whatever tool you want to build plugins. That said, you are 100% responsible for that code if you chose to host it here…
“But the important bit here is that it means if ChatGPT, for example, built your plugin, you have to verify that all the code used is GPL compatible. Just like you are expected to validate licenses on libraries and code-snippets, everything in your plugin has to be GPL compatible. Should we determine that your code is a copy of someone else’s or includes code from non-GPL plugins, your submission will be rejected and any live plugins will be closed.”
Epstein cited an example where a developer built a “scroll to top” plugin with code that was copied from another, existing plugin hosted on WordPress.org. It was submitted five times and rejected every time.
“Yes it’s fine to fork code,” Epstein said. “You have to credit them, however, and that’s something those AIs have been pretty bad at doing.”Â
Commenters noted that autocomplete in modern IDEs workin in a similar way, as well as snippets. These types of tools can enhance productivity but prospective plugin developers who may not be as informed about software licensing, should stay away from wholesale copying another’s work without crediting them. This may require doing some extra research on the code that AI spits out.
In this new era of AI-assisted creation, we have essentially hitched our wagon to a star, as Ralph Waldo Emerson described in his essay on Civilization in 1870:
Now that is the wisdom of a man, in every instance of his labor, to hitch his wagon to a star,’ and see his chore done by the gods themselves. That is the way we are strong, by borrowing the might of the elements. The forces of steam, gravity, galvanism, light, magnets, wind, fire, serve us day by day and cost us nothing.
That decade brought humanity inventions like the phonograph, telephone, and the incandescent light bulb, followed by the automobile in the next decade. Emerson’s essay explores man’s relationship to technology where principles—”justice, love, freedom, knowledge, utility”— are the guiding light and accelerant of technology’s impact.
The GPL is one of those principles for the WordPress community, which has enabled its uncommon growth and its wildly successful ecosystem. There are still a lot of grey areas when it comes to licensing and the code generated by AI. Developers would do well to use AI-generated code for inspiration and give credit where they can.
Web developer Mark Praschan created his first plugin for WordPress.org using ChatGPT. He used the free version, gave it a few prompts describing what he wanted it to do, and ChatGPT produced a functional plugin.
NorthStar allows users to display a message in the WordPress admin bar with settings to customize it along with the text and background colors.
“The first version worked great,” Praschan said. “I made a few small aesthetic improvements to the settings page and the display of the message, but we were already 95% of the way there!”
Praschan also had ChatGPT design an ASCII Art logo for the plugin. It required a few back-and-forth prompts but took just a few minutes before it was ready to be copied and pasted into Photoshop.
The plugin did not pass the code review on the first try for two reasons that Praschan shared on Twitter:
Issue # 1: Variables and options must be escaped when echo’d. There were 2 instances of not “escaping late”
Issue # 2: Generic function/class/define/namespace names. One function was missing the “northstar_” prefix.
“How did I fix it? I made ChatGPT do it, of course,” Praschan said. “I copy/pasted the problems and a few snippets of my code and it spat out the fixed code.”
There are more of these plugins coming – where a person need only dream up the idea and prompt their chosen AI tool for the code. These will more than likely be simple plugins for the time being, but it’s not too early to establish some best practices for using code generators. WordPress is navigating new territory where anyone can create a plugin with a dash of creative prompts and very little code experience.
This is the first in a series, Member Success Stories, where we ask WPMU DEV-ers who are killing it in the WordPress web dev business to share key contributors of their success with us – and you.
Today we welcome Phil, the owner of Capital Web Design, a Canadian web services agency based in Ottawa.
WPMU DEV: Congrats on your professional success, Phil. Please tell us straight away, how did you grow your business so fast?
Phil: I wouldn’t say the business itself grew that fast. I’ve been building websites in some way or another since the early 2000s. Either static sites coded by hand (HTML + CSS + Javascript), using frameworks (VueJS), or with WordPress.
I started my freelance web design company in 2014, after being approached to do a replacement build for what was a costly, difficult to maintain website – and that became my first client. From there I found small and medium businesses in my hometown that had old, unsupported and unmaintained websites, or who had no website at all.
As I continued my efforts, my business ethos emerged: help companies, nonprofits and individuals in my city build a web presence they can be proud of. I focused on creating bespoke WordPress web design based on well-supported multipurpose themes, WPMU DEV and other dependable plugins, and fully managed white-glove web hosting.
Since then, I’ve had the pleasure of working with 20+ clients, and have built 60 websites targeting a multitude of industries and commercial sectors.
WPMU DEV: That’s awesome. Did you know about WPMU DEV at that time?
Phil: I had known about WPMU DEV since around 2016-18, back when you offered dozens of plugins for all sorts of functionality. I couldn’t justify the cost of a membership then, but I popped in every so often to check and see what progress was being made.
In 2019, Hosting was added as a WPMU DEV service – and this really caught my attention. During the Black Friday promotion that November (lifetime reduced membership cost!), I joined as a member, and I can’t see myself ever leaving.
It was a perfect storm: high-quality plugins + managed hosting + 24/7 support + highly reduced cost.
WPMU DEV: So as you were building your clientele, you were putting together your professional tool box. Can you give us a peek inside?
Phil: The tools and services from WPMU DEV have been invaluable to me.
Plugins have provided me with consistency and reliability for all of the most important aspects of WordPress websites.
Knowing that I can count on Hummingbird and Smush for performance optimization allowed me to stop using other freemium plugins such as W3 Total Cache, Autoptimize, WP Super Cache and EWWW Image Optimization. I found these plugins were all good at some things, but had a lot of paywalled features that Hummingbird and Smush offered out of the box, for free.
Defender has been a great peace-of-mind addition to my repertoire, as the one-click recommended fixes are super straightforward and quite effective.
Forminator forms may be difficult at times to style with CSS, but that’s more than made up for in functionality. The drag-and-drop UI makes it much easier to build forms compared to Contact Form 7, and the amount of extras that are baked in (calculation, email routing, etc) blow other (often paid) form builders out of the water.
WPMU DEV: Aside from plugins, you mentioned our services have made a huge impact as well. Can you expand on that?
Phil: When it comes to services, it’s hard to put into words just how much The Hub and the associated Hosting have helped me throughout the last few years.
I have worked with hosting providers like 1and1, DreamHost, Media Temple, Digital Ocean VPS, and Bluehost. Each had their advantages, but in the end it always became a chore to use their services. It was clear that the quality of their offerings reflected the low cost they positioned themselves at. They were in a perpetual fight to undercut their competitors on price, at the cost of quality of service and support.
WPMU DEV Hosting came in late in the game, but out of the gate addressed two of the major concerns I experienced at other hosts: lack of support, and lack of trust in the infrastructure.
By having dedicated resources (versus shared), the web servers were consistently fast, reliable, and offered premium features such as staging, backups and WAF.
WPMU DEV: Walk us through a typical work day; what you reach for the most, and your usual workflow.
Phil: I keep The Hub open in a tab at all times, refreshing it every once in a while to keep track of ongoing community discussions, website maintenance statuses, and plugin updates.
I subscribe to key email notifications to receive alerts of technical issues on my managed sites, as well as member discussions in the WPMU DEV member forums, blogs and newsletter.
When a technical issue occurs, I’m able to troubleshoot it quickly. If I’m unable to resolve it on my own, the LiveChat support is always there to help me right away.
WPMU DEV has allowed me to optimize my workflows across the board, in areas like:
Faster site creation with one-click managed WordPress server provisioning from The Hub.
WPMU DEV: Outside of your own talent and determination, what would you say has contributed most significantly to your growth?
Phil: WPMU DEV has reduced my server build-out time from 30 minutes to 3 minutes (90% reduction). Over the past few years I’ve stood up well over 75 servers, so this has saved me many hours of effort.
At the time of joining, The Hub allowed me to manage about a dozen sites from a central location as opposed to manually logging in to each separate site. This was a reduction of biweekly maintenance effort from approximately 60 minutes to 2 minutes.
Client billing and streamlined invoice creation allowed me to save approximately 20-30 minutes per invoice creation, which throughout the past few years I estimate has saved me over 30 hours of work.
All of these time and effort savings have allowed me to comfortably take on more projects and clients.
Since joining WPMU DEV, my completed projects count has grown approximately 416% – with each project being more efficient to produce than the last.
WPMU DEV: As a self-proclaimed diehard fan, you know we’re constantly upping our game and adding new features and services to our offerings. What’s a newer release that you’re really getting into?
Phil: Reseller focus. I look forward to adding WPMU DEV automated site provisioning via the reseller offerings, as well as domains and email reselling.
WPMU DEV: One last question; let’s close it out with a fun one. If you could talk to yourself at the start of your career, what would you say?
Phil: At the start of my career, I often looked up to senior staff who seemed wise beyond their years. I was afraid of making mistakes or breaking something, for fear that those-who-never-broke-anything would look down on me.
I would try to explain to a younger me that wisdom comes with experience, and experience comes from doing things, failing, and working through the failure.
The more things you work on, the more you get exposed to what works and what doesn’t. Failing or breaking something isn’t strictly negative, because every failure is a learning opportunity: troubleshoot what went wrong, understand how to fix it, and implement a solution.
Do this cycle enough times and you start to pre-emptively detect patterns, plan for success, and you get faster at fixing problems. Don’t be afraid of failure because the more you fail, the more you learn and the wiser you will become.
That wraps up this premiere episode of our Member Success Stories. Thanks to Phil for his candid, insightful answers in our interview.
Phil is one of WPMU DEV’s Agency Partners, and uses his 20 years of web design experience to achieve one goal: give back to his hometown by building modern websites for businesses and nonprofits in the Canadian capital.


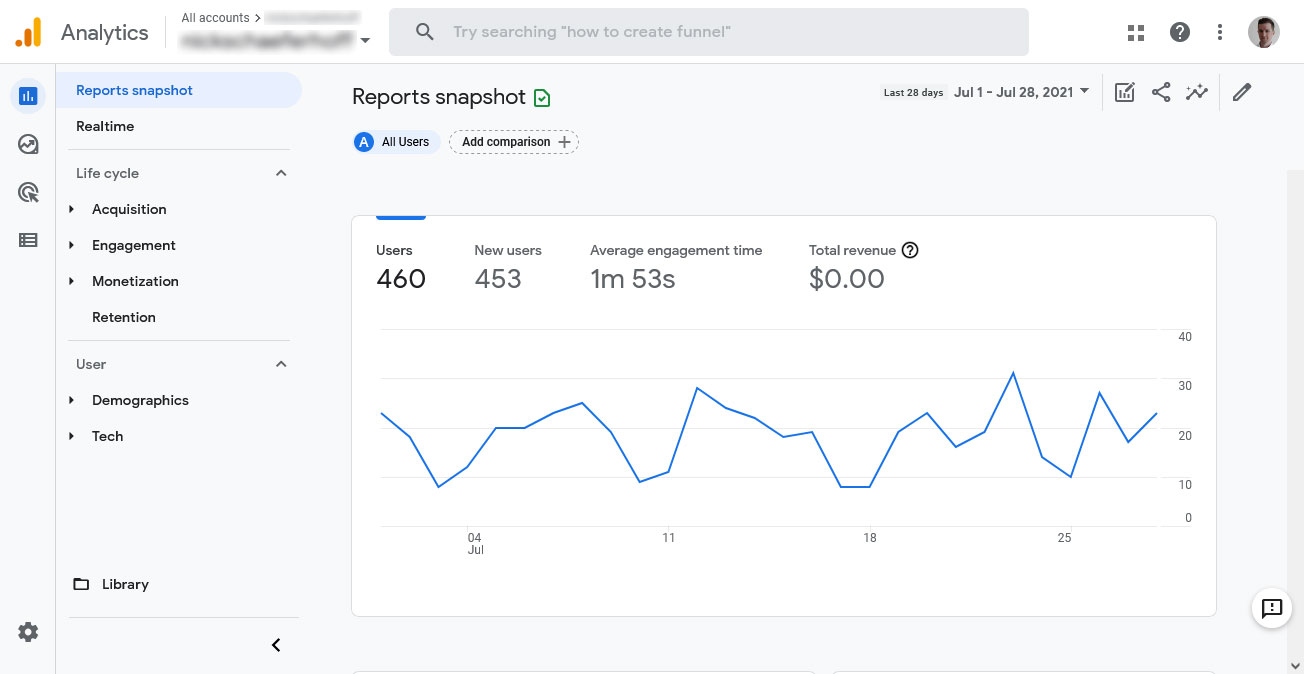


 ).
).


 his 20 years of web design experience to achieve one goal: give back to his hometown by building modern websites for businesses and nonprofits in the Canadian capital.