EDITS.WS

Tag: Divi Resources

  • How to Change the Column Count in Divi’s Filterable Portfolio Module

    As a designer or creative, it’s always a good idea to have a portfolio to show your work online. In the digital era that we’re living in, building a personal brand is a great way to set yourself apart from the competition. Bearing this in mind, using Divi to create your portfolio website is a great idea. Divi has two native modules that can help you build your portfolio. We have the Portfolio Module, as well as the Filterable Portfolio Module. Both allow you to showcase your portfolio in two ways. While the Portfolio Module is a good way to show your work, the Filterable Portfolio Module allows you to showcase more of your work and comes with a filter that will enable you to better present your work in a more organized way. By default, our portfolio modules showcase your work in either one or four columns, depending on the layout you choose. However, in this tutorial, we’ll be using CSS to change columns in Divi’s portfolio module.

    In this tutorial, we’ll be using Divi’s Filterable Portfolio Module within the FREE Print Designer Layout Pack. Specifically, we’ll be using the Print Designer Gallery Page Template from the layout pack. There are two layout styles within Divi’s portfolio Modules. The Grid Layout comes with four columns. The Full Width Layout comes in one column. We’ll be using the Grid Layout and CSS to change columns in Divi’s portfolio module. With CSS, we’ll change the columns within the module to 2, 3, 5, and 6 columns. The module will also be mobile responsive for both tablet and mobile devices.

    Examples of Different Columns in the Filterable Portfolio Module

    Here’s the end result of the work that we’ll be doing in this tutorial:

    Change Divi’s Filterable Portfolio Module to 2 Columns

    Change columns in Divi's portfolio module to 2 columns

    Modify Divi’s Filterable Portfolio Module to 3 Columns

    Change columns in Divi's portfolio module to 3 columns

    Update Divi’s Filterable Portfolio Module to 5 Columns

    Change columns in Divi's portfolio module to 5 columns

    Edit Divi’s Filterable Portfolio Module to 6 Columns

    Change columns in Divi's portfolio module to 6 columns

    Styling the Filterable Portfolio Module

    Before we apply CSS to change the number of columns within our Filterable Portfolio Module, we must first style it to match our template.

    Changing the Layout

    To start, we must change our module layout. To do this, we click on the gear icon to enter the module settings for our Filterable Portfolio Module.

    Edit the layout of the Filterable Portfolio Module

    Next, we click on the Design tab. When we enter this tab, we will now click on the Layout tab. Then, we will change the layout of the module from Fullwidth to Grid.

    Change the layout of the module from Fullwidth to Grid.

    Here, we can see the default Grid Layout contains four columns.

    The default Grid Layout contains four columns

    Style Portfolio Image Thumbnail

    Now that we have our Grid Layout in place, let’s style the portfolio image.

    Styling the Image Overlay

    First, we begin by styling the Overlay. Scroll down and click on the Overlay tab. Use the following settings to add a white, translucent overlay to the Image:

    Overlay Settings:

    • Zoom Icon Color: #000000
    • Hover Overlay Color: RGB(255,255,255,0.9)
    • Hover Icon Picker: Refer to the screenshot below

    Styling the Image Overlay

    Adding Image Border

    After styling the Overlay, we will add a border. To do this, scroll down to the Image tab. Use the following settings to style the border:

    Image Settings:

    • Image Border Width: 8px
    • Image Border Color: #ffffff
    • Image Border Style: Solid

    Let's style the portfolio image border

    Styling Title Text

    Next, we will style the Title Text within the module. Let’s scroll down to the Title Text tab. Next, we’ll use the following settings to style the title:

    Title Text Settings:

    • Title Font: Inter
    • Title Font Weight: Light
    • Title Text Color: #000000
    • Title Text Size: 28px

    Styling Title Text

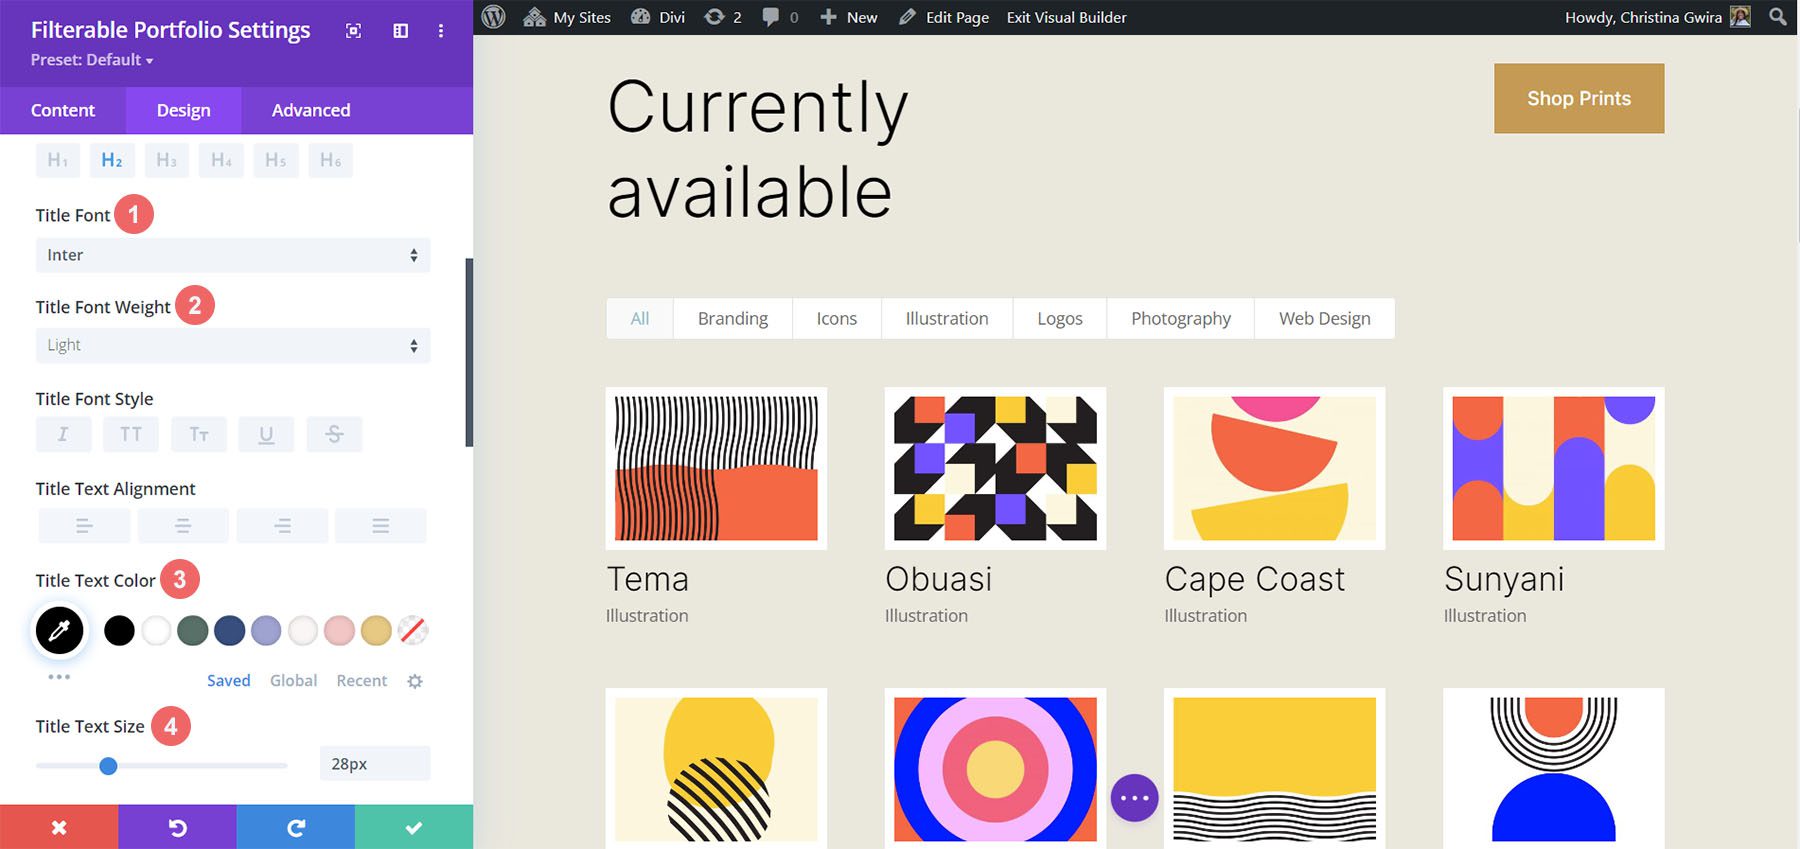
    Notice that we are using the same font that is used through the Print Designer Layout Pack.

    Styling and Adding CSS for the Filter Criteria Text

    For the Filter Criteria Text, we’ll be using a few lines of custom CSS within the Advanced tab of the module settings. Before we add the CSS, let’s style the setting. First, we’ll apply the same font family and color to the Filter Criteria Text.

    Filter Criteria Text Settings:

    • Filter Criteria Font: Inter
    • Filter Criteria Font Weight: Light
    • Filter Criteria Font Size: 14px

    Styling for the Filter Criteria Text

    For now, we’re going to save our changes by clicking on the green checkmark of the Filterable Portfolio Module’s modal box. However, we’re not finished with the Filter Criteria Text just yet. We’re going to navigate to the Page Settings to start building the custom CSS for our project. To do this, we click on the purple circle with the meatball menu in the center of our screen.

    Entering the Page Settings

    Once we have clicked this button, we’ll be able to click on the gear icon. The gear icon will take us into the Page Settings modal box.

    Into the Page Settings modal box

    Once in the Page Settings modal, click on the Advanced tab. Next, paste the following CSS into the Custom CSS box:

    /* Change background color of filters */
    .et_pb_filterable_portfolio .et_pb_portfolio_filters li a {
    background: none;
    border: none
    }
    
    .et_pb_filterable_portfolio .et_pb_portfolio_filters li a:hover {
    background: #ffffff;
    color: #323741 !important;
    }
    

    Notice that we are commenting our CSS! Don’t forget to do so as we’ll be coming back to add to our CSS as we progress through this tutorial. Save your changes by clicking on the green tick button at the bottom of the modal box. Now, let’s move back into editing the Filterable Portfolio Module.

    Styling Meta Text

    We’ll now be styling the meta text that appears below the portfolio item’s title. We want to make it stand out a bit more from the title. To do this, we’ll navigate to the Design tab of the Filterable Portfolio module and scroll down to the Meta Text tab. As with the other text components of our module, we’ll be using the font family Inter. We’ll follow this up with the supporting design selections listed below:

    Meta Text Setting:

    • Meta Font: Inter
    • Meta Font Weight: Regular
    • Meta Font Color: #0102fa

    Style Pagination Text

    Next on the styling block will be the Pagination Text of our module. We’re going to call back our Printer Designer Layout Pack by using the same font. However, we’re going to add a hint of our blue to the hover of this aspect of the module. Also, we’re going to create some interest by making the pagination text significantly larger than its current size.

    To do this, firstly, we’re going to scroll down to the Pagination Text tab and click on it. Next, we’re going to use the following styling settings:

    Pagination Text Settings:

    • Pagination Font: Inter
    • Pagination Font Weight: Light
    • Pagination Text Alignment: Right
    • Pagination Text Color: #000000
    • Pagination Text Color (Hover): #0102fa
    • Pagination Text Size: 28px

    Style Pagination Text

    We’re going to go a step further with our Pagination Text. We want to remove the default border that appears on top of the Pagination Text. To do that, we’re going to click on the Advanced tab within our modal box. Then, we’re going to add the following line of CSS:

    Portfolio Pagiation CSS:

    border: none;
    

    Portfolio Pagiation CSS

    Once you’ve done this, we can now move on to adding some custom CSS to add the finishing touches to our module. Click on the green checkmark button to save your changes. You can go ahead and also save the page as well, just in case you weren’t saving your work along with the tutorial (don’t forget to do so!).

    Customizing the Filterable Portfolio Module with CSS

    Now that we’ve finished designing our Filterable Portfolio Module in Divi, we’ll now be using CSS to change the number of columns that we’ll have in our module. But first, we’re going to make one minor tweak. We’re going to use CSS to remove the initial transition that comes default with the module.

    To do this, we’re going to move into the Page Settings to access the Custom CSS tab.

    Entering the page settings

    Then, we’re going to add the following CSS to our Custom CSS:

    /* Remove transition */
    .et_pb_filterable_portfolio .et_pb_portfolio_item.active {
    transition: none;
    }
    
    .et_pb_portfolio_item {
    animation: none!important;
    transition: none !important;
    }
    

    We add this underneath the previous CSS that we added for the styling of the filters. This is what our Filterable Portfolio now looks like, with all our styling edits.

    Four column filterable portfolio, styled

    Now, let’s change the column number from 4 to 2.

    CSS Design Changes for Our Filterable Portfolio Module

    Firstly, one important fact to remember when using this module, is to take note of the number of posts that you want to showcase on each page. For our CSS to work correctly, remember to showcase a number of posts that is divisible by the number of columns that you have. For example, if you want to show your portfolio in 6 columns, it would be best to show a minimum of 6 posts in your post count. If you would like to show more posts, it would be best to do 12, 18, 24, etc. posts within the module.

    You can find the post count within the Content tab of the Filterable Portfolio and Portfolio Modules.

    Post Count and the portfolio modules

    Before we add our CSS, we need to attach a CSS class to our module. To do this, we’ll re-enter the module settings, click on the Advanced tab and add our CSS class to our module. We’ll use the class column-portfolio. So that we don’t get confused as we move through this tutorial, we’ll prefix this class with the number of columns that we’ll be creating.

    Add our CSS class to our module

    Changing the Filterable Portfolio Module to Two Columns

    To change the number of columns in our module from 4 columns to 2 columns, we’ll once again, go to the Page Settings. Then, we’ll add the following CSS:

    Custom CSS for a Two Column Filterable Portfolio:

    /* 2 Column Portfolio */
    @media (min-width: 981px) {
    .two-column-portfolio .et_pb_grid_item {
    width: 47.25%!important;
    margin-right: 5.5%!important;
    }
    
    .two-column-portfolio .et_pb_grid_item:nth-child(3n) {
    margin-right: 5.5%!important;
    }
    
    .two-column-portfolio .et_pb_grid_item:nth-child(2n) {
    margin-right: 0!important;
    }
    
    .two-column-portfolio .et_pb_grid_item.et_pb_portfolio_item:nth-child(4n+1) {
    clear: none!important;
    }
    
    .two-column-portfolio .et_pb_grid_item.first_in_row {
    clear: unset;
    }
    }
    

    The width of our first selector (.two-column-portfolio .et_pb_grid_item) determines the width of the column. The margin-right property that we use throughout this CSS snippet adds some padding (or gutter) around our portfolio items. Here’s what our new, two-column module looks like.

    Two column filterable portfolio

    Using CSS to Change the Filterable Portfolio Module to Three Columns

    Now, we’re going to change our module from 2 columns to 3 columns. Here’s a new CSS snippet to do this:

    /* 3 Column Portfolio */
    @media (min-width: 981px) {
        .three-column-portfolio .et_pb_grid_item {
            width: 29.66%!important;
            margin-right: 5.5%!important;  
        }
     
        .three-column-portfolio .et_pb_grid_item:nth-child(3n) {
            margin-right: 0!important;
        }
     
        .three-column-portfolio.et_pb_grid_item:nth-child(4n) {
            margin-right: 5.5%!important;
        }
     
        .three-column-portfolio .et_pb_grid_item.et_pb_portfolio_item:nth-child(4n+1) {
            clear: none!important;
        }
        .three-column-portfolio .et_pb_grid_item.first_in_row {
            clear: unset;
        }
    }
    

    Remember, after adding this CSS, we’re going to have to change the post count to a number that is divisible by 3. Let’s go with 9.

    Change the post count for 3 columns

    Change the Number of Columns within the Filterable Portfolio Module to Five Columns

    Here is the snippet for making our module have 5 columns.

    /* 5 Column Portfolio */
    @media (min-width: 981px) {
        .five-column-portfolio .et_pb_grid_item {
            width: 15.6%!important;
            margin-right: 5.5%!important;        
        }
     
        .five-column-portfolio .et_pb_grid_item:nth-child(3n) {
            margin-right: 5.5%!important;
        }
     
        .five-column-portfolio .et_pb_grid_item:nth-child(5n) {
            margin-right: 0!important;
        }
     
        .five-column-portfolio .et_pb_grid_item.et_pb_portfolio_item:nth-child(4n+1) {
            clear: none!important;
        }
     
        .five-column-portfolio .et_pb_grid_item.first_in_row {
            clear: unset;
        }
    }


    Again, remember to change the post count! We’re going to go with a higher number here… we’re going all the way up to 15!

    Change the post count for 5 columns

    Edit the Number of Columns in the Filterable Portfolio Module to Six Columns

    Finally, we’re going to change our portfolio to six columns. However, we need to make a small tweak when using the following CSS snippet. We’re going to go into the module settings one final time and add a line of CSS. This CSS will change the size of the Portfolio Image. The reason we do this is to ensure that we can fit in our padding (gutter) and border within the six column layout.

    To do this, we’re going to navigate to the Advanced tab of our Filterable Portfolio module, and add the following line of CSS to the Portfolio Image option:

    Portfolio Image Custom CSS:

    • Portfolio Image CSS: width: 90%;

    Portfolio Image Custom CSS

    Now that we have this CSS in place, we can go back to the Page Settings and add this CSS snippet to make the module have six columns:

    /* 6 Column Portfolio */
    @media (min-width: 981px) {
        .six-column-portfolio .et_pb_grid_item {
            width:16%!important;
            margin-right: 5px!important;        
        }
     
        .six-column-portfolio .et_pb_grid_item:nth-child(3n) {
            margin-right: 5px!important;
        }
     
        .six-column-portfolio .et_pb_grid_item:nth-child(6n) {
            margin-right: 0!important;
        }
     
        .six-column-portfolio .et_pb_grid_item.et_pb_portfolio_item:nth-child(4n+1) {
            clear: none!important;
        }
     
        .six-column-portfolio .et_pb_grid_item.first_in_row {
            clear: unset;
        }
    }
    

    For this snippet, you’ll notice that we’ve changed the measurement of our right margin. The reason we do this is so that we can still maintain the thick white borders that we implemented in the design phase of this tutorial. So, we reduced our margin to 5px. We also used 18 posts within our post count.

    Post count for 6 columns

    Let’s Wrap it All Up!

    As we have come to the end of your tutorial, I hope that you have been able to see how we can customize the default modules that come with Divi by using CSS. As we are living in an ever-growing digital age, it’s always a good idea to invest time in building an online presence. That could look like adding your work online in the form of a digital portfolio! We hope this tutorial will help you make your portfolio unique.

    The post How to Change the Column Count in Divi’s Filterable Portfolio Module appeared first on Elegant Themes Blog.

  • Get a Free Popup Picnic Layout Pack for Divi

    Hey Divi Nation! Thanks for joining us for the next installment of our weekly Divi Design Initiative; where each week, we give away a brand new Layout Pack for Divi.

    This time around, the design team has created a beautiful Popup Picnic Layout Pack that’ll help you get your next Popup Picnic website up and running in no time!

    This layout pack includes:

    8 Premade page layouts strategically designed for any Popup Picnic website (including a footer design)
    – Original, royalty-free photos and graphics + customizable source file (see below)
    – Plus, a large collection of pre-designed website elements that are customizable and reusable anywhere.

    This layout pack is available right inside Divi for all Divi customers for FREE as the latest addition to our growing Divi library of hundreds of premade layout packs, thousands of page designs, and countless web design elements and resources.

    divi layout

    Check Out The Divi Popup Picnic
    Layout Pack Below

    Get it for free today!

    Popup Picnic layout pack for Divi

    Landing Page Design

    Popup Picnic Pack for Divi

    View The Live Layout Demo

    Home Page Design

    Popup Picnic Layout Pack for Divi

    View The Live Layout Demo

    About Page Design

    Popup Picnic Layout Pack for Divi

    View The Live Layout Demo

    Services Page Design

    Popup Picnic Layout Pack for Divi

    View The Live Layout Demo

    Service Page Design

    Popup Picnic Layout Pack for Divi

    View The Live Layout Demo

    Pricing Page Design

    Popup Picnic Layout Pack for Divi

    View The Live Layout Demo

    Blog Page Design

    Popup Picnic Layout Pack for Divi

    View The Live Layout Demo

    Contact Page Design

    Popup Picnic Layout Pack for Divi

    View The Live Layout Demo

    Key Features

    If you’re looking to get a new Popup Picnic website, you don’t want to miss out on the Popup Picnic Layout Pack for Divi! Each page layout is built to impress your visitors with world-class web design. And it has everything you need to promote Popup Picnic services, and much more. Use it to get your next Popup Picnic website up and running today!

    Live Demos

    Click the links below to see a live demo for each of the layouts included in the pack.

    1. Popup Picnic Landing Page (live demo)
    2. Popup Picnic Homepage (live demo)
    3. Popup Picnic About Page (live demo)
    4. Popup Picnic Services Page (live demo)
    5. Popup Picnic Service Page (live demo)
    6. Popup Picnic Pricing Page (live demo)
    7. Popup Picnic Blog Page (live demo)
    8. Popup Picnic Contact Page (live demo)

    Access This Layout Right Now
    Directly from Your Divi Builder

    Since Version 3.0.99 of Divi, you can find and import any of the layouts included in this pack (along with ALL of Divi’s Premade Layout packs) directly from the Divi Builder. They are already waiting for you.

    To access your new layout, simply activate the Visual Builder when editing a page and look for the “Load From Library” icon in the page settings bar (it looks like a plus symbol). Click this icon to launch the Load From Library popup. Under the Premade Layouts tab, you can easily find the new layout by scrolling through the list of layout packs. Once you find the Popup Picnic Layout Pack, click on it. You will see all the individual layouts included in the pack. Select the layout you want to use and then click the “Use This Layout” button.

    Popup Picnic Layout Pack for Divi

    For more, check out this video to learn how you can get this layout pack up and running today.

    Subscribe To Our Youtube Channel

    Authentication Required

    Before you can download Premade Layouts from the Divi Library you must authenticate your Elegant Themes Subscription. You can do this by navigating to Divi > Theme Options > Updates. There you can enter your username and API key and save changes.

    Popup Picnic Layout Pack for Divi

    You can find your API Key under your members area on the Elegant Themes site. After you enter the Username and API Key, you will gain immediate access to our library of hundreds of free layouts (including this one). If you haven’t done this, when you click to import a layout to your page, you will be prompted to enter your Elegant Themes Membership Username and API Key.

    Use Layout Images for FREE with No Licensing Restrictions

    Divi Popup Picnic Layout Pack for Divi

    The image assets included with these layouts (icons, illustrations, photos, etc.) have no licensing restrictions. This means you can use them in all of your commercial projects without having to worry about paying licensing fees or attributing the photographer. Use them in your commercial websites, sell them within your Divi child themes, include them in your own Divi layout packs or just use them on your blog. We know how challenging it can be to find good photos and how confusing and scary the licensing that governs those photos can be. We want to fix that problem for our users.

    Download the Full Res Image Assets

    New Layout Pack Every Week!

    We hope you enjoy this layout pack. We look forward to hearing your opinions in the comment section below. Make sure you check out next week’s layout pack as well!

    The post Get a Free Popup Picnic Layout Pack for Divi appeared first on Elegant Themes Blog.

  • Stella Coaching & Online Course Child Theme – Divi Child Theme Overview

    The Stella Coaching & Online Course Child Theme is a child theme for Divi specifically designed for coaches and course creators. The theme features pages for a blog, course, quiz, and store, and also has several marketing pages for you to promote your services and lead magnets. Stella is clean, elegant, and thoughtfully designed to help you convert more customers. In this post, we’ll take a look at the Stella Coaching & Online Course Child Theme to help you decide if it’s the right Divi child theme for you.

    Let’s get started!

    Installing Stella Coaching & Online Course Child Theme

    First, open your WordPress dashboard and navigate to the add plugins page. We will install the child theme through the plugin page, not the theme page. Click Upload Plugin, then select the plugin .ZIP file from your computer. Then click Install Now and activate the plugin once it finishes installing.

    Stella Coaching and Online Course Child Theme Divi Child Theme Overview Add Plugin

    Once activated, you will see the Stella Installer in your WordPress menu bar. From this page, you can import all of the child theme content, site structure, settings, plugins, custom CSS, and more, just with one button. Click Begin Site Import to start the import process.

    Stella Coaching and Online Course Child Theme Divi Child Theme Overview Import

    You will see a progress bar as the child theme is installed.

    Stella Coaching and Online Course Child Theme Divi Child Theme Overview Import 2

    Once your import is complete, you can delete the plugin.

    Stella Coaching and Online Course Child Theme Divi Child Theme Overview Import 3

    Stella Coaching & Online Course Child Theme Pages

    Stella comes with 25 pages, including WooCommerce shop pages, course pages, blog pages, and a quiz for capturing leads. Let’s take a look at each of the pages, starting with the home page.

    Stella Coaching & Online Course Child Theme Pages

    Header and Introduction

    The first section on the home page is a large header image and introduction text. The header image is styled with a rounded corner, and the text is styled with different sizes and some icons to create a compelling introduction to the site. This section also includes a call-to-action button.

    Stella Coaching and Online Course Child Theme Divi Child Theme Overview Home 1

    Quiz

    The next section on the home page introduces a quiz built with the free version of Interact. The layout features text with some bullet points, a large image to the right, and another image at the top that moves with the page. Additionally, the round text above the large image rotates while you are on the page.

    Stella Coaching and Online Course Child Theme Divi Child Theme Overview Home 2

    Services

    The services section of the home page is where you can feature two services you offer. You can add an image and a brief description of the service, and there is a button leading customers to the services page.

    Stella Coaching and Online Course Child Theme Divi Child Theme Overview Home 3

    Testimonials

    Next, the testimonials section has space for two quotes with a button leading to the testimonials page. This section uses elegant typography and a large parallax image.

    Stella Coaching and Online Course Child Theme Divi Child Theme Overview Home 4

    Blog

    The latest news section features three recent blog posts with the featured image, a short blurb from the post, and a button to read the full article.

    Stella Coaching and Online Course Child Theme Divi Child Theme Overview Home 5

    Freebie

    This section of the home page features a freebie offer and requires users to enter their name and email address to receive the freebie.

    Stella Coaching and Online Course Child Theme Divi Child Theme Overview Home 6

    Call to Action

    The final section of the home page features some call-to-action text with a button.

    Stella Coaching and Online Course Child Theme Divi Child Theme Overview Home 7

    Stella Coaching & Online Course Child Theme About Page

    The about page begins with a section for your about text. It also features a styled image to the right of the text. Underneath, there are three numbered sections where you can map out a timeline or journey that is relevant to your service or to who you are. This section is styled with three images, as well as a quote block.

    Stella Coaching and Online Course Child Theme Divi Child Theme Overview About

    This page also has a section for recent blog posts, as well as the two lead magnets that were featured on the home page – the quiz and the freebie with the email sign-up. The page ends with a call-to-action section to compel users to view the services page.

    Stella Coaching and Online Course Child Theme Divi Child Theme Overview About 2

    Stella Coaching & Online Course Child Theme Services Page

    The services page starts with a brief introductory text where you can summarize your offerings. Then, there are two dedicated sections where you can go over the details of your services. Each section has areas for text, an image, bullet points, a testimonial quote, and a button to apply for the service.

    Stella Coaching and Online Course Child Theme Divi Child Theme Overview Services 1

    Below, there is a section to invite visitors to join a community Facebook group. This section also features an image, a testimonial quote, and a call-to-action button. Finally, the page features the freebie lead magnet that was on the home page.

    Stella Coaching and Online Course Child Theme Divi Child Theme Overview Services 2

    Stella Coaching & Online Course Child Theme FAQ Page

    The FAQ page is formatted with a brief introduction and a large image at the top. Each of the FAQs is placed in a dropdown accordion. When the question is selected, the question is revealed in the dropdown accordion. Below the FAQ section is a short contact form for visitors to submit any questions you might not have addressed on the FAQ page. The last section on this page is the invitation to join a community Facebook group.

    Stella Coaching and Online Course Child Theme Divi Child Theme Overview FAQ

    Stella Coaching & Online Course Child Theme Raves (Testimonials) Page

    The raves page features customer testimonials in styled block quotes alongside images. Below is a section highlighting customer success stories, with a brief introductory text and a testimonial video for each customer. This is a great way to show social proof in an engaging and compelling way. There is another testimonial quote section after this, on a large parallax image background. Once again, the page ends with an invitation to join a community Facebook group.

    Stella Coaching and Online Course Child Theme Divi Child Theme Overview Testimonials

    Stella Coaching & Online Course Child Theme Sales Page

    The sales page starts with a large header image and some short text where you can introduce your service, with round rotating text over the image. In the next section, you can highlight a problem your customer has that your services solve. This section also has two blurbs where you can highlight some problems your customer might relate to. In the following section, you can discuss how you solve the customer’s problem and how you can help. This section is designed with three blurbs with checkmarks next to them, a large image, and a call-to-action button.

    The next section features a text area for a general overview of the service, a call-to-action button, and an image with the round rotating text over it. There is a testimonial blurb after this for social proof, and another section is where you can highlight additional details or features of your service.

    Stella Coaching and Online Course Child Theme Divi Child Theme Overview Sales 1

    This section has different forms of social proof to go alongside your service. First is an “as seen in” section with logos, then you have another testimonial section over a large image. The next section features customer success stories with some statistics, a large testimonial video, smaller testimonial quotes with customer images, and a call-to-action button.

    Stella Coaching and Online Course Child Theme Divi Child Theme Overview Sales 2

    This section features the service pricing, with three different pricing tiers and an image, details, and a call-to-action button for each tier. There is a FAQ section after this, with a similar design to the FAQ page we covered earlier. Then there is a section featuring a large video and another call-to-action button. There is another pricing section with the same layout as above but with different colors. The page ends with an about section with a large image, a call-to-action button to book a call, and a 30-day satisfaction guarantee.

    Stella Coaching and Online Course Child Theme Divi Child Theme Overview Sales 3

    Stella Coaching & Online Course Child Theme Email Sign-Up Page

    The email sign-up page is where you can go into detail about your freebie and prompt users to sign up with their email. The page starts with a brief introduction of the product, with an image and rotating round text above. Next is the email sign-up form, styled with some text at the top and an image to the right. In the following section, you can give some additional details about what your visitors will receive when they sign up with their email. Then there are some customer testimonials alongside images for social proof. Finally, there is another email sign-up form.

    Stella Coaching and Online Course Child Theme Divi Child Theme Overview Email Sign Up

    Stella Coaching & Online Course Child Theme Email Sign Up Thanks Page

    This is where visitors will be redirected after signing up with their email. The page starts with some text letting them know their freebie is on the way and a video. Below are recent posts from the blog and an invitation to join the community Facebook group.

    Stella Coaching and Online Course Child Theme Divi Child Theme Overview Email Sign Up Thanks

    Stella Coaching & Online Course Child Theme Lead Magnet Delivery Page

    This page is where users receive the freebie they signed up for. The page includes some introductory text and a video, some bullet points encouraging users to get the most out of their freebie, text explaining the next steps, and customer testimonials. This page also ends with an invitation to join the community Facebook group.

    Stella Coaching and Online Course Child Theme Divi Child Theme Overview Lead Magnet Delivery

    Stella Coaching & Online Course Child Theme Quiz Page

    This page features an interactive quiz made with Interact. This is a great idea to engage your website visitors. The page is styled with an image and rotating round text.

    Stella Coaching and Online Course Child Theme Divi Child Theme Overview Quiz

    Stella Coaching & Online Course Child Theme Quiz Results Page

    The quiz results page is specific to the quiz outcome and explains the results in depth. The layout begins with some short introductory text next to an image. Then there is some explanatory text with a video and some action steps for that result. The page ends with a prompt to sign up for the email freebie.

    Stella Coaching and Online Course Child Theme Divi Child Theme Overview Quiz Results

    Stella Coaching & Online Course Child Theme Contact Thanks Page

    The contact thanks page is where users will be redirected after submitting a contact form. This page features a short text section, contact information, a video, recent blog posts, the freebie sign-up form, and an invitation to join the community Facebook group.

    Stella Coaching and Online Course Child Theme Divi Child Theme Overview Contact Thanks

    Stella Coaching & Online Course Child Theme Store Page

    The store in Stella is built with WooCommerce. The store page layout is pretty straightforward, with introductory text and an image at the top, and the products below. The product images are featured as well as the product title and price, and there are category filters at the top. On the right, there is space to promote a blog post.

    Stella Coaching and Online Course Child Theme Divi Child Theme Overview Stores

    Stella Coaching & Online Course Child Theme Product Page

    The product page features breadcrumbs at the top, along with the product title and price. The product image is on the left and you can hover to zoom in. On the right is the description text and the add to cart button. Below you can see the description in one tab and reviews in the other. The page ends with recent posts from the blog.

    Stella Coaching and Online Course Child Theme Divi Child Theme Overview Product

    Stella Coaching & Online Course Child Theme Cart Page

    The cart page is very simple and has a pink header with a cart icon with the cart content below.

    Stella Coaching and Online Course Child Theme Divi Child Theme Overview Cart

    Stella Coaching & Online Course Child Theme My Account Page

    The “my account” page allows users to log in to your website and manage recent orders, shipping and billing addresses, and password and account details. The page also has a contact form and an invitation to join the community Facebook group.

    Stella Coaching and Online Course Child Theme Divi Child Theme Overview Account

    Stella Coaching & Online Course Child Theme Course Layout Page

    Stella uses LifterLMS for the course pages. The course layout page introduces the course and the course instructor. It also lists the course cost, a button to enroll, and the table of contents for the course. On the right sidebar, you can also see a table of contents for the course and navigate to each section.

    Stella Coaching and Online Course Child Theme Divi Child Theme Overview Course Overview

    Stella Coaching & Online Course Child Theme Lesson Layout Page

    The page features a large video with some text underneath and a button to mark the section complete. Below, you have a button to go back to the course or to move to the next lesson. On the right is a short text section introducing the instructor and an overview of the course. You can click on the links in the overview to move to the next section. Finally, there is a progress bar at the bottom.

    Stella Coaching and Online Course Child Theme Divi Child Theme Overview Lesson

    Stella Coaching & Online Course Child Theme Dashboard Page

    The dashboard page allows course members to sign in and view their enrolled courses, grades, certificates, achievements, notifications, and order history. You can also edit account information and redeem a voucher from this page. There is a contact form below this section and an invitation to join the community Facebook group.

    Stella Coaching and Online Course Child Theme Divi Child Theme Overview Dashboard

    Stella Coaching & Online Course Child Theme Blog Landing Page

    The blog landing page includes some welcome text and an image, a search bar, and blog categories. It also features trending posts and then lists recent posts with a large featured image, a couple of lines of text from the post, the category, and a button to read more.

    Stella Coaching and Online Course Child Theme Divi Child Theme Overview Blog Landing

    Stella Coaching & Online Course Child Theme Blog Archive Page

    The blog archive page features an image and a search bar at the top with links to the different blog categories. Below the recent posts are listed, with a large featured image, title and category, a couple of lines of preview text, and a button to read more. The page ends with a freebie sign-up form.

    Stella Coaching and Online Course Child Theme Divi Child Theme Overview Blog Archive

    Stella Coaching & Online Course Child Theme Single Post Page

    The single post page features the title and category at the top and then the large featured image with the blog content below. There are links to navigate to the previous and the next post, and a comment section below. On the right side, there is an image and author introduction as well as social media icons and a grid of four recent images from Instagram. Finally, there is a search bar and links to some recent posts. The page ends with a freebie sign-up form.

    Stella Coaching and Online Course Child Theme Divi Child Theme Overview Blog Post

    Stella Coaching & Online Course Child Theme Contact Page

    The contact page features some introduction text and contact information alongside a large image. Below is a simple contact form. The page ends with an invitation to sign up for a freebie and join the community Facebook group.

    Stella Coaching and Online Course Child Theme Divi Child Theme Overview Contact

    Stella Coaching & Online Course Child Theme Header

    The header is simple but elegant and features a logo on the left and menu items to the right. The secondary menu bar features a call-to-action with a button to sign up for the freebie.

    Stella Coaching and Online Course Child Theme Divi Child Theme Overview Header

    Stella Coaching & Online Course Child Theme Footer

    The footer features the logo and some brief text as well as social media icons. There is a menu with some quick links, and on the right is a grid with recent Instagram images. At the very bottom of the page is a secondary footer bar with a quick links menu.

    Stella Coaching and Online Course Child Theme Divi Child Theme Overview Footer

    Where to Purchase the Stella Coaching & Online Course Child Theme

    Stella Coaching & Online Course Child Theme is available from the Divi Marketplace. It costs $165 for unlimited website usage and one year of support and updates.

    Stella Child Theme Tutorial

    Final Thoughts

    The Stella Coaching & Online Course Child Theme may be an excellent option for your website if you are an online coach or course creator. The child theme is preformatted with every page you would need, and features beautiful typography, colors, and call-to-actions to help you convert your visitors into customers. I like how a lot of the placeholder text throughout the child theme tells you what sort of content to place there, making it easy to replace the content and make the website your own while still keeping your content cohesive with the design of the pages.

    We would love to hear from you! Have you tried Stella Coaching & Online Course Child Theme? Let us know what you think about it in the comments!

    The post Stella Coaching & Online Course Child Theme – Divi Child Theme Overview appeared first on Elegant Themes Blog.

  • Using Basic Captcha vs ReCaptcha in Divi’s Contact Form Module

    Do you have a contact form on your website? If so, you may have noticed spam messages being submitted through your form. Captcha is a great solution to prevent unwanted spam messages from being submitted. The purpose of Captcha is to ensure that the visitor filling out your contact form is actually human and not a computer program. There are many different types of Captcha tests. Some of the most common methods of Captcha tests require users to type in the letters and numbers they see in a distorted image. They also let you calculate a simple math equation, or select images containing a certain object, like a bicycle or stop sign. More recent and advanced methods of Captcha protection work behind the scenes to verify the user is not a bot, giving legitimate users a seamless experience while blocking the bots.

    Divi’s Contact Form Module comes with two different types of Captcha protection for your website: Basic Captcha and ReCaptcha. In this post, we will discuss the differences between Divi’s Basic Captcha and ReCaptcha and go over some pros and cons so that you can better understand when to use these options on your website.

    Let’s get started!

    Using Basic Captcha vs ReCaptcha in Divi’s Contact Form Module

    What is Captcha, And Does my Contact Form Need it?

    First, let’s get a better understanding of what Captcha is and why you should include it in your contact form. Captcha stands for “Completely Automated Turing Test to Tell Computers and Humans Apart.” As the name describes, it is a challenge-response test that can be implemented on your contact form to test whether you are a computer or a human. If you pass the Captcha test, it assumes you are human and allows you to submit the form. If you do not pass the test, Captcha assumes you are a computer and does not allow you to submit the form in order to prevent spam messages from being sent.

    It is a good idea to enable captcha spam protection on your contact form module, as it greatly reduces the number of spam messages you will receive, and helps keep your website safe and secure. Not to mention, if you have lots of spam messages in your inbox, it can be easy to miss legitimate inquiries sent from your website visitors! Divi offers two built-in options to add Captcha to your contact form, Basic Captcha and ReCaptcha. Let’s take a closer look at these two methods and some of their key differences.

    Using Basic Captcha in Divi’s Contact Form Module

    Divi’s basic Captcha is a simple math equation that users are required to solve before they can submit the form. It is very easy to add the basic Captcha requirement to your contact form module and it does not require any additional setup.

    Add the Basic Captcha Requirement

    First, open the contact form module settings. Under the Content tab, navigate to the Spam Protection section. Set Use Basic Captcha to “Yes”.

    • Use Basic Captcha: Yes

    Divi Basic Captcha Contact Form Use Basic Captcha

    Now basic Captcha is enabled for your contact form and users will be required to solve the math equation before submitting the form.

    Divi Basic Captcha Contact Form

    If the user submits an incorrect answer, they will see an error message at the top of the form.

    Divi Basic Captcha Contact Form Error

    Use Cases for Basic Captcha

    Using Divi’s built-in Basic Captcha is a great way to reduce the number of spam submissions you get through your contact form. The setup is as easy as clicking a button, and it does not require you to sign up for an external service. However, Basic Captcha can cause issues with accessibility since it relies on the user having to calculate a math problem, and there is a risk that bots will get past this form since it is simpler and uses less robust methods to detect if the user is a human or a bot.

    While Basic Captcha is a great option for a quick and easy solution to the spam messages you might get through the contact form, there are some drawbacks, especially when compared to the more advanced Captcha options available. If you are interested in a more robust option to prevent spam messages, read on to learn about ReCaptcha!

    Using ReCaptcha for Divi’s Contact Form Module

    Google ReCaptcha is the other spam protection option built into Divi. Unlike other Captcha options you may have seen, ReCaptcha runs completely in the background while the user is on your page. Based on the user’s activity, ReCaptcha generates a score between 0-1, with 0 being very likely a bot and 1 being very likely a human. When you set up ReCaptcha you set a minimum score threshold that determines whether a user will be allowed to submit the contact form or not. The default threshold score is 0.5, so any user below a score of 0.5 (likely a bot) will be blocked. The great thing about ReCaptcha is that your legitimate website visitors will not have to go through a test to decipher letters and numbers or calculate equations in order to submit the form. All they need to do is fill out the contact form and click submit!

    Generating the ReCaptcha Site Key and Secret Key

    In order to add the ReCaptcha requirement to your contact form, we will first need to generate a ReCaptcha v3 Site Key and Secret Key. This requires a Google account.

    First, sign in to the ReCaptcha Admin Console with your Google account and click the plus button to add a new site.

    Divi Basic Captcha vs ReCaptcha Contact Form Add ReCaptcha Site

    Add a label, select the option for ReCaptcha v3, then add your website domain.

    Divi ReCaptcha Contact Form Register

    If needed, add email addresses to the owner section and accept the terms of service. If you would like to receive alert emails, check the “Send alerts to owners” checkbox. Then click submit.

    Divi ReCaptcha Contact Form Register

    On the next page, you will be able to copy the site key and secret key. We will use this when adding ReCaptcha to the contact form.

    Divi ReCaptcha Contact Form Site Key Secret Key

    Add the ReCaptcha Requirement

    Once your site has been registered with ReCaptcha and the site key and secret key have been generated, we can add the ReCaptcha requirement to the contact form.

    Under the Content tab, in the contact form module settings, navigate to the Spam Protection section. Set Use A Spam Protection Service to “Yes”. Then click “Add”.

    Divi ReCaptcha Contact Form Setup

    Enter a name for your account (or leave it at Default), then enter your site key and secret key and click submit.

    Divi ReCaptcha Contact Form Settings

    Finally, you can adjust your minimum score threshold if you want. We will leave ours at 0.5, which is the default. You can always come back and adjust this threshold based on your analytics.

    Divi ReCaptcha Contact Form Minimum Score

    Now your form is protected with ReCaptcha! Legitimate users will not be required to go through any sort of test, and they will just see a small and unobtrusive ReCaptcha banner at the bottom right corner of the screen.

    Use Cases for ReCaptcha

    Of the two built-in Captcha options that comes with Divi’s contact form module, the ReCaptcha option is the most robust and advanced. It is also the most user-friendly option, allowing your site visitors to fill out the contact form without having to do math or decipher letters, which can be confusing and cause frustration. Even though it involves a few more steps than the Basic Captcha option, it may be worth setting up in order to have seamless protection for your contact form and improve your user experience.

    Final Thoughts

    Adding a Captcha requirement to your form is a good practice to follow on your website in order to prevent bots from sending in submissions. Divi’s contact form module comes with two built-in options that make it easy to implement these security measures. Basic Captcha is an easy way to add Captcha protection to your Divi contact form and blocks users who cannot solve the math requirement. ReCaptcha provides a better user experience by running seamlessly in the background. This makes the form easier to fill out and reduces errors, meaning fewer frustrated users abandoning their attempts at contact. Both options are effective in reducing the spam that comes through your contact form, and Divi makes it easy to use whichever option fits your needs best.

    Do you use Basic Captcha or ReCaptcha in your contact form? We would love to hear about your experience. Let us know in the comments!

    The post Using Basic Captcha vs ReCaptcha in Divi’s Contact Form Module appeared first on Elegant Themes Blog.

  • Get a Free Architect Layout Pack for Divi

    Hey Divi Nation! Thanks for joining us for the next installment of our weekly Divi Design Initiative; where each week, we give away a brand new Layout Pack for Divi.

    This time around, the design team has created a beautiful Architect Layout Pack that’ll help you get your next Architect website up and running in no time!

    This layout pack includes:

    8 Premade page layouts strategically designed for any Architect website (including a footer design)
    – Original, royalty-free photos and graphics + customizable source file (see below)
    – Plus, a large collection of pre-designed website elements that are customizable and reusable anywhere.

    This layout pack is available right inside Divi for all Divi customers for FREE as the latest addition to our growing Divi library of hundreds of premade layout packs, thousands of page designs, and countless web design elements and resources.

    divi layout

    Check Out The Divi Architect
    Layout Pack Below

    Get it for free today!

    Architect layout pack for Divi

    Landing Page Design

    Architect Pack for Divi

    View The Live Layout Demo

    Home Page Design

    Architect Layout Pack for Divi

    View The Live Layout Demo

    About Page Design

    Architect Layout Pack for Divi

    View The Live Layout Demo

    Portfolio Page Design

    Architect Layout Pack for Divi

    View The Live Layout Demo

    Project Page Design

    Architect Layout Pack for Divi

    View The Live Layout Demo

    Services Page Design

    Architect Layout Pack for Divi

    View The Live Layout Demo

    Blog Page Design

    Architect Layout Pack for Divi

    View The Live Layout Demo

    Contact Page Design

    Architect Layout Pack for Divi

    View The Live Layout Demo

    Key Features

    If you’re looking to get a new Architect website, you don’t want to miss out on the Architect Layout Pack for Divi! Each page layout is built to impress your visitors with world-class web design. And it has everything you need to promote Architect services, and much more. Use it to get your next Architect website up and running today!

    Live Demos

    Click the links below to see a live demo for each of the layouts included in the pack.

    1. Architect Landing Page (live demo)
    2. Architect Homepage (live demo)
    3. Architect About Page (live demo)
    4. Architect Portfolio Page (live demo)
    5. Architect Project Page (live demo)
    6. Architect Services Page (live demo)
    7. Architect Blog Page (live demo)
    8. Architect Contact Page (live demo)

    Access This Layout Right Now
    Directly from Your Divi Builder

    Since Version 3.0.99 of Divi, you can find and import any of the layouts included in this pack (along with ALL of Divi’s Premade Layout packs) directly from the Divi Builder. They are already waiting for you.

    To access your new layout, simply activate the Visual Builder when editing a page and look for the “Load From Library” icon in the page settings bar (it looks like a plus symbol). Click this icon to launch the Load From Library popup. Under the Premade Layouts tab, you can easily find the new layout by scrolling through the list of layout packs. Once you find the Architect Layout Pack, click on it. You will see all the individual layouts included in the pack. Select the layout you want to use and then click the “Use This Layout” button.

    Architect Layout Pack for Divi

    For more, check out this video to learn how you can get this layout pack up and running today.

    Subscribe To Our Youtube Channel

    Authentication Required

    Before you can download Premade Layouts from the Divi Library you must authenticate your Elegant Themes Subscription. You can do this by navigating to Divi > Theme Options > Updates. There you can enter your username and API key and save changes.

    Architect Layout Pack for Divi

    You can find your API Key under your members area on the Elegant Themes site. After you enter the Username and API Key, you will gain immediate access to our library of hundreds of free layouts (including this one). If you haven’t done this, when you click to import a layout to your page, you will be prompted to enter your Elegant Themes Membership Username and API Key.

    Use Layout Images for FREE with No Licensing Restrictions

    Divi Architect Layout Pack for Divi

    The image assets included with these layouts (icons, illustrations, photos, etc.) have no licensing restrictions. This means you can use them in all of your commercial projects without having to worry about paying licensing fees or attributing the photographer. Use them in your commercial websites, sell them within your Divi child themes, include them in your own Divi layout packs or just use them on your blog. We know how challenging it can be to find good photos and how confusing and scary the licensing that governs those photos can be. We want to fix that problem for our users.

    Download the Full Res Image Assets

    New Layout Pack Every Week!

    We hope you enjoy this layout pack. We look forward to hearing your opinions in the comment section below. Make sure you check out next week’s layout pack as well!

    The post Get a Free Architect Layout Pack for Divi appeared first on Elegant Themes Blog.

  • Divi Photography Portfolio – Divi Child Theme Overview

    Divi Photography Portfolio is a third-party Divi child theme designed with photographers and videographers. It comes with lots of pages in both a light and dark design and throws in extra features with premium plugins. In this post, we’ll look at the Divi Photography Portfolio child theme to help you decide if it’s the right child theme for your needs.

    Installing Divi Photography Portfolio

    The Divi Photography Portfolio child theme is easy to install. With Divi activated, go to Appearance > Themes > Add New.

    Installing Divi Photography Portfolio

    Click Upload Theme, Choose File, and navigate to your zipped file. Click Install Now.

    Installing Divi Photography Portfolio

    Activate the child theme.

    Installing Divi Photography Portfolio

    Next, you’ll need to import the demo content. Select Import Demo Content > Easy Demo Import. Chose all the files you want to import. I recommend leaving this in the default settings. Click Import Demo Content.

    Installing Divi Photography Portfolio

    Once the import completes, click Remove Demo Content & Import Functions to remove the files you no longer need. Your website will now look like the demo.

    Installing Divi Photography Portfolio

    Divi Photography Portfolio Features

    Divi Photography Portfolio has both a light and a dark version with 9 home pages, 3 portfolio layouts, 8 project layouts, 2 video galleries, 2 About Me pages, 2 Contact pages, and 2 blog designs. Overall, it adds 36 layouts to the Divi Library, 7 templates to the Divi Theme Builder, and 26 pages. I’m using the light version in my examples.

    It also includes the plugins Divi Masonry Gallery, Divi Video Gallery, Destaca Fullpage Slider, Recent Posts Widget Extended, Simple Share Buttons Adder, and Smash Balloon Instagram Feed. Many of the elements include animations or scroll effects.

    Divi Photography Portfolio — Home Pages

    Let’s take a look at the home pages and see how they’re different.

    Home 6 — the Default Home Page

    Here’s the main home page in light. This is Home Page 6. It includes a fullscreen slider, a welcome message with the number of years of experience, images that link to types of photography, blurbs that link to services, a mosaic portfolio, number counters, a testimonial slider, client logos, email form, and contact information.

    Divi Photography Portfolio- Home Pages

    Home 1

    Homepage 1 is short. It has a top section with a welcome message on one side that includes a link to the portfolio and social follow buttons. The other side contains an image slider.

    Divi Photography Portfolio- Home Pages

    Home 2

    The second home page is especially interesting. It includes a slider that moves from side to side with your mouse’s scroll wheel. Hovering over an image shows the title and category. It also includes the Instagram feed. It displays the categories at the bottom of the screen until you scroll to that point.

    Divi Photography Portfolio- Home Pages

    Home 3

    The third home page displays a full-screen slider with the title in the lower left corner of the image and a button that links to the portfolio page in the bottom right corner.

    Divi Photography Portfolio- Home Pages

    Home 4

    The fourth home page displays images in a mosaic. The title appears on hover.

    Divi Photography Portfolio- Home Pages

    Home 5

    The fifth home page is a unique full-screen slider. The displays a slider with navigation to slide down or to the side. When you scroll, it changes to the next slide, which is sticky. You can click the arrows to the sides, and it slides to the side where you’ll see the next two slides. Dots indicate which slide you’re viewing. This is one of the most interesting home pages I’ve seen for photography websites.

    Divi Photography Portfolio- Home Pages

    Home 7

    The seventh home page is another large home page. It includes a large slider in the hero section, a unique section of images that scroll at different rates that link to services, a blog, and a mosaic portfolio.

    Divi Photography Portfolio- Home Pages

    Home 8

    The eigth home page 8 includes several video backgrounds. The hero section displays a full-width background video. Several images link to other pages. Another video draws attention to your services.

    Divi Photography Portfolio- Home Pages

    Home 9

    Home 9 also includes videos, and it uses a stacked About section. The Services section displays a few images of different sizes along with the blurbs that link to the services.

    Divi Photography Portfolio- Home Pages

    Divi Photography Portfolio — About Me Pages

    Divi Photography Portfolio includes two About Me pages. The first About Me page shows text on one side and overlapping images on the other side for the hero section, followed by text.

    Divi Photography Portfolio- About Me Pages

    The second About Me page places text on the left and a larger image on the right for the hero section. It removes the text section.

    Divi Photography Portfolio- About Me Pages

    Divi Photography Portfolio — Contact Pages

    The first Contact page displays a large contact form in the hero section.

    Divi Photography Portfolio- Contact Pages

    The second adds a full-width map to the top of the page.

    Divi Photography Portfolio- Contact Pages

    Divi Photography Portfolio — Portfolio Pages

    It includes three portfolio pages.

    Portfolio Grid

    The first portfolio page displays projects in a grid. The categories appear at the bottom of the page until you scroll to that point.

    Divi Photography Portfolio- Portfolio Pages

    Portfolio Horizontal

    The horizontal portfolio includes a slider that slides horizontally as you scroll. Categories are placed under the slider.

    Divi Photography Portfolio- Portfolio Pages

    Portfolio Vertical

    The vertical portfolio presents the projects in a two-column mosaic. The categories remain at the bottom of the screen until you scroll past the portfolio.

    Divi Photography Portfolio- Portfolio Pages

    Divi Photography Portfolio — Video Gallery Pages

    It includes two video gallery pages. These use the Video Gallery module included with the child theme.

    Video Gallery Landscape

    Video Gallery Landscape provides a large video hero section that displays a title in the bottom left corner and the categories in the bottom right corner.

    Divi Photography Portfolio Video Gallery Pages

    This is followed by the video gallery. It displays the video’s featured images in a grid with the category. Hovering removes the category and shows the play button. I’m hovering over the second video in this example.

    Divi Photography Portfolio Video Gallery Pages

    Video Gallery Square

    The square version places the video in the left half of the hero section. The right half shows the title, description, and categories.

    Divi Photography Portfolio Video Gallery Pages

    This page also includes the video grid. This grid shows the play icon and replaces it with the word View on hover. I’m hovering over the first video in this example.

    Divi Photography Portfolio Video Gallery Pages

    Divi Photography Portfolio — Blog Pages

    It includes two blog page designs that look very different from each other.

    Blog

    The first blog layout places blog posts in a two-column grid. It shows the featured image with the title, author, date, and overlay over the image. On hover, the image zooms and removes the overlay and text. It also includes pagination.

    Divi Photography Portfolio Blog Pages

    Blog 2

    The second blog layout displays blog posts in a single column in an alternating layout. It shows the featured image and the title, meta, and excerpt in a box overlapping the image. The text box slides, and the image displays an arrow icon on hover. It also includes pagination.

    Divi Photography Portfolio — Blog Posts

    Two blog post layouts are included. The first includes a sidebar while the second does not. Both show the featured image with a floating title and meta, share buttons, navigation, more posts in the same category, and a subscription form.

    Divi Photography Portfolio Blog Posts

    Divi Photography Portfolio — Contact Pages

    It includes two contact pages. Both include a contact form and a clean design.

    Contact

    The standard contact page includes contact information on one side and the contact form on the other. The fields are gray, but they darken when you hover over them.

    Divi Photography Portfolio Contact Pages

    Contact Map

    The contact map page displays the same form as the standard contact page but adds a full-width map to the top of the page. It’s monochrome and doesn’t zoom on scroll.

    Divi Photography Portfolio Contact Pages

    Divi Photography Portfolio — Header

    The global header includes two Image Modules and two Code Modules. The first Image Module displays an email icon while the other displays the logo. The first Code Module includes the code for the hamburger icon and the second includes the shortcode for the menu.

    Divi Photography Portfolio Header

    The menu opens full-screen and displays the menu items with arrows. Clicking a menu item shows its submenu. Clicking a different menu item closes the first one. The hamburger icon changes to an X. Click the X icon to close the menu.

    Divi Photography Portfolio Header

    Divi Photography Portfolio — Footer

    The global footer contains 6 Divi Modules for the Instagram feed, legal notices, and social media follow buttons.

    Divi Photography Portfolio Footer

    Here’s how it looks on the front end (the photos are mine, from East Tennessee).

    Divi Photography Portfolio Footer

    Where to Purchase Divi Photography Portfolio

    Divi Photography Portfolio is available in the Divi Marketplace for $65. It includes unlimited website usage, 1 year of updates and support, and a 30-day money-back guarantee.

    Where to Purchase Divi Photography Portfolio

    Ending Thoughts

    That’s our look at the Divi Photography Portfolio child theme. This is an interesting child theme with lots of page options. Extra features are added with free and premium plugins. It also includes a dark version of all the pages so you can easily get started with either design. Divi Photography Portfolio is an excellent Divi child theme for any photographer or videographer.

    We want to hear from you. Have you tried the Divi Photography Portfolio child theme? Let us know what you think about it in the comments.

    The post Divi Photography Portfolio – Divi Child Theme Overview appeared first on Elegant Themes Blog.

  • Download a FREE Header & Footer for Divi’s Chocolatier Layout Pack

    Hey Divi Nation! Thanks for joining us for the next installment of our weekly Divi Design Initiative where each week, we give away brand new freebies. We recently shared a brand new Chocolatier Layout Pack. To help you get your website up and running as soon as possible, we’re sharing a global header & footer template that matches this layout pack perfectly as well! Hope you enjoy it.

    divi layout

    Check Out The Chocolatier
    Global Header & Footer Template Below

    Get it for free today!

    Header Design

    Desktop View

    Divi Chocolatier Header Layout in desktop view

    Tablet and Mobile View

    Divi Chocolatier Header Layout Pack in tablet and mobile view

    Footer Design

    Desktop View

    Divi Chocolatier Footer Layout in desktop view

    Tablet and Mobile View

    Divi Chocolatier Footer Layout in tablet and mobile view

    Download The Global Header & Footer Template For The Chocolatier Layout Pack

    To lay your hands on the free global header & footer template, you will first need to download it using the button below. To gain access to the download you will need to subscribe to our newsletter by using the form below. As a new subscriber, you will receive even more Divi goodness and a free Divi Layout pack every Monday! If you’re already on the list, simply enter your email address below and click download. You will not be “resubscribed” or receive extra emails.

    How to Upload The Template

    Go to Divi Theme Builder

    To upload the template, navigate to the Divi Theme Builder in the backend of your WordPress website.

    Getting started with the Divi Conference Layout Pack

    Upload Divi Chocolatier Layout’s Global Default Website Template

    Then, in the top right corner, you’ll see an icon with two arrows. Click on the icon.

    Importing the Header and Footer Layout into the Divi Theme Buidler

    Navigate to the import tab, upload the JSON file which you were able to download in this post, and click on ‘Import Divi Theme Builder Templates’.

    Import settings for the header and footer layout pack

    Save Divi Theme Builder Changes

    Once you’ve uploaded the file, you’ll notice a new global header and footer in your default website template. Save the Divi Theme Builder changes as soon as you want the template to be activated.

    Save global header theme builder

    How to Modify The Template

    Open Divi Chocolatier Layout Header Template

    To modify the global header template’s elements, start by opening the template.

    Editing the global header within the Divi Theme Builder

    Select Menu of Choice

    Select a menu of your choice in the Menu Module.

    Select the menu you'll be using as your main menu within the Divi Chocolatier Header Layout

    Add CTA Link URLs

    This header has a button on the top right. Open the settings of the button and update the link URL to the destination of your choice.

    Update the header CTA to a URL of your choice

    Update Social Media Accounts and URLs

    The desktop view of the Divi Chocolatier Header Layout uses a number of blurbs to showcase social media icons and names. Click within each Blurb Module to update the Title field with the name of the social media network. Next, choose the icon that represents that social media network from within the Image and Icon tab.

    Update Social Media Accounts and URLs for Tablet/Mobile

    For this header template, we use different modules to showcase the social media icons. We do this so that we have accurate mobile responsiveness as we switch from mobile to desktop and tablet. As such, we’ll need to switch to the tablet view within the Divi Theme Builder, to update the social media accounts for tablet and mobile.

    Press the letter ‘t’ on the keyboard to toggle the mobile responsive menu on the bottom left hand side.

    Keyboard shortcuts within Divi allow you to switch views from desktop, tablet and mobile

    After that, you’ll want to edit the Social Media Follow Module within the tablet view with the correct social media networks. Don’t forget to link to your correct accounts, check those URLs!

    Modifying the Social Media Follow Module for the Divi Chocolatier Layout Header template

    Once you have made all your changes to the Header freebie of the Divi Chocolatier Layout, we’ll now move onto editing the footer template.

    Open Divi Chocolatier Layout Footer Template

    Continue by opening the global footer inside the default website template.

    Editing the footer template within the Divi Theme Builder

    Connect Email Marketing Solution

    The footer template of the Divi Chocolatier Layout has a full width section with an Email Optin Module. We need to connect this module to our chosen email marketing solution.

    Connect your email marketing solution of choice to the Email Optin Module

    Also ensure that you edit the Title, Body and Button text of the module. No dummy text allowed 🙂

    Edit the Email Optin Module with your own text

    Update Static Footer Content

    You will need to go through and update the static content of the footer, including adding your logo, contact information, social media networks and their respective link URLs. Don’t forget about the copyright text at the bottom of the footer as well. Here’s a quick diagram of the modules within the second part of the footer that you’ll need to modify.

    Edit static content within the second part of the footer

    New Freebies Every Week!

    We hope you’ve enjoyed the Chocolatier Layout Pack and the Header & Footer freebie that goes along with it. We look forward to hearing your opinions in the comment section below. Make sure you check back next week for more freebies!

    The post Download a FREE Header & Footer for Divi’s Chocolatier Layout Pack appeared first on Elegant Themes Blog.

  • Divi Plugin Highlight: Divi WooCommerce Extended

    Divi WooCommerce Extended is a third-party plugin for Divi with the goal of being the only tool you’ll need to build eCommerce websites with Divi. It includes five modules with lots of features and options. In this post, we’ll look at Divi WooCommerce Extended to help you decide if it’s the right product to design your WooCommerce shop.

    Divi WooCommerce Extended Modules

    Divi WooCommerce Extended adds 5 modules to the Divi Builder. The modules can be used together, independently, on product pages, shop pages, and regular pages.

    Features include:

    1. Mini Cart
    2. Quick View
    3. Product Carousel
    4. Categories
    5. Ajax Search
    6. Tab Manager
    7. Checkout Manager and
    8. Divi Library Shortcode Extension

    We’ll take a closer look at each module, through the eyes of our Perfumery Layout Pack.

    Divi WooCommerce Extended Modules

    Divi WooCommerce Extended Mini Cart

    The Mini Cart Module provides lots of display options for the cart icon. For the icon type, choose from Divi’s native icons or a custom icon. The native icons include an icon picker.

    Divi WooCommerce Extended Mini Cart

    The custom option lets you choose an icon or image from your Media Library.

    Divi WooCommerce Extended Mini Cart

    The mini cart can display as a dropdown, overlay, off canvas, or modal. Trigger options include click or hover. Placement options include the top or bottom and on the right or left. You can also add a title and choose the elements that display from a list.

    Divi WooCommerce Extended Mini Cart

    Text options include the view cart button, checkout button, and empty cart text. It also includes a separate option for the cart background.

    Divi WooCommerce Extended Mini Cart

    Design Settings

    The Design settings let you customize the icon color, size, line height, text shadow, fonts, etc. It includes options for all the text including the product count, mini cart title, product name, quantity, and price, subtotal. It also includes settings for the view cart button, checkout button, empty cart, cart sizing, and standard settings. For this example, I’ve changed the icon color and size and added a text shadow. The text options don’t show in the Visual Builder, so you’ll have to see them on the front end.

    Divi WooCommerce Extended Mini Cart

    Mini Cart Examples

    This example shows Dropdown. I’ve added a DWE Products Module and added a few products to my shopping cart. The number of items in the cart appears above the cart icon. When I click on the cart, a dropdown opens to show the contents of my cart. All the elements can be styled. I’ve changed the color and size of the cart, added a shadow, changed the font and increased the size of the fonts. I’ve also styled the buttons to match the buttons within the layout pack.

    Divi WooCommerce Extended Mini Cart

    This example shows Overlay. You can place it in any of the four corners of the screen.

    Divi WooCommerce Extended Mini Cart

    This example shows Off Canvas. The screen is pushed to one side as the contents are locked into place. Clicking anywhere on the screen closes the window. It can be placed on the right or left side of the screen.

    Divi WooCommerce Extended Mini Cart

    This example shows Modal. It displays the cart content over the screen and includes adjustments to show the close button, the close button position, chose close or esc, and close on background click.

    Divi WooCommerce Extended Mini Cart

    Divi WooCommerce Extended Product Ajax Search

    Divi WooCommerce Extended Product Ajax Search adds a fully customizable product search. The Configuration customizations include the search field placeholder, number of search results, order by, order, and the text for no results.

    Divi WooCommerce Extended Product Ajax Search

    Search Area

    For the search area, you can choose where the module will perform the search. You can use these settings to make the search as wide or as narrow as you want.

    Divi WooCommerce Extended Product Ajax Search

    Display

    The display options let you choose what to show. You can show the search icon, choose the fields, select the number of columns, and choose the column spacing. You can also show or hide the scrollbar.

    Divi WooCommerce Extended Product Ajax Search

    Background

    It includes lots of background options that include the search result box background, search result item background, and regular background settings.

    Divi WooCommerce Extended Product Ajax Search

    Design Settings

    The Design settings include all the font adjustments, borders, backgrounds, etc. Adjust the fields, search icon, loader, and more. In this example, I’ve changed the fonts and styled the search icon. I’ve also rounded the corners and changed the colors.

    Divi WooCommerce Extended Product Ajax Search

    Product Ajax Search Examples

    Here’s how the search results look with the default settings of 1 column using my design settings from the example above.

    Divi WooCommerce Extended Product Ajax Search

    This example shows 2 columns.

    Divi WooCommerce Extended Product Ajax Search

    Divi WooCommerce Extended Products

    Divi WooCommerce Extended Products displays the WooCommerce products as cards within a grid. It’s fully adjustable with several view types and layouts. This example uses the default view type and layout 1. You can choose the number of products to display, add an offset number in case a product is already being displayed in another module and set the order options.

    Divi WooCommerce Extended Products

    For the view type, choose the default option or select to show featured products, sale products, best-selling products, or top-rated products.

    Divi WooCommerce Extended Products

    It includes 3 layout options. They place the elements in different locations within the cards. Layout 1 places the price above the add-to-cart button. This example shows layout 2, which places them side-by-side.

    Divi WooCommerce Extended Products

    Layout 3 places the add to cart button above the title.

    Divi WooCommerce Extended Products

    You can show or hide the out-of-stock products. If you hide them, you can label them as out-of-stock if you want or add any label you want to use. You can also choose the categories and tags to include and choose the taxonomy relation for some logic control.

    Divi WooCommerce Extended Products

    Display

    The display options let you choose the number of columns, the space between the columns, show masonry, show a sorting dropdown, display a quick view link, add quick view text and an icon, choose which elements to show, add zoom effects, choose the thumbnail size, and lots more. You can enable any of the elements individually, so you can disable the images, sale badge, etc. I’ve changed this example to 2 columns, styled the Sale label and customized the button.

    Divi WooCommerce Extended Products

    Pagination

    Pagination adds page numbers. You can also enable the previous and next links and add the text you want them to display.

    Divi WooCommerce Extended Products

    Product Background

    The product background settings control the background for the text area of the card.

    Divi WooCommerce Extended Products

    Design Settings

    The Design settings let you adjust every element independently. You have full control over the sizes, colors, fonts, backgrounds, borders, etc. I’ve adjusted many of the settings in this example.

    Divi WooCommerce Extended Products

    Divi WooCommerce Extended Products Carousel

    Divi WooCommerce Extended Products Carousel presents the WooCommerce products within a slider. It includes the same settings as the WCE Products Module and adds those for the carousel. You can select the product type, layout, number to display, the sorting order, hide products out of stock, choose categories, etc.

    Divi WooCommerce Extended Products

    Display

    All the display options are also the same. Show a quick view button, choose the elements to show or hide, add text, and show the sale badge.

    Divi WooCommerce Extended Products

    Slider

    It doesn’t include pagination. Instead, it has slider options. Choose the slide effect between Slide, Cube, Coverflow, and Flip. Each of the options has different settings. Select the number of products to display within a slide, adjust the space between the slides, equalize the heights, enable loop, enable autoplay, adjust the speed, etc. This example shows Coverflow.

    Divi WooCommerce Extended Products

    The slider also includes the standard types of navigation. You can show them or disable them. You can also choose the arrows from the list of icons, show them only on hover, and choose their position from 8 options. This shows the default option inside the slider. This example shows Arrows in their default position.

    This example shows the arrows in the top center.

    Divi WooCommerce Extended Products

    It also includes dot pagination with 6 styles to choose from. This example shows Solid Dot.

    Divi WooCommerce Extended Products

    This example shows Rounded Line.

    Divi WooCommerce Extended Products

    It also has an option called Dynamic Dots. This changes the sizes of the dots to show those closest to the current slide are larger than those that are further away.

    Divi WooCommerce Extended Products

    Design Settings

    The Design settings include options for every element of the slider. I’ve adjusted font colors, background colors, borders, arrows, and dots in this example.

    Divi WooCommerce Extended Products

    Divi WooCommerce Extended Products Categories

    Divi WooCommerce Extended Products Categories creates cards that represent each of the categories in your WooCommerce shop. It includes 2 layouts, and you can select the categories you want to display. This is layout 1. It places the title and number of items in that category under the featured image for the category.

    Divi WooCommerce Extended Products Categories

    This is layout 2. It places the title and number of items over the image and displays the card as an outlined square.

    Divi WooCommerce Extended Products Categories

    Display

    The display options include the number of columns, column spacing, masonry, thumbnail, zoom effect, thumbnail size, and product count.

    Background

    The background settings place a background color behind the title and product counts.

    Divi WooCommerce Extended Products Categories

    Here’s how the background looks with layout 2.

    Divi WooCommerce Extended Products Categories

    Design Settings

    The design settings include options for all the elements. In this example, I’ve adjusted the text colors, sizes, weights, spacing to match the styling we’ve used across the page template and from the Perfumery Layout Pack.

    Divi WooCommerce Extended Products Categories

    Where to Purchase Divi WooCommerce Extended

    Divi WooCommerce Extended is available in the Divi Marketplace for $59. It includes unlimited usage, 1 year of support and updates, and a 20-day money-back guarantee.

    Where to Purchase Divi WooCommerce Extended

    Ending Thoughts

    That’s our quick look at Divi WooCommerce Extended. These five modules add a lot of features to Divi for building shop pages for your WooCommerce products. I’ve only touched on the main features and it’s easy to see how powerful it is. If you’re interested in adding new features to your WooCommerce shop, Divi WooCommerce Extended is worth a look.

    We want to hear from you. Have you tried Divi WooCommerce Extended? Let us know what you think about it in the comments.

    The post Divi Plugin Highlight: Divi WooCommerce Extended appeared first on Elegant Themes Blog.

  • Get a Free Wedding Invitation Layout Pack for Divi

    Hey Divi Nation! Thanks for joining us for the next installment of our weekly Divi Design Initiative; where each week, we give away a brand new Layout Pack for Divi.

    This time around, the design team has created a beautiful Wedding Invitation Layout Pack that’ll help you get your next Wedding Invitation website up and running in no time!

    This layout pack includes:

    6 Premade page layouts strategically designed for any Wedding Invitation website (including a footer design)
    – Original, royalty-free photos and graphics + customizable source file (see below)
    – Plus, a large collection of pre-designed website elements that are customizable and reusable anywhere.

    This layout pack is available right inside Divi for all Divi customers for FREE as the latest addition to our growing Divi library of hundreds of premade layout packs, thousands of page designs, and countless web design elements and resources.

    divi layout

    Check Out The Divi Wedding Invitation
    Layout Pack Below

    Get it for free today!

    Wedding Invitation layout pack for Divi

    Landing Page Design

    Wedding Invitation Pack for Divi

    View The Live Layout Demo

    Home Page Design

    Wedding Invitation Layout Pack for Divi

    View The Live Layout Demo

    About Page Design

    Wedding Invitation Layout Pack for Divi

    View The Live Layout Demo

    Event Page Design

    Wedding Invitation Layout Pack for Divi

    View The Live Layout Demo

    Blog Page Design

    Wedding Invitation Layout Pack for Divi

    View The Live Layout Demo

    Contact Page Design

    Wedding Invitation Layout Pack for Divi

    View The Live Layout Demo

    Key Features

    If you’re looking to get a new Wedding Invitation website, you don’t want to miss out on the Wedding Invitation Layout Pack for Divi! Each page layout is built to impress your visitors with world-class web design. And it has everything you need to promote Wedding Invitation services, and much more. Use it to get your next Wedding Invitation website up and running today!

    Live Demos

    Click the links below to see a live demo for each of the layouts included in the pack.

    1. Wedding Invitation Landing Page (live demo)
    2. Wedding Invitation Homepage (live demo)
    3. Wedding Invitation About Page (live demo)
    4. Wedding Invitation Event Page (live demo)
    5. Wedding Invitation Blog Page (live demo)
    6. Wedding Invitation Contact Page (live demo)

    Access This Layout Right Now
    Directly from Your Divi Builder

    Since Version 3.0.99 of Divi, you can find and import any of the layouts included in this pack (along with ALL of Divi’s Premade Layout packs) directly from the Divi Builder. They are already waiting for you.

    To access your new layout, simply activate the Visual Builder when editing a page and look for the “Load From Library” icon in the page settings bar (it looks like a plus symbol). Click this icon to launch the Load From Library popup. Under the Premade Layouts tab, you can easily find the new layout by scrolling through the list of layout packs. Once you find the Wedding Invitation Layout Pack, click on it. You will see all the individual layouts included in the pack. Select the layout you want to use and then click the “Use This Layout” button.

    Wedding Invitation Layout Pack for Divi

    For more, check out this video to learn how you can get this layout pack up and running today.

    Subscribe To Our Youtube Channel

    Authentication Required

    Before you can download Premade Layouts from the Divi Library you must authenticate your Elegant Themes Subscription. You can do this by navigating to Divi > Theme Options > Updates. There you can enter your username and API key and save changes.

    Wedding Invitation Layout Pack for Divi

    You can find your API Key under your members area on the Elegant Themes site. After you enter the Username and API Key, you will gain immediate access to our library of hundreds of free layouts (including this one). If you haven’t done this, when you click to import a layout to your page, you will be prompted to enter your Elegant Themes Membership Username and API Key.

    Use Layout Images for FREE with No Licensing Restrictions

    Divi Wedding Invitation Layout Pack for Divi

    The image assets included with these layouts (icons, illustrations, photos, etc.) have no licensing restrictions. This means you can use them in all of your commercial projects without having to worry about paying licensing fees or attributing the photographer. Use them in your commercial websites, sell them within your Divi child themes, include them in your own Divi layout packs or just use them on your blog. We know how challenging it can be to find good photos and how confusing and scary the licensing that governs those photos can be. We want to fix that problem for our users.

    Download the Full Res Image Assets

    New Layout Pack Every Week!

    We hope you enjoy this layout pack. We look forward to hearing your opinions in the comment section below. Make sure you check out next week’s layout pack as well!

    The post Get a Free Wedding Invitation Layout Pack for Divi appeared first on Elegant Themes Blog.

  • Divi Plugin Highlight: Divi Elastic Gallery

    Divi Elastic Gallery is a third-party plugin for Divi that adds a new gallery module to the Divi Builder. Display images with several layout options, choose how the images react when clicked, adjust the captions, titles, filter, pagination, and more. In this post, we’ll take a close look at Divi Elastic Gallery to help you decide if it’s the right Divi Module for your needs.

    Divi Elastic Gallery Module

    Divi Elastic Gallery adds a new module to the Divi Builder called Elastic Gallery.

    Divi Elastic Gallery Module

    The module’s Content tab includes Gallery Settings, Background, and Admin Label. Gallery Settings includes the image selector and lots of image adjustments. To add images to the gallery, select Add Gallery Images. The Media Library will open, and you can choose the images you want to display.

    Gallery Settings

    Adding images automatically display them in the gallery. You can add as many as you want and it doesn’t matter what size they are.

    Divi Elastic Gallery Module

    I’ve selected images of various sizes for the example below. The images have automatically adjusted in size to fit the space. This created a mosaic with various columns. We can adjust the number of images per row, the height of the images, the space between them, the image size, etc. We’ll look at a few of the settings.

    Divi Elastic Gallery Module

    Row Height and Space Between the Images

    A couple of these settings took me a minute to understand. Here’s my explanation of each setting based on the documentation and my tests.

    The Minimum Row Height adds images to each row until the size is higher than the minimum. Using a lower number displays more images in the gallery. In the example below, I’ve set the Minimum Row Height to 145.

    Minimum Row Images determines the number of images that will appear in as many rows as possible, starting with the bottom row. In the example below, I’ve set the Minimum Row Images to 6. The bottom row displays 6 images, and the top row displays 3. If I set it to 4, the top row displays one image and the second and third rows display 4 images.

    Space Between Images determines the number of pixels between each image on the top, bottom, and sides. I’ve set the example below to 21 pixels and there are 21 pixels on all sides between every image.

    Divi Elastic Gallery Module

    Image Onclick Action

    The Image Onclick Action determines what happens when the user clicks an image in the gallery. It can open the image in a lightbox, link to other pages, or do nothing. If you have it open in a lightbox, you’ll see options for the lightbox. If you have it to link to other pages, you’ll see a field where you can enter each URL with instructions on how to add the links.

    Here’s a look at the lightbox options. You can adjust the lightbox color and choose between five options for the image title and caption in the popup. Show nothing, the title outside the image, the title and caption outside the image, the title inside the image, or the title and caption inside the image. Showing the title adds an option for the legend color.

    Here’s the default lightbox. It has a dark background, arrow navigation, a close icon, and a title under the image.

    For this example, I’ve added the title inside the image and changed the background color.

    Categories Filter

    The Categories Filter lets you choose the categories to display and change the text for the All Categories button.

    Divi Elastic Gallery Module

    Pagination

    The Pagination option adds pagination under the gallery. You can also choose the page size, which determines the number of images that displays on each page. in this example, I’ve selected a Page Size of 4. This shows 4 images per page and creates 3 pages to show my images.

    Divi Elastic Gallery Module

    Divi Elastic Gallery Design Options

    The Elastic Gallery Module includes all the standard Divi settings, allowing you full control over the styling of each element. Here’s a look at the main settings.

    Overlay

    The Overlay settings let you choose between showing an icon, the image title to display in the overlay, or only showing the overlay. Change the colors and fonts with the standard Divi settings. in the example below, I’ve selected to show the title and changed the overlay color, font color, font size, style, and added a shadow to the font.

    Divi Elastic Gallery Module

    Hover Animations

    The hover animations determine how the overlay appears when the user hovers over the image. Choose from 7 animations or disable animations.

    Divi Elastic Gallery Module

    You can also choose an animation for the image that takes place at the same time as the overlay animation. Choose from 5 animations or disable the image animation. I’ve selected Grayscale to Color in the example below. This changes the images to grayscale and shows the image in color when you hover over it.

    Divi Elastic Gallery Module

    Images

    The Image settings control the rounded corners and border. Adjust the border’s styles, width, and color. In the example below, I’ve made the rounded corners 30px, added a 1-pixel border, and changed the color to purple.

    Divi Elastic Gallery Module

    Gallery Filter

    The Gallery Filter has an amazing number of options. Adjust the alignment, color, fonts, borders, etc., for the category buttons, and then adjust the current category independently. The currently active category will use the regular filter settings if you don’t adjust it separately.

    In the example below, I’ve set the filter to display on the right. I’ve also increased the size of the fonts, font style, and weight, added line length, changed the background color, added a border, rounded two of the corners, and added right and left padding. I customized the active category independently.

    Divi Elastic Gallery Module

    Gallery Pagination

    The Gallery Pagination also has an amazing number of options. Adjust the alignment, colors, fonts, borders, spacing, shadows, and more. In this example, I’ve adjusted the size of the fonts, changed their weight, rounded the corners, changed the colors of the fonts and backgrounds, and given them a box shadow. I’ve also added a border to the active page, squared the corners, reversed the colors, and increased the size of its font.

    Divi Elastic Gallery Module

    Divi Elastic Gallery Example

    Here’s how Divi Elastic Gallery looks within a layout. I’m using the free Leather Goods Layout Pack that’s available within Divi. I’ve made the gallery full width changed the colors to match the layout and changed the images to grayscale and have them change to color on hover. The space between the images is zero. The font is Inter, with bold for the weight, and TT for the style. I’ve added 20px Padding to the top and bottom and 30px Padding to the left and right.

    Divi Elastic Gallery Example

    This example shows the Elastic Gallery with one of the images showing the hover effect. It was easy to make the gallery match the layout.

    Divi Elastic Gallery Example

    Purchase Divi Elastic Gallery

    Divi Elastic Gallery is available in the Divi Marketplace for $25. It includes unlimited website usage, a 30-day money-back guarantee, and one year of support and updates.

    Purchase Divi Elastic Gallery

    Ending Thoughts

    That’s our look at Divi Elastic Gallery. This is a simple module, but it has a lot of display and styling options to create just about any type of gallery you need. A couple of the Min settings take some tweaking to get the design you want, but I was impressed with the layouts I was able to get from it. If you’re interested in a feature-rich gallery module for Divi, Elastic Gallery is worth a look.

    We want to hear from you. Have you tried Elastic Gallery for Divi? Let us know what you think about it in the comments.

    The post Divi Plugin Highlight: Divi Elastic Gallery appeared first on Elegant Themes Blog.