EDITS.WS

Tag: Divi Resources

  • How to Create a Message Pattern in Your Divi Contact Form Module

    Email Message Patterns are an excellent way to view messages sent through your Divi Contact Forms. You have full control over the layout design and content, so you get the exact information you want in the way you want it. In this post, we’ll see how to create a Message Pattern in your Divi Contact Form Module and explain how to use it.

    What is a Message Pattern?

    The Message Pattern is a template for the email message. It specifies how the message looks and what information it includes when you receive it in email. It can include text that you specify and the content of any of the fields in the form. The Message Pattern is not required, but it is helpful. Simply leave it blank for the default pattern.

    Why Use a Message Pattern?

    Utilizing a message pattern is a great way to streamline your workflow. You’ll have the exact information you want in the layout you want.

    Where to Find the Email Message Pattern

    To find the email Message Pattern field, open the Contact form Module by clicking the dark gray gear icon that appears on hover. For this example, I’m using the Contact page from the free Home Baker Layout Pack that’s available within Divi.

    Where to Find the Email Message Pattern

    Next, scroll down to the section labeled Email. Here, you’ll find two fields. The first is Email Address. This is the address of the message that will be sent. The second field is called Message Pattern. Enter your pattern into this field.

    Where to Find the Email Message Pattern

    When a message is sent to the email address that you’ve imputed into the Email Address field, it normally includes only the content in the Message field. For example, I’ll send this message:

    Where to Find the Email Message Pattern

    The result is an email with who it’s from, as normal, but the body of the content only shows the message itself.

    Where to Find the Email Message Pattern

    How to Create a Message Pattern

    We can adjust the content of the email by creating a Message Pattern. You can add text and specify the fields you want to include. To include a field, add two percent symbols to both sides of the field’s ID. For example, to include the field with the ID-name, use %%name%%. We’ll see how to find the Field ID in the next section.

    You can create a template with text, spaces, and the form content. Add your text around the field names and include spaces for the fields. For example, I am %%name%% and my message is %%message%%.

    When I add this Message Pattern to the example from above, we get a different email. This pattern includes text, field IDs, and extra spaces.

    Here is the message from %%name%%, email %%email%%.

    Message: %%message%%

    How to Create a Message Pattern

    The result is an email with more information and a layout that makes more sense. It’s the same information that was submitted in the form in the section above, but now it shows more of the information and places it in a layout that’s easy to read, which is the layout I created with the Message Pattern.

    How to Create a Message Pattern

    How to Add New Fields

    Each field in the Contact Form Module is a submodule with its own settings. To create a new field, go to the Contact Form Module’s content tab and click Add New Field under all the form’s submodules.

    How to Add New Fields

    Text

    Under Text, enter the Field ID and the Title. The Field ID is the label you’ll use to create the Message Pattern. This is a unique ID and should only use English characters with no special characters or spaces. The Title field can be used to define the content. It doesn’t have to be a unique title or match the Field ID, but it is best if it’s unique to make it easier to understand.

    How to Add New Fields

    Next, scroll down to options and select the Field Type. Choose any settings you want for the field. Click the green check at the bottom or return arrow at the top to return to the regular Contact Form Module settings.

    How to Add New Fields

    Finally, add the new field to the Message Pattern with any text you want to include. Close the module and save your settings.

    How to Add New Fields

    How to Test the Message Pattern

    Finally, test your Message Pattern to ensure it works how you want. Simply fill out the form yourself and go to the email address you used for the email field to view the Message Pattern.

    How to Test the Message Pattern

    You’ll receive the message in your email inbox so you can know if you like the design or not.

    How to Test the Message Pattern

    Creating a Well-Designed Message Pattern

    The Message Pattern should be constructed in a way that you get the most out of it. This is for your use, so design it the way you need to see it.

    Be sure to use whitespace to make the email easier to read and use. The Message Pattern includes all spaces that you add to the pattern. You can use spaces to create the exact layout you want.

    Restaurant Reservation Message Pattern Example

    Let’s see an example of a Message Pattern for a restaurant reservation. For this example, I’m using the landing page from the free Poke Restaurant Layout Pack that’s available within Divi. I’ll replace the reservation button with a new Contact Form Module. We’ll keep the form simple for this example.

    Here’s how the layout looks before adding the Contact Form Module.

    Restaurant Reservation Message Pattern Example

    Change the Title Text

    First, edit the Title Text to show “Make a Reservation.” Highlight the portion of text you don’t want and click the Delete key.

    Restaurant Reservation Message Pattern Example

    Delete Row

    Next, delete the Row with the buttons. We’ll use the style of the left button, but we don’t need these buttons.

    Restaurant Reservation Message Pattern Example

    Add a Contact Form Module

    Next, add a Contact Form Module under the phone number Text Module.

    Restaurant Reservation Message Pattern Example

    Add New Fields

    Now, remove the Message Field and add a new Field by clicking Add New Field.

    Restaurant Reservation Message Pattern Example

    Change the Field ID to Phone, the Title to Phone Number, and use Input Field as the Type. For Allowed Symbols, select Numbers Only. Close the submodule.

    • Field ID: Phone
    • Title: Phone Number
    • Type: Input Field
    • Allowed Symbols: Numbers Only

    Restaurant Reservation Message Pattern Example

    Add another Field, change the Field ID to Guests, the Title to Number of Guests, and use Input Field as the Type. For Allowed Symbols, select Numbers Only. Close the submodule.

    • Field ID: Guests
    • Title: Number of Guests
    • Type: Input Field
    • Allowed Symbols: Numbers Only

    Restaurant Reservation Message Pattern Example

    Add another Field and change the Field ID to Day, the Title to Day of Visit, and use Select Dropdown as the Type. Enter the name of each day for the options. Close the submodule.

    • Field ID: Day
    • Title: Day of Visit
    • Type: Select Dropdown
    • Options: add days

    Restaurant Reservation Message Pattern Example

    Add another Field and change the Field ID to Time and the Title to Time of Visit. Select Radio Buttons for the Type. For the Options, add the possible times. Close the submodule.

    • Field ID: Time
    • Title: Time of Visit
    • Type: Radio Buttons
    • Options: possible times

    Restaurant Reservation Message Pattern Example

    Text

    Now, we’ll adjust the form. Under Text in the Content tab, change the Submit Button text to Book a Table.

    • Submit Button: Book a Table

    Restaurant Reservation Message Pattern Example

    Email

    Next, scroll down to Email and enter the address where you want to receive the email in the Email Address field. Also, create the Message Pattern. I’ll create a pattern that provides the name first, skip a line, and then show the day, time, and number of guests. After this, it will skip a line, show a heading for the contact information and then list the information.

    The Message Pattern looks like this (complete with spaces):

    Reservation for %%name%%


    Day: %%day%%

    Time: %%time%%

    Number of Guests: %%guests%%


    Contact Information

    %%email%%

    %%phone%%

    Restaurant Reservation Message Pattern Example

    Spam Protection

    Scroll down to Spam Protection and disable it.

    • Use Basic Captcha: No

    Restaurant Reservation Message Pattern Example

    Fields

    Now, let’s style the module. First, go to Fields in the Design tab. Change the Background color to rgba(255,255,255,0) and the Text Color to black.

    • Background Color: rgba(255,255,255,0)
    • Text Color: #000000

    Restaurant Reservation Message Pattern Example

    For the Fields Padding, add 13px for the Top and Bottom and 30px to the Left and Right. Change the Font to Darker Grotesque and set the Weight to Medium.

    • Fields Padding: 13px Top and Bottom, 30px Left and Right
    • Font: Darker Grotesque
    • Weight: Medium

    Restaurant Reservation Message Pattern Example

    Change the Size to 24px for desktops, 18px for tablets, and 14px for phones. Set the Line Height to 1.4em.

    • Size: 24px desktop, 18px tablet, 14px phone
    • Line Height: 1.4em

    Restaurant Reservation Message Pattern Example

    Button

    Next, scroll down to Button and select Enable Custom Styles for Button. Change the Text Size to 17px, the Text Color to black, and the Background to #f6c85d.

    • Enable Custom Styles for Button
    • Text Size: 17px
    • Text Color: #000000
    • Background: #f6c85d

    Restaurant Reservation Message Pattern Example

    Set the Border Color to #f6c85d and the Button Letter Spacing to 0.16em. Change the Font to Darker Grotesque, the Weight to Ultra Bold, and the Style to TT.

    • Border Color: #f6c85d
    • Button Letter Spacing: 0.16em
    • Font: Darker Grotesque
    • Weight: Ultra Bold
    • Style: TT

    Restaurant Reservation Message Pattern Example

    Change the Button Padding to 12px for the Top and Bottom and 20px for the Left and Right.

    • Button Padding: 12px Top and Bottom, 20px Left and Right

    Restaurant Reservation Message Pattern Example

    Sizing

    Next, scroll down to Sizing, change the Width to 60%, and set the Module Alignment to Center.

    • Width: 60%
    • Module Alignment: Center

    Restaurant Reservation Message Pattern Example

    Border

    Finally, scroll down to Border. Add 5px to the Rounded Corners, 2px to the Border Width, and make the Border black. Close the module, save your settings, and test your form.

    • Inputs Rounded Corners: 5px
    • Border Width: 2px
    • Color: #000000

    Restaurant Reservation Message Pattern Example

    Message Pattern Results

    Here’s how our message looks in the form and in the email that I received.

    Message in the Form

    Message in the Form

    Message in the Email

    Message in the Email

    Ending Thoughts

    That’s our look at how to create a message pattern in your Divi Contact Form Module. Creating Message Patterns is easy to do with Divi’s Contact Form Module, and they’re great for organizing the information within the emails themselves. Following a few simple steps is all you need to create your own email Message Patterns.

    We want to hear from you. Have you created a message pattern in your Divi Contact Form Module? Let us know about your experience in the comments.

    The post How to Create a Message Pattern in Your Divi Contact Form Module appeared first on Elegant Themes Blog.

  • Get a Free Attorney Layout Pack for Divi

    Hey Divi Nation! Thanks for joining us for the next installment of our weekly Divi Design Initiative; where each week, we give away a brand new Layout Pack for Divi.

    This time around, the design team has created a beautiful Attorney Layout Pack that’ll help you get your next Attorney website up and running in no time!

    This layout pack includes:

    7 Premade page layouts strategically designed for any Attorney website (including a footer design)
    – Original, royalty-free photos and graphics + customizable source file (see below)
    – Plus, a large collection of pre-designed website elements that are customizable and reusable anywhere.

    This layout pack is available right inside Divi for all Divi customers for FREE as the latest addition to our growing Divi library of hundreds of premade layout packs, thousands of page designs, and countless web design elements and resources.

    divi layout

    Check Out The Divi Attorney
    Layout Pack Below

    Get it for free today!

    Attorney layout pack

    Landing Page Design

    Attorney layout pack

    View The Live Layout Demo

    Home Page Design

    Attorney Layout Pack for Divi

    View The Live Layout Demo

    Services Page Design

    Attorney Layout Pack for Divi

    View The Live Layout Demo

    Service Page Design

    Attorney Layout Pack for Divi

    View The Live Layout Demo

    Blog Page Design

    Attorney Layout Pack for Divi

    View The Live Layout Demo

    About Page Design

    Attorney Layout Pack for Divi

    View The Live Layout Demo

    Contact Page Design

    Attorney Layout Pack for Divi

    View The Live Layout Demo

    Key Features

    For legal professionals, having a professional website that accurately represents your firm is crucial. The Attorney Layout Pack for Divi provides a solution that showcases your law firm attractively and professionally. The pack features a strong serif font complemented by tasteful pops of gold, powerful imagery, and compelling testimonials that instill confidence in your brand.

    Live Demos

    Click the links below to see a live demo for each of the layouts included in the pack.

    1. Attorney Landing Page (live demo)
    2. Attorney Homepage (live demo)
    3. Attorney Services Page (live demo)
    4. Attorney Service Page (live demo)
    5. Attorney Blog Page (live demo)
    6. Attorney About Page (live demo)
    7. Attorney Contact Page (live demo)

    Access This Layout Right Now
    Directly from Your Divi Builder

    Since Version 3.0.99 of Divi, you can find and import any of the layouts included in this pack (along with ALL of Divi’s Premade Layout packs) directly from the Divi Builder. They are already waiting for you.

    To access your new layout, simply activate the Visual Builder when editing a page and look for the “Load From Library” icon in the page settings bar (it looks like a plus symbol). Click this icon to launch the Load From Library popup. Under the Premade Layouts tab, you can easily find the new layout by scrolling through the list of layout packs. Once you find the Attorney Layout Pack, click on it. You will see all the individual layouts included in the pack. Select the layout you want to use and then click the “Use This Layout” button.

    Attorney Layout Pack for Divi

    For more, check out this video to learn how you can get this layout pack up and running today.

    Subscribe To Our Youtube Channel

    Authentication Required

    Before you can download Premade Layouts from the Divi Library you must authenticate your Elegant Themes Subscription. You can do this by navigating to Divi > Theme Options > Updates. There you can enter your username and API key and save changes.

    Attorney Layout Pack for Divi

    You can find your API Key under your members area on the Elegant Themes site. After you enter the Username and API Key, you will gain immediate access to our library of hundreds of free layouts (including this one). If you haven’t done this, when you click to import a layout to your page, you will be prompted to enter your Elegant Themes Membership Username and API Key.

    Use Layout Images for FREE with No Licensing Restrictions

    Attorney Layout Pack for Divi

    The image assets included with these layouts (icons, illustrations, photos, etc.) have no licensing restrictions. This means you can use them in all of your commercial projects without having to worry about paying licensing fees or attributing the photographer. Use them in your commercial websites, sell them within your Divi child themes, include them in your own Divi layout packs or just use them on your blog. We know how challenging it can be to find good photos and how confusing and scary the licensing that governs those photos can be. We want to fix that problem for our users.

    Download the Full Res Image Assets

    New Layout Pack Every Week!

    We hope you enjoy this layout pack. We look forward to hearing your opinions in the comment section below. Make sure you check out next week’s layout pack as well!

    The post Get a Free Attorney Layout Pack for Divi appeared first on Elegant Themes Blog.

  • Divi Product Highlight: Ultimate Multipurpose Divi Webkit

    Ultimate Multipurpose Divi Webkit is an extensive compilation of Divi section and page layouts that can be used to build website layouts quickly. The product includes layouts for about sections, contact forms, pricing tables, timelines, tabs, FAQ sections, headers and footers, and much more. Each webkit in the collection is designed around a specific theme, such as digital agencies, gardening, and landscaping, fitness, and gym, among others. However, all layouts are adaptable and can be repurposed for any website you would like to build.

    By utilizing Divi’s design settings, you can have complete control over the look of the sections and customize the designs to your liking. In this product highlight, we’ll look at the layouts you get with the Ultimate Multipurpose Divi Webkit and help you decide if it’s the right product for your next web design project.

    Let’s get started!

    Installing Ultimate Multipurpose Divi Webkit

    Ultimate Multipurpose Divi Webkit comes as a .ZIP file containing Divi Library .json files. The layouts are organized by webkit, and you can choose to import all layouts of a certain type or select the individual layout you would like.

    Ultimate Multipurpose Divi Webkit File Structure

    To install the layouts, start by unzipping the .ZIP file in your file manager. Then, open your WordPress dashboard and navigate to the Divi Library page. Click Import & Export at the top, then select the import tab. Choose a .json layout pack file to import, then select Import Divi Builder Layouts.

    Ultimate Multipurpose Divi Webkit Import Layout

    Once the layout has been imported, open your page in the Divi Builder. Click the blue plus icon to add a new section, then select Add From Library.

    Ultimate Multipurpose Divi Webkit Add From Library

    Locate the layout you want to use, then click the Use This Section button to load the layout on your page.

    Ultimate Multipurpose Divi Webkit Use Section

    Ultimate Multipurpose Divi Webkit

    Ultimate Multipurpose Divi Webkit consists of webkits with different styles and website concepts. The Ultimate Multipurpose Divi Webkit currently comes with 7 different webkits and has plans to add more webkits each month. In total, you can expect 900+ section styles, 28 detail pages, and more than 22 elements.

    Section Layouts

    Each webkit comes with several layouts for each section you might need on your website. Let’s take a look at some of the section layouts.

    About Us

    The first About Us layout we’ll look at is About Us layout 2 from the finance and consulting webkit. This layout consists of two images, some text to introduce the company, a quote, and the founder’s name in a signature-style script font.

    Ultimate Multipurpose Divi Webkit About

    This is About Us layout 4 from the fitness gym webkit. It features an image clipped into a shape on the left and some text and blurb modules on the right.

    Ultimate Multipurpose Divi Webkit About

    About Us layout 3 from the garden and landscaping layout features three images in a collage-style layout with a number counter in the middle. There are a couple of text sections, two buttons, and some number counters that count up when the page loads.

    Ultimate Multipurpose Divi Webkit About

    Blog

    This is digital agency blog style 1. It has a simple and modern layout with card-style blocks displaying recent blog posts. The blog post date is highlighted on a red background at the top of the featured image.

    Ultimate Multipurpose Divi Webkit Blog

    This is blog style 7 from the wind and solar energy webkit. On hover, the image zooms in, the button changes to orange, and a box shadow appears behind the blog post.

    Ultimate Multipurpose Divi Webkit Blog

    Finally, this blog layout is style 3 from the fitness and gym webkit. On hover, the image zooms in, the block with the post date turns black, and the line under the Read More button turns black.

    Ultimate Multipurpose Divi Webkit Blog

    Contact Form/Info

    The first contact form/info layout comes from the finance and consulting webkit. This is contact/info style 1, featuring a contact form on the left on an image background and a FAQ section on the right.

    Ultimate Multipurpose Divi Webkit Contact

    This is contact layout 3 from the fitness and gym webkit. It features three square blurbs with a box shadow, each highlighting important contact information. The card shifts up on hover, and the red circle behind the icon expands.

    Ultimate Multipurpose Divi Webkit Contact

    Style 6 from the wind and solar energy webkit features a unique layout with a fullwidth map and the contact information and form on a card that overlays the bottom of the map.

    Ultimate Multipurpose Divi Webkit Contact

    Counter

    The counter module helps represent numerical data on your website with a count-up effect as the page loads. This first example comes from the garden and landscaping webkit. Style 2 features four number counters in a section with a rounded border.

    Ultimate Multipurpose Divi Webkit Counter

    Counter layout 1 from the fitness and gym webkit features four number counters and an image arranged in a grid.

    Ultimate Multipurpose Divi Webkit Counter

    Finally, counter style 5 from the finance and consulting webkit features three number counters with icons on a rounded orange background in the top left corner.

    Ultimate Multipurpose Divi Webkit Counter

    CTA

    CTA layout style 2 from the wind and solar webkit features header text that shifts left and right and changes color from white to green, creating a subtle but eye-catching effect.

    Ultimate Multipurpose Divi Webkit CTA

    Next is CTA layout 2 from the fitness and gym webkit, which highlights an informational video. The play button has an opaque circle that pulses out from the center, encouraging the user to press play.

    Ultimate Multipurpose Divi Webkit CTA

    Finally, CTA layout 2 from the finance and consulting layout features a large image on the left, some text modules, a contact button, and a phone number displayed in a blurb.

    Ultimate Multipurpose Divi Webkit CTA

    FAQ

    Moving along to the FAQ section layouts, let’s take a look at style 4 from the digital agency webkit. The layout has FAQ blurbs on the left, a collage of three images on the right, and a little square shape that fades in and out while rotating.

    Ultimate Multipurpose Divi Webkit FAQ

    FAQ layout 3 from the finance and consulting webkit features a large image on the left and heading text and FAQ modules on the right.

    Ultimate Multipurpose Divi Webkit FAQ

    FAQ layout 3 from the landscaping webkit features some text, the FAQ modules on the left, and a large image with a testimonial blurb on the right.

    Ultimate Multipurpose Divi Webkit FAQ

    Features

    The feature section is where you can highlight unique features or selling points for your services or products. Layout 3 from the wind and solar webkit features some text on the left, a button to play a video, and four blurbs on the right that highlight features.

    Ultimate Multipurpose Divi Webkit Features

    Layout 3 from the fitness gym webkit has two images with unique border styles on the left, with one blurb overlaying the large image highlighting the fees. On the left are some text and three blurbs that highlight features.

    Ultimate Multipurpose Divi Webkit Features

    This is style 2 from the finance and consulting webkit. It features two images, a number counter on the left, and some text, blurbs, and a button on the right.

    Ultimate Multipurpose Divi Webkit Features

    Gallery

    Gallery style 4 from the garden and landscaping webkit features a blur effect and icon on hover.

    Ultimate Multipurpose Divi Webkit Gallery

    Next, gallery layout 4 from the digital agency webkit has a red overlay that expands over the image on hover.

    Ultimate Multipurpose Divi Webkit Gallery

    Style 3 from the finance and consulting webkit features an interesting hover effect where the image pans over to the right, and a light overlay appears.

    Ultimate Multipurpose Divi Webkit Gallery

    Hero

    Hero section layout 10 for the wind and solar energy webkit features a bright orange layout with some text, a button, an image with a subtle floating animation, and a blurb highlighting the service starting price.

    Ultimate Multipurpose Divi Webkit Hero

    Style 3 in the garden and landscaping webkit features a large blurb with text and an image on a fullwidth image background.

    Ultimate Multipurpose Divi Webkit Hero

    Finally, hero style 3 from the digital agency webkit features a large image background, some text and a CTA button, and a section with three blurbs that reveal an image on hover.

    Ultimate Multipurpose Divi Webkit Hero

    Logo

    Logo section style 4 from the wind and solar energy webkit features a grid of logos that decrease in size and reveal color on hover.

    Ultimate Multipurpose Divi Webkit Logo

    This is logo section 4 from the fitness gym webkit. The logos are displayed in a fullwidth section on a red background.

    Ultimate Multipurpose Divi Webkit Logo

    Layout 3 from the finance and consulting layout has a text section at the top and inverts the logo and background colors on hover.

    Ultimate Multipurpose Divi Webkit Logo

    Newsletter

    This is newsletter sign-up section style 5 from the finance and consulting webkit. It features an image with a unique clip layout, some text, a divider, and a sign-up form.

    Ultimate Multipurpose Divi Webkit Newsletter

    Newsletter style 2 from the garden and landscaping layout features some text, an icon with a pulsing border effect, and a sign-up form on an image background.

    Ultimate Multipurpose Divi Webkit Newsletter

    Finally, newsletter layout style 3 from the fitness and gym webkit features a card with text and a sign-up form on a fullwidth image background.

    Ultimate Multipurpose Divi Webkit Newsletter

    Pricing

    Pricing section style 1 from the wind and solar energy webkit features three pricing tables with a small blurb at the top right highlighting a discount.

    Ultimate Multipurpose Divi Webkit Pricing

    Style 4 from the digital agency webkit also features three pricing blurbs. There is a text section at the top, the pricing information, a Buy Now button, and four blurbs to highlight features.

    Ultimate Multipurpose Divi Webkit Pricing

    Pricing section layout 3 from the garden and landscaping webkit highlights each pricing tier with an icon at the top. The gradient in the button shifts on hover.

    Ultimate Multipurpose Divi Webkit Pricing

    Projects

    The projects section layout 5 from the fitness webkit features some text at the top and the projects listed below with a hover effect that adds an overlay and sets the title background to black.

    Ultimate Multipurpose Divi Webkit Projects

    Next is project section layout 2 from the garden and landscaping webkit. It features some text and some project categories at the top. The project details are listed over the project image, which zooms in on hover.

    Ultimate Multipurpose Divi Webkit Projects

    Finally, project style 5 from the finance and consulting webkit features categories at the top and the project information and an icon on hover.

    Ultimate Multipurpose Divi Webkit Projects

    Service

    Service section 2 from the wind and solar energy webkit features three blurbs with an image and icon highlighting each service. On hover, a box shadow appears, and the icon background turns green.

    Ultimate Multipurpose Divi Webkit Services

    This is service layout 3 from the fitness webkit. It features three blurbs with large icons. On hover, the blurb border turns red, and an arrow icon and border appear at the bottom of the blurb.

    Ultimate Multipurpose Divi Webkit Services

    Service layout 2 from the finance webkit features four service blurbs with an icon, a circle shape, text, and a button. On hover, the colors invert, and the circle shape flips to add some visual interest.

    Ultimate Multipurpose Divi Webkit Services

    Slider

    Slider style 4 below is from the digital agency webkit. It features large red navigation icons and some underlines highlighting portions of the slider text.

    Ultimate Multipurpose Divi Webkit Slider

    Slider style 5 from the garden and landscaping webkit features two navigation arrows on the right. The slide features text and two buttons.

    Ultimate Multipurpose Divi Webkit Slider

    Slider 2 from the finance webkit has a split-style layout with text on the left on an orange background, and an image on the right.

    Ultimate Multipurpose Divi Webkit Slider

    Steps

    The steps section layout highlights steps of a process. This is layout 1 from the wind and solar energy webkit. It features some blurbs with an icon and a number behind each blurb representing the step.

    Ultimate Multipurpose Divi Webkit Steps

    This is style 3 from the fitness webkit, highlighting steps for training. The blurbs surround an image with a red box shadow.

    Ultimate Multipurpose Divi Webkit Steps

    Steps section layout 5 from the garden and landscaping webkit highlights each step on an image background. The number for each step is presented on a green circle that overlays the bottom of the image.

    Ultimate Multipurpose Divi Webkit Steps

    Tab

    Tab layout 6 from the wind and solar energy webkit features the tabs at the top and a tab content layout with an image on the left, some text and blurb modules on the right, along with the price and a CTA button.

    Ultimate Multipurpose Divi Webkit Tab

    Style 4 from the finance and consulting webkit features some large text in the tab content and three large tabs at the bottom you can use to switch the content.

    Ultimate Multipurpose Divi Webkit Tab

    This is tab style 5 from the fitness and gym webkit. It has four large tabs at the top with icons. Within each tab, you have some text, a couple of blurbs, a CTA button, and two images arranged together on the right.

    Ultimate Multipurpose Divi Webkit Tab

    Team

    This is team layout style 3 from the garden and landscaping webkit. It features four team members in a fullwidth layout. On hover, a green overlay appears over the image and reveals the team member information and social icons.

    Ultimate Multipurpose Divi Webkit Team

    Team layout 2 from the digital agency webkit features a team section with round icons and a dotted graphic that rotates on hover. The team member card also turns black on hover.

    Ultimate Multipurpose Divi Webkit Team

    Style 1 from the fitness and gym webkit features an image on the left and the team member information on the right. On hover, an overlay and icon appear over the image, and the divider line turns red.

    Ultimate Multipurpose Divi Webkit Team

    Testimonial

    Testimonial layout style 3 from the garden and landscaping webkit features three testimonial blurbs with a customer image, name, position, testimonial text, star rating, and quote icon.

    Ultimate Multipurpose Divi Webkit Testimonial

    Style 3 from the finance and consulting webkit features testimonial blurbs with a large icon, a title, and a star rating at the top. The customer information is below, outlined with a border.

    Ultimate Multipurpose Divi Webkit Testimonial

    Testimonial layout style 10 from the wind and solar energy webkit has a large testimonial slider on a fullwidth image background.

    Ultimate Multipurpose Divi Webkit Testimonial

    Timeline

    The timeline section layout can be used to highlight a history, tell a story, or demonstrate a process. This is style 3 from the agency webkit. It features an icon for each timeline object and a lien that connects each step.

    Ultimate Multipurpose Divi Webkit Timeline

    This is timeline layout 3 from the garden and landscaping webkit. This layout features a blurb with a date, heading, and text on one side, and an image on the other side.

    Ultimate Multipurpose Divi Webkit Timeline

    Timeline layout 2 from the fitness gym webkit is a vertical timeline with three steps. A line at the bottom connects each blurb, highlighted with a date.

    Ultimate Multipurpose Divi Webkit Timeline

    Header and Footer Layouts

    Ultimate Multipurpose Divi Webkit also comes with some layouts for the header and footer.

    Headers

    This is fitness header layout 1. It features a left-aligned logo, a right-aligned menu, and a CTA button. The secondary menu above features two blurbs with contact information, a menu, and social media icons.

    Ultimate Multipurpose Divi Webkit Header

    Agency webkit header layout 5 features a primary menu with a left-aligned logo and a right-aligned menu. On the very right is a blurb with a phone number. The secondary menu bar at the top features two blurbs with contact information and social media icons.

    Ultimate Multipurpose Divi Webkit Header

    Garden and Landscaping webkit header style 3 has three different menu bars. At the very top, the secondary menu bar has a menu and social media icons. The middle menu bar features a logo and three blurbs with contact information. Finally, the third menu bar has menu items and a CTA button.

    Ultimate Multipurpose Divi Webkit Header

    Footers

    The wind and solar webkit footer style 8 is a three-part footer layout. The first section features four columns with some menu items. Below this is a section with a newsletter sign-up form and social media links. The last section displays the copyright information and a menu.

    Ultimate Multipurpose Divi Webkit Footer

    Finance and consulting webkit footer style 2 features a large email sign-up form at the very top of the footer. The primary footer area features a logo, text, and social media icons, two columns of menu items, and a gallery. At the very bottom is the copyright information.

    Ultimate Multipurpose Divi Webkit Footer

    Gardening and landscaping webkit footer style 4 comes as a two-part footer layout. The primary footer section features a logo, some text, and social media icons. There is a column with menu items and another column with contact info. On the right side is a contact form on a green background. The copyright information is at the bottom.

    Ultimate Multipurpose Divi Webkit Footer

    Detail Page Layouts

    Each webkit included with the Ultimate Multipurpose Divi Webkit comes with a few detail page layouts. Let’s take a look at a few.

    Service Detail Page

    This is the service page layout from the fitness and gym webkit. It features a large image and some buttons on the left highlighting some services. Also on the left side is a download section with a button to download a brochure and a call-to-action blurb with an image background. In the main section of the page, there is some text content with some blurbs to highlight some of the copy. The our benefits section features an image and three blurbs, followed by an FAQ section.

    Ultimate Multipurpose Divi Webkit About Page

    Team Detail Page

    This team detail layout comes from the gardening and landscaping webkit. It highlights a single team member and features a card layout at the top with an image, contact information, social media icons, and a blurb over the image that highlights the years of experience. Below this section is some text, some graphs to represent skills, and blurb modules representing qualifications. Finally, there is a contact form at the bottom of the page.

    Ultimate Multipurpose Divi Webkit Team Page

    Blog Page

    This is the blog post layout from the finance and consulting webkit. Because it’s a blog layout, it should be imported through the Divi Theme Builder. The layout begins with a fullwidth image header with the blog post title. The blog post content is styled with orange accents. Below the post content are an author box and a comment section. The sidebar has a search module, categories, the latest posts, tags, and a CTA.

    Ultimate Multipurpose Divi Webkit Blog Page

    Project Page

    The project page layout should also be imported through the Divi Theme Builder. This layout is from the digital agency webkit. It has a fullwidth header image with the project title, followed by a large image. Below this are two sections for project details and a project overview, with two blurb modules with icons. Key information about the project is presented on the right, surrounded by a red border. Finally, other projects are presented at the bottom. On hover, the project title and category are revealed on a white background.

    Ultimate Multipurpose Divi Webkit Project Page

    Purchase Ultimate Multipurpose Divi Webkit

    Ultimate Multipurpose Divi Webkit is available in the Divi Marketplace. It costs $19 for unlimited website usage and lifetime updates. The price also includes a 30-day money-back guarantee.

    Ultimate Multipurpose Divi Webkit Purchase

    Final Thoughts

    Ultimate Multipurpose Divi Webkit comes with a ton of modern, engaging website section layouts that can help you easily and quickly build a great-looking website. All the layouts seem to be of high-quality design and mobile-friendly. The product appears to be regularly updated with new webkit collections, and several new webkits are planned for upcoming releases. If you are looking for a collection of Divi section layouts to help jumpstart your design process, this product might be a great option for you.

    We would love to hear from you! Have you tried Ultimate Multipurpose Divi Webkit? Let us know what you think about it in the comments!

    The post Divi Product Highlight: Ultimate Multipurpose Divi Webkit appeared first on Elegant Themes Blog.

  • How to Use AI to Create Amazing Web Design with Divi (Using ChatGPT & MidJourney)

    It’s no secret that artificial intelligence (AI) is becoming a significant part of our day-to-day lives, from Netflix recommendations to chatbots, and facial detection to text editors. Today, the impact of AI is not only seen on screens but is felt. An arena that is now seeing an influx of AI’s presence is digital design and art. Conversations are sprouting up about the power and people – or lack thereof – participating in this medium. Is it possible to use AI to create amazing artwork while still supporting artists? Can AI be used as a tool to help facilitate better digital creations? We’d like to think so, so we’ll explore using ChatGPT and MidJourney with Divi.

    In this tutorial, we’ll use two AI tools — MidJourney and ChatGPT — to help influence a homepage design in Divi. We will use the MidJourney bot to create the visual aspect of our design. Then we will use ChatGPT to create the copy that we’ll use in our test. Finally, we will recreate the design, using the design from MidJourney and the copy from ChatGPT in Divi.

    Let’s get into it!

    Using MidJourney to Inspire Amazing Web Design

    MidJourney, according to their website, “is an independent research lab exploring new mediums of thought and expanding the imaginative powers of the human species.”. The MidJourney Discord bot allows you to use your Discord account to create four, custom AI-generated images from simple text prompts. You can then use other commands to modify and interact with the images created.

    Create a MidJourney Account

    Before we start using the AI, you will need to create an account on the MidJourney Discord server.

    Sign up or join the MidJourney Discord server

    If you already have a Discord account, you can log in to your existing account and begin using MidJourney right away.

    Sign into the MidJourney Discord server with your current Discord account

    Enter the MidJourney Discord

    Once on the MidJourney Discord, take a quick read through the quick start guide. This will help you familiarize yourself with the server’s guidelines. You will also gain insights into how the bot works and the other cool things you can do once you are comfortable using the bot.

    Read the MidJourney quick start guide

    Remember that the free version of MidJourney allows you to do 25 queries. Once you enter the MidJourney Discord server, you want to look to join a newbies channel. You can see the available channels on the server by looking in the menu on the left-hand side.

    Joining a newbies channel within the MidJourney Discord

    Click on any newbies channel to start generating images.

    Begin Creating with MidJourney

    Now that you’re in your newbies channel on MidJourney, the real fun begins… creating some images!

    Issue Initial Command

    We want to generate some inspiration to create a clean homepage design. To issue your first command, click in the textbox at the bottom right of your screen. You can be as descriptive or concise as you’d like. In our case, we entered, “create a clean, modern and material design homepage template. Included the CN tower. Use the colors white, grey, gray, and gold.”

    Issuing your first command to MidJourney

    This is what was generated from that command.

    Begin your search in MidJourney

    Here’s what it looks like outside of Discord.

    MidJourney generated homepage layout

    Refine Initial Command

    While these layouts are a good jumping-off point, let’s see what happens when we try to refine our AI-generated web design layouts. To do this, we’re going to refine the fourth option from our list.

    Upscale variation 4 of our AI generated image

    Rework AI-Generated Design

    Once you’ve created your first design, MidJourney allows you to upscale (make larger) or create variations from one of your four options. We decided that we wanted to see some variations of the fourth option and to make it bigger.

    Upscale option 4 and create a variation of this selection in MidJourney

    These are the results of MidJourney making variations of our fourth design.

    Second iteration of MidJourney

    Let’s take a closer look.

    MidJourney generated homepage layout versions

    Notice the addition of elements such as menus, icons, titles, and social media icons. From this layout, we’re going to use the fourth option. This is the design that we are going to emulate in Divi.

    Using ChatGPT to Create AI-Generated Web Design Copy

    Now that our design has been created, we’re going to use AI to create the copy to go into our design. We will use ChatGPT to create a headline, a short paragraph, and a call-to-action to use on our button.

    Create a ChatGPT Account

    To begin, we create an account with ChatGPT. If you already have an account, you can log in.

    Login or signup for a ChatGPT account

    To save time, you can also use your Gmail or Outlook account.

    Create your ChatGPT account

    Issue Initial Command

    Once you are logged in, you’ll be presented with this screen. This is the dark mode version, but there is also a light mode version.

    Using ChatGPT and MidJourney with Divi

    Let’s start by creating our first request. In the text box, we’re going to ask ChatGPT to “create a short slogan for a Toronto-based web design firm.”

    Asking ChatGPT to create a short slogan for our website

    This is the result of that request.

    Results of our first ask

    Refine Copy with ChatGPT

    The beauty of ChatGPT is that we can ask many questions and get some great options to use in our copy. Let’s ask for 5 other variations, but let’s ask that each variation is, at most, 5 words. In the textbox, enter, “Make the slogan only 5 words. Create 10 different variations.”

    Refine slogan for ChatGPT

    These are the variations that ChatGPT came up with for our slogan.

    Different slogan options in ChatGPT

    Let’s use option 5 for our slogan. We’re going to repeat the process for our paragraph of text. Let’s enter into ChatGPT, “Craft a 5-sentence paragraph promoting web design services to Toronto business owners.”

    Creating copy for intro paragraph

    This is the result that was created. It’s pretty good!

    ChatGPT generated welcome paragraph

    Instead of asking for more versions of this paragraph, let’s ask ChatGPT to change the tone of the welcome paragraph. Let’s ask ChatGPT to “Make this paragraph more casual, leaning toward light and fluffy.”

    Change the tone of the welcome paragraph

    Notice that the tone of the paragraph has become more casual and is still on track with what one would need to introduce their web design company.

    Casual copy for welcome paragraph with ChatGPT

    To complete our copy, let’s create 10 different versions of call-to-action text that we can use on our button. Our next command for ChatGTP is, “Come up with 5 versions of call to action text that I can use on a button.”

    Creating a variety of call-to-action text for a button

    While these options are great, they’re a little long for a button.

    Button CTA options

    As our final request to ChatGPT, let’s ask it to make our text shorter by saying, “make them shorter.”

    Our final CTA text options

    We will use the last option Launch Now as the CTA for our button.

    Using ChatGPT and MidJourney with Divi

    Now, we have both our design inspiration and the content to use within this design. We can bring these findings to Divi and start building a real-life working homepage layout. Let us proceed to begin using ChatGPT and MidJourney with Divi.

    Create a New Page in WordPress

    Let’s start by creating a new page in WordPress. From the WordPress Dashboard, we hover over Pages from the left-hand menu. Then, we click Add New. This will create a brand new page.

    Add new page

    When your new page has been created, add a title. Then, publish the page by clicking on the blue Publish button. Lastly, activate the Divi Builder by clicking on the purple Use Divi Builder button.

    Title and publish new page before activating Divi Builder

    With the Divi Builder activated, click the blue button that says Start Building. We’ll build our page from scratch but use assets from the layout generated by MidJourney.

    Build page from scratch

    Creating Sections and Rows

    Once the visual builder has loaded, we are now presented with several column structures that we can add to our default row and section. We will delete this section and use a Special section layout instead. Firstly, we click the X button to exit the row selection menu.

    Exit out of the regular section menu

    Then, we click on the blue button at the bottom of the section. This will allow us to add a new section. We want to click the Speciality section icon. This will allow us to add a section that is similar to the layout that MidJourney generated.

    Add new specialty section

    From the options of Specialty sections, we click the second option.

    Select second specialty section option

    With our section selected, we now have the option to start adding rows to our section. When we refer back to the layout generated by MidJoureny, we see a row containing the headline, paragraph, and call-to-action button. Then, we notice that there is a decorative set of columns. So, let’s add a one-column layout that will hold our copy.

    Add row to column layout, first

    Next, we’re going to add another row beneath this by clicking on the green plus icon. We’ll add a two-column row underneath the initial one-column row. This will function as our decorative columns.

    Add second row to specialty section

    With our Specialty section layout now complete, we can now delete the default section from our page. Click on the trash can icon from the section’s menu to delete it.

    Delete regular section

    Adding Divi Modules

    This is what our base layout looks like in Divi.

    Section and row layout in Divi

    We’re now going to add Divi’s native modules to the layout to create our homepage. This will act as a low-fi wireframe.

    Adding the Image Module

    To begin, let’s add an Image Module to the first column of our section. Click on the gray plus icon within the column. Then, select the Image Module icon.

    Add Image Module to column

    Click the green checkmark to save the Image Module in place.

    Exit out of Image Module

    Inserting the Text Modules

    Next, we’re going to move over to the second column of our section. In the first row, we’re going to add two Text Modules. The first one will hold the headline, and the second will hold our paragraph copy. Both of which were generated in ChatGPT. Click on the gray plus icon within the first row. Then, select the Text Module. This is going to be our Text Module holding our headline.

    Add first text module

    We’re now going to add our heading content. However, we’re going to format it to look like our MidJourney design. To do this, break up the text and use the h3 tag to highlight a keyword within our headline. This is an important step, as we’ll be applying separate styling to that part of the text. Click on the green check mark to save our content.

    Add headline text from ChatGPT to first text module

    Now, we’re going to add a second Text Module for our paragraph content. Click on the gray plus icon again, and select the Text Module icon.

    Add second text module

    This time, however, add the paragraph copy from ChatGPT and click the green check mark to save our content. To complete this row, we can add our last module, which is a Button Module.

    Add paragraph from ChatGPT to second text module

    Add Button Module

    We’re going to add a Button Module to this row. To do that, we click on the gray plus icon and select the Button Module.

    Add Button Module

    Add the text from ChatGPT to the button’s text and click the green check mark to save our content.

    Add CTA text from ChatGPT to our button

    Inserting the Social Media Follow Module

    If you look closely at our AI-generated design, you’ll see some icons underneath the image. We’re going to use the Social Media Follow Module to add a few social media icons under our image module.

    Add Social Media Follow Module

    With our Social Media Follow Module added, let’s add a few social media networks to this module. I’ve added 5 to emulate our AI-generated image.

    Add social media networks to the social media follow module

    Click the green check mark to save your social networks. Now, with all our modules in place, we can begin styling our homepage layout!

    Implementing Visual Branding and Design Elements

    For this next section of our tutorial, we will need some external tools to help us utilize the assets generated by MidJourney. While we are using ChatGPT and MidJourney with Divi, these aren’t the only software we’ll use. You will need a tool that will allow you to select the hex codes from the AI-generated image. You will also need an image editor to crop the photo from the image to use in our design. We will also use Google Fonts to replicate the fonts created by MidJjourney.

    The tools that I used to do this were:

    • ColorZilla: An eyedropper Chrome extension that allows you to select and save hex codes from web pages.
    • Photoshop: To crop and make photo edits. You can also use Photoshop to select the hex codes from your MidJourney image.

    Ultimately, use whatever tools are available to you.

    Uploading Your Image

    Open your image editor of choice, and crop the focal image from the original MidJourney image.

    Crop image from MidJourney photo

    Save this image to your hard drive. Then in Divi, edit the Image Module.

    Edit image module

    Click on the gear icon to open the Media Library. This is where you’ll upload your image.

    Edit image module

    Upload your image from your hard drive and insert it into the module.

    Upload image module

    With our image uploaded, we can now move to the Design tab of the Image Module. In the Design tab, click on the Sizing tab. From there, select Yes next to the Force Full Width toggle.

    Set Image Module to full width

    Next, on the docket, let’s style our social media icons.

    Styling the Social Media Module

    To begin, we click on the gear icon of our Social Media Icon Module.

    Edit social media follow button

    Once we have all our social media links presented to us, we will go into each one and remove the background. To do that, click on the gear icon next to each network.

    Edit individual social media networks

    Then, click on the Background tab and delete the background color present. Click the green check mark, then repeat this for all the social media networks you have added to this module.
    Remove social media network background

    After removing the backgrounds for each social media network, click on the Design tab. Set the alignment of the icons to the right-hand side, exactly as it is in the MidJourney image.

    Change social media icon alignment

    Now, let’s add some color to our icons. Click on the Icon tab, and set the icon color to #000000.

    Set social media icon colors

    Finally, we click on the Spacing tab to add some padding to the right of our module. Add a right padding value of 25px. Then, click on the green check mark to save our edits.

    Add right spacing to module

    Styling Our Text

    At this time, we have styled our modules on the left-hand side. We will now move onto the right-hand side, beginning with our headliner Text Module. Click on the gear icon so that we may enter the Text Module settings.

    Edit first text module

    We navigate straight to the Design tab. Next, click on the Text tab. We can slightly make out that the headline text is in all caps. So, let’s set the text font style to All Caps.

    Set text to all caps

    Then, we set the alignment to center and the text color to Dark.

    Set text alignment and color

    We used the H3 tag to draw attention to the middle word in our headline. So, we now click on the Heading Text tab. Then, we click on the H3 heading to begin to style it. Let’s set the font for the heading to Cantarell.

    Begin heading text styling

    Next, let’s increase the font size to 63px. Finally, we’ll set the letter spacing to -5px. Then, we can click the green checkmark to save our text changes.

    Set font size and letter spacing

    For the paragraph, the default Divi settings a similar to that which MidJourney created. As such, we will simply change the alignment of the text. Enter the text settings by clicking on the gear icon.

    Edit second text module

    Then, select the Design tab. Finally, from the Text tab, set the alignment to the center. Save your changes by clicking the green checkmark.

    Set second text module text alignment

    Customizing the Button

    For our Button Module, we’ll use our color picker tool to find the button color from MidJourney. I used the picker in Photoshop and discovered that the background color’s hex code is #c1aa85.

    Select button hex code color from image

    With this information, we can move into Divi and begin designing our button. As always, click on the gear icon to enter the module’s settings.

    Edit button module

    Then, click on the Design tab and then click the Button tab. For the Use Custom Styles for Button Option, select yes.

    Begin to set custom styles for button

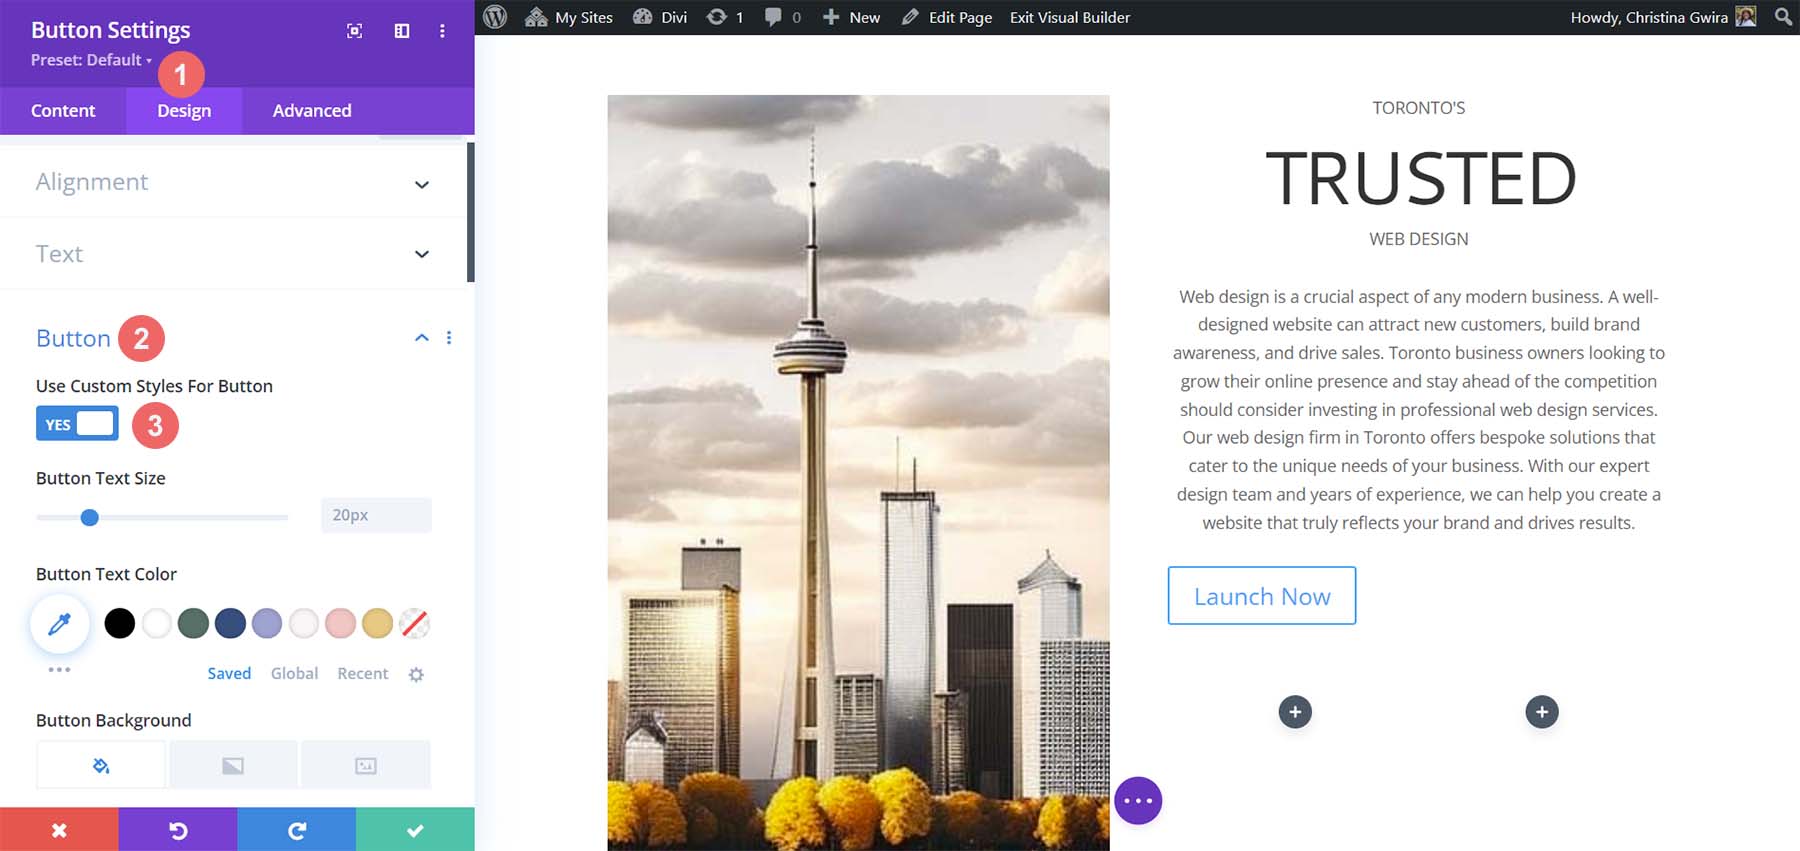
    These are the settings that we’ll be using to style our button.

    Button Design Settings:

    • Button Text Size: 14px
    • Button Text Color: #ffffff
    • Button Background Color: #c1aa85
    • Button Border Width: 0px
    • Button Border Radius: 15px
    • Button Font Style: All Caps
    • Spacing:
      • Top and Bottom Padding: 10px
      • Left and Right Padding: 35px

    This is what our Button Module now looks like after using MidJourney to inspire our design using Divi’s tools.

    Button and Text final preview

    Creating Decorative Columns

    The final design piece of our layout is the decorative columns underneath our copy. To create these, we will need a Divider Module in each column. To begin, click on the gray plus icon and select the Divider Icon.

    Add divider module to column

    While in the Content tab of our Divider Module, de-select the Show Divider option under Visibility.

    Remove divider visibility

    Next, move to the Design tab. From there, click on the Spacing tab. Set the left and right padding to 100%. While it looks like there isn’t much happening with this module, all will be revealed when we add our colors and padding to our sections, rows, and columns. Click on the green check mark to save your changes.

    Add spacing to Divider Module

    Duplicate the Divider Module and move it into the column next to it.

    Duplicate Divider Module

    Adding Backgrounds, Spacing, and Padding

    Now that all our modules are styled and designed, we can add the finishing touches to our homepage layout. For reference, this is where we stand.

    Using ChatGPT and MidJourney with Divi, halway point

    A far cry from the design that MidJourney created for us. However, with a bit of color and spacing, we will be successful at using ChatGPT and MidJourney with Divi.

    To start, let’s click the gear icon of our Specialty section.

    Edit section background color

    Next, click the Background tab. Using our color picker, we deduced that the background color for our section will be #e7e6e4. So, set the background color for our section to #e7e6e4.

    Set section background color

    Now, let’s move to the Design tab. From here, click on the Sizing tab. Here are the settings that you’ll need in the Sizing tab.

    Sizing Design Settings:

    • Equalize Column Heights: Yes
    • Use Custom Gutter Width: Yes
    • Gutter Width: 1
    • Width: 100%
    • Inner Width: 100%
    • Inner Width Max: 100%

    Set section sizing settings

    Now, we move to the Spacing tab. We want all the padding and module within the section to be set to zero. Here are the settings that we’ll be using there.

    Spacing Design Settings:

    • Margin:
      • Top and Bottom: 0px
      • Left and Right: 0px
    • Padding:
      • Top and Bottom: 0px
      • Left and Right: 0px
    • Column 1 Padding:
      • Top and Bottom: 0px
      • Left and Right: 0px
    • Column 2 Padding:
      • Top and Bottom: 0px
      • Left and Right: 0px

    Set all spacing within the section to zero

    Once these settings are in place, remember to save them by clicking the green check mark. With these settings, we can already see that our design in Divi is spacing up to look very similar to that which MidJourney generated.

    Spacing, Backgrounds, and Padding for the Second Column

    We now move on to the second column of our section. We begin editing the first row within this column by clicking on the gear icon for the row.

    Edit the first row within the second column of our section

    While in this row, click on the Design tab. Next, we move to the Spacing tab. Set the padding for the top, bottom, left, and right to 50px. We finish off this section by saving our work.

    Add padding to row

    We move onto our final row, again, clicking on the gear icon to enter the row settings.

    Edit second row or second column

    For the two columns that are a part of this row, we will use the background colors #b0b2b1 and #bfb192 for the first and second columns respectively. Click on the gear icon next to each column.

    Edit columns in the row

    Then, set the background color to each column’s respective color.

    Set background color of each column

    With both columns styled, notice that we are getting closer to our end product. To tie it all together, we need to add some final spacing edits to the row where these decorative columns reside. To start, click on the Design tab of the row. Then, set the Custom Gutter Width to Yes. Set the width of the gutter to 1. Also, activate the Equalize Column Height option.

    Row sizing design settings

    Next, move to the Spacing tab and set the margin and padding to 0.

    Add margin and padding of 0 to row

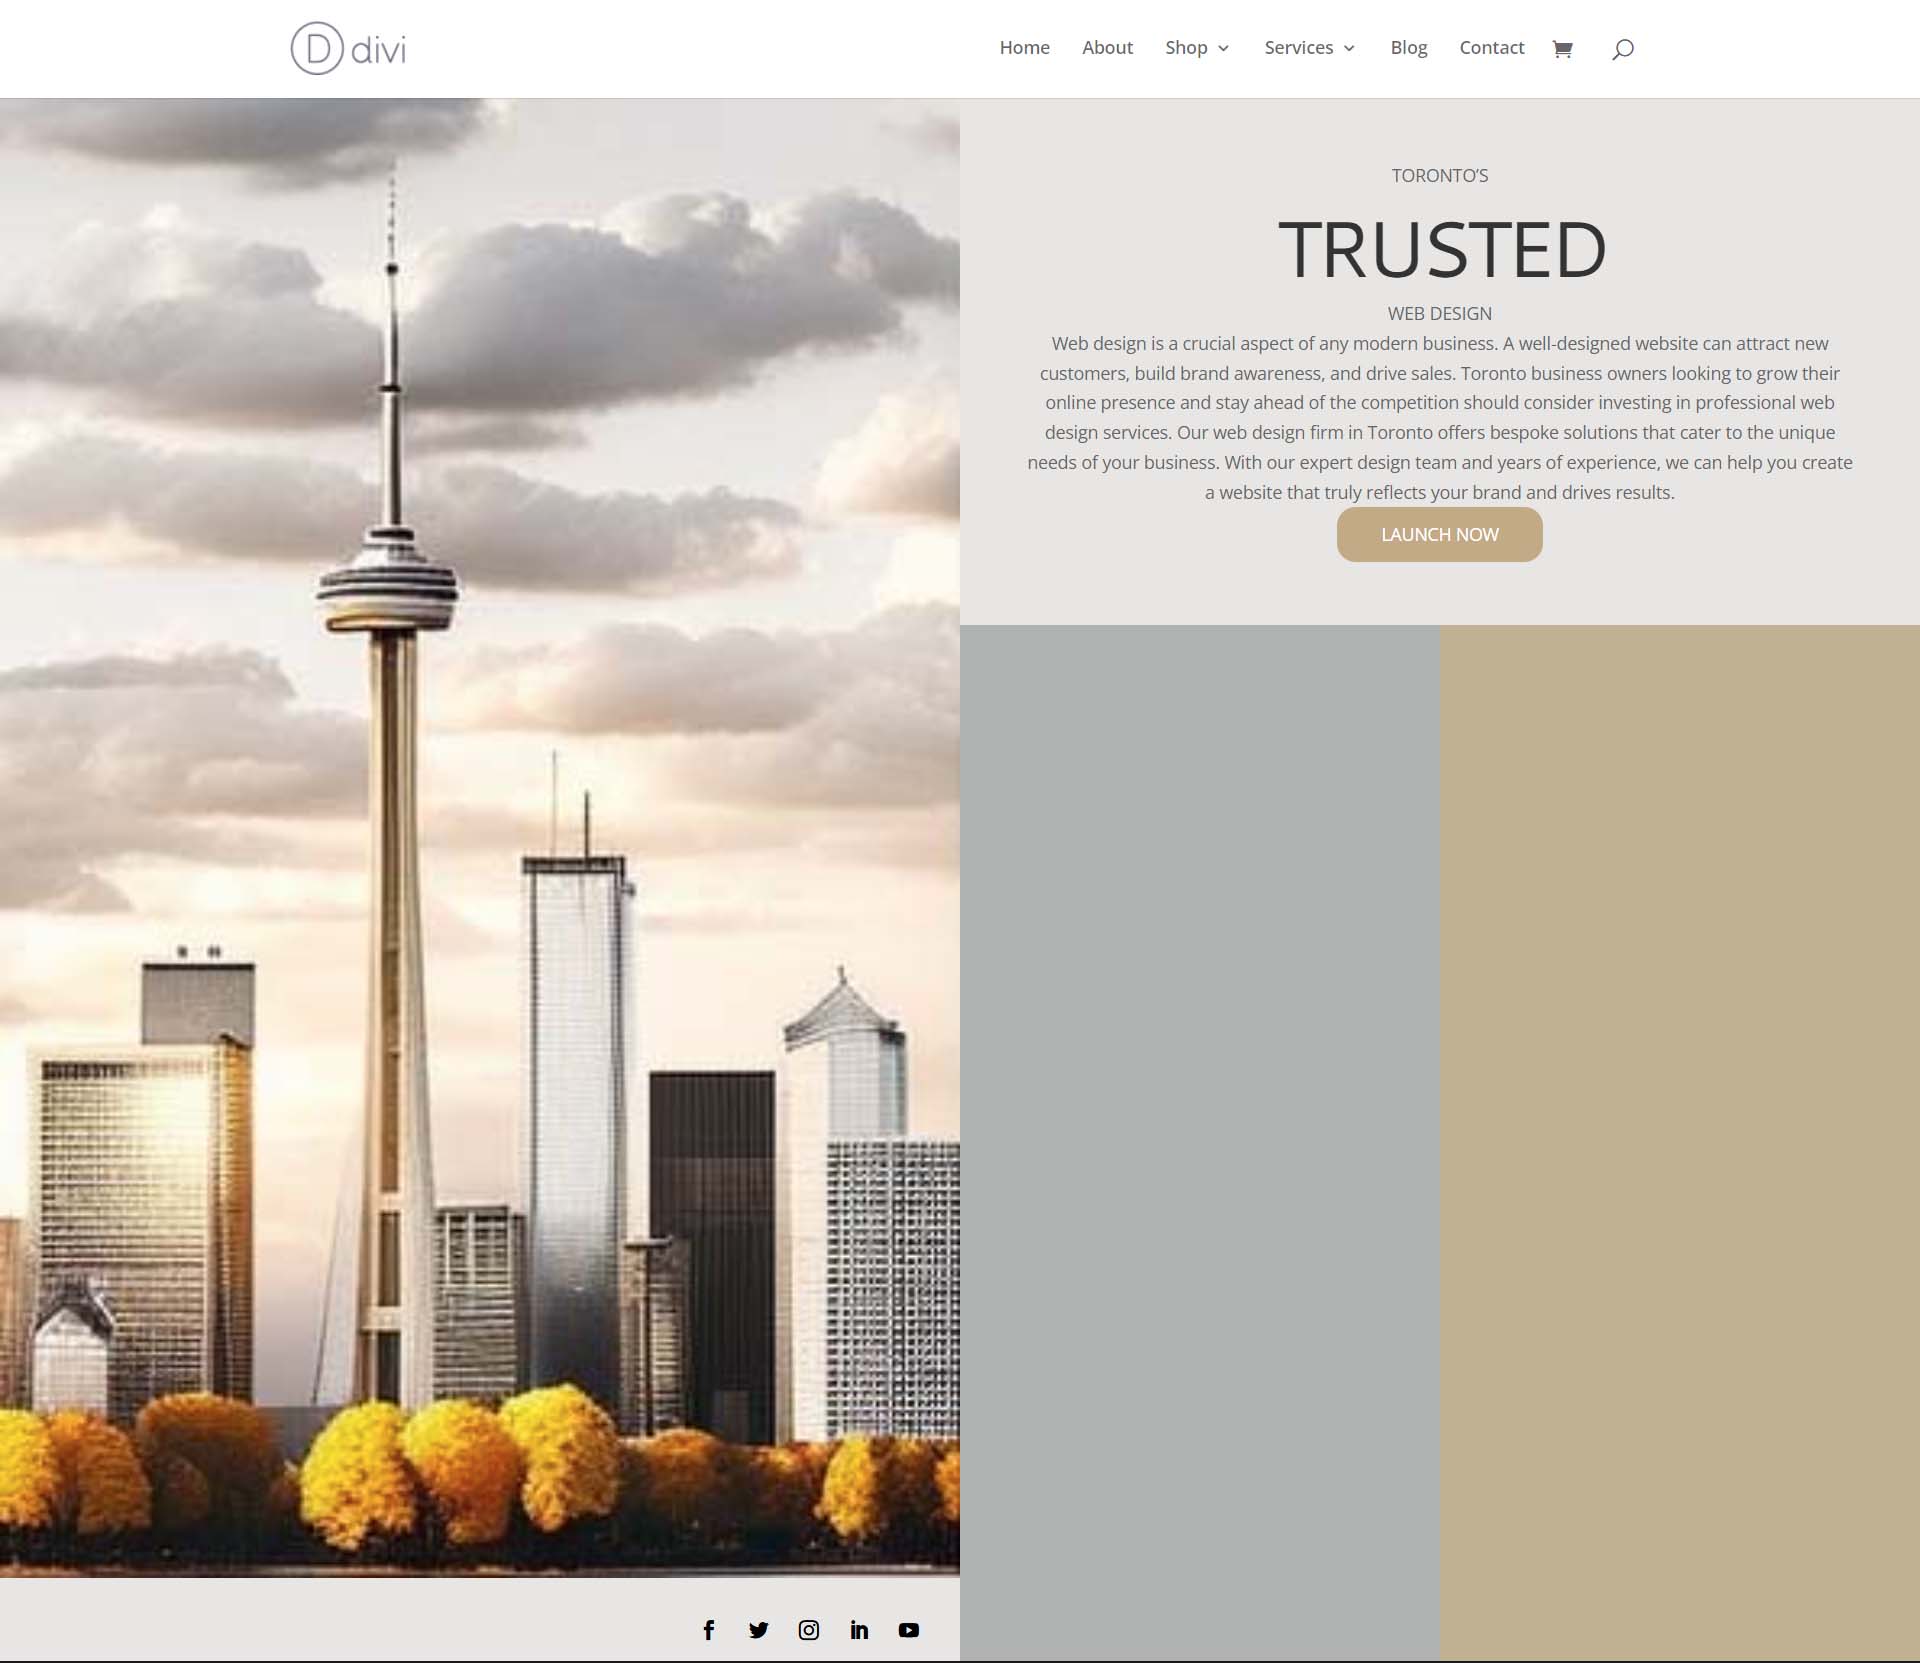
    And with that, we’ve successfully used ChatGPT and MidJourney to create a homepage layout in Divi. Here’s our finished product!

    The results of using ChatGPT and MidJourney with Divi

    Closing Thoughts on Using ChatGPT and MidJourney with Divi

    Using ChatGPT and MidJourney with Divi can help you to brainstorm ideas for your web design faster. Using AI in web design does not necessarily mean the end of digital design as we know it. It is possible to allow AI into your workflow to help speed up processes. AI can also help to bring things to the forefront in terms or concepts that may not have been highlighted. With Divi, it is easy to re-create AI-generated layouts and designs. If you aren’t a natural writer, creating copy for your business or your client’s websites could be difficult. Tools like ChatGPT can help you cover a blind spot you may not have realized you had. Consider using ChatGPT and MidJourney with Divi for your next project.

    Have you started to use AI in your web design business? Would you consider using tools like ChatGPT or MidJourney in your design process? Let us know your thoughts in the comment section below. Let’s get a discussion going!

    The post How to Use AI to Create Amazing Web Design with Divi (Using ChatGPT & MidJourney) appeared first on Elegant Themes Blog.

  • Get a Free Coworking Layout Pack for Divi

    Hey Divi Nation! Thanks for joining us for the next installment of our weekly Divi Design Initiative; where each week, we give away a brand new Layout Pack for Divi.

    This time around, the design team has created a beautiful Coworking Layout Pack that’ll help you get your next Coworking website up and running in no time!

    This layout pack includes:

    7 Premade page layouts strategically designed for any Coworking website (including a footer design)
    – Original, royalty-free photos and graphics + customizable source file (see below)
    – Plus, a large collection of pre-designed website elements that are customizable and reusable anywhere.

    This layout pack is available right inside Divi for all Divi customers for FREE as the latest addition to our growing Divi library of hundreds of premade layout packs, thousands of page designs, and countless web design elements and resources.

    divi layout

    Check Out The Divi Coworking
    Layout Pack Below

    Get it for free today!

    Coworking layout pack

    Landing Page Design

    Coworking layout pack

    View The Live Layout Demo

    Home Page Design

    Coworking Layout Pack for Divi

    View The Live Layout Demo

    About Page Design

    Coworking Layout Pack for Divi

    View The Live Layout Demo

    Pricing Page Design

    Coworking Layout Pack for Divi

    View The Live Layout Demo

    Membership Page Design

    Coworking Layout Pack for Divi

    View The Live Layout Demo

    Blog Page Design

    Coworking Layout Pack for Divi

    View The Live Layout Demo

    Contact Page Design

    Coworking Layout Pack for Divi

    View The Live Layout Demo

    Key Features

    If you’re designing a coworking website for personal or client use, consider using the Coworking Layout Pack for Divi. This pack features a muted color palette and bright yellow icons that effectively draw attention to the most essential information.

    Live Demos

    Click the links below to see a live demo for each of the layouts included in the pack.

    1. Coworking Landing Page (live demo)
    2. Coworking Homepage (live demo)
    3. Coworking About Page (live demo)
    4. Coworking Pricing Page (live demo)
    5. Coworking Membership Page (live demo)
    6. Coworking Blog Page (live demo)
    7. Coworking Contact Page (live demo)

    Access This Layout Right Now
    Directly from Your Divi Builder

    Since Version 3.0.99 of Divi, you can find and import any of the layouts included in this pack (along with ALL of Divi’s Premade Layout packs) directly from the Divi Builder. They are already waiting for you.

    To access your new layout, simply activate the Visual Builder when editing a page and look for the “Load From Library” icon in the page settings bar (it looks like a plus symbol). Click this icon to launch the Load From Library popup. Under the Premade Layouts tab, you can easily find the new layout by scrolling through the list of layout packs. Once you find the Coworking Layout Pack, click on it. You will see all the individual layouts included in the pack. Select the layout you want to use and then click the “Use This Layout” button.

    Coworking Layout Pack for Divi

    For more, check out this video to learn how you can get this layout pack up and running today.

    Subscribe To Our Youtube Channel

    Authentication Required

    Before you can download Premade Layouts from the Divi Library you must authenticate your Elegant Themes Subscription. You can do this by navigating to Divi > Theme Options > Updates. There you can enter your username and API key and save changes.

    Coworking Layout Pack for Divi

    You can find your API Key under your members area on the Elegant Themes site. After you enter the Username and API Key, you will gain immediate access to our library of hundreds of free layouts (including this one). If you haven’t done this, when you click to import a layout to your page, you will be prompted to enter your Elegant Themes Membership Username and API Key.

    Use Layout Images for FREE with No Licensing Restrictions

    Divi Coworking Layout Pack for Divi

    The image assets included with these layouts (icons, illustrations, photos, etc.) have no licensing restrictions. This means you can use them in all of your commercial projects without having to worry about paying licensing fees or attributing the photographer. Use them in your commercial websites, sell them within your Divi child themes, include them in your own Divi layout packs or just use them on your blog. We know how challenging it can be to find good photos and how confusing and scary the licensing that governs those photos can be. We want to fix that problem for our users.

    Download the Full Res Image Assets

    New Layout Pack Every Week!

    We hope you enjoy this layout pack. We look forward to hearing your opinions in the comment section below. Make sure you check out next week’s layout pack as well!

    The post Get a Free Coworking Layout Pack for Divi appeared first on Elegant Themes Blog.

  • Divi Plugin Highlight: Divi Contact Form Helper

    Divi Contact Form Helper is a plugin that works with Divi to expand the functionality of the built-in contact form system. It adds settings to the contact form module, an interface to the WordPress dashboard where you can manage your form entries, and additional settings to the Divi theme options. The plugin adds new design and customization options as well as new functionality such as a date picker, a file upload field, the ability to save submissions to a database, and more.

    In this plugin highlight, we’ll take a look at the features and settings for Divi Contact Form Helper and help you determine if it’s the right product for you.

    Let’s get started!

    Installing Divi Contact Form Helper

    You can install Divi Contact Form Helper just like any other WordPress plugin. Open the plugins page in the WordPress dashboard and click Add New. Click Upload Plugin at the top, then select the .zip plugin file from your computer.

    Divi Plugin Highlight Divi Contact Form Helper Install

    Once the plugin is installed, activate the plugin.

    Divi Plugin Highlight Divi Contact Form Helper Activate

    Divi Contact Form Helper

    Divi Contact Form Helper is an extension to Divi’s existing contact form module. It adds functionality such as file uploads, field text options, the ability to save submissions to a database, a date/time picker, additional design settings, and more. The plugin settings are spread across the contact form module, a new WordPress dashboard page, and additional Divi Theme Options settings. We’ll take a look at all of these settings to give you an idea of what can be accomplished with this plugin.

    Contact Form Module

    As we go through this plugin highlight, we note that the changes made using the Divi Builder Contact Form Helper settings will not display automatically in the Visual Builder. To view the changes made, you will need to open the page in a new tab and refresh to get the updated design.

    To access the new contact form module settings, add a new contact form to your page in the Divi Builder.

    Divi Plugin Highlight Divi Contact Form Helper Insert Module

    Field Content Settings

    The following settings are located within the content tab of the individual field setting of the contact form module.

    Text Settings

    Under the Text settings tab, you can show or hide the field label, show or hide the placeholder, enter custom placeholder text, enter custom description text, and choose the description location.

    Divi Plugin Highlight Divi Contact Form Helper Field Settings

    Here is the result on the front end. In this example, I added a label, a placeholder, and a description to the Name field.

    Divi Plugin Highlight Divi Contact Form Helper Field Labels

    Field Options Settings

    Next, you can find the Field Options settings. The settings change depending on what type of field is selected.

    If the textarea type is selected, there will be an option to set a minimum and maximum length for the message, select allowed symbols, and change the text area minimum height.

    Divi Plugin Highlight Divi Contact Form Helper Text Area Length

    Each field type also has the option to add an icon and change its color.

    Divi Plugin Highlight Divi Contact Form Helper Field Icon

    Here is the icon on the front end, within the Message field.

    Divi Plugin Highlight Divi Contact Form Helper Field Icon-2

    If the Select Dropdown field type is selected, there will be an option to use dropdown search.

    Divi Plugin Highlight Divi Contact Form Helper Dropdown Search

    Here is the dropdown search on the front end. Dropdown results are filtered as you type in the search bar above.

    Divi Plugin Highlight Divi Contact Form Helper Option Search

    If the Checkbox field option is selected, you will see two layout options: Columns or Inline. If columns is selected, you can set the number of columns (up to 4 columns).

    Divi Plugin Highlight Divi Contact Form Helper Checkbox Columns

    Here is the columns layout with 3 columns and an icon.

    Divi Plugin Highlight Divi Contact Form Helper Checkbox 3 Columns

    And here is the alternative inline layout.

    Divi Plugin Highlight Divi Contact Form Helper Inline

    The radio button field layout also has an option for a column or inline layout, with an option for up to 4 different columns.

    Divi Plugin Highlight Divi Contact Form Helper Radio Columns

    Here is the column layout with 2 columns.

    Divi Plugin Highlight Divi Contact Form Helper Radio 2 Columns

    And here is the inline layout.

    Divi Plugin Highlight Divi Contact Form Helper Inline Radio

    File Upload Settings

    To access the file upload settings, you must first set the Field Type to Input Field within the Field Options settings. Then the file upload settings will appear.

    Divi Plugin Highlight Divi Contact Form Helper Input Field

    Under the File Upload Settings tab, select the button to enable the field to be used as a file upload field.

    Divi Plugin Highlight Divi Contact Form Helper File Upload

    Once enabled, you can set the maximum upload file size, maximum number of files, and allowed file types.

    Divi Plugin Highlight Divi Contact Form Helper File Upload Maximum

    Date Time Settings

    The date/time settings only appear when the field type is set to input field. Toggle the button to use the input field as a date/time picker.


    Divi Plugin Highlight Divi Contact Form Helper Date Time Enable

    When the option is enabled, three settings tabs appear. Under the General tab, you can set the type (date and time picker, date picker, or time picker), the date/time format, choose to show the picker inline, set the input with the current date/time, change the language, or change the locale direction to RTL.

    Divi Plugin Highlight Divi Contact Form Helper Date Time Picker

    Under the date settings tab, you can set a custom date format, set the week start day, select days of the week to disable, and disable weeks.

    Divi Plugin Highlight Divi Contact Form Helper Date Settings 1

    You can also disable past dates, disable the current date, set a fixed or relative minimum date, set a fixed or relative maximum date type, and set available and unavailable dates.

    Divi Plugin Highlight Divi Contact Form Helper Date Settings 2

    Under the time tab, you can set a custom time format, minimum and maximum time, available and unavailable times, and time steps interval.


    Here is the date/time picker on the front end.

    Divi Plugin Highlight Divi Contact Form Helper Date Time Picker Front End

    Form Content Settings

    The following settings are located within the content tab of the contact form settings.

    Admin Email Settings

    Under the admin email settings, you can enter a custom message for the admin and use rich text to format the admin message. You can add an admin email or enable conditional email address routing with custom logic using these settings (don’t worry, the plugin author has documentation to help you set this up!).

    Divi Plugin Highlight Divi Contact Form Helper Admin Email Enabled

    Additionally, you can set the admin email subject, email address CC, and email address BCC.

    Divi Plugin Highlight Divi Contact Form Helper Admin Email

    Confirmation Email Settings

    The confirmation email settings can also be customized. You can enable the confirmation email to be sent, enter a custom subject line, and enter a custom message. You can enable rich text formatting to use for the message as well.

    Divi Plugin Highlight Divi Contact Form Helper Confirmation Email

    Submission Entries

    Under the submission entries settings, you can save entries to a database, save file uploads to a database, send file uploads as attachments with emails, collect user agent details, use cookies for tracking unique form views, and change the custom message that is added to emails with files.

    Divi Plugin Highlight Divi Contact Form Helper Submission Entries

    Submit Button

    Under the submit button settings, you can change the submit button text and the wait text.

    Divi Plugin Highlight Divi Contact Form Helper Submit Button

    Integrations

    There are two integration options, Zapier and Pabbly. You can enable either option and add the mailbox address to send emails to.

    Divi Plugin Highlight Divi Contact Form Helper Integrations

    After Submission Behavior

    The after submission behavior includes a space to add a custom success message as well as an option to hide the form title, display a success button with custom text and a link, or enable a redirect URL.

    Divi Plugin Highlight Divi Contact Form Helper After Submission Behavior

    Here is the after submission behavior in action, showing the success message, hiding the form title, and displaying the success button.

    Divi Plugin Highlight Divi Contact Form Helper Success Button

    Admin Label

    Here you can add your own admin label (form ID) that will be shown in the database. You can also add a unique identification number that will appear in the database and other admin areas.

    Divi Plugin Highlight Divi Contact Form Helper Unique ID

    Design Settings

    Let’s move over to the design tab of the contact form settings. You’ll notice some new settings here as well.

    Field Label, Field Description, Success Message Text Settings

    The field label text settings, the field description text settings, and the success message text settings sections feature all of the default font and text design settings, such as font, text color, size, spacing, alignment, etc.

    Divi Plugin Highlight Divi Contact Form Helper Field Label Text

    Here you can see the labels for the name and email fields have been displayed, and the field label text design was customized to be displayed on the front end.

    Divi Plugin Highlight Divi Contact Form Helper Label Design

    Success Button Settings

    The success button settings allow you to customize the design of the success button using the default button design settings, such as font, text size, button spacing, button colors, etc.

    Divi Plugin Highlight Divi Contact Form Helper Success Button Settings

    Here is the customized success button on the front end.

    Divi Plugin Highlight Divi Contact Form Helper Success Button Customized

    Date/Time Picker Settings

    Within the general tab of the date/time picker design settings, you can customize the background color, margin, padding, border, and shadow settings.

    Divi Plugin Highlight Divi Contact Form Helper Date General Settings

    Moving over to the date tab, you can change the date picker width and height, customize the month/year text settings, the days of the week text settings, the calendar dates text settings, the current date background and text color, the selected date background and text color, the available dates background and text color, and the unavailable dates background and text color.

    Divi Plugin Highlight Divi Contact Form Helper Date Settings

    Under the time tab, you can customize the time picker width and height, the time text settings, the current time background and text color, the selected date background and text color, the available time’s background and text color, and the unavailable time’s background and text color.

    Divi Plugin Highlight Divi Contact Form Helper Time Settings

    With all of these customization options, you can completely customize the look of your date/time picker. Here is the date/time picker on the front end with some customized design settings.

    Divi Plugin Highlight Divi Contact Form Helper Date Time Picker Customized

    Submit Button

    Two new settings have appeared under the submit button section. You can change the button alignment and make the button full-width.

    Divi Plugin Highlight Divi Contact Form Helper Button Alignment Full Width

    Here is the full-width button on the front end.

    Divi Plugin Highlight Divi Contact Form Helper Fullwidth Button

    Border

    Here you can style the focus input border with color, style, radius, width, and style settings. This border will appear around the individual field when selected.

    Divi Plugin Highlight Divi Contact Form Helper Input Focus Border

    Here is the focus input border highlighting the name field.

    Divi Plugin Highlight Divi Contact Form Helper Input Focus Border Name Field

    Dashboard

    Now that we’ve explored the new Contact Form module settings, let’s take a look at the Contact Form page in the WordPress dashboard.

    Entries

    You can see all the form submissions you have received on the Entries page. For each entry, you will see the entry number, the email address, its read status (including the user who read the entry and the exact time and date it was read), the form ID, the date, and the IP. The entries page can be sorted by unread and read at the very top. You can also use bulk actions on entries and filter the table by month or by a specific form. Finally, you can export a CSV of your entries with the button at the top and search your entries with the search bar.

    Divi Plugin Highlight Divi Contact Form Helper Entries

    When you click to view an individual entry, you will see the field content in the entry details section. Below this are other entries by the same user, which is a very helpful feature. On the right, you have a trash and delete button, a reply/send email button, a create email template button, and a create post button. Below are meta details such as the submitter ID, submitter, contact form ID, page, referrer URL, and date, followed by user-agent details.

    Divi Plugin Highlight Divi Contact Form Helper Form Entry Details

    Send Email

    When you select the send email button, you will see this interface. You can add the email from address, the email subject, the reply to email address, and the message. You can use the email data tags listed in your message as well.

    Divi Plugin Highlight Divi Contact Form Helper Send Email

    Create Template

    You can also create email templates to quickly respond to entries. You can set the template type, template name, select a contact form, set an email from address, the email subject, and the email message.

    Divi Plugin Highlight Divi Contact Form Helper Create Template

    Create Post

    With the create post option, you can create a new blog post or page by mapping fields in the contact form.

    Divi Plugin Highlight Divi Contact Form Helper Create Post

    Export CSV

    On the export CSV page, you can change the CSV file name, select the contact form, and select what type of entries to include in the export.

    Divi Plugin Highlight Divi Contact Form Helper Export CSV

    Forms

    From the forms page, you can see a list of all of the forms on your site with information such as entries, views, unique views, conversion rate, unique conversion rate, last entry, and links to view entries, export CSV, and view the form.

    Divi Plugin Highlight Divi Contact Form Helper Contact Forms

    Theme Options

    Now let’s navigate to the Divi Theme Options within the WordPress dashboard. You’ll see a new tab titled Divi Contact Form Helper here.

    General Settings

    Under the general settings, you can enable contact form stats, enable sent email logs, enable clone logs, choose to remove plugin data when uninstalled, and edit the allowed MIME types.

    Divi Plugin Highlight Divi Contact Form Helper Theme Options General Settings

    SMTP Settings

    The SMTP settings tab has a button to enable SMTP settings. Once enabled, you will see settings for the SMTP host, SMTP from email, SMTP from name, Encryption, SMTP port, Auto TLS, and Authentication. There is a button to check if the SMTP integration is also working.

    Divi Plugin Highlight Divi Contact Form Helper SMTP Settings

    Auto Backup Settings

    Divi Contact Form Helper comes with an auto backup setting you can enable. You can enable this feature, add a backup email address, and set the backup schedule.

    Divi Plugin Highlight Divi Contact Form Helper Auto Backup

    Custom Label Text

    Finally, here you can customize the contact form label text.

    Divi Plugin Highlight Divi Contact Form Helper Custom Label Text

    Divi Contact Form Helper Examples

    Example 1

    The first example features a name field, an email address field, a date picker, and a message field. It features a blue color scheme with a full-width button.

    Divi Plugin Highlight Divi Contact Form Helper Example 1

    Example 2

    The second example has a green color scheme and features the same name, email address, date picker, and message fields, along with a radio select field and a file upload field.

    Divi Plugin Highlight Divi Contact Form Helper Example 2

    Purchase Divi Contact Form Helper

    Divi Contact Form Helper is available in the Divi Marketplace. It costs $25 for unlimited website usage and one year of support and updates. The price also includes a 30-day money-back guarantee.

    Divi Contact Form Helper Review

    Final Thoughts

    Divi Contact Form Helper adds some major functionality to the Divi Contact Form module. You can completely customize every aspect of the contact form and create a unique design because of this plugin’s additional design options. And thanks to the functionality Divi Contact Form Helper adds, you can even accept files, schedule events, and so much more. The entries interface is convenient to have, allowing you to easily respond to messages and keep track of entries from the WordPress dashboard. If you’re looking to take your contact form to the next level or need functionality beyond what the default contact form can offer, this might be a great product for you.

    We would love to hear from you! Have you tried Divi Contact Form Helper? Let us know what you think about it in the comments!

    The post Divi Plugin Highlight: Divi Contact Form Helper appeared first on Elegant Themes Blog.

  • How We Boosted Our Divi Online Store Sales

    This article is part 2 of a 2-part series written by the founders of Divi Den. In part 1 of this series, Kyra, my co-founder and lead designer at Divi Den, tells the colorful story of how we walked eyes-wide-shut into creating products for the Divi theme. She talks candidly about the practical lessons we learned. Many of which can be applied to your own online business.

    In this second part, I write about how we tweaked and optimized our online store to keep growing and succeed as a business.

    My name is Christiaan. I am the team lead and conversion rate specialist at Divi Den. Kyra and I have founded 3 different startups together since 2005. We’ve done this while traveling all over the world. Being location independent is a huge benefit of earning your income online. For our backstory and global escapades, read The Divi Den Story.

    We consider ourselves extremely lucky to be able to work so closely together. Somehow, our skills are just complementary. Throw in a little bit of love and romance (we’re married) and for some people, it becomes a ticking time bomb. But not for us, it seems. I think we truly appreciate how lucky we are, and that keeps our feet on the ground.

    Now that you have a bit more context, let me elaborate on our efforts to grow our Divi startup.

    To bundle, or not to bundle

    When we launched our first Divi product, we started from zero. Nobody in the Divi niche ever heard about us. We knew we had to put together a product that would appeal to our target audience of Divi creators.

    Create a product that appeals to your target audience

    Create a product that appeals to your target audience

    First, you need to do your research. This is where Kyra is a master. She’s always looking out for new trends or ideas to play around with. The web is a fast-moving place. You can’t sit still for 6 months, or you’re drifting backward.

    The key to doing your research is to get inside the mind of your customer. To stand in your customers’ shoes, so to speak. This can be difficult if you’re searching outside your field of expertise or interest. Instead, we find it helpful to use yourself as your ideal customer. You’ll have a better chance of success.

    With this method, all you have to do is pay attention to the things you personally find interesting. What looks like good value? What doesn’t live up to your expectations? Use yourself as a benchmark.

    Taking this same approach, Kyra asked, “What Divi product would I want to buy?”
    And this is how we landed on the Unicorn bundle idea. Our ultimate long-term goal was to have recurring income but, you need a big enough library of layouts to make it worthwhile to subscribe.

    To bridge that gap, we had to launch a Divi product bundle that would make people go “Wow”. Then keep launching more bundles until we had enough layouts, and value, to turn it into a subscription worth paying for.

    Choosing a memorable name

    Choosing a memorable name

    This is an interesting topic. A great name will grease the wheels of your product in many ways.

    A great name;

    • is quick to remember (who doesn’t know what a Unicorn is?)
    • is easy to talk about (have you seen the Unicorn bundle?)
    • should ideally have meaning (Unicorns… what more can I say?)

    Sometimes it can be a challenge to find a good name. Just keep brainstorming until you hit on the right name. When you hit the right name, it usually just sounds right, looks right, and reads right. That criteria might be vague, I agree. But we’ve found it to work well for us.

    One last thing to keep in mind, you can’t please everybody with a name. Don’t let the search for the perfect name stop you from getting started. It just needs to be good enough.

    The importance of trust

    The internet is a big place with many actors playing the game. Personally, I won’t get my wallet out if a website looks a little bit fishy. You know, that kind of half-backed website I’m talking about. We’ve all seen them. You don’t want to get lumped into that category.

    If you sell anything online, you should pay close attention to how your website and business “appears” to other people. You also need to deliver on your promises. All customer interactions should confirm that you can be trusted. It should prove that you are honest and are here to stay.

    People may judge you on;

    • Your tone of voice, how you write and say things.
    • Your terms and conditions, privacy policy, and refund policy.
    • How they feel after they interact with your support system.

    This is not an exhaustive list, but I think you get the idea.

    Use trust symbols strategically

    Aside from walking the talk and delivering on your promises, you can add elements to your website to highlight that you can be trusted. You can define a trust symbol as anything that indicates that you are a legitimate business. It can be as simple as providing a clearly visible phone number.

    These trust symbols can help;

    • An SSL certificate to show https:// for your domain. Critical. A must-have.
    • Relevant security symbols like badges from Verisign or McAfee.
    • Real customer testimonials.
    • Customer logos. With permission, of course.
    • Industry-related membership badges.
    • Press articles talking about your company.
    • Certification badges.
    • Transparent terms, policy, and privacy pages. Another must-have.
    • A badge for your money-back guarantee.

    Be selective about which trust symbols you add to your website. It should be relevant to what you’re doing or selling. If it’s not relevant to your potential customer, it may cast doubt on your credibility.

    How to think about pricing

    One-off digital product sales are very different from subscriptions. With a one-off product, you need to pack in enough value to justify the price. It might add extra development time and cost, which you have to pay before you even make one cent. It also means you get the sale only once.

    With this sales model, you’ll be under constant pressure to find new customers. To keep growing, you’ll need a steady supply of new products. There will be constant product launches. It can wear you down. Like we discovered in the early days of our startup.

    In our case, we had no choice. Creating one-off products was the only path to creating a layout library that would eventually transform into our subscription product. We learned a valuable lesson here.

    With a recurring pricing model, you’ll have less stress and more time to keep improving your product.
    If you have a choice, think about how you can structure your offer for recurring income. You’ll thank me for it later. Try the keyword “recurring revenue models” in your favorite search engine. That should give you fresh ideas to build upon.

    Deciding on renewal terms. Monthly or yearly?

    When we launched our subscription product Divi Den Pro, we figured it was a good idea to only have monthly subscriptions. This way we would receive a small amount, each month, from many people. We thought this would improve our chances of success. If the price was affordable, we reasoned, more people would try our product and see the value in it. This was true for the most part.

    What we didn’t appreciate yet was the impact monthly renewals had on failed payments. That was an eye-opener.

    Here’s a question for you

    Imagine, your subscription product sells for $10 per month. Would you rather have,

    A) 12 payments of $10 each month, adding up to $120 per year?

    Or

    B) Would you rather have 1 payment of $100 per year?

    Most people would probably say, I want $120 per year in 12 payments. The $20 difference, per year, could add up to be a lot of money. And you would be right. Except for those failed renewals I was talking about earlier.

    Any recurring product requires a payment gateway to integrate with your online store. Services like Stripe or PayPal allow your customers to link a credit or debit card to be charged each month. Sounds good so far…

    What you don’t consider is how often people’s credit cards are maxed out. Or how often a debit card is empty. With monthly renewals, you are going to find out 12 times a year. And you are probably not going to like it. Cards bounce way more often than you think.

    When a card bounces, nobody wins. The customer doesn’t get the product. You don’t get paid. The support load increases. Emails are required. People don’t reply. Maybe they wanted to cancel anyway.
    Maybe they want to continue, but will only have cash again 3 months from now. Could be the card expired. Perhaps, it got canceled or blocked. Now multiply the chances of this occurring by 12 months for each customer. I’m sure that $100 per year is looking way more attractive now.

    Enter yearly subscriptions

    Yearly subscriptions are an effective way to limit failed payments and reduce cancellations when compared to monthly subscriptions. With a yearly subscription, customers only have to worry about making one payment per year, which means there are fewer opportunities for their cards to be maxed out or empty when the renewal comes up. This can lead to a more consistent revenue stream for your business.

    To further improve the customer experience and avoid potential issues, make sure to send out notifications if their credit cards are about to expire. This ensures that your customers are aware of the situation and can take action to update their payment information, preventing failed renewals and maintaining their access to your product or service.

    Optimizing your online store checkout

    Optimizing your online store checkout

    A smooth and efficient checkout process is crucial to the success of your online store. To optimize the checkout experience, consider incorporating the following:

    1. Trust symbols: As mentioned earlier, displaying trust symbols such as security badges, SSL certificates, and money-back guarantees can help establish your credibility and make customers feel more secure when making a purchase.
    2. Reduce friction: Minimize the number of steps and fields required to complete the checkout process. The easier and quicker the process, the less likely customers are to abandon their carts.
    3. Streamline the checkout form: Only request essential information during checkout, and consider using autofill or social logins to save customers time. You may also want to offer the option for customers to create an account after the purchase has been completed, rather than requiring them to sign up beforehand.
    4. Offer multiple currencies: Catering to an international audience? Display prices in the local currency of your customers and provide currency conversion options during checkout. This makes it easier for customers to understand the cost of your product, and they are more likely to complete the purchase.
    5. Payment gateways: Provide a variety of payment options, including popular gateways like PayPal and Stripe, as well as region-specific options. Offering multiple payment methods caters to customers’ preferences and increases the likelihood that they’ll complete their purchase.

    If you use some of these strategies, you can create a seamless and enjoyable checkout experience that increases conversions and grows your sales. The success of your Divi online store depends on a combination of factors, including product appeal, trust, pricing, and an optimized checkout process. Keep these tips in mind as you continue to refine and grow your online business.

    That’s all from me. Good luck with growing your business. Till next time.
    Christiaan – Divi Den

    The post How We Boosted Our Divi Online Store Sales appeared first on Elegant Themes Blog.

  • Get a Free Photographer Layout Pack for Divi

    Hey Divi Nation! Thanks for joining us for the next installment of our weekly Divi Design Initiative; where each week, we give away a brand new Layout Pack for Divi.

    This time around, the design team has created a beautiful Photographer Layout Pack that’ll help you get your next Photographer website up and running in no time!

    This layout pack includes:

    9 Premade page layouts strategically designed for any Photographer website (including a footer design)
    – Original, royalty-free photos and graphics + customizable source file (see below)
    – Plus, a large collection of pre-designed website elements that are customizable and reusable anywhere.

    This layout pack is available right inside Divi for all Divi customers for FREE as the latest addition to our growing Divi library of hundreds of premade layout packs, thousands of page designs, and countless web design elements and resources.

    divi layout

    Check Out The Divi Photographer
    Layout Pack Below

    Get it for free today!

    Photographer layout pack

    Landing Page Design

    Photographer layout pack

    View The Live Layout Demo

    Home Page Design

    Photographer Layout Pack for Divi

    View The Live Layout Demo

    Portfolio Page Design

    Photographer Layout Pack for Divi

    View The Live Layout Demo

    Project Page Design

    Photographer Layout Pack for Divi

    View The Live Layout Demo

    Services Page Design

    Photographer Layout Pack for Divi

    View The Live Layout Demo

    Service Page Design

    Photographer Layout Pack for Divi

    View The Live Layout Demo

    About Page Design

    Photographer Layout Pack for Divi

    View The Live Layout Demo

    Blog Page Design

    Photographer Layout Pack for Divi

    View The Live Layout Demo

    Contact Page Design

    Photographer Layout Pack for Divi

    View The Live Layout Demo

    Key Features

    Are you looking for an elegant way to showcase a photography business for yourself or a client? Then take a look at the Photographer Layout Pack for Divi. The design features large imagery with hover effects, lightboxes to feature your work stunningly, and plenty of white space to make important sections stand out.

    Live Demos

    Click the links below to see a live demo for each of the layouts included in the pack.

    1. Photographer Landing Page (live demo)
    2. Photographer Homepage (live demo)
    3. Photographer Portfolio Page (live demo)
    4. Photographer Project Page (live demo)
    5. Photographer Services Page (live demo)
    6. Photographer Service Page (live demo)
    7. Photographer About Page (live demo)
    8. Photographer Blog Page (live demo)
    9. Photographer Contact Page (live demo)

    Access This Layout Right Now
    Directly from Your Divi Builder

    Since Version 3.0.99 of Divi, you can find and import any of the layouts included in this pack (along with ALL of Divi’s Premade Layout packs) directly from the Divi Builder. They are already waiting for you.

    To access your new layout, simply activate the Visual Builder when editing a page and look for the “Load From Library” icon in the page settings bar (it looks like a plus symbol). Click this icon to launch the Load From Library popup. Under the Premade Layouts tab, you can easily find the new layout by scrolling through the list of layout packs. Once you find the PhotographerLayout Pack, click on it. You will see all the individual layouts included in the pack. Select the layout you want to use and then click the “Use This Layout” button.

    Photographer Layout Pack for Divi

    For more, check out this video to learn how you can get this layout pack up and running today.

    Subscribe To Our Youtube Channel

    Authentication Required

    Before you can download Premade Layouts from the Divi Library you must authenticate your Elegant Themes Subscription. You can do this by navigating to Divi > Theme Options > Updates. There you can enter your username and API key and save changes.

    Photographer Layout Pack for Divi

    You can find your API Key under your members area on the Elegant Themes site. After you enter the Username and API Key, you will gain immediate access to our library of hundreds of free layouts (including this one). If you haven’t done this, when you click to import a layout to your page, you will be prompted to enter your Elegant Themes Membership Username and API Key.

    Use Layout Images for FREE with No Licensing Restrictions

    Divi Photographer Layout Pack for Divi

    The image assets included with these layouts (icons, illustrations, photos, etc.) have no licensing restrictions. This means you can use them in all of your commercial projects without having to worry about paying licensing fees or attributing the photographer. Use them in your commercial websites, sell them within your Divi child themes, include them in your own Divi layout packs or just use them on your blog. We know how challenging it can be to find good photos and how confusing and scary the licensing that governs those photos can be. We want to fix that problem for our users.

    Download the Full Res Image Assets

    New Layout Pack Every Week!

    We hope you enjoy this layout pack. We look forward to hearing your opinions in the comment section below. Make sure you check out next week’s layout pack as well!

    The post Get a Free Photographer Layout Pack for Divi appeared first on Elegant Themes Blog.

  • Divi Plugin Highlight: DiviFlash

    DiviFlash is a third-party plugin for Divi that adds 40+ new modules to the Divi Builder. It also adds several extensions and includes WooCommerce and Advanced Custom Fields integration, as well as several other features. In this post, we’ll look at DiviFlash and see its features to help you decide if it’s the right product for your needs.

    DiviFlash Modules

    DiviFlash adds 40+ new modules to the Divi Builder. Some of those modules are disabled by default. You can enable and disable the modules in the DiviFlash Modules menu in the WordPress dashboard.

    DiviFlash Modules

    The modules are mixed within the regular Divi Modules in alphabetical order. They include a graphic in the module’s background, and their icons and text are purple, making them easier to find.

    DiviFlash Modules

    We’ll look at a few of the modules to see what they can do.

    Advanced Blurb

    The DiviFlash Advanced Blurb lets you display an icon or image, title, subtitle, content, button, a badge with two lines, and an item order option. Each element has independent Z-Index options for placements, styles, borders, box shadow, spacing, etc.

    DiviFlash Modules: Advanced Blurb

    Advanced Carousel

    The DiviFlash Advanced Carousel creates a carousel that works much like the Advanced Blurb. Add blurbs as cards and include an image or icon, title, subtitle, body content, a button, and item order. Style each element independently and change their order with sliders. Slider animation options control how the carousel works.

    DiviFlash Modules: Advanced Carousel

    Advanced Divider

    The Advanced Divider Module includes 10 divider types to choose from. One of the divider types is a custom divider. Display multiple lines and specify the number of lines and the line gap. The separator settings let you display an icon, text, Lottie, or no separator. The design settings include all the adjustments for the divider.
    Advanced Divider

    Advanced Heading

    The DiviFlash Advanced Heading gives you three heading elements, a divider with an optional icon, a divider line background, an infix background, and a suffix background. You can adjust the size of the divider and give it a rounded border. Choose the icon and its position. Style each element independently.

    DiviFlash Modules: Advanced Heading

    Advanced List

    The Advanced List Module lets you add list items as submodules. Add a title, description, and icon to each list item. Display them as a list or in a grid. For the icon type, choose between icons, images, text, Lottie’s, or none. You can always show the icons or have them show on hover. You can add an icon for the title.

    Advanced List

    Advanced Person

    The DiviFlash Advanced Person Module includes an image, name, title, description, and social icons. Adjust each element for color, spacing, border, fonts, etc. You can also adjust the social media buttons’ background color and icon color individually. This module includes 3 layout styles and adjustment options for all of the module’s elements.

    DiviFlash Modules: People

    Advanced Tabs

    The DiviFlash Advanced Tabs Module lets you create unique tabs and style them. You can add as many tabs as you want and style each element of every tab or use a standard styling for all the tabs. You can also style the active tab separately. Add images or icons and add a button. The tab settings include an animation for how the tabs are revealed.

    DiviFlash Modules: Advanced Tabs

    Before and After Slider

    The DiviFlash Before and After Slider lets you show two images in the same location and slide between them. Set the slide to horizontal or vertical and have the slider move on click or hover. You can also style the slider, change the icon and color, and add a blur to the icon where the two images meet. The images include individual filter adjustments.

    DiviFlash Modules: Before and After

    Breadcrumbs

    The Breadcrumbs Module adds breadcrumb navigation to your page. Specify the home page text, add an icon, choose a separator, and style the text with the design settings. Place the home icon on the right or left of the text. Choose between text or an icon for the separator. You can also include a custom page link, a search title, a 404 title, enable schema, and more.

    Business Hours

    The Business Hours Module gives you many ways to set up and style business hours. Each day is a separate submodule. Style them together or independently. Set the hours as a single time, or use the individual open, close, and divider options.

    DiviFlash Modules: Business Hours

    Data Table

    The DiviFlash Data Table lets you upload a file to create a searchable table. You can then style it like any other DiviFlash module. Upload a CSV, import a table, Google Sheet, Database Table, or import from Table Press. Show or disable pagination, search, information, order, allow multiple languages, etc.

    DiviFlash Modules: Data Tables

    Image Accordion

    The DiviFlash Image Accordion displays images in an accordion container and reveals the image in full when the user clicks or hovers. The first image takes the most space in the container, and all the others are shown as a slice of the image. Choose between a horizontal or vertical accordion, choose how it responds, animate the text, and more.

    DiviFlash Modules: Image Accordion

    Image Carousel

    The DiviFlash Image Carousel gives you lots of image options. Display images as a slide, cube, Coverflow, or flip. Add dot navigation, arrow navigation, image captions, image buttons, and choose hover effects. Like the other modules, every element can be styled individually.

    DiviFlash Modules: Image Carousel

    Image Mask

    DiviFlash Image Mask places a shaped mask over the image. It has 30 masks to choose from, and you can adjust the image position, mask size, and rotate every mask to create a unique design.

    DiviFlash Modules: Image Mask

    Packery Gallery

    The DiviFlash Packery Gallery displays your gallery in one of 10 different layouts. It resizes and rearranges the images for each layout to create different sizes and styles for the gallery. Some are uniform, while others are not. This creates lots of interesting galleries. Create a different gallery for desktops, tablets, and phones. Change the space between the images, add a load more button, choose hover effects, use a lightbox, and more.

    DiviFlash Modules: Packery Gallery

    Post Carousel

    The DiviFlash Post Element Module is a blog post card builder that displays posts in a grid. It includes 11 elements from the blog posts you can choose to display. You can add the elements you want to display in any order you want to display them. Display for the posts include the image, title, excerpt, author’s name, date, read more button, comments, a divider, and more. It also has overflow options and works like a regular carousel with slider options.

    DiviFlash Modules: Blog Post Carousel

    Post Grid

    The DiviFlash Post Grid Module works similarly to the Post Carousel in that it’s a blog card builder. It uses the same elements but displays the card in a grid or a masonry layout rather than a slider.

    DiviFlash Modules: Post Grid

    Scroll Image

    The Scroll Image Module adds a scrolling effect to any image when the visitor hovers over the image. You have control over the scroll direction, alignment, size, speed, etc. Add a frame, an overlay, a badge, and a caption, and enable a lightbox. You have control over the badge, including the text, icon, position, and hover options.

    Scroll Image

    Star Rating

    The Star Rating Module lets you place star ratings anywhere on your page. Choose between 5-star and 10-star ratings and set the rating value with a slider. Add a custom icon, show the rating number, enable a single rating, enable the title, add content, and enable schema. If you enable the rating number, you can show the number with or without a bracket, or show the number with or without the upper possible score. You can also choose the placement on the right or left of the icons. If you choose a single rating, it will display only one icon along with your number options.

    Star Rating

    Table

    DiviFlash’s Table Module lets you create tables by hand. Add multiple rows and then add your content to the row in an HTML editor. It even takes HTML as input so that you can add icons and other types of content. Style the odd and even backgrounds independently, and choose the type for the rows to make a row the header, footer, body, etc. It also includes row merge and column merge options.

    DiviFlash Modules: Table

    Testimonial Carousel

    DiviFlash’s Testimonial Carousel Module creates testimonials as cards and displays them in a slider. Add as many as you want and choose between slides and Coverflow for the carousel type. You can add star ratings, a company logo, and a quote icon.

    DiviFlash Modules: Testimonial Carousel

    DiviFlash Plugin Settings

    The extensions are enabled or disabled in the DiviFlash Dashboard menu found in the WordPress Dashboard.

    DiviFlash Extensions

    DiviFlash has four extensions. They include SVG and JSON file uploads, a Divi Library shortcode, and ACF support. All these are excellent extensions. The Divi Library shortcode lets you place a complete Divi layout anywhere you can place a shortcode. This opens a lot of design possibilities. ACF support integrates Advanced Custom Fields.

    DiviFlash Modules

    Menu Extension Settings

    DiviFlash also includes Menu Extension settings. These enable a bottom-line effect, hide the bottom border, and add space between the menu items.

    DiviFlash Modules

    Import/Export Settings

    DiviFlash has an Import/Export feature, so you can easily reuse your designs and settings.

    DiviFlash Modules

    DiviFlash Layout Packs

    The publisher has created 12 free layout packs that include the DiviFlash modules. They include multiple pages to help you get started on your website design. They are free to download.

    DiviFlash Modules

    Where to Purchase DiviFlash

    DiviFlash is available in the Divi Marketplace for $89. It includes unlimited website usage, a 30-day money-back guarantee, and one year of support and updates.

    DiviFlash Product Highlight

    Ending Thoughts

    That’s our look at DiviFlash. There are a lot of well-designed modules in this plugin. All are useful, and they’re fully customizable. I especially liked the blog and product card builders. It’s compatible with WooCommerce and Advanced Custom Fields and includes several extensions that add even more functionality to Divi. If you’re interested in expanding your Divi toolbox and adding more features to your Divi website, DiviFlash is an excellent choice.

    We want to hear from you. Have you tried DiviFlash? Let us know what you think about it in the comments.

    The post Divi Plugin Highlight: DiviFlash appeared first on Elegant Themes Blog.

  • Lessons Learned While Creating Products for Divi

    This article is part 1 of a 2-part series written by the founders of Divi Den. Look out for part 2 coming soon.

    Let’s start at the beginning and go over how it all started! On May 16, 2017, we launched our first Divi product, The Unicorn Bundle. The Unicorn was a huge success and sent us on a wild ride, with highs and lows, and everything in-between. Was it worth it? I hope my personal reflections in this article on our successes and failures will answer that for you.

    For more about our background and how we got into this, read The Divi Den Story.

    For those who don’t know us yet, let me give you a quick introduction:

    I am Kyra, co-founder and lead designer at Divi Den. We’ve been making products for the Divi theme niche for the last 6 years. We are now a fully remote team of 6 people. Likewise, we spend our days brainstorming, designing, and doing Divi stuff.

    In our time as Divi product creators, we’ve learned a lot of valuable lessons. In this post, my team and I will attempt to share the lessons we wish we’d known before we started — enjoy!

    Lesson #1 – Plan for your own success

    Sounds simple enough, right? Well, when we started researching the opportunities for Divi products, we didn’t think it was going to be our core business. We were thinking about a side hustle. It was all the rage about 4 or 6 years ago. Everyone was talking about it.

    Your side hustle should make you extra money while you sleep. Wow, sounds awesome! So naturally, we thought, how can we also make money while we sleep? The golden egg, so to speak. We were hungry and wanted a bite. We came up with a bunch of ideas.

    The basic criteria were:

    • Make one, sell many.
    • It must be a digital product.
    • We must make it ourselves.
    • It must be sold online.
    • Recurring income ideally.

    I won’t bore you with the bad ideas we came up with, but ultimately we decided to design and build premade Divi layouts and sell them on our website. At that time, we were building about 60 Divi websites per year. If there was one thing we knew how to do, it was building high-quality Divi websites. It was logical to extend that to building Divi products for other people to use too.

    It was a solid idea, but upon reflection, we were perhaps too casual about how we launched it. For example, our side hustle didn’t have a name or even a logo yet. So one weekend I just stuck a heart on a shopping bag and called it a day. The thought was… “You want to buy something?” Click the shopping bag.

    And now we are stuck with it. Sigh.

    Fast-forward 6 years and now Divi Den is our main business along with side projects. The logo is just one way in which we didn’t plan to succeed from the start. In hindsight, we should have treated it like a standalone product with its own domain name, logo, and business plan. Sure, we were caught off guard by how successful it was, but we still could have done some basic business best practices from the start that would have made growing our side project much less painful.

    Our advice: When you start something new, do it on a budget by all means but, make sure it can grow fast if there is interest. Start small but think big.

    Different logos representing Divi Den between 2010 and 2021

    The Divi Den logo history. Can you spot the shopping bag?

    Lesson #2 – Don’t just listen to your customer — understand where they’re coming from

    This really happened to me: In 2021, due to the pandemic, we got stranded in Spain. Everything is in Spanish. Even the ducks quack in Spanish. Luckily for us, we have a Spaniard on the team.

    It all happened innocently enough. We had to drop off a document in town. We parked the car and Christiaan hopped out to “drop it off.” Mom and I were sitting in the car chatting. 5 minutes go by, and then 10 minutes. In the corner of my eye, I see the dreaded parking attendant. We didn’t pay for parking. We jump out of the car, coins-in-hand, to attempt the parking meter machine.

    Easy right? Ha! Everything is in Spanish. We try this, try that. It’s not working! A few minutes later, in a flat panic, I text Josh, our Spanish team member, with a picture of the parking meter screen. Caption – HELP!!!

    What does Josh text back to me? “Try to click on the little British flag for English.”

    Oh man, the flag was right there, staring me in the face. But still, it was not obvious to me at that moment. I completely missed the English option. And here I am designing products for other people. Go figure. But that’s exactly my point. What may seem so clear to you personally, is not always as clear to everyone else. And this is the same approach we take with supporting our customers.

    Support interaction is now one of the key elements in our business. It’s humbling, and I think it’s almost as important as the product itself. The key to providing good support is to be flexible. Put yourself in your customers’ shoes. Be ready to react quickly. The reason they are emailing you is that they are frustrated. They just want it to work.

    Even if you get a rude email, it’s likely because the person tried to get it to work and failed. Now they have to stop everything, find the support form, fill it in, and wait for you to reply. (Still, I’m not sure how some people think being rude will get a faster reaction. In reality, it just makes you feel uneasy.) Despite the occasional rude person, we try to not see it as a problem. Rather, an opportunity to help.

    It’s worse, but still, if the person gives up altogether and stops using your service — that’s a lost customer!

    Lesson #3 – When people rely on you, act fast and get it done

    Because we create layouts for Divi, people tend to email us first when they encounter a bug with a layout. While the whole Divi community gets excited with new feature updates, we get a little concerned. The reason is that we have more than 2500 library items to review each time a new update rolls out. And we’ve had some challenging Divi updates in the past. People rely on us. Our layouts must work as expected.

    When new updates roll out, we literally stop everything. The whole team gets into bug-fixing mode. We read the Divi changelog to see if any updates might impact our designs. Then we start testing. When we find an issue, we log it, fix it and schedule it to be included in the next plugin update. When customers email support with an issue, we often provide the fix by email, before the update goes out. No need to wait for a plugin update when the solution has already been found.

    The demanding GDPR update

    One memorable update was about 4 years ago with the GDPR update. All our contact forms broke. The update was sent out on Thursday afternoon, which is typically our Friday morning. We spent the whole Friday and weekend making fixes while pushing out updates as fast as possible. Contact forms are critical for every website. It must collect and send info at all times.

    Our European members were most affected by this update. We even had a guy phone us. He got my mom on the phone, who had no idea what was going on, and he shouted at her. She came into the office looking a little pale and asked what was going on. Of course, we received the 5 email support tickets he sent. We already replied twice and were working on a solution. This is how it goes.

    With web design, many things can go wrong. What matters is how quickly you respond and find a solution to the problem. It’s almost second nature for us now, because we’ve been building Divi websites since 2014.

    Rollback feature

    In the last 5 years, the Divi updates have been smooth sailing. The introduction of the rollback feature in Divi was huge! It gives you breathing space. When an update fails… roll back baby. Such a great feature.

    Right now, we are excited about the new Divi 5 update. We are thrilled there is a beta we can test, so we are confident we will be ready for this update.

    Lesson #4 – Keep improving your product

    When Elegant Themes launched the Divi Theme Builder update, I dropped everything to design new layouts for it. To make it available to our subscribers, we added a new tab in the layout finder of the Divi Den Pro plugin. We sent out the notification email, thinking we covered all bases.

    And here we come back to the parking meter example I gave earlier. Our user interface was not obvious enough. We got a string of emails from people trying to add the library items via the normal expected procedure. Except this was not the right way to do it. With Divi Theme Builder layouts, there is a two-step process. You must first download it to your local machine, and then upload it via the Divi Theme Builder interface.

    To distinguish Divi Theme Builder templates from the others, we added a colored banner to each card. We also added a link to a knowledge base article, explaining how it works. It’s not perfect, but it’s definitely effective. Support emails on the topic disappeared overnight. A great result in the end because we were ready and we acted fast.

    Divi theme builder layouts as seen from the Divi Den Pro plugin

    The purple banner we introduced to identify Divi Theme Builder layouts

    Lesson #5 – Recurring income takes time to accumulate

    After the successful transition from serving web design clients to product sales, came a different set of challenges. Without a client, you suddenly don’t have creative briefs, no content or images, or anything you are used to as a web designer. This basically makes product design a bit like roulette. You have to make calculated guesses about what your future customer might want to buy.

    By then we had a loyal following of people who bought all our products. We started getting feedback that people didn’t want to have to install multiple assistant plugins to get a Divi blurb from the Unicorn collection and a person module from the Pegasus collection. We realized it would be better to just combine all layouts and make them available in one plugin. This was going to be a real coding challenge.

    To make our layouts stand out from the crowd, we need a bit of coding magic. It requires some custom CSS or JavaScript, and of course extra code for responsive views on mobile and tablet devices. We spent a lot of time optimizing the plugin and code delivery to be as lean as possible. Many months were spent fishing out code and CSS, breaking them up into smaller files. Then compressing them. The ultimate goal was for the plugin to detect if a Divi Den Pro module was present on a page. Then only load the necessary code for it to function as expected. Nothing more. Our coding team delivered big time.

    Once all that work was done, we launched the plugin and library membership with some immediate success. Memberships require dedication and take time to grow. And you must keep producing quality work. In the beginning the income was just a trickle. With the subscription model, we lost the ability to do a once-off product launch. Things were tight in the beginning, but we kept working at it.

    Two simple steps to keep your membership growing

    Step one, get the member. Step two, keep the member. A lot easier said than done.

    I can honestly say it took us many months to build up our customer base. While it was tough going at the beginning, we are so happy we persevered. The world is unpredictable, and it was undoubtedly the membership that got us through the pandemic. It also means I can relax a bit more. Get more experimental with designs because there’s no big pressure to launch the next shiniest product bundle that everyone wants to buy.

    While trying to build up our membership in the early days, we ran only one sale promo. What a flop that was, lol. What happened was people canceled their memberships and signed up at the new lower membership price. How to sink your own ship. So needless to say, we haven’t had a similar subscription sale since.

    But that does mean we have nothing for Black Friday. Christiaan (my co-founder) had the idea of selling a product lifetime deal for Black Friday. To be honest, I was not a fan of this idea. The whole point of going to membership was to not have to worry about where the next sale was coming from. But I relented, and it ended up being a great idea.

    The tricky part was to try to put a value on our product. We decided to calculate 3 years of full membership and then add the Black Friday discount on top. This strategy has worked for us. We used to do regular sales with our product bundles before we started our membership. There were sales for Halloween and Labor Day. You name it, there’s a sale for it. There’s even a sale for national Unicorn day!

    In the end, we realized people just wait for the sale. Meanwhile, your business is struggling with cash flow. So we now patiently wait all year and resist all temptations to have a sale. We just focus on Black Friday. This year will be our 7th Black Friday, and we already start Black Friday preparations in September. We always launch a new collection for Black Friday, 🙂 Our team typically takes off in August, so everyone is fresh and ready to tackle it.

    Enter the Divi Marketplace

    In 2020 Elegant Themes launched the Divi Marketplace. We didn’t join straight away as we were unsure how it could work for us. The Divi Den Pro plugin required lots of changes to comply with the Divi Marketplace approval requirements. But ultimately, we knew we had to join to be a part of their Black Friday promo. It turned out to be a nice-added bonus each year. And it’s definitely cool to get in those extra sales.

    For us, the true value of our product lies in the monthly revenue we get. On the Divi Marketplace, you can only offer unlimited yearly plans. Our product is built in such a way that it’s not practical or desirable to break it into smaller products. This makes Divi Den Pro one of the biggest products in the Divi Marketplace.

    Not everyone requires unlimited sites or can pay a big sum upfront. That’s why we offer alternatives on our own website. You’ll find subscriptions for 1 site, 5 sites, and 10 sites with monthly or yearly terms. This pricing structure allows people to start small, test it out, and then switch to a bigger plan as they grow.

    View of a Divi blog layout included with the original Unicorn Bundle

    A blog layout from the original Unicorn Bundle

    My advice to anyone starting out

    Plan small – think big, so you don’t get stuck with a brand you don’t love. There is no gold pot at the end of the rainbow. You may have made the sale while you were sleeping, but with that sale comes support. It is your approach to support that will make or break you.

    Also keep in mind, if you drastically change your core business, you should be financially prepared. We changed our business 3 times, and it always takes longer to grow than you might expect. Just keep working at it. Try not to make the same mistakes twice. And always have a plan B up your sleeve.

    And remember step two, if you have a membership, keeping the member is almost as hard as getting the member. You have to consistently keep your product fresh and updated.

    In closing, I would like to say a big thank you to all our members. Some of you guys have been with us all 6 years now! Your continued support has helped us grow, and for that, we are truly grateful, 🙂 Some of you we know, but to those of you who have never emailed, don’t be shy to pop into our inboxes and say hello. If you’re having a problem, please don’t struggle. We know our product pushes the boundaries.

    Or if you have an idea for a layout or a module, send us a feature request. We love designing things for you.

    Stay safe folks, Kyra :=)

    The post Lessons Learned While Creating Products for Divi appeared first on Elegant Themes Blog.