EDITS.WS

Tag: ecommerce

  • 6 Best WooCommerce Product Search Plugins in 2023

    A great search tool is an essential element of a fantastic customer experience for any ecommerce store. Plus, as customers are two times more likely to make a purchase online after searching on a retailer’s website, providing a modern search experience could even help you increase your store’s revenue. 

    The default search functionality included with WooCommerce works, but enhancing the experience for customers can help boost your reputation and set you apart from competitors. Thankfully, a WooCommerce search plugin can make it easy to upgrade search for faster, more accurate, and more intuitive results. 

    With so many WooCommerce search plugins available, finding the best one for your store can be confusing. So, we’ve put together this handy guide. Read on to explore the features you should be looking for in a WooCommerce product search plugin, and then discover our reviews of six of the best options. 

    What to look for in a WooCommerce search plugin

    Some of the most important features to look for when deciding on the best WooCommerce product search plugin for your site include:

    Instant search results

    It’s important that your WooCommerce product search plugin responds quickly to your customers’ search queries so that they can easily find the products they need. 

    Some plugins, such as Jetpack Search, give instant results, which means your customers start seeing the products that match their query as soon as they start typing. 

    Accurate results

    One of the main things to consider when choosing a WooCommerce search plugin is the accuracy of its product results. This will depend on two main factors:

    1. The plugin’s index. While the standard WordPress and WooCommerce search function works by querying your database each time a user searches, specialized plugins build their own index of your site. This means that the accuracy of this index determines how accurate your customer’s search results are. You should also make sure your customers can always discover your latest products by ensuring it automatically updates every time you add new products or pages to your store.
    2. The plugin’s algorithm. The algorithm used by your search plugin affects the results that it returns for visitors’ search queries. You should look for a WooCommerce product search plugin that allows you to customize its algorithm to meet the needs of your store. For example, you may decide that the plugin should give priority placement to products you currently have on sale or that you’ve recently added to your site.

    It’s also important that your product search delivers accurate results for complex searches. For example, Jetpack Search can instantly respond to complex, multi-faceted searches, such as ‘men’s xl blue shirt,’ which helps your customers find the product they need without needing to refine or filter their query. 

    Autocorrect

    Around one in ten search queries are misspelled, but the great news is that some of the leading WooCommerce search plugins, such as Jetpack Search, feature powerful autocorrect features. This means that a typo won’t get in the way of your customers finding the product they’re looking for. 

    Responsive design

    Over 40% of ecommerce sales take place on a mobile device. So, it’s vital that your website is responsive and delivers an excellent customer experience regardless of the size of their screen. The same is true for your WooCommerce product search plugin — it should display results in a way that looks great on both small and large screens. 
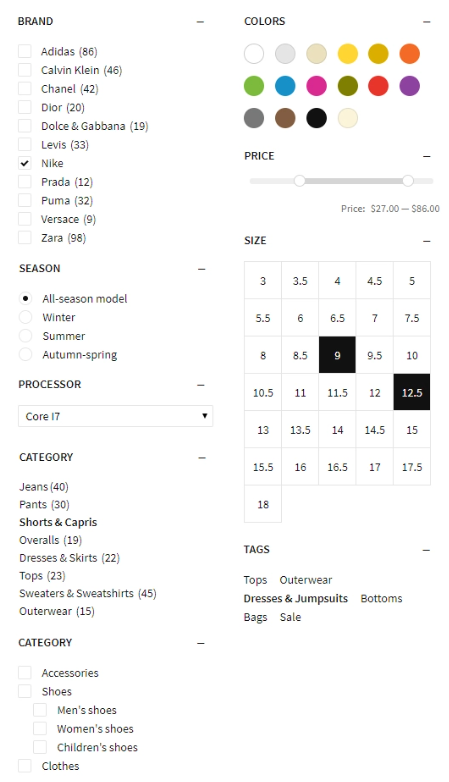
    Filter options

    Filters can help visitors narrow their search results to find the product they’re looking for. You should seek a WooCommerce search plugin that allows your customers to filter their search results by your product categories, tags, and attributes. It’s also important to ensure your plugin quickly applies these filters without needing to reload the page, so visitors enjoy a seamless search experience. 

    Foreign language support 

    If your store has different language options for your customers, then it’s also important that your search plugin works regardless of the language your customer uses. Some plugins offer support for a wide range of languages — for example, Jetpack Search provides comprehensive support for 38 popular languages, ranging from Arabic to Ukrainian, meaning all your customers can get instant search results and find the right product for them.

    A review of the best product search plugins for WooCommerce

    How do you find the best WooCommerce search plugin for your store? To help, we’ve looked at the top options and carefully compared them based on their features, pros and cons, ease of use, and pricing.

    Jetpack Search homepage design

    1. Jetpack Search

    Jetpack Search is one of the best WooCommerce search plugins available. It offers a wide range of advanced tools designed specifically for WordPress and WooCommerce to help your customers quickly find the right product for them. Thanks to its instant search functionality, the plugin displays results as soon as a customer begins to type, eliminating the need to wait for results to load. 

    Jetpack Search was made by the experts at Automattic — the same people behind WooCommerce and WordPress.com. This means it integrates seamlessly with WooCommerce and automatically indexes a wide range of product data, including attributes, variants, descriptions, tags, and categories. 

    Jetpack Search also fully supports faceted searches, which help your customers find the right product without refining or rephrasing their search. For example, a search for “blue size 8 maxi dress under $150” will prioritize results for maxi dresses with a product color attribute of blue that are available in size 8 and that have a price under $150. 

    The plugin has a wide range of features and options to provide a great search experience for your customers that blends perfectly with your site design — for example, choosing to display your results in an attractive grid layout with product pictures. The plugin also offers instant autocorrect, so a rogue typo or spelling mistakes won’t prevent your customers from finding the products they’re looking for. 

    Jetpack Search uses Automattic’s powerful cloud servers to index your site and conduct searches, which means it can deliver lightning-fast search speed regardless of the size of your store. And this is all without placing strain on your servers or slowing down your site. Automattic’s servers automatically index new products, so they’re discoverable within minutes of being added to your store.

    Features of Jetpack Search:

    • Instant product search without reloading the page
    • Instant filtering by a wide range of product attributes
    • Support for faceted search queries
    • Infinite scroll, which automatically loads more search results
    • Autocorrect
    • Advanced ranking algorithms to deliver highly-relevant results
    • Prioritization of results based on your store’s most popular products
    • Advanced customization options
    • Integration with Jetpack Stats to help you see what products visitors are searching for
    • Super fast indexing, so your search index will update within minutes of adding a product to your site
    • Support for over 38 different languages

    Pros of Jetpack Search:

    • Jetpack Search offers instant search, which means your customers can quickly find the product they’re looking for without waiting for a results page to load.
    • The plugin supports complex, faceted search queries, alongside instant filtering by product attributes, which makes it easy for your customers to refine their searches.
    • Jetpack Search can deliver highly accurate search results in a wide range of languages without needing an additional plugin.
    • The plugin also works perfectly with other content on your WordPress site, enabling your customers to easily find relevant blog articles or support pages.
    • Jetpack Search is a cloud-based service that uses Automattic’s speedy servers to index your site and deliver search results, which reduces the impact on your server. 

    Cons of Jetpack Search:

    • Visitors cannot add items to their cart directly from their search results. 

    Who is Jetpack Search most suitable for?

    Jetpack Search is one of the best WooCommerce search plugins and is an ideal solution for any WooCommerce store owner who wants to offer a best-in-class search experience to their customers.

    Ease of use

    Jetpack Search is simple to install. It will automatically replace the default WordPress search function and will get straight to work indexing your store. While this WooCommerce search plugin offers powerful customization options, they’re easy to understand and detailed documentation is available. Jetpack’s team of Happiness Engineers is also on hand to provide email support.

    Pricing

    Jetpack Search is available free of charge for three months. It then costs $8.25 per 10,000 records or search requests a month.

    Yith Ajax product search plugin

    2. YITH WooCommerce Ajax Search

    YITH WooCommerce Ajax Search is an advanced product search plugin from YITH, one of the leading producers of WooCommerce plugins. It adds Ajax-powered live search with autocomplete to your store, allowing customers to find the perfect product for them as soon as they start typing their query. 

    The plugin’s premium version adds many additional features, including indexing a wider range of product data, such as product excerpts, descriptions, and SKUs. It also allows you to show product images in your search results and provides instant filtering, so your customers can refine their search results to find the product they’re looking for. 

    Features of YITH WooCommerce Ajax Search:

    • Ajax-powered live search
    • Autocomplete 
    • The ability to show product images, descriptions, prices, and promotional banners in search results (premium only) 
    • Indexing of categories, SKUs, excerpts, tags, and site posts and pages (premium only)
    • A customizable search box and results pages
    • Automatic indexing for new products
    • The ability to exclude out-of-stock products from search results (premium only)
    • Foreign language support via WPML

    Pros of YITH WooCommerce Ajax Search:

    • The plugin enables your customers to get instant results for their search queries, and with the premium version, they can see results that include a wide range of product information and attributes.

    Cons of YITH WooCommerce Ajax Search

    • The plugin lacks some of the advanced features offered by other premium WooCommerce product search plugins, including autocorrect and support for faceted search.
    • The plugin uses your site’s servers for indexing and processing search requests, which could impact your site’s speed and take up space on your server.

    Who is YITH WooCommerce Ajax Search most suitable for?

    Due to the comparatively limited feature set and the use of your own server space and bandwidth to perform searches, YITH WooCommerce Ajax Search is best suited to relatively small WooCommerce stores. 

    Ease of use

    The plugin is easy to install and activate and automatically starts indexing your products. Documentation is provided, and email support is available for all premium subscribers. 

    Pricing

    A free version of the plugin is available, which offers Ajax-powered search with autocomplete. The premium version unlocks all features for $65 a year.

    WooCommerce Product search demonstration

    3. WooCommerce Product Search 

    WooCommerce Product Search is a search plugin developed by itthinx, who also produces a number of popular WooCommerce extensions. The plugin offers instant live search and provides a wide range of options to customize search results, including adjusting the weighting the algorithm places on different product categories or content types. 

    WooCommerce Product Search also provides advanced search statistics and business insights, allowing you to spot trends in your customers’ searches and discover opportunities for growth by reviewing search terms that didn’t generate any results. Your customers can also instantly filter their search results using intuitive icons, including filtering by color, category, and price. 

    Features of WooCommerce Product Search:

    • Instant live search
    • An add to cart option on both live search results and the search results page
    • The ability to index a wide range of product data and attributes, including SKUs, price, categories, tags, and titles 
    • The ability to display product images in search results 
    • Instant filtering by product attribute, tags, categories, keywords, or price range
    • Automatic integration with WooCommerce and many popular themes
    • Search statistics and business insights
    • A customizable algorithm and search weighting 
    • Automatic indexing of new products

    Pros of WooCommerce Product Search:

    • The plugin offers live search, which includes product images by default, and your customers can add products straight to their cart from the live search results. 
    • WooCommerce Product Search is compatible with many popular WooCommerce themes, which minimizes the need to make custom CSS changes. 

    Cons of WooCommerce Product Search:

    • The plugin does not offer autocorrect or auto-complete. 
    • While search filters are offered, the plugin does not support faceted search requests.
    • The plugin uses your server’s storage and resources to index your site and process search requests, which could cause issues if you have a large number of products or a basic hosting package.

    Who is WooCommerce Product Search most suitable for?

    As WooCommerce Product Search lacks some of the features offered in other premium search plugins, it’s most suited for small ecommerce store owners who want to improve their search function for a relatively low cost. 

    Ease of use

    WooCommerce Product Search includes an automated setup wizard that integrates the plugin with your site and activates the most common features and settings. Detailed documentation is also provided alongside support from the developer through the WooCommerce helpdesk.

    Pricing

    WooCommerce Product Search costs $49 per year.

    Doofinder WooCommerce Advanced Product Search homepage

    4. Doofinder

    Doofinder is an ecommerce search provider that works with a wide range of platforms, including WooCommerce. It processes your visitors’ search requests on its own servers, which means that it can cope with a large volume of customers searching at the same time without slowing down your site. 

    Doofinder’s live search feature shows search results to your customers as soon as they start typing their results. Its natural language processing technology helps deliver relevant results to your customers by filtering out typos and considering a range of information like product titles, descriptions, and attributes. Doofinder also supports faceted searches and offers instant filtering, so your customers can refine their search results to find the product they’re looking for. 

    Features of Doofinder:

    • Live search with autocomplete 
    • Integration with the native WordPress and WooCommerce search functions
    • Faceted searches and instant filtering
    • Support for over 30 languages
    • Search logging and analytics
    • Customizable results (Pro plan and above)
    • Automatic indexing of new products
    • Recommended products and product banners (Pro Plan and above)
    • A hosted search solution
    • Support for visual and voice search
    • A customizable search box
    • A fully responsive, mobile-friendly design

    Pros of Doofinder:

    • Doofinder offers a range of advanced features, including autocomplete and instant search, which helps create a seamless search experience for your customers.
    • As Doofinder is a hosted service, indexing and processing search requests don’t use your server’s resources. 

    Cons of Doofinder:

    • Doofinder has a high monthly cost, which varies based on the number of requests each month. Requests include indexing, as well as any searches. The instant search feature can also send multiple requests per search, making pricing unpredictable.

    Who is Doofinder most suitable for?

    Due to Doofinder’s relatively high cost, it’s best suited for large WooCommerce stores. 

    Ease of use

    Doofinder’s WooCommerce search plugin simplifies the process of connecting your store to the Doofinder service. While most features can be accessed within the WooCommerce dashboard, some advanced features can only be accessed on Doofinder’s site. This may be confusing for some users. Doofinder has documentation available and email support is provided for all paid plans.

    Pricing

    Doofinder offers a free plan with limited features which supports up to 1,000 requests per month. The basic plan offers more features and costs $35 a month for up to 10,000 requests. The Pro plan unlocks more features and costs $59 a month for up to 10,000 requests. 

    Advanced Woo Search homepage

    5. Advanced Woo Search

    Advanced Woo Search is a highly customizable WooCommerce product search plugin that aims to deliver the most relevant product search results to your customers. It uses an advanced search algorithm to index and search through a wide range of product information, including descriptions, titles, and variants. The plugin is created by a full-time WordPress and WooCommerce developer, and is designed to seamlessly integrate with many popular WooCommerce plugins. 

    The plugin uses Ajax to display visitors’ search results without them having to reload the page, and you can choose which elements are shown in your search results, including images and prices. In addition, the Pro version of the plugin unlocks additional features, including indexing product attributes, the ability to put an ‘add to cart’ button next to each search result, and instant results filtering, so your customers can refine their search results. 

    Features of Advanced Woo Search:

    • Fully customizable search results, including adding product images and prices 
    • The ability to search across all product variations
    • Options to exclude products, categories, or tags from search results
    • The capability to search for synonyms and ignore stop words
    • Search filters (Pro version only)
    • The ability to extend the search index to include product attributes and custom fields (Pro version only)
    • An add to cart button in search results (Pro version only)
    • Google Analytics integration
    • A range of ready-to-go search layouts and styles (Pro version only)
    • Foreign language support through integrations with WPML, Polylang, qTranslate, and WooCommerce Multilingual

    Pros of Advanced Woo Search:

    • The plugin allows a high level of customization of how search results appear, so you can tailor it to display the information you want your visitors to see and match your site’s design. 
    • The plugin automatically searches for synonyms and ignores stop words, which helps make sure that relevant products are not unnecessarily excluded from search results. 

    Cons of Advanced Woo Search:

    • The plugin doesn’t support faceted searches, so customers may have to refine their results using filters to find the right product for them. 

    Who is Advanced Woo Search most suitable for?

    As it uses your site’s servers to carry out searches and index your site, Advanced Woo Search is best suited to small to medium-sized stores. The free version offers many useful features to enhance your site’s search experience, which may make it a good choice for stores with very limited budgets.

    Ease of use

    The plugin is easy to install and has been designed to automatically integrate with many popular WooCommerce themes. There’s detailed documentation available, and the plugin’s author regularly responds to support requests for free users via the plugin’s support forum. Email support is offered for users of the premium version.

    Pricing

    There’s a limited free version available on the WordPress plugin directory. The ‘Pro’ version unlocks all features and costs $69 a year for a single website.

    Smart WooCommerce Search homepage

    6. Smart WooCommerce Search

    Smart WooCommerce Search is a product search plugin that offers your customers an instant live search experience. The plugin, developed by a WordPress developer known as YummyWP, will automatically index your product descriptions, tags, categories, and SKUs.

    Alongside adding images and prices to your search results, the plugin’s premium version allows your customers to add items to their cart straight from the search result. The premium version also supports the display of labels, which means you can clearly show customers which products are featured, on sale, or out of stock. It also aims to improve the relevancy of search results by extending the plugin’s index to include a wider range of data, including product attributes, variations, and custom fields. 

    Features of Smart WooCommerce Search:

    • Instant live search
    • The display of images and prices in results
    • Indexing of product descriptions, categories, tags, and SKUs
    • Exclusion of out of stock products from search results
    • Compatible with a range of page builders, including Elementor, Visual Composer, and Divi
    • The ability to extend the search index to include product attributes, variations, brands, and custom fields (pro only)
    • Capability to searches for synonyms and ignore stop words (pro only)
    • An add to cart button on search results (pro only)
    • Foreign language support through integration with WPML and Polylang (pro only)

    Pros of Smart WooCommerce Search:

    • The plugin offers a simple way to add instant live search to your store, so customers don’t have to wait for a search results page to load to find the items they’re looking for.
    • The plugin is compatible with a range of popular page builders.

    Cons of Smart WooCommerce Search:

    • The plugin lacks many features found in other WooCommerce product search plugins, such as filtering and faceted search support.
    • While the synonyms feature can be used to enter commonly misspelled words and their correct spelling manually, there is no automatic autocorrect feature.
    • The plugin doesn’t offer the ability to customize the search algorithm, meaning you can’t increase the weighting given to specific products, categories, or tags.
    • The plugin uses your site’s server to index your site, which may mean it takes longer to return results for larger stores.

    Who is Smart WooCommerce Search most suitable for?

    Smart WooCommerce Search is best suited to small store owners who want to add live search functionality to their site without some of the more advanced features offered by other plugins.

    Ease of use

    The plugin is easy to install and automatically replaces the default WordPress search function. The developer has provided detailed documentation and offers email support for all plugin users.

    Pricing

    There’s a limited free version available in the WordPress plugin directory. A premium version of the plugin is available for a one-time cost of $49.

    Comparison of the top WooCommerce search plugins

    Jetpack Search YITH WooCommerce Ajax Search WooCommerce Product Search Doofinder Advanced Woo Search Smart WooCommerce Search
    Live Search Yes Yes Yes Yes Yes Yes
    Autocorrect Yes No No Yes No No
    Instant filtering Yes Premium Only Yes Yes No Pro only
    Support for faceted searches Yes No No Yes No No
    Customizable results Yes Premium Only Yes Pro Plan only.  No Pro only
    Hosted service to remove strain on your site’s servers Yes No No Yes No No
    Foreign language support Yes – 38 languages. Requires additional plugin. No Yes – over 30 languages.  Requires additional plugin. Pro only. Requires additional plugin.
    Cost Free for the first 3 months, then only $8.25 a month per 10,000 records Limited free version. Premium version $65 a year. $49 a year. The basic plan is $35, and the Pro Plan is $59 a month for up to 10,000 requests. A limited free plan supports 1,000 requests a month.  Limited free version. Pro version $69 a year. Limited free version. Premium version $49 one time.

    Factors to consider when choosing a product search plugin

    Does it seamlessly integrate with WordPress and WooCommerce?

    You don’t want to spend hours troubleshooting issues or waste money on something that doesn’t work. Solutions available in the WordPress repository or WooCommerce extension library are the most likely to work smoothly with your store. Check reviews and documentation before installing. 

    Could it slow down your site?

    Nearly all WooCommerce search plugins use your site’s web server to index your product and carry out your customers’ search requests. Depending on the number of products in your store and your web hosting package, this could slow down your site. 

    But, the great news is that the top plugin in our review, Jetpack Search, uses Automattic’s speedy cloud servers to index your products and search your site — this means that no matter how many products you add to your store, you are guaranteed to always offer a lightning-fast experience to your customers. 

    Does it update its search index in real time?

    Your customers can only find your products through search if they’re added to the index of your WooCommerce search plugin. Therefore, it’s important that the plugin you choose indexes your products as soon as they are added to your store. For example, Jetpack Search automatically indexes your site using powerful cloud servers, meaning products are visible in search results within minutes of them being added to your store.

    What support is offered?

    It’s also important to consider the support available. Is there a way to directly reach out to an expert for support with the plugin, or are you limited to asking your questions through a forum? The top plugin in our review, Jetpack Search, allows you to easily raise support tickets, which are responded to by a dedicated team of Jetpack Happiness Engineers, who are experts in WordPress and WooCommerce.

    Does it offer a good value for your money?

    You should also consider if your WooCommerce search plugin is cost-effective. You should consider the features it offers against its cost. For example, Jetpack Search offers an excellent value for most WooCommerce stores as it provides a lightning-fast search experience with a wide range of advanced features, all for a relatively low monthly cost. 

    Conclusion: What is the best product search plugin for WooCommerce?

    The best product search plugin for WooCommerce will depend on several factors, including your experience with WooCommerce and WordPress, the size of your site, and if you need the plugin to offer features such as instant search. 

    But it’s clear from the comparison table above that Jetpack Search is the best product search plugin for WooCommerce. Jetpack Search is an affordable, hosted search solution that can easily scale with your store as your business grows.

    It offers an impressive range of premium features, including instant search and powerful product filtering. It’s simple to set up and works automatically behind the scenes to keep your site’s search index up to date and deliver fast search results to your customers without using your valuable server resources. 

    Plus, as it’s made by the people behind WooCommerce and WordPress.com, it’ll integrate seamlessly into your site, and you can get help from Jetpack’s team of Happiness Engineers if you have any questions about how to set up, install, or optimize the plugin.

    Frequently asked questions about WooCommerce product search plugins

    What makes a good WooCommerce product search plugin?

    A good WooCommerce product search plugin should provide fast and accurate search results that help your customers find the products they’re looking for. It should also offer a range of search features that ensure your store’s search experience is seamless, including instant search, filtering, and support for faceted search. 

    A good WooCommerce search plugin should also be easy to use and automatically update its index every time you add new products to your store. Jetpack Search, the top plugin in our review, offers all these features plus many more and is one of the best WooCommerce search plugins available. 

    How much does a top-tier WooCommerce product search plugin cost?

    WooCommerce product search plugins vary significantly in price. The top plugin from our review, Jetpack Search, is fantastic value, offers a wide range of powerful features, and is available to try free of charge for three months. Then, it’s $8.25 for 10,000 records or search requests per month.

    Is it easy to set up a product search plugin on WooCommerce?

    This varies massively between plugins. Jetpack Search is the top WooCommerce search plugin in our review and allows you to easily set up your customers’ search experience. You can also fully customize your site’s search functionality to help customers find the products they are looking for.

  • Top 10 Best Online Payment Solutions for Business Owners and How to Choose the Right One

    Online payment solutions are critical to starting an online business. They let companies securely accept different currencies and payment methods, from credit cards to digital wallets, making purchasing easier for customers. To help you choose the best one for your needs, we’ll go over 10 online payment solutions and discuss each option’s key features, pricing, […]

    Read More…

    The post Top 10 Best Online Payment Solutions for Business Owners and How to Choose the Right One appeared first on Hostinger Tutorials.

  • Shopify WordPress Integration: How to Make Them Work Together

    Shopify is good at ecommerce, but so-so at content management. WordPress is good at content management but many people prefer Shopify to WooCommerce for online selling. If you’re adamant about using Shopify for ecommerce, but WordPress is a crucial part of your content management process, it’s essential to learn about the Shopify WordPress integration.

    The post Shopify WordPress Integration: How to Make Them Work Together appeared first on Themeisle Blog.

  • Tiered Pricing Table for WooCommerce Tutorial: Bulk Price Discounts

    In this step-by-step tutorial, you’ll learn how to set up tiered/quantity-based pricing on your WooCommerce store, along with adding a frontend tiered pricing table to your single product pages.

    The post “Tiered Pricing Table for WooCommerce Tutorial: Bulk Price Discounts” first appeared on WP Mayor.

  • How to Sell Audiobooks Online (3 Simple & Easy Ways)

    Do you want to sell audiobooks online?

    By selling your books as downloadable audio files, you can make money without having to pay for shipping or printing. You can also sell the same audio file an unlimited number of times.

    In this article, we will show you how to easily sell audiobooks online using WordPress.

    How to sell audiobooks online

    Why Sell Audiobooks Online?

    There are lots of ways to share your experiences or knowledge online. You can create an online course, record a webinar, or even start a podcast.

    Another option is recording that information as an audiobook. This is a great way to collect everything you want to say into a single, downloadable file that’s easy to distribute and sell to other people.

    Unlike traditional printed books, you don’t have to pay printing or shipping fees for your audiobooks. You also don’t have to worry about physical storage, supplies, or managing your inventory. All of this means lower costs and bigger profits, which makes audiobooks the perfect way to make money online with WordPress.

    If you have an ebook, then there are plenty of services that can help you turn it into an audiobook including ACX. Every audiobook you make on ACX will be available on Audible.com, Amazon.com, and iTunes, but it’s also a good idea to add the audiobook to your own website.

    With that in mind, let’s see how you can sell audiobooks online. Simply use the quick links below to jump straight to the method you want to use.

    Method 1. How to Sell Audiobooks With Easy Digital Downloads (Recommended)

    The easiest way to sell audiobooks online is by using Easy Digital Downloads. Easy Digital Downloads is one of the best eCommerce WordPress plugins, and it’s designed specifically to sell digital products.

    How to sell an audiobook in WordPress using Easy Digital Downloads

    Unlike general eCommerce plugins, Easy Digital Downloads has the specific features you need to promote, sell, and distribute digital products with ease. This means you don’t have to waste time and effort with unnecessary settings, such as configuring your store’s shipping.

    Even better, if you’re using SiteGround then Easy Digital Downloads already comes pre-installed on their EDD plan, so you can start using it straight away.

    If you’re using a different hosting provider, then you’ll need to install and activate the Easy Digital Downloads plugin. If you need help, then please see our guide on how to install a WordPress plugin.

    Upon activation, go to Downloads » Settings in the WordPress dashboard.

    The Easy Digital Downloads plugin's settings

    Even though you’re selling audiobooks, you’ll need to set your store’s location. This allows Easy Digital Downloads to auto-fill some fields in the order form, which will help improve the customer experience.

    Easy Digital Downloads also uses your location to calculate sales tax.

    To add your location, simply open the ‘Business Country’ dropdown menu. You can then choose where your business is based.

    Setting the location for your audiobook store

    Next, find the ‘Business Region’ field.

    Here you can open the dropdown and choose the region where your store operates from.

    Setting the region for your online audiobook store

    After making these changes, go ahead and click on Save Changes to store your settings.

    Next, you’ll need a way to accept credit card payments in WordPress by clicking on the ‘Payments’ tab. Then make sure the ‘General’ tab is selected.

    Adding payment gateways to your WordPress website

    In the Payment Gateways section, check the box next to each gateway that you want to add to your WordPress blog or website.

    If you add more than one payment method, then you’ll need to choose a default gateway.

    Adding multiple payment gateways to an online store

    You can use any gateway you want, but Stripe can accept credit cards as well as Apple Pay and Google Pay. This is why we recommend using Stripe as the default payment gateway.

    With that done, click on the ‘Save Changes’ button.

    You’ll now see some new tabs where you can configure each payment method.

    Configuring payment gateways including Stripe

    Configuring the payment gateway will be slightly different depending on which gateway you’re using, but Easy Digital Downloads will walk you through the process.

    Once you’ve set up at least one payment gateway, you’re ready to start uploading audiobooks to your WordPress website.

    To create a digital product, select Downloads from the left-hand menu. Then, click on the ‘Add New’ button.

    Adding a downloadable audiobook to your WordPress website

    You can now type a name for the product into the ‘Enter download name here’ field. This will appear on the audiobook’s page, so you’ll want to use something that catches the visitor’s attention and accurately describes the book.

    Next, type out the description that will appear on the ebook’s product page. You’ll want to give visitors all the information they need to decide whether this book is right for them.

    Adding a title to a downloable audiobook

    Many online stores use product categories and tags to help shoppers find what they’re looking for. If you’re selling lots of audiobooks, then these categories and tags help visitors find related audiobooks, which can get you more sales.

    You can create new categories and tags in the Categories and Tags boxes.

    Adding categories and tags to a downloadable ebook

    For more information, see our step-by-step guide on how to add categories and tags for WordPress pages.

    Next, you’ll want to set a price by scrolling to the Download Prices section. Here, type in how much visitors will pay to download the audiobook.

    Adding prices to an audio book in WordPress

    You’re now ready to upload the audio file that you want to sell. When it comes to audio, WordPress supports mp3, ogg, and wav. It also supports m4a, although this format may not work on all browsers.

    Pro Tip: If you want to sell audiobooks in a file type that WordPress doesn’t support, then see our guide on how to allow additional file types in WordPress.

    To add an audio file, simply scroll to the Download Files section.

    How to upload a downloadable audiobook to WordPress

    In the File Name field, type a name for the file that shoppers will get when they buy the audiobook. Then, simply click on ‘Upload a File.’

    You can now choose any audio file from the WordPress media library, or you can upload a new audiobook from your computer.

    Finally, you’ll need to add a product image, which will usually be your audiobook’s front cover. Simply scroll to the Download Image section and then click on the ‘Set Download Image’ link.

    Adding a featured image to your audiobook

    This launches the WordPress media library where you can choose an image or upload a new file from your computer.

    When you’re happy with your digital download, click on the Publish button to make it live.

    Easy Digital Downloads will now create the audiobook as a downloadable product, but visitors still need a way to access the product page.

    This might mean adding the page to your website’s menu, creating a sales page where you advertise all your audiobooks, or even adding the book to a custom home page.

    No matter what method you choose, you’ll need to know the audiobook’s URL.

    To get this link, simply go to Downloads Â» Downloads. Then, find the audiobook you just created, and click on its ‘Edit’ link.

    How to get a link to a downloadable audiobook product

    You will then find the URL directly below the product title.

    Now, you can link to this product page from any area of your website, simply by using its URL. To learn more, see our step-by-step guide on how to add a link in WordPress.

    Easy Digital Downloads also creates a ‘Purchase’ button for this particular audiobook. Visitors can click this button to add the audiobook to their cart.

    Adding an audiobook purchase button to an online store

    You can add the button for this book to any page, post, or widget-ready area. This allows visitors to start the purchasing process without even Needing to visit the individual product’s page.

    To get the audiobook’s shortcode, simply scroll to its Download Settings section. You can then copy the text in the ‘Purchase Shortcode’ field.

    Adding an audiobook to your site using a product shortcode

    For more information on placing the shortcode, please see our guide on how to add a shortcode in WordPress.

    Every time someone buys an audiobook from your website, Easy Digital Downloads will send them an email and download link.

    A purchase receipt for an audiobook

    While this email has everything the customer needs to access their download, it’s a good idea to customize it. For example, we recommend adding your own logo and branding.

    To customize the default email, simply go to Downloads » Settings. Then click on the ‘Emails’ tab.

    Customizing the Easy Digital Download emails

    When you’ve finished making changes, you may want to send a test email so you can see how the message will look to your customers.

    To do this, simply click on the ‘Send Test Email’ button and Easy Digital Downloads will send an email to your admin email address.

    Sending a test email for your downlodable audiobook

    Have you clicked on the ‘Send Test Email’ button, but haven’t got a test email? If your site isn’t sending emails correctly, then customers won’t be able to download your audiobook.

    With that in mind, you can follow our guide on how to fix the WordPress not sending email issue. You can use WP Mail SMTP to make sure the purchase confirmation emails arrive safely in the customer’s inbox.

    When you’re happy with how the email looks, you can go ahead and click on the ‘Save Changes’ button.

    This is all you need to start selling audiobooks online. However, Easy Digital Downloads has lots more advanced features that can help you sell audiobooks.

    For more information on Easy Digital Downloads, please see our guide on how to sell digital downloads on WordPress.

    Method 2. How to Sell Audiobook Memberships (Best for Recurring Revenue)

    Another option is using your audiobooks to create recurring revenue streams.

    For example, you might offer members unlimited monthly or annual access to all your audiobooks for a membership fee. In this way, you can get reliable recurring revenue over a longer period of time.

    How to add an audiobook to your site using MemberPress

    A membership site is also a great choice if you’re releasing your audiobooks as a series.

    If you want to get recurring revenue, then MemberPress is the best WordPress membership plugin. It allows you to accept payments, create an unlimited number of membership levels, restrict access to audiobook pages based on membership subscription, and more.

    First, you need to install and activate the MemberPress plugin. For more details, see our step-by-step guide on how to install a WordPress plugin.

    Upon activation, go to the MemberPress » Settings page to configure the plugin settings.

    How to configure the MemberPress plugin

    To start, you’ll need to set up a payment gateway.

    Out of the box, MemberPress supports PayPal (Standard, Express, and Pro), Stripe, and Authorize.net. You simply need to select the payment method you want to use and then type in the required credentials, such as your PayPal email address.

    Adding a payment gateway to a membership site

    You may want to add multiple methods, so members can use their preferred gateway. When that’s done, don’t forget to click on the Update Options button to save your settings.

    With the setup out of the way, it’s time to create one or more membership levels. These are the subscriptions that visitors will buy to access your audiobooks, or other content.

    MemberPress allows you to offer different content for different membership levels. For example, you might create Bronze, Silver, and Gold memberships and then give members access to different audiobooks.

    To create the first membership plan, go to the MemberPress » Memberships page and then click on the ‘Add New’ button.

    Adding a membership level to your audiobook website

    On the next screen, you’ll need to provide a title for the membership plan and then add details in the post editor.

    After that, you can set the pricing, billing type, interval, and expiration under the ‘Membership Terms’ section.

    How to sell audiobooks online using MemberPress

    Next, scroll to the Membership Options box below the editor.

    Here, you can customize the plan permissions and membership options.

    Adding a membership level to your WordPress blog or website

    When you’re happy with how the plan is set up, go ahead and click on ‘Publish.’ To create more membership levels, simply repeat the same process described above.

    Once you’ve created all the membership levels, it’s time to add some access rules. These allow you to restrict access to your audiobooks based on the user’s membership plan.

    Just go to MemberPress » Rules and then click on the Add New button.

    Adding a new rule to your WordPress membership site

    Here, you can create all kinds of access rules, but you’ll typically start by selecting the audiobook that you want to restrict access to.

    Under ‘Protected Content,’ open the dropdown menu and choose an option from the list. This might be the specific page where you embedded the audio file, content that has a particular tag, or any other option from the list.

    Creating content restriction rules in WordPress

    After that, open the ‘Access Conditions’ dropdown and choose ‘Membership.’

    In the second dropdown menu, select the membership level people will need in order to access this content.

    Creating subscriptions for your audiobooks

    There are more settings that you can configure, but this is all you need to create a simple access rule.

    When you’re happy with how the rule is set up, click on ‘Save Rule.’ To create more access rules, simply follow the same process described above.

    Now that everything is set up, you’ll need to make sure visitors can buy memberships and log into their accounts. Thankfully, MemberPress comes with ready-made forms that you can add to your site.

    We recommend adding the MemberPress login widget to a widget-ready area, so members can log in from any page.

    Simply head over to Appearance » Widgets and add the ‘MemberPress login’ widget to the sidebar or similar section.

    Adding a MemberPress login widget to WordPress

    To learn more, please see our guide on how to add and use widgets in WordPress.

    Don’t forget to click on the ‘Update’ button to save your widget settings.

    There are a few different ways to add a signup page to your website, but MemberPress automatically creates a registration page for each membership level. This means you can simply add these pages to your main navigation menu.

    In your WordPress dashboard, go to Appearance » Menus. In the left-hand menu, simply click to expand the ‘Memberships’ section.

    Adding membership subscriptions to your WordPress website

    You’ll now see a list of all the different MemberPress levels.

    To add a membership to the navigation menu, simply check the box next to it and then select ‘Add to menu.’

    How to sell audiobooks online

    For step-by-step instructions, please see our guide on how to add a navigation menu.

    When you’re happy with how the menu is set up, click on ‘Save Menu.’

    At this point, you’ve created a website where visitors can buy audiobook subscriptions. However, MemberPress has lots more settings you can use to sell audiobooks, grow your brand, and get more members.

    For more information about MemberPress, check out our ultimate guide to creating a WordPress membership site.

    Method 3. How to Sell Audiobooks With WooCommerce (Best For Online Stores)

    Easy Digital Downloads makes it easy to sell audiobooks on any WordPress blog or website, without you having to configure lots of unnecessary settings like shipping and handling.

    However, if you’ve already created a WooCommerce store, then you can sell digital products like audiobooks using this popular eCommerce plugin.

    How to sell an audiobook online using WooCommerce

    Although it’s mostly used to sell physical products, you can add support for digital products by going to WooCommerce » Settings and then clicking on the ‘Products’ tab.

    Here, click on the ‘Downloadable products’ link.

    Creating downloadable WooCommerce products

    You can now open the ‘File download method’ dropdown and choose an option from the list.

    When you’re selling digital downloads, there is a risk that customers may share the direct link with other people. This allows people to download your audiobook without paying.

    ‘Force Downloads’ helps to protect your site from direct linking, so it’s the recommended method. However, just be aware that very large files may result in a timeout, especially if your server has limited resources.

    If this happens, then you may need to change your WordPress hosting plan or select a different file download method.

    You may also want to enable the checkbox next to ‘Allow using redirect mode (insecure) as a last resort.’ If WooCommerce encounters any problems, then this setting will deliver the audiobook via an unsecured redirect link rather than showing an error.

    This is a much better customer experience.

    WooCommerce's downloadable product settings

    The second option is ‘X-Accel-Redirect/X-Sendfile,’ which serves the file directly to the customer. This protects the audiobook from unauthorized downloads without impacting your site’s performance.

    However, this method requires you to install and enable the X-Accel-Redirect/X-Sendfile module on your server, so it’s not very beginner-friendly. Depending on your plan, you may also need to speak to your WooCommerce hosting provider.

    The final option is ‘Redirect only,’ which uses a direct link to the file. This means your audiobook isn’t protected and anyone can access it using the URL. That said, we don’t recommend the ‘Redirect only’ method.

    After selecting a download method, you can choose whether visitors must be logged into an account in order to download the audiobook.

    Allowing guest checkout can get you more sales and downloads, but requiring users to register with your online store can help you do lead generation.

    To make this decision, either enable or disable the ‘Downloads require login’ checkbox.

    How to disable guest checkout for audiobooks in WooCommerce

    By default, customers can download the audiobook while their order is processing.

    If you want to wait until the order is complete, then uncheck the following box: ‘Grant access to downloadable products after payment.’

    By default, WooCommerce will download the audiobook to the customer’s computer.

    Most of the time this is the best customer experience, but you can set the file to open in a new tab instead. The customer can then decide whether they want to save the file.

    There are some use cases where this may be the better option. For example, if you’re showing the customer a free sample, or your audiobooks are short enough to enjoy in one sitting.

    In this case, you may want to check the box next to ‘Open downloadable files in the browser.’

    How to set up downloadable files in WooCommerce

    When you’re happy with the settings you’ve entered, click on ‘Save Changes.’

    With that done, you’re ready to add the audiobook as a downloadable product by going to Products » Add New. Here, you can type in a title, add a description, upload a product image, and set the price as normal.

    Creating a downloadable WooCommerce product

    Then, scroll to ‘Product Data’ and check the box next to ‘Downloadable,’ which adds some new settings.

    To start, click on ‘Add File.’

    Adding a downloadable audiobook to a WooCommerce online store

    You can now either choose the audiobook from your media library or upload a new file from your computer.

    After that, type in a filename for the audiobook.

    Adding a downloadable audiobook in WooCommerce

    By default, customers can download the audiobook as many times as they want, for as long as they want.

    If you want to limit the number of downloads per customer, then type a number into the ‘Download limit’ field.

    Adding a download limit for your audiobook

    If you want the download link to expire after a certain number of days has passed, then type a number into the ‘Download expiry’ field.

    When you’re happy with how the audiobook is set up, click on the ‘Publish’ button. The audiobook will now appear as a downloadable product on your online store.

    We hope this article helped you learn how to sell audiobooks online. You may also want to check out our expert pick of the best WordPress plugins to grow your site, and our comparison of the best email marketing services for small businesses.

    If you liked this article, then please subscribe to our YouTube Channel for WordPress video tutorials. You can also find us on Twitter and Facebook.

    The post How to Sell Audiobooks Online (3 Simple & Easy Ways) first appeared on WPBeginner.

  • How to Edit & Customize Your WooCommerce Shop Page

    WooCommerce is a plugin that adds a store to your WordPress website. Owned by Automattic, the people behind WordPress.com, and supported by more than 300 employees, it’s considered the top option for aspiring ecommerce store owners and existing enterprise-level ecommerce operations alike. 

    Building your site with WordPress and WooCommerce gives you complete ownership over your store, with a flexible framework for building a system and design that’s as unique as your dream. 

    Today we’re going to talk about the WooCommerce Shop page, why you may want to build one, and how to customize it. 

    New to ecommerce? Learn more about WooCommerce

    What is a WooCommerce Shop page?

    The WooCommerce Shop page is included by default, and is the archive page for the product post type. This simply means that it will show all of your published products for visitors to scroll through. It’s essentially your online showroom, where visitors view your catalog. You can display items individually, by category, or both, with categories and products on a single page. 

    Why build a custom WooCommerce Shop page?

    The default WooCommerce Shop page is a good option for many stores, and helps you get up and running quickly. But customizing this page provides a curated experience for buyers that can lead to more sales for you and a more streamlined journey for your shoppers.

    So let’s begin with reasons you may want to customize your Shop page.

    1. Make it quick and easy for shoppers

    The faster your visitors can find what they’re looking for — and get the information they need to feel comfortable making a purchase — the better. A well-organized store keeps shoppers from feeling overwhelmed.

    In this example from The Hidden Grounds, there’s a category filter list on their sidebar so shoppers can quickly jump to any category. The Quick View and Select Options buttons make it easy to learn more, choose variations, and add to cart without leaving the Shop page.

    Hidden Grounds Shop page with Quick View options

    Greene King lets shoppers choose quantities and add items to their cart directly from the Shop page. They also added content sections to the Shop page that promote their personalization options.

    Greene King Shop page with options to add directly to cart

    2. Provide an experience tailored to your products and audience

    What you’re selling — and who you’re selling to — affects the amount and type of product information your customers need to make a decision. The approaches below let you provide an experience tailored to your audiences and their needs.

    For well-known brands and products, shoppers may not need to know anything more than item availability and price. In this case, the faster someone can find and add items to their cart, the better. A customer may want to add multiple products to their cart without leaving the Shop page, then proceed directly to checkout. 

    For new and unfamiliar items — or product categories where shoppers need detailed information like food ingredients or accessory specifications — you may want to display information right there on the Shop page. 

    Here are some examples of how you might modify your shop page based on the products you sell or your audience:

    • Add filters for large catalogs of products, or items that get very granular. Perhaps you sell replacement parts that shoppers need to find based on their size, color, SKU, etc.
    • Focus on images if you sell items that are more visual. Clothing stores, for example, might want to showcase larger photos or allow people to scroll through an image carousel directly on the Shop page.
    • Present products in a table. If you sell items that aren’t reliant on visuals, you may want to take images out of the equation entirely. Instead of a more traditional product grid, use a table presenting key information. This is a particularly good setup for service-based businesses or wholesale stores with customers who add a lot of items to their cart at once.
    • Include badges specific to your products. For example, if you sell food, you might have badges for “vegan” or “nut-free.” This helps shoppers immediately see what fits their needs (and what doesn’t.)

    This example from My LAB BOX uses a mix of tables categorized by type of test so visitors can quickly scan options and add them to their cart. Bonus: They also use badges to highlight special attributes (“new”, “popular”).

    MyLabBox products listed in a table

    3. Highlight featured products and promotions

    Editing your WooCommerce Shop page lets you grab your customers’ attention and direct their interest towards featured products and categories, promotional offers, and things like free shipping or satisfaction guarantees.

    Block themes really shine in this case. Use the Top Rated Products block to put your best foot forward, the On Sale Products block to highlight discounted options, or the Hand Picked Products block to have a section of items you can quickly swap out based on the season, current events, or other situation. 

    4. Reflect your brand and personality

    The default Shop page template has a clean and professional appearance, so many site owners choose to use it without any personalization. 

    That’s fine, but customizing your Shop page can help you stand out from competitors, present a unified look across your site and other company profiles, and build confidence by featuring reviews and other trust symbols.

    Daelmans’ Shop page is an excellent reflection of their brand design. Every detail — even the red bar that appears when someone hovers over a product — perfectly fits the style of their entire site.

    Daelman's Shop page, customized to meet their specific brand design

    And The Kind Pen added stars below each product to show how well-reviewed they are. Plus, there’s a slick little callout to the left where curious shoppers can click to read even more reviews to ease any hesitation they may have. 

    The Kind Pen shop page, with green stars underneath each item

    See more examples of what WooCommerce store owners have done with their Shop pages on the WooCommerce Showcase.

    How to customize your WooCommerce Shop page

    Okay, so how do you make changes to your Shop page? There are several options that you can choose from, depending on how your site is built and your experience level.

    1. Customize your Shop page using the WooCommerce Customizer

    The WooCommerce section of the Customizer includes tabs for Store Notice, Product Catalog, Product Images, and Checkout. This is the simplest way to make basic changes to your Shop page.

    To find it, go to Appearance → Customize → WooCommerce.

    making Shop page changes in the Customizer

    Customize the WooCommerce Store Notice

    The Store Notice appears to site visitors in an overlay bar at the very bottom of your site (some themes may place it at the top). The bar appears sitewide with an option to dismiss it. The feature is a great way to let visitors know about a current promotion, a featured product category, an upcoming event, or a storewide policy like free shipping for orders over a certain amount.

    The Store Notice tab has a field for you to enter text and HTML tags for formatting and linking. Click the Enable Store Notice checkbox to activate the feature.

    turning on the WooCommerce store notice

    Customize the WooCommerce Product Catalog

    The Product Catalog tab has dropdown menus for managing aspects of your Shop and Product Category pages.

    WooCommerce Product Catalog settings

    If you have a large number of items in your store, a single Shop page can be overwhelming to visitors. Use the Shop Page Display menu to select what should appear on the page — categories, products, or both. The Category option will display a grid of thumbnails representing the categories available on your store. 

    Use the Default Product Sorting menu to manage the display of items on the Shop page. It defaults to Custom ordering + name, but you can also sort by:

    • Popularity (sales)
    • Average Rating
    • Most Recent
    • Price (ascending)
    • Price (descending)

    To set a custom order for the default option, go to Products → All Products. Then, click the Sorting tab at the top.

    Next, select a category, product type, stock status, or any combination of the three. Click Filter. Now you can drag and drop products however you’d like.

    Customize the WooCommerce Shop page product images

    The Product Images tab lets you customize the size and display of product images on the Shop page. There are three options:

    • 1:1 (cropped to a square)
    • Custom aspect ratio
    • Uncropped (displayed using the aspect ratio in which images were uploaded)

    When you publish your changes, thumbnails in the new image sizes are generated automatically.

    Product Image options in the Customizer

    2. Customize your Shop page using the Gutenberg Block Editor

    If you’re using a block theme, you can edit and customize your WooCommerce Shop page with the Site Editor. Always back up your WordPress site before making edits to your Shop page template.

    To customize your page, go to Appearance → Editor and choose Browse all templates from the dropdown menu at the top center of the page. 

    template options in the Site Editor

    Click to edit the Product Catalog template.

    selecting the Product Catalog template

    The Product Catalog template consists of the header, the footer, and the body area. Click into the header or footer areas to edit their contents and add new blocks as desired, like an image or paragraph block.

    By default, the body of the page simply has the Product Grid block, which will display the product image, title, price, etc. 

    WooCommerce Product Grid block displayed by default in the Site Editor

    Add blocks above and below the Product Grid block to customize your shop page template. You can use any block type, including 20+ WooCommerce Blocks, located in a dedicated section of the Block Inserter for easier browsing.  

    Use the Best Selling Products and Top Rated Products blocks to promote your most popular items. Use the All Reviews block to include customer testimonials on the page.

    WooCommerce block options

    The custom Shop page below uses a Columns block to create the content area and sidebar layout. An All Products block loads the catalog into the main area, while filter blocks in the sidebar let the customer quickly find what they’re looking for.

    custom Shop page design

    The All Products block settings — accessed via the gear icon at the top right — include tools for adjusting the grid layout, hiding the sorting dropdown, and setting the default product ordering.

    options for customizing product display

    You can edit the All Products block to customize your WooCommerce Shop page further. Click on the block, then on the Edit icon. 

    To manage their settings, you can then click on elements within the example product — like Product Image and Product Title.

    settings for individual product displays

    You can rearrange the contents displayed for items in the grid. For example, you can move the Add to Cart button above the product ratings. Click to select an element, then use the up/down arrows to move its placement in the layout.

    moving a green Add to Cart button

    Learn more about WooCommerce Blocks.

    3. Customize your shop page using WooCommerce extensions

    Extensions are types of plugins created specifically for WooCommerce stores. You can use them to improve the shopping experience and enhance your Shop page’s content and features. 

    We’re going to go through a few examples. For more extensions, visit the extension library.

    Product Filters for WooCommerce

    With Product Filters for WooCommerce, you can allow customers to filter your products based on several criteria, including the category, price, average rating, and stock status. 

    Filters make a catalog of thousands of items accessible, since shoppers can use them to get relevant results quickly and easily. The extension uses AJAX to update results without the need for visitors to refresh the page. 

    Filtering options can display in multiple ways — checkboxes, radio buttons, price sliders, size charts, and color lists. They can be based on tags, allowing you to create custom filters like “Staff favorites.”

    Product Filters with a variety of options

    Learn more about Product Filters for WooCommerce

    WooCommerce Quick View

    WooCommerce Quick View lets your shoppers learn more about products, choose between variations, and add items to their cart without leaving the main Shop page. 

    The extension adds Quick View buttons to your Shop page that will trigger a pop up window when clicked. The window contains essential product information, plus the ability to choose between variations and add items to their cart. This speeds up the shopping experience, as visitors can compare products and make selections without having to load multiple new pages. 

    Quick View buttons in action on a product page

    Learn more about WooCommerce Quick View

    WooCommerce Advanced Product Labels

    WooCommerce Advanced Product Labels adds visual flair to your shop page to catch customers’ attention. You create custom labels to showcase new products, sale items, bestsellers, and more.

    various colored labels on top of product listings

    Labels can be applied globally, to a specific product, or a group of items based on conditions.

    You can set a wide variety of conditions for each label. Add a “New” label for all items added within the last two weeks. Display a “Sale” label for discounted items. Or showcase the items that shoppers purchase the most with a “Bestseller” label.

    Conditions include product category, type, price, stock status, popularity, shipping class, featured status, and more. You can even create conditions based on tags for flexible custom groups.

    There are six label graphics to help your shoppers browse visually, or you can upload your own label images. Select from a predefined color palette or apply custom colors to match your brand. A live preview option lets you see how labels will look to shoppers.

    Learn more about WooCommerce Advanced Product Labels.

    Product Tables for WooCommerce

    Product Tables for WooCommerce lets you display your catalog in a table format for easy reference and comparison on a single page. The column titles are customizable, and you can select a default sort order.

    The extension supports variable products, with dropdown menus to select variations. Each row has an Add to Cart button and a checkbox for adding multiple items to cart simultaneously. 

    example of a product table with a list of items

    Shoppers can use the fields above the table to filter their results based on category and price range. They can also filter by variation attributes like size or color. The filtering is done via AJAX, so it’s quick, with no page refresh required.

    filter and search options for product tables

    You can create as many customized product tables as you want, and use shortcodes to add them to your Shop page. Choose how much product data to display and configure options down to each individual table. 

    This extension is excellent for any store where customers choose multiple items from a list — like a B2B wholesaler or restaurant displaying menu items for online ordering.

    Learn more about Product Tables for WooCommerce.

    4. Customize your Shop page manually (using code and hooks)

    Hooks allow you to customize templates — like the Shop page — without any of the risks that come with editing core files. WooCommerce uses the template file archive-product.php for the Shop page. You can find a list of available hooks on the WooCommerce Action and Filter Hook reference page.

    Always back up your site before making any changes — when you modify site code, even one mistake can cause major problems. Jetpack VaultPress Backup is an excellent option, because it saves your site each time a change is made. Then, if your site is down, you can quickly and easily restore a version from right before you made your edits. 

    Also, never edit the plugin files directly, since future updates will overwrite your work. Instead, add your custom code to your child theme’s functions.php file or use a plugin like Code Snippets

    Here are some customizations you can make to your Shop page using hooks and code:

    Hide the shop page result count and default sorting dropdown menu

    These page elements are convenient for shoppers but aren’t very useful for stores with only a few items. Add this code to hide them from your Shop page. 

    // Hide the shop page result count
    
    remove_action( 'woocommerce_before_shop_loop', 'woocommerce_result_count', 20 );
    
    // Hide the shop page default sorting menu     
    
    remove_action( 'woocommerce_before_shop_loop', 'woocommerce_catalog_ordering', 30 );
    
    You can also hide these elements using CSS code. Go to Appearance → Customize → Additional CSS and add the following code:
    
    .woocommerce-result-count {
    
    display: none;
    
    }
    
    .woocommerce-ordering select {
    
    display: none;
    
    }

    Change the number of products per row on your Shop page.

    Use this code to override the default number of products per row. Set a higher number to increase the number of products visible on the page without scrolling. Set a lower number, and each product’s image will appear larger for a more detailed view. 

    In this example, we set the number to two items per row:

    // Change the number of products per row on the shop page
    
    add_filter('loop_shop_columns', 'loop_columns', 999);
    
    if (!function_exists('loop_columns')) {
    
        function loop_columns() {
    
            return 2; // 2 products per row
    
        }
    
    }

    Move the product titles above the product images on your Shop page.

    Use this code to move your product titles from below each row of product images to above them. This layout change gives you a design option to stand out from other stores and puts your titles higher on the page, so shoppers see them without scrolling.

    // Move the product title above the product image
    
    add_action( 'woocommerce_before_shop_loop_item', 'woocommerce_template_loop_product_title', 10 );
    
    remove_action( 'woocommerce_shop_loop_item_title', 'woocommerce_template_loop_product_title', 10 );

    Make your prices stand out. 

    Make your prices stand out to shoppers by adding the following code to the Additional CSS field in the Customizer. This style change is helpful if the price point is important to your customers. In this example, the price is bolded and set to the color blue.  

    .wc-block-grid__product {
    
    font-weight: bold;
    
    color: blue;
    
    }

    Add some color to your product image borders.

    This code adds a colored border to your product image. Here the border is set to 2px wide and the color is orange.  

    .wc-block-grid__products .wc-block-grid__product-image img {
    
    border: 2px solid #f27c21;
    
    }

    Frequently asked questions about customizing the WooCommerce Shop page

    What is the WooCommerce shop page?

    When you install WooCommerce, it creates several pages by default, including Shop. The default URL is /shop/, but you can choose a different option via WooCommerce → Settings → Product → General. For example, if you’re selling memberships, you could change the default Shop page to one titled “Memberships.”

    WooCommerce uses your Shop page name in the URL path for your products: yoursite.com/shop/product-category/product-name/. Go to Settings → Permalinks to customize the URL structure for your Shop and products. 

    permalinks settings in WordPress

    What is the best way to customize a WooCommerce Shop page?

    The best way for you to customize your Shop page depends on considerations like your budget for extensions, your comfort level with coding, and your familiarity with blocks and the Site Editor. 

    You can use the WooCommerce documentation library and blog to enhance your knowledge of WooCommerce and how to customize it.

    Should I back up my site before editing the Shop page template?

    WordPress does not store a revision history of templates like it does pages and posts. For this reason, you should always back up your site before editing the WooCommerce Shop page template.

    Jetpack VaultPress Backup is a real-time, automatic backup solution for WordPress that lets you restore your site without losing crucial customer and order data. It saves to the cloud every time you make a change to your site, so you can restore it even if your dashboard becomes inaccessible. 

    Learn more about how to back up your WooCommerce store.

    How do I boost my Shop page’s loading speed?

    Jetpack Boost is the speed optimization plugin for WordPress that beat five top performance plugins in a head-to-head test

    It specifically targets key areas related to the user experience. These are some of the same things measured by Google when determining site rankings, so an improvement in this area might also help you attract more traffic. 

    Jetpack Boost can defer the parsing of JavaScript that’s not essential, optimize CSS delivery, and implement lazy loading on your site.

    Simply install and activate the plugin, then go to Jetpack → Boost. You can see your performance scores and toggle acceleration features for debugging and speed-testing purposes from one convenient screen.

    Jetpack Boost dashboard and settings

    For more ways to speed up your Shop page, check out Nine Ways to Speed Up a WooCommerce Store.

    What else can I do to enhance my WooCommerce Shop page?

    Below are more ways you can enhance and optimize your WooCommerce Shop page. 

    Customize your Shop page’s “Add to Cart” behavior

    Speed up the shopping process for your customers by allowing them to add items to their cart directly from the Shop page and then immediately redirecting them to the cart page. You’ll do this through the options found by going to WooCommerce Settings → Products → General.

    Check Enable AJAX add to cart buttons to display on archives to display Add to Cart buttons on the main Shop page. 

    Check Redirect to the cart page after successful addition, and shoppers will go directly to the Cart page after adding an item. This option is great for stores where customers generally don’t need to stay on the Shop page to add more items. 

    Set a custom product placeholder image 

    If WooCommerce doesn’t have a photo for one of your SKUs, it will use a default placeholder image.

    You can update the Placeholder image to use a custom graphic like your logo. This way, if there’s ever a product without a picture in your store, WooCommerce will show your branded image vs. the default placeholder.

    Go to WooCommerce Settings → Products → General and enter the image URL or attachment ID into the Placeholder image field. Save your changes to update the default image.

    Improve the speed of your WooCommerce store

    A one-second delay in mobile loading times can reduce conversion rates by 20%. So improving your site speed can have an immediate impact on sales. 

    Jetpack Boost is the fastest and most convenient WordPress speed solution, with a simple dashboard for monitoring your site’s performance and enabling speed tools. Install the plugin, review your mobile and desktop speed reports, then measure the difference after activating the one-click optimization features.

  • How to Automatically Add WordPress Products in Google Shopping

    Do you want to add your WordPress products to Google Shopping?

    Adding your online store products to Google Shopping can help you increase traffic, reach more customers, and generate greater revenue.

    In this article, we’ll show you how to easily add WordPress products to Google Shopping.

    How to Add WordPress Products in Google Shopping

    Why Should You Add WordPress Products to Google Shopping

    Google Shopping is a virtual marketplace like Amazon and Etsy, where users can search, view, and compare products from different online stores that have paid to advertise their products.

    If you have a WooCommerce store, then adding your products to Google Shopping can prove to be extremely beneficial for your business.

    Your products will be shown to all users browsing through Google shopping which will increase traffic on your WordPress website, generate more revenue and bring in more customers.

    Google Shopping

    That being said, let’s see how you can add WordPress products to Google Shopping.

    How to Add WordPress Products in Google Shopping

    Step 1: Creating a Google Merchant Account

    To add your products to Google Shopping, you have to start by creating an account in the Google Merchant Center. This is the place where your product information will be stored for viewing by Google Shopping.

    First, go to the Google Merchant Center page and click the ‘Sign up for free’ button.

    Sign up for the Google Merchant account

    After that, Google will ask you about your online business.

    Just check the answers that apply to you, and then provide your website’s URL.

    Provide the URL of your online store

    After you’ve provided the details, you’ll be redirected to another page.

    Here, you simply have to click the ‘Create a Google Merchant Account’ button at the bottom of the page.

    Click the Create Google Merchant Account button

    Now, you will be asked to provide your business details. You can start by writing your business name.

    Next, select the country where your business is based from the dropdown menu below the ‘Registered Country’ option.

    After that, click the ‘Continue to Merchant Center’ button.

    Provide business details

    You’ve successfully created your Google Merchant Account. Now all you have to do is provide your business info and shipping details.

    Once you’ve filled in those details, simply click the ‘Save’ button at the bottom to store your settings.

    Provide shipping and business details once a GMC account is created
    Step 2: Linking Your Google AdWords Account

    Now you’ll have to link your Google AdWords account to your Google Merchant Center account so that you can show your products via Google Shopping.

    To link your account, simply go to the Google Merchant Center dashboard and click the gear icon at the top of the page.

    Clicking it will open up a ‘Tools and Settings’ prompt. Here you simply have to choose the ‘Linked Account’ option present.

    Click the Linked Accounts option from the Settings

    This will take you to the ‘Linked Accounts’ page.

    Now you simply have to click the ‘+’ button to create your Google Ads account.

    Click the Plus button to create a Google Ads account

    This will open up a ‘Create Your Google Ads Account’ prompt.

    Simply choose your preferred time zone and currency and then click the ‘Create’ button.

    Create a Google Ads account

    You have now successfully created your Google Ads account.

    This is how it will look once your account has been created.

    GMC account has now been linked to the Google Ads account
    Step 3: Adding WordPress Products to Google Shopping

    To add your WordPress products to Google Shopping, we will be using the ELEX Google Shopping plugin to display your WooCommerce products in Google Shopping.

    First, you need to do is install and activate the ELEX Google Shopping plugin. For more instructions, check our guide on how to install a WordPress plugin.

    Upon activation, head over to the Google Shopping Feed » Create Feeds page from the WordPress admin sidebar.

    From here, simply fill in your business details and click the ‘Continue’ button at the bottom.

    Fill basic info on the Google Shopping Feed page

    Next, you’ll be taken to the ‘Map Category’ page. Here you simply have to select your product categories.

    Simply type your product categories in the ‘Google Categories’ tab and click ‘Continue’

    Select Map Category

    After that, you’ll be directed to the ‘Map Attributes’ page.

    This is where you’ll have to fill in your product details including product id, product description, product link, pricing, image, and more.

    Here select and fill in as many attributes as possible for more visibility in Google Shopping and click the ‘Continue’ button.

    Map attributes

    Now that you’re on the ‘Filtering Options’ page, simply fill in the details as required for your online store.

    For example, you can include how many items you have in stock or note how many have sold already.

    Next, simply click the ‘Generate Feed’ button at the bottom.

    Click the Generate Feed button

    After you’ve created your Google Shopping feed, go to the Google Shopping Feed » Manage Feeds page from the admin sidebar.

    Here you will be able to view your Google Shopping Feed. Now you have to simply click the ‘Download’ button beside it.

    Click the Download button

    Once you’ve downloaded your feed as an XML file, go back to the ‘Google Merchant Center’ dashboard and click the Products » Feeds option from the sidebar.

    This will open up the ‘Primary Feeds’ page where you have to click the ‘+’ button to add a new feed.

    Click the plus button to create a feed

    This will take you to the ‘New Primary Feed’ page where you can start by filling in basic details. First, start by adding all your target countries.

    Next, select your preferred language and then click the ‘Continue’ button.

    Fill in basic details

    Then, you have to choose a name for your feed and select a method to connect your data to the Merchant center.

    For this tutorial, we will be uploading the feed XML from WordPress.

    After that, just click on the ‘Continue’ button.

    Choose a name and method for uploading the feed

    Now that you’re on the ‘Setup’ page, simply type the name for your Google Shopping Feed.

    Next, just upload the Feed file you got from WordPress and click the ‘Create Feed’ button.

    Upload file and click the Create Feed button

    You have now successfully added your WordPress products to Google Shopping.

    Bonus: How to Add Google Merchant Center Schema in WordPress

    To improve your product search visibility in Google Shopping and increase conversion rates, you should add a Google Merchant schema in WordPress.

    Schema markup is an HTML code that provides more details about your products to search engines.

    A GMC listing schema will make your search snippets more prominent and will allow your products to be featured as popular products for the relevant search terms.

    The easiest way to add a Google Merchant Center listing schema to WordPress is by using the All in One SEO for WordPress.

    It is the best SEO plugin for WordPress that is used by over 3 million websites.

    First, you need to install and activate the All in One SEO for WordPress. For more instructions, please see our guide on how to install a WordPress plugin.

    Upon activation, a setup wizard will open up. Simply go ahead and click the ‘Get Started’ button.

    All in One SEO setup

    After that, you need to follow the onscreen instructions in the setup wizard to configure the plugin. If you need help, please see our guide on how to properly set up AIOSEO in WordPress.

    After the AIOSEO plugin has been set up, you need to visit the Products » All Products page from the admin sidebar.

    From here, simply click on the ‘Edit’ link below a product to open up the ‘Edit Product’ page.

    Click the Edit link below the product name

    Once there, you need to scroll down to the ‘AIOSEO Settings’ section and click on the ‘Schema’ tab.

    Now, you need to make sure that the schema type is set to ‘Product’ by default.

    If that is not the case, then simply click on the ‘Generate Schema’ button.

    Click the Generate Schema button to add another schema

    It will open up the Schema Catalog which will list all the available schema templates.

    From here, you need to click the ‘Add Schema’ (+) button beside the Product option to set it as your primary schema.

    Note: You may see the ‘Article’ schema already applied. If so, you can remove it as you add the new one because this particular page isn’t an article or blog post in Google’s eyes.

    Click the Add Schema button next to the Product option

    Next, you will need to fill in the product information to add the GMC listing schema.

    For that, you need to click the ‘Edit Schema’ button next to the ‘Schema in Use’ option.

    Click the Edit button next to the Schema in use option

    This will open up the ‘Edit Product’ modal where you will need to fill in the product details.

    If you’re using WooCommerce, then AIOSEO will automatically pull most of the product data from your product information.

    However, if you want to fill in the information manually, you need to simply toggle the ‘Autogenerate Fields’ switch to ‘No.’

    Toggle the Autogenerate fields switch to No

    The product attributes that you will need to add include the product name, description, image, ISBN, price, material, color, shipping details, and more.

    We recommend that you provide all the details so that the schema markup can make your product snippets more engaging.

    Once you’re done, simply click the ‘Update Schema’ or ‘Add Schema’ button to store your settings.

    Click the Update Schema button

    You have now successfully added the Google Merchant Center listing schema to WordPress, and your products can now be featured on the platform and hopefully earn you more sales.

    We hope you learned how to add WordPress products to Google Shopping. You may also want to check out our best WooCommerce reporting and analytics plugins and our article on how to speed up your eCommerce website.

    If you liked this article, then please subscribe to our YouTube Channel for WordPress video tutorials. You can also find us on Twitter and Facebook.

    The post How to Automatically Add WordPress Products in Google Shopping first appeared on WPBeginner.

  • 12 Ways to Increase Sales on Your WooCommerce Store

    Do you ever feel like you’re just waiting for the phone to ring? Or, these days, waiting for your next order notification? You hear stories about store owners who are so overwhelmed with orders that they can barely keep up. And… you want to be overwhelmed, too. 

    Well, if you want to increase sales, revenue, and profits, it’s time to get moving. There are very specific, proven steps you can take to increase sales in your WooCommerce store, and we’re going to show you the 12 that will make the greatest impact.

    Whether you sell physical products, digital products, or both, the ecommerce strategies in this article apply to almost every WooCommerce store. 

    And the best news is, you can start working on all of these right now. Even better, since there are twelve, you’ve got a plan you can use as a roadmap for improvement over the next year. Focus on one strategy per month, and this time next year you might just be one of those store owners overwhelmed with orders. 

    Let’s get to it.

    1. Boost your page loading speed

    There’s a direct link between page loading speed and sales. Why? Because if your pages take too long to load, potential customers will abandon your site before they interact with your content. If they don’t use your site, they can’t buy anything. 

    So it’s in your interest to make sure your site is running quickly. If your pages take more than three seconds to load, 40% or more of visitors will simply give up. 

    But how do you boost your site’s speed? Even if you’re a relatively new store owner or aren’t familiar with the technical aspects of WordPress, there are some simple steps you can take to help your site’s performance.  

    First, you can test your current site speed using a variety of free online tools like GTmetrix and Google PageSpeed. These tools will not only tell you how quickly your site loads, they’ll also show you specific ways you can improve.

    Your next step is to install Jetpack Boost, a free plugin you can use to optimize your core web vitals. These metrics are a good indication of the experience that people have with your store, measuring things like loading performance, visual stability, and interactivity. Additionally, Google factors them in when determining where to rank your sites on search engine results pages. 

    settings in Jetpack Boost

    Jetpack Boost will allow you to optimize your CSS loading, defer non-essential Javascript, and implement lazy image loading. And you can turn on each of these features with a simple toggle.

    Then, give Jetpack CDN a try. This is a free content delivery network that loads your website from super-fast servers located around the world. This means that every individual visitor will get the best possible experience based on their location.

    Jetpack CDN also has extra speed-boosting powers like image optimization based on the device each visitor is using to access your website. You can get both things in one place, along with additional security, performance, and marketing tools through Jetpack Complete

    Looking for more tips? See 9 Ways to Speed Up Your WooCommerce Store.

    Pro tip: Hosting isn’t the best place to try and save a few dollars per month. Even a perfectly-optimized site will run slowly if its hosting service is subpar. Your host provides the foundation for everything else needed to run and deliver your site to visitors. Learn how to choose a host for your WooCommerce store, or look through our recommended WordPress hosts

    2. Improve the checkout process

    No matter how many ads you run, blog posts you write, or referrals you receive, the checkout page remains one of the single most important points in the sales process. Despite getting so close to the finish line, many potential customers abandon their cart during these final steps. 

    So improving this single point in the process could have an immediate, profound impact on your sales. 

    Think about it: Every abandoned cart represents someone who found your site, chose one or more products, and at least began the process of making a purchase. But something held them back from completing it. And this happens way more often than any of us like to admit — about 69% of shopping carts are abandoned. 

    So how do you improve your checkout process?

    Start with the easy stuff — remove unnecessary fields. Only keep the ones you need in order to complete the sale. If you want, you can provide opt-ins for joining your email list and other incentives and optional items, but don’t overdo it and be sure they don’t interfere with simply completing the purchase. 

    Also, don’t require customers to log in or register just to buy something. In most cases, you won’t need to do this, and customers can always return later to create an account if they want to make another purchase. If creating an account is absolutely necessary, you should at least allow people to log in using their social media accounts to offer a more frictionless experience.

    Next, allow multiple forms of payment. Credit cards are the baseline, but many people also expect to be able to pay using things like Venmo, Paypal, and Apple Pay. And, for many stores, the time is right to start offering the ability to pay with cryptocurrencies.  

    WooCommerce Payments homepage design

    WooCommerce Payments makes it easy to accept payment in multiple forms and in many different currencies. The best part? It’s completely free.

    3. Consider offering free shipping

    While consumers always love free shipping, you can’t afford to simply give everything away. For most merchants, fulfilling and delivering orders is a major expense. But, if done correctly, it might just turn into an advantage. Here are a few factors to consider about free shipping on your ecommerce store:

    • The weight of your products
    • The shipping providers you’re using
    • Packaging
    • Distance to customer
    • Speed of shipping
    • Cost of the product or order
    • Profit margins

    If offering free shipping eats up all your profits, it’s a bad deal. Some businesses include shipping in their prices. This means they charge higher prices up front, but then there’s no shipping charge added on the checkout page. 

    You can also offer free shipping if the order size is above a certain amount. And you can hold special free shipping for particular days, events, or promotions. 

    4. Improve the user experience

    Website usability matters no matter what type of site you run. But for ecommerce stores, its importance magnifies. A WooCommerce store that’s hard to navigate will make fewer sales because shoppers will get frustrated and give up. 

    And, the more products you have, the more complicated it becomes to maintain a store that’s easy to use. You need clear product categories, a logical navigation menu, a responsive design, and a functional search feature.

    Jetpack Search makes it easy to add a search feature to your WooCommerce store that allows your customers to find what they’re looking for with minimal hassle. It offers advanced filters, spelling correction, and live results to make the process fast and simple.

    example of Jetpack Search in action

    For more options, check out the best WordPress search plugins

    5. Give the information your customers need

    If all your product pages are looking pretty bare — maybe just a photo, a title, and price — you can increase your WooCommerce sales by making these pages more robust. 

    People have questions. They want to know certain facts about products before buying. If your store has been around very long, you probably already know what people ask. You’ve answered the same questions dozens of times. Don’t make them come to you or your FAQ page — get out ahead of them so they can make a purchase decision right then and there. 

    If you’re not sure what information your visitors might be looking for, go back and look at your customer service communications and make notes. If you get any product returns, find out why. 

    If it’s food, list the ingredients. If it’s clothing, specify the sizes. Describe the materials. Explain the care procedures. If it’s a more complicated product, give some information about how to use it, what it’s made of, things to know, and even directions for use. Include high-quality photos

    And another note about clothing. Sizes are not standardized, especially if you’re selling children’s clothes. If possible, include a size chart with measurements so there’s no room for error.

    Anticipate what a customer might want to know, and put that on the product page.

    6. Use email more effectively

    Once you’ve won a customer or gotten someone to opt into your email list, start sending emails! There are a number of smart ways for WooCommerce stores to increase sales using email, such as:

    • New product announcements
    • First-time customer discounts and rewards
    • Referral rewards
    • Abandoned cart emails 
    • Holiday campaigns
    • Birthday and anniversary specials
    • Segmented emails based upon prior purchases

    Email is an excellent method for following up with potential customers. They cost very little to send and the subscriber list data is yours. You have more control and ownership over this kind of marketing when compared to advertising on social media or search engines. 

    WooCommerce store owners who are new to email marketing should look into MailPoet. It has automations that are built specifically for WooCommerce stores, so it works seamlessly. Plus, you can manage everything directly from the WordPress dashboard. Create promotions for those who ordered from a particular product category. Follow up with people who’ve abandoned a cart, announce your newest product launch, or reward your most loyal customers. 

    There’s a lot you can do, and improving your email marketing is almost guaranteed to help grow your store.

    7. Be available to online store visitors

    When potential customers have questions, they want answers. At the bare minimum, every WooCommerce store should have a phone number and contact page. 

    If you want to increase sales from your WooCommerce store, respond within minutes, if possible, but certainly on the same day. If you wait too long, a shopper might buy from somewhere else or just give up.

    Live chat is even better than contact forms! Customers can get answers more quickly. You can designate an employee to handle requests based on their availability, or if it’s just you, connect a chat program to your phone so you can respond to notifications right away. 

    WooCommerce LiveChat

    WooCommerce has a number of chat extensions that are simple to use. LiveChat and Facebook’s chat integration are both popular options. 

    8. Use coupons strategically

    Coupons make great sales boosters, as long as you’re not giving up too much revenue. Look at it this way:

    Suppose you sell a product for $30, and your profit margin is $10. If you give a 20% off coupon that a customer uses on that item, they’re now buying it for $24. That reduces your profits by 60%! 

    So while coupons can sometimes seem like an appealing strategy for convincing more customers to buy from you instead of the competition, you need to be careful. Here are few ways to use coupons strategically:

    • Offer one-time coupons to encourage new or returning customers
    • Use coupons on specific holidays when competition is more fierce
    • Offer coupons for new or specific products that have a higher dollar value
    • Use dollar-off coupons rather than percentages

    That last one could appeal to customers, increase your order size, and reduce your profit losses. 

    Suppose you offer a deal where the customer saves $20 off a purchase of $100 or more, and $40 off a purchase of $200 or more. Seems like the same thing right? 20% off. But it’s not, because the discount doesn’t increase with the price. How many people will spend exactly $100 or $200 dollars?

    A customer who spends $200 saves $40. But a customer who spends $280 also saves $40. Your profits increase the more they spend. And anyone who spends $180 or more in that scenario will probably try to bump up their order to get over $200. This approach increases order size and doesn’t cut into profits as much as a percentage discount. 

    If you offer a 20% off coupon and a customer spends $280, your profits go down $56 instead of $40, because the percentage increases the amount saved no matter how much is spent.

    Another coupon strategy is to offer an upsell. 

    Suppose the customer is about to spend $50 on an item. Offer them the chance to buy two for $89 before they check out. It saves them $11, but it increases your order size without much effect on profits since shipping one order costs less than shipping two separate ones. Here are more creative ways to use coupons

    9. Nurture your leads

    One of the most effective ways to use email marketing is with segmented and personalized emails. But what does that mean? 

    A large part of it revolves around knowing what your customers have purchased, and communicating with them based on that knowledge. 

    As a simple example, suppose a WooCommerce store sells T-shirts, sweatshirts, and jackets, and also has a business line where companies can create branded versions of those same products. Any business customer should be communicated with as a business, not a person. They’re not going to be ordering a couple shirts here and there. 

    On the other hand, another customer may be ordering kids’ shirts and sweatshirts every couple years. Clearly, this customer is a parent buying for their kids, and their kids are getting older, as kids tend to do. So you would communicate with that customer very differently from a business. 

    How do you keep track of customer purchases at this level? With a CRM (customer relationship management) tool.

    Jetpack CRM enables you to keep track of customer purchases, order sizes, dollars spent, and other information that will help you to nurture and follow up with your customers and leads in ways that are relevant and timely to them. 

    customer profile in Jetpack CRM

    For the family buying ever enlarging kids’ clothes, the best time to send special deals and new product announcements would probably be before school starts, and in the months leading up to the holidays.

    A CRM plugin or tool allows you to keep track of this information and make your marketing more effective. And the best thing about JetpackCRM is that it connects seamlessly with WooCommerce. See how it works

    10. Offer social proof

    One of the greatest barriers to online sales is trust. Can I trust this company and their products? One of the best ways to overcome that is with testimonials and reviews. 

    As you acquire more reviews, post them all over your site. You can integrate reviews from well-known sites like Google, and put them on your own product pages to increase authenticity. 

    And don’t just put all your testimonials on one page, or on the homepage. When you get reviews that mention specific products, put those on that exact product page. If you get a review commending your customer service, put that on your contact page, checkout page, or other relevant page. 

    If you have any reviews on social media, connect people so they can see the reviews on your site. 

    You can’t have too many customer reviews and testimonials. And the more detail you include, the better. Full names are better than first names. Cities are better than states or provinces. For business customers, include company names and the job title of the person leaving the review. Photos are better than just names. Video testimonials are gold.

    See more ways to use reviews to generate sales.

    11. Harness the power of upsells and cross-sells

    One of the most powerful ways to increase WooCommerce sales is with upsells and cross-sells. 

    An upsell could be like the example given earlier, where a customer bought an item for $50, and you offer them the chance to buy two for $89 before they finish checking out. You’re getting them to spend more, but it’s a good deal for them, too. 

    Another common upsell strategy is to offer a bonus item or some other perk such as an event ticket or contest entry. You can also upsell by offering larger quantities. This works great for food and consumable products. 

    Cross-selling, on the other hand, involves recommending other products that relate in some way to the first one. Using the clothing example again, if someone orders a couple t-shirts, you can mention sweatshirts and jackets of a similar color or style as a product recommendation. 

    This is also another place you can use coupons strategically. You could combine the product recommendation with a one-time-only coupon to buy two items and get a third one free. Or, if you have a minimum threshold for free shipping, mention how close the shopper is to reaching that when you recommend other products. 

    Here are five more strategies for upselling and cross-selling.

    12. Increase your marketing efforts

    Even though this is the last tip on this list, if you’re using this article to help plan out your next twelve months, don’t wait until the 12th month to start this one. Marketing is a continuous process and many of these methods begin with a slow build. So start early, and keep building on it as you implement other strategies on this list.

    Online marketing requires online traffic. How do you get traffic? In general, there are two ways:

    1. Attract the traffic organically
    2. Pay for the traffic

    You can attract online traffic from social media and from search engine optimization (SEO). Social media sites such as Facebook and Pinterest offer ways to showcase products, post comments and updates, get feedback, and interact with customers. You can also use social media to send people to your site. 

    For many WooCommerce stores, Pinterest can be particularly helpful because it’s a visual showcase. With the free Pinterest for WooCommerce extension, you can link your online store to your Pinterest page and put your entire product catalog on display. 

    SEO is how you attract online traffic organically, through search engines like Yahoo, Bing, and Google. SEO relies on having high quality content on your website that uses keyword terms that your ideal customers might be searching for. This is another reason why having quality product pages with lots of helpful information should be a high priority. Your SEO also improves with well-organized and clearly-defined product categories and site architecture that’s easy to navigate. 

    And you can greatly improve your SEO by writing helpful high-quality blog posts, which offer a natural way to answer questions often asked by customers, and provide solutions to common problems. 

    With paid online ads, you can more directly attract people who are searching for your products, and leapfrog ahead of the organic listings in search engines. The downside is that you’ll pay for every click and, if you stop paying, the traffic stops flowing. That said, it can still be a great way to generate profitable traffic and learn what terms your audience uses most. 

    The Google Listings & Ads extension, another free download for WooCommerce, makes it easier to run ads that sync with your specific product pages. 

    Frequently asked questions about increasing sales on WooCommerce

    1. How can I analyze my WooCommerce sales performance?

    The simplest way to begin is with the site stats you can see through Jetpack. This is a free feature that shows where your traffic is coming from, and your most popular pages. Next, review the built-in stats that come with WooCommerce. You’ll see which products are most popular along with everything from gross and net sales to average order size, taxes, shipping, refunds and more with WooCommerce Analytics

    And if you want more data, you can use Jetpack to connect WordPress with Google Analytics for an advanced view of site stats and marketing performance.

    2. Which metrics or KPIs should I focus on, in priority? 

    For most WooCommerce stores, your key metrics will include total sales, average order size, returns, and discounts. There’s a lot more depth within each of these such as date ranges, categories, coupons redeemed, and more. All of these metrics and much more can be found within WooCommerce Analytics. See what else WooCommerce Analytics can show you

    3. How can I see where my sales come from?

    The best way to see which of your marketing sources are producing the most sales is to connect Jetpack with Google Analytics. Here’s how to set it up. This will show you geographical data, but also which paid ads, blogs, social media sites, emails, and other marketing channels are producing your sales and converting your customers. 

    When you’re ready to get more detailed, you can learn about advanced analytics and marketing performance tracking for WooCommerce

  • How to Make Money With AI? Using AI Tools for Financial Success

    Artificial Intelligence (AI) is becoming increasingly prevalent in the business sector. It helps entrepreneurs with various tasks, from analyzing data to creating content and developing marketing strategies. Therefore, it has emerged as a great way to save money. However, since artificial intelligence is a relatively new technology, its implementation can be confusing for some. In […]

    Read More…

    The post How to Make Money With AI? Using AI Tools for Financial Success appeared first on Hostinger Tutorials.