Traditionally, creating unique and engaging imagery for social media platforms often required a basic understanding of image editing tools. Adding text to images, changing photo orientation, and tinkering with different visual styles for each social network was tedious and frustrating. But not anymore.
With Jetpack Social Advanced, you can overlay custom text onto your images and choose from a variety of styles to increase engagement on your social posts. Most importantly, you’ll save time by doing it all within the WordPress editor.
Choose your image & add custom text
Jetpack Social Advanced gives you the freedom to create social images with custom text applied to them. This is handy if you often have long blog post titles for SEO purposes, but prefer to use specific calls-to-action with your social media post images.
Sometimes the featured image of your blog post may not be the best fit to share on social platforms. With the Jetpack Social Image Generator, you can choose to share your featured image, select a different image from your media library, upload a new image, or select “no image†if you just want to create a text-based image for your socials.
Pick a template to make it your own
Tie everything together by exploring creative templates with various fonts and text placement around your image. Choose from full width images with text overlays or images with text aligned to either side.
Preview before you share
Finally, use the built-in Jetpack social preview tool to see exactly how your image will look on each of your connected social media platforms. Publish right away or schedule your posts to be shared when your audience is most active on social media.
With Jetpack Social, it’s never been easier to share your WordPress content to social media.
Facebook boasts over 2.8 billion monthly active users, which is to say that nearly everyone uses it. By integrating WordPress and Facebook, you can share audiences between your website and social media profiles. The best way to achieve that integration is by using Facebook plugins for WordPress.
In this article, we’ll introduce you to the nine best Facebook plugins for WordPress, and discuss when to use each of them. Let’s get to it!
A Facebook plugin can be beneficial for website owners in several ways. It can allow users to easily share content on their Facebook profiles, leave comments using their Facebook accounts, and like or recommend content. Additionally, Facebook plugins can integrate your website with your Facebook page, allowing you to promote your social media content and display your page’s feed on your site. Overall, a Facebook plugin can help increase engagement, visibility, and traffic to your WordPress website.
9 Best Facebook Plugins for WordPress
For this roundup, we’re focusing on Facebook plugins that add useful new functionality to your website. There is a mix of free and paid options here, and they’re all regularly updated and have strong reviews. With that in mind, let’s start by talking about feed integration.
1. Social Post Feed
First up, the Social Post Feed plugin provides you with a simple way to embed Facebook feeds anywhere on your site, as well as in individual posts. You can pull feeds from pages or groups, and the plugin doesn’t limit how many elements you can embed on your website:
Thanks to this plugin, visitors will be able to like posts within embedded feeds. However, if they want to leave comments, they’ll be redirected to Facebook.
Social Post Feed also includes a feature that can make your embedded feeds compliant with the General Data Protection Regulation (GDPR). Moreover, since it doesn’t use IFrames for embedding content, search engines will be able to crawl those elements on your website, giving you a boost in SERPs.
Key Features for Social Post Feed:
Displays unlimited posts and feeds
Lets you customize the look of embedded content so it matches your site
Supports Facebook pages and groups
Social Post Feed is for you if…
…You want to add a lot of Facebook content to your website, or you’re trying to ensure GDPR compliance.
Price: Free, with a premium version starting at $49 per year.
Creating a custom login screen is useful for your subscribers and can make your membership website easier to log in to. After all, if you want users to register for your website, you need to make that process as easy as possible. The default WordPress registration system works, but it also forces users to remember yet another set of credentials.
A fantastic alternative is to enable users to register and log in using their social media accounts. The Nextend Social Login and Register plugin adds that functionality to your website.
The free version of the plugin adds support for Facebook, Twitter, and Google registration and logins. Plus, users will be able to use their social media profile pictures on their WordPress accounts.
Key Features for Nextend Social Login and Register:
Enables users to register for and log in to your site using Facebook and other social profiles
Connects users’ social accounts to their WordPress accounts
Displays users’ social profile pictures as their WordPress account avatars
Nextend Social Login and Register is for you if…
…You want to streamline the login process for your users or encourage them to connect their Facebook accounts to your site.
Price: Free, with the premium version starting at $49 (one-time fee).
Next on our list is 10Web Social Post Feed. This plugin enables you to embed Facebook feeds on your WordPress website, as well as specific publications.
One new feature this plugin brings to the table is the ability to add feeds to your website using widgets. With this approach, you can use your Facebook feed as a sidebar without it distracting from the rest of your page’s content.
The plugin also includes lightbox functionality, multiple feed layout styles, and pre-made templates to choose from for each element. By using 10Web Social Post Feed, you can embed an unlimited number of Facebook feeds on your website.
Key Features for 10Web Social Post Feed
Enables you to display unlimited feeds on your posts and pages
Lets you choose what types of content you want to display in your feeds
Provides an exceptional amount of customization options
10Web Social Post Feed is for you if…
…You want ultimate control over how your Facebook feeds appear.
Price: Free, with a premium version (in a bundle) starting at $85 for six months.
Social Warfare is a lightweight, robust social sharing plugin that adds sharing buttons for Facebook, Twitter, Pinterest, LinkedIn, and others. With various placement options, you have the freedom to place social sharing buttons anywhere on your site.
Additionally, users have the option to float the buttons on the page so that buttons follow readers as they advance throughout the page. This makes it easier to share your content with their followers, increasing the likelihood of readership. Additional features include the ability to style how your posts look on social media platforms, with options for thumbnail and text size, custom visual themes, and custom date ranges.
Key Features for Social Sharing Plugins – Social Warfare:
Post display options
Multiple placement options
Various social media platforms included
Click to tweet quotes
Shortcode support
Content hijacking protection
Social Sharing Plugins – Social Warfare is for you if…
…You want to give your site’s visitors the ability to share your content with their followers and need custom post display capabilities.
Price: Free, with a premium version starting at $29 per year.
Social proof is one of the most powerful ways to encourage new visitors to trust your site’s content, service, and product recommendations. If you have a Facebook page for your website that includes ratings, The WP Review Slider plugin enables you to display them in WordPress.
Serving as both a review plugin and Facebook plugin, this tool can retrieve review data from your Facebook page, import it into WordPress, and display it using a custom slider style. It can also import text-only tweets and display them as part of your carousel:
In addition, WP Review Slider lets you customize your slider to show a specific number of reviews, show or hide ratings, display multiple rows, and more. You can even use custom CSS to tweak your review slider’s style.
The free version of the plugin only works with Facebook page reviews. If you pay for the premium version, you’ll also be able to import reviews from Yelp, TripAdvisor, Google, and many more platforms.
Key Features for WP Review Slider:
Helps you display Facebook reviews and positive tweets on your WordPress site
Provides you with a highly-customizable slider feature for showing off reviews and feedback
Lets you determine display placement using shortcodes, templates, or widgets
WP Review Slider is for you if…
…You want to show off Facebook reviews on your website and get a high level of control over their appearance and placement.
Price: Free, with a premium version starting at $29 per year.
We already recommended a great Facebook feed plugin for WordPress. However, Easy Social Post Feed is worth looking at as well, since it brings several unique features to the table.
For one, this plugin doesn’t work with just Facebook, as it also enables you to embed Instagram feeds, making it a good general social media plugin. Plus, it gives you full control over how you display feeds from either social media platform, and includes several built-in “skins” or templates that you can choose from.
What’s more, Easy Social Post Feed lets you feature a Load More button, which enables visitors to keep scrolling through your feed without leaving your website. However, it’s worth noting that the free version of this tool only enables you to embed a single social media feed at a time.
Key Features for Easy Social Post Feed:
Lets you embed a fully-customizable Facebook feed on your WordPress site
Includes a “PopUp†feature so users can view content more closely without leaving your site
Enables you to feature Instagram feeds on your website, as well as customize them extensively
Easy Social Post Feed is for you if…
…You want to feature both your Facebook and Instagram content on your site and like the idea of an all-in-one solution for the two platforms.
Price: Free, with a premium version starting at $39 per year.
Enabling users to share your WordPress blog posts via social media is a great way for your content to find new audiences. To implement that feature, you’ll need to use the right Facebook plugin for WordPress.
With Social Media Share Buttons, you’ll be able to add sharing icons to your website for over 200 platforms, including Facebook, Pinterest, Instagram, Twitter, and more.
This plugin also includes features that enable you to customize each social media icon’s actions. For example, you can configure your Facebook icons so that instead of sharing content, users will like your page or be redirected to it:
In addition, you can decide precisely where social media icons will show up on your website, and choose from a broad range of button styles. Keep in mind that if you share blog content on Facebook, you may want to use the platform’s OpenGraph Debugger to ensure that it displays correctly.
Key Features for Social Media Share Buttons:
Lets you add icons for Facebook and many other popular platforms to your site
Provides multiple design options for your social icons, and permits custom designs
Offers control over where your icons lead and what actions they prompt
Social Media Share Buttons is for you if…
…You want to encourage website visitors to share your Facebook content and check out your other social platforms as well.
Price: Free, with a premium version starting at $29 per year.
If you want to run a popular Facebook page for your website, then it needs to be active. That means publishing new content often, and engaging with members so they’ll want to keep checking for new updates.
The WP2Social Auto Publish plugin enables you to auto-publish the content that you upload to WordPress on Facebook. This means that if you publish a blog post, you can automatically share it on your Facebook page as well, saving you from having to do so manually. What’s more, you can decide what kind of content you want to auto-publish on Facebook and what elements will be ported over to the social media platform.
Key Features for WP2Social Auto Publish
Enables you to automatically publish your blog posts on Facebook
Gives you multiple options for how your posts are displayed on the social platform
The default WordPress comments system works just fine for many users. However, there are a lot of alternative solutions that add more functionality to your comments section.
One such tool is the Fancy Facebook Comments plugin. This solution enables you to add a Facebook-powered comments section to your posts and pages. If visitors are logged into Facebook, they’ll be able to leave comments on your website without needing to sign up for an account.
You get some control over your Facebook comments section’s style as well, including which pages it appears on, what fonts it uses, and more:
Fancy Facebook Comments also works with BuddyPress, BBPress, and WooCommerce, and it’s compatible with multisite setups.
Key Features for Fancy Facebook Comments:
Lets visitors leave comments on your website using their Facebook accounts
Enables visitors to easily sort and search comments based on various factors
Helps you choose where Facebook comments will be displayed, and integrate them with third-party solutions
Fancy Facebook Comments is for you if…
…You’d like to drive engagement on your site without requiring users to sign up for new accounts.
Price: Free, with a premium version starting at $11.99 per year.
It shouldn’t come as a surprise there are a lot of fantastic Facebook plugins for WordPress, considering this social media platform’s popularity. A lot of those tools implement similar features, but some solutions provide more unique and must-have functionality. For the top pick, we choose Social Post Feed, primarily due to having the ability to embed multiple Facebook feeds, as well as styling options to match branding.
Whether it’s embedding feeds, social sharing, or even using Facebook’s commenting system, there’s a lot that the tools listed above can offer to your WordPress site. By integrating Facebook with WordPress using these solutions, you can offer a stronger user experience and leverage the platform to grow your website.
Do you have any questions about Facebook plugins for WordPress? Let’s talk about them in the comments section below!
Featured image illustration by V3rc4 / shutterstock.com
Do you want to learn how to fix the Facebook and Instagram oEmbed issue in WordPress?
If you’ve previously added Facebook or Instagram content to WordPress using the default oEmbed or Embed block, then this feature no longer works. This can cause errors and missing content on your WordPress website.
In this guide, we’ll show you how to fix the Facebook and Instagram embed issue, so visitors can enjoy social content on your WordPress website.
What is the Facebook and Instagram oEmbed Issue in WordPress?
In the past, you could easily embed Instagram and Facebook posts in WordPress using a protocol known as oEmbed.
However, Facebook changed the way that oEmbed works so you can no longer easily embed videos, pictures, updates, and other content from Facebook or Instagram.
Instead, you now need to register an app and use a client token to get data from the Facebook Graph API, before you can embed Facebook or Instagram content on your WordPress blog.
This would take a lot of time and effort, especially if you want to show lots of different social posts across your website. With that in mind, the people behind WordPress decided to remove the Facebook and Instagram embed feature.
If you previously added any Facebook content to your website using oEmbed, it’ll now look something like the following image.
If you embedded any Instagram posts using oEmbed, then you’ll get a similar error.
This is a bad user experience, and some visitors may assume that your website is broken, no longer maintained, or that you’re not a trustworthy or reliable business.
There are ways to fix the problem manually. For example, you might go through each page and post and delete the embedded content. However, this would take a lot of time and effort, and there’s no guarantee you’ll manage to find every broken embed.
With that being said, let’s see how you can easily fix the Facebook and Instagram oEmbed issue on WordPress.
How to Fix the Facebook & Instagram oEmbed Issue
The easiest way to fix the oEmbed issue is by using one of the free Smash Balloon plugins.
First, you need to install and activate the plugin. For more details, see our step by step guide on how to install a WordPress plugin.
After installing either plugin, simply head over to Instagram Feed » oEmbeds or Facebook Feed » oEmbeds, depending on the plugin you’re using.
We’re using the Social Photo Feed plugin in all our images, but the steps will be exactly the same no matter what plugin you’re using.
On this screen, simply click on the ‘Enable’ button.
That’s it. You can now embed Facebook and Instagram posts on your WordPress website.
How to Embed Instagram or Facebook Posts in WordPress
Whether you’re using Facebook or Instagram, you can embed a specific post in any page, post, or widget-ready area, such as the sidebar.
One option is to open the page or post where you want to show the social content. Then, click on the ‘+’ icon and type in ‘Embed.’
When the right block appears, click to add it to the page or post.
In the ‘Embed’ field, simply paste the URL of the Instagram or Facebook post that you want to show on your website.
Then, click on ‘Embed.’
WordPress will now show that specific post. When you’re ready to make the post live, simply click on ‘Update’ or ‘Publish.’
Now when you visit the page, you’ll see the social media post live.
Another option is adding the Instagram or Facebook post to a widget-ready area such as the sidebar. That way, you can promote the same post across every page of your website.
To add a Facebook or Instagram post to a widget-ready area, simply go to Appearance » Widgets and click on the blue ‘+’ button.
In the search bar, type in ‘Embed’ to find the right block.
When the ‘Embed’ block appears, drag it onto the area where you want to show the Facebook or Instagram post.
In the ‘Embed’ field, simply paste the URL of the Instagram or Facebook post that you want to show on your website. Then, click on ‘Embed.’
WordPress will now show that specific post.
If you’re happy with how it looks, then click on ‘Update’ to make it live.
Now, when you visit your website, you’ll see the Instagram or Facebook post live.
How to Add an Instagram or Facebook Feed to WordPress
With the free Smash Balloon plugins, it’s easy to fix the oEmbed issue so you can add Facebook and Instagram posts to your website.
This is great if you only want to embed a small number of posts or you want to control exactly where each social post appears on WordPress. However, you may also want to embed a Facebook or Instagram feed on your website.
By creating a feed, you can show all your latest posts in a nice layout. Even better, the feed will update automatically so visitors will always see the newest posts without you having to update your site manually.
This can keep your site fresh and interesting, even for regular visitors.
Want to add both Facebook and Instagram feeds to your WordPress website? Then you may want to look at Smash Balloon Social Wall.
This powerful plugin lets you combine any feeds you’ve created using the Smash Balloon plugins, including Facebook, Twitter, YouTube feeds, and more.
For example, if you’ve set up the Facebook Feed and Instagram Feed plugins, then you can simply go to Social Feeds »Create a Social Wall in your WordPress dashboard.
Here, you’ll see all the different feeds you’ve created so far.
Simply select each feed that you want to add to the social wall.
For example, you can combine posts from your Instagram and Facebook accounts.
Small Balloon Social Wall will then create a shortcode that allows you to add the social wall to any page, post, or widget-ready area.
If you liked this article, then please subscribe to our YouTube Channel for WordPress video tutorials. You can also find us on Twitter and Facebook.
Your social media endeavors need to be a part of your SEO strategy. Especially now that the younger generations (Gen Z) are using platforms like TikTok and Instagram instead of Google. This means your site’s popularity on social media ties into your SEO more than ever!
But which social media should you focus on? With so many platforms out there, you can feel overwhelmed with choices. Don’t worry, though! You don’t have to be active everywhere. That isn’t always sustainable. And if your most loyal customers are on Twitter, and you’re focusing on Pinterest, then you miss out on many opportunities.
Instead, decide which platform your audience uses the most, then find a rhythm that works for you and build on that. Once you’ve got your social strategy in place, it’s time to start posting! Below are some tips you can use to set up or improve your social media strategy.
1. Keep your account alive
The most crucial advice when using social media is that you need to keep your account alive. But what does this mean? You’ll see a lot of advice about posting daily, but that’s not always realistic, especially if you’re a small business owner.
Our advice: keep your account alive by posting regularly and going at your own pace. If you can only post a couple of times a week, then do it. A good starting pointing is:
People will be able to tell that you’re being genuine and fall in love with you for that. What’s more, they’ll want to continue to follow you if you’re posting genuine content that they can relate to.
Of course, everybody needs a vacation, but you don’t want to abandon your followers. That’s why we recommend scheduling posts for the time you are away or letting people know when you’ll be back. And be sure to share some photos of your vacay!
Save time by automating
If you also have a blog where you write regularly, Yoast SEO Premium can help you automate some of your postings. With our Zapier integration, you can automate your social sharing and stay in control of what your social link posts look like. This integration makes it possible to automatically post to your favorite social network whenever you publish new content to your site. It saves you time without compromising on the quality of your social posts.
For social media like Instagram and TikTok, there are also a number of platforms that you can use to stay on top of your schedule and keep all your media in one place, ready to post.
2. Write captivating excerpts
Depending on the type of content you want to share, you need to make sure the copy that goes with your posts is appealing enough to draw people in. There are a number of ways you can approach this. For instance, you can choose the most important sentence or the main point of the blog post you’re going to share. You could also share the introduction of the post if you feel that is captivating enough.
Depending on the platform, you could share a story behind a photo you’re posting or the failures you’ve had when testing new products. Or maybe you just want to jump on the latest trend and apply it to your brand.
Is it thumb-stopping?
You want this piece of copy to get people to click on the link in your bio or read the whole caption on the platform. But the basic formula is:
Hook: Something that is going to grab their attention.
Pain point: What is it that your followers are struggling with?
Solution: Well, it’s a good thing you have an answer!
CTA: Don’t forget to ask your readers to do something.
If you want to learn more about copywriting for social media, check out our article about social media writing tips.
3. Diversify your posts
Having a few solid content pillars is important. They are particularly helpful in keeping you on track with your content creation. Need some inspiration? Here are a few different types of posts you could create. Remember, you’re no longer limited to just posting photos!
To help you out, let’s look at a few examples. First, you could share your blog posts with a link post. This is one of the most basic post types you can use:
Congratulations Piermario for receiving the #YoastCareFund! Nominated by @Luisa_Ravelli because of his contributions to the #WordPress community, Piermario is also heavily involved in WordCamps and Test contributions. Read more about him here https://t.co/OIysg6osWN
But don’t be afraid to change it up. Not all your social media posts need to necessarily direct people to your website. They can also be focused on informing people about a recent piece of news or simply increasing engagement on your social media platforms themselves.
And like we said in the intro, short-form videos are huge right now. They’re a great way to give your audience a few quick tips or take your fans behind the scenes.
To decide which posts do well on social media and which content you should make more of, you need to analyze the numbers. This could be the number of views, the number of comments, and how many times a post was shared or saved. Of course, numbers won’t mean anything if you don’t have a goal in mind. However, it’s a good rule of thumb to post more of the content that received numerous views, saves and shares.
Speaking of diversifying your content
At Yoast, we believe in the importance of inclusivity. In addition to diversifying when it comes to types of posts, you should also pay attention to making your content accessible and relatable, for as many people as possible. You need to show diversity to make this happen and being as visual as it is, social media is a great place for that. That being said, the topic of diversity shouldn’t be limited to your social media presence. This is a company-wide issue that you need to take seriously and nowadays is non-negotiable in both marketing and social media. Be aware of the image that you’re currently putting out there and invest time and resources into making that relatable to everyone.
But it’s not all about visuals. You should also use inclusive language, language that avoids excluding marginalized groups of people as much as possible. You might not get all of it right in one go, but becoming aware of it and changing it as you go is a great start. Not only does inclusive language help you reach a bigger audience, but it also helps all of us move toward a more inclusive society. And you might have noticed that social media platforms are being used a lot to talk about this and create more awareness on the topics of inclusiveness and diversity. So be part of the change and use inclusive language on your socials and in your website content. If you’re not sure where to start, our inclusive language analysis in Yoast SEO gives you feedback on which words might be harmful and provides you with alternatives to use!
4. Handle comments
If you share your posts on social media, you’ll get comments. This is something many people forget about, or try to do in some cases. Because sometimes comments will be good, and sometimes they will be bad. But the comment section is also where conversations are happening. Answering questions, then following up with one of your own is a great way to keep your audience engaged.
Don’t forget to monitor your comments!
While you may get the odd troll in the comments, most of the time you’ll find your fans cheering you on and recommending you to their friends. There are some wonderful people in the comment section. Longtime followers can also become huge advocates for you and your brand, so make sure to have a chat with them.
But you should handle the trolls quickly! You don’t want your comments section to become a toxic place. Your fans won’t like it, but it can also have an effect on your mental health. So make sure your comments section is a safe space.
5. Use eye-catching photos or illustrations
Even with all the recent updates and focus on short-form video content, Adam Mosseri, Head of Instagram, said there is still a place for photo posts on Instagram. Just like on Facebook, where visual content is also essential. And let’s not forget Pinterest, which is all about images.
However, you might not have a graphic designer on staff or a photography department at your disposal. Don’t worry, though! There are plenty of online tools that can help you create your posts. Just remember to use clear images that either show your products or yourself. This could either be a crisp photo or a delightful illustration. Great quality will make your post stand out in someone’s feed, which can increase the post’s engagement, saves and shares.
Thankfully, if you’re using Yoast SEO Premium, you can check what your blog posts, product page or collections will look like before sharing them on social media. So you can easily adjust your content before posting it online. See how easy it is!
6. Be part of the community
If you’re not already part of a community, make one! Being active in a certain community or niche can help build allies, brand ambassadors, and new ideas. In any community, you’ll soon discover other interesting people. What’s more, talking to customers and end-users can be a great way for you to develop your product. And make sure to let people know that they are always welcome to join.
Additionally, you can make these people fall in love with your brand quicker by giving them exclusive access to discounts, Betas or just generally behind the scenes.
7. Add metadata
All the social platforms are becoming their own little search engines. So in order to be found, you need to make sure that you’re including some metadata in the form of hashtags. These can help your growth immensely. For instance, if you are at an event, include the hashtag for that event in your post. Everyone searching for the event will then come across it. There are also hashtags for certain interests or technology.
Some people also have bots set up that retweet everything that is posted in a certain hashtag, which is a great way to boost your post. But don’t go overboard! Nobody likes a post that is filled with all kinds of random hashtags. Keep them relevant to your post, and make sure they are accessibility-friendly!
Note that tags on social media work a lot differently than tags on your site. If you’re using tags on your site the same way you would on social media, take a look at this post to find out why that’s not good for your SEO.
Conclusion
Social media is a key aspect of every (off-page) SEO strategy. Setting up a comprehensive social media strategy can be hard. It will certainly ask for a bit of creativity, and it’ll definitely be time-consuming. But trust us when we say that it’ll be worth it! And if you think about it, social media and blogging are very similar in many aspects. You just need to get into the flow of it! Good luck!
Do you want to embed a Facebook video in WordPress?
The videos that you post to Facebook also make great content for your website. By embedding a Facebook video feed, you can keep your site fresh and interesting while also growing your Facebook following.
In this article, we’ll show you an easy way to embed Facebook videos in WordPress.
Why Add Facebook Videos in WordPress?
Videos are a great way to connect with your audience and keep them engaged. This is true no matter whether you’re running a personal blog or a business website.
Creating engaging and entertaining videos takes time and effort so if you’re posting videos to Facebook, then it makes sense to re-use them on your WordPress website.
By linking your website to your Facebook account, any new videos that you post to Facebook will appear on your website automatically. In this way, you can keep your website fresh with very little day-to-day effort.
Embedded videos can even help grow your Facebook page. If website visitors see lots of interesting videos and playlists then they’ll want to follow you on Facebook. This can get you some extra followers and more engagement.
With that being said, let’s see how you can easily embed a Facebook video in WordPress.
Installing a Facebook Video Plugin in WordPress
The easiest way to embed a Facebook video in WordPress is by using the Custom Facebook Feed Pro plugin.
In this guide, we’ll be using the pro version of Smash Balloon as it allows you to embed videos in WordPress including HD, 360o, and Facebook Live videos.
Smash Balloon Pro also lets you show photos in a custom Facebook feed, and display the total number of likes, shares, comments, and reactions below each post. However, if you’re just starting out and have a limited budget, then there’s also a free version you can use.
Upon activation, head over to Facebook Feed » Settings and enter your license key into the ‘License Key’ field.
You’ll find this information under your account on the Smash Balloon website.
After entering the key, click on the ‘Activate’ button.
Connect Your Facebook Page or Group to WordPress
Smash Balloon Custom Facebook Feed allows you to embed videos from Facebook pages and groups. You can even show the videos in a lightbox popup so people can watch the full video directly on your WordPress website.
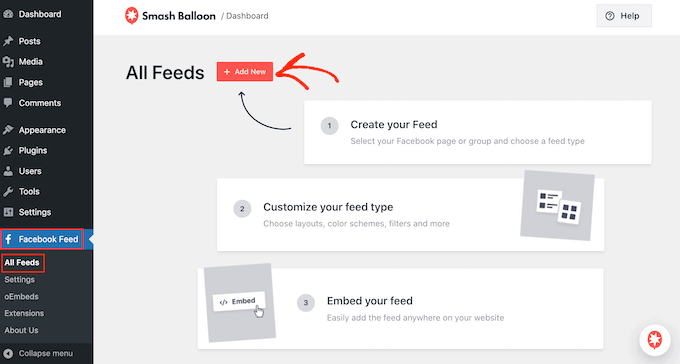
The first step is connecting your Facebook page or group to WordPress, so go to Facebook Feed » All Feeds and then click on ‘Add New.’
Smash Balloon lets you show posts from your Facebook timeline, photo albums, Facebook statuses, events, and more.
Since we want to embed Facebook videos in WordPress, you’ll need to select ‘Videos’ and then click on ‘Next.’
Now, you need to select the Facebook page or group where you’ll get the videos from.
To do this, click on ‘Add New.’
Next, choose whether you want to show videos from a Facebook page or group.
Once you’ve done that, click on ‘Connect to Facebook.’
This opens a popup where you can log into your Facebook account and choose the pages or groups that you want to use with Smash Balloon.
After that, click on ‘Next.’
Now, Facebook will show all the information that Smash Balloon will have access to, and the actions it can perform.
To restrict Smash Balloon’s access to your Facebook account, simply click to disable any of the switches.
Just be aware that this may affect the videos that you can embed on your WordPress blog or website so we recommend leaving all the switches enabled.
When you’re happy with how the permissions are set up, click on ‘Done.’
After a few moments, you should see a message confirming that you’ve connected your WordPress website to Facebook.
With that done, you’re ready to click on ‘OK.’
Smash Balloon will now return you to the WordPress dashboard automatically.
How to Embed Facebook Videos in WordPress
At this point, you’ll see a popup with the Facebook group or page that you just linked to your website. Simply select the radio button next to the page or group you want to use and then click on the ‘Add’ button.
If you accidentally closed the popup, don’t worry. You can simply refresh the page to reopen the popup.
Once you’ve done that, WordPress will take you back to the Facebook Feed » All Feeds page automatically. Just like before, click on ‘Add New,’ select ‘Videos’ and then click on the ‘Next’ button.
Now, select your Facebook page or group, and click on ‘Next.’
On this screen, you can choose the template that you want to use for the video feed.
All of these templates are fully customizable so you can fine-tune the design depending on how you want to show the Facebook videos on your website.
We’re using the ‘Default’ template, but you can choose any template you want. After making your selection, click on ‘Next.’
After that, you can choose whether to show all the videos from your Facebook page or group or just the videos from a specific playlist.
If you choose ‘Show from a specific playlist,’ then you’ll need to enter that playlist’s URL.
Once you’ve made a decision, go ahead and click on the ‘Next’ button.
Smash Balloon will now create a feed based on your source and the template you’ve chosen. This is a good start, but you may want to fine-tune how the videos appear on your site.
How to Customize Your Embedded Facebook Videos
The Smash Balloon Custom Facebook Feed plugin gives you lots of ways to customize how the videos appear on your website. That being said, it’s worth taking a look at these settings.
In the WordPress dashboard, go to Facebook Feed » All Feeds. Here, find the video feed you just created and click on the ‘Edit’ button next to it, which looks like a small pencil.
This opens the Smash Balloon feed editor, which shows a preview of your Facebook video feed to the right.
On the left-hand side, you’ll see all the different settings you can use to customize how these videos appear on your WordPress website. Most of these settings are self-explanatory, but we’ll quickly cover the major areas.
If you want to change the template, then click on ‘Template.’
Then, select the ‘Change’ button.
This opens a popup showing all the different templates you can use for your video feed.
Simply select the design you want to use instead, and then click on ‘Update.’
The next setting is ‘Feed Type,’ which allows you to show different content in your feed. For example, you might decide to show photos, albums, or events instead of videos.
Since we want to embed Facebook videos, you’ll typically want to ignore this area.
Next, click on ‘Feed Layout.’
Here, you can choose between different layouts, such as masonry and grid, and change the feed height.
As you make changes, the preview will update automatically so you can try different settings to see what looks the best.
By default, Smash Balloon will show the same number of videos on desktop computers and mobile devices such as smartphones.
You can preview how your videos will look on desktop computers, tablets, and smartphones using the row of buttons in the upper-right corner.
Mobile devices usually have smaller screens and may struggle to process lots of large, high-resolution videos. Visitors may also be using their mobile data rather than free Wi-Fi.
With that being said, you may want to show fewer videos on smartphones and tablets. To do this, simply type a different number into the ‘Mobile’ field under ‘Number of Posts.’
By default, the Facebook feed shows fewer columns on smartphones and tablets, compared to desktop computers. This helps all your videos fit comfortably on smaller screens.
You can change the number of columns that Smash Balloon uses on tablets, mobiles, and desktop computers using the ‘Columns’ settings.
The next settings page is ‘Color Scheme.’
Smash Balloon uses the colors inherited from your WordPress theme by default, but on this screen, you can switch to a ‘Light’ or ‘Dark’ color scheme instead.
Smash Balloon can add a header to your feed, which is your Facebook profile picture and the name of the page or group. This lets visitors know where the embedded videos come from, and where they can find this content on Facebook.
To add this section, click on ‘Header’ in the left-hand menu.
You can then click on the ‘Enable’ toggle.
After adding a header you can change how this area looks, including hiding or adding your Facebook profile picture, changing the size of the bio text, and more.
If you want to remove the header completely, then click to turn off the ‘Enable’ toggle.
By default, Smash Balloon shows the title of each video. If you want to hide the title, then select ‘Posts’ from the main Smash Balloon editor menu.
Then, go ahead and click on ‘Post Style.’
On this screen, you can hide the video titles by clicking on the ‘Show Video Title’ slider.
This can be useful if you haven’t added titles to all your videos, or your titles don’t make sense outside of Facebook.
On this screen, you can also hide or show the video descriptions. For example, you may use these descriptions to provide extra information about the video.
To add the description, simply click to enable the ‘Show Video Description’ switch.
By default, Smash Balloon doesn’t add the Facebook ‘like’ button to your video feed. If visitors like your embedded videos then they may want to follow you on Facebook.
With that being said, you may want to add a ‘like’ button to the feed, by selecting ‘Like Box’ from the editor’s left-hand menu.
After that, simply click on the ‘Enable’ button so that it turns blue.
Smash Balloon adds this button below your video feed, but you can change this by opening the ‘Position’ dropdown and choosing ‘Top.’
On this screen, you can also change how the ‘like’ section looks including changing its width, showing how many people follow you on Facebook, adding a custom call to action, and more.
When you’re happy with how the button looks, you can move on to the next settings page by selecting ‘Load More Button.’
The Load More button encourages visitors to scroll through more of your video feed, so Smash Balloon adds it to your embedded Facebook feed by default.
Since it’s such an important button, you may want to customize this button by changing its background color, hover state, label, and more.
Another option is to remove the button completely, by clicking the ‘Enable’ toggle. For example, you might remove this button and then encourage visitors to check out your Facebook page in order to see more of your videos.
By default, Smash Balloon allows visitors to watch your Facebook videos without leaving your WordPress website.
They can simply click on any video thumbnail to open it in a lightbox, as you can see in the following image
Visitors can scroll through the videos in your feed using the arrows.
If they want to like a photo, leave a comment, or share the video to their page, then they can click on the ‘View on Facebook’ link.
There are a few different ways that you can customize Smash Balloon’s default lightbox.
To see your options, click on ‘Lightbox’ in the left-hand menu.
Here, you can change the color of the lightbox’s text, links, and background colors.
The lightbox feature allows visitors to watch your videos in a popup. If you prefer, then you can disable the lightbox so that all your videos play as small thumbnails, embedded inside the page content.
In this way, you can encourage people to visit your Facebook page, to see the full-size video. To disable the lightbox, simply click on the ‘Enable’ toggle to turn it from blue to grey.
When you’re happy with how the video feed looks, don’t forget to click on ‘Save.’
You’re now ready to embed the Smash Balloon feed in your website.
How to Add Facebook Videos to WordPress
With Smash Balloon, you can add the video feed to your WordPress website using a block, widget, or shortcode.
If you’ve created more than one feed using Smash Balloon, then you’ll need to know the feed’s code if you’re going to use a widget or block.
To get this code, go to Facebook Feed »All Feeds and then look at the feed="" part of the shortcode. You’ll need to add this code to the block or widget, so make a note of it.
In the following image, we’ll need to use feed="6"
If you want to embed your Facebook feed in a page or post, then we recommend using the Custom Facebook Feed block.
Just open the page or post where you want to embed your Facebook videos. Then, click on the ‘+’ icon to add a new block and start typing ‘Custom Facebook Feed.’
When the right block appears, click to add it to the page or post.
The block will show one of your Smash Balloon feeds by default. If you want to use a different video feed instead, then find ‘Shortcode Settings’ in the right-hand menu.
Here, simply add the feed="" code and then click on ‘Apply Changes.’
The block will now show the videos from your Facebook page or group. Just publish or update the page to make the video feed live on your website.
Another option is to add the feed to any widget-ready area, such as the sidebar or similar section. This allows visitors to watch your Facebook videos from any page of your site.
Simply go to Appearance » Widgets and then click on the blue ‘+’ button.
After that, find the ‘Custom Facebook Feed’ widget.
Then, just drag it onto the area where you want to show the video feed.
The widget will show one of your Smash Balloon feeds automatically.
To show a different feed instead, type or paste the feed’s code into the ‘Shortcode Settings’ box and then click ‘Apply Changes.’
You can now make the widget live by clicking on the ‘Update’ button. For more information, please see our step-by-step guide on how to add and use widgets in WordPress.
Finally, you can embed videos on any page, post, or widget-ready area using a shortcode.
Simply go to Facebook Feed »All Feeds and copy the code in the ‘Shortcode’ column. You can now add this code to any Shortcode block.
Sometimes you may want to embed a specific Facebook video in a page or post. For example, you might have a Facebook video that talks about the same topics as your latest blog, or a promotional video showing the product you’ve just launched on your online store.
To embed a specific video, you’ll need to buy and install the Featured Posts extension as it allows you to display a particular post or event using its ID.
To start, go to Facebook Feed » Extensions.
Here, find the ‘Featured Posts’ extension and click on its ‘Add’ button.
This will open the Smash Balloon website in a new tab, with instructions on how to purchase the extension.
Once you have the extension, you can install it in exactly the same way you install a plugin. If you need help, then please see our guide on how to install a WordPress plugin.
After activating the plugin, go to Facebook Feed » All Feeds and click on ‘Add New.’
Under ‘Advanced Feed Types,’ select ‘Single Featured Post’ and then click ‘Next.’
You can now choose the page or group that you want to use as your source by following the same process described above.
On the next page, you’ll need to enter the ID of the video that you want to embed.
To get this ID, visit Facebook in a new tab and then open the video that you want to embed.
You can now go ahead and copy the URL.
After that, just post the URL into your WordPress dashboard and click on ‘Next.’
Once you’ve done that, you can style the video and then add it to your site following the same process described above.
If you liked this article, then please subscribe to our YouTube Channel for WordPress video tutorials. You can also find us on Twitter and Facebook.
Are you looking for a way to embed Facebook status posts in WordPress?
Facebook statuses are an easy way to share important updates and time-sensitive information with your audience. By embedding your Facebook timeline in WordPress, you can get more engagement, let people know what’s happening on your Facebook page or group, and grow your followers.
In this article, we will show you how to embed Facebook status posts in WordPress.
Why Embed Facebook Status in WordPress?
Facebook is the most popular social media platform in the world and has billions of active users. For website owners, Facebook is a powerful way to connect with a new audience and engage with the people who already know about your brand.
Facebook is also perfect for sharing time-sensitive information in real time. In this way, you can use FOMO to create a sense of urgency.
For example, you might post a status about how visitors are running out of time to enter your giveaway in WordPress, or take advantage of your flash sale.
However, people won’t see your Facebook status if they just visit your website. This makes it difficult to grow your Facebook following and build a relationship with your audience.
By embedding your Facebook status posts in WordPress, you can promote your social media page and encourage more people to follow you on Facebook.
As you post new statuses, they’ll appear on your site automatically, so it’s also a great way to keep your website fresh, even for regular visitors.
That being said, let’s see how to embed Facebook status posts in WordPress.
This plugin lets you display text and links from your Facebook page or group.
In this guide, we’ll be using the free version of Smash Balloon as it allows you to embed Facebook statuses no matter what your budget. However, there’s Smash Balloon Facebook Feed that lets you embed different kinds of content. For example, you can embed a Facebook video in WordPress, and show images and videos in a lightbox popup on your site.
The first thing you need to do is install and activate the Smash Balloon Social Post Feed plugin. For more details, see our guide on how to install a WordPress plugin.
After that, you’ll need to connect Smash Balloon to your Facebook page or group, by going to Facebook Feed » All Feeds. Here, click on ‘Add New.’
Smash Balloon pro lets you show posts from your photo albums, timeline, events, and more.
However, the free version only allows you to embed your Facebook statuses so click on ‘Timeline’ and then select ‘Next.’
Now, you need to select the page or group which you’ll get the Facebook statuses from.
After that, go ahead and click on ‘Connect to Facebook.’
This opens a popup where you can log into your Facebook account and choose the pages or groups which you want to get the status updates from.
As soon as you’ve done that, click on ‘Next.’
Facebook will then show all the information that Smash Balloon will have access to and the actions it can perform.
To restrict Smash Balloon’s access to your Facebook account, just click any of the switches to turn it from ‘Yes’ to ‘No.’ Just be aware that this may affect the content that you can embed on your WordPress blog or website.
With that in mind, it’s a good idea to leave all the switches enabled.
When you’re happy with how your Facebook permissions are set up, click on ‘Done.’
After a few moments, you should see a message confirming that you’ve connected your WordPress website to Facebook. With that done, click on the ‘OK’ button.
Smash Balloon will now take you back to the WordPress dashboard automatically.
How to Embed Facebook Status Posts in WordPress
You will now see a popup with the source you just linked to your website. Simply select the radio button next to your Facebook page or group and then click on the ‘Add’ button.
If you accidentally closed the popup, then don’t worry. You can simply refresh the tab to reopen the popup.
After that, Smash Balloon will take you back to the Facebook Feed » All Feeds page automatically. Just like before, click on the ‘Add New’ button, select ‘Timeline,’ and then click on the ‘Next’ button.
Now, select your Facebook page or group, and click on ‘Next.’
Smash Balloon will now go ahead and create a timeline feed from the Facebook page or group you’ve chosen.
This is a good start, but Smash Balloon has lots of settings that you can use to customize your embedded timeline.
How to Customize Your Embedded Facebook Status Posts
To fine-tune your timeline, go to Facebook Feed » All Feeds in the WordPress dashboard.
Here, find the timeline feed you just created and click on the ‘Edit’ button next to it.
This opens the Smash Balloon feed editor, which shows a preview of your timeline to the right.
On the left-hand side, you’ll see all the different settings you can use to customize how the timeline looks on your site. Most of these settings are self-explanatory, but we’ll quickly cover all the main areas.
To start, you can change how the statuses are displayed by clicking on ‘Feed Layout.’
On this screen, you can switch between list and masonry layouts, as well as change the feed height. As you make changes, the preview will update automatically so you can try different settings to see what looks the best for your website.
You can preview how your status feed will look on desktop computers, tablets, and smartphones using the row of buttons in the upper-right corner.
Mobile devices usually have smaller screens and less processing power, so if you’re not happy with how the feed looks then it’s smart to show fewer statuses on tablets and smartphones.
To make this change, just type a different number into the ‘Mobile’ field in the ‘Number of Posts’ section.
By trying out different layouts you can create a Facebook status feed that looks great across all devices.
By default, Smash Balloon feed shows fewer columns on smartphones and tablets, compared to desktop computers. This helps your Facebook statuses fit comfortably on smaller screens.
To do this, simply change the numbers under ‘Columns.’
When you’re happy with how the feed looks, click on the ‘Customize’ link.
This will take you back to the main Smash Balloon editor, ready for you to explore the next settings screen, which is ‘Color Scheme.’
Smash Balloon uses a color scheme inherited from your WordPress theme by default, but on this screen, you can switch to a ‘Light’ or ‘Dark’ look.
By default, Smash Balloon adds a header to your feed, which is your Facebook profile picture and the name of the group or page.
To customize this section, click on ‘Header’ in the left-hand menu.
Here, you can change the header size and color, hide your Facebook profile picture, and more.
If you would prefer to remove the header entirely, then click to turn off the ‘Enable’ toggle.
Next, you can change how the individual posts look inside your feed by selecting ‘Post Style’ from the left-hand menu.
After that, click on ‘Post Style’ again.
On this screen, you can choose between a regular and boxed layout.
If you select ‘Boxed’ then you can create a colored background for each Facebook post.
If you choose ‘Regular’ then you can change the thickness and color of the line that separates your different social media posts.
In the following image, we’ve added a thicker line to our Facebook status feed.
You can also customize the individual parts within each status by going back to the main settings screen.
Once again, select ‘Post Style’ but this time choose ‘Edit Individual Elements’ instead.
You will now see a list of all the different content that Smash Balloon includes in each post, such as the date, post author, and event title.
To remove a piece of content from your feed, simply click to uncheck its box.
You can also customize how each type of content looks by clicking on it.
For example, in the following image, you can see settings to change the size and color of the author text.
By default, Smash Balloon doesn’t include the Facebook ‘like’ button in your feed.
This button makes it easier for visitors to follow you on Facebook, so you may want to add it to your status feed by selecting the ‘Like Box’ settings.
After that, simply click on the ‘Enable’ button so that it turns blue.
You can now use the settings to change where the link box appears and the kind of content included in the box, such as your Facebook cover photo and total number of followers.
If you upgrade to Smash Balloon premium, then there are some more settings to explore. This includes a lightbox feature that allows visitors to explore your content in a popup.
Since you’re using the free version of Smash Balloon for now, you can go ahead and click on ‘Save’ to store your changes.
The next step is adding the Facebook status feed to your WordPress website.
How to Embed Facebook Status Posts in WordPress
You can add your Facebook status feed to WordPress using a block, widget, or shortcode.
If you’ve created more than one feed using Smash Balloon, then you’ll need to know the feed’s code if you’re going to add it using a block or widget.
To get this information, simply go to Facebook Feed »All Feeds and then look at the feed="" part of the shortcode. You’ll need to add this code to the block or widget, so make a note of it.
In the following example, we’ll need to use feed="8".
If you want to embed your Facebook statuses in a page or post, then we recommend using the ‘Custom Facebook Feed’ block.
Simply open the page or post where you want to embed the status feed. Then, click on the ‘+’ icon to add a new block and start typing ‘Custom Facebook Feed.’
When the right block appears, click to add it to the post or page.
The block will show one of your Smash Balloon feeds by default. If you want to use a different feed instead, then simply find ‘Shortcode Settings’ in the right-hand menu.
You can now add the feed="" code to this box. Once you’ve done that, click on the ‘Apply Changes’ button.
The block will now show all the status updates from your Facebook page or group. Just publish or update the page to make the feed live.
Another option is to add the feed to any widget-ready area, such as the sidebar or similar section. This allows visitors to see your latest Facebook updates across your entire website.
Simply go to Appearance » Widgets in the WordPress dashboard and then click on the blue ‘+’ button.
Now, start typing ‘Custom Facebook Feed’ into the search bar to find the right widget.
You can now drag it onto the area where you want to show your Facebook status updates. By default, the widget will show one of the feeds you created using Smash Balloon.
To show a different feed instead, type the feed’s code into the ‘Shortcode Settings’ box and then click on ‘Apply Changes.’
You can now click on the ‘Update’ button to make the widget live.
Finally, you can embed your status on any page, post, or widget-ready area using a shortcode. To get the shortcode, simply go to Facebook Feed »All Feeds and copy the value in the ‘Shortcode’ column.
If you liked this article, then please subscribe to our YouTube Channel for WordPress video tutorials. You can also find us on Twitter and Facebook.
Do you want to create a custom Facebook feed in WordPress?
A custom feed allows you to show posts from your Facebook page or group on your WordPress website. This can make your site more engaging and encourage visitors to follow you on Facebook.
In this article, we’ll show you how to easily create a custom Facebook feed in WordPress.
Why Create a Custom Facebook Feed in WordPress?
With almost 3 billion monthly active users, Facebook is the biggest social media site in the world. As a website owner, you may have already created a Facebook page or group where you engage with your audience.
However, people who only visit your website won’t see your Facebook posts. By adding a custom Facebook feed you can show visitors what’s happening on your group or page.
This can make your website more engaging and interesting, especially if you post multimedia content to Facebook such as videos and images.
It’s also a great way to promote your Facebook page or group, which will help you get more Facebook likes and grow your following.
This plugin lets you show Facebook content and comments directly on your site, and even combine posts from multiple Facebook feeds. It also makes it easy to display powerful social proof, by embedding Facebook reviews and community posts on your website.
In this post, we’ll be using the pro version of Smash Balloon as it allows you to show videos and photos in your Facebook feed, choose different layouts, filter your feed based on post type, and more.
However, there’s also a free version that allows you to create a custom Facebook feed for WordPress, no matter what your budget.
Upon activation, you’ll need to go to Facebook Feed » Settings and enter your license key into the ‘License Key’ field.
You’ll find this information under your account on the Smash Balloon website.
After entering the key, click on the ‘Activate’ button.
Connect Your Facebook Page or Group to WordPress
Smash Balloon Custom Facebook Feed allows you to create multiple feeds from your different Facebook pages and groups. You can even merge feeds to create a custom feed.
To create your first feed, go to Facebook Feed » All Feeds and then click on ‘Add New.’
Smash Balloon lets you display posts from your timeline, photos, videos, albums, events, and more. For this guide, we’ll create a ‘Timeline’ Facebook feed but you can select any feed type you want.
After choosing a feed type, click on the ‘Next’ button.
Now, you need to select the Facebook page or group where you’ll get the content from.
To get started, click on ‘Add New.’
On the next screen, choose whether you’re creating a feed from a Facebook page or group.
Then, simply click on ‘Connect to Facebook.’
This opens a popup where you can log into your Facebook account and choose the pages or groups that you want to use in your feed.
After making your selection, click on the ‘Next’ button.
Once you’ve done that, Facebook will show all the information that Smash Balloon will have access to, and the actions it can perform.
To restrict Smash Balloon’s access to your Facebook account, simply click any of the switches to turn them from ‘Yes’ to ‘No.’ Just be aware that this may affect the content that you can show in the custom Facebook feed.
With that in mind, we recommend leaving all these switches enabled.
When you’re ready, click on ‘Done.’
After a few moments, you should see a message that you’ve successfully linked your WordPress website to Facebook. You can now click on ‘OK.’
With that done, Smash Balloon will return you to the WordPress dashboard automatically.
How to Create a Custom Facebook Feed in WordPress
You will now see a popup with the group or page you just linked to your WordPress website. Simply select the radio button next to your source and then click on the ‘Add’ button.
If you accidentally closed the popup, then don’t panic. You can simply refresh the tab to reopen the popup.
Once you’ve done that, you’ll be returned to the Facebook Feed » All Feeds page.
Just like before, click on the ‘Add New’ button and then choose the type of custom Facebook feed you want to create, such as Timeline, Photos, or Videos.
Then, click on ‘Next.’ Now, under ‘Select a Source’ you’ll see your Facebook group or page as an option.
Go ahead and select the page or group, and then click on ‘Next.’
You can now choose the template that you want to use as the starting point for your feed. All of these templates are fully customizable so you can fine-tune them to perfectly fit your WordPress blog or website.
We’ll be using the ‘Default’ template, but you can use any template you want.
After choosing a design, click on the ‘Next’ button.
Smash Balloon will now go ahead and create a Facebook feed based on your source and chosen template. This is a great start, but you may want to fine-tune how this feed appears on your website.
How to Customize Your Facebook Feed
The Smash Balloon Custom Facebook Feed plugin gives you lots of ways to customize your feed. With that in mind, it’s worth seeing what changes you can make.
On the Facebook Feed » All Feeds screen, find the feed you just created and click on its ‘Edit’ button, which looks like a small pencil.
This opens the feed editor, which shows a preview of how the custom Facebook feed will look on your website.
On the left-hand side, you’ll see all the different settings you can use to customize the feed. Most of these settings are self-explanatory, but we’ll quickly cover some key areas.
To start, you can change how your posts are displayed by clicking on ‘Feed Layout.’
On this screen, you can switch between different layouts, such as masonry and list, and change the feed height. As you make changes, the preview will update automatically so you can try different settings to see what works best for your website.
By default, the feed will show the same number of posts on desktop computers and mobile devices such as smartphones.
However, mobile devices usually have smaller screens and less processing power, so you may want to show fewer posts on tablets and smartphones. To do this, just type a different number into the ‘Mobile’ field under ‘Number of Posts.’
You can preview how your changes will look on desktop computers, tablets, and smartphones using the row of buttons in the upper-right corner.
By trying out different layouts you can create a custom feed that looks great, no matter what device the visitor is using.
By default, the Facebook feed shows fewer columns on smartphones and tablets, compared to desktop computers. This helps all your content fit comfortably on smaller screens.
However, after testing the mobile version of your WordPress website, you may be unhappy with how the columns look on smartphones and tablets. If this is the case, then you can adjust the columns by changing the numbers in the ‘Columns’ section.
When you’re happy with the changes you’ve made, click on the ‘Customize’ link at the top of the menu.
This will take you back to the main Smash Balloon editor.
Next, you can click on ‘Color Scheme‘ in the left-hand menu and take a look at the different colors you can add to the Facebook feed.
By default, Smash Balloon uses a color scheme inherited from your WordPress theme, but you can also choose ‘Light’ or ‘Dark,’ or even create your own custom color scheme.
By default, Smash Balloon adds a header to your feed, which is your Facebook profile picture and the name of your page or group.
To change how this looks, click on ‘Header’ in the left-hand menu.
On this screen, you can change the size and color of the header, hide or show your Facebook profile picture, and more.
If you want to remove the header completely, then click the toggle to turn it from blue (enabled) to grey (disabled).
Next up is the ‘Posts’ screen. Here, you can change how the individual posts are displayed inside the custom Facebook feed.
For example, you can switch between regular and boxed styles, change the background color, add a boxed shadow, and more.
By default, Smash Balloon doesn’t include the Facebook ‘like’ button in your feed.
To encourage more visitors to follow your Facebook page, you may want to add this button by selecting ‘Like Box’ from the editor’s left-hand menu.
After that, simply click on the ‘Enable’ button so that it turns blue. Now, if you scroll to the bottom of the preview you’ll see a ‘like’ button.
You can style this area using different settings. For example, you can choose whether the button appears at the top or bottom of the feed, and whether to include the cover photo from your Facebook page.
When you’re happy with how the ‘like’ button looks, you can move on to the ‘Load More Button’ screen.
The ‘Load More’ button encourages visitors to scroll through more of your Facebook feed.
For this reason, you may want to make the button more eye-catching by changing its background color, text color, and label.
Another option is to remove the ‘Load More’ button completely by clicking on the ‘Enable’ toggle so that it greys out.
Disabling the ‘Load More’ button is useful if your Facebook feed is time-sensitive. That wat, visitors don’t need to scroll through your previous posts that don’t apply to them.
When you’re happy with how the custom Facebook feed is set up, don’t forget to click on ‘Save’ to store your changes.
You’re now ready to add the Facebook feed to your WordPress website.
How to Add Your Custom Facebook Feed to WordPress
You can add your custom Facebook feed using a block, widget, or shortcode.
If you’ve created more than one custom feed, then you’ll need to know the feed’s code if you’re going to use a block or widget.
Simply go to Facebook Feed »All Feeds and then look at the feed="" part of the shortcode. This is the value you’ll need to add to the block or widget, so make a note of it.
In the following image, we’ll need to use feed="1".
To use this shortcode in a page or post, you can use the ‘Custom Facebook Feed’ block in the content editor.
Simply open the page or post where you want to show the feed. Then, click on the ‘+’ icon to add a new block and start typing ‘Custom Facebook Feed.’
When the correct block appears, click to add it to your page or post.
The block will show one of your feeds by default. If you want to use a different feed instead, then simply find ‘Shortcode Settings’ in the right-hand menu.
You can now add the feed="" code to this box. After that, click on ‘Apply Changes.’
The block will now show your custom Facebook feed, and you can publish or update the page to make it live on your website.
Another option is to add the feed to any widget-ready area, such as the sidebar or similar section. This is an easy way to show the custom Facebook feed across your whole site.
To get started, go to Appearance » Widgets in the WordPress dashboard. Then, click on the blue ‘+’ button.
You can now find the ‘Custom Facebook Feed’ widget.
Then, just drag it onto the area where you want to show the feed.
Again, Smash Balloon will show one of your custom Facebook feeds by default.
To show a different feed, type the feed’s code into the ‘Shortcode Settings’ box and then click on ‘Apply Changes.’
If you liked this article, then please subscribe to our YouTube Channel for WordPress video tutorials. You can also find us on Twitter and Facebook.