EDITS.WS

Tag: full site editing

  • Torque Social Hour: The Big Changes in WordPress 6.2

    The Torque Social Hour is a weekly livestream of WordPress news and events. WordPress 6.2 is here and it’s full of great new features. In this video, we talk with Nick Diego about what makes this version so special. Nick is a WordPress Core contributor who is very passionate about the Full Site Editor.

    Join us next each Wednesday from 3-4pm PST for WordPress news and interviews.

    The post Torque Social Hour: The Big Changes in WordPress 6.2 appeared first on Torque.

  • Torque Social Hour: Talking WordPress 6.2 with Aurooba Ahmed

    The Torque Social Hour is a weekly livestream of WordPress news and events. In this episode, we talked with Aurooba Ahmed, a Software Developer specializing in WordPress and the co-host of the viewSource podcast. We talked about what’s Style Books and other new features in WordPress 6.2. We also talked about the lessons Aurooba has learned will doing her daily podcast project.

    Join us next each Wednesday from 3-4pm PST for WordPress news and interviews.

    The post Torque Social Hour: Talking WordPress 6.2 with Aurooba Ahmed appeared first on Torque.

  • Torque Social Hour: Josepha Haden Chomphosy talks about WordPress’s 20th Anniversary

    The Torque Social Hour is a weekly livestream of WordPress news and events. In this episode, we talked with Josepha Haden Chomphosy, the Executive Director of the WordPress project, about WordPress’s 20th anniversary, the upcoming release of WordPress 6.2, Hot Ones hot sauce, and much more. It was a great conversation and we hope you enjoy it too.

    https://youtube.com/live/9T0LgQP7M4A

    Join us next each Wednesday from 3-4pm PST for WordPress news and interviews.

    The post Torque Social Hour: Josepha Haden Chomphosy talks about WordPress’s 20th Anniversary appeared first on Torque.

  • Torque Social Hour: Brian Coords and the viewSource Podcast

    The Torque Social Hour is a weekly livestream of WordPress news and events. In this episode we talk with Brian Coords, a WordPress developer and co-host of the viewSource podcast. We talk about the viewSource, a WordPress-themed podcast Brian runs with Aurooba Ahmed. Then we switch gears to talk about Brian’s recent interest with GitHub’s CoPilot.

    On the final segment of the show, Brian and Doc speculate on how SEO and site discovery could change if AI chat results become the dominating result in Google searches.

    We’ve talked a lot about AI and WordPress on the Social Hour lately, including this recent episode where Doc talks with Chris Wiegman and Nyahsa Green about the rise of AI tools in WordPress and the possible ethical issues involved.

    Join us next each Wednesday from 3-4pm PST for WordPress news and interviews.

    The post Torque Social Hour: Brian Coords and the viewSource Podcast appeared first on Torque.

  • How to Use the WordPress Row Block

    The WordPress row block is an important design block that enables you to organize your content into a horizontal row. It’s a versatile block that can be used anywhere in the WordPress editor to organize content in templates, template parts, as well posts and pages. In this post, we’ll explain what it is, how to use it, and answer your burning questions about it. Let’s get to it.

    What is the WordPress Row Block

    WordPress row block

    The row block works much like the stack block. However, instead of displaying items vertically, it displays blocks horizontally across the available space of the parent container. By default, the block will evenly space the blocks contained inside of it – and uses the flex CSS property to display content in a grid format on smaller screens.

    row block flex

    If you are using a page builder, like Divi, the row block isn’t necessary. You can use the Divi Builder to add rows and other elements with more advanced design options.

    How to Add the Row Block to your Post or Page

    For this post, we’ll be adding it using the Twenty Twenty-Three theme, but you can use any block theme or full site editing theme to follow along. Start by logging into your WordPress site. Then, add a new page.

    There are a couple of ways to add the block to your site from the block directory. The first way is to use the block inserter. Click the block inserter icon at the top left of your page.

    click the block inserter

    Next, type row in the search bar. Locate it from the search results and either click to add it, or drag it into the page editor.

    insert the row block

    An alternate way to add the block is to click the + icon on the page editor, or simply start typing /row to reveal the block results. Click the row block to insert it into the page.

    insert row block in page editor

    After adding a row to the page, you can insert as many blocks within your row as you’d like. Blocks display depending on whether you choose to stack them or not. We’ll get more into that in the next section. By default, as you add blocks, they appear from left to right in the row.

    adding blocks to row

    Row Block Settings and Options

    The WordPress row block can be customized using the toolbar settings and additional settings. Here is a breakdown of the settings available.

    Toolbar Settings

    The toolbar settings group consists of several settings that are outlined in the image below:

    row block toolbar settings

    1. Transform to
    2. Drag
    3. Move
    4. Justification
    5. Vertical alignment
    6. Width
    7. More options

    Transform To

    The first on the list is transform to. You have a few options here.

    transform to controls

    You can transform the row into a quote, unwrap it, convert it to columns, or convert it to a cover. When you unwrap a row, each block contained within it will stack on top of each other, rather than being displayed from left to right. Gutenberg will provide you with a preview of how your row will look once unwrapped.

    unwrap option

    When converted to a cover, you can add a background image, background overlay, and set the padding on it. Choosing this option converts your row into a cover block, but retains the blocks within the row itself.

    cover option

    Drag and Move

    The drag option enables you to reposition the block anywhere on the page. This is handy for complex page designs that contain multiple sections of content. Similarly, move will allow you to move the row up or down on the page without the need to drag.

    Justification

    The justification setting allows you to either justify the items in your row to left, center, right or evenly space the items in your row from left to right.

    justification controls

    Alignment

    With the alignment tool, you can either align the blocks contained in the row to the top, middle, or bottom.

    row alignment

    Width Controls

    You can specify the width of the block to be a max of 650px wide, 1200px wide, or full width. Full-width rows span the full width of the page, which is good for rows converted to covers or for a call-to-action sections.

    width controls

    More Options

    Under More Options, you’ll be able to do things like copy, duplicate, insert, move, lock, group, ungroup, remove, or create a reusable block from the row.

    more options

    Additional Block Settings

    You’ll find several options under additional settings. To locate the block’s additional settings, click the block tab located in the sidebar settings for the row block.

    access row additional settings

    First, you can arrange blocks in your row either horizontally or stacked vertically.

    row options

    Next, you can set justification and orientation options, as well as set blocks to wrap to multiple lines. Justification options are the same as in the toolbar settings. You can set your blocks to align to left, middle, right, or space evenly. Orientation functions similarly to the arranged options in that you can choose horizontal or vertical orientation.

    row justification

    Under color options, you can change colors for text, background, and links in the row’s blocks. Depending on the theme you’re using, gradient background colors are an option as well as solid colors.

    color options

    Typography options can be set for any text contained in your row. You can set the font family, font size, font weight (appearance), line height, letter spacing, text decoration, and letter case.

    typography settings

    Dimension settings control the padding, as well as block spacing. Block spacing controls the amount of space between blocks.

    row dimensions

    The last setting controls the border, as well as the border radius for the row. Units include pixels, percent, em, rem, vh, and vw.

    row border

    Tips and Best Practices for Using the Row Block Effectively

    The row block is a versatile block that will allow you to do a lot of cool things, apply nice effects to your blocks, and keep your content organized. There are a few things you should consider doing to use the block effectively. Using it is a great way to add different effects to groups of blocks. For example, when creating call to action sections for your website, you could use a call to action block, but its uses are limited. Instead, consider using a row so that you can add any type of block that you want.

    Additionally, using a row allows you to set the width, vertical alignment, and background options for a group of blocks. This can come in handy when you are trying to draw emphasis to a certain section of your website, such as a group of posts, for example.

    Another tip you should consider when using rows is to utilize the list view. The list view comes in handy, especially when you have quite a few blocks on a single page. You can easily determine where your rows begin and end, drag blocks to other locations within the row to arrange them, and add new blocks exactly where you want them.

    list view

    Frequently Asked Questions about the Row Block

    The row block is a complex block with a ton of uses and features, so you’re bound to have some questions. Hopefully, these will help.

    What’s the Difference Between a Row Block and a Column Block?

    Rows and columns are very similar to each other. A row works the same as a column in that it allows you to add blocks horizontally. However, there is one key difference. A column block requires you to designate a set width for each column, whereas a row does not. You can easily drag blocks within it to resize the column width, whereas columns demand that you enter a value to resize them.

    Can I Use the Row Block in a Template?

    Absolutely! As previously mentioned, the row block is suitable for use in any scenario. Whether it’s in a post, page, template part, or template, the row block is useful for all types of content. Using them is a great way to organize and structure content in your templates, as well as your posts and pages.

    How Many Blocks Can I Use in a Row?

    One of its coolest features is the ability to handle limitless blocks within it. Unlike the column block, there isn’t a predefined number of spaces that can be used. For example, if you were to start adding images blocks to a row, your images will continue to display from left to right, regardless of how many you add. Each image will scale to fit within the space allotted.

    Conclusion

    The row block is a crucial design element for providing structure to your website content. It can be used within templates, posts, and pages, and can contain unlimited blocks within it. It’s useful in creating template parts such as headers where multiple blocks are displayed. For example, a header row might contain the site logo, page list, social icons, as well as a call to action button. If you’re creating a website using blocks, this block will be essential.

    How do you incorporate the row block into your WordPress website? Let us know by sounding off in the comments section below.

    The post How to Use the WordPress Row Block appeared first on Elegant Themes Blog.

  • Torque Social Hour: Using CodeWP and AI to generate WordPress snippets

    The Torque Social Hour is a weekly livestream of WordPress news and events. In this episode we talk with James LePage, the Founder of CodeWP, an AI code generator for WordPress. James tells us about his time running a WordPress agency and how it led to him building a tool that uses AI to generate WordPress snippets.

    We discuss how CodeWP trained its data, how it can be used, some of the other AI tools designed for WordPress users, and a deep dive into some of the history behind ChatGPT and GPT3.

    We’ve talked a lot about AI and WordPress on the Social Hour lately, including this recent episode where Doc talks with Chris Wiegman and Nyahsa Green about the rise of AI tools in WordPress and the possible ethical issues involved.

    Join us next each Wednesday from 3-4pm PST for WordPress news and interviews.

    The post Torque Social Hour: Using CodeWP and AI to generate WordPress snippets appeared first on Torque.

  • How to Create a Block Theme for WordPress (The Easy Way)

    Creating a WordPress Block Theme for your website isn’t as hard as you might think. WordPress Block themes have been growing in popularity since their introduction in WordPress 5.9 with a growing number of premade block themes available in the WordPress repository. And, for those who want to create a WordPress block theme on your own, you’re in luck. The Create Block Theme plugin simplifies the process so you create a custom block theme quickly without extensive coding. Plus, you can even use it to create a child theme for your site.

    In this post, we’ll explain the benefits of using the Create Block Theme plugin and how to create your own block theme in a few clicks.

    What is a WordPress Block Theme?

    WordPress block theme

    A WordPress block theme is a full site editing theme for WordPress based on blocks. A block theme allows you to create any page or post using a drag-and-drop interface with blocks and block patterns you can use to build your content. You can even create custom templates and template parts (like headers and footers using the site editor.

    Additionally, it is easier to add custom styles to a block theme. There’s no need to edit the functions.php, style.css, or other theme files to create custom blocks, fonts, or add theme styling. Everything can be accomplished by editing one file – theme.json. WordPress considers block themes to be the future of WordPress. Thankfully, there are quite a few advantages to using them.

    Intro to the Create Block Theme Plugin

    For this post, we’ll be highlighting the Create Block Theme plugin, which is a free plugin available in the WordPress plugin repository. It allows you to create a new theme, blank theme, or child theme quickly. You can also embed Google fonts – either via CDN or locally.

    The Create Block Theme plugin saves you a ton of work creating child themes by allowing you to create and install one in a matter of minutes. Let’s take a look at the steps you’ll need to take to use the plugin.

    Key Features

    The Create Block Theme plugin has some amazing features to make theme creation easy and fast:

    • Create a block child theme with a single click.
    • There’s no extensive coding required.
    • It’s easy to clone a theme.
    • You can export WordPress block themes for use on other projects.
    • You can create a blank block theme.
    • Add a new style variation to the global styles in site editor

    How to Create a WordPress Block Theme?

    Before we use the plugin to create a block theme, you must first install and activate a parent block theme. For this tutorial, we’re going to use the Twenty Twenty-Three theme.

    Install A Parent Block theme

    To get started, log in to your WordPress dashboard. Next, navigate to Appearance > Themes.

    WordPress dashboard

    You can choose any theme you wish – as long as it’s a WordPress block theme. If you’d like to use a block theme other than Twenty Twenty-Three, start by clicking the Add New button in Appearance > Themes.

    Add new theme

    Click the block theme tab to reveal the options for available block themes.

    choose WordPress block theme tab

    Once you find the desired theme, hover over it, then click the Install button.

    Install block theme

    Install Create Block theme Plugin

    The next step is to install the Create Block Theme plugin. There a few ways to install a WordPress plugin, but this one can easily be installed from the dashboard. Start by navigating to Plugins > Add New in the WordPress dashboard.

    Add new plugin

    Type Create Block Theme in the search box. When the page refreshes, select the plugin, then click Install Now.

    Install Create Block Theme plugin

    Once installed, simply activate the plugin.

    activate plugin

    Configure the Create Block Theme Plugin

    Now that the plugin has been installed, navigate to Appearance > Create Block Theme.

    configure Create Block Theme plugin

    In the plugin’s settings, you’ll have a few options:

    create block theme settings

    1. Export (theme name)
    2. Create child of (theme name)
    3. Clone (theme name)
    4. Overwrite (theme name)
    5. Create blank theme
    6. Create a style variation

    Export Theme

    This setting allows you to export the activated theme along with any changes you’ve made. Any templates, global styling, fonts, or other structural changes will be present. Using this setting, you can export the theme, then use it in other WordPress installations. All of your settings will be preserved.

    To export your currently installed theme, select the export option, then click the generate button. The file will be downloaded to your downloads folder as a zip file, like any other WordPress theme.

    Create Child Theme

    create child theme

    This option allows you to create a child theme based off of your current parent theme. Before generating the child theme, be sure to give your theme a name, description, URL, note the author, as well as the author URL if you choose to. Once you click the generate button, the plugin will automatically download your child theme as a zip file.

    Clone Theme

    clone block theme

    When cloning your block theme, the plugin will create a new theme. The clone will retain all assets of the parent theme, as well as any user changes. Similarly to creating a child theme, be sure to name your theme, give it a description, and note a theme URL, author, and author URL.

    Overwrite Theme

    overwrite theme

    When you overwrite your block theme, all user changes will be saved and converted to theme changes. Any templates you create or style changes you make will be saved into theme files, making them a permanent part of the theme.

    Create Blank Theme

    create blank theme

    When you select this option, a blank theme will be created within your website’s theme directory. Before generating your new theme, give it a name, description, and theme URL (if desired), note the author, and author URL. Upon clicking the generate button, you can navigate to Appearance > Themes to view your new blank theme.

    new blank theme

    Create a Style Variation

    Style variations are located in Appearance > Editor. To locate them, navigate to the theme editor, then click the styles button at the top right corner of the editor. There, you can create new styles for text, colors, and buttons. There are additional options for styling individual blocks, too.

    theme styles

    Once you’ve created styles, you can create a style variation in the Create a Block Theme plugin by choosing the last option in the settings. Give your style a name, then click Generate.

    new style variation

    To view your new style, navigate back to Appearance > Editor, click the style icon, and select browse styles. There you can browse through the styles to locate the new one you just created.

    custom style

    Manage Theme Fonts

    To manage the fonts installed in your theme, navigate to Appearance > Manage Theme Fonts. There you’ll be able to view all of the installed fonts in your theme.

    manage theme fonts

    One of the most surprising and amazing features of the Create Block Theme plugin is the ability to manage your theme’s fonts. In this section of the plugin, you can remove entire font families or a single variation. Additionally, you can easily add Google fonts to your theme either by hosting them locally or calling them through the Google Fonts CDN. Here are some of the best Google fonts for the web.

    To remove a font family or font variation, simply click the remove link next to the family or variation you’d like to remove from your site.

    remove font

    Add a Google Font

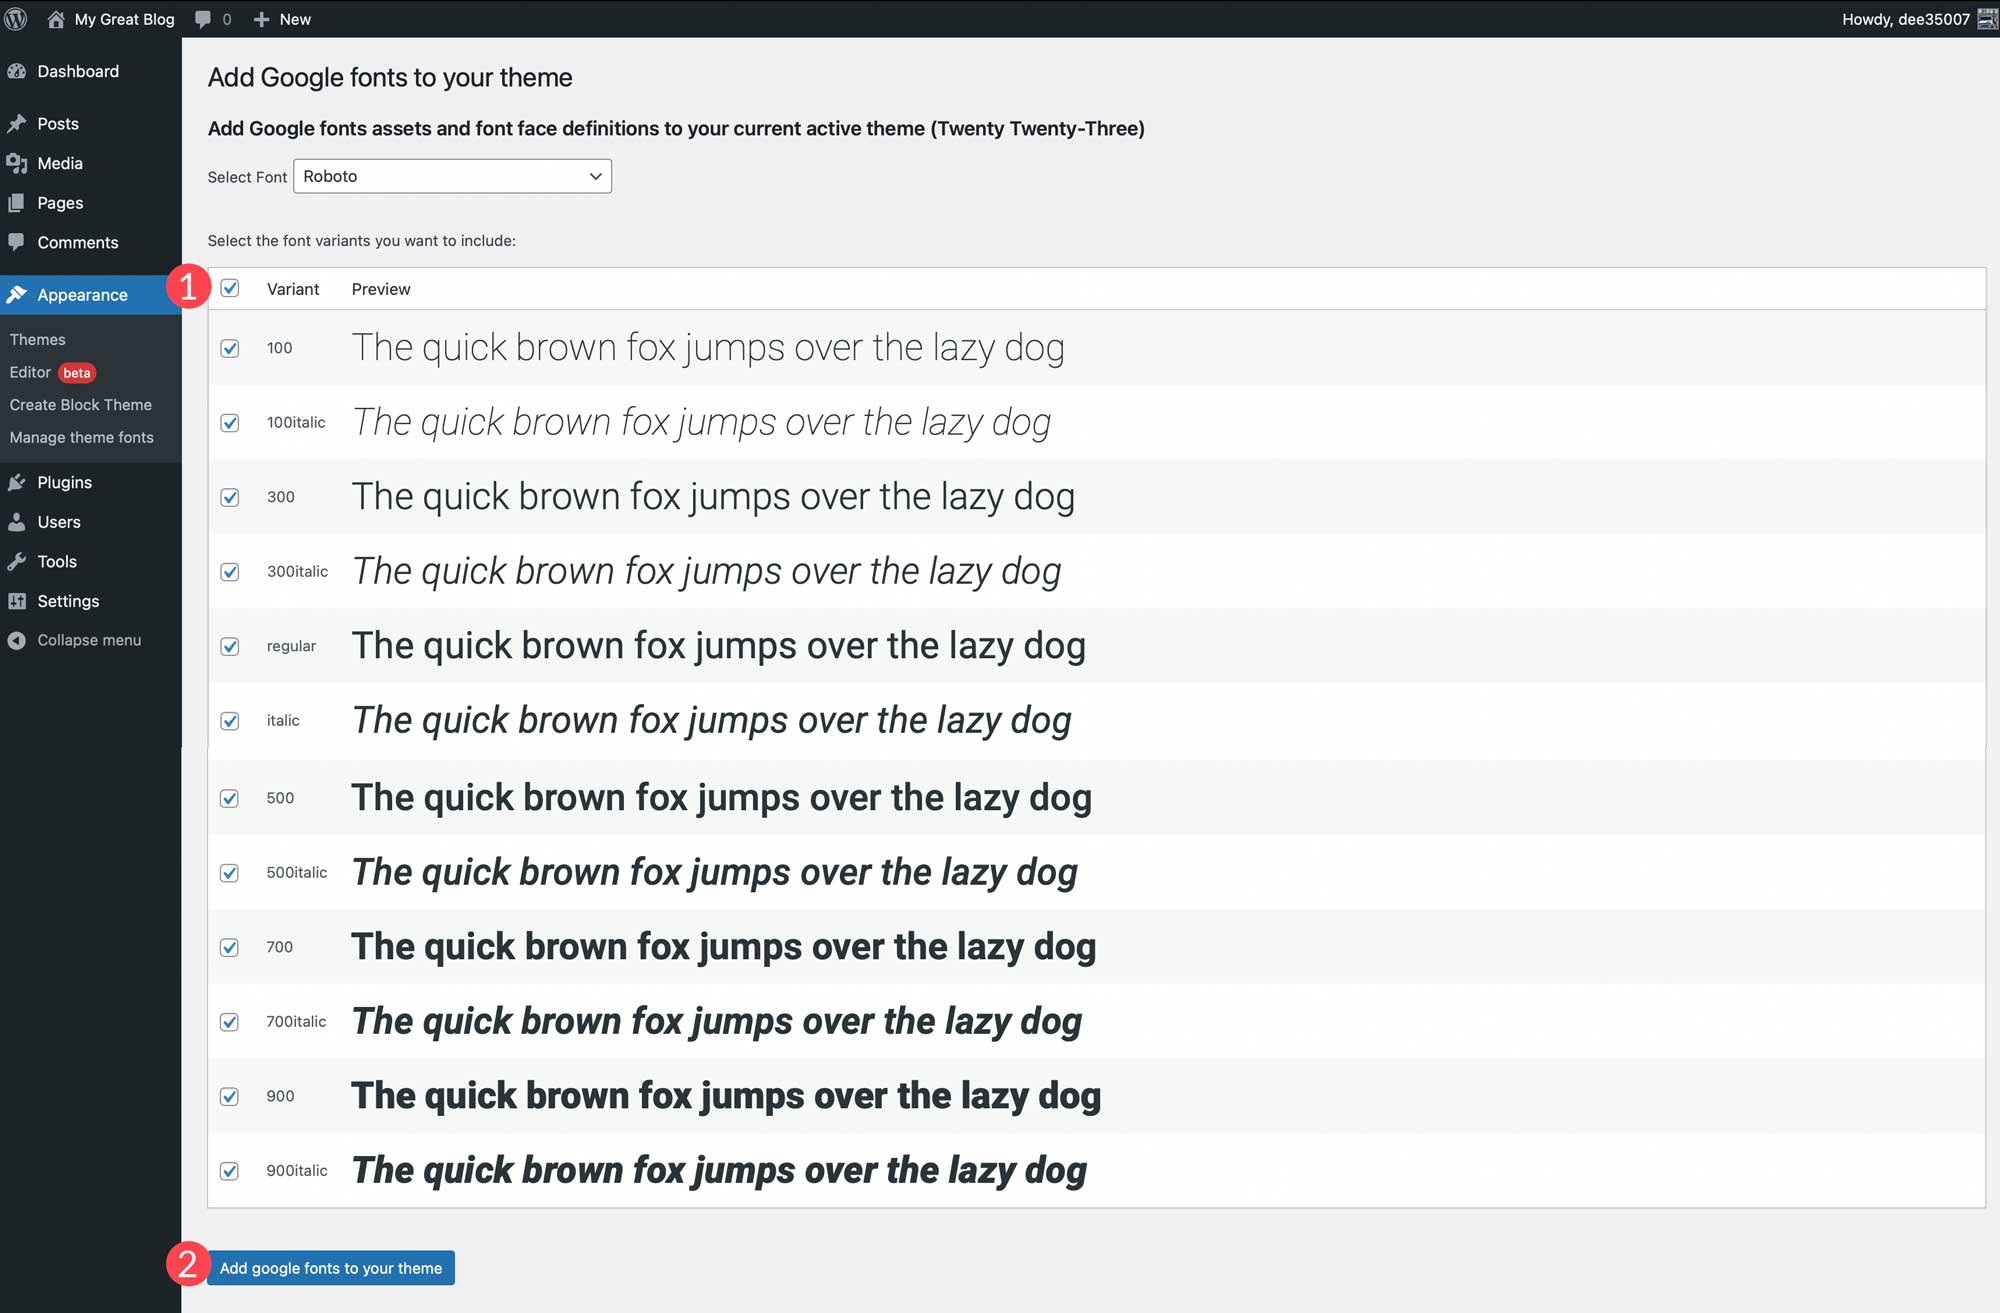
    To add a Google font, start by clicking the Add Google Font button at the top of the page.

    add Google font button

    When the page refreshes, use the dropdown menu to select a font. You’ll be able to choose any font in Google’s font library.

    select a font

    Once you make a font selection, you’ll have the option to choose the variants you wish to include. You can choose all by clicking the checkbox at the top or choose individual ones. After choosing variants, click the Add google fonts to your theme button.

    Add Google font

    You can also add local fonts to your theme. Start by clicking the Add Local Font button. Fonts in the ttf, off, and woff2 file formats are supported.

    add local font button

    Upload a font by choosing a file saved on your local machine. Next, give it a name, and apply a font style, and font weight. Finally, click Upload local fonts to your theme.

    Once fonts are installed, they can be managed within the Create Block Theme plugin and applied to styles in the site editor.

    fonts in style editor

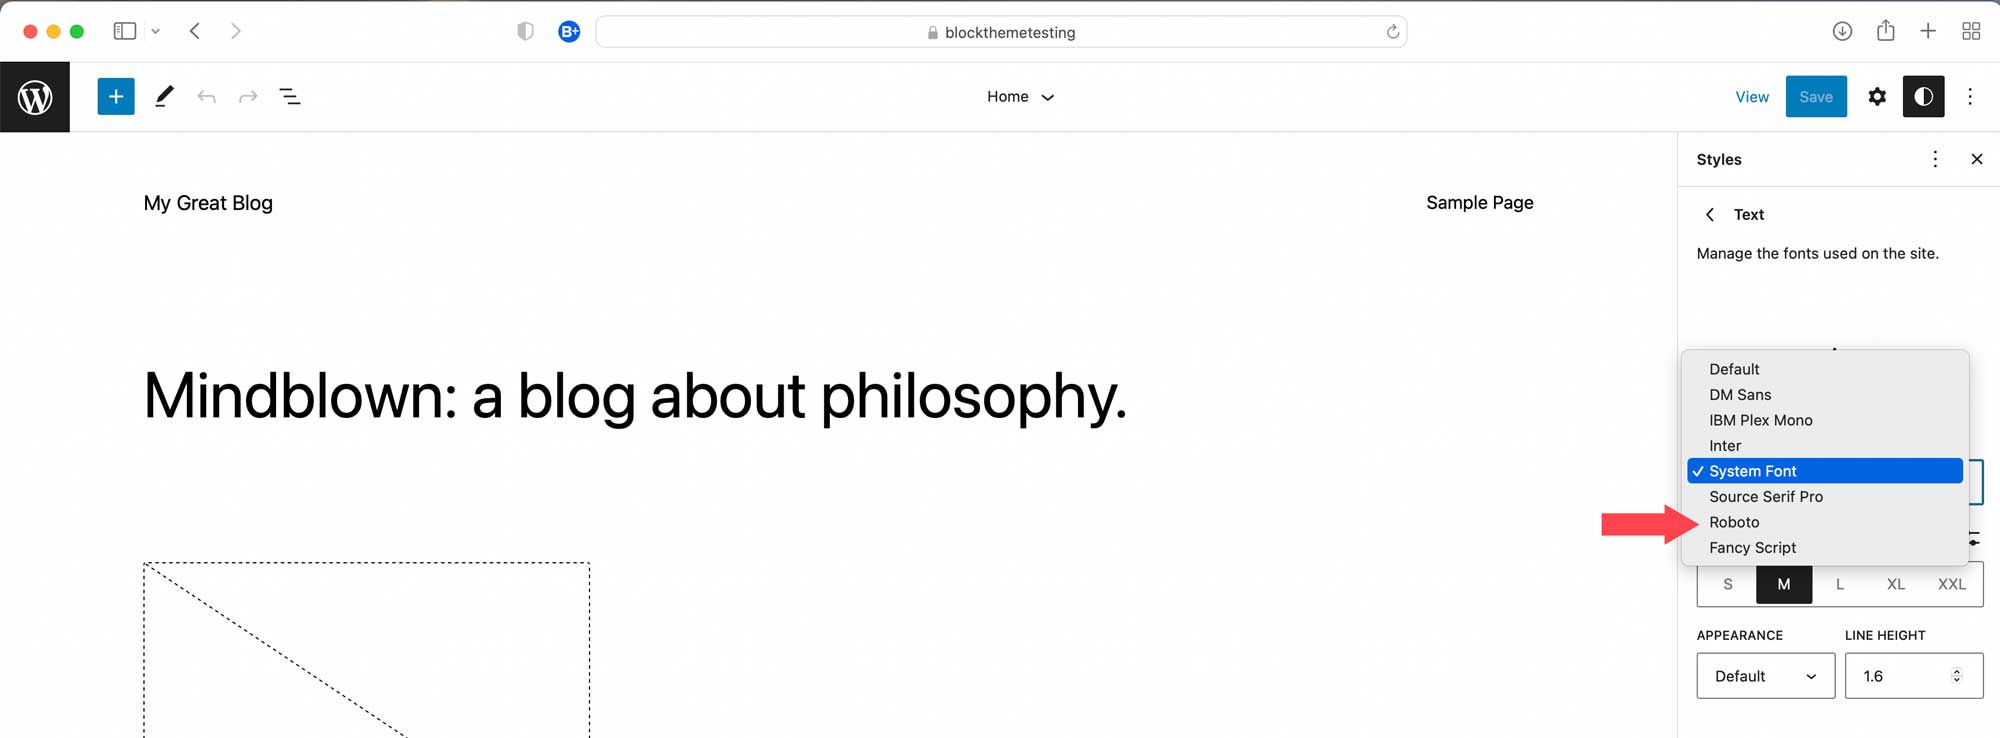
    After fonts are added, you can head back over to the Create Block Theme tab to apply one of the options to create a child theme, export it, clone it, or overwrite your current theme. All fonts will be preserved along with style variations, as well as templates that you create.

    Creating a WordPress Block Theme Doesn’t Have to Be Hard

    Thanks to the Create Block Theme plugin, it’s easier than ever to create a block theme for your website. You can create your own theme templates using the full site editor, add new styles, add and manage fonts, and even export your block themes for use on other projects. There’s no coding, no theme files to alter, and it’s all done within a few clicks. If you’re looking to start using block themes, or are looking for an easy way to manage them, consider using the Create Block Theme plugin.

    For those using page builders, there should be built-in options for creating custom themes. With Divi, you can easily import and export all of your templates and designs using the theme builder. This allows you save entire site styles to be used like a child theme to kickstart new website builds in a few clicks.

    Have you made the switch to WordPress block themes? If so, let us know in the comments below.

    The post How to Create a Block Theme for WordPress (The Easy Way) appeared first on Elegant Themes Blog.

  • Torque Social Hour: A Conversation About AI, WordPress, and Ethics

    The Torque Social Hour is a weekly livestream of WordPress news and events. In this episode we talk with Nyasha Green, an Editorial Director at MasterWP, and Chris Wiegman, a Manager of Engineering at WP Engine, about the pros and cons of AI. We talk about about some WordPress plugins that are powered by AI, as well as a few recent lawsuits in the space. It was a lively conversation with a lot of great comments in the chat.

    Here’s a list of topics mentioned during the show:

    Join us next each Wednesday from 3-4pm PST for WordPress news and interviews.

    The post Torque Social Hour: A Conversation About AI, WordPress, and Ethics appeared first on Torque.

  • How to Use the WordPress Stack Block

    Thanks to the introduction of Gutenberg blocks in version 5.8, WordPress makes it easy to organize your content and create awesome patterns. With the help of the WordPress Stack Block, you can add any type of block you choose, then display it vertically to create beautifully stunning layouts with ease.

    What is the Stack Block in WordPress?

    The WordPress Stack Block is a useful block that allows you to stack multiple blocks in a vertical column. Similar to the row block, it allows you to group multiple blocks together, making it easier to keep your blocks nice and tidy. It’s a versatile block because you can add any block you wish within it such as headings, images, buttons, and more.

    How to Add the Stack Block to your Template

    Adding the Stack Block to your page using the WordPress Editor is a simple process. Start by clicking the block inserter icon near the top left of the site editor screen.

    click block inserter

    Next, you can either search for the Stack Block or type /stack into the page editor directly. Then, simply click the block to add it.

    add Stack Block

    Stack Block Settings and Options

    There are two settings groups within the WordPress Stack Block – toolbar and additional settings. Let’s go over each group to give you a better understanding of how to use it.

    Toolbar Settings

    As with every block in WordPress, there are a few standard toolbar settings for the Stack Block. They can be observed by viewing the screenshot below:

    Stack Block toolbar settings

    1. Transform to
    2. Drag
    3. Move arrows
    4. Justification
    5. Alignment
    6. More options

    The first setting in the Stack Block is Transform To. With this option, you can turn the Stack Block into a quote, unwrap (ungroup) it, convert it to columns, or convert it into a cover block.

    transform settings

    The next two settings – drag and move – allow you to either drag your block into a different position on the page, or use the move arrows to move it up and down.

    The Justification option in the toolbar settings controls the justification of the blocks within the stack. They can either be aligned to the left, center or right.

    justification settings

    Next is the Align option. This option doesn’t necessarily control alignment, but rather the width of the stack. You can set it to None, which will allow the stack and all interior blocks to occupy a maximum of 650px. Wide width will allot 1000px for the stack, and Full width will stretch the Stack Block and all interior blocks across the full width of the page.

    Stack Block alignment settings

    The last toolbar settings group is more options. Within it, you can copy, duplicate, insert, move, lock, group, remove, or create a reusable block.

    Stack Block more settings

    The Stack Block Settings

    There are quite a few additional settings specific to the Stack Block. First, there is the Layout setting. Under the Layout options, you can control the justification and orientation of the stack, as well as control whether the blocks within the stack should be allowed to wrap to multiple lines. Justification options include left center, and right. For orientation, you can choose whether to orient them horizontally or vertically.

    Note that if you choose the horizontal orientation, the Stack Block will automatically be converted to a row block.

    Stack Block layout settings

    Next is the Color settings. When selecting a text color on the stack, it will control the color of the text on every block inserted into it. Alternatively, when choosing a background color, it will only apply a background color to the stack itself, rather than its contents. Finally, link color settings control any links added within the Stack Block.

    color settings

    Within the Typography settings, you can set the font size, appearance, line height, letter spacing, text decoration, and letter case for any block inserted into the Stack, which contains the text.

    typography settings

    Next are the Dimension settings. Here you can control the padding around the Stack. You can either set padding as a whole, or individually for the top, left, bottom, and right. Additionally, you can control the block spacing for all blocks contained within the stack.

    dimension settings

    The Border options allow you to add a border and/or a border radius to the Stack.

    border settings

    Tips and Best Practices for Using the WordPress Stack Block Effectively

    Even though the block is fairly simple to use, there are a few best practices that you should follow.

    When adding blocks to the Stack, a great way to stay organized and view your blocks is to use the WordPress List View. List view enables you to view each block within the stack, and allows you to easily drag them around to move them. To access the list view, simply click the list view icon to reveal all of the blocks in your stack.

    list view

    Also, make sure to keep the orientation option set to vertical. Swapping to a horizontal view in the layout settings will convert your Stack to a row. As previously mentioned, rows display blocks horizontally rather than vertically.

    Lastly, when setting colors for your stack, keep in mind that if you set a text color on the Stack Block itself, it will apply to other child blocks containing text as well. If you don’t want to apply a color to all blocks within the stack, be sure to apply color settings to individual blocks within the stack.

    WordPress Stack Block FAQs

    The WordPress Stack Block is a versatile block that can be utilized in pages, posts, and templates. So you will likely have a few questions. Hopefully, these will help.

    What’s the Difference Between a Row Block and a Stack Block?

    While Row Blocks and Stack Blocks allow you to group a series of blocks together, the difference is in orientation. You should use a row block when you want to display blocks horizontally. A great example of when to use a row block is when building a header. Typically, you want to have your site logo, as well as navigation links displayed horizontally. The Block works in much the same way. It can house a group of blocks. However, a Stack Block displays the block vertically. A great way to use the block is to build a sidebar with your post categories.

    Can I Use the Stack Block in a Template?

    Yes! Stack Blocks are a great way to display a group of blocks vertically, and help to keep blocks organized. This is especially useful when creating a template using full site editing in WordPress. For example, when creating a blog post template, it’s a good idea to use the block to house your post title, post meta, post content, and other post-related blocks.

    Wrapping Things Up

    Building a website in WordPress starts with adding structural elements like rows and columns. The Stack Block is a convenient way to add a row of content that is aligned vertically instead of horizontally. The block can be easily configured to help you design a page in WordPress using the built-in settings in the toolbar and sidebar block settings. Though this block is native to WordPress, page builders like Divi have more robust design options for optimizing the structure of your page using modules.

    For more, check out our other WordPress Block tutorials as well as our complete guide to WooCommerce Blocks.

    Have you experienced using the Stack Block on your website? Let us how in the comments below.

    The post How to Use the WordPress Stack Block appeared first on Elegant Themes Blog.

  • Torque Social Hour: Be Your Own Social Aggregator

    The Torque Social Hour is a weekly livestream of WordPress news and events. In this episode we talk with Shawn Hooper and David Bisset about social media, owning your own content, and turning your WordPress site into an aggregator of your all your social networks.

    We start off talking about Shawn’s Twitter-Archive-To-WP tool. Then we discuss davidbisset.social, which was built with WordPress and shows a chronological version of all of David’s social media posts. I also mentioned a tool called Tweetgrab, which allows you to convert any existing Twitter embeds on your WordPress site into static images with properly formatted Alt-Text descriptions.

    During the show we also mention FeedWordPress, Anil Dash’s thoughts on search and consent in the fediverse, the Searchadon retrospective, and the the Timeline Block for WordPress.

    YouTube video of the Torque Livestream with Tim Nolte and Matthias Pfefferle

    If you’d like to know more about how to turn your WordPress site into a Linktree-style list of your favorite social networking sites, check out my tutorial:

    Join us next each Wednesday from 3-4pm PST for WordPress news and interviews.

    The post Torque Social Hour: Be Your Own Social Aggregator appeared first on Torque.