Google Web Stories are a visual content format that enables creators to easily make short videos, images, or animations. They are similar to Stories on social media platforms such as Instagram or Facebook. Unlike their social media counterparts, you can add Google Web Stories to your website and link them on multiple platforms. They are […]
Blogging has become a standard marketing strategy for businesses since it can help promote your brand effectively. A blog allows customers to find your business easily on Google, supporting your business growth. In fact, companies that create blogs generate 67% more leads. That’s because blogging helps business owners share valuable content and engage with potential […]
Email marketing has been a constant staple for over 20 years. Its success is because of steady consumer email behaviors and the continuous development of exceptional email marketing platforms. These platforms make it easy to send emails that get results. Mailchimp has been a leading email marketing platform used by millions to grow their audience and business. In this post, we’ll show you how to start using Mailchimp for Email Marketing step by step.
Why Use Email Marketing?
Marketing your website or business is an interesting challenge. Technology, strategies, and platforms constantly change, making it hard to stay on top. The fact is, email marketing remains one of the most effective ways to reach customers. It has a high return on investment (ROI), with an average of $36 for every $1 spent. Many marketers are investing a lot of time in and money building their lists and cultivating email campaigns with segmentation and automation tools to help streamline the growth of their business.
If you’re not already using email marketing, now is the time to start.
What is Mailchimp?
Mailchimp is primarily known as an email marketing service provider. Mailchimp had its founding in Atlanta circa 2001. It now enjoys over 11 million account users who send more than 18 billion monthly emails through the platform. The service includes features like contact segmentation, opt-in forms, automation, and a digital marketing platform. Mailchimp is clearly one of the most popular email marketing platforms used by businesses of all sizes.
WordPress users love Mailchimp because it offers easy integration with their sites with a free tier much like many plugins they use in the Repo—which allows them to scale at will. Divi even sports a built-in MailChimp integration.
How to Use Mailchimp for Email Marketing – 8 Steps
In order to string together a successful email marketing campaign, you need to establish a few things between Mailchimp’s marketing platform and your website. We’ll look into how to use Mailchimp for email marketing with a WordPress website.
Get Started with Mailchimp Email Marketing Account
The obvious first step, if you’ve not already done this, is to sign-up for a Mailchimp account. It takes less than 2 minutes to get into the actual account.
If you have a particular pricing tier in mind, you can select that. Of course, they offer a free plan with all the basic needs included (for up to 500 contacts).
Then, you need to set up your account by providing your email, username, and password preferences for Mailchimp.
Mailchimp offers a smooth onboarding experience. It’ll ask you several stages of questions that will populate your account with the correct settings. Very important among these are your business information, physical business address, and the type of business/how you plan to use Mailchimp. Each of your answers creates a customized onboarding experience where they show you what they’d recommend you set up to achieve success.
Once you’ve set up your accounts, there are 2 very nice WordPress-focused integrations you can set up between Mailchimp and your website. They are:
WooCommerce Integartion
WordPress Subscriber Integration
The WooCommerce integration connects your store information (buyers, purchases, and inventory) to your Mailchimp accounts which gives you ecommerce marketing abilities within Mailchimp (subject to Mailchimp’s pricing tiers).
The general WordPress integration with Mailchimp brings your site’s subscriber information into Mailchimp. It essentially creates an easy import of those contacts into Mailchimp so you don’t have to export your WordPress subscribers into an Excel file and import it into Mailchimp.
At this point, your account is created and you can start diving into the depths. Next, we’ll quickly show you how to add contacts not found in WordPress or WooCommerce.
How to Create a Contact List
Mailchimp’s email marketing platform has multiple terms used for creating mailing lists. The big bucket term for Mailchimp is “Audiences”. Mailchimp recommends most businesses use 1 audience though you are allowed to use multiple should your needs be more advanced.
You can categorize and separate your audience into smaller chunks using “Groupsâ€, “Tagsâ€, and “Segmentsâ€. Each helps organize and filter audiences with specific criteria allowing you to send specific messages/emails to the exact people you want to.
Mailchimp Groups: From Mailchimp, “Groups are specialized audience fields that let contacts self-categorize based on interests or preferences using uniform responses you set.” You can think of groups as Custom Fields that you can insert into contact forms for user-generated data.
Mailchimp Tags: From Mailchimp, “Tags are labels you create to help organize your contacts. Tagging lets you bring your own contact structure into Mailchimp and label contacts based on data you know about them.” Tags are not seen on signup forms or by your contacts. They are an internal designation that you can set up to create a customized organization structure based on your business processes and data collection practices.
Mailchimp Segments: From Mailchimp, “Your audience contains a lot of information about your contacts, like when they were added, where they live, and how they interact with your marketing. You can use this information to filter contacts into segments, and then target them with email, postcards, or ad campaigns.” Segments are groups of filtered contacts based on available data. These segments routinely update so you can send automated campaigns based on the platform’s conditional logic.
So, creating a contact list involves data management. To get started, however, we can easily add contacts to our audience. If you are starting a new venture and have no contacts to add you can skip down to creating a sign-up form to use on your website to start getting contacts.
How to Add/Import Contacts into Mailchimp
To start, click under “Audience” in the Mailchimp sidebar or select the “Audience dashboard” sub-item. This will show an “Add Your Contacts” button that you can click on.
This will bring you to a few import options you have at your disposal. You can import from:
Another Service
Contact File
Copy and Paste (Manual Entry)
Import Contacts from another service
Mailchimp allows you to import contacts from the following services:
Mailchimp uses CSV files to import contacts into an audience. If you have a past website, CRM, or accounting software that allows contact export, you can usually bring that into Mailchimp. The only required piece of data is a unique email address for each contact.
Once exported from your program, you can edit or clean up the contact list in a program like Google Sheets or Microsoft Excel. Simply save the list as a CSV file format and import it into Mailchimp. It should let you know if there are errors or invalid formatting of your file.
Manually Enter Contacts
Mailchimp also allows for a manual entry of contacts where you can copy and paste data from your various programs and files. This is a great way to collect data from random and disparate places (like email threads, text messages, and sticky notes) and add them to your account. This isn’t recommended for entering large amounts of data. You should compile large amounts of contact data into CSV files when possible.
Create a Signup Form
Whether or not you are starting out with contacts, adding a Signup form is very important to the continued growth and health of your email lists.
To get started creating a signup form, under the “Audience” sidebar section, click “Signup forms”. To create a form in your account for use on your website select the “Embedded forms” option which gives you an HTML code for installation on your site.
There is also an option to create a Pop-up form right under the Embedded form option. Note, that popups can harm your SEO by affecting website UX which in some cases is taken into consideration for ranking by Google. Other than that, they are typically pretty effective at gathering new subscribers (up to 11% conversion rate) from frequent website visitors.
Next, you will see the Embedded Form Builder page. You will have the option of editing displayed form fields (and required fields) and various form settings. At all times, you will see a live preview of your visual changes in the center of your screen.
Once you’re happy with your form, you can click “Copy Code” to save the form HTML code to your clipboard.
Add the Signup form to your WordPress Website
You can now add the form to your website. There are a few ways of doing this that we’ll briefly go over with links out to specific instructions for deploying custom inline code on your website.
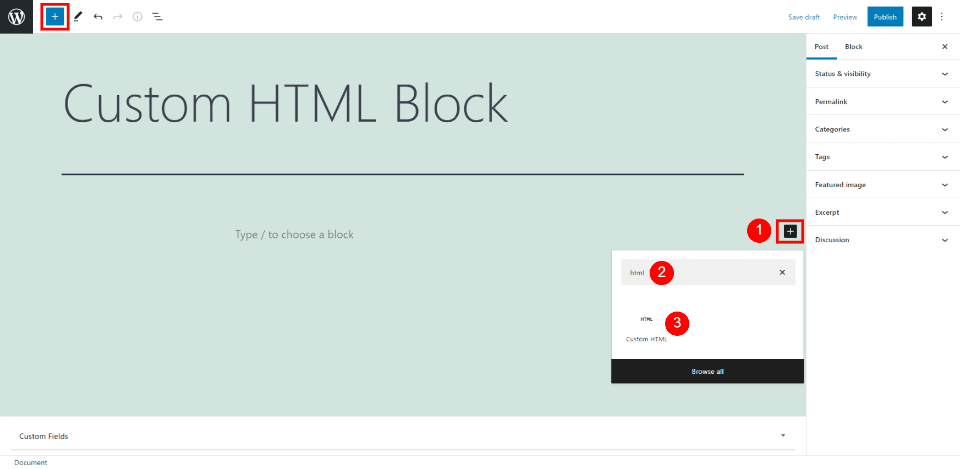
Add Mailchimp Embeddable Form Code Using Custom HTML Block
On your preferred WordPress Page or Post, open the Block Editor. Add an HTML Block where you want it, and paste the HTML code.
Create Opt-in Forms and Popups with Bloom that Connect to Mailchimp
Bloom is an advanced email opt-in form builder for WordPress websites that integrates with Mailchimp. It is built by the developers of the Divi Theme so you can trust that it allows for maximum design freedom.
Once you’ve set up your Mailchimp account integration, you can create opt-in forms in Bloom that feed new contacts to your Mailchimp account.
Create a Mailchimp Email Marketing Template
Email templates can save a lot of time in your email campaign workflow. Being able to reuse or repurpose an email template means that you don’t have to start from a blank screen while creating your emails. Templates also keep your email uniform which helps build brand recognition and trust over time.
To create a template, on the “Campaigns” section of the sidebar, select “Templates”.
This will open up your first options. There are pre-made templates that you can choose from. You can choose between basic layouts and fully built templates that Mailchimp calls “themes”.
The layouts are nice if you know what you want to build but don’t want to undo a bunch of design settings when you insert your branding into an email. The themes are nice when you are unsure of how to use the email editor and want a quick start. Sometimes you can also find something really close to your business’ branding. Either way, the time savings are massive.
It is worth knowing that with the free tier of Mailchimp, there are limitations to which templates you are able to use.
From there, you can go on designing your template email. If you are having trouble with the email builder or just want a quick primer, see the support doc for using the email builder.
Once your template is designed, you can go ahead and save it and give it a name that you’ll remember.
We can now use the Mailchimp template that we created for a campaign we’ll send to our lists.
Create a Mailchimp Email Marketing Campaign
After you’ve created a template in Mailchimp, we can use that to create an email campaign. To do that, on the template window, find your template, click the dropdown arrow and select “Create campaign”. This will create a new campaign based on the template without altering the template.
To create a campaign, there are a few pieces of information that have to be in place before sending it to your contacts.
Campaign Name
To Field: Who is it that you are sending this campaign to?
From Field: What display name and email address will this email look like it is coming from?
Subject: What is the email subject line that your contacts will see in their email client?
Campaign Design: Iterating off your template to create a campaign that is ready to send
Once you’ve completed each of these steps and have a green checkmark next to them you are allowed to schedule or send your email.
Sending and Scheduling a Campaign
Scheduling lets you schedule a send into the future to try and send at the perfect time. Mailchimp also has tools that can help you find your best email sending times.
You also have the ability to send the email right away. This will let the email send to your contacts when Mailchimp servers are ready to handle the request. This usually does not take much time at all but may be longer for first-time senders.
From template to campaign, Mailchimp makes it easy to send business newsletters and marketing emails.
Following Up On Campaign Reports
The last thing for you to do is analyze the results of your campaign. Don’t stare at the campaign report dashboard for too long after sending your campaign because it could be hours or even upwards of 2 days for the final results of your email to come in.
When the dust has settled, here’s what to look for:
Opens: Opens correspond with how many people opened your campaign. This number is growing more unreliable because of the transition away from cookies
Clicks: This is how many link and image clicks happened in your email.
Bounces: Bounces are an email delivery term indicating how many times your email went to email addresses that could not receive it. There are different types of bounces but this number reflects your overall list health.
Unsubscribes: This is how many times this campaign was used to unsubscribe from all your future emails. This number indicates good list growth practices, consistent branding, and content that is relevant to your audience.
If you have the WooCommerce integration for Mailchimp, you may see ecommerce stats populate at the bottom of the report. These numbers are those that Mailchimp can prove that this campaign helped achieve. It shows the number of orders and revenue figures for that specific campaign.
FAQs
Got questions about Mailchimp, WordPress, and Divi? We’ve got answers.
Is Mailchimp Free?
Mailchimp is a popular email marketing platform that offers a free plan for up to 500 total contacts. This makes it an excellent option for small businesses and site owners just starting out with email marketing. While the free plan does have some limitations, it is still a great way to get started with Mailchimp email marketing.
Does Mailchimp Work with WordPress?
Do you have a WordPress website and want to use Mailchimp to create an email marketing campaign? You’re in luck! Mailchimp is compatible with WordPress websites. You can either use the Mailchimp WordPress plugin or embed a Mailchimp signup form on your website using an embed code. Or, if you use Divi Theme, Divi’s forms can connect with the Mailchimp API for effortless integration between WordPress and Mailchimp.
Can I integrate my email opt-in form with Mailchimp?
Chances are, yes, you can integrate your WordPress form plugin with Mailchimp. Mailchimp by far has the most integrations of all the email marketing platforms. Divi Forms, Bloom, WPForms, Gravity Forms, Ninja Forms, and others all have easy-to-use integrations with Mailchimp.
Does Mailchimp integrate with Divi?
Yes, Mailchimp integrates with the Divi Theme. Simply connect the Mailchimp marketing integration with Divi to seamlessly use native forms that connect with your Mailchimp contact lists. See what else Divi can connect with to make marketing your website and business easier.
Conclusion
In conclusion, if you are looking for an easy way to get started with email marketing, Mailchimp is a great option. With its user-friendly interface and integrations with popular WordPress plugins, Mailchimp makes it simple to create and send newsletters, automated emails, and targeted campaigns. Plus, its affordable pricing makes it a good choice for small businesses and startups.
Have you used MailChimp for Email Marketing? If so, share your experience in the comments below.
Working for multiple clients at once can be exciting. However, your workflow can quickly become inefficient and disorganized without proper agency tools. For instance, communication might get delayed, and files can go missing. Fortunately, with the right resources, you can collaborate more effectively with your team. For instance, you can use marketing tools to improve […]
Every business needs a target audience. However, creating a client profile can help market your products and services to the right customer. If you skip this step, your marketing campaigns might fail to produce the desired results. Fortunately, you don’t need to hire a marketing expert to identify your target audience. By doing some market […]
Bitrix24 is an all-in-one business software (or Saas) with a suite of tools to help grow your company and manage customer relationships. Using Bitrix24 with WordPress could be an effective combination for streamlining your business. Your WordPress site can help capture sales and leads while Bitrix24’s Customer Relationship Management (CRM) handles the rest. This article will discuss the features of Bitrix24 and how to use the Bitrix24 CRM with your WordPress website.
What is Bitrix24 CRM?
Bitrix24 is an enterprise collaboration and CRM platform that helps businesses improve communication and performance while lowering business costs. It consists of a number of integrated applications that cover every aspect of running and managing a company including project management, CRM, task management, document management, file sharing, and more.
Bitrix24 is available in both cloud-based and self-hosted versions. It offers a wide range of features and pricing options to meet the needs of businesses of all sizes. The best part is that many of its features integrate with WordPress websites, especially form and WooCommerce, to make your business operate smoothly.
Who Uses Bitrix24?
Bitrix24 has a CRM and collaboration platform used by millions of companies worldwide. The platform helps sales, marketing, and support teams work together more efficiently and improve customer relationships. So, both small businesses (SMBs) and large enterprises are able to find success with it.
Customer service, marketing, and sales organizations use Bitrix24 by using a single source of truth for tracking and managing customer interactions alongside corresponding tasks and internal communications. Plus, the platform is robust and flexible allowing organizations to completely customize how it is used to fit the operations and strategy of each company.
Why Connect Bitrix24 CRM with WordPress?
WordPress enables business owners to create any type of website they need. And it is a popular CMS because it is flexible and easy to use, especially with front-end no-code page builders like Divi.
Your website oftentimes acts as the frontline of service to your customers. Therefore, integrating your WordPress site with Bitrix24 can help improve your customer relationships and grow your business. A WordPress site connected to Bitrix24 can send customer data collected on the site straight to your Bitrix24 CRM. This allows you to connect sales and support organization tools and automation to increase the efficiency and quality of each function. When the technology is accessible and connected with helpful employees, businesses are able to deliver on their promises and improve customer value.
Bitrix24’s Features
Bitrix24 offers a full suite of applications that are interconnected to keep disparate parts of a company running in sync. There are quite a few features under the hood that are worth considering.
Some of Bitrix24’s best features for WordPress website owners are:
Bitrix24 is a powerful CRM tool that offers a variety of features and capabilities to help businesses streamline their customer relationships. Custom fields, records, reports, workflows, and kanban boards are just some of the ways that Bitrix24 can help businesses manage their customer data. There are also different user types that can be assigned to specific tasks. This ensures the right people have access to the right information.
Kanban Workflows
The CRM can display customers, leads, and active deals in a Kanban view which lets you visualize where each is within your workflows. Users can click on any one of them to see your complete record for that object.
You can view:
Contact Information
Background Information including previous notes
Previous Interactions including phone calls, web chat, and email
Teams can stay on top of a full pipeline of new sales leads or customers who’ve reached out for a support inquiry. With collaboration tools built into the workflow views, entire teams can work together to move the needle. This makes Bitrix24 one of the most effective company communication applications.
Business Process Automation
Every business needs a good automation platform to make internal processes more efficient. With Bitrix24, you can customize internal automation to create tasks based on certain actions or move leads along a sale journey.
Bitrix24 CRM for Customer Quotes and Invoicing
Bitrix24 is a powerful platform for sending customer quotes and invoices and offers a wide range of features and capabilities. This allows businesses to create custom quotes and branded invoices for their customers, offer discounts and taxes, and email or print them in PDF format.
Quotes and Invoices
Businesses can also use Bitrix24 for creating custom quotes at scale to help sales teams and service providers. You can create, customize, and send quotes and track actions that potential customers take — keeping you in the know at each step.
Craft custom invoices for customers that are fully branded, accurately calculate taxes, and offer discounts.
Bitrix24 for Customer Support Call Centers
The Bitrix24 call center solution provides a comprehensive set of features to help businesses manage their customer support ops. It includes a powerful workforce management system, an integrated softphone for making and receiving calls, and conversation recording for extended record keeping.
Call center technology is fully integrated with website live chat functionality that you can add to your website. Along with that, connect social accounts like Instagram and Whatsapp to serve customers where they are ready and willing. Bitrix24 offers an omnichannel support experience that scales into marketing opportunities with CRM and Email Marketing capabilities built in.
How to Integrate Bitrix24 CRM Forms with WordPress
If you’re a WordPress user, you might be wondering how to integrate your site with Bitrix24 CRM. There are a couple of ways to do this using forms to collect and update customer/lead information. And you can also make deeper connections if you use WooCommerce or a WordPress plugin that supports Zapier integrations.
In the rest of this article, we’ll run through how to complete each of these integrations and why each may be helpful.
Note: Fully integrating any CRM with a website (and the operations of your business) is a tall order. There is no one-size-fits-all approach as each CRM configuration and website configuration is different. Your business needs will demand different levels of integration and software solutions. The following are basic solutions for you to explore.
Using Bitrix24 CRM Embeddable Forms
Bitrix24 comes with a feature full web form creator. Web forms are the engine of a growing and flowing CRM. New leads, updated contacts, and new business can all start out as a simple web form fill.
The web form creator allows you to create forms with custom fields that populate vital information necessary for your sales, support, and marketing teams. Collecting accurate and timely information on customers and prospects is imperative to increase business and customer satisfaction. These forms are built into the Bitrix24 CRM and are embeddable on your website or landing pages.
To create an embeddable form in Bitrix 24, navigate to the “CRM” pane of the online platform. Then visit the “Add ons” tab and select “CRM Forms”.
Once there, you will have two options you can use. The first option allows you to use (and customize) premade contact forms that have basic settings that work well for most businesses.
In addition to using premade forms, the second option allows you to create a new form from scratch. To do so, click the “Add” button near the top.
There are multiple options that you can use to create a custom-tailored form. These options changes both how the form operates and how it can be designed to match your brand.
Once your form is fully configured, click “Save”. Then, in the top right, click “Form Features” then “Share”.
This will open up a window with all of Bitrix24’s Form sharing options. For a simple embed code, select the “Webpage” sharing option. You’ll see a drop-down section to view the form’s code.
This Bitrix24 Contact Form 7 premium plugin integration is a great way to get more from your contact forms. With custom fields, duplicate control, and UTM catching, you can make sure that your forms are as effective as possible. Use a form builder that you are comfortable using while still channeling lucrative customer data into your CRM.
Non-form integrations are also vital for business websites. They can collect user interactions and gather that information to populate your CRM with accurate and actionable information. Here are few integrations to consider.
WooCommerce
If you’re running a WooCommerce store on WordPress, then you know how important it is to have a CRM system in place to manage your customer relationships. But what if you could integrate your WooCommerce store with a CRM system like Bitrix24? With the premium WooCommerce plugin by Flamix for Bitrix24, you can do just that.
Note that this premium plugin has low installs and reviews so do what research you can before using it.
If you’re using Bitrix24 for your CRM needs, you can now integrate it with WordPress using Zapier. Zapier uses WordPress triggers to perform actions within Bitrix24, making it easy to keep your data synchronized between the two platforms. This integration is especially useful if you use WordPress for your website and want to keep your customer data centralized in Bitrix24.
Example Actions and Triggers available between platfoms
In order to set up the automation, allow Zapier access to both your Bitrix24 account and your WordPress installation. Then pick the combination of triggers/actions that are helpful for your CRM workflow in Bitrix24. Zapier gives you a lot of customization options. You may need a paid plan to achieve the level of automation that you are hoping for but a simple, lone automation may be doable on their free plan. Find out more if we piqued your interest in what’s possible with Zapier and WordPress.
Conclusion
In conclusion, Bitrix24 CRM is a great tool for WordPress users. The software is easy to use and has a wide range of features. And, when combined with your WordPress site, it can help you manage your customers, sales, and marketing. If you are looking for a CRM for your WordPress site, Bitrix24 should be at the top of your list.
Have you tried to integrate a CRM like Bitrix24 with WordPress? Let us know you experience in the comments below!
Email blasts have been a staple of email marketing and general-purpose newsletters since the advent of bulk email. They certainly aren’t going away either. But email recipients are growing more discerning and skeptical, especially with marketing emails, so it is important to know how to send an email blast the right way.
In this article, we’ll explore what an email blast is, what you should be careful of, and how to send one to get the best results.
What is an Email Blast?
An email blast is a single email sent to a large list of contacts, all at once. It is a way to reach a lot of people at once without having to email each individual contact on the list. Email blasts can be called single emails, email campaigns, newsletters, or e-blasts. But no matter what you call them, when done well, they are an effective way to reach out to your audience and keep them in the know.
Curtisoy of Teachable and Really Good Emails
Email blasts are often used for promotional purposes, such as announcing a sale or new product. Still, they can also be used to send important information, like an announcement or an update.
Using the term “blast” can easily turn people off from the idea. Nobody wants to be “blasted” with any kind of message. It sounds impersonal, promotional, and untrustworthy. It is important, instead, to make sure to provide value that is welcome by your contacts rather than only trying to exploit your readers to gain value for yourself. Businesses and marketing campaigns flourish when all parties leave with value.
Email Blasts vs. Segmentation—Which Should You Use?
If you are getting serious about email marketing, you’re going to need to be more strategic in your approach. That’s why most email marketers use list segmentation instead of relying on a simple email blast.
Email segmentation is the process of separating your entire list of contacts into smaller groups based on certain criteria. This allows for more targeted (personalized) email campaigns, unlike email blasts which are more generic and impersonal. Segmentation increases revenue from email marketing by 720%. This is because segmented email campaigns tailor messages toward different groups, buyer personas, and needs that exist among your many contacts.
Image Assets by Gazlast, iconohek and, magic pictures / shutterstock.com
That doesn’t mean an email blast doesn’t still serve a purpose. There are times for blasting your entire list (or a large portion of it) and there are times for targeting only a segmented list. Both have a place.
Here are some things to consider when deciding which one to use.
When to Use an Email Blast
Any company, non-profit organization, or person with contacts should utilize email blasts for informational updates that apply to their entire audience. The level of sophistication of your business’ marketing needs will dictate how much you can rely on e-blasts instead of automation, segmentation, and personalization.
Those with small contact lists will mostly use email blasts. It’s not necessary to use segmentation on a list that will stay below a few hundred contacts indefinitely. They may need to build your list a bit more before looking into more advanced email marketing strategies. Also, businesses with one service or product also might not need segmentation since their customers share enough similarities with one another.
When to Use Segmentation
In most cases, it is a good idea to use email list segmentation whenever possible, even for smaller lists. But if you have a large list, you will definitely want to use segmentation. The beauty of segmentation is that it allows you to meet your customers where they are. A music service app might send very different email content based on contact age or music preferences. Segmentation can tailor messages to separate sub-groups that otherwise would go to your general list. And larger businesses with a sales team and/or multiple products/services should use segmentation to send targeted emails based on buyer personas and/or differentiated customer journeys.
How to Send an Email Blast for Best Results (7 Tips)
There are common steps for sending out an email blast. Follow these steps and best practices to make sure you stay reputable among your contacts.
1. Choose a Reputable Service Provider
First, you need to choose an email marketing service provider. There are plenty of options. If you need the field narrowed down, consider these suggestions:
Once you have a reliable email marketing provider on your side, you need to ensure you have cleaned contact data. At a minimum, you should clean contacts twice a year (or more if you are a heavy sender).
Cleaning contacts is a best practice for maintaining your lists. Contact cleaning involves looking at contact activity data, trying to re-engage unengaged contacts, and removing those proven to be a lost cause. You’re essentially looking for abandoned email addresses and people who’ve lost interest that they never open your emails.
Keeping your lists clean boosts your sender reputation, makes your stats easier to interpret, and lowers your payment for total contacts.
3. Choose the Right Content and Occasion
Since random messages aren’t the best for your brand or marketing, be selective with what you send to your contacts. If every occasion is an occasion for sending out an email blast, your contacts might experience inbox fatigue and unsubscribe (or worse—mark it as spam).
Be selective about what you choose to send to your entire list. Make sure it is relevant for a large group of people. Email blasts are excellent at getting out really important information but they lack nuance. This can make an email irrelevant to entire sub-groups on your list. Being selective avoids sending information that is only relevant to a few contacts.
4. Define a Single Goal for the Email Blast
Once you’ve determined a viable occasion to send an email blast, you need to craft it in an engaging and effective way.
Image by olesia_g / shutterstock.com
An email blast should have one goal. That means all the text, images, and call-to-actions move readers toward one desired result. If you have too many CTAs, graphical elements, or even text, all of it will suffer. Narrowing down the major details is paramount.
The only exception might be for contacts lists that truly expect a newsletter (in the traditional sense) for you. If you provide a newsletter that offers curated content, updates about news/events, and multiple types of content, this would be the exception to the rule. Still, it might make sense to find a way to harmonize your content in a way that makes your main push clear. Having a consistent CTA in each of these emails may prove to be beneficial even in a traditional newsletter. But, don’t assume that a newsletter is the best email marketing strategy that you should be employing.
5. Personalize Email Blasts
Personalization is a best practice for email marketing in general and no less with email blasts. As we’ve discovered, e-blasts often lack some of the elements of really effective email marketing—like segmentation and targeting. Leveraging the data you have about contacts is a great way to add elements that make emails effective. This is called “Personalization”.
Personalization can be as simple as adding a first name to a subject line or using tags to create sections of dynamic content. As long as personalization is tactful, it captures the attention of your recipients and benefits the message of your email blasts.
Different platforms call their personalization tools different things. Mailchimp calls them “Merge Tags” but Constant Contact calls them “Greetings Tags” inside email content or “Personalization” in the subject line editor. These tools let you dynamically add personalized details based on the availability of that information on a contact-by-contact basis. If a particular contact entry does not have “First Name” listed, your personalization tag can still work. By setting up a fall-back entry you can have the contact without a first name read “Friend” or “Valued Customer” instead of the first name. This lets you personalize every email for contacts with a First Name and have a fallback to a more generic option for contacts without.
The big thing is collecting personalization information and adding it to your email marketing software routinely. An opt-in form like Bloom can collect email addresses and important details that you wish to collect. From there, it can also push those contact details to your platform of choice with its 19+ email provider integrations.
One other practical way to make your email blasts more personal and effective is to avoid using spam words. For a list of spam words to avoid along with tips for creating emails that stay out of the spam folder, check out our article on spam words to avoid.
6. Send the Email Blast at the Best Time
Sending the email blast is the part most people think about. They skip right to the step where they just shoot out a message to their contacts. Hopefully, following the previous steps, you’ve crafted a careful email that is sure to delight your readers.
At this point, there is a need to consider the best time to send out an email blast. Many platforms will analyze past email data and let you know the average days of the week and times that work best for sending emails. They do this by analyzing when emails were opened by your contacts and tracking those averages over time.
If you don’t have this ability or there is not yet enough data to determine this, you can find general best practices for your industry by Googling “best email marketing send times for _______ industry”. Just know that this data is getting fuzzier and fuzzier because of the sheer saturation of marketing emails being sent on a daily basis. It’s best to use your provider’s data on your own campaigns when you are able to.
7. Analyze Email Blast Reporting and Stats
Now is the time to determine if the email was a success.
Did contacts open the email? Did contacts submit a large number of unsubscribes or spam reports? How about going to your website and converting in meaningful ways? What links were clicked on and which ones were largely ignored? Any surprises?
Image by olesia_g / shutterstock.com
This is the point where you really get to know your list. By looking at the data, you are completing a postmortem on your email blast. Did it serve the business purpose you intended for it and did your contacts receive it well? Over time, you’ll be able to dial in the messaging, graphics, and content that your contacts crave. If you see negative trends, change things and see what corrects course. Seeing strong, growing numbers? Find out what is contributing to that and double down.
Email blasts are a contentious topic—but they can be done well. Some senders will only utilize email blasts while others will have more sophisticated needs and also sprinkle in segmentation and automation. Those who are serious about email marketing should never settle for generic email blasts that lack personalization or strategy. That is how you lose followers. Instead, it’s best to limit email blasts to those occasions where it makes sense and use a more targeted approach using segmentation for the bulk of your communication.
There’s one thing every website owner will say yes to, and that’s more traffic.
But how on earth are you meant to get noticed when the internet is so over-saturated with just about everything else?
If you’re looking for a fool-proof way to drive more traffic to your website and convert those visitors into paying customers, PPC advertising could be just what you need.
Hostinger Academy Webinar: Starting With PPC Ads
Subscribe For more educational videos! Hostinger Academy
PPC or pay-per-click advertising refers to online ads where the advertiser only pays when people interact with their ad through impressions or clicks.
Getting Started With PPC: 6 Top Tips
Contrary to popular belief, PPC advertising is no rocket science. Often, you simply need to know who you’re trying to reach and why they should visit your website.
Some of the best practices every PPC marketer should abide by include the following:
1. Decide On Your Channels
Ideally, you should be advertising where your audience likes to hang out.
If you’re selling to suited-up businessmen, chances are you won’t have much luck with an ad campaign on TikTok. Similarly, you won’t reach teens and tweens as easily on sites like LinkedIn as you would on Instagram or Facebook.
There’s “no one-stop-shop for every available audience.†You need to understand who your ideal customer is, where they spend their time online, and where they are in the buyer journey before you can settle on the best PPC channel.
Since every online advertising platform offers some form of pay-per-click solutions, start by creating a user persona and doing customer research to fully understand your customers’ pain points and habits.
Your customers might already be searching for products or services through search engines, or they may need to be introduced to your brand through social media first.
Overall, for most advertisers, it’s easier to create search ads in the beginning and branch out to other channels as you gather more data on your customers.
2. Determine Your Goals
As they say, “well planned is half doneâ€. That applies to PPC advertising, too. Before you launch a single campaign, you should be clear about your goals. Start by asking yourself:
How and what am I currently doing with my website and online marketing efforts?
What do I want to achieve with this particular campaign?
How does this PPC campaign support my other marketing objectives?
Next, you need to determine goals that you can measure:
Do you want to increase overall traffic to your website?
Do you want the campaign to result in more sales?
Are you looking to generate more sales leads instead of full conversions?
Is the primary focus of your campaign to simply promote an app or offer?
Do you want to build more brand awareness?
Remember that a single PPC campaign should have one or two main goals. If you want to have more, consider running multiple campaigns with different focuses.
3. Set a Budget
The thing with PPC marketing is that in order to set an effective budget, you need to understand how the bidding process works.
In short, when you set up a PPC campaign, you choose the keywords that best reflect your ad and what you’re offering. How much you pay for each click depends on your field of business, overall competition, and how well the platform considers your ad to reflect the chosen keyword.
The cost per click for different fields can differ a lot. For example, eCommerce search ads run a lot cheaper than legal ones, but the average spend on legal services is often a lot higher than the average order value of a standard eCommerce store.
In order to get the most out of your budget, you should allow the platform to increase or decrease your bids based on performance.
This way, you can make adjustments based on different categories, like the device, overall demographics, users’ language, and so on.
4. Know Your Audience
How likely would you be to click on an ad offering car repairs if you don’t own one? Chances are you’d continue scrolling and not give the ad a second thought.
But if you’re a motorist and have maintenance due, you’re likely to be much more inclined to see how you could save on upcoming repairs.
Successful PPC marketing involves defining your audience – it can make or break your campaign. Ideally, you should do research beforehand to understand who the right audience for your ad is.
This could mean running surveys on your website and conducting interviews with ideal and existing customers to determine what the buying and decision-making process looks like. You should know the general age, location, gender, interests, and usual behaviors of your audience, as well as the type of keywords they use to navigate the internet.
You should also not shy away from utilizing remarketing audiences on platforms like Google and Meta. Remarketing campaigns are a great way of getting customers who have already done business with you in the past to reactivate. Since they already know your brand, you often simply need a good offer to get them to engage with your website again.
5. Copy Is Important
Don’t underestimate the importance of words on your ads or on your landing page.
The best PPC ads speak directly to your target audience member, appealing and offering solutions to potential challenges or pain points the user might have. Give potential customers a reason to do business with you by highlighting your unique selling points in your ad copy.
You should always include the main keywords you’re bidding on in your ad copy and provide a call to action in your messaging. This will help ad platforms determine the overall quality of your ad.
Ideally, your ad should use language that matches your landing page copy for a smooth and cohesive user experience. This way, when users click on it, they won’t get distracted or discouraged from performing the desired action (signing up for a newsletter, making a purchase, scheduling an appointment, and so on).
On the landing page your PPC ad is linking to, you should have a strong headline mirroring it. The copy on the page should be very specific and relevant to the keywords your ad is targeting.
Most importantly, the offer that you are promising in your ad should be clearly present on your landing page, paired with a clear call-to-action button. A clean, intuitive and responsive page design will help your copy stand out and do the heavy lifting.
6. Know Your Competitors
Chances are that you have direct and indirect competitors. But that’s not a bad thing. You should be actively checking your competitors’ websites, landing pages, social media accounts, and PPC activities down to the copy they are using in their ads.
Doing this helps you understand how your competitors are differentiating themselves and how they position themselves in the market overall.
If your main competitor has been around longer than you and can sell their products and services for less, you might want to look for a unique selling point other than the price. For instance, maybe you can offer better customer support or higher-quality products instead.
Get Your PPC Campaign Live Today
Starting PPC advertising is simpler than people often realize.
As long as you know your audience and target the right keywords and channels, you can launch your first campaigns in no time. And the better you can monitor and optimize your ads, the better value you will get for your money.
For your business to amplify its growth, you must turn to your customers as early as possible and put the insights you get into action. Otherwise, you risk not knowing your clients enough, resulting in products and marketing activities that do not resonate with your users.
That’s why Customer Obsession is one of the guiding principles at Hostinger. We’ve been reaching out to our clients so we could actually connect with them and make Hostinger the best platform for SMBs and prosumers to achieve their goals online.
This mindset is what led to the conception of the Customer Interview initiative. I’ll share how this project came to be and how it has helped Hostinger so you can implement a similar initiative to scale your own operations!
Identifying the Issue
The web hosting industry is tough, and the competition is constantly increasing. Only the fastest and most effective businesses survive and can thrive. On the other hand, the global market is enormous, so many different players can emerge and succeed.
Hostinger is focused on having the best product and exceptional customer support. We know that users value that immensely since they like sharing their experiences within their circles.
When I joined Hostinger back in 2017, our team’s main goal was – and still is – to use the traction we have to create scalable new user acquisition loops and keep our pace of growth increasing.
At some point, we realized that we didn’t know our clients enough. We develop products and services or activate various marketing strategies but lack certainty whether they actually strike a chord with our core audience.
We understood that this was inhibiting Hostinger’s growth – for it to accelerate, we’d need to unlock real relationships with our clients.
So, we got to work.
Planning Pathways
I was aware of the Golden Questions by Sean Ellis, CEO of Qualaroo. They emphasize the importance of asking the right questions to uncover where exactly your customers are coming from, what their reservations and fascinations are, and how they see your business in relation to your competition.
The Golden Questions are a surefire way to get actionable feedback that can actually improve conversions. For example, asking your customer, “What’s the one thing that nearly stopped you from buying from us?†may reveal surprising answers and information you would’ve never come across otherwise.
There may be a lot of noise, but all it takes is one brilliant idea – and your customers are full of them, I assure you.
After some deliberation, we implemented the Golden Questions in our CRM process. This was very helpful, sure, but I still felt that it hadn’t allowed us to truly know our clients – not to mention the process wasn’t flexible enough.
That’s why I started looking for a different approach. While networking and seeking information from within the industry, I found the tips by Louis Grenier, the founder of EveryoneHatesMarketers.com, that changed everything.
Top Tips for Understanding
Here’s Louis’ six-step guide on talking to and setting up efficient interviews with your clients:
Create a segment of your best customers (based on whatever info you have available).
Write a customer interview script for your team with simple directions (listen more than you talk, don’t be afraid to improvise, etc).
Add your entire team to your Calendly (or similar) account.
Create an evergreen Zoom meeting and set it to “Automatically record on the cloud.â€
Create a round-robin event by allowing customers to choose a time with any available member of your team and link the Zoom meeting to it.
Set up an automated email after a specific customer event (e.g., registered 30 days ago) and add that Calendly link.
These six simple steps were exactly what we needed. We took some time for internal promo campaigns to rustle up the project’s release.
It felt essential to have everyone from the CEO to engineers and designers take part, not just the client-facing colleagues. So we drummed up excitement within our teams, encouraging an atmosphere of communication and creativity.
And after two weeks, everything was ready to go.
Everyone Has a Story to Tell
I was overjoyed to see the levels of interest in participating. The initial challenge of the sheer volume of interviews we had to navigate resolved itself naturally. While waiting their turn on the schedule, colleagues watched other conversations taking place. This also helped calm the nerves of anyone new to client interaction.
It was super inspiring to watch this project develop. The more interactions we had with clients, the more amazing worlds unfolded, and we learned from each other. A deeper understanding of your customers builds empathy and establishes connections through confidence, helping all the involved parties grow.
So far, we’ve had around 1,500 client interviews. To say they’ve been inspiring would be an understatement.
For example, I talked with Paul of Peedie Models, who lives on a Scottish island with few inhabitants. Even though he is a gifted model maker, this made it challenging for him to grow the business, especially during the pandemic.
Following Hostinger Tutorials, he learned the basics of getting his craft online and spurred his online business, which is now highly successful. Without our services, this wouldn’t have been possible. He expressed so much appreciation for Hostinger during the interview – I was touched beyond words.
Talking with individuals like Paul has allowed me and other Hostinger team members to really understand how our services impact people’s lives and livelihoods.
Hearing how we’re helping a single mother move her business online, so she’s not tied to a geographical location while her son is studying abroad or how an 84-year-old pastor can reach out to his parishioners without worrying that his church’s site would go down gives new meaning to how we approach our client relationships.
And the best thing – it lets me and the other Hostingerians really live and breathe the Customer Obsession principle.
What’s become clear from the customer interview initiative is that everyone wants to interact, learn new things, meet new people, and feel good vibes.
Next up is making the insights gained from the interviews actionable. We are taking business decisions based on them, like improving the access management systems for freelancers and agencies for more convenient functionalities or tailoring our Hostinger Academy YouTube tutorials around our customers’ needs and observations.
You can always do better, so we are constantly improving our processes. The initiative has started us on an exciting new journey – it’s rare for any strategy to be as valuable and as inexpensive.
We now factor customer interviews as essential to client feedback and interaction. I suggest you do the same. So grab the toolbox, put your own spin on it, and use it to scale your business.
And most importantly – don’t forget to rock & roll!


