EDITS.WS

Tag: midjourney

  • How to Use Midjourney to Create AI Art in 2023 (Detailed Tutorial)

    Artificial intelligence (AI) has taken the world by storm. With countless text-to-image generators hitting the market, there are plenty of options to try. However, if you want to create the most realistic images using AI art generators, MidJourney is among the best. In this post, we’ll walk you through the steps you’ll need to take to get started, along with some tips and tricks to get the most out of it. Let’s get started.

    What is MidJourney?

    Midjourney

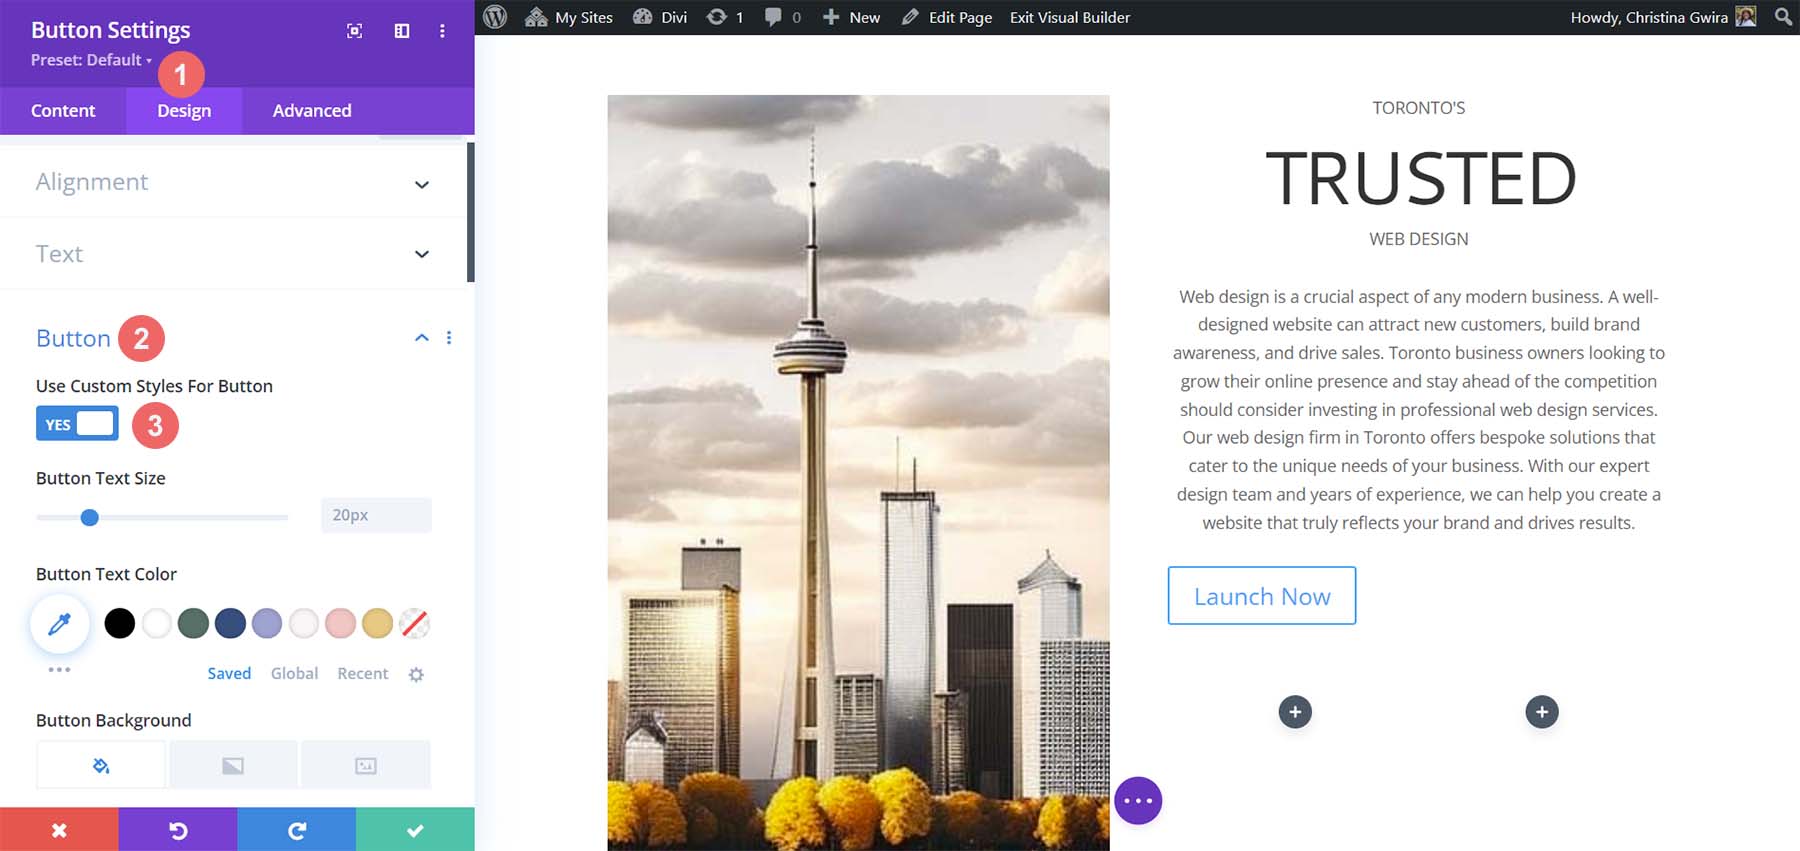
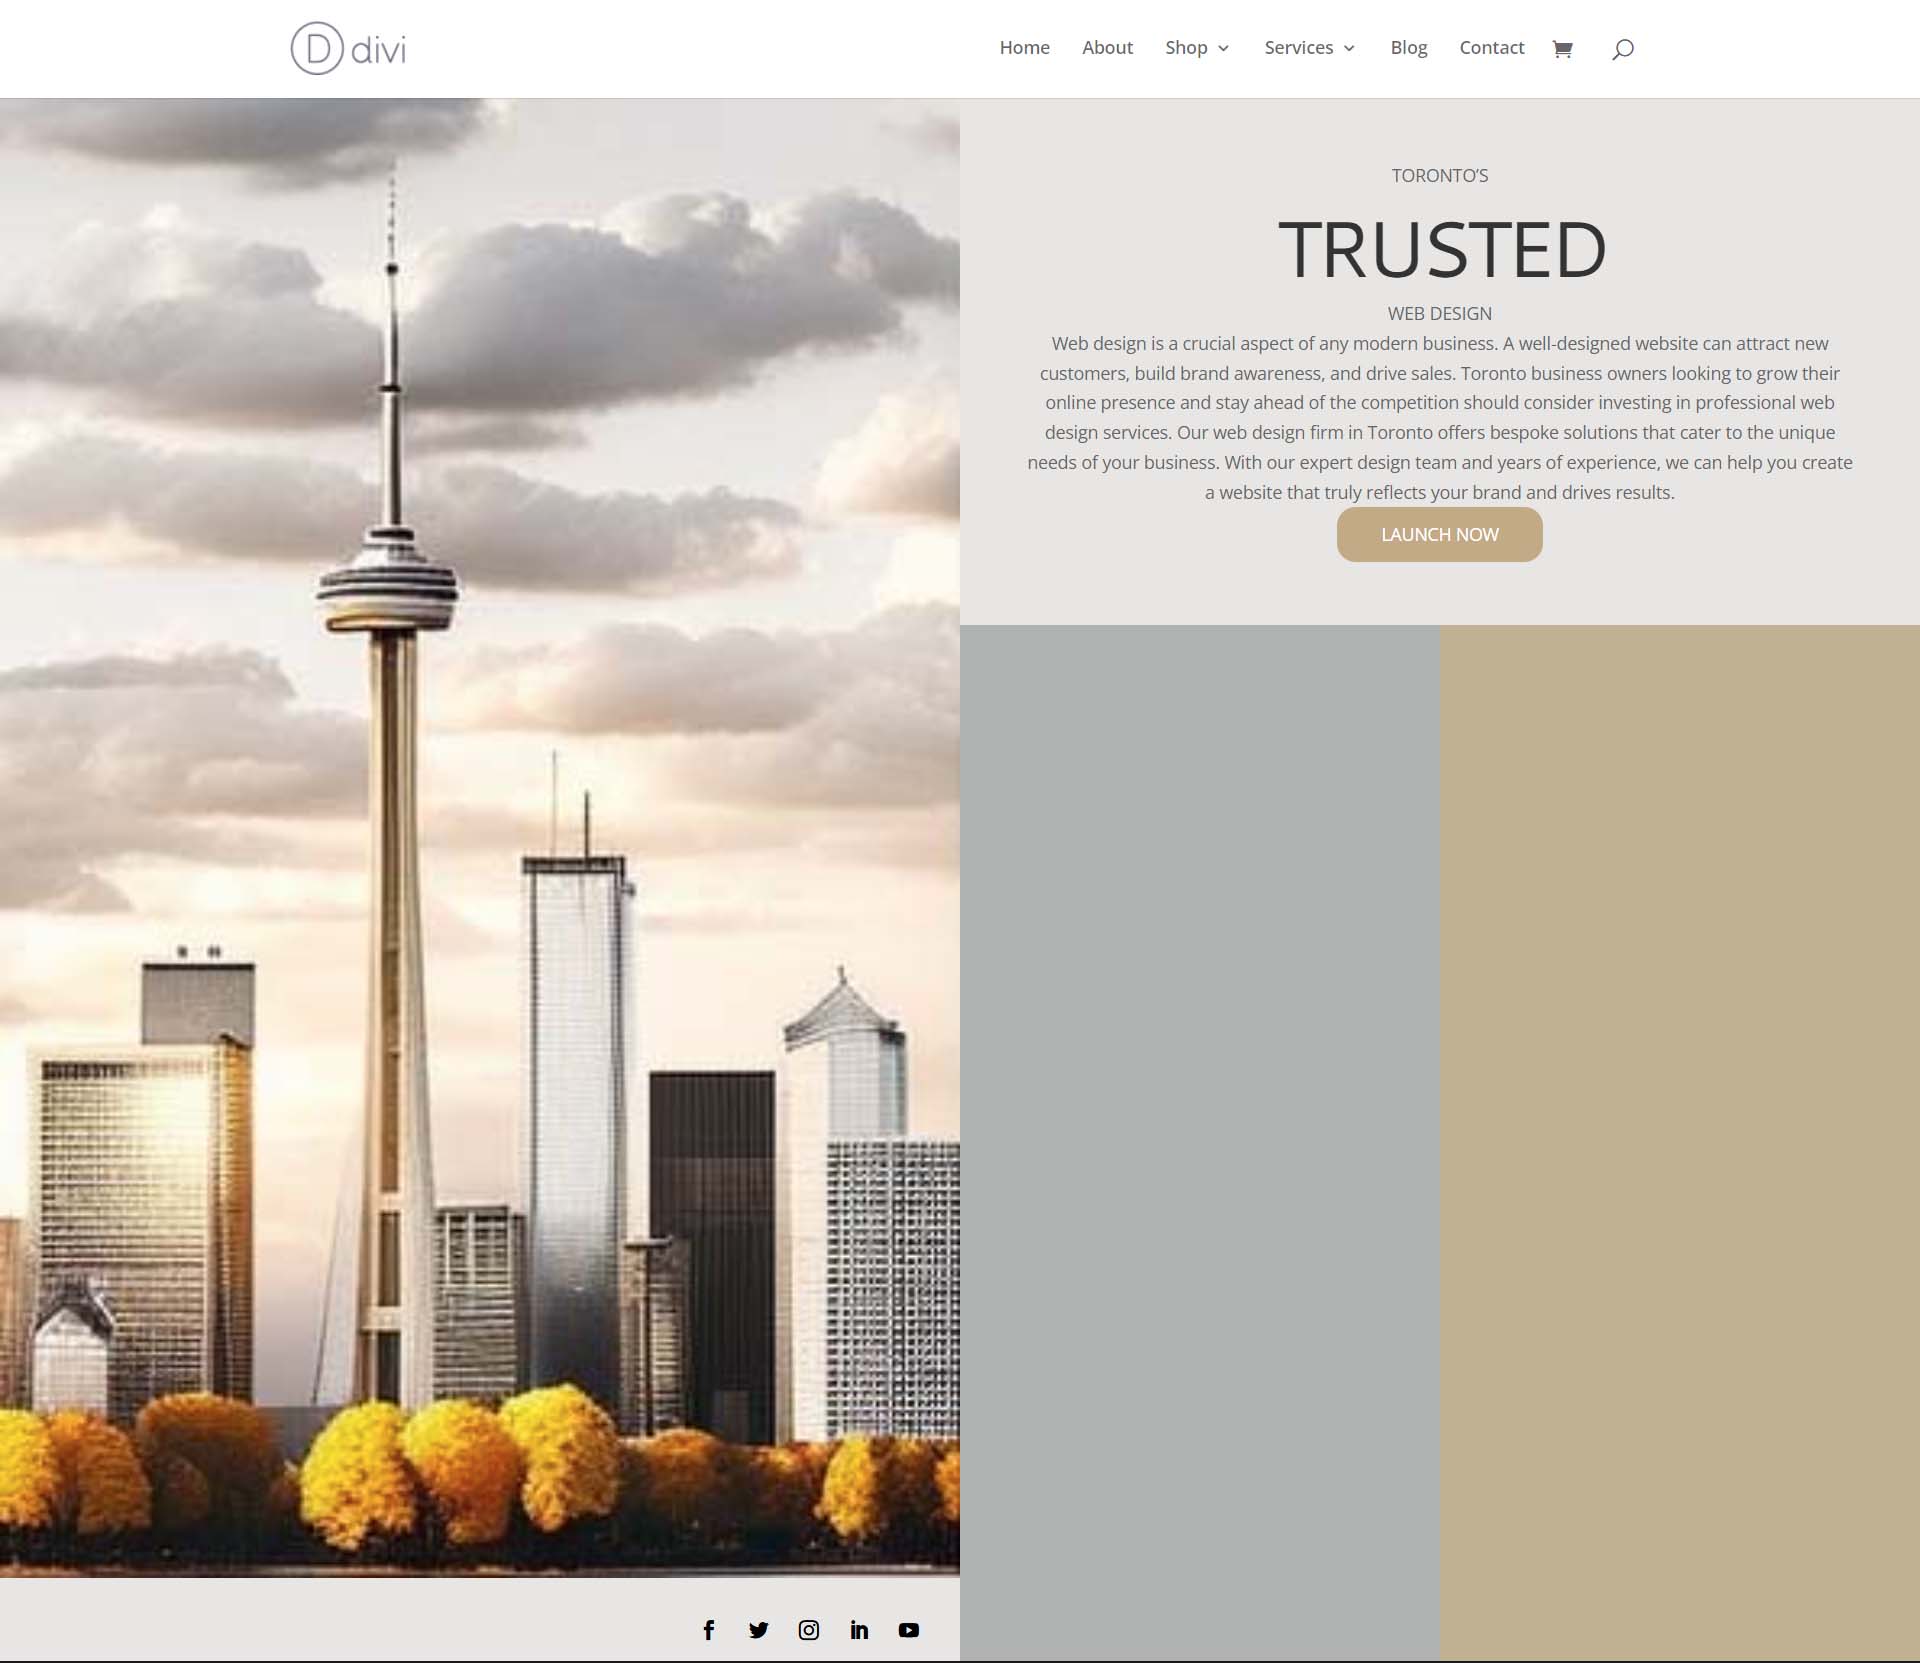
    Midjourney is an excellent example of generative AI that creates images based on text prompts. It has become one of the most popular tools for creating AI art, along with Dall-E and Stable Diffusion. Unlike its competitors, Midjourney is self-funded and closed-source, so knowing exactly what’s under the hood is cloudy. We know that it relies heavily on machine learning technologies such as large language and diffusion models. The results are sometimes startling, always impressive, and can possess very realistic qualities.

    Unlike other AI art generators, it doesn’t have a free trial. It’s become so popular that signing up for a subscription is necessary before using it. That said, their lowest-tiered plan is reasonable at $10 monthly. In our experience, it’s well worth it, considering the level of detail, realism, and creativity it provides. It’s also relatively easy to get started. Within a few minutes, we were able to generate a highly detailed, realistic series of photos of a dog having the time of his life in the bed of a truck just from a simple text prompt.

    Midjourney pups

    Getting Started With MidJourney


    Subscribe To Our Youtube Channel

    As previously mentioned, Midjourney no longer offers a free trial. You’ll need to subscribe to generate AI art to get the most out of it. We’ll walk you through the steps to set up your Discord account and show you how to subscribe to Midjourney.

    Step 1: Setting up Discord

    Before you can create amazing AI art with Midjourney, you’ll need to sign up or sign in to your Discord account. If you already have one, you can skip to the next step. Start by navigating to the Midjourney landing page.

    Click on Join the Beta.

    Join Discord

    This will bring you to a new screen where you can create a Discord account. Once you’ve filled out the required fields, click the continue button. Alternatively, if you already have Discord, click Already have an account.

    Discord account creation

    Next, click the + button near the top left of the Discord toolbar. This allows you to add the Midjourney server to your Discord account.

    add discord server

    A popup will appear with several options. Click join a server for this tutorial.

    join a server

    Next, click don’t have an invite. This allows you to browse servers you’d like to join.

    Midjourney sign up

    Locate Midjourney under the featured communities, then click on it.

    join Midjourney

    Once logged in, you’ll be redirected to the Midjourney Discord server. As a free member, you won’t have the option to create images, but you can poke around the interface to see what all the fuss is about. You can browse other users’ artwork by visiting different rooms, such as newbies-4, to get a feel for how Midjourney works.

    newcomer rooms

    Step 2: Signing up for a Midjourney Subscription

    To create artwork, you must sign up for a Midjourney subscription. We’ll walk you through the easiest way to do it. Near the bottom of the screen, you’ll discover a text prompt. Click within it and start typing /subscribe. This will bring up the subscription prompt, allowing you to sign up for one of Midjourney’s paid plans. Click subscribe to Midjourney, then click enter on your keyboard.

    subscribe

    The bot will redirect you to the subscription page to choose a plan tier that meets your needs. There are three tiers: Basic, which costs $10 per month, comes with 200 generations a month, and gives you a private chat room to generate images. The next plan, the Standard, gives you 15 hours of image generation, unlimited relaxed (slow) generations, and a private chat room for $30 monthly. Finally, there’s the Pro plan, which costs $60 per month, and provides 30 hours of fast image generation, a free chatroom, and unlimited relaxed image generation at $60 per month.

    Midjourney paid plans

    The basic plan is your best option if you’re starting out. It allows you to explore the platform, generate images, and familiarize yourself with the interface and how text prompting works. If you like what you see, you can always upgrade to a higher tier simply by inputting the /subscribe prompt to bring you to your account, where you can easily upgrade.

    Understanding MidJourney’s Tools and Features

    When first starting out, Midjourney can be hectic. While it is a good idea to check out one of the newcomer rooms to get a feel for how things work, it can be challenging to keep up. Thousands of people are in the newbie rooms at any given time, making it difficult to see your generated images. It’s best to download and install the Discord app, where you can access private messaging with Midjourney, making viewing and altering your images much more straightforward. To download the app, click on the floating green bar at the top of your screen. Discord will sense your operating system and automatically suggest the correct app version.

    Download Discord

    Once installed, you can click the Discord icon at the top left of the app to access your private chat room.

    Midjourney private messages

    Using private messaging provides a much less hectic interface, where you can generate images and easily see them in a private chat without the distraction of viewing other users’ photos. However, participating in group rooms is a great way to get inspiration and watch what prompts others use to generate gorgeous images.

    Creating AI Art with Midjourney

    Before beginning your quest to create unique AI art, there are a few basic commands to be aware of. First and foremost, any prompt must start with /. For example, when wanting to create a new image, you’d input something along these lines: /imagine a hyperrealistic image of a dog in the bed of a truck. In less than a minute, your first set of images will appear.

    general imagine prompt

    When your first set of images appears, you’ll notice a series of buttons underneath them. The top row of buttons is for upscaling one or more of the generated images. They are numbered U1 – U4, which are used to identify the images in the sequence. So, for instance, if you want to upscale the second image, click the U2 button in the top row.

    upscaling buttons

    On the right side of the first row is the regenerate button. This is an excellent tool if you aren’t satisfied with the first set of images Midjourney created for you. Click the regenerate button to ask Midjourney to try another concept based on the original prompt.

    regenerate button

    Finally, the second row of buttons is used for variations. Numbering V1 – V4, you can choose the button corresponding to the image you wish to create variations for. Once clicked, Midjourney will take that image and create variations of it.

    variation buttons

    In addition to the imagine prompt, there are a few other commands to be aware of. Here’s a list of all the basic commands within Midjourney.

    Imagine Commands

    If you want to control the output of your imagine prompts, you can input additional parameters behind /imagine. You can choose things like aspect ratio, level of styling, and more. For example, we input this prompt to generate an image that has an image quality of 3 and an image prompt weight of .25: /imagine cats and dogs –q3 –iw 0.25. We instructed Midjourney to create an image of cats and dogs, give it an image quality of 3, and set the image weight to .25. Image weight lets Midjourney know how closely you want your image to relate to the text prompt. A higher weight will result in images closely related to your prompt. In contrast, a lower one gives the bot more freedom to create the images.

    cats and dogs

    There is also the aspect ratio command, which is useful for changing the width and height of your images. By default, Midjourney creates square images with an output resolution of 1024 x 1024 pixels. If you want to create an image that isn’t square, you’ll need to specify an aspect ratio. For example, we used this prompt to generate a photo with a 16:9 aspect ratio: a beautiful, hyperrealistic landscape with mountains in the background. A frozen lake is in the foreground, with children ice skating –ar 16:9:

    Midjourney aspect ratio

    Since the release of version 5, some commands no longer work. For example, you can no longer use the width (–w) or height (–h) parameters. Here’s a full list of all parameters you can use with /imagine.

    Advanced Prompts

    With image prompts, you can upload one of your images to use within Midjourney. You can combine them with image weight (–iw) to adjust the image’s importance in relation to the text portion of your prompt. You can also use Remix, which allows you to change your prompts, parameters, model versions, or aspect ratios. You can use remixing to change the lighting, evolve a focal point, or create cool compositions. To enable remix mode, type in /prefer remix. For example, we’ll take an upscaled image of a frozen lake with children skating and change it to penguins skating.

    Midjourney remix mode

    There are also multi prompts, which gives you the ability to define more than one concept during image generation using a double colon (::) within your prompt. For example, typing /imagine cat tails will have a very different result than /imagine cat::tails would:

    Midjourney multi prompts

    Finally, permutation prompts allow you to generate variations of a single /imagine command. It works by inputting a list of options separated by a comma within curly brackets. For example, if you want to create variations of different colored flowers, you’d use something like this: /imagine a {red, orange, yellow, blue} bouquet of flowers:

    multi-prompt

    Tips for Using Midjourney

    Knowing a few tips is important to successfully use any AI generative software. Although a relatively new concept, AI art generators like Midjourney are becoming mainstream. Because of this, learning how to get the most out of it is important. Here are a few tips and tricks to start you on your quest for digital art creation.

    Be Concise

    While that might sound counterproductive, generating AI art follows the same concept as writing a good blog post. It’s always better to be descriptive but concise when constructing prompts in Midjourney. Giving it too much to go on can either overwhelm it or, at the very least, result in undesirable images.
    For example, check out the differences in these prompts. The first one /imagine a photorealistic cat will produce a set of cat images, but a more specific prompt, such as /imagine a photorealistic cat with long white fur and blue eyes, will produce a more detailed output.

    Midjourney concise prompts

    Use Styles and Mediums

    One of the best aspects of Midjourney is its ease of use. Literally, anyone can create a prompt that produces beautiful artwork. If you want to improve your game, use styles and mediums in your prompts. For example, we uploaded images of ourselves to turn us into Victorian queens simply by telling Midjourney to imagine this woman as a 1700’s era Victorian queen. Using the descriptors Victorian and queen, Midjourney understood what we wanted. The results were interesting.

    Midjourney era art

    You can also have Midjourney create images based on different artistic styles. In this example, we asked it to /imagine a photo of a Goldendoodle created in the style of Leonardo da Vinci, with the following result:

    Leonardo da Vinci goldendoodle

    Additionally, you can use mediums such as line art, sketch, oil painting, or similar to create images that have a unique artistic appearance. For example, /imagine a black-and-white line drawing of a 1968 Chevrolet Camaro:

    Midjourney Chevy Camaro

    Combine Concepts

    Another thing to try is combining concepts to create interesting pieces. Rather than prompting Midjourney to create a superhero, add another theme to get more targeted results. For example, we used /imagine a Canadian superhero, which resulted in a series of images of a superhero clad in the colors of the Canadian flag:

    Combining concepts

    Use Lighting for More Dynamic Output

    One of the most important aspects of artistic expression is using lighting effectively. By default, Midjourney will add some lighting to the output. However, if you want to see improvement, one of the best places is to start by adding a bit of lighting to your prompt. For example, we used the following prompt to incorporate beautiful lighting effects: /imagine an image of the Eiffel Tower at midday, complete with cinematic lighting.

    cinematic lighting

    Examples of Midjourney AI Art With Prompts

    One of the best ways to learn Midjourney is to play with it as much as possible. Use it to generate images with different styles, learn better ways to enter prompts, and gain inspiration from other AI artists. To show you the massive capabilities of Midjourney, here are a few examples of what can be achieved after a few hours of image generation.

    Using Your Images

    If you want to turn yourself into a member of the Royal family or just a cool superhero, try using one of your photos with Midjourney. To do this, click the plus next to the text prompt box at the bottom of your screen.

    upload a file

    Once uploaded, click the image, then select open in browser. In the next step, you’ll need to copy the image URL to use alongside /imagine.

    open in browser

    Next, type /imagine into the text field, then paste the URL of your uploaded image. Follow up with the image you’d like to create. In our case, we want an image of a superhero with cinematic lighting.

    image prompt

    Midjourney will do its best to create your desired image, but remember to be specific. If you want the photos to be female, specify that. Just because you upload an image of a woman doesn’t mean you’ll receive female superheroes. For example, we used the prompt /imagine a hyperrealistic image of a female superhero. Omitting the word female might cause Midjourney to create male photos, which may or may not work for you.

    female superheroes

    Using Blending Effects

    Try using the /blend command to create stunning effects.

    blend command

    It works much like the /imagine command, except you can upload anywhere from 2-5 images, then ask Midjourney to blend them with a text prompt. That said, ensure that both images have the same dimensions for the best results. You can even specify the aspect ratio you’d like. For example, we used the /blend command to combine a photo of a cat and dog, resulting in the image of the dog taking on the same feel as the photo of the cat.

    blended images

    Final Thoughts on MidJourney

    No matter what type of AI art you create, Midjourney can do it. One of the best things about generating AI art is not having to be able to draw or paint to be creative. Using pre-defined tools such as blend or custom parameters for aspect ratio, styling, or image weight, you can create one-of-a-kind pieces of artwork that will blow you away.

    AI art collage

    Are you looking for more AI tutorials? Check out our post using Midjourney and Divi to design a website: How to Use AI to Create Amazing Web Design with Divi (Using ChatGPT & MidJourney).

    The post How to Use Midjourney to Create AI Art in 2023 (Detailed Tutorial) appeared first on Elegant Themes Blog.

  • How to Use AI to Create Amazing Web Design with Divi (Using ChatGPT & MidJourney)

    It’s no secret that artificial intelligence (AI) is becoming a significant part of our day-to-day lives, from Netflix recommendations to chatbots, and facial detection to text editors. Today, the impact of AI is not only seen on screens but is felt. An arena that is now seeing an influx of AI’s presence is digital design and art. Conversations are sprouting up about the power and people – or lack thereof – participating in this medium. Is it possible to use AI to create amazing artwork while still supporting artists? Can AI be used as a tool to help facilitate better digital creations? We’d like to think so, so we’ll explore using ChatGPT and MidJourney with Divi.

    In this tutorial, we’ll use two AI tools — MidJourney and ChatGPT — to help influence a homepage design in Divi. We will use the MidJourney bot to create the visual aspect of our design. Then we will use ChatGPT to create the copy that we’ll use in our test. Finally, we will recreate the design, using the design from MidJourney and the copy from ChatGPT in Divi.

    Let’s get into it!

    Using MidJourney to Inspire Amazing Web Design

    MidJourney, according to their website, “is an independent research lab exploring new mediums of thought and expanding the imaginative powers of the human species.”. The MidJourney Discord bot allows you to use your Discord account to create four, custom AI-generated images from simple text prompts. You can then use other commands to modify and interact with the images created.

    Create a MidJourney Account

    Before we start using the AI, you will need to create an account on the MidJourney Discord server.

    Sign up or join the MidJourney Discord server

    If you already have a Discord account, you can log in to your existing account and begin using MidJourney right away.

    Sign into the MidJourney Discord server with your current Discord account

    Enter the MidJourney Discord

    Once on the MidJourney Discord, take a quick read through the quick start guide. This will help you familiarize yourself with the server’s guidelines. You will also gain insights into how the bot works and the other cool things you can do once you are comfortable using the bot.

    Read the MidJourney quick start guide

    Remember that the free version of MidJourney allows you to do 25 queries. Once you enter the MidJourney Discord server, you want to look to join a newbies channel. You can see the available channels on the server by looking in the menu on the left-hand side.

    Joining a newbies channel within the MidJourney Discord

    Click on any newbies channel to start generating images.

    Begin Creating with MidJourney

    Now that you’re in your newbies channel on MidJourney, the real fun begins… creating some images!

    Issue Initial Command

    We want to generate some inspiration to create a clean homepage design. To issue your first command, click in the textbox at the bottom right of your screen. You can be as descriptive or concise as you’d like. In our case, we entered, “create a clean, modern and material design homepage template. Included the CN tower. Use the colors white, grey, gray, and gold.”

    Issuing your first command to MidJourney

    This is what was generated from that command.

    Begin your search in MidJourney

    Here’s what it looks like outside of Discord.

    MidJourney generated homepage layout

    Refine Initial Command

    While these layouts are a good jumping-off point, let’s see what happens when we try to refine our AI-generated web design layouts. To do this, we’re going to refine the fourth option from our list.

    Upscale variation 4 of our AI generated image

    Rework AI-Generated Design

    Once you’ve created your first design, MidJourney allows you to upscale (make larger) or create variations from one of your four options. We decided that we wanted to see some variations of the fourth option and to make it bigger.

    Upscale option 4 and create a variation of this selection in MidJourney

    These are the results of MidJourney making variations of our fourth design.

    Second iteration of MidJourney

    Let’s take a closer look.

    MidJourney generated homepage layout versions

    Notice the addition of elements such as menus, icons, titles, and social media icons. From this layout, we’re going to use the fourth option. This is the design that we are going to emulate in Divi.

    Using ChatGPT to Create AI-Generated Web Design Copy

    Now that our design has been created, we’re going to use AI to create the copy to go into our design. We will use ChatGPT to create a headline, a short paragraph, and a call-to-action to use on our button.

    Create a ChatGPT Account

    To begin, we create an account with ChatGPT. If you already have an account, you can log in.

    Login or signup for a ChatGPT account

    To save time, you can also use your Gmail or Outlook account.

    Create your ChatGPT account

    Issue Initial Command

    Once you are logged in, you’ll be presented with this screen. This is the dark mode version, but there is also a light mode version.

    Using ChatGPT and MidJourney with Divi

    Let’s start by creating our first request. In the text box, we’re going to ask ChatGPT to “create a short slogan for a Toronto-based web design firm.”

    Asking ChatGPT to create a short slogan for our website

    This is the result of that request.

    Results of our first ask

    Refine Copy with ChatGPT

    The beauty of ChatGPT is that we can ask many questions and get some great options to use in our copy. Let’s ask for 5 other variations, but let’s ask that each variation is, at most, 5 words. In the textbox, enter, “Make the slogan only 5 words. Create 10 different variations.”

    Refine slogan for ChatGPT

    These are the variations that ChatGPT came up with for our slogan.

    Different slogan options in ChatGPT

    Let’s use option 5 for our slogan. We’re going to repeat the process for our paragraph of text. Let’s enter into ChatGPT, “Craft a 5-sentence paragraph promoting web design services to Toronto business owners.”

    Creating copy for intro paragraph

    This is the result that was created. It’s pretty good!

    ChatGPT generated welcome paragraph

    Instead of asking for more versions of this paragraph, let’s ask ChatGPT to change the tone of the welcome paragraph. Let’s ask ChatGPT to “Make this paragraph more casual, leaning toward light and fluffy.”

    Change the tone of the welcome paragraph

    Notice that the tone of the paragraph has become more casual and is still on track with what one would need to introduce their web design company.

    Casual copy for welcome paragraph with ChatGPT

    To complete our copy, let’s create 10 different versions of call-to-action text that we can use on our button. Our next command for ChatGTP is, “Come up with 5 versions of call to action text that I can use on a button.”

    Creating a variety of call-to-action text for a button

    While these options are great, they’re a little long for a button.

    Button CTA options

    As our final request to ChatGPT, let’s ask it to make our text shorter by saying, “make them shorter.”

    Our final CTA text options

    We will use the last option Launch Now as the CTA for our button.

    Using ChatGPT and MidJourney with Divi

    Now, we have both our design inspiration and the content to use within this design. We can bring these findings to Divi and start building a real-life working homepage layout. Let us proceed to begin using ChatGPT and MidJourney with Divi.

    Create a New Page in WordPress

    Let’s start by creating a new page in WordPress. From the WordPress Dashboard, we hover over Pages from the left-hand menu. Then, we click Add New. This will create a brand new page.

    Add new page

    When your new page has been created, add a title. Then, publish the page by clicking on the blue Publish button. Lastly, activate the Divi Builder by clicking on the purple Use Divi Builder button.

    Title and publish new page before activating Divi Builder

    With the Divi Builder activated, click the blue button that says Start Building. We’ll build our page from scratch but use assets from the layout generated by MidJourney.

    Build page from scratch

    Creating Sections and Rows

    Once the visual builder has loaded, we are now presented with several column structures that we can add to our default row and section. We will delete this section and use a Special section layout instead. Firstly, we click the X button to exit the row selection menu.

    Exit out of the regular section menu

    Then, we click on the blue button at the bottom of the section. This will allow us to add a new section. We want to click the Speciality section icon. This will allow us to add a section that is similar to the layout that MidJourney generated.

    Add new specialty section

    From the options of Specialty sections, we click the second option.

    Select second specialty section option

    With our section selected, we now have the option to start adding rows to our section. When we refer back to the layout generated by MidJoureny, we see a row containing the headline, paragraph, and call-to-action button. Then, we notice that there is a decorative set of columns. So, let’s add a one-column layout that will hold our copy.

    Add row to column layout, first

    Next, we’re going to add another row beneath this by clicking on the green plus icon. We’ll add a two-column row underneath the initial one-column row. This will function as our decorative columns.

    Add second row to specialty section

    With our Specialty section layout now complete, we can now delete the default section from our page. Click on the trash can icon from the section’s menu to delete it.

    Delete regular section

    Adding Divi Modules

    This is what our base layout looks like in Divi.

    Section and row layout in Divi

    We’re now going to add Divi’s native modules to the layout to create our homepage. This will act as a low-fi wireframe.

    Adding the Image Module

    To begin, let’s add an Image Module to the first column of our section. Click on the gray plus icon within the column. Then, select the Image Module icon.

    Add Image Module to column

    Click the green checkmark to save the Image Module in place.

    Exit out of Image Module

    Inserting the Text Modules

    Next, we’re going to move over to the second column of our section. In the first row, we’re going to add two Text Modules. The first one will hold the headline, and the second will hold our paragraph copy. Both of which were generated in ChatGPT. Click on the gray plus icon within the first row. Then, select the Text Module. This is going to be our Text Module holding our headline.

    Add first text module

    We’re now going to add our heading content. However, we’re going to format it to look like our MidJourney design. To do this, break up the text and use the h3 tag to highlight a keyword within our headline. This is an important step, as we’ll be applying separate styling to that part of the text. Click on the green check mark to save our content.

    Add headline text from ChatGPT to first text module

    Now, we’re going to add a second Text Module for our paragraph content. Click on the gray plus icon again, and select the Text Module icon.

    Add second text module

    This time, however, add the paragraph copy from ChatGPT and click the green check mark to save our content. To complete this row, we can add our last module, which is a Button Module.

    Add paragraph from ChatGPT to second text module

    Add Button Module

    We’re going to add a Button Module to this row. To do that, we click on the gray plus icon and select the Button Module.

    Add Button Module

    Add the text from ChatGPT to the button’s text and click the green check mark to save our content.

    Add CTA text from ChatGPT to our button

    Inserting the Social Media Follow Module

    If you look closely at our AI-generated design, you’ll see some icons underneath the image. We’re going to use the Social Media Follow Module to add a few social media icons under our image module.

    Add Social Media Follow Module

    With our Social Media Follow Module added, let’s add a few social media networks to this module. I’ve added 5 to emulate our AI-generated image.

    Add social media networks to the social media follow module

    Click the green check mark to save your social networks. Now, with all our modules in place, we can begin styling our homepage layout!

    Implementing Visual Branding and Design Elements

    For this next section of our tutorial, we will need some external tools to help us utilize the assets generated by MidJourney. While we are using ChatGPT and MidJourney with Divi, these aren’t the only software we’ll use. You will need a tool that will allow you to select the hex codes from the AI-generated image. You will also need an image editor to crop the photo from the image to use in our design. We will also use Google Fonts to replicate the fonts created by MidJjourney.

    The tools that I used to do this were:

    • ColorZilla: An eyedropper Chrome extension that allows you to select and save hex codes from web pages.
    • Photoshop: To crop and make photo edits. You can also use Photoshop to select the hex codes from your MidJourney image.

    Ultimately, use whatever tools are available to you.

    Uploading Your Image

    Open your image editor of choice, and crop the focal image from the original MidJourney image.

    Crop image from MidJourney photo

    Save this image to your hard drive. Then in Divi, edit the Image Module.

    Edit image module

    Click on the gear icon to open the Media Library. This is where you’ll upload your image.

    Edit image module

    Upload your image from your hard drive and insert it into the module.

    Upload image module

    With our image uploaded, we can now move to the Design tab of the Image Module. In the Design tab, click on the Sizing tab. From there, select Yes next to the Force Full Width toggle.

    Set Image Module to full width

    Next, on the docket, let’s style our social media icons.

    Styling the Social Media Module

    To begin, we click on the gear icon of our Social Media Icon Module.

    Edit social media follow button

    Once we have all our social media links presented to us, we will go into each one and remove the background. To do that, click on the gear icon next to each network.

    Edit individual social media networks

    Then, click on the Background tab and delete the background color present. Click the green check mark, then repeat this for all the social media networks you have added to this module.
    Remove social media network background

    After removing the backgrounds for each social media network, click on the Design tab. Set the alignment of the icons to the right-hand side, exactly as it is in the MidJourney image.

    Change social media icon alignment

    Now, let’s add some color to our icons. Click on the Icon tab, and set the icon color to #000000.

    Set social media icon colors

    Finally, we click on the Spacing tab to add some padding to the right of our module. Add a right padding value of 25px. Then, click on the green check mark to save our edits.

    Add right spacing to module

    Styling Our Text

    At this time, we have styled our modules on the left-hand side. We will now move onto the right-hand side, beginning with our headliner Text Module. Click on the gear icon so that we may enter the Text Module settings.

    Edit first text module

    We navigate straight to the Design tab. Next, click on the Text tab. We can slightly make out that the headline text is in all caps. So, let’s set the text font style to All Caps.

    Set text to all caps

    Then, we set the alignment to center and the text color to Dark.

    Set text alignment and color

    We used the H3 tag to draw attention to the middle word in our headline. So, we now click on the Heading Text tab. Then, we click on the H3 heading to begin to style it. Let’s set the font for the heading to Cantarell.

    Begin heading text styling

    Next, let’s increase the font size to 63px. Finally, we’ll set the letter spacing to -5px. Then, we can click the green checkmark to save our text changes.

    Set font size and letter spacing

    For the paragraph, the default Divi settings a similar to that which MidJourney created. As such, we will simply change the alignment of the text. Enter the text settings by clicking on the gear icon.

    Edit second text module

    Then, select the Design tab. Finally, from the Text tab, set the alignment to the center. Save your changes by clicking the green checkmark.

    Set second text module text alignment

    Customizing the Button

    For our Button Module, we’ll use our color picker tool to find the button color from MidJourney. I used the picker in Photoshop and discovered that the background color’s hex code is #c1aa85.

    Select button hex code color from image

    With this information, we can move into Divi and begin designing our button. As always, click on the gear icon to enter the module’s settings.

    Edit button module

    Then, click on the Design tab and then click the Button tab. For the Use Custom Styles for Button Option, select yes.

    Begin to set custom styles for button

    These are the settings that we’ll be using to style our button.

    Button Design Settings:

    • Button Text Size: 14px
    • Button Text Color: #ffffff
    • Button Background Color: #c1aa85
    • Button Border Width: 0px
    • Button Border Radius: 15px
    • Button Font Style: All Caps
    • Spacing:
      • Top and Bottom Padding: 10px
      • Left and Right Padding: 35px

    This is what our Button Module now looks like after using MidJourney to inspire our design using Divi’s tools.

    Button and Text final preview

    Creating Decorative Columns

    The final design piece of our layout is the decorative columns underneath our copy. To create these, we will need a Divider Module in each column. To begin, click on the gray plus icon and select the Divider Icon.

    Add divider module to column

    While in the Content tab of our Divider Module, de-select the Show Divider option under Visibility.

    Remove divider visibility

    Next, move to the Design tab. From there, click on the Spacing tab. Set the left and right padding to 100%. While it looks like there isn’t much happening with this module, all will be revealed when we add our colors and padding to our sections, rows, and columns. Click on the green check mark to save your changes.

    Add spacing to Divider Module

    Duplicate the Divider Module and move it into the column next to it.

    Duplicate Divider Module

    Adding Backgrounds, Spacing, and Padding

    Now that all our modules are styled and designed, we can add the finishing touches to our homepage layout. For reference, this is where we stand.

    Using ChatGPT and MidJourney with Divi, halway point

    A far cry from the design that MidJourney created for us. However, with a bit of color and spacing, we will be successful at using ChatGPT and MidJourney with Divi.

    To start, let’s click the gear icon of our Specialty section.

    Edit section background color

    Next, click the Background tab. Using our color picker, we deduced that the background color for our section will be #e7e6e4. So, set the background color for our section to #e7e6e4.

    Set section background color

    Now, let’s move to the Design tab. From here, click on the Sizing tab. Here are the settings that you’ll need in the Sizing tab.

    Sizing Design Settings:

    • Equalize Column Heights: Yes
    • Use Custom Gutter Width: Yes
    • Gutter Width: 1
    • Width: 100%
    • Inner Width: 100%
    • Inner Width Max: 100%

    Set section sizing settings

    Now, we move to the Spacing tab. We want all the padding and module within the section to be set to zero. Here are the settings that we’ll be using there.

    Spacing Design Settings:

    • Margin:
      • Top and Bottom: 0px
      • Left and Right: 0px
    • Padding:
      • Top and Bottom: 0px
      • Left and Right: 0px
    • Column 1 Padding:
      • Top and Bottom: 0px
      • Left and Right: 0px
    • Column 2 Padding:
      • Top and Bottom: 0px
      • Left and Right: 0px

    Set all spacing within the section to zero

    Once these settings are in place, remember to save them by clicking the green check mark. With these settings, we can already see that our design in Divi is spacing up to look very similar to that which MidJourney generated.

    Spacing, Backgrounds, and Padding for the Second Column

    We now move on to the second column of our section. We begin editing the first row within this column by clicking on the gear icon for the row.

    Edit the first row within the second column of our section

    While in this row, click on the Design tab. Next, we move to the Spacing tab. Set the padding for the top, bottom, left, and right to 50px. We finish off this section by saving our work.

    Add padding to row

    We move onto our final row, again, clicking on the gear icon to enter the row settings.

    Edit second row or second column

    For the two columns that are a part of this row, we will use the background colors #b0b2b1 and #bfb192 for the first and second columns respectively. Click on the gear icon next to each column.

    Edit columns in the row

    Then, set the background color to each column’s respective color.

    Set background color of each column

    With both columns styled, notice that we are getting closer to our end product. To tie it all together, we need to add some final spacing edits to the row where these decorative columns reside. To start, click on the Design tab of the row. Then, set the Custom Gutter Width to Yes. Set the width of the gutter to 1. Also, activate the Equalize Column Height option.

    Row sizing design settings

    Next, move to the Spacing tab and set the margin and padding to 0.

    Add margin and padding of 0 to row

    And with that, we’ve successfully used ChatGPT and MidJourney to create a homepage layout in Divi. Here’s our finished product!

    The results of using ChatGPT and MidJourney with Divi

    Closing Thoughts on Using ChatGPT and MidJourney with Divi

    Using ChatGPT and MidJourney with Divi can help you to brainstorm ideas for your web design faster. Using AI in web design does not necessarily mean the end of digital design as we know it. It is possible to allow AI into your workflow to help speed up processes. AI can also help to bring things to the forefront in terms or concepts that may not have been highlighted. With Divi, it is easy to re-create AI-generated layouts and designs. If you aren’t a natural writer, creating copy for your business or your client’s websites could be difficult. Tools like ChatGPT can help you cover a blind spot you may not have realized you had. Consider using ChatGPT and MidJourney with Divi for your next project.

    Have you started to use AI in your web design business? Would you consider using tools like ChatGPT or MidJourney in your design process? Let us know your thoughts in the comment section below. Let’s get a discussion going!

    The post How to Use AI to Create Amazing Web Design with Divi (Using ChatGPT & MidJourney) appeared first on Elegant Themes Blog.