Are you looking for a WordPress plugin to show WooCommerce products in a grid?
Showing your products in a grid view provides a better user experience for customers. With the right plugin, you can easily customize and style your product category grid.
In this article, we will show you the best product grid plugins for WooCommerce.
Why Use a Product Grid Plugin for WooCommerce?
When you’re creating an online store, it is important to showcase your best products and make it easier for customers to view them.
With the right WooCommerce plugin, you can easily display multiple products or features from a single product in a grid view. This provides a better user experience and makes it easy for customers to interact with your products.
Besides that, a product grid plugin also offers more flexibility for customization. You can easily adjust the grid, choose the number of rows and columns, change the color, and more.
Some plugins will also let you add category filters. This way, users can simply search for a product and view them in a grid rather than explore each product in your WooCommerce store. It helps boost conversions and increase sales.
That said, let’s look at the best product category grid plugins for WooCommerce.
SeedProd is the best WordPress website builder and landing page plugin. It is used by over 1 million professionals.
The plugin offers a drag-and-drop builder that lets you create custom themes and page layouts. You get prebuilt templates and lots of customization options.
In the page builder, SeedProd offers exclusive WooCommerce blocks to customize your product page. You simply drag and drop the products grid block on your template.
The plugin lets you choose the number of columns in the grid. It also offers options to filter products and show all products, best-selling products, top-rated products, and more. Besides that, you can select the order of the products based on date, title, rating, ID, and more.
Other than that, SeedProd offers other blocks for customization. For instance, you can add images, optin forms, countdown timers, contact forms, and more to your product pages.
It also easily integrates with email marketing tools to help you collect leads and grow your email list.
Pricing: SeedProd prices start from $39.50 per year. There is also a free SeedProd Lite version you use to get started.
MonsterInsights offers a Popular Posts feature that lets you show your best-selling products in a grid view. You get to choose from prebuilt themes for your product grid.
The plugin also shows a preview of your theme. Besides that, you get plenty of customization options.
For instance, you can change the color and size of the title, prices, and ratings. It also gives you the option to select a layout for your grid, choose product count to display, and more.
Other than that, you can also exclude certain products or product categories from appearing in the MonsterInsights popular post widget on the page.
ProductX is another popular product grid plugin for WooCommerce. It lets you create WooCommerce stores using the drag-and-drop builder.
There are different blocks you can use to customize your store. Plus, the plugin offers a template toolkit, so you can quickly select a design and edit it according to your requirements.
ProductX offers different product category grid blocks. You can choose from 3 different variations to display products in a grid view. Besides that, there are multiple settings to edit the design of the product grid.
Other features offered by ProductX include advanced product filters, a progress bar, product comparison, whitelist items, and much more.
Pricing: ProductX is a paid WordPress plugin with prices starting from $49 per year for 1 site.
YITH WooCommerce Best Sellers is a great plugin to have on your online store and display top-selling products in a grid layout.
The plugin is easy to use and offers different options to customize your product category grid. For example, you can change the text, ratings, colors, and other details of any product in the grid. Plus, you can choose the number of rows and columns to display.
Using YITH WooCommerce Best Sellers, you can show your most popular products or top-selling product category. There is also a best-seller badge you can use to highlight a product and get more conversions.
Pricing: YITH WooCommerce Best Sellers will cost you $59.99 per year.
If you’re using Instagram shopping to sell products online, then you can easily display items on your WordPress website using Smash Balloon’s Instagram Feeds plugin.
You can simply connect your Instagram account with the WooCommerce store. After that, display product feeds as grids, carousels, masonry, and other layouts.
The plugin also lets you link each Instagram post to a page on your WooCommere website. This way, users will land on the product page and easily make a purchase.
With Smash Balloon, you get full control over the appearance of your social media feeds. There are options to change the width, height, number of images, and more for your Instagram shoppable feed.
Pricing: You can get Smash Balloon Instagram Feed plugin for $49 per year.
The plugin offers built-in themes for carousels and grids. Plus, it lets you customize the grid by choosing the number of products to display per page, showing a header title, and controlling the image sizes. The plugin also gives you settings for selecting columns and rows and enabling pagination.
You can then choose which products to show in the grid. There are multiple options to choose from, like the latest products, older products, and featured products. After creating the product grid, you can easily add them anywhere on your WooCommerce store using shortcodes.
Besides that, there are options to show different badges on products. For instance, you display a sales badge, featured badge, discount badge, and sold-out badge in your product grid. You can also edit the style settings and change the product title font, color, ratings, and more.
Pricing: You can use the Product Carousel Slider & Grid Ultimate for WooCommerce plugin for free.
Grid/List View for WooCommerce is the next product category grid plugin on our list. The plugin is a great free solution for business owners looking to create simple product grids and lists.
You get to choose from 2 default styles, which include a grid or list layout. Besides that, there are basic options to customize your product grid. You can choose how many products to display and where to position the product count.
Sadly, there is no drag-and-drop customization option as you’d get in SeedProd. However, the plugin offers a wide variety of buttons to choose from for your WooCommerce product grid.
Pricing: Grid/List View for WooCommerce is a free-to-use plugin.
If you have different product categories on your WooCommerce store, then all you have to do is install the plugin and use shortcodes to display the products.
There are no customization options or additional settings that you’ll find in your WordPress dashboard. Everything is controlled through shortcodes. You can use different shortcodes for choosing the number of columns, order of product categories, design of the product grid, and more.
However, if you’re looking for more customization features and ease of use, then you can use any other plugin on our list, like SeedProd or MonsterInsights.
Pricing: You can get started with Product Categories Designs for WooCommerce for free.
Which is the Best Product Grid Plugin for WooCommerce?
In our experience, SeedProd is the best product grid plugin for WooCommerce. It is super easy to use because it offers a drag-and-drop builder with lots of template customization for your site and pages.
You can create stunning WooCommmerce pages with customized product grids that will help boost conversions. The plugin also offers tons of options to edit and change the appearance of your product category grids.
That’s not all, SeedProd also integrates with popular email marketing services, which helps grow your email list.
Bonus: If you’re looking to grow your WooCommerce store, then we also recommend that you try FunnelKit. It’s one of the best WooCommerce plugins to grow your store revenue.
If you liked this article, then please subscribe to our YouTube Channel for WordPress video tutorials. You can also find us on Twitter and Facebook.
Do you want to make sure that your WordPress site is properly optimized for search engines?
Going through a search engine optimization (SEO) checklist can help you follow best practices and ensure you don’t miss out on small details. This way, you can rank higher on Google and grow website traffic.
In this article, we will share a WordPress SEO checklist for beginners.
Why Follow a WordPress SEO Checklist?
Search engines are often the largest source of traffic for many websites. However, the idea of optimizing your site for WordPress SEO can be intimidating, especially for beginners.
There are many technical terms, SEO tactics, and new trends that can put off new website owners from optimizing their sites and ranking higher in search engines.
This is where a WordPress SEO checklist can help you out. It covers all the basics and makes sure you follow SEO best practices. Plus, there are many tools and plugins that can optimize your site and take care of technical SEO for you.
You can use the checklist by going through each point step by step. After that, make changes to ensure search engines can easily crawl and index your content.
That said, let’s look at the WordPress SEO checklist for beginners. Here are all the things we’ll cover, so you can simply click the links below to jump ahead to your preferred section:
An SEO plugin can help configure your WordPress site for search engines. It ensures that you follow the best practices and handles all the technical SEO optimizations.
It is also the SEO plugin we also use on WPBeginner.
AIOSEO offers lots of powerful features. For instance, you can use it to create an XML sitemap, add schema markup, integrate social media, breadcrumb navigation, TruSEO On-Page analysis score, robots.txt editor, local SEO, WooCommerce SEO, link assistant, track broken links, and much more.
You can also use AIOSEO to conduct an SEO audit. The plugin will monitor and highlight crucial issues. Plus, you’ll get actionable insights for resolving these issues and boosting organic traffic on your site.
Next, you’ll need to set up different search engines’ webmaster tools, like Google Search Console, Bing Webmaster Tools, and Yandex Webmaster Tools.
These free tools help you track your site’s organic search performance. You can use them to see which keywords people are using to find your website, check rankings, submit sitemaps, uncover errors that might be preventing your site from ranking in search engines, and more.
For example, Google Search Console shows which pages are indexed in the search results. You can then find out why Google doesn’t index other pages, fix any issues, and submit pages for indexing.
You can follow these guides to add your WordPress site to each webmaster tool:
Another vital tool to set up on your WordPress website is Google Analytics. It is a free tool that shows how people behave on your site, where they’re coming from, which pages they view, and a lot more.
Google Analytics can help you track your WordPress SEO efforts and see the number of visitors that come from organic searches. It is an excellent tool for tracking website traffic and keeping an eye on all the traffic spikes and dips.
Besides that, you can use it to find high-converting pages and improve their SEO, look for opportunities to boost organic traffic, track 404 errors, and more.
The easiest way of setting up Google Analytics in WordPress is by using MonsterInsights. It is the best Analytics solution for WordPress, and you don’t have to edit any code or hire a developer to configure Google Analytics.
The best part, you can get started with the MonsterInsights Lite version for free to add analytics to your site. The plugin also offers a premium version and helps set up advanced tracking features like eCommerce tracking, form conversions, and more.
Keyword research is a technique that content creators and SEO experts use to discover topics your audience is interested in using search engine data.
Many beginners will use their best guesses to come up with topics that they think people might like. Instead, you should do proper keyword research and find search terms for each page on your website.
It is important that you define a primary target keyword for your blog post or landing page. Having too many different search terms can make it harder for search engines to understand the content.
You can use many keyword research tools to find a primary search term. We recommend Semrush because it offers in-depth keyword data, keyword position tracking, competitor analysis, related keywords, questions, and more.
5. Use LSI Keywords and Check for Keyword Stuffing
Now that you’ve found a focus keyphrase for your content, the next thing to do is find Latent Semantic Indexing (LSI) keywords. These are related search queries to your primary keyword.
The easiest way of finding LSI keywords is through Google Search. Simply scroll down to the bottom of the search results and see the ‘Related searches’ section.
You can then use these terms throughout your content and cover the overall topic in depth. This also helps search engines better understand your content.
That said, it is vital that you don’t stuff the keywords. Using the exact search term repeatedly doesn’t provide a great reading experience for users, and search engines are pretty clever at detecting keyword stuffing.
6. Optimize Your SEO Title and Meta Description
The next WordPress SEO checklist item is whether your SEO titles and meta descriptions are optimized.
The title of your WordPress blog post or product page plays an essential role in search rankings. A compelling title will encourage the user to click on the link.
The meta description also provides more information to users about the page and helps improve the organic click-through rate (CTR). As more people click on your site’s link, it will send a positive signal to Google and help you achieve higher rankings.
It is an SEO best practice to include the primary keyword in your SEO title, meta description, and URLs. Plus, you should ensure that your titles are not more than 55 characters and meta descriptions are not more than 155 characters. Otherwise, Google will truncate your headline and description.
If you’re using AIOSEO, then you can use the headline analyzer to create engaging title tags. It shows a score for your headline and offers tips for improving your SEO title.
You should also optimize the URLs of your blog posts and landing pages for SEO.
Creating short and descriptive permalinks helps searchers to understand what’s the page about in the search results. Besides that, it is also a good practice to include the primary keyword in your URL.
For example, here is what an SEO-friendly URL should look like:
On the other hand, here’s what a URL that’s not optimized for SEO would look like:
https://www.wpbeginner.com/articles/651472
You can change these in your WordPress permalink settings.
8. Make Sure to Add Alt-Text to Your Images
Optimizing your images for search engines is also important in WordPress SEO. One way of doing that is by ensuring that your photos have descriptive alternative or alt text.
Alt text helps Google and other search engines understand the image’s subject matter. This way, your pictures can appear in Google Images and help you get more organic traffic.
In WordPress, you can easily add alt text to your images. When you upload a picture in the WordPress content editor using the Image block, you’ll see the Alt Text option in the settings panel on the right.
You can also go to Media » Library from the admin panel.
After that, simply select any image and enter the ‘Alt Text’ in the right side panel.
Aside from that, you can also use an image compression tool to reduce the size of your pictures. This will help your site to load faster and provide a great user experience.
Note: Using the block editor to add alt text will only add it to that specific use of the image. If you want to add the same alt text to the image no matter where on your site it’s used, use the media library.
When going through the WordPress SEO checklist, another important thing to check is the internal links in your content. Internal links are pages you link from your own website.
Search engines use these links to find and index content on your website. It also helps pass authority from one page to another.
Additionally, it assists your visitors in navigating your website, reading related posts, finding sources for statistics, and discovering old articles and pages.
If you’re using AIOSEO, then you can use its Link Assistant feature to uncover internal linking opportunities. It will show orphaned pages with no internal links, provide suggestions and anchor text, and allow you to insert links in a single click.
When checking for on-page SEO, it is essential that your content is easy to read. It plays a massive role in getting higher rankings because blogs that are easier to read often rank higher than those that are hard to read.
Studies show that people spend less than a second deciding whether to exit or stay on the page. This means they scan through your content, and you have a very short time to convince them to stay on your website.
By improving the readability of your content, you can help users quickly scan your articles. A simple way of doing that is by grouping sections of your content under headings (H2, H3, H4, and so on).
Besides that, you can write short sentences, use bulleted lists, break long chunks of paragraphs into smaller paragraphs, and add a table of contents. Adding images, videos, and other multimedia can also enhance readability and make your content more engaging.
With AIOSEO, you can analyze readability issues inside the content editor and get suggestions on improving your content.
You can also use grammar checker tools like Grammarly to make sure your content is free from spelling mistakes, missing punctuation, and grammatical errors.
11. Ensure that Search Engines Can Easily Find Your Website
Now that your content and on-page SEO is optimized, there are a few technical elements you should also check as part of the WordPress SEO checklist.
First, you should make it easier for search engines to find your website and index your site. WordPress has a built-in option that stops search engines from crawling your site. If it is enabled, Google and other search engines will not list your site in the search results.
You can check this by heading to Settings » Reading from your WordPress dashboard, and scrolling down to the ‘Search engine visibility’ section. Just make sure that the ‘Discourage search engines from indexing this site’ option is not checked.
Another way you can help search engines find content on your site for crawling and indexing is by creating a sitemap.
An XML sitemap tells search engines about the most important pages on your site, so they can quickly discover new content and index them in the search results.
With AIOSEO, it is very easy to create a sitemap. The plugin lets you set up sitemaps for videos, news, RSS feeds, and HTML.
Next, your WordPress website speed is critical in ranking higher in Google. That’s because page load time is now a ranking factor, and Google will rank faster-loading sites higher compared to slow-loading sites.
A simple way of checking load time is by using MonsterInsights. It lets you run a website speed test and shows a Site Speed report inside your WordPress dashboard.
You can see an overall score for mobile and desktop, along with other important metrics for measuring how fast your site loads.
The plugin also shows suggestions and benchmark goals for improving each metric. For example, you can use a content delivery network (CDN) to improve site speed,
The last WordPress SEO checklist item you need to check is whether your site is mobile responsive.
Google has now gone mobile-first. What that means is that it will use your site’s mobile version for indexing instead of the desktop version. You will lose out on higher rankings if your site is not mobile-ready.
The free tool will analyze your site and tell you whether the website is mobile-responsive or not.
You can simply enter your site’s URL in the tool and click the ‘Test URL’ button.
If your site isn’t mobile-ready, then you can start by changing the theme. There are many responsive WordPress themes designed for mobile. You can follow our guide on how to change a WordPress theme without losing data or traffic.
If you liked this article, then please subscribe to our YouTube Channel for WordPress video tutorials. You can also find us on Twitter and Facebook.
Are you looking for the best practices to maximize the SEO benefits of internal links?
Internal links play an important role in search engine optimization (SEO). They help search engines discover your content and rank them higher in search results.
In this article, we’ll list the best practices to use for internal linking for SEO.
How Does Internal Linking Improve SEO in WordPress?
Internal links are links between posts on your own website. Having internal links is important for your WordPress SEO. They help search engines like Google crawl your website and discover new content to index and rank.
Generally, the more links a page has pointing to it, the more likely it is to rank higher in search results. That means that you can use internal links to point to important pages on your site as a way to increase their traffic.
That being said, let’s take a look at the best practices for improving SEO by adding internal links in WordPress. Since this is a comprehensive guide, we have included a table of contents for easier navigation.
We recommend that you make a habit of linking to your older articles from your new articles.
It’s a great way to develop a contextual relationship between your new and old posts. It also allows you to pass relevant link juice to your older articles.
Because internal links play such an important role in SEO, we have even made it part of our pre-publish blog post checklist for WPBeginner writers.
You can also edit your older articles to add links to your newer content whenever you publish. Many successful bloggers dedicate time to adding internal links that point to new articles on a weekly or monthly basis.
This will help you boost your pageviews, increase the time users spend on your site, and ultimately will improve the SEO score of your individual blog posts and pages.
WordPress makes it easy to search for your old posts right inside the post editor. Simply select the text you want to link and click on the link button in the toolbar that appears.
A text pop-up will appear below your highlighted words. Then, you can start typing to search for the older articles you want to link to.
2. Monitor Your Internal Link Performance in WordPress
It’s helpful to see your website’s SEO performance in terms of links by using a tool such as the Links Report in Google Search Console. This is a helpful starting point for working out how to improve internal linking on your site.
The Links Report will show you how many pages are linking to this page. You can compare it with other pages and see whether pages with more internal links are ranking higher than posts with many internal links.
Just make sure you are only linking to the article when it makes sense. Adding links where they don’t make sense creates a bad user experience.
Another way to monitor the impact of internal linking is to see which keywords are gaining or losing position. All in One SEO makes this extremely easy with the Search Statistics feature.
Once you connect the plugin with Google Search Console, All in One SEO will fetch your Google Search Console data and present it under All in One SEO » Search Statistics.
The keyword positions chart shows a graph of your site’s keyword positions.
Below this, you’ll see the Keyword Rankings overview box. This shows your top 10 keywords, and if you use them for internal links they are very likely to be clicked.
3. Improve Your WordPress Site’s Internal Linking With a Plugin
If you’re not sure which posts you want to link to, then you will often find it faster to add internal links in WordPress using an internal linking plugin.
We recommend using All in One SEO. It includes a unique Link Assistant feature that lets you add links to your old and new content without having to open up the post. Plus, it provides link recommendations, detailed link reports, and much more.
Link Assistant will crawl every link on your website and then show a comprehensive list report.
The report will show you an overview of the links with total counts for internal, external, and affiliate links. It will also show you the number of orphaned posts that have not yet been linked to from another post or page.
You can switch to the Links Report tab for detailed information on all your links. Here you’ll see a list of all your posts and pages with columns for internal, external, and affiliate links.
It will also show a number of suggestions where you can add links.
For more details, you can click on the right arrow button next to a post or page. This will show all links organized in different tabs. From the suggestions tab, you can quickly view link suggestions and add links without directly editing a post or page.
Link Assistant also helps you discover more internal linking opportunities.
You can switch to the ‘Linking Opportunities’ tab to see suggestions about how to improve the internal linking on your website, and also see the list of orphaned posts so you can add links to them.
Another plugin useful for internal linking is Semrush SEO Writing Assistant because it can help you keep track of links inside your article.
For example, it lets you know when your article has too many or too few internal links and also suggests ways you can improve your links.
This tool also comes in handy if you have other authors working on articles. Editors can quickly see if the article includes internal links to other posts on your website.
4. Display a List of Your Most Popular Posts in WordPress
You can use a WordPress popular posts plugin to point users toward the articles that other users have already found helpful. These plugins automatically create a list of internal links to your most popular content.
Popular posts are usually your most successful content, which means they are more likely to increase user engagement, conversions, and sales. They are also a good opportunity for internal linking to your other less popular articles.
For example, MonsterInsights has a feature that allows you to show your popular articles anywhere on your WordPress site. You can use also use inline popular posts to show articles inside your content.
If you want to show articles in the sidebar or at the end of your content, then you can select the Popular Post Widget. MonsterInsights even lets you display your top-performing products anywhere on your eCommerce store.
5. Create List Posts That Roundup Other Articles in WordPress
Another way to increase the number of internal links on your WordPress blog is to create roundups of your existing content. You do this by creating a new post that mentions your best articles on a certain subject to give a detailed overview of the topic.
In fact, you’re reading a post like that now.
Luckily, there are some plugins that make this job easy. For example, WP Tasty Roundups allows you to quickly repurpose your existing content into beautiful roundup posts that rank in search results.
All you need to do is type one or two keywords into the built-in search functionality, and the plugin will automatically pull images, titles, descriptions, and links from relevant posts into your roundup list.
6. Get Google Sitelinks for Your WordPress Site
Sitelinks are a feature on Google search engine results pages (SERPs) where additional sub-pages appear under a website in the search results.
These are often internal links to the most popular pages of that website.
The top 3 spots on Google get the most clicks. When sitelinks are shown for a website, it takes up the same amount of space as three regular search listings.
Having this much screen space dedicated to your site significantly increases your overall click-through rate. Simply put, more visitors will visit your website from the keyword.
While there is no guaranteed way to get Google to show sitelinks for your website, it certainly helps to create lots of internal links to your most important posts and pages.
7. Preload Links in WordPress for Faster Loading Speeds
Link preloading is a browser technology that will load links in the background before a site visitor clicks them. This makes your website seem faster, which can improve SEO.
Because loading speed is one of the top indicators for search engine rankings and user engagement, when your internal pages are preloaded, your visitors are more likely to stay on your website longer.
They are more likely to view more pages because they’re loading instantly.
The easiest way to preload links is by using the Flying Pages plugin. It simply adds intelligent preloading to make sure preloading won’t crash your site or even slow it down.
Broken links are bad for your website’s SEO. Search engine crawlers find new content on your website by following internal links, so a broken link can stop them from indexing a new post.
They also negatively impact user experience because broken links will return a 404 error. If a visitor clicks on a link and is unable to find a page they’re looking for, then they may leave.
AIOSEO offers a powerful redirection manager that helps track 404 errors on your website and lets you set up permanent 301 redirects to fix broken links.
9. Update Internal Link URLs When Moving a Site to a New Domain
If you ever move your WordPress site to a new domain name, then it is important to update all internal link URLs. Otherwise, you will have lots of broken links.
You should start by changing the WordPress address and site URL by visiting the Settings » General page from your WordPress dashboard.
But you will also need to change the URLs of every internal link added to your posts and pages.
10. Use MediaWiki Syntax to Quickly Add Internal Links to WordPress
If you want to make internal linking a habit, then it helps to use the most efficient method. Since WordPress 6.0, WordPress has supported standard MediaWiki syntax to quickly add internal links when creating or editing a post.
You can now quickly add links by adding two square brackets followed by the post title. The animated gif below shows you how easy this feature is to use inside WordPress.
The link will automatically add the correct URL to the post, and use the post title as an anchor link.
If you know the title of a post (or even just part of it), then using the double square bracket method is the fastest way of creating an internal link.
11. Track Which Internal Links Are Clicked in WordPress
One of the best ways to uncover how users interact with your website is to track which internal links your visitors are clicking. Tools such as MonsterInsights can help you see which internal links your visitors are the most interested in.
You can then use these insights to improve the way you add internal links to your posts and pages.
You can also use All in One SEO to enable breadcrumbs for your WooCommerce products. For details, see the fifth tip in our guide on WooCommerce SEO made easy.
If you liked this article, then please subscribe to our YouTube Channel for WordPress video tutorials. You can also find us on Twitter and Facebook.
Conversion tracking is the ability to track and measure the success of your various marketing efforts.
Depending on your business, the conversion is the desired action you want users to perform on your website.
For an online store or eCommerce website, a conversion could be a successful purchase.
For a news/blog site, the conversion could be a successful subscription to the email newsletter.
For a professional services website, a conversion could be a user filling up a contact form.
Simply put, conversion tracking shows you how many of your website visitors successfully perform the desired action.
Why is Conversion Tracking Important?
Conversion tracking is important because it helps you make data-driven decisions to grow your business.
For instance, it shows that users from a specific traffic source are more likely to convert. You can then focus your attention on getting more traffic from that particular source.
Conversion tracking also helps you uncover the users who are not converting so well.
For instance, you may learn that users open the contact page, but many abandon it before submitting the form. You can then make your form easier by removing unnecessary fields, making it conversational, changing colors, setting up partial form submission, etc.
Basically, you need conversion tracking to measure your success and failures and then improve upon them to grow your online business.
That being said, let’s take a look at what tools we’ll need to set up conversion tracking in WordPress.
Tools You Need to Setup Conversion Tracking in WordPress
Most conversion optimization experts rely heavily on Google Analytics. It is a free tool provided by Google that helps you track your website traffic.
It shows where your users are coming from, and what they do while on your website.
If you are running Google AdWords, Facebook Ads, and Twitter Ads to promote your business, then you’ll need to set up those for conversion tracking.
This may sound complicated, but you’ll only have to set it up once, and we’ll walk you through every step of the way.
Ready? Let’s get started.
Setting Up Conversion Tracking in Google Analytics
First, you need to install Google Analytics on your website.
The easiest way to do this is by using MonsterInsights. It is the best Google Analytics plugin on the market that comes with enhanced eCommerce tracking, form tracking, and other conversion tracking tools built-in.
You’ll need the PRO version of the plugin to access eCommerce and other conversion tracking features. For basic tracking, the free version works as well.
Upon activation, you’ll see the setup wizard. Go ahead and click the ‘Launch the Wizard’ button.
Next, you can follow the on-screen instructions to connect your WordPress site to Google Analytics using MonsterInsights. For more details, see our guide on how to install Google Analytics in WordPress.
With MonsterInsights, you can also easily create a Google Analytics 4 (GA4) property. GA4 is the latest version of the famous analytics platform, and it will replace the old version on July 1, 2023.
Now that you have installed Google Analytics, let’s set up conversion tracking on your website.
Turning on Enhanced Ecommerce Conversion Tracking
Ecommerce tracking helps you see which products are doing well on your site, which products are being looked at but not purchased, and what’s bringing you the most revenue.
Google Analytics comes with enhanced eCommerce tracking, which works for most eCommerce websites, including WooCommerce, Easy Digital Downloads, MemberPress, and more. However, you’ll need to enable it for your website manually.
Step 1. Turn on eCommerce Tracking in MonsterInsights
MonsterInsights comes with an eCommerce addon that lets you properly set up eCommerce conversion tracking in Google Analytics.
It works with all top eCommerce platforms for WordPress, including WooCommerce, MemberPress, LifterLMS, Easy Digital Downloads, and more.
First, you need to visit the Insights » Addons page to install and activate the eCommerce addon.
Step 2. Turn on Enhanced Ecommerce in Google Analytics
Next, you need to enable enhanced eCommerce tracking in your Google Analytics account. Go to your Google Analytics dashboard and select your website.
From here, you need to click on the Admin button located at the bottom left corner of the screen.
On the next screen, you’ll see different Google Analytics settings.
Under the ‘View’ column, click the ‘Ecommerce Settings’ link.
After that, you need to turn on the ‘Enable Ecommerce’ and ‘Enable Enhanced Ecommerce Reporting’ options.
Don’t forget to click the ‘Save’ button when you’re done.
Google Analytics will now turn on the eCommerce reporting feature for your account.
Afterward, you can return to your WordPress dashboard and visit the Insights » Settings page. From here, switch to the eCommerce tab.
MonsterInsights will automatically detect your eCommerce software and enable advanced eCommerce tracking for your store.
Note: the manual process for adding eCommerce conversion tracking has a lot of room for errors, so we strongly recommend using a plugin like MonsterInsights.
Viewing eCommerce Conversion Tracking Reports
Now that you have enabled eCommerce conversion tracking on your website. Let’s see how to view these reports and use them to make informed decisions about your business.
Ecommerce Conversion Reports in MonsterInsights
Simply go to the Insights » Reports page inside the WordPress admin area and then switch to the eCommerce tab.
At the top, you’ll see your most important metrics, like the conversion rate, transactions, revenue, and average order value.
Below that, you will see a list of your top products with quantity, sale percentage, and total revenue. This shows you which products are doing well in your store.
Next, you’ll see your top conversion sources with the number of visits, conversion share, and revenue. You can see which sources are bringing you more revenue and which traffic sources are not very effective.
MonsterInsights will also show you shopper behavior reports with the number of times products were added to and removed from the cart.
That’s not all the data. You can drill down these reports even further inside Google Analytics.
Ecommerce Conversion Reports in Google Analytics
In Google Analytics 4, you can head to Reports » Monetization » Overview to view the report.
Here, you can see the total revenue your online store is making. Besides that, there are more metrics you can track, like items purchased, first-time purchasers, and total purchases.
On the other hand, you can visit your Universal Analytics dashboard and click on the Conversions » Ecommerce from the left column.
The overview section offers the most important stats, such as revenue, conversion rate, transactions, and average order value.
You can further drill down to view different reports. For example, you can switch to shopping and checkout behavior reports to see how users reach the conversion page. You can also figure out what stopped them at the last minute from completing the transaction.
Turning on Form Conversion Tracking in Google Analytics
Not all websites use an eCommerce platform to conduct business. For instance, a restaurant website may use an order delivery form, or a salon may use a booking form.
Many businesses use contact forms to capture leads from their website. A lot of news and blogs use an email newsletter to convert website visitors into subscribers.
To track them, you need to enable form conversion tracking in Google Analytics.
MonsterInsights comes with a Forms addon that lets you easily track form conversions on your WordPress site. It works with all popular WordPress form plugins, including WPForms, Formidable Forms, Gravity Forms, Contact Form 7, and more.
Simply go to the Insights » Addons page. Scroll down to the ‘Forms’ addon, and then click on the Install button.
Upon activation, you need to visit the Insights » Settings page and switch to the ‘Conversions’ tab.
MonsterInsights will automatically detect your WordPress form plugin and will also start tracking miscellaneous WordPress forms on your site.
Viewing Your Form Conversion Reports
You can now view your form conversion reports inside your WordPress admin area.
Head over to the Insights » Reports page and switch to the ‘Forms’ tab.
You’ll see a list of forms on your website with their impressions, conversion, and conversion rates.
This helps in tracking how each WordPress form is performing. You can optimize low-converting forms while increasing the visibility of high-converting forms.
Setting Up Goals for Conversion Tracking in Universal Analytics
So far, we have covered how to track eCommerce and form conversions.
What if you wanted to manually set up conversion goals and track them in Google Analytics?
For instance, you may want to consider users visiting a specific page as a conversion. Since it is not a form submission or an eCommerce transaction, it will not appear as a conversion in your reports.
Universal Analytics allows you to create your own goals and track their conversion.
However, an important thing to note is that Google Analytics 4 doesn’t have goals anymore. It is one of the major differences you’ll see between the new and old versions.
That said, let’s see how to set them up in Universal Analytics and track them on your website.
Go to the Google Analytics dashboard and click the ‘Admin’ tab on the bottom left. Then, in the View column, click on Goals.
Now, you will need to create a new goal.
Simply click the ‘+ New Goal’ button to set up a new goal.
Next, you will need to select the goal type. Universal Analytics offers 4 types:
Destination: This tracks whether a visitor went to a specific page. This could be a thank you page or any conversion page on your site.
Duration: This tracks how long a visitor spends on your website. More time spent on a website means more engagement.
Pages/Screens per session: This tracks how many pages an average visitor looks at on your site.
Event: This can track all sorts of things, like button clicks, video plays, and downloads. It requires a bit more setup than the other options.
Destination and Event types are the most commonly used goal types for most businesses.
For this tutorial, we will create a ‘Destination’ goal to track visitors who view our thank you page after completing a form.
First, provide a name for your Goal. It needs to be something meaningful so that you can easily identify it in your Google Analytics reports.
After that, choose ‘Destination’ as your goal type and click the Continue button.
Now you can simply provide the last part of the URL you want to track as the destination.
For instance, if your page is: https://www.example.com/thank-you-for-booking/
Then you should enter the following: /thank-you-for-booking/
Below that, you can optionally add value for the conversion. This makes sense if people are completing a payment form or if you know how much each lead is worth to you on average.
If you want to track a funnel, such as a customer moving through a checkout process, then you can also do this as part of the destination goal. This can help you pinpoint areas you might want to improve.
Once you’re happy with your goal, click the Save button. You should then see your goal listed in a table. You can edit it, switch it off and on, or create more goals here.
Viewing Your Goal Conversions in Universal Analytics
Now that you have created your goal, allow Google Analytics to collect some data. After that, you can view your Goal Conversion report under the Google Analytics dashboard.
Simply, go to the Conversions » Goals and then click on Overview.
Like all Google Analytics reports, you can drill down to view visitor journeys and get deeper insights.
Google Analytics 4 replaces goals with events. You can manually configure events to track different user interactions in GA4.
First, you’ll need to go to the ‘Admin’ settings from your GA4 property.
Next, you will need to navigate to the Property column.
After that, simply click the ‘Event’s option.
You are now ready to create a new event in GA4.
Simply click the ‘Create event’ button to get started.
You should now see a new window slide in from the right. This is where all your custom events will be listed.
Go ahead and click the ‘Create’ button.
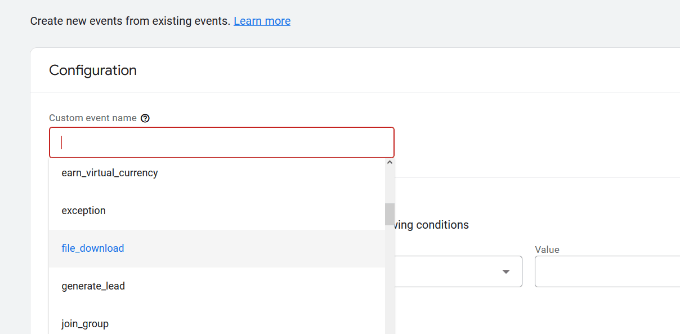
On the next screen, you can enter details of your new event.
Google Analytics 4 already has pre-built events. Simply click the Custom event name dropdown menu and choose an event. For example, we’ll select the ‘file_download’ event for this tutorial.
GA4 will automatically enter the specific Parameter and Operator for your custom event.
Next, you can enter a value for your event. For instance, we will enter ‘.pdf’ since we want to track PDF file downloads. However, you can enter any specific word you use to organize filenames on your site.
After entering these details, click the ‘Create’ button at the top.
You will now see your new custom event listed under the Custom events area in GA4.
Viewing Your Event Conversions in Google Analytics 4
Now that you’ve created a custom event in GA4, the next step is to view the conversions.
To do that, simply head to Reports » Engagement » Event: Event name from the menu on your left and view the report.
You can now repeat this step to track other custom events.
That said, an easier way of tracking user behavior is by using MonsterInsights. The plugin automatically sets up different events in Google Analytics.
This way, you don’t have to manually configure events or worry about messing up your tracking.
Google Ads Conversion Tracking in WordPress
If you run Google Ads (formerly Google AdWords) to bring targeted traffic to your website, then you may want to track those conversions.
Setting up is a bit complicated because it requires adding code to your website. However, with MonsterInsights, you can easily set up Google Ads conversion tracking without editing code or hiring a developer.
First, you can go to Insights » Addons from your WordPress dashboard and install the Ads addon.
Once you install the addon, it should automatically activate.
From here, you can go to Insights » Settings and head to the Publisher tab.
Next, you can scroll down to the ‘Ads Tracking’ section.
Here, you will need to enter the Conversion ID, which will be in this format: AW-123456789.
If you’re tracking Google Ads on an eCommerce store, then you can also enter the Conversion Label.
To find the Conversion ID and Conversion Label, you’ll need to go to your Google Ads dashboard and create a conversion action.
Viewing Google Ads Conversion Reports in Google Analytics 4
Your Google Ads conversion tracking will now appear in your Google Analytics reports.
In Google Analytics 4, you can head to Acquisition » Acquisition overview and then navigate to the ‘Session Google Ads’ report.
After that, click the ‘View Google Ads campaigns’ option at the bottom of the report.
This will expand the report and show more details about your ad campaigns.
You can see the total number of users, sessions, Google Ads clicks, and more.
Viewing Google Ads Conversion Reports in Universal Analytics
For Universal Analytics, you can open your website property.
After that, view the Google Ads report by going to the Acquisition » Google Ads » Campaigns section. Here, you can see conversions for all your paid campaigns.
Use UTM Parameters for Conversion Tracking in Google Analytics
UTM parameters are special tags you can add to URLs to pass important information to Google Analytics.
For instance, if you want to track users coming from a particular ad, then you can add UTM parameters to your ad URL like this:
MonsterInsights makes it super easy to build URLs with UTM parameters. Simply head over to the Insights » Tools page and select the ‘URL Builder’ tab.
Simply enter the UTM parameters you want to use, and it will automatically generate the URL, which you can then use in your campaigns.
For instance, you can enter a campaign source, like a newsletter or Google, which tells you where the users are coming from. After that, you can define a campaign medium, such as emails or banner ads, and enter a campaign name.
MonsterInsights will also give you additional options to add campaign terms and content.
This is useful if you’re split-testing different emails or paid campaigns.
For creating a custom URL, you can leave these options blank.
Next, you can scroll down to the bottom to see your custom URL.
Go ahead and use the link for campaigns and track conversions on your website.
Viewing UTM Parameter Reports in Google Analytics 4
Now that you’ve added UTM parameters to a URL, you can track its performance in Google Analytics.
First, log in to your GA4 account. After that, head to Reports » Acquisition » Traffic Acquisitionfrom the menu on your left.
You should now see traffic from different sources on your website, such as organic search, email, display, and more.
You can use the search bar to filter the traffic source for your custom campaign. For example, if you’re tracking conversions from a newsletter, then you can look up ‘Email’ in the report.
After that, you further drill down and filter your traffic.
Simply click the ‘+’ button under the search bar.
GA4 will then show different options to filter your traffic.
You can select Traffic source » Session source from the dropdown list.
Next, Google Analytics will list your email campaigns.
You can now see which campaign performs best and gets the most conversions.
Viewing UTM Parameter Reports in Universal Analytics
In Universal Analytics, you can track the conversions of your campaigns under your Google Analytics dashboard.
Simply switch to the Acquisition » Campaigns » All Campaigns report.
Your campaigns will appear here.
You can click on any of them to drill down further.
Setting Up Facebook Conversion Tracking in WordPress
Facebook is the largest social media website on the planet, with billions of active users. This is why Facebook ads are sometimes the easiest way to reach a niche audience.
Now, if you are running Facebook ads, then you may want to see how well your ads are doing by implementing conversion tracking for your Facebook ads.
Usually, you’d need to add a code snippet to your WordPress website to track Facebook conversions. However, WPCode makes it very simple, and you can simply enter the Facebook Pixel ID to set up tracking.
First, you’ll need to log in to Facebook and visit the Meta Business Suite. Then, click on All Tools » Events Manager.
Next, you need to add a data source to the Event Manager.
Simply click the ‘+ Connect to Data Sources’ button in the left-hand menu.
You should now see different options to connect your new data source.
Go ahead and select the ‘Web’ option and click the ‘Connect’ button to continue.
After that, enter a name for your pixel.
Once that’s done, you can click the ‘Create Pixel’ button.
Next, you need to choose how to connect your website and send activity to Facebook.
At the bottom, you will see the Facebook Pixel. Go ahead and copy the pixel ID.
Note that you’ll need at least the WPCode Plus plan because it includes the Conversion Pixel Addon. However, there is also a free version of WPCode you can use to get started.
Upon activation, you need to visit the Code Snippets » Conversion Pixel page and go to the Facebook tab. From here, you need to paste the Facebook Pixel ID in the respective field.
WPCode will now automatically add the code to your site that’s needed to track Facebook ad conversions.
Setting Up Twitter Conversion Tracking in WordPress
If you run Twitter Ads to promote your business, then you’ll need to set up Twitter conversion tracking to measure the success of your ads.
Simply log in to your Twitter Ads account and click on the Tools » Event manager from the menu at the top.
You should now see a pixel created by Twitter.
Go ahead and click the ‘View Twitter Pixel’ option.
On the next screen, you will see different options to add the Twitter pixel to your site.
You can use the ‘Pixel Code’ method and simply copy the code.
You will need to add this code to the header of your WordPress site.
First, you need to switch back to your WordPress website’s admin area.
If you haven’t already done so, then go ahead and install and activate the WPCode plugin. For more details, please see our guide on how to install a WordPress plugin.
Upon activation, you need to visit the Code Snippets » Header & Footer page. Now you can paste the Twitter pixel code into the Header section.
Don’t forget to click the ‘Save Changes’ button to store your settings.
After you have successfully installed the pixel code, you can track conversions on your Twitter Ads account.
Optimizing Conversion Rates to Boost Sales
Once you start tracking conversions on your website, the next step is to improve those conversion rates.
You’d be surprised how little things can make a huge impact on your business.
The best way to improve your conversions is by using OptinMonster. It is the best conversion optimization software on the market and helps you convert more visitors into customers.
It integrates with any email marketing service and works with all popular eCommerce platforms.
OptinMonster’s display rules allow you to show targeted messages to your customers at the precise time and nudge them into making a buying decision.
For instance, if you notice that customers are leaving a product page without taking any action, then you can offer them a discount when they are about to exit.
Similarly, you can run time-sensitive campaigns to trigger the FOMO effect and give customers a nudge in the right direction.
If you liked this article, then please subscribe to our YouTube Channel for WordPress video tutorials. You can also find us on Twitter and Facebook.
Do you want to enable customer tracking in WooCommerce?
Customer tracking allows you to offer a personalized shopping experience based on customer behavior in your eCommerce store.
In this article, we will show you how to easily enable customer tracking in WooCommerce with Google Analytics.
Why Enable Customer Tracking in WooCommerce with Google Analytics?
Google Analytics allows you to see where your visitors are coming from and what they do on your website. In other words, it helps you track your traffic sources as well as user engagement on your website.
For eCommerce platforms, Google Analytics offers an enhanced eCommerce tracking feature. This allows you to better understand users’ shopping and checkout behavior. Plus, you can see which products perform the best and track your WooCommerce store’s sales performance.
By default, a WooCommerce store allows your customers to create an account or checkout as guest users. Creating an account helps the user save their shipping and billing information for faster checkout next time. It also helps you offer customers a personalized shopping experience based on their browsing and shopping history.
Wouldn’t it be great if you could track logged-in users with their user IDs in Google Analytics and also see the path customers took before making a purchase?
This will give you access to a treasure trove of information and insights on customer behavior. You can use it to offer a better on-site experience and boost your sales.
Let’s take a look at how to easily enable customer tracking in WooCommerce. Here are quick links that you can use to jump ahead to any section:
Set up Ecommerce Tracking in WordPress with Google Analytics
The best way to set up WooCommerce customer tracking in Google Analytics is using MonsterInsights. It is the best analytics solution for WordPress and helps you set up tracking without editing code.
If you use the native method for tracking WooCommerce conversions, then you’ll need to edit the tracking code, use Google Tag Manager, or both. This can be tricky for beginners, and the slightest mistake can mess up your analytics data.
The MonsterInsights plugin offers an eCommerce addon, which automatically detects WooCommerce and starts tracking customer behavior in Google Analytics. It also comes with a Customer Journey addon that allows you to see users’ behavior before they make a purchase.
First, you will need to install and activate the MonsterInsights plugin. For more details, see our step-by-step guide on how to install a WordPress plugin.
You will need to be on the ‘Pro’ plan to access the eCommerce and User Journey addons, which we will use for this tutorial. However, there is also a MonsterInsights Lite version you can use for free.
Upon activation, you will see the welcome screen and the setup wizard. Simply click the ‘Launch the Wizard’ button and follow the on-screen instructions.
Once you’ve configured Google Analytics on your website, the next step is to install the eCommerce addon.
The addon automatically sets up eCommerce tracking on your website and detects your WooCommerce store.
First, you need to visit the Insights » Addons page from your WordPress dashboard and navigate to the ‘eCommerce’ addon. Simply click the ‘Install’ button, and the addon will automatically activate.
That’s it! MonsterInsights will take care of the rest once the addon is active.
Now that you’ve set up WooCommerce tracking in Google Analytics, the next step is to enable the MonsterInsights Customer Journey addon.
The addon will allow you to see the steps a customer takes before making a purchase in WooCommerce. Plus, it also shows the time it took at each step, the pages a user visited, and more.
First, you’ll need to go to Insights » Addons from your WordPress admin panel. Next, navigate to the User Journey addon and click the ‘Install’ button.
The addon will automatically activate and start tracking your WooCommerce customer’s journey.
Next, you can go to WooCommerce » Orders from your WordPress dashboard to view the path your customers took when purchasing a product.
After that, click on the order for which you’d like to see the user journey.
On the next screen, you’ll see the path a customer took before buying the product. You get to view the pages they visited, where they clicked, and how much time they spent on a page.
This is really useful information to better understand your customers. You can see which product categories are performing the best and where customers are exiting your store during the purchase process. Using the data, you can then fix these issues and optimize your site for more conversions.
Enabling User ID Tracking in Google Analytics
While MonsterInsights makes it very easy to track customers on your WooCommerce store, it also tracks WordPress ID tracking in Google Analytics.
WordPress ID is a unique ID to identify every user on your website. The user ID is called the ‘Client ID’ in Universal Analytics and the ‘App Instance ID’ in Google Analytics.
Do remember that enhanced eCommerce tracking will enable eCommerce reporting features for your WooCommerce store. However, it does not enable user tracking by default.
Let’s take a look at how you can enable user ID tracking in Google Analytics 4.
Enabling Customer Tracking in Google Analytics 4
To start, you’ll need to go to the Admin settings from your GA4 dashboard and click the ‘Reporting Identity’ option.
On the next screen, you will need to select a way to identify users on your online store.
GA4 uses multiple ways to identify customers. These include user ID, Google signals, device ID, and modeled data. For the sake of this tutorial, we’ll select the ‘Observed’ option and click the ‘Save’ button.
Viewing Customer Tracking Reports in Google Analytics
Now that everything is set up, Google Analytics will now track all your website customers. It will also be able to track logged-in users with their unique WordPress user ID.
View User ID Data in Google Analytics 4
You can view GA4 eCommerce tracking WooCommerce data by going to the ‘Explore’ tab from the menu on your left.
Under Explorations, you’ll see different report templates. Simply click the existing ‘User explorer’ report.
Next, you’ll see the User explorer report in Google Analytics 4.
One thing you can notice is the Client ID will be replaced with the App instance ID.
You can click on any of the app instance IDs to view more details.
For example, the report shows the total events that were triggered, the location of the user, the time stamp for each event, and more.
View User ID Data in Universal Analytics
Note: Universal Analytics has now sunset and is no longer processing data from your website. However, you can still view past data and use it for comparison.
To view all your individual customer activity, you can go to your Universal Analytics account and click on the Audience » User Explorer menu.
You will see individual customer reports with a unique ID assigned to all non-logged-in users.
To view customer tracking reports for logged-in users in WooCommerce, you need to click on the Google Analytics logo on the top left corner of the screen.
This will show all your Google Analytics profiles. You will see your website profile and under ‘All website data’ you will see the UserID reporting view you created earlier.
Go ahead and click on the UserID reporting view to load it.
Once it’s loaded, you need to click on the Audience » User Explorer menu. This way, you will see a logged-in customer tracking report where each user is represented by their WordPress user ID on your website.
You can click on the user ID to view a customer’s individual tracking data.
For instance, the device category they use, acquisition date, the channel they used to arrive on the online store, and more.
Matching Customer Tracking with Their WordPress Accounts
Now that you’ve identified users in Google Analytics, you can match them with WordPress accounts. This will help you know who this customer is, and how you can create personalized offers, emails, or shopping experiences for them.
First, you need to note down the customer ID you see in your Google Analytics User-ID reporting view.
After that, go to your WordPress website’s admin area and click on the ‘Users’ menu. It will show you a list of all users on your WordPress site.
Next, you can click the ‘Edit’ link below any username in the list.
WordPress will now open the user profile for you.
If you look in your browser’s address bar you will ‘user_id’ parameter in the URL.
Next, you need to replace the value next to user_id with the one you copied from your Google Analytics report and press enter key on your keyboard.
WordPress will now load the user profile associated with that particular User ID. You now have the customer’s name, username, email address, and social media information. You can also track their orders, product views, cart activity, and more.
We hope this article helped you learn how to enable customer tracking in WooCommerce with Google Analytics. You may also want to see our expert pick of the best free WooCommerce plugins for your online store and how to get a free email domain.
If you liked this article, then please subscribe to our YouTube Channel for WordPress video tutorials. You can also find us on Twitter and Facebook.
Are you looking for the best WordPress blogs to follow, so you can get fresh WordPress tutorials, news, and latest community updates?
WordPress is the most popular content management system (CMS) in the world and powers over 43% of sites on the internet. Following different WordPress blogs can help you learn how to better use WordPress, get website growth tips, stay up to date with WordPress updates, and receive latest community news.
In this article, we will share the list of some of the best WordPress blogs that you should follow. We’re following these WordPress blogs in our own RSS reader.
Why Should You Follow WordPress Blogs?
If you have a WordPress website or plan to create one, then you definitely want to follow top WordPress blogs.
You can get in-depth knowledge about WordPress and how it works. Plus, you get to see step-by-step tutorials on how to get started. Aside from that, they also have tips on choosing the best WordPress hosting services, themes, and plugins to operate your site.
Many WordPress blogs will also share tips and tricks to optimize your website for search engines, make it load faster, strengthen your website security, make money online, and more.
That being said, let’s look at some of the best WordPress blogs you should read and follow. We’ve broken down the list of blogs into different sections, so you can jump ahead by clicking the links below:
If you are looking for blogs that help you learn about WordPress, then here are our top picks. Each of them covers detailed tutorials, plugin reviews, comparison posts, guides, the latest WordPress news, and more.
WPBeginner is the largest free WordPress resource site for beginners. Our goal is to provide helpful tutorials on WordPress for small business owners, bloggers, and non-techy WordPress users.
WPBeginner was launched in 2009 by founder Syed Balkhi. Since then, it has become one of the best WordPress blogs in the world. There are over 320,000 subscribers from across 190 countries.
You can find a variety of topics on WPBeignner. There are WordPress beginner guides, showcases, step-by-step tutorials, articles on themes and plugins, comparison posts, and the latest news about WordPress.
To help you get started with WordPress, here are some helpful tutorials on WPBeginner:
Besides that, you can also join the free WPBeginner Facebook group and connect with a large community of WordPress users and experts (over 90,000 members). It is an excellent place for beginners and non-tech users to get help and support about WordPress, plugin suggestions, learn tips and tricks, and more.
If you like video content, then you can subscribe to WPBeginner’s YouTube channel. There are detailed videos on WordPress that will guide you every step of the way.
IsItWP is another free online resource that offers WordPress tutorials, product reviews, guides, how-to articles, and showcases. It is a great place to get started with WordPress and learn about different things.
You can learn about creating a WordPress blog, online store, membership site, and more. Plus, you’ll get to know about WordPress security, performance, email marketing, lead generation, plugins, and themes. It also offers detailed guides on marketing hacks, like 30 ways to make money online blogging.
The best part about using IsItWP is that you get to use multiple free tools. Some tools include a domain name generator, WordPress speed test, website uptime checker, headline analyzer, and more.
Blog Tyrant is the next WordPress blog on our list. If you’re looking to start a WordPress blog and learn strategies to grow your business, this is the right website for you to follow.
Blog Tyrant was started in 2010 to help bloggers make a living online. It covers extensive guides, how-to tutorials, product reviews, and other resources to help you create a successful blog and make money online.
The website also lists valuable tools for blogging and helps pick the right plugins for your website.
For instance, you can use tools like a password generator to secure your website, a security scanner to check for vulnerabilities, or a site speed test to see how fast your website loads.
WP Tavern is another famous WordPress blog that covers the latest news and events about WordPress. You can follow the blog to learn about new WordPress releases, and industry news.
It also covers the latest news about different WordPress plugins and themes. You can learn about product acquisitions, feature releases in themes, and new features coming in WordPress, and more.
With the WPForms blog, you can learn how to create all types of forms for your WordPress site. From simple contact forms to complex multistep forms, the WPForms blog has detailed guides and tutorials to help you out.
Plus, you get to stay informed about the latest updates and releases in the plugin. Other than that, you’ll find more helpful blog posts, how-to guides, and showcases on WordPress. For example, there are step-by-step tutorials like how to create an NPS survey form in WordPress or thought-leadership pieces like 7 benefits of conversational marketing.
Elegant Themes offers a high-quality premium WordPress theme collection. It is also the company behind Divi, a popular WordPress theme and page builder.
The Elegant Themes blog offers a lot of content focused on using Divi. For instance, you can learn how to use the website builder, use its features, and customize your site.
Aside from content on Divi, Elegant Themes also publishes general content about WordPress. There are WordPress tutorials, plugin suggestions, reviews, comparisons, and other marketing guides. For example, you can read articles like how to customize your WordPress header.
CodeinWP is the next WordPress blog on our list. It covers extensive topics about WordPress and offers tutorials, lists, comparison posts, and other detailed guides.
What makes CodeinWP different is that it offers various resources and tools besides blog posts and guides. For instance, there are free code snippets you can use to customize your WordPress site.
They also offers free illustrations from designers that you can use for your site among other helpful resources.
OptinMonster is the best WordPress popup and lead generation software. It helps you grow your email list, get more leads, increase sales, and optimize your site for conversions.
With the OptinMonster blog, you can learn how to use the plugin and get the most out of it. There are detailed tutorials on setting up different marketing campaigns, configuring targeting rules to show popups at the right place and time, and more.
Besides that, you can get knowledge about content marketing, email marketing, and lead generation in WordPress by following the blog.
What makes OptinMonster blog different is its case studies. You can learn how other companies are using the plugin to get more email subscribers, which display rules they’re using to target new audiences, how they’re converting traffic into leads, and more.
Post Status is a membership community for people looking to work and grow in the WordPress ecosystem. It offers premium memberships and access to different content about WordPress.
You can get the latest news about WordPress, learn about new plugin features and acquisitions, and read blogs about different Post Status members. For example, there are blog posts called Membership Spotlight, where you get to know about Post Status members, their experience in working in WordPress, and more.
It is also an excellent resource for anyone who wants to connect with founders of WordPress plugins, developers, and other WordPress enthusiasts. There are plans for individuals, agency owners, product founders, and partners.
With Post Status premium memberships, you get important WordPress news and events in the weekly newsletter, access to the Slack community, members-only content, and a weekly members hurdle.
The website also has a podcast and videos to get insights about WordPress. As a partner, you can also post WordPress job openings for your company on the Post Status website.
Torque Magazine is another top WordPress blog you should follow. It is a publication by WP Engine but maintains complete editorial independence.
The website covers extensive articles on WordPress. It has divided its content into different categories: development, tools, business, community, videos, and ebooks.
For example, you can find useful guides like CSS best practices and troubleshooting WordPress issues under the development section. You’ll also find interviews with industry experts, step-by-step tutorials, plugin suggestions, marketing and SEO tips and tricks, and more in Torque Magazine.
Best WordPress Plugin Blogs
There are many WordPress plugins that have a great blog section. They cover extensive topics on WordPress and share useful tips and resources.
You can follow these blogs to get more information about WordPress and learn how to use a specific plugin.
MonsterInsights Blog – MonsterInsights is a popular WordPress analytics plugin used by over 3 million websites. Their blog contains helpful marketing tips like how to setup website tracking, and make data-driven decisions to grow your business.
All in One SEO Blog – AIOSEO is the best WordPress SEO plugin used by over 3 million websites. Their blog covers SEO tips and WordPress tutorials to help you improve your SEO rankings.
Smash Balloon Blog – Smash Balloon is a leading WordPress social media plugin used by over 1.4 million websites. Their blog has tips on how to improve your social media engagement.
Easy Digital Downloads Blog – EDD is the best plugin for selling digital downloads in WordPress. Their blog covers tips for online creators to help you increase your sales & revenue.
SeedProd Blog – SeedProd is a popular page builder for WordPress. Their blog covers tips on how to improve your website design and tips to improve your website customization workflow.
AffiliateWP Blog – AffiliateWP is the best WordPress affiliate plugin for WordPress and WooCommerce. Their blog covers tips on how to create and grow your affiliate program.
WP Simple Pay Blog – WP Simple Pay is a leading payments plugin for WordPress. Their blog cover tips on securely accepting payments as well as other WordPress tutorials.
RafflePress Blog – RafflePress is the best WordPress giveaway plugin. Their blog cover tips on how to unlock viral traffic growth for your website to get more traffic, subscribers, and sales.
ThriveThemes Blog – ThriveThemes is a popular conversion optimization suite for WordPress. Their blog covers marketing tutorials and tips to improve your converisions.
WP Mail SMTP Blog – WP Mail SMTP is one of the must have plugins for WordPress used by over 3 million websites. Their blog covers tips on how to improve your email deliverability along with other WordPress tutorials.
WPMU Dev Blog – WPMU Dev offers a suite of WordPress plugins and tools. Their blog covers a vast number of topics from how-to posts, product reviews, news, and more.
Blogs by WordPress Founders and Influencers
You can also learn a lot about WordPress from different founders and influencers. You get to read about their journey, experiences, and how they’re growing their business in the WordPress space.
Syed Balkhi – Syed Balkhi is the founder of WPBeginner and a well-known entrepreneur. His blog shares tips on his entrepreneurship journey.
Matt Mullenweg – Matt Mullenweg is the co-founder of WordPress. His blog is always full of his latest experiences and entrepreneurship journey.
Chris Lema – Chris Lema is a well-known speaker and blogger who writes about various topics from communication, eCommerce, LMS, and more.
Tom McFarlin – Tom McFarlin is a WordPress developer who loves writing, building, and sharing WordPress-based projects. You can follow his blog to learn about WordPress, PHP, databases, and other backend technology.
Joost de Valk – Jost is the founder of Yoast and now serves as the head of WordPress strategy for Newfold Digital (parent company of Bluehost).
Popular Marketing and SEO Blogs to Follow
There are other great resources out there that help not only help you learn about WordPress but also allow you to grow your website.
You can learn tips on growing your traffic, boosting search engine rankings, uncovering different marketing techniques, and more from marketing and SEO blogs. These blogs also cover WordPress’s latest news and guides, which is really useful.
Neil Patel Blog – Neil Patel is a top SEO influencer who regularly creates detailed SEO tutorials, guides, case studies, and more to help you learn SEO.
Search Engine Roundtable – Search Engine Roundtable is the go-to WordPress blog for staying up to date with SEO news, Google algorithm changes, and more.
Search Engine Journal – Search Engine Journal is another popular SEO blog although their coverage on WordPress topics are generally extremely biased and misinformed. We only recommend following their SEO tips but for WordPress related news, you should avoid them.
Digital Marketer – Digital Marketer provides marketing tutorials, guides, and best practices on how to grow your online traffic and sales.
ShoutMeLoud – ShoutMeLoud is a blog created by Harsh Agrawal. He’s a well-known blogger who shares his blogging journey, WordPress tips, and more to help you grow your online presence.
Blogging Wizard – Blogging Wizard is a popular resource that you can use to learn proven strategies for growing your WordPress blog.
Ahrefs Blog – Ahrefs is a popular SEO tool. Their blog is full of useful guides to improve your website’s SEO ranking.
After being in the WordPress industry for the last 16+ years, we recommend you follow multiple WordPress blogs. Each of the top 10 blogs listed in our post will help you expand your knowledge about WordPress and pick up new ways to grow your business.
The easiest way to follow these WordPress blogs is by either adding them to your RSS feed reader or joining their free email newsletter.
If you liked this article, then please subscribe to our YouTube Channel for WordPress video tutorials. You can also find us on Twitter and Facebook.
Do you want to create a Net Promoter Score (NPS) survey in WordPress?
Net Promoter Score is a popular method to measure customer loyalty, so you can improve your brand image, find new product ideas, and provide better customer service.
In this article, we will show you how to easily create a Net Promoter Score® survey in WordPress and how to properly use it to improve your business.
What is Net Promoter Score?
Net Promoter Score is a management tool that helps businesses measure customer loyalty. The idea was first introduced in 2003, and more than two-thirds of Fortune 1000 companies have adopted it since then.
Here is how it works.
It is based on a single question, ‘How likely are you to recommend our company/product/service to a friend or colleague?’
The answer is provided on a scale of 0 to 10.
Customers who respond with a score of 9 or 10 are called ‘Promoters’. These are your brand’s most loyal customers and are highly likely to purchase again and recommend your business to others.
Users who answer with a score between 0-6 are considered ‘Detractors’. These customers are unhappy with your business and are least likely to purchase or recommend your business.
Customers responding with a score of 7 or 8 are called ‘Passives’. They can be either promoters or detractors and are less likely to actively recommend your business and products to their friends or colleagues.
Your final NPS score is calculated by subtracting the percentage of detractors from the percentage of promoters. The overall score ranges from -100 to 100.
A score of -100 means all customers are detractors, and a full 100 score means all customers that took part in the survey were promoters. Normally, a score of positive numbers (0-40) is considered good, and a score of 50 or above is considered excellent.
Due to the popularity of NPS surveys among businesses, there are numerous very expensive survey tools that will charge you hundreds of dollars per month. These solutions are not very affordable for small businesses.
We’ll show you 2 methods of creating an NPS survey in WordPress. You can use WPForms or UserFeedback plugin. Simply click the links below to jump ahead to your preferred method.
WPForms is a paid plugin, and you will need at least their Pro plan to access the surveys addon used in this tutorial.
Upon activation, you need to visit the WPForms » Settings page from your WordPress to enter your license key. You can find this information under your account area on the WPForms website.
After entering your license key, you must visit the WPForms » Addons page and locate the ‘Surveys and Polls Addon.’
Go ahead and click on the ‘Install Addon’ button. WPForms will now install and activate the addon.
You are now ready to create your first Net Promoter Score survey form.
Head over to WPForms » Add New from the WordPress admin panel to create a new form. First, you must provide a title for your form, then select a form template.
WPForms offers lots of prebuilt form templates. You can simply search for an NPS form template from the search bar on the left.
For this tutorial, we will use the ‘NPS Survey Simple Form’ template.
WPForms will now load the form builder interface with some typical survey form fields.
This is a drag-and-drop form builder where you can just point and click to edit any existing form fields or add new fields from the left column.
If you click on the existing fields in the form, then you’ll see more options for customization.
For instance, you can change the text for each question and make it a required field.
Your Net Promoter Score survey form is now almost ready. Simply getting the score is not very helpful because you don’t know why these customers are unhappy or happy.
Let’s add some smart conditional fields to the form to get more helpful feedback from users.
Adding Conditional Logic to Net Promoter Score Survey Form
WPForms comes with a smart conditional logic feature that allows you to show or hide form fields based on the user’s answers to previous form fields.
You can use that feature to ask users for more feedback based on their answers.
For example, you can ask users who select a score between 0-6 to give you another chance to make things right. These customers are unhappy, and asking them for an opportunity to make things right will help you improve your relationship with these customers.
Similarly, you can also ask users giving a score between 9-10 to leave a testimonial and ask for their permission to share it on your website. These are your most loyal customers, and their testimonials can help you add social proof to your website.
Let’s add these conditional fields to your NPS survey form.
First, select the question after the NPS scale. Next, switch to the ‘Smart Logic’ tab from the menu on your left and click the ‘Enable Conditional Logic’ toggle to enable the option.
We only want to show this field to users responding with a score between 0 and 6. To do that, we will add conditional logic to this form field.
WPForms will add the logic by default. However, you can edit the rating for which you’d like to show the survey question.
Similarly, you can set up conditional logic for the second question in the survey. By default, WPForms will set the condition for you and only show the field when the score is between 7 and 9.
You can edit these conditions according to your survey needs. However, if you’re just starting out, then we recommend using the default settings.
Now repeat the process for other questions in the form. Don’t forget to save your changes.
Adding Your Net Promoter Score Survey in WordPress
WPForms makes it super easy to add forms to any post or page on your website.
You can simply click the ‘Embed’ button inside the form builder to get started.
Next, you’ll see 2 options to embed the NPS survey. You can create a new page or select an existing page.
We’ll choose the ‘Create New Page’ option for this tutorial.
After that, a popup window will open.
Simply enter a name for your new page and click the ‘Let’s Go’ button.
Next, you should see your NPS survey form embedded in the content editor.
Alternatively, you can also use the WPForms block to add the NPS form anywhere on your website.
Simply click the ‘+’ button to add the WPForms block. After that, select your form from the dropdown menu.
You can now save your changes and visit your website to see the form in action.
Now, whenever a user selects a score between 0 to 6, they will see another form field asking for their feedback.
Viewing Your Net Promoter Score Results
After your form is live, WPForms will start calculating your Net Promoter Score based on survey results. You can send the NPS survey link to your customers using an email marketing service to encourage them to fill it out.
You could use OptinMonster to embed the survey form and show it to users who meet certain criteria, such as after they complete a purchase in your WooCommerce store.
After a few users have filled out the form, you can go ahead and check your score.
To do that, head over to WPForms » All Forms from your WordPress dashboard and click on the ‘Survey Result’ link under your Net Promoter Survey form.
WPForms will now display your total Net Promoter Score along with the number of promoters, detractors, and passives. It will also break down the results into beautiful charts, bars, and graphs.
You can use the feedback from users to improve your product, add new features, as well as offer support to unhappy customers, and turn them into loyal brand evangelists.
Method 2: Creating NPS Survey in WordPress using UserFeedback
Another way you can create Net Promoter Score (NPS) survey in WordPress is by using the UserFeedback plugin. It helps you collect user feedback quickly and easily.
The plugin is super easy to use and offers pre-built templates to help you set up an NPS survey in no time.
For this tutorial, we will use the UserFeedback Pro version because it includes customization options, 20+ templates, unlimited questions and responses, and more. However, there is also a UserFeedback Lite version that you use to get started for free.
Setting Up UserFeedback Plugin in WordPress
First, you’ll need to install and activate the UserFeedback plugin. For more details, please see our guide on how to install a WordPress plugin.
Upon activation, the plugin will launch the setup wizard. You can click the ‘Start’ button to begin.
Next, the plugin will ask you to build your first feedback survey.
Since we’ll be creating an NPS survey, you use the default option and move ahead to the next step.
After that, you can enable different features to enable in UserFeedback. These options will depend on your license level.
Go ahead and enable the features you’d like to use and move to the next step.
The UserFeedback plugin will now ask you to enter an email address where you can receive responses from users.
Simply enter your email address and click the ‘Next Step: Publish’ button.
In the final step, the plugin will install everything, including the UserFeedback widget, addons, and other integrations.
When that’s done, you can click the ‘Exit to dashboard’ button.
Once the plugin is set up, then you can head to UserFeedback » Settings from the WordPress dashboard.
After that, you’ll need to enter the license key and click the ‘Verify’ button. You can easily find the key in your account area.
From here, you’ll need to go UserFeedback Addons from the WordPress dashboard.
Next, you can install the ‘Additional Templates’ and ‘Question Types’ addons by clicking the ‘Install Addon’ button.
The Additional Templates addon will unlock 20+ survey form templates in the UserFeedback plugin. While the Question Types addon will add all question types for your feedback surveys.
Once the addons are installed, you can then activate them.
Let’s see how you can create one in UserFeedback.
Creating an NPS Survey Using UserFeedback
Next, you can create a new survey by going to UserFeedback » Surveys page and clicking the ‘Create New’ button.
From here, the plugin will show multiple survey templates to choose from.
Go ahead and choose the ‘NPS Survey’ template.
Next, the NPS survey will be created for you. The template will automatically add a question and rating scale for you.
However, you can edit the question type, and question title, and add a low score label.
You can scroll down and add more questions if you want to your NPS survey.
Simply click the ‘Add Question’ option and select the question type you’d like to add.
Next, you can switch to the ‘Settings’ tab at the top.
Here, you can make the question mandatory for users to respond to and enable a comment box.
Besides that, there is also an option to edit the thank you message that users will see when they submit the survey form.
You can change the text of the message. Once that’s done, simply click the ‘Next Step: Settings’ button.
After that, you can enable Google Analytics tracking if you have MonsterInsights installed.
It is the best Analytics plugin for WordPress and helps install Google Analytics in WordPress without editing code or hiring a developer. MonsterInsights also helps set up advanced tracking features like form conversion tracking.
UserFeedback also offers a Targeting addon that lets you select what type of devices and which pages the NPS survey will appear on.
For instance, you can show the survey on desktop, tablet, and mobile. Plus, the plugin will show it on all the pages by default. However, you can edit this and set up conditions on which the survey will appear.
If you scroll down, then you’ll see the Behavior section.
Here, you can set the display time for your NPS survey. For instance, there are options to show the survey after a delay, when a user is about to abandon a page, or when a user scrolls halfway through the page.
Besides that, you can also show the display length of your survey and configure a survey run time. The display length will let you decide how often the survey will appear to a user and run time helps you set how long the survey will appear on specific pages.
Lastly, you can scroll down and view the ‘Start Survey Minimized’ setting.
Enabling this will show a minimized version of the survey widget. Once you’re done, simply click the ‘Next Step: Notifications’ button.
In the next step, you’ll see notification settings for your NPS survey.
You can enter your email address to receive responses to the survey. The plugin also lets you set up conditional logic for receiving notifications.
When you’re done, simply click the ‘Next Step: Publish’ button.
You can change the Survey Status from Draft to Publish or schedule a specific time and date to publish the survey.
Don’t forget to click the ‘Save and Publish’ button.
That’s it! You can now visit your website to see the NPS survey in action. It will open as a popup in the bottom right corner.
If you liked this article, then please subscribe to our YouTube Channel for WordPress video tutorials. You can also find us on Twitter and Facebook.
Do you want to know how much revenue you’re generating from Google Ads on your website?
Setting up Google Ads conversion tracking will help you uncover insights about your ad campaign’s performance. You can find out which campaign is performing the best, how users interact with your ads, and how you can improve conversions.
In this article, we’ll show you how to properly set up eCommerce Google Ads conversion tracking in WordPress. This is the exact same method that we use on our own websites.
Why Set Up Google Ads Conversion Tracking in WordPress?
If you’re running Google Ads for your WordPress blog, eCommerce store, or membership site, then it is important to know how they’re performing. You can’t improve, what you can’t measure.
Tracking Google Ads conversions helps you see how much revenue you earned from users who clicked on your ad campaigns. It also helps you see which paid keywords and ad groups drive the most conversions. This way, you can optimize your campaigns and budget for more profitable search terms.
Besides that, Google Ads conversion tracking also uncovers how users behave on your WordPress site after clicking an ad. For instance, you might see a lot of users arrive on a landing page, but abandon it after adding products to the cart.
You can use this information to improve the checkout process, offer discounts and incentives as users are about to leave your site, and provide a better user experience.
That said, let’s see how you can add Google Ads conversion tracking in WordPress.
MonsterInsights offers an Ads addon that lets you setup comprehensive conversion tracking without touching a single line of code or hiring a developer.
We will use the MonsterInsights Pro license for this tutorial because it includes the Ads addon. There is also a MonsterInsights Lite version you can use for free.
First, you’ll need to install and activate the MonsterInsights plugin. If you need help, then please see our guide on how to install a WordPress plugin.
Upon activation, you will be redirected to the welcome screen in your WordPress dashboard. Go ahead and click the ‘Launch the Wizard’ button.
Next, you can follow the onscreen instructions to connect Google Analytics to your site. For more details, you can see our guide on how to install Google Analytics in WordPress.
With MonsterInsights, you can also use dual tracking to set up a Google Analytics 4 property. It is the latest analytics version and will soon replace Universal Analytics. You can learn more by following our guide on how to switch to Google Analytics 4 in WordPress.
Once you’ve connected Google Analytics with WordPress, the next step is to install the Ads addon. Simply go to Insights » Addons from your WordPress dashboard and navigate to the ‘Ads’ addon.
Go ahead and click the ‘Install’ button. The addon will now automatically install and activate on your site.
Creating a Conversion Action in Google Ads
Next, you’ll need to create a conversion action in Google Ads.
After that, go ahead and click the ‘Tools and settings’ option at the top. Under the ‘Measurement’ column, simply select the Conversions option.
On the next screen, you’ll need to create a conversion action.
You can click the ‘New conversion action’ button to get started.
Next, Google Ads will ask you to select the type of conversions you want to track. It will show you 4 options, including a website, app, phone call, or import.
For this tutorial, we’ll choose the ‘Website’ option for tracking ad conversions.
After that, you’ll need to enter the website URL where you’d like to measure conversions.
Once that’s done, simply click the ‘Scan’ button.
Google Ads will now show 2 options to create conversion actions, including an automatic and manual method. In the automatic method, you’ll need to select the conversion goal, choose a match type, and enter the URL. This way is suitable if you know which events to count as conversions.
However, we recommend selecting the manual method. Simply scroll down and click the ‘+ Add a conversion action manually’ option.
Next, you’ll need to enter the Conversion action details.
First, you can select the ‘Goal and action optimization’ for your conversion. This is the action you’d like to track. For example, when a user subscribes to your newsletter, makes a purchase, adds a product to a cart, submits a contact form, and more.
For the sake of this tutorial, we will select ‘Subscribe’ as the goal. After that, you can enter the Conversion name.
You can now scroll down and select a Value for your conversion. Google Ads lets you choose the same value for each conversion, assign different values for conversions, or don’t use a value for conversion action.
We will select the ‘Use the same for each conversion’ option, select the currency, and enter a value for this tutorial.
Besides that, you can also choose how many conversions to count per click.
If you’re tracking email newsletter signups, then we recommend selecting the ‘One’ option. This way, each subscriber is counted once. However, you can use the ‘Every’ option in an eCommerce store and count each purchase as a conversion.
After selecting these options, simply click the ‘Done’ button at the bottom.
You can now see your conversion action under the ‘Create conversion actions manually using code’ section.
Go ahead and click the ‘Save and continue’ button to get instructions for adding the tracking tags for conversion action to your site.
On the next screen, you’ll see 3 options to add the conversion action to your site.
Simply select the ‘Use Google Tag Manager’ option. You should see the Conversion ID and Conversion Label. Copy these to a notepad file or keep the browser window/tab open.
To finish the setup process, you’ll need to head to your WordPress website dashboard and view the MonsterInsights settings.
From here, go to Insights » Settings and click on the ‘Publisher’ tab.
After that, you can scroll down to the ‘Ads Tracking’ section.
Go ahead and enter the Conversion ID. Make sure you follow the format, which will look like this: AW-123456789.
That’s it. You’ve successfully set up Google Ads conversion tracking on your WordPress website.
View Google Ads Conversion Tracking Data in Google Analytics
You can take it a step further and connect Google Ads with Google Analytics to get more insights about how people use your website after clicking on an ad.
For instance, you can see the number of visitors from paid search and find out which pages they view after landing on your site. You can also use different filters and create custom reports in Google Analytics.
Let’s see how you can link your Google Ads account with Google Analytics 4 and Universal Analytics.
Connect Google Ads with Google Analytics 4
First, you’ll need to log in to your GA4 account and then go to the ‘Admin’ settings.
After that, you can click the ‘Google Ads Links’ option.
It is located under the Property column.
A new window will now slide in from the right.
Go ahead and click the ‘Link’ button in the top right corner.
Next, you will see different options for Link setup.
First, you can click the ‘Choose Google Ads accounts’ option.
On the next screen, you’ll need to select the Google Ads account you wish to connect.
Once that’s done, simply click the ‘Confirm’ button at the top.
You will now see the Google Ads account that you want to link.
Go ahead and click the ‘Next’ button.
In the next step, Google Analytics will give you options to enable personalized advertising and enable auto-tagging.
You can use the default settings and click the ‘Next’ button.
After that, you’ll see a summary of your Link setup settings.
If everything checks out, then go ahead and click the ‘Submit’ button.
You should now see a ‘Link Created’ notification in front of your Google Ads account. This means that you’ve successfully connected Google Ads with Google Analytics.
Do note that it can take up to 24 hours for your Google Ads data to appear in Analytics reports.
Next, you can view the Google Ads conversion tracking report in Google Analytics 4.
First, you can head to Acquisition » Traffic acquisition from the menu on your left and scroll down to see how many visitors came from the Paid Search channel.
After that, you can go to Acquisition » Acquisition overview and view the Session Google Ads campaign report. This will show which campaign got the most traffic.
You can also click the ‘View Google Ads campaigns’ option at the bottom to view more details.
For each campaign, you can see the total number of users, sessions, number of Google Ads clicks, cost per click (CPC), conversions, and more.
Using the information from this report, you can see which campaigns perform the best.
Connect Google Ads with Universal Analytics
If you’re using Universal Analytics, then you can first log in to your account.
After that, head to the ‘Admin’ settings.
Next, you’ll need to go to the Google Ads Links option.
You can find the option under the Property column.
On the next screen, you’ll need to select the Google Ads account you want to connect.
After selecting your account, simply click the ‘Continue’ button.
Next, you will need to enter a Link group title.
You can then select the Views to link with your Google Ads account. Simply click the toggle to ON for the correct Views.
Once that’s done, simply click the ‘Link accounts’ button.
Google Analytics will now show a summary of your settings. Simply scroll down and click the ‘Done’ button.
That’s it. Your Google Ads account will now be linked to the Universal Analytics property.
To view data from your ad campaigns, head to Acquisition » Google Ads » Campaigns from the menu on your left. You can see the number of clicks, cost, CPC, and more for each campaign.
Final Thoughts on Google Ads Conversion Tracking in WordPress
When it comes to setting up any conversion tracking, the most important thing you want to make sure is that the setup is done properly. This is why we use and recommend MonsterInsights because it just does everything for you behind the scenes without touching any code.
However if you prefer to add code directly on your WordPress site, then you can do that as well by using a plugin like WPCode. This will help future-proof your customizations. There’s a free version of WPCode that you can use by following our tutorial on adding custom code in WordPress.
If you liked this article, then please subscribe to our YouTube Channel for WordPress video tutorials. You can also find us on Twitter and Facebook.
There are several popular analytics plugins for WordPress, including:
1. Google Analytics for WordPress: This plugin allows you to easily add your Google Analytics tracking code to your website and view important stats within your WordPress dashboard.
2. MonsterInsights: This plugin is a popular choice for adding Google Analytics to your website, and it also includes additional features like ecommerce tracking, event tracking, and custom dimension tracking.
3. Jetpack: This plugin includes a variety of features, including analytics and website stats, which can be accessed via the WordPress dashboard.
4. WP-Statistics: This plugin provides detailed website analytics and statistics, including page views, visitors, and search engine referrals.
5. Matomo: This is an open-source analytics platform that you can host on your own server, and then use the plugin to integrate it with your WordPress site.
These are just a few options, and the best one for you will depend on your specific needs and preferences. It’s worth trying out a few different ones to see which one works best for you.
Do you want to track conversions on your WooCommerce store?
Conversion tracking helps you understand what’s working on your online store and what needs more attention. It helps you keep track of your best-performing products while also allowing you to see what’s stopping customers from completing a purchase.
In this guide, we’ll show you how to easily set up WooCommerce conversion tracking, step by step.
Why Set up WooCommerce Conversion Tracking?
WooCommerce makes it easy to sell anything online. However, once you have set up your WooCommerce store, you will need to learn what works on your website to grow your business.
You will need to learn which products are popular among your users, what they are viewing the most, how many users end up making a purchase, how they are finding your website, and more.
To get all this information, you need to set up conversion tracking on your online store. This helps you get access to insights you need to make informed decisions about growing your business.
Conversion tracking helps you unlock key performance indicators including your eCommerce conversion rate, average order value, shopping cart abandonment, cost per acquisition, top referral sources, and more.
Apart from that you also get to learn about:
Shopping behavior – It tells you what products users are adding to carts, which products are being abandoned, what pages lead users to a successful purchase, and more.
Checkout behavior – Helps you view how users successfully complete a checkout.
Product performance – Tells you which products are bringing you the most sales.
Product list performance – This allows you to group products and see their performance as a list. This comes in handy when you want to see how different product categories are doing in your online store.
That being said, let’s take a look at how to unlock all this useful information by setting up conversion tracking on your store.
Setting Up WooCommerce Conversion Tracking in WordPress
The easiest way to track WooCommerce conversions is by using MonsterInsights.
It is the best Google Analytics plugin for WordPress and comes with an eCommerce addon that literally enables all the tracking within a few clicks.
The challenge is that setting up Google Analytics with WooCommerce requires a lot of custom coding, event tracking, and more.
The good news is that MonsterInsights makes it super easy to set up eCommerce tracking, and you can do it without writing any code. It works seamlessly with WooCommerce and supports other popular eCommerce plugins.
For this tutorial, we’ll use the MonsterInsights Pro version because it includes the eCommerce addon, advanced tracking features, and eCommerce dashboard report. There is also a MonsterInsights Lite version you can use to get started for free.
First, you will need to install and activate the MonsterInsights plugin. If you need help, then please see our guide on how to install a WordPress plugin.
Upon activation, you can see the MonsterInsights welcome screen in your WordPress admin area. Simply click the ‘Launch the Wizard’ button.
Next, you can follow the onscreen instructions in the setup wizard to configure Google Analytics with your website. See our guide on how to install Google Analytics in WordPress for complete installation instructions.
With MonsterInsights, you can also set up dual tracking and set up a Google Analytics 4 (GA4) property. GA4 is the latest version of Google Analytics, and it will replace Universal Analytics on July 1, 2023.
After this date, you won’t be able to track your online store’s data in Google Analytics and will have to start from scratch. However, dual tracking lets you send data to GA4 and Universal Analytics at the same time.
This way, you will have historical data in your GA4 property when the time comes to completely switch to the new version. For more details, please see our guide on how to switch to Google Analytics 4 in WordPress.
Once you have installed Google Analytics using MonsterInsights, you can move on to installing the MonsterInsights eCommerce addon.
First, you need to visit the Insights » Addons page from your WordPress dashboard and navigate to the ‘eCommerce’ addon.
Go ahead and click the ‘Install’ button. The addon will now install and activate on your site. You should see the ‘Status’ change from ‘Not Installed’ to ‘Active.’
Next, you’ll need to enable enhanced eCommerce in Google Analytics.
Enable Enhanced Ecommerce in Google Analytics
First, you need to go to your Google Analytics account and select your website.
From here, you need to click on the Admin button located at the bottom left corner of the screen.
Next, you need to click on the ‘Ecommerce settings’ option.
It is located under the ‘View’ column.
After that, you need to turn on the toggles for ‘Enable Ecommerce’ and ‘Enable Enhanced Ecommerce Reporting’ options.
Google Analytics will now turn on the eCommerce reporting feature for your account.
Next, you can go back to your WordPress dashboard and head over to the Insights » Settings page.
From here, switch to the eCommerce tab and make sure to turn on the ‘Use Enhanced eCommerce’ option.
MonsterInsights will automatically detect your eCommerce software. Currently, it supports WooCommerce, Easy Digital Downloads, LifterLMS, and MemberPress.
That’s all, you have successfully set up WooCommerce conversion tracking on your online store.
Viewing WooCommerce Conversion Reports
Now that you have set up conversion tracking on your WooCommerce store, you need to give Google Analytics some time to collect data.
After a while, you will be able to view your eCommerce reports in both MonsterInsights and Google Analytics.
Let’s start with your eCommerce reports in MonsterInsights.
eCommerce Reporting in MonsterInsights
Log in to your WordPress site and go to the Insights » Reports page and switch to the eCommerce tab.
At the top, you’ll get your most important conversion metrics including the conversion rate, transactions, revenue, and average order value.
Below that you will see a list of your top products with quantity, sale percentage, and total revenue.
Next, you’ll see your top conversion sources. You can use this report to attract more customers and offer exclusive discounts for customers from specific sources.
That’s not all the data. You can dig deeper with more advanced reports under your Google Analytics account.
WooCommerce Tracking in Universal Analytics
Google Analytics provides even more in-depth reporting for your WooCommerce store.
Simply visit your Universal Analytics dashboard and click on Conversions » Ecommerce from the left column.
First, the overview report will provide you with important numbers such as revenue, conversion rate, transactions, and average order value.
You can then switch to different reports for more in-depth analysis. For example, the ‘Shopping Behavior’ report will break down user sessions to add to cart, cart abandonment, and sessions that resulted in the checkout.
WooCommerce Tracking in Google Analytics 4
To view your WooCommerce reports in Google Analytics 4, you can go to Reports » Monetization » Ecommerce purchases.
In the report, you’ll see different metrics like total items viewed, add to carts, eCommerce purchases, and more for each product.
Boost Your WooCommerce Conversions and Increase Sales
Now that you have the data you need to track your WooCommerce conversions, let’s take a look at how to improve your conversion rates and make more sales.
1. Improve Speed and Performance
According to a StrangeLoop case study, a 1 second delay in page load time can lead to a 7% loss in conversions, 11% fewer page views, and a 16% decrease in customer satisfaction.
Slower websites create a bad user experience which results in lower conversion rates. See our complete step-by-step guide to improve your WooCommerce speed and performance.
2. Recover Abandoned Cart Sales
On average 60 – 80% of people who “add to cart” do not end up buying. This means if you have an online store, then you’re losing out on a lot of sales.
Luckily, there are several best practices that help you recover some of those abandoned cart sales. See our tips on how to recover abandoned cart sales and increase your conversions.
3. Provide Users with Alternatives
If users decide to leave your website without making a purchase, then there is very little chance that they will ever see your website again.
You need to provide users a chance to stay in touch even if they don’t end up making a purchase.
If you liked this article, then please subscribe to our YouTube Channel for WordPress video tutorials. You can also find us on Twitter and Facebook.