Do you want to display different sidebars for certain posts and pages on your WordPress site?
A lot of the time, you will want to show the same sidebar across your entire website or blog. However, sometimes you may need to show different sidebar content on some of your posts and pages.
In this article, we will show you how to create and display different sidebars for each post and page in WordPress.
When Would You Need Different Sidebars in WordPress?
Many WordPress themes have a sidebar where you can add useful widgets and content. For example, many sites add a search bar to the sidebar or show a list of recent posts.
If your WordPress theme has a sidebar, then by default, it will look the same on all your posts, pages, categories, and archive pages.
However, you may want to display different sidebar widgets on certain posts and pages.
For example, you might show different content in the sidebar of your most popular posts or display ads that are more relevant to a particular page.
Having said that, let’s see how to create and display a different sidebar for each post and page in WordPress. Simply use the quick links below to jump straight to the method you want to use:
Method 1: Displaying Different Sidebars for Each Post and Page in WordPress (Easy)
If your theme supports sidebar widgets, then you can easily create multiple sidebars using Lightweight Sidebar Manager. This plugin lets you build as many custom sidebars as you want and then assign them to different posts and pages. You can also add them to custom post types or assign a sidebar to all the pages or posts that have a specific category.
The first thing you need to do is install and activate the Lightweight Sidebar Manager plugin. For more details, see our step-by-step guide on how to install a WordPress plugin.
Upon activation, you need to go to Appearance » Sidebars. To create the first sidebar, click on the ‘Add New’ button.
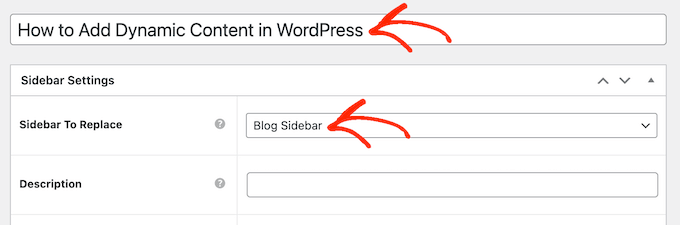
You can now type in a title for the sidebar. This is just for your reference, so you can use anything you want.
With that done, open the ‘Sidebar To Replace’ dropdown menu and choose the location where you want to show the sidebar. The options you see may vary depending on your WordPress theme.
Now, you can control where the sidebar appears by creating inclusion or exclusion rules.
To create an inclusion rule, just open the ‘Display On’ dropdown and choose the pages, posts, custom post types, or categories where you want to use the sidebar.
For example, you might add the sidebar to a specific page, such as your 404 error page or the author archive.
Another option is using the sidebar for a particular page, post, or category by selecting ‘Specific Pages/Posts/Taxonomies.’
This adds a box where you can type in the page, post, or category.
To create more inclusion rules, simply click on the ‘Add Display’ Rule button.
This adds a section where you can create the new inclusion rule.
If you prefer, then you can create exclusion rules instead. For example, you may want to show the sidebar on every page except the homepage.
You can also combine inclusion and exclusion rules to control exactly where the sidebar appears on your WordPress website.
To create an exclusion rule, just click on the ‘Add Exclusion Rule’ button.
In the new ‘Do Not Display On’ section, open the dropdown menu and select the page or post that shouldn’t use this sidebar.
You can also exclude the sidebar from pages that have a specific category by following the same process described above.
After deciding where the sidebar will appear on your WordPress blog, you may want to show different content to different users.
For example, if you have a membership site, then you might use a different sidebar for visitors compared to logged-in members.
To do this, open the ‘User’ dropdown and choose a role from the dropdown menu. Now, only people with this specific user role will see the sidebar.
Finally, you may want to type in an optional description. This will only appear in the WordPress dashboard, so it’s a good way to share information with other admins or users on a multi-author WordPress blog.
If you are going to create lots of sidebars, then you can also use this field to leave yourself notes and helpful reminders.
When you are happy with the information you have entered, simply click on ‘Publish.’
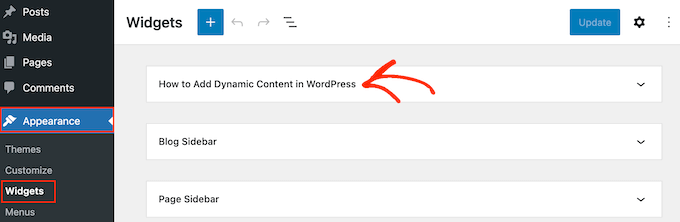
With that done, go to Appearance » Widgets. You will now see all the widget-ready areas that your theme supports by default, plus the new sidebar you created in the previous step.
You can now go ahead and add widgets to the sidebar, just like any other widget-ready area.
SeedProd is the best landing page builder plugin for WordPress. With this plugin, you can create any type of custom page without writing any code. It also has dozens of professional site kits and templates that you can easily edit and fine-tune using the drag-and-drop builder.
When designing a custom page, you can choose a layout that has a sidebar.
You then simply find the blocks you want to show in that sidebar and add them using drag and drop.
SeedProd has all the blocks and features you’d expect from a powerful page builder, such as optin forms, social profiles, countdown timers, contact forms, buttons, various content blocks, and more. This makes it easy to create powerful and unique sidebars for your WordPress blog.
If you liked this article, then please subscribe to our YouTube Channel for WordPress video tutorials. You can also find us on Twitter and Facebook.
Are you trying to understand what WordPress layout terms mean?
Many beginners come across WordPress layout terms and vocabulary when working on their websites. These are words used by designers and developers, and average users may find them confusing.
In this guide, we will explain some of the most commonly used WordPress layout terms. This will help you understand the lingo used for WordPress website layouts and work on your website like a total pro.
Why Learn WordPress Layout Terms?
WordPress themes control the appearance of your website. Depending on which theme you are using, you can customize it in multiple ways.
For themes that support the full site editor, you can customize them by visiting the Appearance » Editor page.
If you use a classic theme (a theme that doesn’t currently support the full site editor), then you can customize it by visiting the Appearance » Customize page.
This will launch the theme customizer, which looks like this:
All top WordPress themes have options to modify your website design using the theme customizer or the full site editor, but your options are limited depending on the theme.
SeedProd allows you to easily create custom layouts using simple drag-and-drop tools without writing any code.
It also has dozens of templates you can use as starting points. Plus, SeedProd supports WooCommerce, which also helps you create layouts for your online store.
However, as you work on creating a layout for your website, you might come across web design terms that you may not be familiar with.
Learning these website layout terms will help you to understand the building blocks of WordPress website design so you can more easily create any design you can imagine.
Let’s demystify these common WordPress layout terms to learn what they mean and how to use them. Here is a quick list of the concepts and terms we will explain in this article:
Most websites use a very familiar layout. It looks something like this:
The top area of a website is called the header, followed by a content area, and then a footer at the bottom of the page.
Depending on which page a user views, the layout might differ.
For instance, a WordPress blog page may include a sidebar next to the content area.
This basic layout is filled with other elements, which we will discuss later in this article.
Let’s first talk about each of these main sections in more detail.
Header in WordPress Layout
The header in a WordPress layout is the top section of any page. It usually contains your website logo, title, navigation menus, a search form, and other important elements you want users to see first.
Here is how the header section looks on WPBeginner.
Custom Header in WordPress Themes
Many popular WordPress themes come with additional features to customize the header area of your WordPress layout. This feature is sometimes called a custom header.
If you use a theme with site editor support, then you can change the header by clicking on the header area in the site editor.
From here, you can customize the header to your liking. You can change colors, the navigation menu, and add blocks like search, site logo, buttons, and more.
For classic themes, you can find the custom header settings in the ‘Header Options’ tab.
Depending on your WordPress theme, you may be able to add a full-width image to the header with a tagline or a call-to-action button.
Some WordPress themes may allow you to change the logo’s position, navigation menus, and header images.
Custom Background in WordPress
Some WordPress themes also allow you to easily change the background color or use a background image for your website.
If you use a theme with site editor support, then you can change the background color by going to ‘Styles’ in the full site editor.
Simply choose the ‘Colors’ option from the Styles panel.
After that, you can click on ‘Background’ to pick a background color for your website.
For classic themes, the settings will depend on your theme features.
Many classic themes come with custom background support. You can find these settings in the ‘Colors’ or ‘Background Image’ options in the theme customizer.
Often, these options are buried inside other tabs, and you will have to look around to find them.
The content area comes right after the header part of a layout. This is where the main content of the page is displayed.
For a custom homepage layout, the content section may include a call to action followed by services or products, testimonials, and other important information.
Online stores typically use this area to promote ongoing sales, featured products, best-selling items, and more.
A WordPress blog may use a content-heavy layout with excerpts and images from recent articles, a newsletter sign-up form, and more.
Here is how WPBeginner’s homepage layout looks. It is a content-rich website, so the recent articles take up the whole content area.
By default, WordPress uses a blog layout showing your most recent blog posts as the front page of your website.
However, you can change that setting and use any page as the front page of your website.
Just go to the Settings » Reading page and choose ‘A static page’ under the ‘Your homepage displays’ option.
After that, you can choose a page you want to use for your homepage and another for your blog page.
As the name suggests, sidebars typically appear on the content area’s right or left side.
In WordPress, sidebars are also widget-ready areas. This means that you can add widgets to this area and display elements like archives, newsletter sign-up forms, categories, popular content, and more.
To edit your sidebars, you need to go to the Appearance » Widgets page. From here, you can add blocks to your sidebars and edit them to your liking.
However, not all WordPress themes come with widget-ready areas or sidebars.
If you cannot see a Widgets menu under Appearance, then your theme doesn’t support sidebars or have any widget-ready areas.
Footer Area in WordPress Layouts
The footer area appears below the content area at the bottom of a page layout.
If you use a WordPress theme with site editor support, then you can edit the footer area by clicking on it.
You can also edit the footer area by clicking on ‘Patterns’ in the site editor navigation. The footer area will appear under the ‘Template Parts’ menu item.
While editing the footer area in the site editor, you can add any blocks to display different elements.
For instance, you can add a list of your most important pages, show a navigation menu, add a contact form, and more.
If you are using a classic theme, then there is a good chance that your theme comes with a footer widget area.
Simply go to the Appearance » Widgets page and look for a footer widget area.
Like the site editor, you can use blocks to add different elements to footer widgets in your theme.
Next, we will look at some of the components of a WordPress layout that you can add to your header, content, sidebar, or footer sections. These are the building blocks that help you make a functioning layout.
Navigation Menus in WordPress
Navigation menus or menus are horizontal or vertical lists of links. Most websites have at least one primary navigation menu in the header area.
However, some websites use multiple navigation menus in the header area.
WordPress also allows you to display navigation menus as a widget. These menus appear as a vertical list of links, and you can place them in sidebars or the footer widget areas.
If your WordPress theme supports widgets, then you can use them to rearrange your website layout. Plus, with block widgets, your theme can now also use blocks in the widget areas.
You can add widgets to your WordPress website’s widget-ready areas or sidebars. Some WordPress themes come with multiple widget-ready areas to add widgets or blocks.
WordPress comes with several built-in widgets and blocks that you can use. Many popular WordPress plugins also provide their own widgets and blocks.
For example, you can use widgets/blocks to add popular post lists, a contact form, banner ads, social media feeds, and more.
You can see all these widgets by visiting the Appearance » Widgets page in the WordPress admin area.
Note: You may not see the ‘Widgets’ page in the WordPress admin area if your theme has no widget areas.
WordPress uses the block editor to write content, manage widget areas, or edit your website. It uses blocks for all common web elements, which is why it’s called the block editor.
This editor is designed to help you create beautiful layouts for your WordPress posts and pages using blocks.
There are different types of blocks for the most common elements of any type of content. For instance, you can add paragraphs, headings, images, galleries, video embeds, columns, tables, and more.
This allows you to create different layouts for each post or page on your WordPress website without installing a plugin or changing your theme.
Featured Images in WordPress Layouts
If you visit the homepage of WPBeginner, you will notice thumbnail images next to each article title. These are called featured images.
WordPress allows you to set featured images for your posts and pages. Your WordPress theme then uses these images in different areas of your website.
Patterns are collections of pre-arranged blocks that you can use to quickly add different sections to your layouts.
You can use patterns for writing content and editing posts and pages.
Similarly, you can use patterns in the full site editor in your WordPress theme and website layout.
Simply launch the site editor, and you will see patterns in the ‘Design’ options.
Each pattern is a collection of blocks arranged in a particular order for commonly used layouts.
Your WordPress theme may come with several patterns. You can also find more patterns in the WordPress Patterns Library.
Want to save your design sections? You save your own block arrangements as patterns and reuse them later.
It is a relatively new feature, so a limited set of patterns is available. However, more options will become available as more WordPress themes and plugins add their patterns to the block editor.
Buttons play an important role in modern website design and layouts. They provide users with a clear call to action, which helps you grow your business and conversions.
The default block editor comes with a Button block that you can use in any WordPress post or page or inside the site editor.
Your WordPress theme may also come with a call to action button settings in the theme customizer. Most popular WordPress page builder plugins also come with buttons in various styles that you can use.
CSS is the styling language used to create websites. Your WordPress theme and plugins come with their own CSS rules, but from time to time, you may want to change small things like text color, font size, or background color.
This is where custom CSS comes in. WordPress makes it easier for you to save your own custom CSS rules.
If you use a theme with the site editor support, then just go to the Appearance » Editor page to launch the site editor.
Click on any template to start editing, and then click on the ‘Style’ button in the top-right corner of the screen.
This will show the ‘Styles’ panel in the right column. From here, scroll down and click on the ‘Additional CSS’ tab.
This will show a text box where you can add your additional CSS code.
Don’t forget to click on the ‘Save’ button to store your changes when you are finished.
If you are using a classic WordPress theme, then you can add your custom CSS in the theme customizer.
Simply go to the Appearance » Customize page and then click on the ‘Additional CSS’ tab.
From here, you can add your custom CSS rules, and you will be able to see them applied in the live preview.
Adding Custom CSS in WordPress Using a Plugin
Normally, if you use the default methods, then your custom CSS code is saved with your theme settings. Changing your theme will disable your custom CSS code.
A better way to store your custom CSS in WordPress is by using the WPCode plugin. It is the best WordPress code snippet plugin that allows you to easily add custom code snippets without breaking your site.
Upon activation, go to the Code Snippets » + Add New from the WordPress admin dashboard.
Then, hover over the ‘Add Your Custom Code (New Snippet)’ option in the code snippets library and click the ‘Use snippet’ button.
Next, at the top of the page, add a title for your custom CSS snippet. This can be anything that helps you identify the code.
After that, write or paste your custom CSS into the ‘Code Preview’ box and set the ‘Code Type’ by choosing the ‘CSS Snippet’ option from the dropdown menu.
Then, scroll down to the ‘Insertion’ section and select the ‘Auto-Insert’ method if you want to execute the code across your entire WordPress website.
You can choose the’ Shortcode’ method if you only want to execute the code on specific pages or posts.
Finally, go back to the top of the page, toggle the switch to ‘Active’, and then click on the ‘Save Snippet’ button.
The easiest way to build custom WordPress layouts for your landing pages is by using a WordPress page builder.
We recommend using SeedProd. It is the most beginner-friendly WordPress page builder plugin on the market.
Other page builders use similar terms for common tools and features.
Using Templates in WordPress Page Builders
Templates are the quickest way to create a web page layout. All popular page builder plugins come with a bunch of ready-to-use templates that you can use as a starting point.
For instance, SeedProd has templates for different types of pages that you may need, including landing pages, sales pages, 404 pages, coming soon pages, and more.
Modules and Blocks in WordPress Page Builders
Like the blocks in the default WordPress editor, page builder plugins also use blocks.
Some page builders may call them modules or elements, but they are essentially the same thing.
However, page builder plugins come with more blocks than the default editor. For instance, SeedProd includes blocks for testimonials, WooCommerce blocks, Google Maps, contact forms, Facebook embeds, and more.
You can use blocks to create your own layouts, move them around, and play around to figure out what works best for your business.
Using Sections in Your WordPress Layouts
Similar to the ‘Patterns’ feature in the default editor, a Section is a set of blocks grouped to instantly create common areas of a website.
For instance, you can typically use a header section, hero image, pricing tables, and more.
Different WordPress page builder plugins may use different terms for them. For instance, in SeedProd, they are called sections, and Beaver Builder calls them saved rows and columns.
If you liked this article, then please subscribe to our YouTube Channel for WordPress video tutorials. You can also find us on Twitter and Facebook.
Are you looking to improve the customer experience in your online store?
When you take time to understand your customers’ needs, you can improve their journey from first discovering your site to making a purchase. By optimizing the WooCommerce customer journey, you can increase conversion rates, improve customer satisfaction, and boost profits.
In this article, we will show you how to optimize the customer journey for your WooCommerce store, from beginning to end.
What Is a WooCommerce Customer Journey?
‘Customer journey’ refers to a customer’s entire experience when they visit your WooCommerce store, including all of their interactions with your brand.
Optimizing the customer journey involves understanding each stage and ensuring that the customer has a seamless and enjoyable experience throughout.
These are the five stages of the WooCommerce customer journey:
Awareness stage: Make it easier for potential customers to find your online store and learn more about your business.
Consideration stage: Make it easier for your customers to find and learn about the products they need.
Decision stage: Optimize your checkout to encourage your customers to make a purchase.
Service stage: Improve your after-sales communications, express your appreciation for the sale, and better support your customers.
Loyalty stage: Build long-term relationships with customers through excellent customer service, personalized recommendations, and loyalty rewards.
In short, you should simply look at your online store from your customer’s point of view and then make it awesome.
How to Optimize the Customer Journey for Your WooCommerce Store (12 Tips)
With that being said, let’s take a look at how to optimize the customer journey for your WooCommerce store.
We will share actionable tips on how you can improve the customer journey at each stage. You can use the quick links below to jump to the different parts of our tutorial:
Here are some tips for optimizing the WooCommerce customer journey during the awareness stage.
1. Understand How Your Customers Find You
The first thing you need is to see the journeys your users take before they make a purchase in your online store. This is where customer tracking can help.
The best way to set up WooCommerce customer tracking in Google Analytics is using MonsterInsights. It is the best analytics solution for WordPress and has a User Journey addon that can help you plan how to improve the user journey in your online store.
After that, you can see the path each customer took before buying your product. You get to view the pages they visited, where they clicked, and how much time they spent on a page.
This is really useful information to better understand your customers. You can see which product categories are performing the best and where customers are leaving your store during the purchase process.
It’s important to do search engine optimization (SEO) for your online store so that it ranks higher on search engine results pages (SERPs). This will make it easier for potential customers to find you when searching for products and solutions that you offer.
Improving SEO involves writing SEO-friendly product titles and descriptions, using product categories and tags, adding alt text to product images, and much more.
We recommend using All in One SEO because it’s the best WordPress SEO plugin on the market and is used by over 3 million websites. It will help you to optimize your entire store for SEO and get found by more customers.
Here are some tips for optimizing the customer journey in your WooCommerce store during the awareness stage.
3. Design an Eye-Catching Product Page
When a visitor clicks on a link to your website on Google or Facebook, you want to give a good first impression. You can do that by creating product pages and landing pages that are optimized for sales.
This is where SeedProd comes in. It is the best WordPress page builder on the market that allows you to easily create landing pages, sales pages, product pages, and even completely custom WordPress themes.
SeedProd comes with dozens of ready-made templates that are already optimized for higher conversions. Plus, it has an intuitive drag-and-drop interface that you can use to customize your landing pages.
SeedProd also includes a WooCommerce integration that allows you to add eCommerce elements to any page.
For example, you can display featured products that you want to upsell, product grids, add-to-cart buttons, and more.
You can also customize your WooCommerce product search results to help your customers find what they are looking for quickly and easily.
By default, WordPress and WooCommerce have a limited search function. That’s a problem because if your customers can’t find what they are looking for, then they may not come back to your online store.
We recommend using the SearchWP plugin. It’s the best custom search plugin for WordPress and is used by over 30,000 websites.
5. Keep Your Visitors Coming Back With Push Notifications
Push notifications are automated messages that show up in your customers’ browsers even after they have left your WooCommerce store.
You can use drip campaigns with multiple push notifications over time to promote products, build a relationship with your customers, increase sales, and get visitors to return to your store.
The easiest way to set up automated push notifications is with PushEngage. It’s the best web push notification software, and it is used to send over 15 billion push messages every month.
Customer reviews are a powerful form of social proof that can make your business seem more trustworthy and encourage people to buy from your online store.
But collecting, managing, and formatting customer reviews takes a lot of time and effort. That’s why we recommend using a customer review plugin to add different types of reviews to WordPress.
Smash Balloon Reviews Feed Pro allows you to show reviews from Yelp, Facebook, Google, and TripAdvisor. That way, you don’t need to install any extra plugins.
Next, you will want to help customers get through your checkout and buy your products. Here are our tips for optimizing the WooCommerce customer journey during the decision stage.
7. Improve Your Checkout
You can easily personalize the purchase experience in your WooCommerce store using FunnelKit, a WordPress sales funnel builder and optimization plugin.
For example, it comes with a One-click Upsells feature, which allows users to add products to their carts on their way to the checkout.
You can also add one-click order bumps to your checkout for increased conversions.
FunnelKit lets you customize the user journey with pre-checkout offers, custom checkout form layouts, beautiful templates, and more.
On average, 60 to 80% of people who add items to their cart don’t actually buy the products. This means that if you have an online store, then you are losing out on a lot of sales.
Often when a customer has added a product to their shopping cart, they will need some reassurance that they are making the right decision. This often leads to cart abandonment.
It allows you to create beautiful popups, countdown timers, slide-in forms, and more to nudge users in the right direction.
For example, OptinMonster can tell when a customer is about to leave your website and display a popup offering free shipping or a discount before they do.
You can learn how to grab your customers’ attention with targeted messages at just the right time in our guide on how to create a WooCommerce popup.
Provide Great Customer Service
After customers have bought items from your WooCommerce store, you will want to give them great customer service to keep them coming back. Here are some tips for optimizing the service stage of the customer journey.
9. Follow Up With Your Customers
When running a WooCommerce store, your customers will receive different transactional emails. These emails help them get order confirmations, track their order statuses, get invoices, learn about how to return a product, and find more information about your online store.
By default, the design and layout of emails sent by WooCommerce are plain and generic. When you customize these emails, it helps to build trust with your customers, boost brand awareness, and get them to return to your store.
It includes a growing library of pre-built WooCommerce email templates that are proven to get results. And you can use the visual email automation builder to make any changes that you need.
What makes FunnelKit Automations really powerful is the custom goals-driven email automation builder. It shows you in-line analytics for each email.
For example, here is a screenshot of a workflow for sending out a thank you email after a customer’s first order.
As your online store grows, it’s important to provide good customer service. This leads to repeat sales, which means more profits for your business in the long run.
One way to do that is to add live chat to your website. This will let you interact with the people who visit your website, answer their questions, and solve their problems in real time. This can get you more sales and encourage existing customers to stay loyal to your brand.
The easiest way to add a live chat feature to your website is by using LiveChat Inc. It is one of the best live chat solutions for WordPress, and we use it on our own OptinMonster site.
The LiveChat WordPress plugin is free, although you will need to buy a paid subscription to the LiveChat service.
Another option is to automate live chat by using Chatbot.com, the best AI chatbot software for WordPress. You don’t need to do any coding or have any special technical skills to use it.
Finally, it’s important to turn your users into long-term and happy customers. Here are a few ways to optimize the WooCommerce customer journey for the loyalty stage.
11. Reward Loyal Customers
Creating a loyalty program can keep customers coming back to your online store and keep them away from your competitors. It can also be a great way to reward your best customers and make them feel valued.
You can give customers points for buying products and services, but also for creating an account, placing their first order, signing up for your email newsletter, and spending over a certain account.
It’s super easy to create a WooCommerce loyalty program using the Loyalty Program for WooCommerce plugin. It allows you to set up a loyalty program in just minutes and reward customers for buying products, leaving customer reviews, and more.
Adding gamification so that your customers are rewarded after they take certain actions on your website, like leaving a product review, posting a comment, or buying a product.
12. Automate Your Store and Focus on Your Customers
There’s a lot to keep track of when running an online store. Luckily, you can automate tasks to save time and money so you can focus on your customers while growing your business.
For example, you can use automation tools and plugins to send SMS messages to your customers, automate your payment processes, use social proof to increase conversions, automatically display your best product reviews, and much more.
If you liked this article, then please subscribe to our YouTube Channel for WordPress video tutorials. You can also find us on Twitter and Facebook.
If you are one of the many beginners who want to customize your WordPress site design without touching CSS, then you are in luck.
The CSS Hero plugin for WordPress allows you to customize the design without touching a single line of code.
In this updated CSS Hero review, we will show you how to use CSS Hero to customize your website and why we believe it’s one of the plugins every WordPress beginner should try.
Our CSS Hero Review
CSS Hero is a premium WordPress plugin that allows you to design your own WordPress theme without writing a single line of code (no HTML or CSS required).
You can undo changes quickly, which is extremely helpful for beginners. All changes are saved as an additional stylesheet, so you can update your WordPress theme without worrying about losing the changes.
If you are a designer or developer, then you will find CSS Hero equally as good. It works well with all popular WordPress themes and frameworks. You can quickly change a theme or child theme and export it to a client’s website.
CSS Hero can save you time and frustration when making design customizations.
CSS Hero vs. WordPress Page Builders
CSS Hero is a design tool and not an ideal solution for creating landing pages or making a custom WordPress theme from scratch. It works along with your WordPress theme and allows you to customize CSS without writing CSS code.
On the other hand, a WordPress page builder plugin allows you to create landing pages and customize your WordPress layout regardless of which WordPress theme you are using.
Pro Tip: If you want to make landing pages, sales pages, product pages, and more, then we recommend using SeedProd. It is the best WordPress page builder plugin, allowing you to quickly design high-converting and beautiful pages for your website.
How to Use CSS Hero to Customize Your WordPress Theme
It is a premium WordPress plugin with pricing starting from $29 for a single site (totally worth the investment, considering the time and hassle it will save you).
You can use the CSS Hero coupon code: WPBEGINNER to get a special discount of 34% Off. If you are buying the PRO plan, then the same code will get you a whopping 40% discount.
You will be redirected to get your CSS Hero License key upon activation. Simply follow the on-screen instructions, and you will be redirected back to your site in a few clicks.
CSS Hero aims to provide you with a WYSIWYG (what you see is what you get) interface for editing your theme.
Simply visit your WordPress website while logged in, and you will notice the CSS Hero button in the WordPress admin bar.
Clicking on the button will convert your site into a live preview.
You will now be able to see the CSS Hero editor. It has a top and bottom toolbar, a left column, and a live preview of your website.
Next, take your mouse over to an element that you want to edit, and CSS Hero will highlight it to indicate where you are.
Clicking on it will select that element and show its properties in the left column.
These will include common CSS properties for the selected element, like the background, typography, borders, spacing, and more.
You can click on any item to expand it and then edit the CSS properties using a simple user interface.
As you make changes, the custom CSS magically appears below.
If you are learning CSS, then you will find it helpful to see how different CSS changes are applied with the result in the live preview.
CSS Hero also has a built-in Unsplash integration, allowing you to browse, search, and use beautiful photographs in your website’s design.
CSS Hero also comes with some ready-made snippets that you can apply to different elements on your website.
Simply switch to the ‘Snippets’ tab in the left column. You will see a bunch of column elements listed there.
Click to select an element, and CSS Hero will show you different style variations.
Click on the ‘Set Params’ button to edit a style that you like, and then click on the ‘Apply’ button to add it to your theme.
As you make changes to your website, CSS Hero will autosave those changes but not publish them.
To apply these changes to your live website, you need to click the ‘Save and Publish’ button in the bottom right corner of the screen.
How to Undo Changes in CSS Hero
One of the best features of CSS Hero is the ability to undo any changes you make at any time.
CSS Hero keeps a history of all the changes you make to your theme. Simply click on the history button in the CSS Hero toolbar to see the list of changes. This button looks like a small clock.
You can click on a date and time to see what your site looked like at that time. If you want to revert to that state, simply save or resume editing from that point.
This doesn’t mean that changes you made after that point will disappear. They will still be stored, and you can also revert to that time. It doesn’t get any simpler than that.
But what if you only want to revert changes you made to a particular item?
In that case, you don’t need to use the history tool. Simply click on the element you want to revert to an earlier version and then click the ‘Reset’ button.
This will change the item back to the default settings defined by your WordPress theme.
Customizing Your Site for Mobile Devices in CSS Hero
The most challenging aspect of web design is device compatibility. You need to make sure that your site looks equally impressive on all devices and screen sizes.
Web designers use various tools to test for browser and device compatibility. Lucky for you, CSS Hero comes with a built-in preview tool.
Simply choose from mobile, tablet, and desktop devices in the top toolbar. The preview area will change to your selected device. You can also toggle between ‘Edit’ and ‘Navigate’ modes to hide other toolbars.
Switching to the ‘Edit’ mode will allow you to edit your site while previewing it for mobile devices. This tool is handy for tweaking your theme’s design for mobile and tablets.
CSS Hero Theme Compatibility
The official CSS Hero website has an ever-growing list of compatible themes. This list includes many of the best free WordPress themes.
What About Themes Not on the Theme Compatibility List?
CSS Hero comes with a feature called Rocket Mode Auto-detection. If you use a theme not included in the theme compatibility list, then CSS Hero will automatically start using Rocket Mode.
Rocket Mode tries to guess the CSS selectors from your theme. This works perfectly most of the time. If your theme follows WordPress coding standards, then you will be able to edit almost everything.
You may also want to contact your theme developer and ask them to provide compatibility with CSS Hero.
If you are using a WordPress plugin that generates an output not editable by CSS Hero, then you can ask the plugin author to fix that. They don’t need to do much to provide compatibility with CSS Hero.
If you liked this article, then please subscribe to our YouTube Channel for WordPress video tutorials. You can also find us on Twitter and Facebook.
Most website code contains HTML, CSS, and JavaScript. Learning these programming languages requires hours of studying and practice. The good news is that there are some excellent tools that let you create any type of website (without writing code).
In this comprehensive guide, we will cover how to code a website using drag-and-drop tools that create all the code for you. We will share how to learn the code fundamentals for those who want to code a website from scratch so you can do just that.
Website Builders vs. Coding a Website From Scratch
In the early days of the internet, building a website was complicated. That’s because developers had to code a website from scratch, which would take hours, if not weeks.
However, those days are now behind us.
Over 62.9% of all websites on the internet are built on a website framework, so most developers don’t have to know how to build a website from scratch anymore.
Most developers now use WordPress and other CMS platforms (website builder frameworks) to speed up website building.
In 95% of cases, you can build a website with website builders or no-code solutions, and it will be just as good as writing code from scratch.
Pros and Cons of Using a Website Builder
Here are some of the benefits of using a website builder:
It is easy to use, even for beginners.
You don’t need to invest time and money in learning web development.
It saves you time, which you can then spend on growing your business.
Easily build eCommerce, membership, and business websites without spending a fortune.
However, there are a few drawbacks to using a website builder:
Your website could have unnecessary features that could slow it down.
You may not need CMS capabilities for a project but will still have to maintain the software updates and backups.
Pros and Cons of Writing Code From Scratch
Here are some benefits of writing code all by yourself from scratch:
Your website will only have the code it needs, which allows it to load faster.
You won’t need to maintain software updates.
You will get valuable programming skills that may lead to new WordPress career opportunities.
However, you will have to compare these advantages with the following downsides:
You will spend hours and days learning to code in HTML, CSS, and JavaScript.
Generating content dynamically will be difficult.
Adding and updating content will require editing multiple files.
You can’t easily share access to your website without giving full control to someone else.
If you hire a developer to write the code for you, then it will be expensive and not very cost-effective.
Since time is your most valuable asset, we will show you the fastest ways to code a website using tools that do the code writing for you (methods 1 and 2 will cover this).
In method 3, we will share resources on how to make a website from scratch. This is great for students who want to learn programming.
With that said, let’s look at how to code a website. You can use the quick links below to jump to the method you want to use:
WordPress is the most popular website builder platform. In fact, according to our CMS market share report, WordPress powers over 43% of all websites on the internet.
It has multiple tools that let you create a custom website from scratch without learning to code.
Our #1 pick is SeedProd. It’s the best drag-and-drop WordPress website builder, used by over 1 million websites.
To start with WordPress, you will need a domain name and web hosting. We recommend using Bluehost.
They are one of the top WordPress hosting providers, and they are offering our readers a free domain name and a 60% discount on hosting (just $2.75/month).
After you have a domain and hosting, the next step is to install WordPress (the right way). If you are using a hosting provider like Bluehost, then you will have access to a 1-click, user-friendly WordPress installation process.
Once you have installed WordPress, you can log in to the admin dashboard. It will look something like this:
SeedProd is the best WordPress drag-and-drop page builder for WordPress. It allows you to easily design your website and create beautiful pages without writing any code.
Once you have installed SeedProd, just go to the SeedProd » Landing Pages page and click the ‘Add New Landing Page’ button.
On the next screen, you will be asked to choose a template.
SeedProd has dozens of beautifully designed templates that you can use as a starter point, or you can choose ‘Blank Template’ to start with an empty page.
After that, you will be asked to enter a title for your page and a URL slug.
For instance, if you are creating the front page of your website, then you can enter ‘Home’ as the title and URL.
Then, you need to click on the ‘Save and Start Editing the Page’ button.
SeedProd will now load the page builder interface. It is an intuitive page builder where you can simply point and click to start editing.
SeedProd’s drag-and-drop interface is easy for beginners but powerful enough for developers.
In the left column, you’ll see the most commonly used web design elements as blocks that you can add to your page.
To your right, you’ll see a live preview of your design where you can simply point and click on any element to edit, delete, or move it.
Basically, you can create a custom web design, including a navigation menu, sidebars, and footers, without writing code.
However, if you need to add custom code, then you can do it by dragging and dropping the Custom HTML block.
Inside the custom HTML block, you can manually add any HTML code.
You can also adjust the margin, padding, and design attributes of your custom HTML block.
Similarly, you can also add custom CSS code to your page.
Just click the ‘Settings’ button in the bottom left corner and choose ‘Custom CSS’.
Once you finish editing your page, click the ‘Save and Publish’ button to make it go live.
You can also click the ‘Preview’ button to view your page in live action.
Simply repeat the process to create other pages for your website. You can quickly create a small business website within minutes.
SeedProd website builder makes it easy to make and edit a website effortlessly.
This is why many professional developers use it worldwide. Even developers at large companies like Awesome Motive use SeedProd to build their main websites because it allows for rapid deployment and customization.
Alternatives to SeedProd
There are several other popular WordPress page builders you can use. The following are our top picks for beginners to code a website from scratch without actually writing the code:
Divi Builder – Drag and drop theme and page builder
Beaver Builder – Another well-known WordPress page builder
Astra is a highly customizable theme with ready-made starter websites that you can install with one click.
While we are biased toward WordPress, its popularity speaks for itself. Many big companies use WordPress, like BBC, Microsoft, Facebook, The New York Times, etc.
If you don’t want the hassle of getting a domain, hosting, and installing various software like WordPress, then you can use the Web.com website builder.
It is a great platform to build simple business websites and online stores. They even have a guided wizard that helps with the process.
Web.com pricing plans include a free domain name, free SSL certificate, dozens of templates, and an AI writing tool to help you generate website copy quickly.
Simply pick from their thousands of beautiful pre-made website templates and customize the design to match your brand needs with point and click.
The builder comes with all the powerful features you would expect.
You can easily add photo galleries, videos, testimonial sliders, contact forms, map locations, social media buttons, and more.
You won’t need to worry about updates, security, or backups because Web.com takes care of all of that for you. They also offer 24/7 chat, email, and phone support.
Alternatives to Web.com
There are plenty of different all-in-one solutions out there. Apart from Constant Contact, the following are our top picks for easy website builders that are not WordPress:
Gator by HostGator – Fully hosted website builder with drag-and-drop tools and templates.
Domain.com Website Builder – Hosted website builder with dozens of beautiful templates for all types of websites
HubSpot – All-in-one website builder and marketing platform for small businesses
Wix – Another well-known drag & drop website builder.
BigCommerce – Fully hosted website builder to create eCommerce stores.
Want to have an expert design a custom website for you? The team at Web.com also offers custom web design services, giving our users an exclusive deal. Get your free quote today.
3. Learn to Code a Website From Scratch
If you are a student and want to learn how to code a website from scratch, you will need to understand web development fundamentals like HTML, CSS, and more.
While there are many free and paid courses, the best one we have found is the one on Code Academy.
It takes roughly 9 hours to complete, but by the end of it, you will have learned to code a custom responsive website from scratch using HTML, CSS, and Bootstrap.
Even after you finish the course, you will need hours of practice before you can truly become efficient at coding websites from scratch. In the next section, we will show you how to code a very basic website using HTML and CSS.
Coding a Basic Website
Websites use HTML, CSS, and sometimes some JavaScript.
HTML defines the basic layout of a web page, including content like images, text, videos, and more.
CSS defines colors, margins, padding, text size, and more.
To write this code, you will need a code editor. A code editor comes with syntax highlighting, which helps you easily catch mistakes and write code more efficiently.
Next, you will need to start a project.
Simply create a new folder on your computer and call it whatever you want. This is where you will store all your website files.
Open your code editor and create a new file. Since this will be your website’s home page, we recommended naming it index.html.
This file is where you will write the HTML code for your first web page.
A basic HTML page contains the following sections.
HTML document wrapper
Head
Body
You can define this structure by writing the following code:
<html>
    <head>

    </head>
    <body>

    </body>
</html>
The code inside the head section is not visible on the screen.
It defines metadata for your HTML document, like the title of your HTML document, link to the CSS file, and more.
Now, let’s fill in the head section of your HTML page:
If you liked this article, then please subscribe to our YouTube Channel for WordPress video tutorials. You can also find us on Twitter and Facebook.
Are you wondering how to create a waitlist landing page for your WooCommerce store or WordPress website?
You can easily generate excitement for a product or service that hasn’t been launched yet by making a waitlist landing page. This prompts visitors to sign up for the waitlist using their email addresses and share the promotion with others.
In this article, we will show you how to easily create a viral waitlist landing page in WordPress.
Why Create a Viral Waitlist Landing Page in WordPress?
Making a waitlist landing page on your WordPress website will allow your visitors to enter their email addresses and join your waiting list.
For example, if you have a WooCommerce store that sells clothes and is about to launch a new collection for summer, then you can create a waitlist for interested users to sign up.
This way, interested users will get an email notification as soon as your new summer clothing collection goes live.
Moreover, it can also create a sense of urgency and excitement among potential customers, making them more likely to sign up for your waitlist.
That being said, let’s see how to easily create a viral waitlist landing page in WordPress.
How to Create a Viral Waitlist Landing Page in WordPress
You can easily create a waitlist landing page in WordPress using SeedProd. It is the best WordPress landing page plugin with a drag-and-drop builder to create themes and landing pages.
First, you need to install and activate the SeedProd plugin. For detailed instructions, you may want to see our step-by-step guide on how to install a WordPress plugin.
Note: You can also use the free version of SeedProd to create a waitlist landing page. However, some of the advanced blocks used in this tutorial will only be available with the paid plan.
Upon activation, you need to head over to the SeedProd » Settings page to enter your license key. You can find this information in your account on the SeedProd website.
Once you have done that, it’s time for you to start creating a waitlist landing page.
Step 1: Create a Waitlist Landing Page
To create a waitlist landing page, head over to the SeedProd » Landing Pages screen from the WordPress admin sidebar.
Once you are there, just click on the ‘Add New Landing Page’ button.
This will take you to the ‘Choose a New Page Template’ screen, where you can select a pre-made SeedProd template for your landing page.
Upon doing that, a prompt will open up on your screen, asking you to enter a page name and URL. Go ahead and enter the details and then click the ‘Save and Start Editing the Page’ button to continue.
This will launch the template in SeedProd’s drag-and-drop builder. From here, you can now start customizing your waitlist landing page as you want.
Step 2: Customize Your Waitlist Landing Page
Once the drag-and-drop builder has been launched, you will notice that all the available blocks are in the left column, with a landing page preview on the right side of the screen.
From here, you can drag any block you want onto your waitlist landing page, including an image, video, button, heading, or text block.
For example, if you want to add a headline for the new product that you are launching in your online store, then you can just drag and drop the Headline block onto the landing page.
Once you’ve done that, simply click on the block again to open its settings in the left column. From here, you can insert dynamic text and change the font size, alignment, color, and more.
Next, scroll down to the ‘Advanced’ section in the left column. From here, you can add a giveaway, optin form, contact form, social profiles, countdown timer, and more.
Since you are creating a waitlist, you should add a contact form to your landing page. That way, your visitors can sign up for notifications when new products are available, and they can also be added to your general email list.
To do this, just drag and drop the Contact Form block from the left column onto the page.
Next, click on the block to open its settings in the sidebar on the left. From here, you can select a contact form that you created with WPForms from the dropdown menu.
After that, you can also add the Social Sharing block to the waitlist landing page so that users will be able to share it with their friends and followers, making your waitlist viral.
Upon adding the block, click on it to configure its settings in the left column. You can now add a social media button from the dropdown menu and configure its size and alignment.
Once you’ve done that, it’s time for you to add the Countdown block from the left column to create a sense of urgency among your customers.
Next, click on the block to open its settings in the sidebar. From here, you can choose an end date, timezone, size, template, and more.
You can also choose an action to take once the countdown on your waitlist expires.
For example, if you choose the ‘Show Message’ option from the ‘Action To Take On Expires’ dropdown menu, then a message will be displayed to your customers upon waitlist expiration.
However, you can also choose the ‘Redirect’ option and add a URL that users will be redirected to if they visit the waitlist page after its expiration. This could be the WooCommerce product page with the items from your new collection.
Step 3: Add WooCommerce Blocks to Your Waitlist Landing Page
If you have a WooCommerce store, then you can also add the WooCommerce blocks offered by SeedProd. Keep in mind that the WooCommerce plugin will need to be activated for these blocks to work.
To add these blocks, just scroll down to the ‘WooCommerce’ section in the left column of the drag-and-drop builder.
From here, you can add the featured products, add to cart, or best-selling products block to your waitlist page to showcase other products from your store.
This way, users visiting your waitlist landing page will also be able to see other products that are currently available and may end up making a purchase.
You will also be able to limit the number of products that are shown and control the block’s alignment, typography, pagination, button color, and more.
Step 4: Connect Your Waitlist With Your Email Marketing Provider
You can also connect your waitlist landing page with an email marketing provider to build your email list and capture leads.
To do this, switch to the ‘Connect’ tab at the top of the landing page builder. Then, simply choose your email marketing provider from the ‘Email Marketing’ section.
Once you have chosen your provider, you will need to provide an API key or account details, depending on the service you chose. You can get this information from the account dashboard of your email marketing service provider.
After that, just click the ‘Connect’ button to move forward.
Upon connecting your SeedProd with an email marketing provider, you will also have to choose the email list that you want to use with your waitlist landing page.
Next, click on the ‘Save Integration Details’ button. You have now successfully connected your landing page with the marketing service.
Step 5: Save and Publish Your Waitlist Landing Page
Now, you need to switch back to the ‘Design’ tab from the top of the SeedProd page builder.
Once you’ve done that, click the ‘Save’ button at the top to store your settings.
Next, open the ‘Save’ dropdown menu and click the ‘Publish’ button to make your waitlist landing page live.
Now, you can visit the landing page on your WordPress site to see how it looks.
Bonus Tips to Build Excitement and FOMO in Your Online Store
Other than designing a great landing page, you can use a few other methods to easily build excitement and FOMO among your customers. This can encourage them to sign up for your waitlist.
Since scarcity is a key element of FOMO, shoppers will now be more likely to sign up for your waitlist.
Other than that, you can also create website banners using Thrive Leads to show users that other visitors are already interested in your product and signing up for it.
Additionally, you can also build excitement and hype around the product or service that you are launching by hosting a giveaway. A viral giveaway can help you can reach a wider audience, increase your conversions, and urge more visitors to sign up for your waitlist.
For example, you can use RafflePress, which is the best WordPress giveaway plugin, to give away a few items from your new clothing collection in exchange for a referral or follow on social media.
Another tip is to run a live blogging session with your customers to further hype up the product/service that will soon be launched. This way, you will be able to interact with your audience and convince them to sign up on your waitlist landing page.
If you liked this article, then please subscribe to our YouTube Channel for WordPress video tutorials. You can also find us on Twitter and Facebook.
Are you looking for an easy way to find 404 error pages on your WordPress website and redirect them?
404 errors occur when users try to reach a page on your website that no longer exists. These errors create a bad user experience, which can lead to a drop in search engine rankings and lower eCommerce sales.
In this article, we will show you how to easily track 404 pages and redirect them in WordPress.
What Is a 404 Error?
A 404 error is an HTTP status code that shows that the server couldn’t reach the web page you are trying to visit.
This means that if you enter a URL of a web page that does not exist, then you will see a ‘404 Page Not Found’ error.
Now, there are many reasons why the 404 error occurs. It could be because the visitor made a mistake when entering the URL, the page was deleted from the website, or the domain name no longer exists.
Another cause of the 404 error is when a page was moved to another URL but wasn’t properly redirected, resulting in a broken link.
Finally, sometimes server malfunctions can also lead to 404 errors on a WordPress website.
Why Track and Redirect 404 Pages in WordPress?
Now that you know the different causes of 404 errors, let’s take a look at why it’s extremely important for website owners to track 404 errors and fix them.
404 errors are bad for your site’s user experience. If users can’t find the page they are looking for, then they will likely leave your site and go to your competitors.
This means you will lose potential customers and miss an opportunity to convert your visitors into subscribers.
Aside from that, 404 errors have a negative impact on your WordPress SEO rankings. Search engine ranking algorithms often penalize websites when they run into broken links.
Not to mention, these broken pages will cause you to lose valuable backlinks for your website, which results in lower domain authority and a significant drop in Google keyword rankings.
With that being said, let’s take a look at how you can easily track 404 pages and redirect them in WordPress. We will cover two different methods, so feel free to click the links below to jump ahead to your preferred method:
If you’d prefer written instructions, then just keep reading.
Method 1: Track & Redirect 404 Pages Using AIOSEO (Recommended)
The easiest way to track and fix 404 pages on your WordPress website is by using the All in One SEO plugin for WordPress, which is also known as AIOSEO. It’s the best SEO WordPress plugin that is used by over 3 million professionals.
AIOSEO allows you to easily find pages with broken links and fix them with just a few clicks using its powerful Redirection Manager.
The best thing about AIOSEO is that it helps you set up faster 301 redirects, which helps you improve search engine rankings.
For this tutorial, we will be using the AIOSEO Pro version because it includes the powerful Redirection Manager addon. There is a free version of AIOSEO, but it doesn’t include 404 monitoring or the Redirection Manager.
First, you will need to install and activate the AIOSEO Pro plugin. For more details, please see our step-by-step guide on how to install a WordPress plugin.
Activating Redirects and Enabling 404 Error Logs in AIOSEO
Once the plugin is active, you can go to All in One SEO » Redirects and click the ‘Activate Redirects’ button.
After that, you need to visit the ‘Settings’ tab under Redirects and configure the plugin to keep 404 logs and track pages with broken links.
Simply scroll down to the ‘Logs’ sections and make sure that the ‘404 Logs’ option is enabled. Next, select the time period to record the 404 logs using the dropdown menu. We recommend no longer than one month for optimal server performance.
Once you are done, go ahead and click the ‘Save Changes’ button.
You will now see a ‘404 Logs’ tab in the Redirects section in AIOSEO. When you first enable 404 logs, this page will not have any data because it only starts monitoring 404 pages after you enable the setting.
In time, it will show a list of all the URLs that have a 404 error. You will see how many times someone tried to visit the link in the ‘Hits’ column and the date when it was last visited in the ‘Last Accessed’ column.
Once you have identified the pages with broken links, you can simply redirect them by clicking the ‘Add Redirect’ button. You should redirect the URL to a relevant page on your website.
When you click the button, you will see the option to enter a target URL and select the redirection type from the dropdown menu.
For example, you can move a page permanently by selecting the ‘301 Moved Permanently’ option.
After that, click the ‘Add Redirect’ button, and your broken link will now automatically redirect to the new target URL.
Clearing 404 Error Logs in AIOSEO
With time, the size of your log file can grow and take up a lot of disk space. A lack of WordPress hosting disk space can lead to errors. To make sure that you don’t run into this problem, it’s a best practice to delete and clear 404 error logs.
With AIOSEO, you can easily delete any individual 404 error from your logs by clicking the trash can icon.
You can also bulk delete your 404 logs by going to All in One SEO » Tools and then clicking on the ‘Database Tools’ tab.
Now, just scroll down to the ‘Logs’ section and click the ‘Clear 404 Logs’ button.
Permalink Monitoring in AIOSEO
Aside from tracking 404 errors, the AIOSEO Redirect Manager also comes with permalink monitoring. This means that if you delete a page on your site, or change the URL of any blog post, then AIOSEO will automatically notify you to set up a redirect.
In some cases, AIOSEO can even set up the proper 301 redirects for you without any effort.
Bonus Tip: Set Up Faster 301 Redirects in WordPress With AIOSEO
AIOSEO also allows you to set up faster redirects by going to the ‘Settings’ tab and choosing the ‘Web Server’ redirect method.
This allows you to unlock significant speed improvements when compared to the default WordPress/PHP redirect method.
Method 2: Track & Redirect 404 Pages Using the Redirection Plugin
The next method to track and redirect 404 errors is by using the free Redirection Plugin for WordPress. This is an advanced plugin, so some beginners may find it harder to use.
First, you need to install and activate the plugin. For more details, please see our step-by-step guide on how to install a WordPress plugin.
Upon activation, go to Tools » Redirection and then scroll down and click the ‘Start Setup’ button to set up your redirects.
After that, the plugin will ask whether you would like to monitor permalink changes in WordPress and keep logs of redirects and 404 errors.
Just select the checkbox for these options and click the ‘Continue Setup’ button.
The plugin will now test the REST API status.
When the status result comes back as ‘Good’, you can click the ‘Finish Setup’ button.
After that, the plugin will set up redirection. This will take several seconds, and when it is complete, you will need to click the ‘Continue’ button and then the ‘Ready to begin!’ button.
Now, you can start to redirect your 404 pages.
Simply enter the URL of the page you want to redirect in the ‘Source URL’ column.
Next, select whether you’d like to exactly match the query parameters, ignore them, or pass them through to the target URL from the ‘Query Parameter’ dropdown menu.
Now, you need to enter the Target URL to where the 404 page will be redirected, keep the Group option as ‘Redirection’, and click the ‘Add Redirect’ button.
If you want more options to set up redirection, then just click the gear icon next to the ‘Add Redirect’ button.
You can begin by adding the old URL showing 404 in the ‘Source URL’ field, selecting the Query Parameter like before, and adding a title to describe the purpose of this redirect.
After that, select the ‘Match’ option from the dropdown. You will see multiple options, including URL only, URL and referrer, URL and user agent, and URL and login status.
In most cases, you want to use the ‘URL and referrer’ setting. That’s because if you see several 404 requests for a specific page, then those users probably clicked on the same link to the wrong URL rather than all typing the same wrong web address.
Now, whenever someone else clicks on the broken URL, it will automatically redirect them to the new location.
Next, make sure that your action is ‘Redirect to URL’. The other options are complex and require advanced technical knowledge.
For the redirection type, you need to select an option from the HTTP code dropdown. For a permanent redirection, this should be ‘301 – Moved Permanently’.
Lastly, enter the target URL in the ‘Matched Target’ field. After you have entered this information, just hit the ‘Add Redirect’ button.
You can go to the new URL to test and make sure that the redirection is working properly.
The plugin also has the option to track 404 error logs. Simply click on the ‘404s’ tab at the top, and the plugin will show you recent 404 errors that occurred on your site since you installed the plugin.
Note: If you just enabled the Redirection plugin, then the 404 log page will be empty. It only starts keeping a log of 404 errors after the plugin is activated.
Bonus: Design a Custom 404 Page With SeedProd
Setting up redirects means that visitors shouldn’t run into many 404 error pages on your WordPress website. However, if they do land on a 404 page, it’s a good idea to have a custom design that will help out your users.
Including your custom branding can make your 404 page look more reputable. Adding a contact form can allow users to tell you the address they entered that triggered the 404 error. You can even include links to your popular posts or products so that visitors will be tempted to stay on your website.
Luckily, it’s easy to design a custom 404 page with SeedProd. It’s the best WordPress landing page builder and comes with plenty of customizable templates for 404 pages.
If you liked this article, then please subscribe to our YouTube Channel for WordPress video tutorials. You can also find us on Twitter and Facebook.
Do you want to learn how to sell your photos online?
No matter whether you are a professional photographer or an enthusiastic hobbyist, you can make money by selling your photography. You can sell your work to businesses that need beautiful stock photos for their projects or even to individuals who are simply looking for a nice photo.
In this article, we will show you how to start selling your photos online using WordPress.
Why Sell Your Photos Online?
Stock photography websites are very popular with businesses, organizations, and even individuals who need professional images for their projects. If you are looking for an online side business, then selling photos online is a great way to make money.
By selling your photos as downloadable files, you can make money without having to pay for shipping or professional printing. You can also sell the same file countless times. You will just need to create your website, upload your files, and make extra income without a lot of day-to-day effort.
If you are a professional photographer, then selling your work online can also introduce your brand to a wider audience. As a result, people who like your work may book you for professional photoshoots and events.
With that in mind, let’s see how you can sell photos online.
Which Platform Should You Use to Sell Photos Online?
First, you will need to choose an eCommerce platform that you will use to upload your photos and then sell them.
While you can change your eCommerce platform later, it will often take a lot of time and effort and will almost certainly disrupt your business. So, it’s important to choose your eCommerce platform carefully.
Since you want to sell photos online, it’s a good idea to use a platform that’s designed specifically to sell digital downloads.
WordPress is the best website builder in the world. According to our CMS market share report, WordPress powers over 43% of all websites on the internet, including millions of websites that sell digital downloads. WordPress gives you full control over your digital store, so you can design a beautiful website that shows off your photography.
Meanwhile, Easy Digital Downloads is the best WordPress eCommerce plugin to sell digital products. In fact, we use the plugin ourselves to sell many of our premium WordPress plugins.
With WordPress and Easy Digital Downloads, you can sell as many photos as you want to a worldwide audience without paying high transaction fees. This gives WordPress and Easy Digital Downloads a big advantage over other platforms like Sellfy, Gumroad, WooCommerce, and Sendowl.
Let’s see how you can quickly and easily start selling photos online using WordPress and Easy Digital Downloads. You can use the quick links below to jump to different parts of the tutorial:
Before you start building your WordPress website, it’s important to know that there are two types of WordPress software: WordPress.org and WordPress.com.
For your online store, you will need WordPress.org. Also known as self-hosted WordPress, it has more features and flexibility. You can also install any WordPress plugin, including Easy Digital Downloads, which is designed for selling products online.
To start selling digital photos with WordPress, you will need a domain name. This is the address that people will type into their browser when they want to visit your store, like shutterstock.com or stockphotos.com.
You’ll also need web hosting, which is where your website’s files are stored online, and an SSL certificate so that you can securely accept credit card payments.
A domain name typically costs $14.99/year, and hosting costs start from $7.99/month. The price of an SSL certificate differs depending on where you buy the certificate, but you can expect to pay anywhere between $50-200/year.
As you can see, the costs can really start to add up, especially if you are just getting started.
Thankfully, SiteGround is offering a huge 73% discount on their managed hosting for Easy Digital Downloads. Their plan comes with a free SSL certificate, Easy Digital Downloads pre-installed, and all the optimization features you need to make a successful business website.
This means you can start selling your photos for less than $4 per month.
Let’s go ahead and show you how to easily buy a domain name, web hosting, and an SSL certificate.
To get started, you need to go to the SiteGround website and click on ‘Get Plan.’
After that, SiteGround will ask you to enter a domain name for your online store and will also show some optional extras you can buy. You can add these extras at any point, so we recommend skipping this step.
Then, simply enter your payment information to finish the purchase. After a few moments, you will get an email with details on how to log in to your SiteGround account.
Once you log in, select the ‘Websites’ tab. Here, you will see two buttons: Site Tools and WordPress Admin.
Site Tools is SiteGround’s hosting dashboard, where you can manage everything related to your site, such as setting up your emails.
To log in to your new website, go ahead and click on the ‘WordPress Admin’ button.
This will take you to a screen where you can log in to your WordPress dashboard.
Here, simply type in the username and password you created, and then click on ‘Log In.’
Now, you are ready to start building a store to sell your digital photos online.
Upon activation, you need to go to Downloads » Settings in your WordPress dashboard and enter your license key into the ‘License Key’ field.
You can find this information in your account on the Easy Digital Downloads website. With that done, just click on the ‘Activate License’ button.
First, you need to set your store’s location.
You may be selling your photos online, but Easy Digital Downloads will still use your location to auto-fill some fields when a visitor makes a purchase. It may also use your location to calculate sales tax.
To add your location, simply open the ‘Business Country’ dropdown menu. You can then choose where your business is based.
Next, find the ‘Business Region’ field.
Here, you can open the dropdown and choose the area where your store operates from.
When you are happy with the information you have entered, simply click on the ‘Save Changes’ button to store your settings.
Step 3: Adding a Payment Gateway to WordPress
When selling photos online, you will need a way to accept credit payments in WordPress. By default, Easy Digital Downloads supports popular payment gateways like Stripe, PayPal, and Amazon Payments.
Pro Tip: Want to use a different payment gateway instead? You can add extra payment options using the Easy Digital Download extensions.
To add payment gateways to your website, simply click on the ‘Payments’ tab.
You can then follow the onscreen instructions to set up Stripe or PayPal for your website.
When done, go ahead and click on the ‘General’ link.
In the Active Gateways section, check the box for each of the gateways that you want to add to your digital product marketplace.
If you check more than one payment method, then you will need to open the ‘Default Gateway’ dropdown and choose the payment method that will be selected by default.
You can use any gateway you want, but Stripe can accept credit cards as well as Google Pay and Apple Pay. With that being said, you may want to use Stripe as your site’s default payment gateway.
After selecting one or more payment gateways, just click on the ‘Save Changes’ button.
By default, Easy Digital Downloads shows all your prices in US dollars. Once you have set up your payment gateway, you may want to change the currency that’s used on your website.
To show your prices in any currency other than US dollars, select the ‘General’ tab, followed by the ‘Currency’ link.
Next, open the ‘Currency’ dropdown and choose the currency you want to use.
Just be aware that some payment gateways may not accept every currency. If you are not sure, then you can always check your chosen payment gateway’s website. Most have a list of currencies that they support.
When you are happy with how the plugin is set up, click on the ‘Save Changes’ button to store your settings.
Step 4: Turning Individual Photos Into Downloadable Products
Once you have set up at least one payment gateway, you are ready to create your first digital product. This can be any photo or digital file that you want to sell online.
To create a digital product, simply go to Downloads and then select the ‘Add New’ button.
You can now type a name for the product into the ‘Enter download name here’ field.
This will be shown on the product’s page, so you will want to use something that catches the visitor’s attention and accurately describes your photo.
Next, type out the description that will appear on the product page. You will want to give visitors all the information they need to decide whether they want to buy this photo.
For example, you might include the image’s dimensions and resolution or your camera’s technical specifications. You could also talk about the product’s licensing and how the customer can use the photo after buying it.
Many online stores use product categories and tags to help shoppers find what they are looking for. These categories and tags can also encourage visitors to explore related photos, which can get you more sales.
Next, you will want to set a price by scrolling to the Download Prices section.
Here, type in how much visitors will need to pay to download this photo.
Easy Digital Downloads also supports variable pricing. For example, you might sell the same photo in multiple resolutions or sizes.
If you want to offer variable pricing, then just select the ‘Enable variable pricing’ checkbox. This adds a new section where you can type in a name for each digital download and set the price.
To create more pricing variations, simply click on the ‘Add New Price’ button.
You can then type in a title and price for each variable.
After adding all the options, you will need to set the default option. This will be selected automatically when the shopper arrives at the product page.
Simply find the option you want to use, and click its ‘Default’ button.
You are now ready to upload the image file that you want to sell. When it comes to images, WordPress supports gif, heic, jpeg, png, and webp formats.
To get started, click on the ‘Upload a File’ icon.
You can now choose any image from the WordPress media library or upload a new file from your computer.
Easy Digital Downloads will generate a file name automatically. However, you can change the file name by typing into the ‘File Name’ field.
If you have enabled variable pricing, then you need to open the ‘Price Assignment’ dropdown.
Then, choose a price from the list.
After that, just click on the ‘Add New File’ button.
This adds a section where you can upload a file, add a title, and choose a price assignment.
Simply repeat these steps for each pricing variation you want to offer.
Once you have uploaded your photo files, the next step is adding a product image.
When you are selling photos online, you don’t want people to steal your work without paying. For this reason, we do not recommend using the original photos as your product image.
Instead, you can use a lower-resolution version of the original photo or add a watermark.
If you create a watermark using web design software, then make sure you show this watermark in a location that isn’t easy to crop out. Many photographers place their watermark in the center of the image, or they use the watermark in a repeating pattern that covers the entire photo.
To add a product image, simply scroll to the Download Image section and then click on ‘Set Download Image’.
This launches the WordPress media library, where you can choose an image or upload a new file from your computer.
When you are happy with your digital download, simply click on the ‘Publish’ button to make it live. You can now repeat these steps to add more digital downloads to your WordPress website.
Once you have uploaded all your individual photos, you may want to create bundled photo packs that shoppers can buy.
For example, you could add all your foodie-themed photos to a pack that people can use on their restaurant websites or create packs showing a particular workplace or location.
This can save your customers time since they don’t have to search through your entire catalog and buy each photo they want to use.
You may also want to offer these photo bundles at a discount compared to buying each photo individually. In this way, you can get more conversions and increase the average order value.
To add multiple photos to the same bundle, simply create a new digital product following the same process described above. Just like before, you can add a title, description, categories and tags, a price, and more.
Next, under ‘Download Files’, you will need to open the ‘Product Type Options’ dropdown and choose ‘Bundle’.
This adds a new ‘Bundled Downloads’ section.
You can now open the dropdown that shows ‘Choose a Download’ by default.
In the dropdown, start typing in the name of the first photo you want to add to the bundle. When the photo name appears, just click to select it.
With that done, you need to click on ‘Add New File’.
You can now add a second photo to the bundle.
Simply repeat these steps to add all the photos you want to offer as part of this bundle.
When you are happy with how the bundle is set up, click on ‘Publish’ to make it live. You can now repeat these steps to create as many photo bundles as you want.
Step 6: Customizing Your Digital Download Emails
Every time someone buys a photo from your website, Easy Digital Downloads will send them an email with a link to download their product.
While this default email has everything the customer needs to download their file, we still recommend customizing it with your own logo, branding, and messaging.
To customize the default email, simply go to Downloads » Settings. Then click on the ‘Emails’ tab.
You may want to start by adding your own logo.
This branding appears at the top of your purchase receipt emails, so customers can clearly see who the email is from.
To add a logo, click on the ‘Attach File’ button.
You can now either choose an image from the WordPress media library or upload a file from your computer.
You can also add a ‘From Name’.
This name will appear in the customer’s inbox, so you will want to use something that the customer will recognize, like the name of your website, business, or photography studio.
You will also need to add a ‘From Email’, which will act as the ‘from’ and ‘reply-to’ address.
Some customers may reply to the purchase receipt email. For example, if they are having problems downloading the file, then they might reach out by clicking ‘Reply’. With that in mind, you will want to use a professional email address that you check frequently.
After making these changes, just click on the ‘Purchase Receipts’ tab.
On this screen, you can type in an email subject, add a heading, and also change the email’s body text.
You could simply type in the text that you want to send to every customer. However, you can create more helpful and personalized emails by using the Conditional Emails feature.
Conditional Emails use ‘template tags’ to personalize your content. Every time it sends an email, Easy Digital Downloads will replace these tags with real values, such as the customer’s name and how much they paid for the digital download.
To see all the available tags, simply scroll to the bottom of the ‘Purchase Receipts’ screen.
When you have finished making changes, you may want to send a test email to see how the message will look to your customers.
To do this, simply click on the ‘Send Test Email’ button, and Easy Digital Downloads will send an email to your WordPress admin email address.
Have you clicked on the ‘Send Test Email’ button but didn’t get a test email? Your WordPress website may not be sending emails properly, which can be a big problem. If customers don’t get purchase confirmation emails, they won’t be able to download your photos.
When you are happy with the purchase receipt email, go ahead and click on the ‘Save Changes’ button.
Step 7: Testing Your Digital Download
Once you have created your first Easy Digital Downloads product and customized the purchase emails, it’s a good idea to check that visitors can buy your photos without any issues.
To test your download, you will need to put your site into test mode. This allows you to test the purchasing process without typing in your credit or debit card information.
To put your store into test mode, go to Downloads » Settings and then click on the ‘Payments’ tab.
Under ‘Active Gateways’, you must check the box next to ‘Store Gateway’.
After that, scroll to the bottom of the screen and click on ‘Save Changes’.
Now that you are in test mode, go to Downloads » All Downloads and hover over the product that you want to test. When it appears, click on the ‘View’ link.
This opens the product page where shoppers can buy the photo or photo pack.
To make a test purchase, simply click on the ‘Purchase’ button.
Easy Digital Downloads will now add this item to your cart.
After that, it’s time to click on the ‘Checkout’ button.
You can now type in your email address and name and then click on ‘Purchase’.
Since you are in test mode, you don’t need to enter any payment information.
After a few moments, you will get a purchase confirmation email containing a link to download the individual photo or all the files in a stock photo pack.
Once you have completed the test, you are ready to take your store out of test mode and start accepting payments from visitors.
To do this, head over to Downloads » Settings » Payments. You can then uncheck the ‘Store Gateway’ box.
Step 8: Selecting and Customizing Your WordPress Theme
Themes control how your WordPress website looks, including the colors, layout, fonts, and widget-ready areas. The right WordPress theme will make a good first impression on visitors and make them want to explore more of your site.
With that in mind, you will want to choose a design that looks great and has exactly the features you need.
To help you make the right choice, we have put together a list of the most popular WordPress themes. Our top pick is the Astra Theme since it’s fully compatible with Easy Digital Downloads, free, and completely customizable.
Another option is to create your own custom page designs with SeedProd. It’s the best drag-and-drop WordPress theme builder on the market and comes with more than 180 ready-made, professionally designed templates.
You can use SeedProd to design landing pages and sales pages where you promote your photographs and photo packs.
This can get you more conversions and boost your profits.
If you want complete control over your store, then you can even use SeedProd to design your own theme without writing a single line of code. Simply find the blocks you want to use, and then drag them onto your page designs in the SeedProd editor.
Another option is writing great blog posts about industry topics. You can then include links to a few relevant products that readers may want to buy.
You can also build an email list and then send your subscribers updates about new photos you have just added to your site, your latest blog posts, or other interesting content that will make them want to visit your store.
No matter how you promote a product, you will need to know its URL.
To find this link, simply go to Downloads » Downloads. You can then find the product you want to link to and click on its ‘Edit’ link.
You will find the URL in the right-hand menu.
You can now link to this product page from any area of your website using its URL. To learn more, see our step-by-step guide on how to add a link in WordPress.
Easy Digital Downloads also creates a unique ‘Purchase’ button for each photo. You can add this button to any page, post, or widget-ready area.
Visitors can simply click this button to add the photo to their shopping cart. In this way, you can start the purchasing process from any page on your website, including landing pages, sales pages, and any ads you show on your WordPress blog.
You can add this button to any page, post, or widget-ready area using a shortcode that Easy Digital Downloads creates automatically.
To get a product’s shortcode, simply scroll to its Download Settings section. You can then copy the text in the ‘Purchase Shortcode’ field.
MonsterInsights is the best analytics solution for WordPress. It helps you see where your visitors are coming from and the actions they take on your online store. This allows you to fine-tune your site and marketing activities to get more sales based on real data.
OptinMonster is the best conversion optimization software on the market. You can use it to create optin forms to grow your email list and convert visitors into paying customers. It can also help reduce your shopping cart abandonment rates.
PushEngage is the best push notification software for WordPress. It allows you to send personalized web push notifications to visitors and customers. For example, you might notify them about a flash sale or a new photo pack that you just added to your website.
FAQs About Selling Photos Online
In this guide, we showed you how to sell photos online using WordPress. If you still have questions, then here are our FAQs about running an online photography business.
Where Can I Sell My Photos Online?
There are lots of platforms, stores, and digital marketplaces where you can upload your photos and sell them to an existing audience.
Some popular choices among photographers include Adobe Stock, Shutterstock, and Alamy. These popular platforms already have lots of users, so you can reach a large audience and introduce your photography to people who may not know about your brand.
However, many of these stock photography marketplaces and websites take a percentage of every sale you make, and some even charge upfront fees.
To build a successful photography business, we recommend creating your own website instead. This gives you complete control over your brand, and you get to keep all the profits from every sale.
How Much Does It Cost to Sell Photos Online?
We always recommend a business model where you start small. That way, you can spend more money as you build your audience and start selling more products.
The good news is that selling photos online is already a low-cost and easy online business. To further reduce your startup costs, we recommend taking advantage of SiteGround EDD Hosting and using free WordPress themes and plugins.
By using Easy Digital Downloads to sell your photos directly to customers, you can avoid many of the upfront costs and middleman fees of selling via third-party marketplaces like iStock and Getty Images.
The easiest way to make money from your photos is by selling them online. You can either sell your photographs for a one-time fee or sell licenses that control how customers can use those photos.
Another option is to create a membership website and sell subscriptions. For example, you might allow members to download and use as many photos as they want or create membership tiers where your most popular photos are reserved for the highest-paying members. Another option is selling group memberships for corporate teams.
Can I Also Sell Physical Products Using Easy Digital Downloads?
At some point, you may want to sell physical products. For example, you might create merchandise featuring your most popular photos or sell your photographs as framed prints.
Despite the name, you can also use Easy Digital Downloads to sell physical products. There’s even a Simple Shipping addon that adds shipping features to the Easy Digital Downloads plugin. In this way, you can ship your branded merchandise, framed prints, or other physical products to customers using the tools you’re already familiar with.
If you liked this article, then please subscribe to our YouTube Channel for WordPress video tutorials. You can also find us on Twitter and Facebook.
Are you looking for WordPress FAQ plugins to use on your website?
Using FAQ plugins can improve the customer experience by making it easier for users to find answers to their questions without leaving your website. It can also boost your search engine rankings and help more people find your content.
In this article, we will share some of the best WordPress FAQ plugins that can help add an attractive FAQ section to your website.
Why Use a WordPress FAQ Plugin?
FAQ plugins create a Frequently Asked Questions (FAQ) section on your WordPress website with a list of some commonly asked questions and their answers.
This helps build trust and credibility with your customers by letting them know that you understand their questions and worries. FAQs can even increase conversion rates.
FAQs also allow users to find an answer to their questions without needing to contact customer service. This saves time and enables your customer support team to focus on other issues.
Additionally, using these plugins can also improve your search engine rankings because most FAQs often contain long-tail keywords that users commonly search for using search engines.
That being said, let’s look at some of the best WordPress FAQ plugins that can help improve user experience on your website.
The plugin comes with an FAQ block that helps you create an attractive FAQ section in the block editor. Within the block, you can enter questions and answers for your FAQ section.
You can also customize your FAQ section from the block panel, including its text color, background color, typography, and title wrapper.
Moreover, All in One SEO even allows you to add FAQ schema to your WordPress website. This schema markup can increase your visibility on Google and bring more traffic to your website.
Note: The AIOSEO free version comes with an FAQ block. However, you will need to buy the Pro version of the plugin to unlock the FAQ schema feature.
To activate the FAQ schema, you need to scroll down to the AIOSEO section in the block editor and switch to the ‘Schema’ tab.
After that, click the ‘Generate Schema’ button to open up a prompt.
Once the Schema Generator opens up, click on the ‘FAQ’ option to add the schema.
Next, you can add questions and answers to the schema template. For more detailed instructions, please see our tutorial on how to add FAQ schema in WordPress.
Apart from FAQs, AIOSEO has custom sitemaps, advanced redirects, SEO titles and descriptions, multiple keyphrases, and more. These features make it the ultimate toolkit for improving SEO on your website.
Heroic FAQs is a premium WordPress plugin that comes with a drag-and-drop interface to organize, reorder, or group related questions together.
It offers 5 pre-designed FAQ templates and a visual editor that lets you insert images, blockquotes, lists, videos, and more into your FAQ content.
You can display the FAQs in accordion or toggle format. You are also able to choose from 15 different FAQ icon styles to match your website’s design.
Using the Heroic FAQs plugin can also improve your website visibility and search engine rankings because it has a built-in FAQ schema.
Some of its other features include fast loading, FAQ search, analytics reports, mobile responsiveness, and page builder integrations. It is the perfect solution if you are looking for an all-in-one FAQs management kit.
It also comes with an Accordion block that lets you create FAQs by adding text sections that expand and collapse to any part of your page.
First, you will need to choose a template and start building your page with SeedProd. For detailed instructions, you may want to see our guide on how to create a landing page in WordPress.
Then, you can drag and drop the ‘Accordion’ block onto the landing page from the block panel on the left side of the screen.
You can now add a question and an answer in the text box to start creating an FAQ section.
After that, you can also customize the font size, icon image, typography, text color, and background color for your FAQs.
You can even add custom CSS and animation effects to your FAQs.
SeedProd also comes with built-in SEO features that will allow you to optimize your landing pages for search engines and increase visibility.
Thrive Architect is another powerful drag-and-drop page builder that helps you easily create custom landing pages, layouts, and content for your WordPress site.
It comes with a Toggle element that lets you add an FAQ section in an accordion style to your landing pages. Once you drag and drop the Toggle onto your page, its settings will open up in the settings menu on the left.
You can now add content to the toggle headlines. To expand the toggle and add an answer to the question, click the ‘Expand’ button in the block toolbar above each toggle.
You are able to customize the FAQ section by adjusting the columns, width, vertical space, and dropdown animations.
With Thrive Architect, you can also further customize the FAQs section by changing the icons, typography, layout, background color, borders, adding HMTL attributes, and more.
It allows you to create an FAQ section for your product pages and also enables customers to submit their own questions that can be answered by the support team.
This can help increase user engagement in your WooCommerce store and provide a better customer experience.
It is a highly customizable plugin with a category filter and search feature to make it easier for users to find the answers to their questions.
With YITH WooCommerce Questions and Answers, you can even implement a voting system, activate the email notification process, hide inappropriate questions, and encourage users to post their own answers in the FAQs section.
Ultimate FAQ is a popular WordPress plugin that provides shortcodes and blocks in the Gutenberg editor to add an FAQ section to your website.
It comes with unlimited support for categories and tags and even lets you add an unlimited number of FAQs to a single section.
By default, the plugin comes with accordion and toggle styles. However, you can also use custom CSS to style your FAQs according to your liking.
Other than that, it lets you import FAQs in bulk by using Google Sheets and even offers a search and filtering feature that customers can use to find the answers to their questions.
The plugin is super easy to use and helps create SEO-friendly FAQs to improve your search engine rankings.
Moreover, Ultimate FAQ also integrates with WooCommerce, so you can easily add an FAQ section for your online store.
Some of its other features include email support, social sharing, custom fields, multiple FAQ layouts, video/image support, and more.
Easy Accordion is a powerful FAQ builder plugin that provides a drag-and-drop interface to create an accordion-style FAQ section.
It’s lightweight, fast, and SEO-friendly, helping you quickly optimize your website content for search engines.
The plugin offers more than 16 pre-designed templates and other customization options, including typography, icon sets, font colors, themes, animation effects, padding, color schemes, and more.
This makes it the perfect choice if you want to create a highly customizable FAQ section.
Besides that, Easy Accordion has a responsive layout that works on various devices, including mobile phones, iPads, desktops, and tablets.
WP Responsive FAQ with Category is a simple WordPress plugin that uses shortcodes to add FAQ sections to your pages or posts.
If you are looking for a beginner-friendly and easy-to-use solution to create FAQs, then this plugin is for you.
It comes with a drag-and-drop interface and 15+ pre-designed templates that will help you create an aesthetically-pleasing FAQ section for your website.
Other than that, WP Responsive FAQ also offers WooCommerce support and makes it super easy for you to display an FAQ section in your online store.
Some of its other features include image/video support, customization settings, accordion animation adjustments, and more.
Which Is the Best WordPress FAQ Plugin?
In our expert opinion, All in One SEO is the best WordPress FAQ plugin because it allows you to easily add FAQ sections and schema to your pages and posts.
However, if you want to create an FAQ section on a landing page, then you can also use SeedProd or Thrive Architect. They are the best WordPress page builders on the market that come with built-in features to help create an attractive FAQ section.
You can also use the Heroic FAQs plugin if you are looking for an all-in-one solution. Its user-friendly, drag-and-drop interface allows you to easily build FAQs and FAQ schema.
If you liked this article, then please subscribe to our YouTube Channel for WordPress video tutorials. You can also find us on Twitter and Facebook.
Are you looking for a WordPress theme for your app?
You can use WordPress app themes to promote your app or software. These themes showcase your product screenshots, features, reviews, and other useful information.
In this article, we will share some of the best WordPress themes for apps that you can use to grow your business.
Building a WordPress Website for Apps and Software
WordPress is the most popular website builder in the world. Many top brands use WordPress for their websites, including banks, enterprise businesses, and more.
There are two types of WordPress. They are WordPress.com, which is a hosted solution, and WordPress.org, which is a self-hosted platform.
For a software or app website, you will need to use self-hosted WordPress.org. It offers the most flexibility and features you need to promote your business.
Before you begin, you will also need to purchase a domain name and web hosting. A domain name is your site’s address on the web, like wpbeginner.com or google.com. Web hosting is the storage for all your website files.
We recommend using Bluehost. It’s the most popular WordPress hosting company and an official WordPress hosting partner.
For WPBeginner users, Bluehost offers a free domain name, a free SSL certificate (for your website security), and a huge discount on web hosting.
Astra is a powerful WordPress multipurpose theme for all kinds of websites. It comes with a 1-click demo content importer and a few dozen demo websites to get you started quickly.
It has multiple blog page layouts, global design options, header and footer options, and dedicated sidebars for pages. The theme is fast, lightweight, and easy to set up, even for beginners.
SeedProd is the best WordPress theme builder on the market. It isn’t a regular WordPress theme, but SeedProd makes it easier for anyone to design a custom website from scratch without writing code.
The best part is that SeedProd comes with dozens of ready-made theme layouts. You can import a pre-built theme and customize it with the powerful drag and drop builder to launch your site.
It includes WordPress themes for apps, landing pages, and more. The theme templates are built specifically for beginners with beautiful designs and complete content.
Ultra is a modern WordPress theme for any type of website. It has a built-in professional template for your app or software.
It comes with builder addons, custom page templates, pre-designed layouts, and more. Other notable features include section scrolling, a mega menu, archive layouts, image filters, and support for WooCommerce.
Divi is a popular WordPress theme and an ultimate page builder plugin. It comes with hundreds of ready-made website layouts for different business niches.
It has a highly flexible visual page builder to customize your website from the front end. The Divi theme offers multiple design elements, visual effects, fonts and text styling, and custom backgrounds.
Infinity Pro is a professional WordPress theme designed specifically for mobile apps and software. It’s built on top of the Genesis Theme framework, making it powerful and robust.
The theme has a fullscreen layout with an image slider, a call-to-action button, a navigation menu, and a custom logo. It comes with layout options and multiple custom page templates.
OceanWP is a free WordPress multipurpose theme. It comes with several demo websites and a 1-click content importer to launch your website right away.
The theme offers fast page load time, built-in SEO optimization, RTL language support, and more. It’s also fully compatible with WooCommerce to sell your apps.
Neve is a stylish WordPress multipurpose theme that you can use to create any website. It comes with a few demo sites, including one-page and multi-page templates.
It features header and footer layouts to create an engaging user experience. The theme integrates with all popular WordPress page builders for customization. It’s also eCommerce ready to start an online store easily.
Struct is a fantastic WordPress theme designed specifically for mobile apps, SaaS startups, and software websites. It lets you display screenshots, testimonials, team members, portfolios, and app features on the homepage.
Inside, you will also find backgrounds, color schemes, typography options, and more. Struct has WooCommerce integration to sell your mobile apps online.
Hestia Pro is a one-page WordPress theme for any kind of website. It comes with a sleek and modern design to let you build your app or software website easily.
It works great with all popular drag and drop page builder plugins. Hestia is easy to customize using the WordPress live customizer.
iTheme2 is a stunning WordPress apps theme. It comes with a fully customizable featured content slider on the homepage to showcase your apps and software.
It includes website templates, a header menu, a footer menu, custom footer text, and more. It also has a social media widget to add social icons in the header of your website.
Bramble is a beautiful WordPress multipurpose theme. It ships with a page builder that lets you customize your website and design custom landing pages of your own.
The theme comes with built-in homepage layouts to set up your website. It also includes an image slider plugin to display your apps beautifully.
Nozama is a classic WordPress eCommerce theme built for creating Amazon-style websites for mobile apps and software. It lets you display your apps, testimonials, and other products on the homepage.
You can use this theme to share professional screenshots of your app and maximize your sales. Besides professional shop page layouts, Nozama has unlimited color schemes, custom backgrounds, Google Fonts, and parallax effects.
Specialty is an excellent WordPress theme designed specifically for job board apps and software. It comes with flexible search functionality for instant search and complex filters.
The theme includes hundreds of customizer settings for color, typography, and layout. It supports drag and drop page builders to create custom landing pages easily.
14. Altitude Pro
Altitude Pro is a black-and-white WordPress app theme. It has a fullscreen layout with a custom background image, welcome text, and call-to-action buttons.
The theme has multiple homepage widget areas and layout options. Altitude Pro is eCommerce friendly and helps you sell your apps online.
Inspiro is a WordPress multipurpose theme built for any kind of website. It features interactive homepage elements to engage your users from the first click on your site.
The theme options include parallax scrolling, video backgrounds, 1-page and multi-page templates, page builder compatibility, and more. It’s easy to set up, even for absolute beginners.
Multi Mobile App is a free WordPress theme for apps and software. It lets you showcase your apps professionally in different categories.
If you are looking for a free multipurpose apps theme, then the Multi Mobile App theme is an ideal solution. It’s translation ready and offers powerful customization options.
Cousteau Pro is a WordPress theme for travel apps. It comes with video and image slider support on the homepage to create a powerful first impression on your visitors.
Inside, you will find a search and filtering system. The theme has a fullscreen background layout that looks beautiful and professional.
Venture is a WordPress portfolio theme to display and sell your apps. It has a dynamic homepage builder and custom widgets to set up your website quickly.
You can also use the built-in visual customizer for colors, fonts, and other settings. It includes a featured content slider to showcase your most important content on the front.
Mobile App is a free WordPress multipurpose theme designed specifically for apps and software websites. It uses bright colors that make your website highly attractive.
The theme features a fullscreen image slider, a products section, an about section, and more. It’s easy to set up using the WordPress live customizer.
Pinboard is a modern WordPress multipurpose theme. It has a Pinterest-like layout to create an app or software review website.
It supports WordPress multisite network and lets your users sign up to post reviews. The theme is fully responsive and adjusts to any screen size beautifully.
Listable is an excellent WordPress directory theme built specifically for small business websites. It has a fullscreen layout and parallax homepage sections.
The theme lets you add all your apps and allow users to submit apps from the frontend. Listable also integrates with popular WordPress page builders for easy customization.
FAQs About WordPress Themes for Apps and Software
If you are still unsure which theme is best for you, here are some frequently asked questions about WordPress themes for apps and software that can help you select the right theme for your website.
1. Which is the best WordPress theme for apps and software websites?
With so many options, picking the right theme to promote your apps and software business can confuse beginners.
We recommend Astra, SeedProd, Ultra, and Divi, as they come with multiple templates for apps, software, and technology websites.
2. Why is SeedProd included in the themes for apps and software?
SeedProd is included in the themes for apps and software because it’s a powerful theme builder for beginners. It lets you drag and drop features to design a custom theme for your apps and software website without writing code.
Moreover, SeedProd comes with ready-made coming soon and maintenance mode landing pages. You can use these pages to engage users while your website is in the development process.
SeedProd also includes hundreds of built-in theme templates that can give you a head start. You can import a template and customize it to launch your website right away.
If you liked this article, then please subscribe to our YouTube Channel for WordPress video tutorials. You can also find us on Twitter and Facebook.