WordPress Playground, an experimental project that uses WebAssembly (WASM) to run WordPress in the browser, makes it possible for users to quickly test plugins and themes without having to set up a local development environment.
Ordinarily, testing a plugin or theme with Playground requires visiting playground.wordpress.net, which will instantly create a real WordPress instance with admin access without having to install PHP, MySQL, or Apache. It runs inside the browser using a SQLite database. Adding a plugin or theme to the instance is as easy as appending the slug to the URL when creating the test site:
A new Chrome browser extension, created by LUBUS, a development agency, makes this even easier by adding a “Playground” button to theme and plugin pages on WordPress.org. Users can fire up a sandbox instance to test drive a theme or plugin in just one click.
I tested the extension and it works as advertised. It’s a neat little shortcut for launching a Playground instance without having to remember the URL or get the plugin/theme’s slug to append to it. The video below shows a site created with a selected plugin installed in under 20 seconds.
“We have been using Playground internally a lot for testing out plugins, and quick demos for internal or client meetings,” LUBUS founder Ajit Bohra said. “We often find a plugin or theme which we would like to test drive. It involves copying the slug of the theme or plugin and using them in the URL. To make this quick we thought of building and quick browser extension to add a button on wordpress.org to quickly launch a plugin or theme in the Playground.”
Bohra posted his process of creating the extension in a thread on X. He used the Plasmo framework, which offers a dedicated runtime for building browser extensions, taking the project from idea to built in approximately 30 minutes.
Bohra said the browser extension is currently a proof of concept that he would like to further extend with more settings based on feedback from users. He also hopes to collaborate with the Meta team in the future to see something like this added to the plugin and theme pages on WordPress.org so that users don’t have to rely on a browser extension.
When designing a website, simplicity is paramount. Clean, well-organized layouts help direct attention to essential elements like calls-to-action, navigation, and top-selling products. And the best way to apply minimalist design principles to your website is by using a minimalist theme. Websites hosted on a WordPress server have plenty of minimal theme options on the platform’s […]
WordPress’ Themes team launched its Community Themes initiative earlier this year with the goal of bringing together contributors to build block themes year round, the same way that default themes are built and officially supported. Their first theme release was Stacks, a single-purpose theme for creating slide decks that can be used for a presentation.
The team has now released its second community theme called Blue Note, inspired by American jazz record label “Blue Note Records.” It’s more versatile than Stacks, as it can be used for writing/blogging, a personal website, portfolio, nonprofit, memorial, event, or other types of landing pages.
Although Blue Note does not package any style variations, it comes with 14 beautifully designed patterns inspired by jazz record covers. The patterns enable users to quickly add images with text or quotes with multiple designs for each. There are also patterns with striped images, an artful way to break up a single image, paired with text. Users can select from multiple headers and footers, among seven page templates and four template parts.
Blue Note was designed by Automattic-sponsored contributor Beatriz Fialho, inspired by her work on the State of the Word slides in 2020. It was developed during the WCEU contributor day with the help of more than a dozen contributors.  The Community Themes GitHub repository has other themes they are working on which are in various stages of development.
Check out Blue Note on WordPress.org and download it for free via the Themes browser inside the admin.
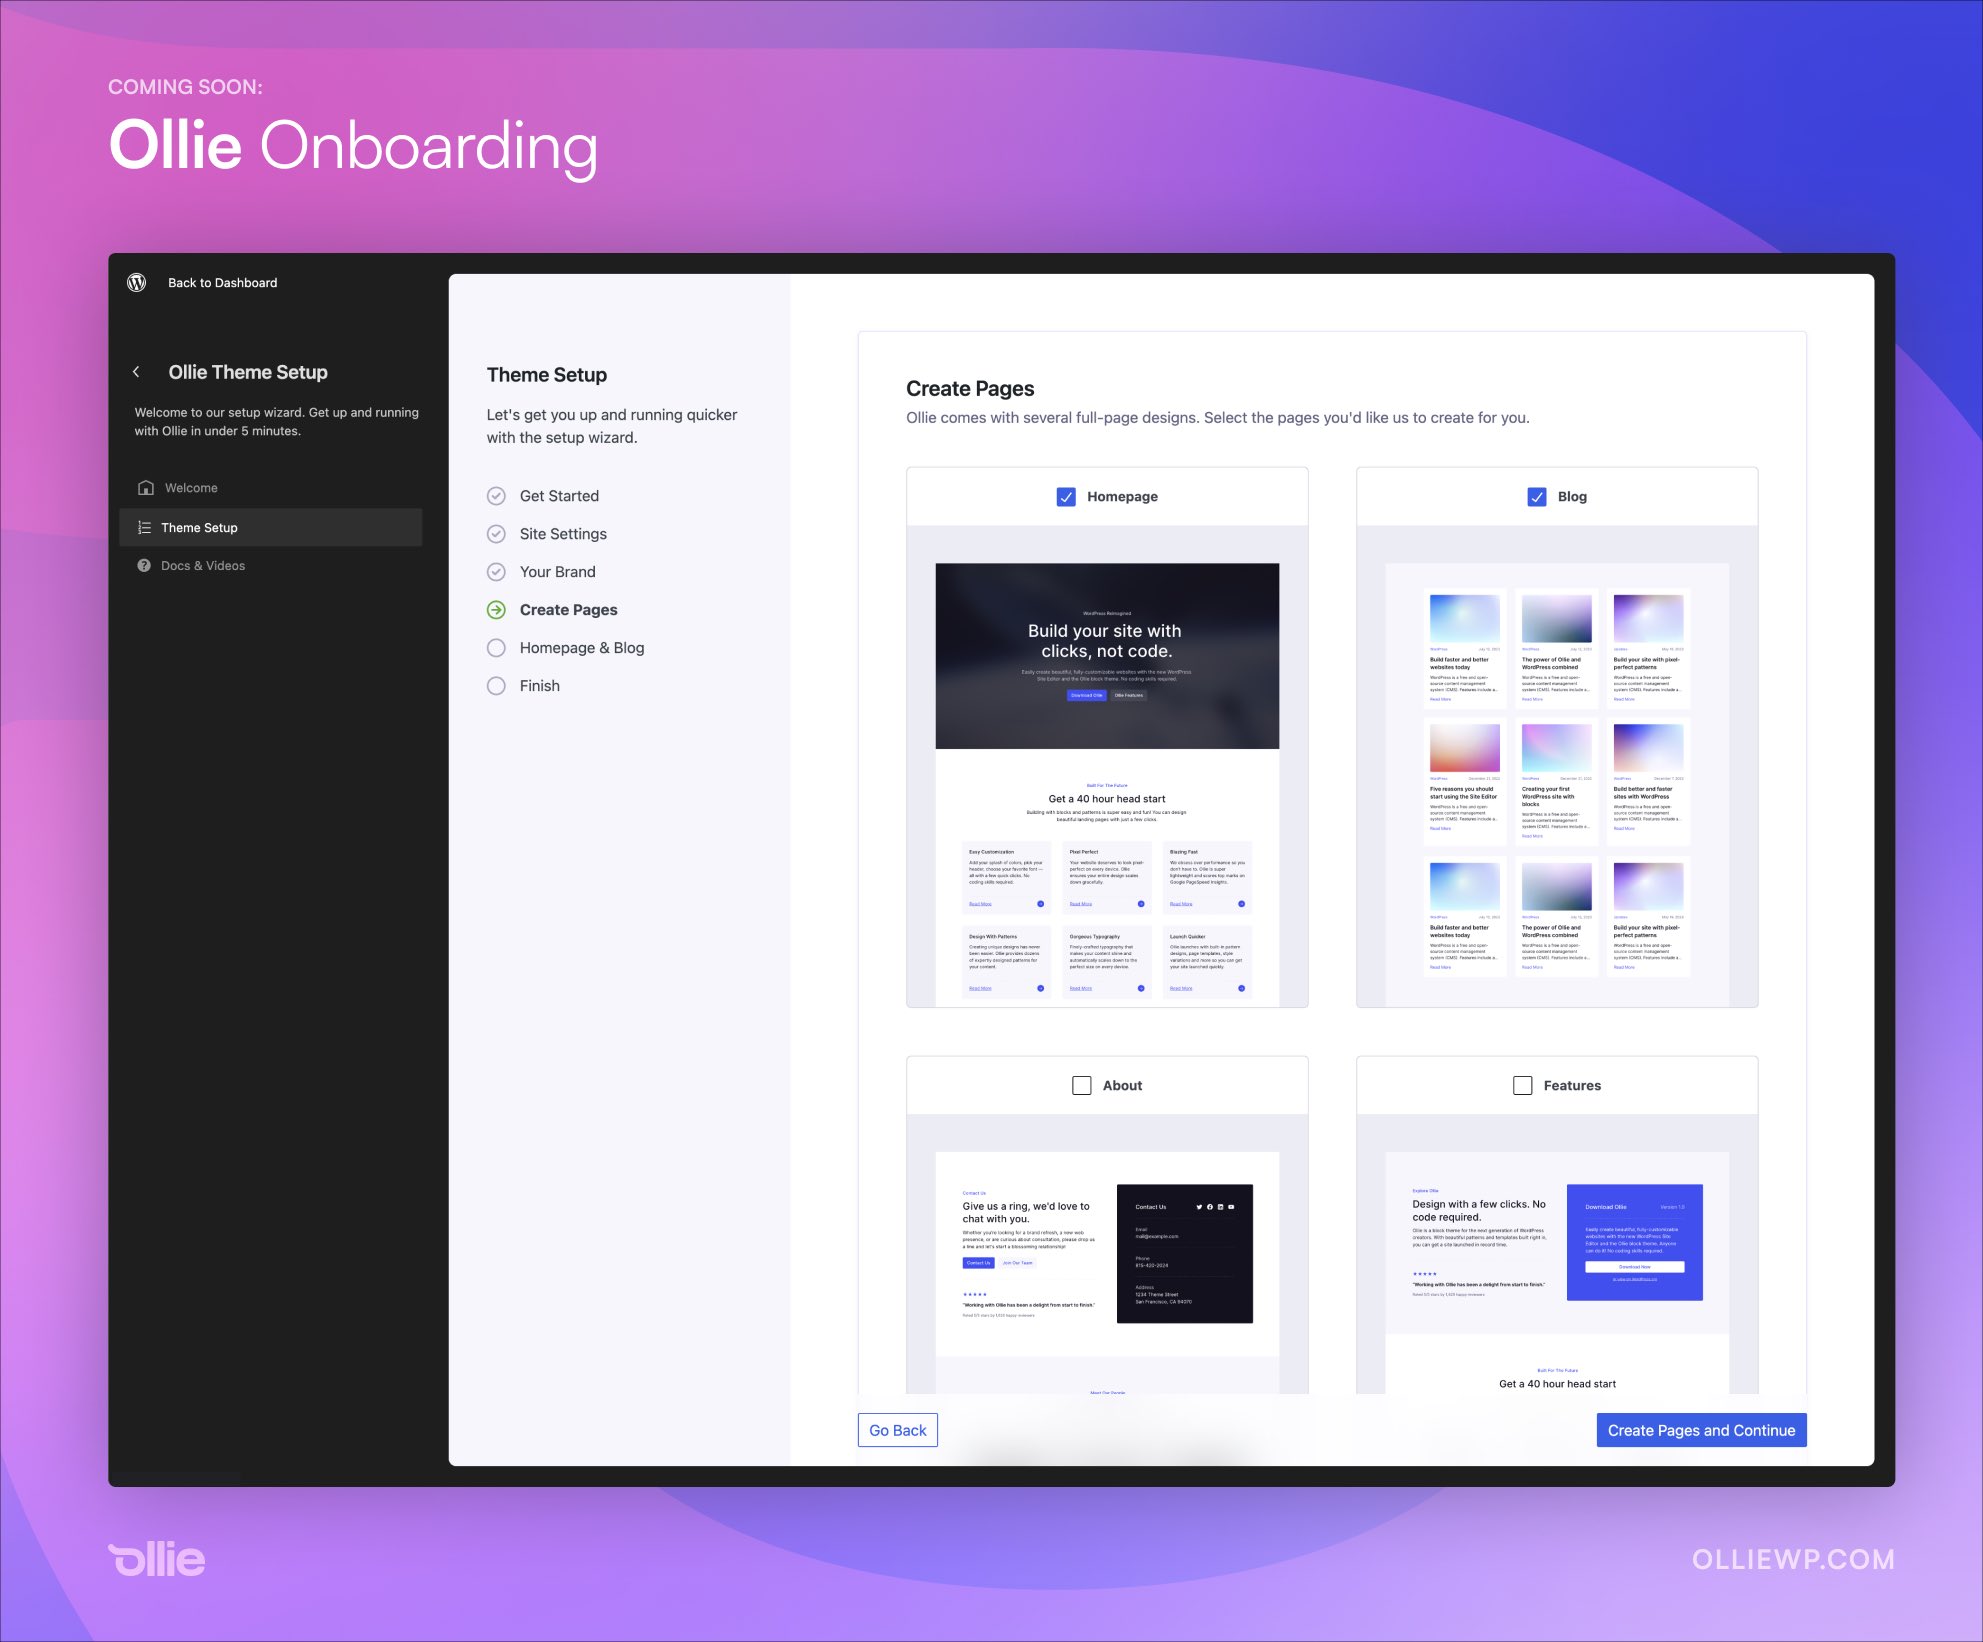
Unless you are some kind of wizard with the block editor, starting a WordPress website from a blank slate can be overwhelming and ultimately defeating. Mike McAlister, maker of the free Ollie theme, is developing an onboarding experience that aims to drastically reduce the amount of time users spend setting up a new site.
“I suspect we’re cutting out a half hour or more of finagling a new WordPress site,” McAlister said. “No more wrestling with a blank canvas.”
The Ollie Onboarding Wizard creates a guided setup experience that allows users to add basic site settings, select a color palette, input their brand colors, add a logo and site icon, and move on to creating pages. It eliminates the necessity of hunting all these settings down inside blocks and the Site Editor.
Instead of having to create pages individually and assign them the correct template or place the right full-page pattern, Ollie onboarding makes it possible for users to simply check which pages they want automatically created.
“The goal of this wizard is to help WordPress users zoom through a site setup with the Ollie theme and abstract away those annoying and disconnected setup steps we have to do for every site,” McAlister said.
“The wizard is also a way to educate users along the way. WordPress is going through a much-needed evolution, but as expected, users are having a tough time with the transition. Change is tough, especially when you power half of the internet. Workflows like this can help.”
The onboarding interface leans heavily towards the design of the Site Editor to make it seem naturally at home inside WordPress. It demonstrates just how nice plugins and themes can look in the admin with a more modern interface, which could soon be a reality once the ambitious admin UI revamp plans are complete.
“Months ago, Patrick Posner and I agreed that the future of WordPress is in the new Site Editor view, so that’s where we built this wizard,” McAlister said. “That assumption has since been validated, and because of that, our interface blends in seamlessly with native WordPress.”
“This is just a v1, but we’re already planning on how to seamlessly integrate choosing a vertical with curated plugins (eCommerce, landing page, email marketing, etc.) and surfacing pro features to really bring this experience together. This isn’t just a WordPress theme.”
McAlister said the interface is all React with largely native WordPress components and a few custom components sprinkled in to handle some of the more unique aspects of the tool.
After previewing the onboarding wizard, some people have asked if it will be available as a standalone product. McAlister confirmed that he doesn’t have any plans of productizing it but if there is enough demand he is willing to entertain the idea. Others have asked if there is an API for developers to add their own sections.
“No API yet, although with the announcements of the admin overhaul initiative, perhaps one is coming,” McAlister said. “Right now, this is just a custom React layer that mimics the site editor view. It’s built to be flexible though, so if a core solution opens up, we can migrate to that.”
McAlister previewed the wizard on Twitter and in his newsletter, but it’s still in development and not yet available for testing. He plans to launch the Ollie theme on WordPress.org once the wizard is ready for public use.
Hey is a block theme designed by Automattic for users on WordPress.com and also released for free in the WordPress.org Themes Directory. It’s the kind of simple theme that enables you to quickly get started writing online, without having to configure a bunch of design elements. The homepage features a profile image (Site Logo), site title, and recent posts with dates.
Single posts display with the feature image at the top of the post, although this template can easily be edited if this is an undesirable feature. Previous and Next post navigation appears under the post. Users can add menu items to display at the top, but clicking the site logo brings the visitor back home in the absence of a navigation menu.
The Hey theme comes in two different styles – the default and a serif variation. Colors can be adjusted to create a more vibrant palette for the site design.
One major drawback to this theme, which may not be immediately evident by looking at the demo, is that if users want to display more than the three most recent posts, they will need to add the pagination block inside the query loop block. It will also need to be styled to match the theme better. The query loop can be edited to show more posts on the homepage.
Although Hey is a simple personal blog theme, it also comes packaged with templates for WooCommerce compatibility. This is likely for the benefit of WordPress.com users who may want to quickly fire up a store. Self-hosted users who want to sell products with WooCommerce will be able to easily display things like the mini-cart, customer account block, product archive, product search results, and more.
Overall, Hey is an elegantly simple block theme with a clean design and plentiful white space. It’s suitable for the person who wants an almost blank slate to get started, or just a theme that enables writing without any distraction for the reader. Check out the live demo on WordPress.com and download Hey from WordPress.org.
During the 2022 State of the Word, Matt Mullenweg announced a plan to add new “Community” and “Commercial” taxonomies for the theme and plugin directories that would help users more quickly ascertain the purpose of the extensions they are considering. Shortly after the announcement, instructions were published for theme and plugin authors to opt into the new taxonomies.
The new filters are now enabled on both the theme and plugin directories, giving users the ability to quickly sort between free community extensions and those with commercial upgrades. Anything with a “pro version” should be designated as Commercial. These usually come with some upsells for more features than are offered in the free version. So far, the number of themes identified as commercial vastly exceed the number of community themes.
In the Plugin directory, extensions designated as free are nearly equal those designated as commercial. Many of the most widely used plugins have already been identified as commercial, including Yoast SEO, Jetpack, Akismet, Elementor, WooCommerce, All-in-One WP Migration, and more. Examples of community plugins include the WordPress Importer, Classic Editor, Classic Widgets, Gutenberg, Performance Lab, and Debug Bar.
In both directories it appears only a small percentage of authors have designated their extensions using the commercial or community taxonomies. At this time, use of the taxonomies is not required. This gave rise to some questions in the comments of the announcement.
“Would a better classification system would be to just have either no label for the majority, and then something closer to ‘includes paid upgrades’ that just implies they also offer additional services on top of their free (and often fully functional) version?” WordPress developer Kevin Batdorf said.
“All plugins are open source regardless of whether they sell something, and that doesn’t make those developers any less passionate about open-source. Nor does it imply non-commercial plugins have any less features, or that the level of dedication to support is any less dedicated.”
Batdorf also asked if use of the taxonomies would be a requirement in the future, because, at the moment, their low usage could give some plugins an advantage under these new classifications.
“Should it also be a requirement?” he said. “Otherwise this also seems like something to be gamed for visibility. Do Community or Commercial (or neither) plugins show higher install growth? I guarantee you people are tracking this already.”
WordPress’ Meta team is seeking feedback on the current implementation. Automattic-sponsored contributor Steve Dufresne said “work is continuously underway to improve the browsing experience and refine the visual aspects of the Theme and Plugin Directory as part of the site redesign.” The new filters will be incorporated into the upcoming redesign changes that have been slowly rolling out across WordPress.org.
These filters will also be making their way into the admin theme and plugin browsers, so users can access them from wherever they search for extensions. In the meantime, users and theme and plugin developers can leave feedback via Meta Trac on the specific tickets outlined in the announcement, as the team continues to iterate on the project.
Do you want to use shortcodes in your WordPress theme?
Normally, you will use shortcodes inside content areas like posts, pages, or sidebar widgets. However, sometimes you may want to add a shortcode inside your WordPress theme.
In this article, we will show you how to easily add any shortcode to your WordPress theme.
Why Use Shortcodes in Your WordPress Themes?
Shortcodes allow you to add all kinds of features to your website, including image galleries, forms, social media feeds, and much more.
WordPress comes with a few built-in shortcodes, but there are also many popular WordPress plugins that add shortcodes to your site.
For example, WPForms has easy-to-use blocks, but it also provides shortcodes so that you can add forms to other areas of your website.
Most of the time, you will add shortcodes inside content areas like posts and pages.
However, sometimes you may want to use a shortcode inside your WordPress theme files.
This allows you to add dynamic elements to areas you can’t edit using the standard WordPress post editor, such as your 404 page. It’s also an easy way to use the same shortcode on multiple pages.
For example, you might add a shortcode to your theme’s Page or Post template.
With that in mind, let’s see how you can use shortcodes in your WordPress theme. Simply use the quick links below to jump straight to the method you want to use.
Method 1: Using the Full-Site Editor (Block Themes Only)
The easiest way to use shortcodes in your WordPress theme is by using the full site editor. This allows you to add a Shortcode block to any part of your website.
However, this method only works with block-based themes like Hestia Pro. If you are not using a block-enabled theme, then you will need to use a different method instead.
To get started, head over to Themes » Editor in the WordPress dashboard.
By default, the full site editor shows your theme’s home template, but you can add shortcodes to any template or template part, such as the header or footer.
To see all the available options, just select either ‘Templates’ or ‘Template Parts’.
You can now click on the template or template part you want to edit.
As an example, we will add a shortcode to the 404 page template, but the steps will be exactly the same no matter which template you select.
WordPress will now show a preview of the template or template part.
To add a shortcode, go ahead and click on the small pencil icon.
With that done, click on the blue ‘+’ icon in the top left corner.
In the search bar, you need to type in ‘Shortcode’.
When the right block appears, drag and drop it onto the theme template.
You can now either paste or type the shortcode that you want to use.
After that, go ahead and click on the ‘Save’ button.
Now, simply visit your WordPress blog to see the shortcode in action.
Method 2: Editing Your WordPress Theme Files (Works With Any WordPress Theme)
You can also add shortcodes to your WordPress theme by editing the theme files. This method is more advanced, but it works with every WordPress theme.
If you are creating a custom theme, then you can add or modify the code in your existing theme files.
When editing your theme files, you can’t add the shortcode in the same format you use with standard content areas. Instead of seeing the shortcode’s output, you will see the shortcode itself on the screen.
This happens because WordPress doesn’t execute shortcodes inside theme template files. Instead, you will need to explicitly tell WordPress to run the shortcode using the do_shortcode function.
If you are adding a shortcode with extra parameters, then the code snippet will also change a little bit.
Imagine you have created a contact form using WPForms. In this case, you will need to use the standard WPForms shortcode plus the form’s ID:
echo do_shortcode("[wpforms id='92']");
Troubleshooting: What to Do When do_shortcode Isn’t Working
Sometimes, you may add a shortcode to a theme file, but the code’s output doesn’t appear on your WordPress website. This usually means the shortcode depends on a WordPress plugin or some other code on your website.
If the do_shortcode function is not working, then make sure the plugin providing the shortcode is installed and activated by going to Plugins » Installed Plugins.
In the following image, WPForms is installed but deactivated, so the echo do_shortcode code won’t work.
You can also check whether a shortcode is available for you to use by adding the shortcode_exists() function to your index.php file.
In the following snippet, we are checking whether the WPForms snippet is available to use on our website:
if ( shortcode_exists( 'wpforms' ))  {
  echo do_shortcode("[[wpforms id='147']]");
}
If you still don’t see the shortcode output on your website, then try clearing the WordPress cache, as you may be seeing an outdated version of your site.
Method 3: Creating Your Own WordPress Theme (Fully Customizable)
Another option is to create a custom WordPress theme. This is a more advanced method, but it allows you to add as many shortcodes as you want to any area of your WordPress theme. You can also make other changes to create a theme that has exactly the features and design you want.
In the past, you would need to follow complicated WordPress tutorials and write code to build a custom WordPress theme. However, it’s now possible to create a custom theme without writing a single line of code using SeedProd.
SeedProd is the best WordPress page builder and also comes with a theme builder. This allows you to design your own themes using drag and drop.
If you liked this article, then please subscribe to our YouTube Channel for WordPress video tutorials. You can also find us on Twitter and Facebook.
Do you want to change the Gravatar image size in WordPress?
Gravatar is a service that connects a user’s email address with a picture. WordPress themes show Gravatars at a set size, but you may prefer to make these images smaller or larger to better suit your website’s design.
In this article, we will show you how to change the size of Gravatar images in WordPress.
Why Change the Gravatar Image Size in WordPress?
Gravatar stands for Globally Recognized Avatar. It’s a web service that allows you to create a profile and associate avatar images with your email address.
Most WordPress themes show a Gravatar next to the user’s comment. Some themes also display a Gravatar in the author bio box.
Even if a user doesn’t have a Gravatar account, then your site will still show one of the default WordPress Gravatars.
Sometimes you may want to change the size of your theme’s Gravatars. For example, you may want to make them bigger so that they stand out. This can draw the visitor’s attention to your site’s comment section and help you get more comments on your WordPress posts.
Having said that, let’s take a look at how you can change the Gravatar image size on your WordPress site. Simply use the quick links below to jump to the method you want to use.
Method 1: Change Gravatar Size Using the WordPress Full-Site Editor (Block Themes Only)
If you are using a block-based theme such as ThemeIsle Hestia Pro or Twenty Twenty-Three, then you can change the Gravatar size using the full-site editor.
This method doesn’t work with all themes, so if you are not using a block-enabled theme, then we recommend using method 2 instead.
In the WordPress dashboard, go to Appearance » Editor.
In the left-hand menu, you can choose whether to edit a template or template part.
To change the Gravatar size for WordPress comments, you will typically select ‘Template Parts’ from the left-hand menu.
After that, just click on ‘Comments.’
You can now click to select the Comments template part.
This opens a new menu with settings you can use to customize the comments template part.
You can now go ahead and click on any of the Gravatars in the live preview.
In the right-hand menu, you can select the ‘Block’ tab if it isn’t already selected.
You can now make the Gravatars bigger or smaller by dragging the ‘Image Size’ slider.
As you move the slider, all the Gravatars will update automatically, so you can try different sizes to see what looks the best.
When you are happy with the changes you have made, click on the ‘Save’ button.
Now if you visit any comment section on your WordPress website, you will see the changes live.
Method 2: Change Gravatar Size for WordPress Comments (Works With All Themes)
If you are not using a block-enabled WordPress theme, then you can change the Gravatar size for WordPress comments using code.
This method requires you to edit theme files, so it’s not the most beginner-friendly option. However, this method should work for most WordPress themes.
After creating a child theme, you will need to connect to your WordPress site using an FTP client such as FileZilla, or you can use the file manager of your WordPress hosting cPanel.
If you are a SiteGround customer, then you can use the Site Tools dashboard instead.
Once you are connected, you need to go to /wp-content/themes/ and open the folder for your current WordPress theme.
Once here, open the comments.php file and look for a wp_list_comments function. Inside this function, you will find theavatar_size, which sets the size of the Gravatar.
You can simply change the avatar_size to the size you want to use. In the code snippet above, this would mean changing 60 to another number.
Gravatars are square, so WordPress will use the same value for the image’s width and height. This means that you only need to type in one number.
After making this change, make sure to save and upload the file back to your WordPress hosting account. When you are finished, you can visit your WordPress blog to see the change in action.
If the Gravatar still doesn’t change, then your theme’s CSS could be overriding the settings in the comments.php file.
You can see whether this is the case using your browser’s Inspect tool. The steps will vary depending on which browser you are using, but on Chrome, you can simply right-click or Ctrl-click the Gravatar and then select ‘Inspect’.
This will show the page’s HTML and CSS code in a new panel.
In this code, you need to look for the height and width values.
If the size is different from what you specified in the comments.php file, then this means your theme’s style.css file is overriding your changes.
If this is the case, then simply switch back to your FTP client. You can now open the theme’s folder and then open the style.css file.
Here, search for a block of code that has the word avatar.
You will typically find this in a comment-author .avatar CSS class, such as this:
You can now go ahead and change the width and height to the values you want for your Gravatars.
After that, simply save your changes. Now if you visit your WordPress blog or website, you will see your updated Gravatar images.
At this point, you may be wondering why we recommend trying to change the Gravatar size in the comments.php file before using the easier CSS method.
Firstly, CSS can sometimes make the Gravatars look blurry, especially if you make the avatars much larger than the original image. Secondly, changing the image size in comments.php often helps your site to load faster.
Many author bios show the writer’s Gravatar along with their bio. To change the default Gravatar size in your author bio boxes, you need to find the theme file that adds the bio.
Simply connect to your site using an FTP client such as FileZilla or the file manager of your WordPress hosting. Once you are connected, go to /wp-content/themes/ and open the folder for your current WordPress theme.
After that, you need to open the template-parts folder.
You now need to find the file that contains the get_avatar code. You will often find this code in a template part file called author-bio.php, single.php file, functions.php file, or similar.
You can simply replace the number with the value you want to use to make the Gravatar bigger or smaller.
After changing the size, don’t forget to save your changes. You can then visit your website to see the new author bio box in action.
If the Gravatars haven’t changed, then you will need to search for the avatar class in the style.css file by following the same process described above. Once you find this class, you can type in the new Gravatar height and width values.
If you liked this article, then please subscribe to our YouTube Channel for WordPress video tutorials. You can also find us on Twitter and Facebook.
Shufflehound made a big splash in March when it released Lemmony, a free WordPress block theme with more than 30 patterns. This was the company’s first block theme on WordPress.org and it is already active on more than 1,000 websites. Building on the success of this theme, Shufflehound has created a child theme for agencies.
Lemmony Agency bears a strong resemblance to its parent theme but with more agency-specific patterns. This theme ships with 25 new custom block patterns, on top of the ones already included in Lemmony, for a total of more than 50 patterns.
The patterns unique to this theme suit agencies but would also work well for non-profits, advocacy, portfolios, or businesses of any kind. These include a hero with services, accordions for things like FAQ, counters, more pricing tables, services with icons or images, a blockified sidebar, testimonials, and more.
The theme’s creators have done an excellent job in organizing all the patterns available to users. Inside the pattern explorer/inserter, they have been separated into different panels for the patterns specific to the Lemmony Agency theme, the Lemmony patterns, and the Lemmony full-page patterns. This makes it easier to build pages, since users won’t have to hunt through all the patterns lumped together.
The Lemmony Companion plugin, recommended when users install the theme, adds a handful of custom blocks that some of the patterns rely on to work. It includes blocks for a counter, icon, post featured image caption, typing text, hero auto-slider, and accordion.
This might be the best way to ensure these features are styled exactly to match the theme and give users more creative control inside these particular blocks. Sometimes using third-party plugins to add sliders or icons can look like it’s bolted onto the design in an unsightly way. A companion plugin designated specifically for this theme makes sense in this instance.
Shufflehound made an interesting choice creating Lemmony Agency as a child theme of what is already a very flexible multi-purpose theme. This certainly could have been shipped as full-page pattern but it would have also greatly expanded the patterns packaged with the parent theme. In these early days of block theming, it’s not yet clear what users might consider “pattern bloat” or too many patterns, especially since they can easily be categorized under various panels inside the explorer.
Lemmony Agency is a solid option for building websites that need to showcase their services, display pricing, or simply maintain an informational web presence. It’s available for free from WordPress.org and will auto-install the parent theme at the same time.
WordPress is approaching its 20th anniversary, and for the majority of those years, contributors have cranked out a new default theme. Even though the structure and supported features of default themes have drastically changed over the years, contributors are still actively maintaining all 13 of the “Twenty” themes.
A new proposal on WordPress.org recommends winding down active maintenance on older themes and implementing a new system of requirements for retiring them.
“The level of effort to support 13 themes is not insignificant, especially in the times of the rapidly evolving block editor,” Bluehost-sponsored core contributor Jonathan Desrosiers said. “The burden of maintaining these themes has historically fallen on the Core team to ensure they continue to receive any needed updates.” These tasks include things like ensuring compatibility with newer PHP versions, fixing bugs, updates and deprecations of dependencies, security updates, and much more.
“Because there are so many, it’s not uncommon for it to take several months before older default themes properly support newer features added in WordPress Core,” Desrosiers said. “Additionally, themes created prior to the existence of certain APIs are often unable to fully take advantage of these new features (global styles, block patterns, etc.).”
Desrosiers contends that reducing the support burden on contributors will allow them to focus on ensuring the most modern block-based themes deliver the best experience.
“It also helps clear the path for work on new block theme-focused experiments and initiatives (such as the Community Themes Initiative) attempting to refine the role that themes will have in the block editor era,” he said.
Themes released through the WordPress.org account via the Community Themes Initiative, like the recent Stacks slide deck theme, will be officially supported, adding to the load. These themes, however, have the benefit of working with the Site Editor and all the latest features WordPress offers. When dealing with limited volunteer resources, supporting older default themes doesn’t have as much upside as spending these efforts the more modern themes.
WordPress bundles the three most recent default themes in the latest download. This proposal seeks to retire older themes after a minimum of five years of support and when usage falls to less than 1% of all WordPress sites as determined by WordPress.org data. Using this criteria the default themes Twenty Ten through Twenty Sixteen would be retired and only receive security updates. Desrosiers suggests a yearly assessment of usage data to determine which themes would be retired.
The three most recent WordPress default themes would be actively maintained and contributors would continue maintaining the following themes with bug fixes, compatibility updates, and security fixes:
Twenty Seventeen
Twenty Nineteen
Twenty Twenty
The proposal has multiple benefits, in addition to reducing the number of actively supported themes from 13 to 6, but also has the drawback of affecting an estimated 730,000 users who will no longer receive maintenance on their themes.
General reception to the proposal has been positive, as those using very old themes are usually looking for as few changes to their website as possible. With security updates still available to retired themes, these users would not be forced to update to a newer theme.
The proposal was developed based on feedback and recommendations from a group of contributors. It is now awaiting feedback from the larger community. Unless the proposal needs to be significantly modified, contributors will soon move on to the practical tasks associated with retiring themes.