Do you want to use cookie retargeting in WordPress?
Cookie retargeting is the secret tool already used by many of the most popular websites. It allows you to show custom on-site messages to your users based on their past behavior which helps you boost sales.
In this article, we’ll show you how to use cookie retargeting in WordPress to show custom on-site messages and boost conversions.
What is Cookie Retargeting?
Cookie retargeting is a marketing technique where websites use cookies to track user behavior and offer a personalized experience.
There are two types of cookie retargeting techniques.
First, there is off-site cookie retargeting. This method is used to track user activities across the web.
Facebook pixel and Google remarketing are two of the most popular advertising programs that allow you to use their massive reach and show targeted ads to people who visit your website.
Secondly, you have on-site cookie retargeting, which allows you to show targeted messages to users based on how they interact with your WordPress website.
What are cookies?
Cookies are small text files containing pieces of data. Websites set cookies in users’ browsers to store temporary information such as login status, user preferences, session details, and more.
How to Use On-Site Cookie Retargeting to Boost Conversions?
There are a number of ways website owners use on-site retargeting messages to boost conversions and increase sales.
For instance, eCommerce stores can show custom offers to users based on how they interact with other offers. This allows you to create a dynamic sales funnel that leads users to make a purchase.
Another use-case scenario would be lead generation. With on-site retargeting, if a user closes one sign-up form, then you can show them a different message with another offer.
On-site retargeting messages are highly effective because:
It shows personalized messages to users at a time when they are already engaged with your website.
Allows you to create customized campaigns that get better with each user interaction until they convert
You save money on paid advertising campaigns by utilizing your existing website traffic to the max
That being said, let’s take a look a how to use cookie retargeting in WordPress.
Creating On-Site Retargeting Campaign in WordPress
The best way to create on-site retargeting messages is by using OptinMonster. It is the best conversion optimization and lead generation software in the world.
You can use it to easily create attention-grabbing signup forms, popups, welcome mats, in-line offers, custom offers, and more.
First, you need to signup for an OptinMonster account by visiting the website and clicking the ‘Get OptinMonster Now’ button. You’ll need at least their Pro plan for cookie retargeting and Growth plan for follow-up campaigns.
This plugin acts as a connector between your WordPress site and the OptinMonster app.
Upon activation, you will see the welcome screen. Simply click the ‘Connect Your Existing Account’ button.
Next, a new window will open, where you’ll need to sign in to your account and connect your website with OptinMonster.
Go ahead and click the ‘Connect to WordPress’ button.
Now, you’re ready to create a new campaign.
First, you’ll need to go to OptinMonster » Campaigns from your WordPress admin panel and then click the ‘Create Your First Campaign’ button.
This will take you to the OptinMonster website, where you’ll be asked to choose a campaign type and a template.
You can choose any campaign type or template, but for this tutorial, we’ll be creating a lightbox popup.
You can select any template that you’d like to use for your campaign.
Next, you’ll be asked to provide a name for your campaign and click the ‘Start Building’ button.
After that, you’ll enter the drag-and-drop campaign builder interface.
It is a powerful design tool where you can simply point and click on any item to edit it. You can also add new items like buttons, images, columns, and more to your popup campaign.
Next, you can switch to the ‘Display Rules’ tab at the top.
Here, OptinMonster will give you different options for displaying your onsite targeting campaigns.
For instance, you can show the popup after users spend a certain time on the page, are from a particular location, or are about to exit your website.
By default, OptinMonster will show your campaign after a visitor spends at least 5 seconds on the site. Plus, it appears on all the pages.
Once you are satisfied, simply switch to the publish tab.
Next, you’ll need to make your campaign live by changing its status from Draft to Publish. Don’t forget to click the ‘Save’ button when you’re done.
Now by default, OptinMonster will show this campaign to all users who visit your website. Users will be able to close the popup or perform their desired action.
Creating a Retargeting Campaign to Show Custom Messages
Now that you have launched your first campaign, let’s add another campaign using the follow-up retargeting feature.
Click on the create new campaign button in the OptinMonster dashboard and select your campaign type and template. Since we have used a lightbox popup, we’ll be using a ‘Floating bar’ as our retargeting campaign.
After selecting a template, you’ll enter your campaign name.
Then simply click the ‘Start Building’ button to continue.
After that, you’ll enter the OptinMonster builder where you can design your campaign using simple drag-and-drop tools.
You can edit the optin text, adjust the countdown timer to generate FOMO, add a coupon, and so much more.
Once you are satisfied with the design, it is time to select which users you want to show this custom message to.
Simply switch to the Display Rules tab at the top of the builder. OptinMonster offers a ton of display rules that you can choose from. You can also add multiple rulesets.
Next, under the If menu, go to the ‘Personalization’ display rules options and select Has Closed.
After that, select ‘Campaign’ and then select your previous campaign.
Next, you need to switch to the ‘Publish’ tab.
Here, simply change your campaign status from Draft to Publish under ‘Publish Status.’ Once that’s done, simply click the ‘Save’ button and exit the campaign builder.
You can now visit your website in the incognito browser tab to see your campaign and the follow-up retargeting message.
Adding Cookie Retargeting with Custom Messages
Cookie retargeting allows you to show custom messages to users based on their previous actions, cart status, shopping history, and more.
This allows you to create promotions and upsells designed for customers at different stages of your sales funnel.
When customizing your campaign, simply switch to the ‘Display Rules’ tab.
Under the If menu, you can go to the ‘Targeting (Who)’ display rules options and select Cookie Targeting.
Next, you’ll need to enter the cookie key and value. The key is the cookie name, and the value parameter is the contents of the cookie.
OptinMonster lets you select different operators to use for the display rule. These include options like match exactly, contain, exist, start with, ends with, and more operators.
For instance, if you are using WooCommerce, then you can use WooCommerce cookies to target users who have added products to their cart. This way, you can cross-sell items in their cart, reduce cart abandonment, and more.
After adding cookie retargeting rules, go to the ‘Publish’ tab.
From here, simply change the Publish Status from Draft to Publish for your campaign.
OptinMonster will now display your custom message based on the cookie-targeting rules you have set.
We hope this article helped you learn how to use cookie retargeting in WordPress to show custom on-site messages. You may also want to see our guide on how to recover abandoned cart sales in WooCommerce as well as our comparison of the best live chat software for websites.
If you liked this article, then please subscribe to our YouTube Channel for WordPress video tutorials. You can also find us on Twitter and Facebook.
Do you want to embed a Facebook video in WordPress?
The videos that you post to Facebook also make great content for your website. By embedding a Facebook video feed, you can keep your site fresh and interesting while also growing your Facebook following.
In this article, we’ll show you an easy way to embed Facebook videos in WordPress.
Why Add Facebook Videos in WordPress?
Videos are a great way to connect with your audience and keep them engaged. This is true no matter whether you’re running a personal blog or a business website.
Creating engaging and entertaining videos takes time and effort so if you’re posting videos to Facebook, then it makes sense to re-use them on your WordPress website.
By linking your website to your Facebook account, any new videos that you post to Facebook will appear on your website automatically. In this way, you can keep your website fresh with very little day-to-day effort.
Embedded videos can even help grow your Facebook page. If website visitors see lots of interesting videos and playlists then they’ll want to follow you on Facebook. This can get you some extra followers and more engagement.
With that being said, let’s see how you can easily embed a Facebook video in WordPress.
Installing a Facebook Video Plugin in WordPress
The easiest way to embed a Facebook video in WordPress is by using the Custom Facebook Feed Pro plugin.
In this guide, we’ll be using the pro version of Smash Balloon as it allows you to embed videos in WordPress including HD, 360o, and Facebook Live videos.
Smash Balloon Pro also lets you show photos in a custom Facebook feed, and display the total number of likes, shares, comments, and reactions below each post. However, if you’re just starting out and have a limited budget, then there’s also a free version you can use.
Upon activation, head over to Facebook Feed » Settings and enter your license key into the ‘License Key’ field.
You’ll find this information under your account on the Smash Balloon website.
After entering the key, click on the ‘Activate’ button.
Connect Your Facebook Page or Group to WordPress
Smash Balloon Custom Facebook Feed allows you to embed videos from Facebook pages and groups. You can even show the videos in a lightbox popup so people can watch the full video directly on your WordPress website.
The first step is connecting your Facebook page or group to WordPress, so go to Facebook Feed » All Feeds and then click on ‘Add New.’
Smash Balloon lets you show posts from your Facebook timeline, photo albums, Facebook statuses, events, and more.
Since we want to embed Facebook videos in WordPress, you’ll need to select ‘Videos’ and then click on ‘Next.’
Now, you need to select the Facebook page or group where you’ll get the videos from.
To do this, click on ‘Add New.’
Next, choose whether you want to show videos from a Facebook page or group.
Once you’ve done that, click on ‘Connect to Facebook.’
This opens a popup where you can log into your Facebook account and choose the pages or groups that you want to use with Smash Balloon.
After that, click on ‘Next.’
Now, Facebook will show all the information that Smash Balloon will have access to, and the actions it can perform.
To restrict Smash Balloon’s access to your Facebook account, simply click to disable any of the switches.
Just be aware that this may affect the videos that you can embed on your WordPress blog or website so we recommend leaving all the switches enabled.
When you’re happy with how the permissions are set up, click on ‘Done.’
After a few moments, you should see a message confirming that you’ve connected your WordPress website to Facebook.
With that done, you’re ready to click on ‘OK.’
Smash Balloon will now return you to the WordPress dashboard automatically.
How to Embed Facebook Videos in WordPress
At this point, you’ll see a popup with the Facebook group or page that you just linked to your website. Simply select the radio button next to the page or group you want to use and then click on the ‘Add’ button.
If you accidentally closed the popup, don’t worry. You can simply refresh the page to reopen the popup.
Once you’ve done that, WordPress will take you back to the Facebook Feed » All Feeds page automatically. Just like before, click on ‘Add New,’ select ‘Videos’ and then click on the ‘Next’ button.
Now, select your Facebook page or group, and click on ‘Next.’
On this screen, you can choose the template that you want to use for the video feed.
All of these templates are fully customizable so you can fine-tune the design depending on how you want to show the Facebook videos on your website.
We’re using the ‘Default’ template, but you can choose any template you want. After making your selection, click on ‘Next.’
After that, you can choose whether to show all the videos from your Facebook page or group or just the videos from a specific playlist.
If you choose ‘Show from a specific playlist,’ then you’ll need to enter that playlist’s URL.
Once you’ve made a decision, go ahead and click on the ‘Next’ button.
Smash Balloon will now create a feed based on your source and the template you’ve chosen. This is a good start, but you may want to fine-tune how the videos appear on your site.
How to Customize Your Embedded Facebook Videos
The Smash Balloon Custom Facebook Feed plugin gives you lots of ways to customize how the videos appear on your website. That being said, it’s worth taking a look at these settings.
In the WordPress dashboard, go to Facebook Feed » All Feeds. Here, find the video feed you just created and click on the ‘Edit’ button next to it, which looks like a small pencil.
This opens the Smash Balloon feed editor, which shows a preview of your Facebook video feed to the right.
On the left-hand side, you’ll see all the different settings you can use to customize how these videos appear on your WordPress website. Most of these settings are self-explanatory, but we’ll quickly cover the major areas.
If you want to change the template, then click on ‘Template.’
Then, select the ‘Change’ button.
This opens a popup showing all the different templates you can use for your video feed.
Simply select the design you want to use instead, and then click on ‘Update.’
The next setting is ‘Feed Type,’ which allows you to show different content in your feed. For example, you might decide to show photos, albums, or events instead of videos.
Since we want to embed Facebook videos, you’ll typically want to ignore this area.
Next, click on ‘Feed Layout.’
Here, you can choose between different layouts, such as masonry and grid, and change the feed height.
As you make changes, the preview will update automatically so you can try different settings to see what looks the best.
By default, Smash Balloon will show the same number of videos on desktop computers and mobile devices such as smartphones.
You can preview how your videos will look on desktop computers, tablets, and smartphones using the row of buttons in the upper-right corner.
Mobile devices usually have smaller screens and may struggle to process lots of large, high-resolution videos. Visitors may also be using their mobile data rather than free Wi-Fi.
With that being said, you may want to show fewer videos on smartphones and tablets. To do this, simply type a different number into the ‘Mobile’ field under ‘Number of Posts.’
By default, the Facebook feed shows fewer columns on smartphones and tablets, compared to desktop computers. This helps all your videos fit comfortably on smaller screens.
You can change the number of columns that Smash Balloon uses on tablets, mobiles, and desktop computers using the ‘Columns’ settings.
The next settings page is ‘Color Scheme.’
Smash Balloon uses the colors inherited from your WordPress theme by default, but on this screen, you can switch to a ‘Light’ or ‘Dark’ color scheme instead.
Smash Balloon can add a header to your feed, which is your Facebook profile picture and the name of the page or group. This lets visitors know where the embedded videos come from, and where they can find this content on Facebook.
To add this section, click on ‘Header’ in the left-hand menu.
You can then click on the ‘Enable’ toggle.
After adding a header you can change how this area looks, including hiding or adding your Facebook profile picture, changing the size of the bio text, and more.
If you want to remove the header completely, then click to turn off the ‘Enable’ toggle.
By default, Smash Balloon shows the title of each video. If you want to hide the title, then select ‘Posts’ from the main Smash Balloon editor menu.
Then, go ahead and click on ‘Post Style.’
On this screen, you can hide the video titles by clicking on the ‘Show Video Title’ slider.
This can be useful if you haven’t added titles to all your videos, or your titles don’t make sense outside of Facebook.
On this screen, you can also hide or show the video descriptions. For example, you may use these descriptions to provide extra information about the video.
To add the description, simply click to enable the ‘Show Video Description’ switch.
By default, Smash Balloon doesn’t add the Facebook ‘like’ button to your video feed. If visitors like your embedded videos then they may want to follow you on Facebook.
With that being said, you may want to add a ‘like’ button to the feed, by selecting ‘Like Box’ from the editor’s left-hand menu.
After that, simply click on the ‘Enable’ button so that it turns blue.
Smash Balloon adds this button below your video feed, but you can change this by opening the ‘Position’ dropdown and choosing ‘Top.’
On this screen, you can also change how the ‘like’ section looks including changing its width, showing how many people follow you on Facebook, adding a custom call to action, and more.
When you’re happy with how the button looks, you can move on to the next settings page by selecting ‘Load More Button.’
The Load More button encourages visitors to scroll through more of your video feed, so Smash Balloon adds it to your embedded Facebook feed by default.
Since it’s such an important button, you may want to customize this button by changing its background color, hover state, label, and more.
Another option is to remove the button completely, by clicking the ‘Enable’ toggle. For example, you might remove this button and then encourage visitors to check out your Facebook page in order to see more of your videos.
By default, Smash Balloon allows visitors to watch your Facebook videos without leaving your WordPress website.
They can simply click on any video thumbnail to open it in a lightbox, as you can see in the following image
Visitors can scroll through the videos in your feed using the arrows.
If they want to like a photo, leave a comment, or share the video to their page, then they can click on the ‘View on Facebook’ link.
There are a few different ways that you can customize Smash Balloon’s default lightbox.
To see your options, click on ‘Lightbox’ in the left-hand menu.
Here, you can change the color of the lightbox’s text, links, and background colors.
The lightbox feature allows visitors to watch your videos in a popup. If you prefer, then you can disable the lightbox so that all your videos play as small thumbnails, embedded inside the page content.
In this way, you can encourage people to visit your Facebook page, to see the full-size video. To disable the lightbox, simply click on the ‘Enable’ toggle to turn it from blue to grey.
When you’re happy with how the video feed looks, don’t forget to click on ‘Save.’
You’re now ready to embed the Smash Balloon feed in your website.
How to Add Facebook Videos to WordPress
With Smash Balloon, you can add the video feed to your WordPress website using a block, widget, or shortcode.
If you’ve created more than one feed using Smash Balloon, then you’ll need to know the feed’s code if you’re going to use a widget or block.
To get this code, go to Facebook Feed »All Feeds and then look at the feed="" part of the shortcode. You’ll need to add this code to the block or widget, so make a note of it.
In the following image, we’ll need to use feed="6"
If you want to embed your Facebook feed in a page or post, then we recommend using the Custom Facebook Feed block.
Just open the page or post where you want to embed your Facebook videos. Then, click on the ‘+’ icon to add a new block and start typing ‘Custom Facebook Feed.’
When the right block appears, click to add it to the page or post.
The block will show one of your Smash Balloon feeds by default. If you want to use a different video feed instead, then find ‘Shortcode Settings’ in the right-hand menu.
Here, simply add the feed="" code and then click on ‘Apply Changes.’
The block will now show the videos from your Facebook page or group. Just publish or update the page to make the video feed live on your website.
Another option is to add the feed to any widget-ready area, such as the sidebar or similar section. This allows visitors to watch your Facebook videos from any page of your site.
Simply go to Appearance » Widgets and then click on the blue ‘+’ button.
After that, find the ‘Custom Facebook Feed’ widget.
Then, just drag it onto the area where you want to show the video feed.
The widget will show one of your Smash Balloon feeds automatically.
To show a different feed instead, type or paste the feed’s code into the ‘Shortcode Settings’ box and then click ‘Apply Changes.’
You can now make the widget live by clicking on the ‘Update’ button. For more information, please see our step-by-step guide on how to add and use widgets in WordPress.
Finally, you can embed videos on any page, post, or widget-ready area using a shortcode.
Simply go to Facebook Feed »All Feeds and copy the code in the ‘Shortcode’ column. You can now add this code to any Shortcode block.
Sometimes you may want to embed a specific Facebook video in a page or post. For example, you might have a Facebook video that talks about the same topics as your latest blog, or a promotional video showing the product you’ve just launched on your online store.
To embed a specific video, you’ll need to buy and install the Featured Posts extension as it allows you to display a particular post or event using its ID.
To start, go to Facebook Feed » Extensions.
Here, find the ‘Featured Posts’ extension and click on its ‘Add’ button.
This will open the Smash Balloon website in a new tab, with instructions on how to purchase the extension.
Once you have the extension, you can install it in exactly the same way you install a plugin. If you need help, then please see our guide on how to install a WordPress plugin.
After activating the plugin, go to Facebook Feed » All Feeds and click on ‘Add New.’
Under ‘Advanced Feed Types,’ select ‘Single Featured Post’ and then click ‘Next.’
You can now choose the page or group that you want to use as your source by following the same process described above.
On the next page, you’ll need to enter the ID of the video that you want to embed.
To get this ID, visit Facebook in a new tab and then open the video that you want to embed.
You can now go ahead and copy the URL.
After that, just post the URL into your WordPress dashboard and click on ‘Next.’
Once you’ve done that, you can style the video and then add it to your site following the same process described above.
If you liked this article, then please subscribe to our YouTube Channel for WordPress video tutorials. You can also find us on Twitter and Facebook.
Using WordPress and WooCommerce to host your online store is a powerful combo. But what if you sell products wholesale? You’re going to need a more robust solution. You need a WooCommerce B2B extension.
Do you want to add dark mode to your WordPress site?
By adding a dark mode to WordPress, your website will adapt automatically based on the visitor’s browser preferences. You can also add a dark mode toggle to your site, so visitors can easily switch between dark and light modes.
In this article, we’ll show you how to add dark mode to your WordPress website.
What is Dark Mode and Why Add it to Your Website?
Many modern mobile devices and computers use dark mode to minimize the amount of white light that comes from the screen. This can reduce eye strain, especially in low-light conditions.
Some people even believe that it allows you to use computers and mobile devices late into the night without the white and blue light ruining your sleep.
Some devices come with a built-in night mode that simply uses warmer color tones. However, dark mode actually adds dark colors to the device’s background.
If you have an iPhone or Android smartphone, then you may be able to switch to dark mode using a toggle. Some popular websites like YouTube even offer a built-in dark color scheme.
On desktop computers, you can visit websites in dark mode by using a Chrome extension such as Night Eye.
Here’s how the WPBeginner website looks using that extension:
By adding a dark mode toggle to your website, users will be able to choose the mode they prefer without having to install a special browser extension.
Many plugins also allow you to customize how dark mode looks on your website, so you don’t have to use the browser or device’s default settings.
You can even add dark mode to your WordPress admin area. This can be useful if you work on your site in the evenings or at night, or if you’re suffering from eye strain.
With that in mind, let’s see how you can add dark mode to your website’s public-facing front-end, and the admin area of your WordPress website.
Tip: Want to use a dark color scheme, even when the visitor’s device is in normal or daytime mode? Then check out our list of the best dark themes for WordPress.
How to Add Dark Mode to Your WordPress Website
The easiest way to create a dark mode for your website is by using Droit Dark Mode. This plugin adds a toggle so visitors can enable dark mode on the front end of your site. It can even add a toggle to the admin area, so you can enable dark mode for the WordPress dashboard.
First, you’ll need to install and activate the Droit Dark Mode plugin. For more details, please see our guide on how to install a WordPress plugin.
Upon activation, go to Droit Dark Mode » Preset Colors and choose how your dark mode will look to visitors. The free version of the plugin comes with two preset colors, so select the color that you want to use.
After that, click on ‘Display Settings’ and select a style for your dark mode switch.
Next, open the Body Position dropdown and choose where the slider will appear on your WordPress blog or website. You’ll typically want to add it to the top of your site so visitors can easily switch between the different modes.
With the setup out of the way, it’s time to enable dark mode by selecting ‘General Settings.’
To start, you’ll need to activate ‘Enable Front-end Dark mode,’ which will add the switch to your website’s front-end.
At the moment, WordPress will always load your site in regular, light mode.
If you want to make dark mode the default, then simply click to activate the ‘Enable Default Dark Mode’ switch.
With that done, just click on ‘Save Settings.’ Now if you visit your website, you’ll see the new dark mode switch in action.
To enable and disable dark mode, simply give the switch a click.
Adding Dark Mode to Your WordPress Admin Area
You can change the admin color scheme in WordPress using the built-in settings. However, none of the default color schemes reduce the white light coming from the screen.
If you work late into the evening or suffer from eye strain, then you can try adding a dark mode to the WordPress admin area.
Simply go to Droit Dark Mode » General Settings and click to activate the ‘Enable Backend Dark Mode’ toggle.
After that, you can choose a color scheme for the admin dark mode. Just open the new ‘Select Color Palette’ dropdown and select either Color 1 or Color 2.
With that done, click on ‘Save Changes.’
Droit Dark Mode will now add a dark mode toggle to the admin toolbar. To see admin dark mode in action, just click the toggle.
If you’re not happy with how dark mode looks, then open the ‘Select Color Palette’ dropdown and choose a new style from the list.
After that, click on ‘Save Settings’ and use the toggle to see the new colors in action.
If you liked this article, then please subscribe to our YouTube Channel for WordPress video tutorials. You can also find us on Twitter and Facebook.
Have a domain purchased from somewhere else besides WPMU DEV? It’s now easier than ever to transfer them to our platform in The Hub with our domain transfer-in feature.
As you’ll see, it only takes three steps to quickly establish a domain into a new home at WPMU DEV – so you can manage everything under one roof!
Plus, you’re in control regarding nameservers, autorenewal, associating a domain with a client, and more.
After reading this, you’ll immediately be able to implement transferring domains into one easy-to-manage system – cheaply and effectively.
But first…
Before we get into the steps to transfer a domain, here are some general guidelines to get you in good shape:
These tips will set you on the right course to domain transfer!
Now, if you’re ready — let’s begin!
Triggering Domain Transfers
There are several ways to transfer a domain over. Whether it’s an established domain with us or you have a third-party domain service, it’s a breeze.
There are just a few differences…
New User
If you’re a new user with no registered or connected domains, you’ll get started in The Hub by clicking the Domains tab and Transfer a Domain.
No domains in our system? This area will get you started.
Already have domains registered or connected? Under Registered Domains, you’ll start by clicking Transfer Domain.
This gets you started right away.
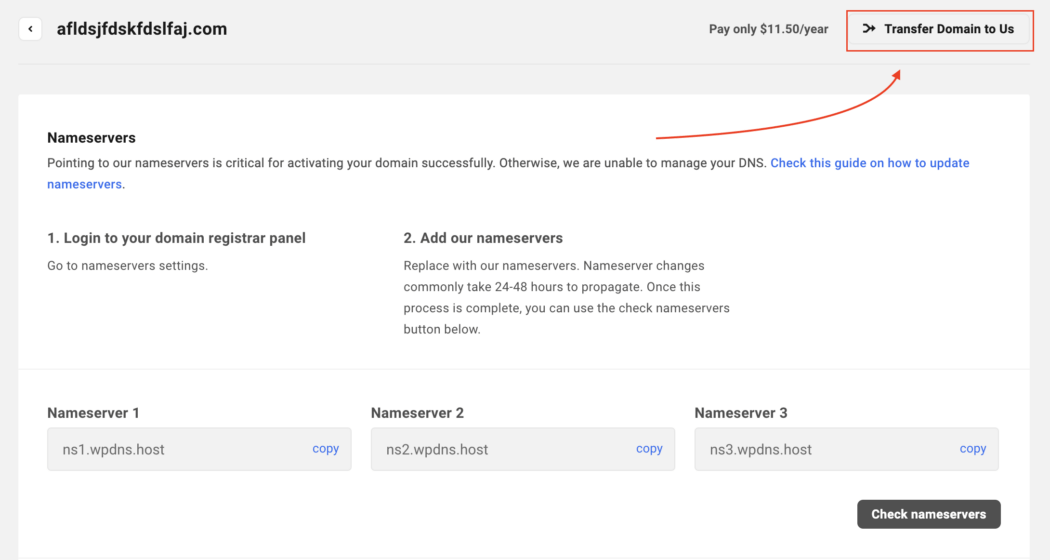
Another route is if you have connected any domain(s), click on the ellipsis icon on any domain’s row to show the available management options for that domain. From that, click on the Transfer Domain to Us button.
You have other options under the ellipsis as well, such as managing and rechecking DNS.
Additionally, you can click on any connected domain’s row, which will open up Nameserver details for that specific domain. Clicking the Transfer Domain to Us button is another way to get the process going.
As you can see, the price per year is also mentioned here.
Whatever option you choose will lead to an area where you can start the 3-step process.
Step 1: Domain Eligibility Check
In this first step, we check whether the domain is transferable.
To start, you’ll specifically enter the domain you want to transfer. Enter it completely with its TLD (e.g. .com).
Once entered, hit ‘Transfer’ to continue.
If a domain is ineligible, you’ll get an error message. The messages will vary, depending on the issue.
In this example, it’s an invalid TLD.
Almost any domain TLD is okay to transfer. We have over 260 TLDs that are available for use and transfers. For any questions or issues about this, please contact support or see our documentation for rules and reasons a domain doesn’t transfer.
That being said, if all is good and the domain is eligible, once you hit Transfer, it will take you to the nameserver step.
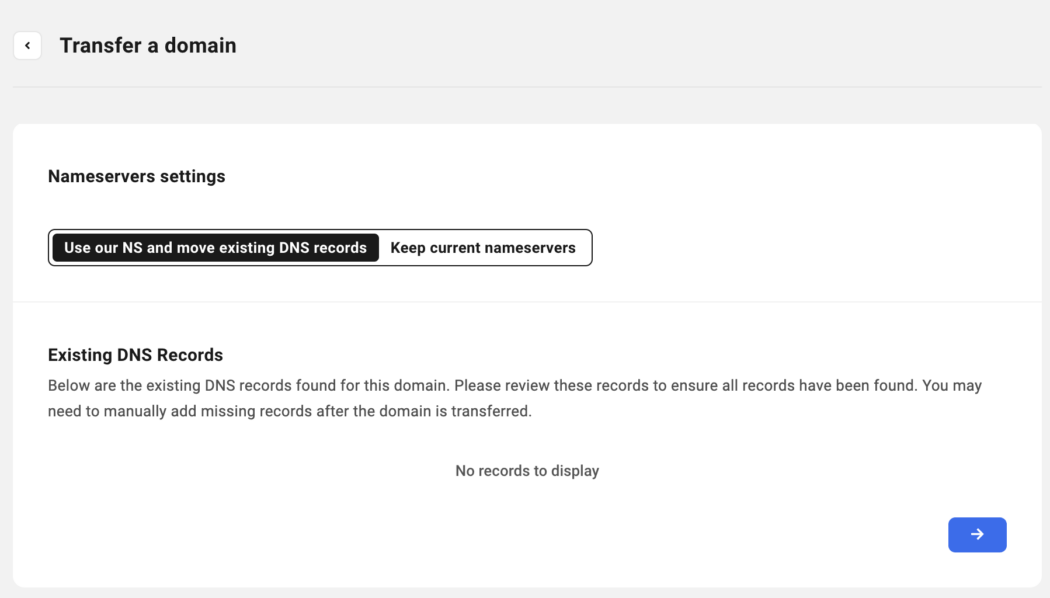
Step 2: Nameserver Settings
This step is where you can choose to use our nameservers and DNS records, or keep current nameservers. If existing DNS records are available, they will be shown here. If not, it will be blank and state that there are no records to display.
Choose where you’d like to manage your DNS in one click.
If you choose to Keep Current Nameservers, it will keep the current nameserver records for the domain.
The type of nameserver and TTL is listed.
Once you decide on what’s best for you, you can continue on…
You can start by viewing the Registration Terms. You’ll notice the transfer price, renewal price, auto-renew option, and whether domain privacy is active or not.
Want auto-renew? It’s a click away.
Next, the domain will need an Authorization Code from your current registrar. This is a normal process that is universal amongst domains. You’ll get this from the losing domain register you’re transferring from.
You’ll need this code from the domain provider you’re transferring from.
Additionally, you’ll also add the Registrant Information. You can associate the domain with a client or add personal details.
You can always go back and edit this information at any time.
Then, checkout in the Summary. This has the Domain Name, Registration Period, and Price. Plus, it shows whether Auto-Renew is activated or not.
Read the Terms of Service and Privacy Policy for more information.
After hitting Pay Now, you’re all set!
By default, the Registration Period of all the transfer-in domains is set to One year. Pay the transfer fee on our pricing page to transfer a domain to WPMU DEV. Upon successful transfer, the domain’s expiration date will be extended by one year.
It’s also important to note that if the Authorization code is invalid, the domain transfer will fail, and the transfer amount will be refunded to your account.
The Domain Transfer Process
Once the new domain transfer-in payment is complete, the Domain Registration process begins. You’ll be able to see the status under Domain Overview.
The transferring part is always highlighted in orange.
The system will verify three registrant contact data pieces: First Name, Last Name, and Email Address. For more information about registrant verification, please read our documentation.
When complete, you’ll see that it’s Active OR Verifying. Also, additional information will be displayed (e.g. Registration Date, Expiration date, Costs, etc).
All other information is displayed, too.
Be aware that the domain transfer can take up to five days – and that’s out of our control. It depends on how quickly the verification can take place from the losing register (e.g. GoDaddy).
Once completed, your domain will then be available in the Domains area in The Hub – along with any others you have.
Bulk Domain Transfer
Last but not least, if you need to do a Bulk Domain Transfer, contact our 24/7/365 support to help assist with this. It’s the easiest and quickest way to get any bulk domains transferred over to our system.
The Main Way to Manage Your Domain
As you can see, bringing in domains from third-party providers is quick and easy, with only three steps. And once done, you can manage all your domains in one place with The Hub!
Adding domains to a client’s site, setting up auto-renewal, connecting nameservers – the process couldn’t be more streamlined. So, try bringing a new domain in today. Good luck, and enjoy!
Oh, and if you’re not on our Agency Plan yet, give it a go. Not only do you get domain management like bringing in third-party domains, you’ll also have access to unlimited site licences, 500GB CDN, $144 hosting credits, and more.
By default, WooCommerce shows all the prices of online shops in American dollars (USD). It can be confusing for people outside of the US. Therefore, WooCommerce website owners need to show their prices in the native currency of their users. If you’re selling products or services globally, you need an efficient way to handle multiple currencies.
Do you want to prevent fraud and fake orders on your WooCommerce store?
Fraud and fake orders can cause serious losses for an online store. Luckily, there are effective tools to prevent spam and block fraudulent orders.
In this article, we’ll show you how to easily prevent fraud and fake orders in WooCommerce.
Why Do You need to Prevent Fraud and Fake Orders in WooCommerce?
Fraudulent and fake orders can cause serious financial losses to a business. This is why you need to monitor your online store and prevent fraud and fake orders.
Last year, online stores lost more than $20 billion in revenue due to fraudulent payments, chargebacks, and fake orders.
For some eCommerce stores, the total fraudulent order costs were higher than 4% of total revenue.
A large number of fake orders are usually spam that can be easily prevented. Some orders are more malicious and are placed just to annoy or harass an online business.
The rest of the fraudulent orders are scammers trying to make a few quick bucks.
That being said, let’s take a look at how to prevent fraud and fake orders in WooCommerce.
Here is a quick overview of all the tips we’ll cover in this guide.
Upon activation, you need to visit WooCommerce » Settings page and switch to the Anti-Fraud tab.
From here, you can set a minimum and high-risk threshold score.
Below that, you can change the order status based on the risk score. For instance, you can set the score when an order will be automatically canceled and set a score to put an order on hold.
Don’t forget to click on the ‘Save Changes’ button to store your settings.
Next, you need to switch to the Rules tab. From here, you can configure the rules and assign them a risk score.
For instance, you can set a 5-point score for a customer who is placing their first order.
You can set scores for suspicious IP addresses, emails, unsafe countries, matching IP addresses to geographic locations, and more.
Carefully review the rules and their assigned scores and make changes if necessary. If you are unsure, then default settings would work for most eCommerce websites.
If you are using PayPal as a payment option on your store, then you can switch to the PayPal tab. From here, you can require users to verify their PayPal email addresses.
The plugin also allows you to connect with third-party fraud detection service Maxmind.
This paid service uses a global database to collect data about suspicious payment details, emails, IP addresses, and more.
You can then add this score to your plugin risk score and choose what to do when this score is higher.
Once you are satisfied with your settings, don’t forget to click on the ‘Save Changes’ button to store them.
Viewing Fraud Detection Activity
The plugin comes with an easier dashboard where you can see plugin activity in an easy-to-understand format.
Simply click on the Anti Fraud menu item in your WordPress admin sidebar. From here, you can see statistics about all your orders.
The anti-fraud plugin will help you catch most of the fake and fraudulent orders on your WooCommerce store.
However, if you need more strict measures then continue reading for additional WooCommerce fraud prevention tips.
2. Use Stripe Radar and 3D Secure to Automatically Block Fraud
Stripe is the most popular online payment solution in the world. There is a WooCommerce Stripe gateway by FunnelKit that helps you properly connect WooCommerce with Stripe, so you can take advantage of SCA as well as 3D Secure payments option by default.
This method would require you to use Stripe as your main payment gateway in WooCommerce. First you’ll need to install and activate the Stripe for WooCommerce plugin by FunnelKit. Once that’s configured, it will guide you to set up Apple Pay, Google Pay, and other settings to help you protect against fraud transactions.
Aside from that, Stripe also offers a feature called Stripe Radar to help fight against fraudulent transactions. This is a powerful set of algorithm that reduces chargeback risks for your business.
Basically Stripe uses machine learning to block orders. Their machine learning is trained on data across millions of companies worldwide that use Stripe.
We use Stripe Radar on our own eCommerce websites to help reduce fake and fraudulent orders.
Aside from their machine learning algorithm, you can also set custom rules with allow and block lists, and more.
Unfortunately not all WooCommerce gateways have these robust features. If you’re looking to switch to Stripe, then we recommend talking with FunnelKit team as they’re WooCommerce experts who can help.
3. Using the Cash on Delivery Payment Option Carefully
In many countries, ‘Cash on Delivery’ is a popular payment option. However, these stores find themselves more vulnerable to fake and fraudulent orders.
Users are able to place an order with a fake address, refuse to accept the order, or cancel an order that is already shipped.
Once you have shipped an order, you will pay out of pocket for shipping and return of that package.
We recommend not using the ‘Cash on Delivery’ option when possible, as that can lower the number of fake orders you may get.
Try to offer alternate payment options for users to pay before you can ship the order.
4. Sell in Specific Countries
WooCommerce allows you to easily restrict orders from specific countries. This helps you prevent fake orders from countries where you don’t sell or ship to.
Simply go to the WooCommerce » Settings page and select the countries you want to sell / ship to under the General tab.
Note: Geographical restrictions may reduce fake orders but users can simply use VPN to change their location and provide fake information to place an order.
5. Require Users to Create an Account
Another useful trick to slow down and prevent fake orders is by requiring users to create an account before they can checkout.
Simply go to WooCommerce » Settings page and switch to the Account and Privacy tab. From here, you need to uncheck the box next to the ‘Allow customers to place orders without an account’ option.
Below that, you can check options that allow users to create an account during checkout or from the My Account page.
Asking users to create an account also allows you to easily block customers who placed fraudulent or fake orders.
6. Use a Web Application Firewall and Custom Rules
Many scammers use disposable email addresses, fake IP addresses, and dummy data to place spam or fake orders.
A WordPress firewall helps you block this before it even reaches your website.
We recommend using either Sucuri or Cloudflare, both are among the best WordPress firewall plugin on the market. They comes with powerful security features, CDN servers, and a malware removal service.
In Cloudflare, you can also setup custom page rules to trigger CAPTCHA, or even automatically block users with suspicious activity. We use Cloudflare enterprise on our larger eCommerce stores which comes with all bots anomaly detection and threat response.
If you’re running a large eCommerce store, then it’s worthwhile exploring Cloudflare Enterprise tools.
7. Require Customers to Verify Their Email Addresses
Another way to reduce fake orders and fraudulent activity is by requiring new customers to create an account and then require them to verify their email addresses.
Upon activation, you need to visit the WooCommerce » Settings page and switch to the Email Verification tab.
From here, you can configure the plugin settings to your own requirements.
For instance, you can switch to the Email tab and delay the default WooCommerce new user email until the user verifies their account.
Don’t forget to click on the ‘Save Changes’ button to store your settings.
The plugin will now send a verification email to new WooCommerce customers to verify their email addresses.
It’s important to make sure that if you’re setting up email verification that your WooCommerce store actually have reliable email deliverability. Otherwise this can block real customers from purchasing your products.
There’s also a free version of WP Mail SMTP that you can use as well.
We hope this article helped you prevent fraud and fake orders in WooCommerce. You may also want to see our complete WordPress security guide to make your online store more secure or take a look at our expert pick of the best WooCommerce plugins to grow your store.
If you liked this article, then please subscribe to our YouTube Channel for WordPress video tutorials. You can also find us on Twitter and Facebook.
If your commerce platform is online and in-person, you need flexibility regarding payments. This article covers agile point-of-sale tools and plugins that can power your business on WordPress.
We will showcase some plugins and other options that allow you to have the flexibility of selling face-to-face with a customer or online, setting up your business for omnichannel success!
As you’ll see, many options are free and can be upgraded accordingly. They all have a good track record and are established point-of-sale (POS) systems that perform as a modern-day cash register (and are much less clunky, too).
Hopefully, after reading this post, you’ll have a good idea of what type of POS tool works best for your business and can set it up accordingly.
But first…
Why Should You Use a Good POS system?
It may seem obvious. It’s because you need to sell in-person and online, right? However, there’s a bit more to it than that. A good POS system goes beyond just ringing up a customer.
Systems today can integrate with other systems, keep track of sales, manage merchandise – and offer some tech that can enhance your services to the next level.
Some benefits include:
— Sales can be streamlined from multiple locations.
— Your functionality increases.
— Ability to keep track of real-time data.
— Having a better grasp on managing employees.
— Automatically get your taxes managed.
And more…
It’s vital to be up-to-date on what you can do when selling in-person and online with your WordPress website.
So, are you ready to cash in? Let’s go!
Point of Sale Systems
Here are a handful of modern, efficient, and well-known POS systems to help your WordPress site. They’re in no particular order. (And please note: We are not affiliated with ANY of these. We just find them to be top-notch choices.)
FooSales
FooSales syncs your WooCommerce inventory with a point of sale.
If you’re using WooCommerce, the FooSales plugin is a POS system that will make any computer, iPad, or Android tablet into a physical retail space.
This plugin helps allow you to run your business from anywhere in the world and sell your WooCommerce items quickly and easily. It automatically syncs your WooCommerce product inventory, orders, and customer data.
The sales screen and search tools can promptly locate products with images and descriptions so that you can focus on the clients when they’re checking out. It adds items, shows the amounts of products, and offers a quick one-click checkout.
All the items are displayed – making it easy to locate and check out customers.
Payments can be made with Square and Stripe. It leverages the strengths of both platforms and allows you to enter credit card information or purchase add-on terminals for a monthly fee.
There is also a monthly fee associated with using this plugin. They vary depending on the number of websites and add-ons.
Hike
Hike is another plugin option for WooCommerce POS.
For another WooCommerce option, Hike offers a POS solution in-store and online. It integrates with WooCommerce, allowing access to your customers, product catalog, inventory, and other necessary information.
With Hike, you can control and manage your entire business from a retail POS system. It works with iPads, PCs, and Mac products. It’s fully interactive with card payment systems like PayPal Here, Tyro, and iZettle.
There are many POS options, including offering discounts to sales, parking orders, enabling a custom sale, and adding order notes.
Plus, you can use your existing card terminal – so you don’t need to purchase one directly from them. That said, they offer hardware bundles for complete POS systems (cash register, receipt printer, etc).
Prices vary depending on the outlet, registers, and other factors.
Square
Square is no stranger to modern POS systems.
A very popular POS is Square. Millions of brands use their software to accept payments in-store and online.
You can incorporate Square into your business quickly and easily – whether that be a WordPress developer’s website, restaurant, or street vendor – you name it!
They have great solutions for getting paid with their flexible omnichannel commerce tools. They offer registers, terminals, stands, readers, and more for in-person sales. For online, there’s an app-like shopping experience, customization, the ability to highlight products, and more.
Their plans vary – but you can start for free. The free plan does take transaction fees, but otherwise, there are no costs. You can upgrade to include more features.
wePOS
wePOS is a WooCommerce-focused plugin.
wePOS is another plugin that offers a fast and responsive WooCommerce POS option. You can easily take orders and track your inventory in your WooCommerce store.
Plus, you can physically count WooCommerce products by scanning bar codes and adding them directly to a customer’s cart to process the order.
It features a sleek UI that’s simple to navigate. From this, you can manage your inventory and orders.
You can see the organized items, total costs, tax, and more.
There is a free version and upgrades available. They also have 24/7 support.
Oliver
Oliver is here for your WooCommerce store needs.
With a 5-star rating, the Oliver  plugin for WooCommerce might be a great option for a POS system for your business.
They state: “It’s simple, smart, and easy to use.†Made specifically for WooCommerce, it allows for a consistent combination of eCommerce and physical brick-and-mortar stores. Everything is in one place, and there’s no need for multiple integrations.
It’s designed to work with numerous devices, including iPad, Mac, or PC. The system supports using a mouse, touchpad, and keyboard entry.
They also have POS hardware, like a terminal, printer or all-in-one solutions.
Toast is named this for a reason – it specializes in restaurants. So, if your restaurant runs on WordPress or another platform, you may consider this system.
You’re able to manage all in-person and online sales in one place. They note that their restaurant-grade hardware is 3x faster than competitors, and you can integrate your FOH (front of house) and BOH (back of house) to reduce ticket times by up to 40%.
The Toast platform even includes payroll and team management – so it goes beyond just a POS option.
Their hardware includes handheld devices for ordering, kitchen display systems, self-ordering kiosks, and much more.
It’s free to use. Like many of our other systems, upgrades are available depending on your needs.
Shopify
Shop it to me: Shopify might be the POS solution you’re looking for.
Another well-known platform (millions of merchants and 10% of US eCommerce) is Shopify. Shopify allows customers to order online or in-person. It features one-click checkout that lets shoppers pay how they want – through digital wallets or multi-currency.
It includes a ton of insights into customer data. Everything from their behavior, total sessions, order numbers, and more.
Additionally, they incorporate your social media with tools for Facebook, Instagram, TikTok, and other channels.
There’s a whole range of what Shopify offers, hence why it’s so popular. Be sure to visit their website for more information.
And when it comes to pricing, there’s a free trial – otherwise, it does cost.
There are various levels that you can purchase, depending on what your needs are for your store.
Stripe
Stripe is no secret to POS.
Stripe is a very well-known POS company that offers solutions to millions of companies worldwide. It works with some of the biggest brands (Amazon, Instacart, Zoom, Lyft, etc).
They feature everything that brings websites and apps together for payment. With support for 135+ currencies, it’s available for use with credit, and debit cards, virtual wallets, and more. Additionally, they have items, such as terminals, for in-person sales.
Plus, they are big on security, with a team of world-class security experts at their helm. They’ve also received regulatory licenses around the world.
Stripe is free to use but takes a percentage of the costs.
PayPal
PayPal is another POS giant in the industry.
Like Stripe, PayPal is another payment solution we use for our products. PayPal’s popular with millions of other companies, too.
It’s known chiefly online; however, they offer POS software so you can run your business online and off.
Their POS offers streamlined checkout, business metrics, and an app. You can easily manage products with prices, stock levels, and more – all in one place.
The portable terminal PayPal uses is entirely portable. It accepts most forms of payment (credit, debit, Google Pay, etc), and works with chip and contactless payments.
There is currently a 2.29% transaction fee and costs for the terminal. However, the PayPal Zettle app is completely free to use.
Stay On Top of Your Shop
Out of all of these 10 options we just covered, surely you can stay on top of your WordPress website’s sales – in-person and online. Whether it be a plugin or a separate system, modernizing your selling platform is quick and easy.
And with all of the latest advancements in selling (real-time analytics, instant checkout, inventory control, etc), there’s no reason to be stuck with anything but the most efficient method for your business.
For more information on online sales, check out our article on eCommerce gateways.
Once you have systems implemented, there is no stopping customers from shopping!
Do you want to display your most popular posts by day, week, month, or even all-time in WordPress?
Popular posts allow your visitors to quickly discover your top content, which helps you increase user engagement, pageviews, and conversions.
In this article, we will show you how to display popular posts by day, week, month, and all time in WordPress.
Why Display Popular Posts in WordPress?
When you start a WordPress blog, you don’t have much content, which allows you to display selected posts in a sidebar widget manually.
However, as your website grows, you will notice that older articles on your website don’t get much exposure. By showcasing your top content, you allow new users to quickly discover the best articles on your website. This boosts user engagement on your website and increases your page views.
Now the problem is that if you are showing your all-time popular articles, then a very limited set of articles get repeated exposure. You can diversify it by displaying popular posts by day, week, or month as well.
Let’s take a look at how to easily display popular posts in WordPress by day, week, month, or all time.
Add Popular Posts by Day, Week, and Month in WordPress
For this tutorial, we’ll use the MonsterInsights Pro version because it lets you automatically show top posts from Google Analytics.
There is also a MonsterInsights Lite version that’s free and also includes the Popular Posts feature, but does not connect to GA.
First, you’ll need to install and activate the MonsterInsights plugin. If you need help, then please see our guide on how to install a WordPress plugin.
Upon activation, you will be directed toward the MonsterInsights welcome screen. Go ahead and click the ‘Launch the Wizard’ button.
With MonsterInsights, you can also set up a Google Analytics 4 property. This is the new version of Analytics. The previous Universal Analytics version will sunset on July 1, 2023, and you won’t be able to track website data after this date. That’s why now is the best time to switch to Google Analytics 4 and protect your data.
Now that you’ve added Google Analytics to your website, the next step is to go to Insights » Popular Posts from your WordPress dashboard.
MonsterInsights lets you show your top articles within the content, in the sidebar as a widget, and display popular products if you have an online store.
For this tutorial, we’ll use ‘Inline Popular Posts’ and show featured articles within the content of other blog posts.
The plugin comes with prebuilt themes, and you can see a preview of how your popular posts will appear on the website.
Once you’ve chosen a theme, simply scroll down to see more customization options. For instance, you can change the title color and size, edit the color of the label and background, and more.
Show Popular Posts by Day, Week, Month, and All Time in WordPress
Next, you’ll need to choose how the plugin will determine your popular posts. Let’s see how you can show posts by day, week, month, and all time.
Displaying Popular Posts by Day, Week, and All Time
In MonsterInsights, you can manually select which posts appear in the Popular Posts widget.
This is useful when displaying top content from a specific day or week. Plus, you can also show your all-time best articles anywhere on your website.
Simply select the ‘Curated’ option under Sort By section and then choose the articles you want to feature.
These could be your evergreen content, weekly announcement or news, trending topics from a particular day, and more.
Just begin typing the name of the posts you want to include, and then select them as their name pops up in the field. To continuously display your top posts of all time, you simply need to select them, and as long as ‘Curated’ is chosen, they will appear as popular posts.
However, if you want to display popular posts by the day or the week, you will have to manually change some of these curated posts so they stay fresh for your audience.
For instance, if you are featuring different WooCommerce products weekly, you will need to choose which posts are listed under ‘Curated’ each week.
Displaying Popular Posts by Month and All Time
In MonsterInsights, you get multiple options to automatically show popular posts by month and all time.
First, you can show your most commented pages from the last 30 days by selecting the ‘Comments’ option. The plugin will randomly rotate blog posts with the highest comments and show them in the popular post widget.
Similarly, MonsterInsights also lets you automatically display popular posts based on social shares using the ‘SharedCount’ option.
It integrates with the SharedCount and helps you display your all-time most shared articles. This way, people can easily find content that’s driving social engagement.
MonsterInsights also offers an option to show the top 5 posts from Google Analytics in the last 30 days. This way you can show your top-performing content from last month or all-time anywhere on your site.
First, you’ll need to select the ‘Curated’ option under the ‘Sort By’ section.
After that, you can enable the ‘Add Top 5 Posts from Google Analytics’ option under the Automated + Curated section.
To ensure that your data is being fetched from Google Analytics, click the ‘Test Automated Posts’ button under ‘Automated + Curated.’
A popup message will now appear, showing that the popular posts are being fetched correctly. You can click the ‘Close’ button.
Do note that you’ll need to set up the ‘Post Type’ custom dimensions in MonsterInsights and Google Analytics to use the Automated + Curated feature.
Next, you’ll need to select how you’d like to insert the featured articles.
MonsterInsights offers 2 options, including automatic placement and manual placement.
If you select the ‘Automatic’ option, then you can decide after how many words you’d want the popular post widget to appear. There is also an option to include and exclude pages from display featured posts.
When you’re done, simply click back to the top and click the ‘Save Changes’ button.
This way, your settings will be saved, and MonsterInsights will automatically display popular posts on your site.
On the other hand, you can also show popular posts in any blog post by adding the MonsterInsights block or using a shortcode.
First, add a new post or edit an existing one. Once you’re in the content editor, simply click the ‘+’ button and add the ‘Popular Posts’ block.
After that, you can see a preview of your featured articles in the content editor.
Once you’re satisfied with the widget’s appearance, you can go ahead and publish your article.
We hope this article helped you display popular posts by day, week, month, and all time in WordPress. You may also want to see our guide on WordPress SEO and the best WooCommerce plugins.
If you liked this article, then please subscribe to our YouTube Channel for WordPress video tutorials. You can also find us on Twitter and Facebook.