Discover the importance of specialized WooCommerce hosting and dive deep into WP Engine’s managed WooCommerce hosting features. From high-performing live cart functionalities to Stripe Connect integration and advanced caching, WP Engine offers a comprehensive solution for eCommerce stores. Learn about its unique features, the benefits of managed hosting, and get an inside look at the user-friendly dashboard. Whether you’re starting a new store or looking to optimize an existing one, WP Engine provides the tools and support needed for a successful online business.
Do you want to offer installment payments on your eCommerce store?
Offering an installment plan encourages customers to purchase more products or services. It makes it easier for them to buy expensive items and helps boost sales on your WooCommerce store.
In this article, we will show you how to set up installment payments in WooCommerce using different plugins.
Why Set Up Installment Payments in WooCommerce?
Installment payments allow customers to break up the total amount of a product or service into smaller portions. Instead of paying the price in full, users can pay a certain amount upfront and then pay the remaining amount over a period of time.
As a WooCommerce store owner, you can select the timeframe you’d like to offer to customers for repayments. Usually, this depends on the product and niche you’re in, but you can offer anything between 6 to 24 months.
Setting up installment payments in WooCommerce helps provide alternative payment methods to customers. It encourages your visitors to purchase more valuable and expensive items.
You can also reduce cart abandonment by offering an installment payment option. Customers might not purchase products if they don’t have sufficient funds and would exit your site without checking out. With an option to pay in installments, you can motivate them to buy the product and boost sales.
That said, let’s see which plugins are the best for WooCommerce installment payments.
Affirm Payments is a WooCommerce extension that lets you add tailored buy now pay later programs to your eCommerce store. Affirm is a payment service that helps customers pay at their own pace.
The plugin is beginner-friendly to use. Once you install it, you’ll see the Affirm payment option in WooCommerce. Customers can then select a payment plan that works for them.
Affirm offers 4 interest-free payment features, where customers can split the initial cost into 4 installments with no interest. This makes it easier to sell high-ticket items, and customers won’t have any impact on their credit scores.
Besides that, Affirm Payments also allows customers to choose their payment terms. The best part is that it shows the exact amount that needs to be paid every month with the annual percentage rate (APR).
Who Should Use It: Affirm Payments plugin is a great solution for anyone looking to add just a buy now pay later payment option in WooCommerce. The provider helps create installment plans for customers and also offers 4 interest-free installments every 2 weeks.
Pros:
Easily add Affirm as a payment option in WooCommerce
Offer ‘Pay in 4’ plans with no interest (0% APR)
Allow customers to choose their installment plan
Showcase all payment plans in a single view
Cons:
Limited customization options from within the WordPress dashboard
High-interest rate (up to 30%) for some items
Sometimes Affirm may require a credit check before transaction approval
Pricing: Affrim Payments is a free WooCommerce extension.
Klarna Payments for WooCommerce is a free WordPress plugin that adds Klarna payment options to your online store. Klarna is a Swedish fintech company that offers online payment solutions for website owners.
Using the plugin, you can offer customers to pay the full amount at checkout, first try the product and then pay later, or slice the total amount into installments.
It provides customers the flexibility of choosing when they want to pay in the installment plan. There is also an option to provide 4 interest-free payments, so customers can save costs and pay for a product in smaller portions.
The setup process is very easy. First, you’ll need to sign up for a Klarna account. Once that’s done, simply use the plugin to add Klarna as a payment option in WooCommerce. Klarna will then approve your store, and you can start offering installment plants to customers.
The best part about using Klarna is that it easily integrates with WP Simple Pay. You can use it to offer buy now, pay later payment plans in WordPress.
WP Simple Pay comes with a built-in Klarna (Buy Now, Pay Later) Form template. This way, you let customers choose the payback period for a product.
On the downside, Klarna will work with merchant accounts and is only available in selected countries. For instance, it’s available in Sweden, Norway, Finland, Denmark, Germany, Austria, the Netherlands, Belgium, Switzerland, France, Italy, Poland, Spain, Portugal, Great Britain, Hungary, Czech Republic, Slovakia, the USA, and Australia.
Why Should You Use It: If you’re looking for a plugin that offers flexible installment plans for your online store, then Klarna Payments for WooCommerce is perfect. It’s easy to use and also integrates with WP Simple Pay, so you can create payment forms without editing code.
Pros:
A free plugin that lets you add installment plans
Beginner-friendly to use
Offer 4 interest-free installment plans
Let customers choose when they want to pay (up to 24 months)
Easily integrates with WP Simple Pay
Cons:
Only available in limited countries
Not many customization options
Pricing: Klarna Payments for WooCommerce is 100% free to use.
Jifiti Buy Now Pay Later is the next WooCommerce installment payments plugin on our list. It adds a Jifiti payment option to your online store and offers a white-labeled buy now pay later platform for WooCommerce.
Jifiti is a platform that connects lenders, merchants, and customers. With a white-label program, you can use your custom branding while offering installment plans. The service lets you add zero-interest split payments, pay in 3 or 4 installments, and more.
In the background, Jifiti will connect you with leading banks and lenders like MasterCard, Credit Agricole, and Citizens Pay. This way, customers can break large payments into smaller amounts and pay them over a period of time.
What makes this plugin different is that if financing is not approved by one of the lenders, it will automatically pass your customer’s financing application to the next lender in the network. As a result, you’ll see more financing and a boost in sales.
Who Should Use It: The Jifiti Buy Now Pay Later plugin is excellent for users who want to add a white-label installment payment program to their WooCommerce store. You can work with a lender or a bank to add a buy now pay later option on your site and then customize its appearance.
Pros:
Create branded installment payment plans for your store
Offer interest-free installment plans
Work with leading banks and lenders for financing options
Automatically pass the customer’s financing application to the next lender
Cons:
Setting up white labels can be time-consuming
Customers would have to wait for their financing to be approved
Pricing: Jifiti Buy Now Pay Later is a free WooCommerce plugin.
WooCommerce Deposits is a premium plugin that lets you set up installment plans on your online store. The plugin offers flexible payment options and allows you to offer custom schedules based on days, weeks, or months.
You can create multiple payment plans for your WooCommerce store. It also lets you choose variable percentages and intervals for each payment. For instance, you can decide what percentage a customer should pay initially and then over time.
The plugin is straightforward to use and offers a clean interface. You can easily create and manage all your installment payment schedules from the WordPress dashboard.
Who Should Use It: From our testing, WooCommerce Deposits is a user-friendly plugin that’s perfect for creating custom payment schedules. If you’re looking to set up multiple installment plans for your WooCommerce store, then this plugin is for you.
Pros:
Easily create custom payment schedules
Have full control over payment amount and intervals
Very easy to use and setup
Add a description to each payment schedule to guide customers
Cons:
Limited customization options for changing appearance
There is no free version
Pricing: WooCommerce Deposits is a paid extension and will cost you $18.25 per month.
Splitit is the next WooCommerce installment payments plugin on our list. It lets you add installment payments to your online store with ease.
In our experience, what’s different about this plugin is that it allows customers to use their existing debit or credit card to split the total amount into smaller portions. Customers don’t have to get a loan or wait for approval to purchase a product.
As long as a customer has available credit on their card that’s equal to the price of the purchase, they can easily use it to set up installments.
Splitit supports different card network providers, including Visa, MasterCard, American Express, Discover Global Network, and more. The plugin is also easy to use. Simply connect your merchant account and configure the settings in your WordPress dashboard.
Besides that, Splitit also offers a white label buy now pay later feature, supports high-value orders (up to $50,000), allows installment plans up to 24 months, lets you set up interest-free payment plans, and more.
Who Should Use It: If you’re looking for a way to allow customers to use their own credit cards for installment payments, then Splitit is the best solution. Plus, it works with popular payment network partners and also lets you create white-label buy now pay later plans.
Pros:
Allows customers to use debit or credit cards for installment plans
Offers customization options inside the WordPress dashboard
No application or credit checks are needed for customers
Create an interest or fee-free repayment schedule
Cons:
Works with limited payment providers
It doesn’t improve the user’s credit score
Pricing: Splitit is a free WordPress plugin that you can use.
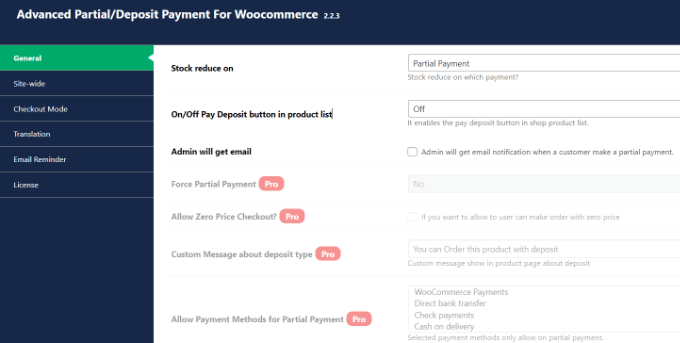
The plugin lets your customers have the flexibility to reserve a product or service and break the total amount into 2 installments. The first installment is at the time of purchase and the second installment is the remaining balance, which customers can pay at a later time.
You can set the deposit amount for all the products in your store. There is an option to choose a fixed amount or a percentage value of the total amount.
The plugin also lets you set up rules and charge different deposit amounts based on the products a user adds to the cart.
Who Should Use It: The plugin is perfect for online stores that require an initial deposit or down payment to book or reserve a product or service. They can then collect the remaining payment on delivery or set it up for an even later time.
Pros:
Simple and clean plugin to use
Easily collect deposits for products and services
Create rules to define the deposit value
Easily manage remaining balances for your orders
Cons:
You can only set up 2 installments
Limited integration options
No free version
Pricing: YITH WooCommerce Deposits / Down Payments will cost you $129.99 per year.
The best part is that it works with all the payment methods that are supported by WooCommerce. You can simply choose the deposit amount or percentage customers will have to pay at the time of purchase.
Besides that, you’ll also see a history of all the partial payments on your WooCommerce store from the dashboard.
While the free plugin is great for collecting deposits, you can unlock more features in its premium version. For instance, you can select the payment term, offer a zero deposit option, set up payment reminders for customers, and more.
Who Should Use It: Deposit & Partial Payments for WooCommerce is a great plugin for anyone looking to set up down payments on their online store for free. You can also create a payment plan and set up installments in WooCommerce. It is also a great alternative to YITH WooCommerce Deposits / Down Payments.
Pros:
Add a deposit or down payment option for free
Get multilingual support
Easily integrate with WooCommerce-supported payment methods
Set up fixed or percentage deposits
Cons:
The free version of the plugin offers limited features
Pricing: Deposit & Partial Payments for WooCommerce is a free WordPress plugin. However, it also offers a premium version with prices starting from $29 per year.
The best part, WP Simple Pay supports buy now, pay later payment plans. You can select different methods, including installment payments. Simply choose the billing time period to accept installments.
It supports 13 payment methods in 135+ currencies from over 45 countries. You can easily add credit/debit cards, ACH debits, Klarna, Afterpay, Apply Pay, Google Pay, and other payment methods in WooCommerce.
WP Simple Pay comes with pre-built form templates. You can simply select the Installment Plan Form template and enter your details.
Next, you can customize the installment plan form according to your requirements.
WP Simple Pay lets you choose the billing period. For instance, there are options to break the actual amount into smaller portions, and you can select the billing period based on days, weeks, months, or years.
Besides that, you can also enable recurring payment options, create customized receipts, set up purchase restrictions, automatically calculate taxes, and more.
Why Should You Use It: WP Simple Pay is best for setting up installment plans and accepting credit card payments without setting up a shopping cart. It’s super easy to use, and you can add a purchase button anywhere on your online store without editing code.
Pros:
Very easy to set up and use
Add a Stripe purchase button without editing code
No need to set up a shopping cart to collect online payments
Offer pre-built payment form templates, including installment plan form
Supports 13 payment methods
Easily integrates with buy now, pay later providers like Klarna
Cons:
The free version offers the installment plan form but has limited features
3% credit card fee per transaction when using the free version
Pricing: WP Simple Pay offers premium plans starting from $44.55 per year. There is also a free version of WP Simple Pay you can use to get started and add installment plans to your WooCommerce store.
Which is the Best WooCommerce Installment Payments Plugin?
After reviewing different plugins, we believe that Affirm Payments is the best WooCommerce installment payments plugin.
It lets you create custom installment plans for customers and also offers a 4-interest-free installment plan feature. Customers can even choose their own repayment plan and break the total amount into smaller portions.
The best part is that you can use Affirm Payments for free.
On the other hand, if you’re looking for a free WooCommerce plugin that lets you add a buy now pay later option, then you can also check out Klarna Payments for WooCommerce.
FAQs about WooCommerce Installment Payments
Here are some common questions users have about setting up WooCommerce installment payments.
1. What is the WooCommerce plugin to pay in installments?
Affirm Payments is the best WooCommerce plugin for setting up pay in installments. It offers multiple payment methods, allows you to add a buy now pay later option, built-in templates, and more.
2. What are the payment options in WooCommerce?
WooCommerce offers multiple payment options. You can allow customers to pay through their credit cards, Stripe, PayPal, Klarna, Apply Pay, and more.
3. How do I add pay later to WooCommerce?
You can use a plugin like WP Simple Pay to add an installment plan and pay later in WooCommerce. Other plugins like Affirm and Klarna Payments in WooCommerce are also great for setting up split payments.
If you liked this article, then please subscribe to our YouTube Channel for WordPress video tutorials. You can also find us on Twitter and Facebook.
Choosing between Shopify and WooCommerce for your eCommerce store in 2023? Dive into our detailed comparison covering costs, ease of use, payment options, and integrations. Discover which platform aligns best with your business needs and budget. Start your online venture with the right tools!
Are you looking for a point-of-sale plugin for WooCommerce?
WooCommerce isn’t just useful for online stores. By adding a point of sale (POS) plugin to your website, you can also sell your products in a physical store and make more profits.
In this article, we will share the best WooCommerce POS plugins for easy point-of-sale setup.
Why Do You Need a Point of Sale System?
You can think of a point of sale (POS) system as a modern cash register that runs on software. It allows you to take payments from customers in person, like in a physical store, a mobile food truck, or when selling merchandise at an event.
Like a cash register, you and your staff can use a POS system to ring up products, display the total cost to the customer, allow them to pay, and make a receipt or invoice.
But most POS systems don’t stop there. You can choose a system that offers the features you need, such as automatically adjusting your stock levels as products are purchased, keeping sales statistics so that you know what is selling and what isn’t, or working offline.
You might be thinking about purchasing one or more dedicated POS terminals for your business. However, these are expensive, and most require paying for an ongoing subscription for the software you need to run the terminal.
A better choice is to use WooCommerce, the world’s most popular eCommerce platform. It is super-flexible, cost-effective, and easy to manage, even for beginners. It allows you to sell products online from your WordPress website and in-person using a POS plugin.
The best part is that by installing a WooCommerce POS plugin, you have an inexpensive point-of-sale system that can be used at physical stores on any computer or tablet that runs a modern web browser.
Now, let’s take a look at some of the best POS plugins for WooCommerce.
Your cashiers can easily search for products or scan barcodes when checking out customers. They can even add new products when needed.
If you run both an online and physical store, then the product listings, orders, and customers from both stores will be kept in sync. And if you have many stores or a franchise, then there is no limit to the number of stores and registers the plugin can handle.
YITH Point of Sale for WooCommerce comes with layouts for both desktop and mobile devices. Like most POS plugins, the mobile layout is suitable for iPads and Android tablets but not smartphones.
The plugin’s dashboard lets you keep track of useful analytics such as sales trends, the revenue collected by each terminal, the payment methods used, and even the cashier with the highest number of sales.
Pros
Unlimited stores and registers
Layouts for desktop and mobile devices
Useful sales statistics
Cons
Free version is limited to cash payments
Does not work offline
Why we recommend YITH POS: YITH makes powerful plugins that are affordable and easy to use. Their POS plugin includes the features most stores need and supports multiple stores.
Pricing: YITH Point of Sale for WooCommerce (POS) starts at $147.99/year for a single site. There is also a free version of the plugin, but it is limited to cash payments.
Oliver POS is one of the best WooCommerce POS plugins. It is designed to allow physical shops to easily sell products from their online inventory from a single system.
This makes it perfect for people who want to combine eCommerce shops with physical stores. You can easily sync inventory between your online store, retail store, and warehouse.
Oliver POS runs on any internet-enabled computer or device, and apps are available for iPads and Android tablets. You can also purchase hardware POS devices from the official website, including registers, tablet stands, barcode scanners, cash drawers, and printers.
You can quickly look up your customers to see whether they have made a purchase online or in-store. You can track their total spending, order history, store credit, and more.
You can also keep on top of in-store and online transactions. The plugin can generate reports for payments, sales, inventory, and more.
Pros
Easy to set up and use
Can run online and physical stores together
Free version
Cons
Limited customization options
Does not work offline
Why we recommend Oliver POS: With 4.8 stars, Oliver POS is the highest-rated WooCommerce POS plugin in the WordPress Plugin Directory. It’s easy to install and use.
Pricing: A limited free plan is available with enough features to get you started. Paid plans start from $24.99/month per register.
Square for WooCommerce is a free WooCommerce extension that lets you accept payments using Square, a popular payment gateway that makes credit card payments easy.
The Square extension allows your customers to pay using all major credit and debit card types. It also supports digital wallets like Apple Pay and Google Pay.
These payments can be taken from customers both online and in person. However, credit card payments are only available in the USA, Canada, Australia, Japan, the United Kingdom, the Republic of Ireland, France, and Spain.
Square charges a fixed transaction rate, and this varies for each country.
Setup is easy. Your products and payments will be automatically kept in sync between your Square account and your online store. That means that when you add products to your Square account, they will be automatically added to your WooCommerce store as well.
Square also helps protect your business. They provide a dedicated dispute management team as well as fraud protection that uses machine learning to detect fraud before it happens.
Pros
Easy setup
Low cost of entry
Multiple payment options
Free
Cons
Does not work offline
Accepts credit card payments in only certain countries
Why we recommend Square for WooCommerce: Square for WooCommerce lets you easily set up a point-of-sale system without any up-front fees. For that reason, it’s one of the best free WooCommerce POS plugins.
Pricing: The Square for WooCommerce extension is free from the WooCommerce store. However, like most payment platforms, Square charges a fee for each transaction you make.
wePOS is an affordable and attractive POS solution for WooCommerce that is fast and easy to set up and use. However, it lacks some features that other POS systems offer.
For example, wePOS doesn’t directly integrate with retail hardware such as cash drawers. However, it does support barcode readers and printers.
Also, wePOS accepts only two payment methods: cash and credit card. When paying by credit card, the order number and receipt number will need to be inserted into wePOS manually to keep track of the sale.
Currently, you can’t produce daily sales reports for cashiers, generate bar codes, offer gift cards, or customize the user interface.
And like many of the other POS plugins for WooCommerce, wePOS does not work without an internet connection.
Pros
Fast and easy to use
Affordable
Cons
Does not work offline
Only two payment methods: cash and credit card
Limited hardware support
Limited customization
The free version is limited to cash payments
Why we recommend wePOS: wePOS is a popular point of sale for WooCommerce. It will suit users who are after a fast and reliable system rather than lots of features.
Pricing: wePOS offers a free plan with limited features, such as support only for cash payments. Premium plans start at $99/year.
Hike POS is a full-featured, standalone retail POS cloud service that works on PCs, Macs, iPads, and Android tablets. It also offers plug-and-play compatibility with most retail hardware, including scanners and receipt printers.
It offers lay-by sales, returns and refunds, gift cards, quotes, and credit notes. You can also see detailed sales analytics and use the software in multiple stores.
Besides its standalone apps, the service also integrates well with WooCommerce. Your Hike and WooCommerce inventory, orders, and customer profiles are automatically kept in sync.
Even though it’s a cloud service, it does work offline, making it more reliable than many of the other plugins in this list. Once you are connected again to the internet, all data is synced back to the cloud.
Hike POS supports multiple payment options, letting your customers choose their preferred method. Options include PayPal, Square, Afterpay, Tyro, and many more.
Hike POS also offers integrations with other cloud services, like Xero, MYOB, QuickBooks, Mailchimp, and Amazon.
Pros
Works offline
Integrates with many third-party cloud services
Works with or without WooCommerce
Supports multiple stores
14-day trial
Cons
No free version
Why we recommend Hike POS: Hike POS is a versatile solution that offers a point-of-sale system using WooCommerce or one of their native apps. It’s a great option if you need to work away from an internet connection.
Pricing: A Hike POS subscription starts at $59/month when billed annually. There is a 14-day free trial and no extra charge for WooCommerce integration.
Vitepos lets you quickly set up a point of sale system for your local store or sell from your existing online store in your physical store.
You can choose one of three different settings for the POS mode: grocery/retail, restaurant (pay first), and restaurant (traditional). Simply pick the option that best matches your store.
Vitepos can handle your inventory and stock management. You can add new products from vendors, transfer stock between your stores, and update prices.
There are also helpful features to help your cashiers, including holding stock, adding discounts or fees, and taking split payments. Your team can add products by scanning their barcodes or by searching for them.
Finally, Vitepos can run without an internet connection. Like Hike POS, once you are online again, your data will be uploaded automatically.
Pros
Works offline
Can run an online store and a local store simultaneously
Free version
Cons
Lacks third-party integrations
Why we recommend Vitepos: Vitepos is an affordable and user-friendly POS plugin for WooCommerce. It gives users a lot of control over their system and works offline.
Pricing: The Pro version starts at $79/year or $299 lifetime for a single site. Vitepos Lite is a limited free version available from the WordPress Plugin Directory.
ConnectPOS is a point-of-sale system that works on multiple platforms, not just WooCommerce. These include Magento, Shopify, BigCommerce, and more.
It is an award-winning POS system and has been used successfully by reputable brands like ASUS, Trinny London, Eyewa, and Lapaire.
The company can build custom POS solutions that don’t rely on any eCommerce platform. Also, they can create custom solutions that integrate your POS with your other business systems like ERP, CRM, and accounting.
Data is automatically updated in real time between your WooCommerce database and the POS system. This includes orders, inventory, customers, and products.
Plus, the software is able to work offline. Data will be saved locally and updated once your internet connection is restored.
The ConnectPOS website maintains a list of compatible hardware, including receipt printers, label printers, barcode scanners, payment terminals, card swipers, and more.
Pros
Works offline
Can meet the needs of large companies and enterprises
Offers a free WooCommerce plugin
Cons
Pricing is not listed
Why we reommend ConnectPOS: ConnectPOS is a highly rated, award-winning POS solution that suits large companies and enterprises.
Pricing: Payment is by subscription. However, pricing information has not been made available. You can request a quote for the Professional and Enterprise versions from the ConnectPOS website.
What Is the Best WooCommerce POS Plugin?
After reviewing all of the popular point-of-sale systems for WooCommerce, we believe that YITH Point of Sale for WooCommerce (POS) is the best POS plugin for most local stores.
However, this choice depends on your needs and budget, so we have a few additional recommendations.
Our top recommendation doesn’t work offline. If you need to take payments at times when there may not be an internet connection, such as on a food truck, then your best options are Hike POS, Vitepos, and ConnectPOS.
Some users prefer to get started with a free solution that’s easy to set up, and in that case, we recommend Square for WooCommerce. But be aware that with fees for each transaction, you may pay more in the long term.
If you have a franchise or chain of stores, then you will need YITH Point of Sale for WooCommerce (POS) or Hike POS. And if you have very specific needs and a budget for complex customizations, then it’s worth considering ConnectPOS.
FAQs About Point of Sale Systems
Our readers often ask us about point-of-sale systems and the best WordPress POS plugins. Here are our answers to some of the most common questions.
Does every WooCommerce store need a POS system?
No, if you are only making sales online, then you don’t need a POS system. They are only needed when your customers make payments in person.
What makes WooCommerce a good eCommerce platform?
WooCommerce is the most flexible eCommerce solution for an online store that sells physical goods. With the right plugin, it is also an excellent point-of-sale system for physical stores.
However, if you are selling digital goods like eBooks, software, or music, then Easy Digital Downloads is a better WordPress eCommerce plugin. And BigCommerce could be the best option if you don’t want to manage all the technical stuff of building an online store.
MonsterInsights is the best analytics solution for WordPress. It helps you see where your visitors are coming from and what they do on your website. You can optimize your business strategy based on real data.
OptinMonster is the best conversion optimization software on the market. You can use it to create optin forms to grow your email list and convert visitors into paying customers. It can also reduce shopping cart abandonment.
If you liked this article, then please subscribe to our YouTube Channel for WordPress video tutorials. You can also find us on Twitter and Facebook.
In the bustling world of e-commerce, standing out is no longer just a luxury—it’s a necessity. Enter the STAGGS WooCommerce Product Configurator, a game-changing tool designed to revolutionize the WooCommerce landscape. But what makes it so special? Let’s dive in.
Are you looking to add an express checkout button to your online store?
Express checkout helps streamline the checkout process and improves the overall shopping experience for your customers. It can also boost conversions and reduce cart abandonment.
In this article, we will show you how to add express checkout buttons in WooCommerce.
Why Add Express Checkout in WooCommerce?
Adding express checkout to your WooCommerce store provides a better shopping experience for your customers.
It allows customers to go directly to the payment page and skip the shopping cart or checkout pages. They also won’t have to go to a payment provider page or fill out a checkout form to complete their purchases.
Express checkout buttons make the entire buying process quicker. Customers can simply click the buttons and log in to pay for the products they wish to buy in an instant. As a result, you may see a boost in conversions and fewer abandoned carts.
Adding express checkout also helps mobile users where their screen sizes are small. Customers will just tap the buttons to quickly purchase the products.
However, WooCommerce doesn’t offer an express checkout option by default. You will need to use a WooCommerce plugin to add the feature to your online store.
That said, let’s see how you can add express checkout buttons in WooCommerce.
Setting Up FunnelKit on Your WooCommerce Store
FunnelKit is the best WooCommerce sales funnel plugin on the market. It lets you add express checkout buttons and create different funnel pages for your online store.
The best thing about using the plugin is that it works with Stripe, Apple Pay, Google Pay, PayPal Express, Amazon Pay, and other payment gateways for express checkout. This way, you don’t have to add each payment provider to your online store using third-party plugins or extensions.
FunnelKit also provides user-friendly templates and lets you do A/B testing. You can easily customize your funnels using different drag-and-drop page builders. Plus, there are multiple pre-built templates and automation features for your marketing campaigns.
Note: For this tutorial, we will be using the FunnelKit Pro plugin because it includes premium templates and more customization options. You can also use the free Funnel Builder for WordPress by FunnelKit plugin to add express checkout buttons in WooCommerce.
First, you will need to install and activate the FunnelKit plugin. If you need help, then you can follow our guide on how to install a WordPress plugin.
Upon activation, you will see the FunnelKit setup wizard. Go ahead and click the ‘Get Started’ button.
After that, you will need to enter your license key. You can find the key in the FunnelKit account area.
Simply click the ‘Activate’ button after entering the license key.
Once you have enabled your preferred payment gateways, you can head to the FunnelKit » Store Checkout page from your WordPress admin panel.
From here, simply click the ‘Create Store Checkout’ button.
On the next screen, FunnelKit will show you professionally-designed templates for your checkout page. It will also let you create a checkout page from scratch.
However, we recommend using a template and quickly customizing it according to your requirements.
Simply hover over a template you’d like to use and click the ‘Preview’ button.
For this tutorial, we will use the Livewire template.
Next, go ahead and click the ‘Import This Funnel’ button at the top.
Depending on the template you use, FunnelKit may ask you to install additional plugins like Elementor to edit the checkout page.
Next, you will need to enter a name for your store checkout and click the ‘Add’ button.
After that, you will see all the steps that are included in the template.
You can simply click the ‘Edit’ button for the Checkout page to continue.
Next, you can switch to the ‘Optimizations’ tab. From here, simply enable the ‘Express Checkout Buttons’ option.
FunnelKit will also let you choose the position of the buttons from the following options:
Top of the checkout page
Before/after the product switcher
Before/after the order summary
Above the payment gateways
When you are done, simply click the ‘Save Changes’ button.
That’s it, you have successfully added express checkout buttons to your online store.
If you want to edit the appearance of the checkout page, then you can switch to the ‘Design’ tab and click the ‘Edit Template’ button.
Once you have made your changes, simply visit your online store to view the express checkout buttons in action.
Additionally, FunnelKit helps you upsell products in WooCommerce. This way, you can boost sales by encouraging users to buy more products.
You can also set up automated emails in WooCommerce using FunnelKit Automations, a sister product of FunnelKit. This plugin lets you create automated workflows and send email campaigns to customers.
If you liked this article, then please subscribe to our YouTube Channel for WordPress video tutorials. You can also find us on Twitter and Facebook.
Are you looking for a way to filter products by attribute in your WooCommerce store?
Filtering your WooCommerce products by attribute makes it easier for customers to locate the item they want to purchase. It helps save customers’ time and makes the shopping experience more seamless.
In this article, we will show you how to use WooCommerce filter by attribute settings in your online store.
Why Filter WooCommerce Products by Attribute?
Filters make it super easy for customers to browse products in your WooCommerce store.
They allow shoppers to narrow down their search based on different attributes, including color, price range, fabric, size, and more. Rather than scrolling through your entire collection of products, users can simply browse the products they are interested in.
Adding filters can help enhance user experience, improve search functionality, and reduce bounce rates in your online store.
They can also increase sales by enabling customers to see all of the available options for the products they are interested in, helping them make more informed purchases.
That being said, let’s see how you can easily filter the products on your WooCommerce store. We will show you how to filter WooCommerce products by attribute and custom attribute.
If you are looking for a quick and easy way to filter WooCommerce products, then this method is for you. We will show you how to set up a simple WooCommerce filter by attribute settings.
Note: There is also a free version of the YITH WooCommerce Ajax Product Filter plugin. However, we will be using the premium version of the plugin for this tutorial.
Upon activation, head to the YITH » Ajax Product Filter page from the WordPress admin sidebar.
From here, click the ‘+ Create a new preset’ button to start creating a filter preset.
Once you are there, you can start by typing a name for the filter into the ‘Preset name’ box.
Keep in mind that the preset name won’t be displayed in your store and is only there for your reference.
Next, simply choose ‘Horizontal’ as the preset layout and then click on the ‘+ Add a new filter button’ at the bottom.
If you are using the free version of the plugin, then this option won’t be available for you. Instead, you will have the ‘Default’ preset layout.
You can now start creating a filter for your WooCommerce products.
Create a Filter for WooCommerce Products
First, you will need to type a filter name next to the ‘Filter Name’ option.
For instance, if you are creating a filter that will help customers sort through product categories, then you can name it ‘Filter by Category’.
Next, you can select the parameters for the filter from the ‘Filter for’ dropdown menu. Keep in mind that the free version of the plugin only offers filters for product categories and tags.
If you are creating a filter to sort products by different price ranges, then you must choose the ‘Price Range’ option. Similarly, if you want to sort products by popularity or average rating, then you need to choose the ‘Order by’ option.
You can also choose the ‘Taxonomy’ option if you want to filter product tags, categories, colors, sizes, materials, styles, and more. For this tutorial, we will be going with this option.
After you have done that, you must choose from the taxonomy options for the filter. For instance, if you want to filter products by color, then you will need to choose that option from the dropdown menu.
As we are creating a filter for product categories, we will be selecting the ‘Product categories’ option.
Next, you must type all the product categories on your website in the ‘Choose Terms’ section.
After that, you can choose how you want the filter to display on the front end of your store from the ‘Filter type’ dropdown menu.
You can display the filter as a checkbox, dropdown menu, text, color swatches, and more. For this tutorial, we will be choosing the ‘Select’ option to add a dropdown menu.
Next, you need to toggle the ‘Show Search Field’ switch if you want to enable a search box within the dropdown menu.
You can also display the filter you are creating as a toggle by activating the ‘Show as toggle’ switch. Then, customers will be able to toggle the filter on and off.
Once you have done that, just choose a default order for the filtered terms from the ‘Order by’ dropdown menu. The filter categories will be displayed in the order that you choose.
You can sort the filter categories using the name, term count, or slug. You can also choose the ‘Order type’ for the filtered terms in ascending (ASC) or descending (DESC) order.
Finally, click the ‘Save Filter’ button at the bottom to save your filter.
Now, repeat the process to create multiple filters.
After you have done that, go back to the top and switch to the ‘General Settings’ tab to configure some settings.
Configure the General Settings
Here, you have to start by choosing a ‘Filter mode’ option. You can select if you want to apply filters in real-time using AJAX or if you want to show an ‘Apply Filters’ button on your site.
Next, you must also make a choice between showing a save button or displaying filter results immediately.
Once you have done that, choose if you want to show the filter results on the same page using AJAX or if you want to reload the results on a new page.
Next, you need to scroll down to the ‘Hide empty terms’ option and toggle the switch on if you don’t want to display filter terms that are empty.
For instance, if you have added a ‘Mugs’ category in your WooCommerce store, but it currently has no items in it, then it won’t be displayed in the ‘Filter by Category’ list.
After that, go ahead and toggle the ‘Hide out of stock products’ switch if you don’t want to display out-of-stock products in the results.
You can leave the other settings as default or configure them to your own liking.
After making your choices, click the ‘Save options’ button to store your changes and switch to the ‘Customization’ tab at the top.
Configure the Customization Settings (Premium Plugin Only)
Note: The ‘Customization’ tab won’t be available if you are using the free version of the plugin.
From here, you can choose your WooCommerce filter’s label style color, textual term color, color swatch size, filter area color, and more.
Adding colors can help your WooCommerce filter look more aesthetically pleasing and match your online store’s branding.
Once you have made your choices, click on the ‘Save Options’ button and switch to the ‘SEO’ tab from the top.
Configure the SEO Settings
Once you are there, toggle the ‘Enable SEO option’ switch to activate the settings.
Now you can add meta tags from the dropdown menu to use on your filtered pages. This will improve the SEO of your site.
You can also automatically add the nofollow attribute to all the filtered anchors by toggling on the ‘Add “nofollow” to filter anchors’ switch. This will tell search engines not to use the filter anchors when ranking your page.
Once you are happy, click the ‘Save Options’ button to store the settings.
Add the WooCommerce Filter to the Products Page
To add the filters that you have just created to your WooCommerce products page, you need to switch to the ‘Filter presets’ tab from the top.
Once you are there, simply copy the shortcode of the filter preset that you just created.
Next, simply open up your WooCommerce products page in the block editor from the WordPress admin sidebar.
Once you are there, click the Add Block ‘(+)’ button in the top left corner to find the Shortcode block.
Now simply paste the filter preset shortcode that you copied into the Shortcode block.
Finally, click on the ‘Publish’ or ‘Update’ button to save your changes.
You can now visit your website to see the WooCommerce filter by attribute feature in action.
How to Filter WooCommerce Products by Custom Attribute
If you want to create a WooCommerce products filter using custom attributes, then this method is for you.
Create a Custom Attribute
To create a custom attribute, you will need to visit the Products » Attributes page from the WordPress admin sidebar.
Once you are there, start by entering a name and slug for the attribute.
For instance, if you want to create a filter for a specific product material, then you can name the attribute ‘Filter by Material’.
Next, you must check the ‘Enable Archives’ box if you want to display all the items that share that attribute on a single page.
After that, click the ‘Add Attribute’ button at the bottom.
Once the attribute has been created, click on the ‘Configure Terms’ link to add terms to the attribute.
This will direct you to a new screen, where you must type a term into the ‘Name’ box.
For example, if you created an attribute called ‘Filter by Material,’ then you can add the individual materials as terms, such as wool. You can add as many terms as you want to an attribute.
Once you are done, click on the ‘Add new filter by Material’ button to save the term.
Add the Custom Attribute to a Product
After creating an attribute, you will need to add it to individual WooCommerce products.
For this, you will have to open the product page that you want to edit. From here, scroll down to the ‘Product data’ section and switch to the ‘Attributes’ tab.
Next, simply open up the ‘Custom Product Attribute’ dropdown menu and select the custom attribute you just created.
Now, go ahead and click the ‘Add’ button.
Now that the custom attribute has been added, simply search for the term that matches the product in the ‘Select Terms’ option.
For instance, if you created an attribute for material and the product you are editing is made of wool, then you will need to choose ‘Wool’ from the dropdown menu.
Once you are done, click the ‘Save attributes’ button.
Next, click the ‘Update’ or ‘Publish’ button at the top to save your changes.
You will now have to repeat the process for all the products that share the same attribute.
Note: You can use the free or premium version of the plugin to create a custom attribute filter for WooCommerce.
Upon activation, head to the YITH » Ajax Product Filter page from the WordPress admin sidebar.
From here, go ahead and click on the ‘+ Create a new preset’ button.
Next, you have to type a name for the preset that you are creating into the ‘Preset name’ box.
Once you are done, click the ‘+ Add a new filter button’ at the bottom to start creating a WooCommerce custom attribute filter.
First, you will have to type a name into the ‘Filter Name’ box.
For example, if you are creating a filter that will help customers sort through different material options, then you can name it ‘Filter for Material’.
Next, simply select ‘Taxonomy’ from the ‘Filter for’ dropdown menu. If you are using the free version of the plugin, this option will be chosen for you by default.
Now, the custom attribute that you created will already be available in the dropdown menu next to the ‘Choose taxonomy’ option.
Go ahead and choose the custom attribute from the dropdown list and type the attribute terms into the ‘Choose terms’ box.
Next, you must choose how you want the filter to be displayed on the front end of your store from the ‘Filter type’ dropdown menu.
The filter can be displayed as a checkbox, dropdown menu, text, color swatches, and more.
Once you have done that, choose a default order for the filtered terms from the ‘Order by’ dropdown menu.
You can sort the filter categories using the name, term count, or slug. You can also select the ‘Order type’ for the filtered terms in ascending (ASC) or descending (DESC) order.
Finally, click on the ‘Save Filter’ button at the bottom to save your custom attribute filter.
Next, you need to switch to the ‘General Settings’ tab from the top. From here, you can choose a filter mode, hide empty terms, and configure other settings according to your needs.
Once you are done, click the ‘Save options’ button to store your changes and switch to the ‘Customization’ tab at the top.
Note: If you are using the free version, then the customization settings won’t be available.
From here, you can customize how your filter preset will look on the front end of your website.
For instance, you can choose the label style color, textual term color, color swatch size, filter area color, and more.
After you have made your choices, click on the ‘Save Options’ button and switch to the ‘SEO’ tab from the top.
From here, toggle the ‘Enable SEO option’ switch to activate the settings.
You can add robots meta tags from the dropdown menu to use on your filtered pages. This will improve the SEO of your site.
You can also toggle the ‘Add “nofollow” to filter anchors’ switch to automatically add the nofollow attribute to all of the filter anchors.
Once you are satisfied, click the ‘Save Options’ button to store the settings.
Add the Custom Attribute Filter to a WooCommerce Products Page
To add the custom attribute filter to a WooCommerce products page, you will need to switch to the ‘Filter presets’ tab at the top.
From here, copy the shortcode of the custom attribute filter.
Next, open up your products page in the block editor from the WordPress admin sidebar.
Here, click the Add Block ‘(+)’ button in the top left corner to find and add the Shortcode block.
After that, simply paste the filter preset shortcode that you copied into the block.
Finally, click on the ‘Publish’ or ‘Update’ button to save your changes.
You can now visit your website to see the WooCommerce custom attribute filter in action.
We hope this article helped you learn how to filter WooCommerce products by attribute and custom attribute. You may also want to see our article on how to add fuzzy search to your website to improve search results and our top picks for the best WooCommerce themes.
If you liked this article, then please subscribe to our YouTube Channel for WordPress video tutorials. You can also find us on Twitter and Facebook.
Are you looking for the best conditional logic plugins for your WordPress website?
Conditional logic plugins allow you to show or hide information based on users’ responses and behavior. They help collect relevant leads, boost conversions, and provide a better user experience.
In this article, we will show you the best WordPress conditional logic plugins.
What is Conditional Logic in WordPress?
In simple words, you can think of conditional logic as if-then statements. It is a technique where you can automatically display relevant information, snippets, or scripts to users based on their actions.
For instance, a user may want to connect with the support team. If they select a support team as an option on your WordPress site, then you can show relevant contact information or a landing page.
Similarly, let’s say a customer is looking for hiking shoes. You can use conditional logic to only show those products and addons that a customer is looking for.
Where Can You Use WordPress Conditional Logic Plugins?
You’ll find conditional logic in WordPress forms, automated email workflows, conversion optimization methods, and more.
Here are some ways you can use conditional logic on your WordPress website:
Use conditional logic on your WordPress forms and dynamically change form fields based on the selection users make while filling out your forms.
Create optin campaigns and show popups based on different rules, like the user spending a certain time on the page or clicking a link.
Load code snippets and scripts based on conditional logic and user roles.
Ask different questions in online quizzes based on the user’s previous answers.
Display or hide products, addons, and other items based on customer choices on your eCommerce store.
Set up visibility rules using conditional logic to show menu items for your visitors.
That said, let’s see the best WordPress conditional logic plugins you can use today for your website.
WPCode is the best WordPress code snippet plugin. You easily add custom code snippets to your website and manage them using the plugin.
The best part, WPCode offers a conditional logic feature that lets you set up rules for running code snippets without editing code. It is super easy to use and offers a beginner-friendly interface.
For example, you can load code snippets for logged-in users, run PHP code snippets for specific user roles and page URLs, and insert header and footer pixel scripts for certain pages.
You can also hide custom code from running on pages like the homepage or for different user roles.
Conditional Blocks is a free WordPress plugin for hiding or showing different blocks in the content editor. You can control the visibility of each block without writing a single line of code.
The plugins let you set up conditions where WordPress blocks will appear for different user roles or membership levels. For instance, you can show the image block to only logged-in users. It also allows you to show certain blocks based on screen size.
Conditional Blocks offers a premium version as well. You get to unlock more conditions for showing WordPress blocks. For example, you can control block visibility based on post type, time, server requests, and more. There are also conditions for WooCommerce users in the pro version.
WPForms is the best contact form plugin for WordPress. It is beginner friendly plugin that offers a drag-and-drop form builder, lots of templates, and a smart conditional logic feature.
You can easily hide or show different form fields, display payment options, dropdown menus, and more based on the user’s responses.
All you need to do is select the form field in the template and enable conditional logic. After that, you can set up the rules to show different form fields.
For example, let’s say you’re running a net promoter score (NPS) survey on your website. If a user rates 8 or higher, then you can hide other questions in the survey using conditional logic. If they rate a lower score, then you can ask more questions to improve your performance.
Besides that, WPForms offers lots of other features and addons. You can integrate different payment services and create forms to collect online payments.
It also works with some of the most popular email marketing tools, so you can easily collect leads and grow your email list.
Other than that, there are addons for recovering form abandonment, tracking user journeys, adding save and resume features, learning about the user’s geolocation data, and more.
OptinMonster is the best WordPress popup and lead generation plugin. It helps you get more conversions, grow your email list, and increase sales.
OptinMonster offers powerful display rules that you can use to display your campaigns to the right people at the right time.
For example, you can show optin popups to users that spend a certain time on a page, visit a particular page, or scroll X% of the page.
OptinMonster also offers an Exit-Intent technology, which triggers your campaigns as a user is about to leave your website. This helps recover abandoning visitors and converts them into subscribers and customers.
Other than that, you can display campaigns to users from a particular location or when they click a link. There are also display rules for eCommerce sites. You can show popups when customers have a specific cart total or when they view a product.
OptinMonster also offers a drag-and-drop builder, which makes it very easy to create attractive campaigns. There are lots of templates for different types of campaigns and various customization options. You can also integrate it with leading email marketing tools to collect leads.
The plugin is very easy to use and allows you to add options and extra services, like warranty, insurance, special transfer services, express shipping, customizations, and more.
For example, if you’re selling jewelry and rings, then you can add an option to engrave the customer’s name. Or if you’re selling tech products in WooCommerce, then you can offer additional services like warranty, product customization, and device checkup.
With YITH WooCommerce Product Add-Ons & Extra Options, you get a conditional logic feature that automatically shows or hides addons and options based on the customer’s selection.
You can define rules, and when the conditions are met, users will be able to see extra services and addons on your WooCommerce products.
Thrive Quiz Builder is the best WordPress quiz plugin and is part of Thrive Theme suite. It is beginner friendly to use, and you can create complex quizzes for your website without editing code.
The plugin offers different quiz styles, which include a right/wrong, number, percentage, personality, and survey. Thrive Quiz Builder also provides pre-made quiz templates that you can use to get started quickly.
Using the plugin, you can create conditional quizzes. The drag-and-drop quiz builder lets you display questions based on the user’s previous answers. Simply set the conditions where the next question will only appear if a person enters a particular answer.
When they’re finished, you can direct them to a page or product based on their answers.
Besides that, you can create badges for users, customize the quizzes, track results, check the quiz flow and see where users dropped off, and get detailed analytics of how your quizzes perform.
Formidable Forms is the next WordPress conditional logic plugin on our list. The plugin allows you to create simple contact forms to advanced and complex WordPress forms, like mortgage calculators.
Formidable Forms offers a conditional logic feature built into its drag-and-drop form builder. You can easily set up conditions for each form field and show or hide them based on the user’s answers.
If you have a multi-step form, then you can use conditional logic to automatically skip pages and lead users to the relevant section. Similarly, you can send email confirmation or redirect users to respective pages based on their answers.
Other features offered by Formidable Forms include pre-built templates for web applications. It also lets you create apps for real estate listings, product reviews, restaurant menus, and more.
The plugin also has a visual views feature that allows you to display data from form entries on the frontend of your site.
If Menus is the next conditional logic plugin for WordPress on our list. It is a free WordPress plugin that you can use to create dynamic menus and control their visibility on your site.
The plugin lets you use conditional logic to show or hide different menu items. For instance, it lets you display certain menu items only if a user is logged in, hide menu items on mobile devices, show specific menus to admin and editors, and more.
Similarly, you can also show menu items to users from different locations or show any entirely new menu to members.
FunnelKit Automation offers multiple triggers that you can for automating workflows. You can set up different conditions, and based on the user’s actions, you can initiate different tasks.
For example, if a customer adds products to the cart but doesn’t checkout, then you can trigger the cart abandonment recovery workflow.
Similarly, you can automatically show different products to customers as upsells or order bumps. This way, you’ll increase sales without spending on paid ads.
Which WordPress Conditional Logic Plugin Should You Use?
Choosing the right conditional logic plugin for WordPress depends on your requirements and what you want to achieve.
If you want to create dynamic forms that show different fields to users based on their selection, then WPForms is the best plugin. It is super easy to use and offers lots of customization options.
Similarly, if you are looking to run different code snippets based on certain conditions, then WPCode is the perfect solution. It lets you set up rules and conditions without editing code.
On the other hand, you can use OptinMonster to display different campaigns based on user actions or create conditional quizzes using Thrive Quiz Builder.
You can also use conditional logic in WooCommerce and use FunnelKit to trigger workflows based on customers’ selections and actions.
If you liked this article, then please subscribe to our YouTube Channel for WordPress video tutorials. You can also find us on Twitter and Facebook.
Are you looking to add product videos to your WooCommerce product galleries?
Videos can provide more detailed and engaging demonstrations of your products. Additionally, they can help make your WooCommerce store more visually appealing and engaging.
In this article, we will show you how to add WooCommerce product videos to your online store.
Why Add WooCommerce Product Videos to Your Store?
By adding product videos to your WooCommerce store, you can effectively showcase your products in a more detailed and informative way. This can provide your customers with a better understanding of your product’s features and benefits.
This can lead to increased conversion rates because visitors who watch product videos are 73% more likely to make a purchase.
Additionally, showing your products in action through video can help build trust and credibility with potential customers, making them feel more confident about their purchases.
For instance, if you have an online store that sells headphones, then adding a video that demonstrates the sound quality and features of the headset can help you get more conversions.
Furthermore, adding product videos to your WooCommerce galleries can also help increase your website’s SEO rankings because search engines prioritize websites that have multimedia content, including videos. Higher visibility in the search results can lead to more people visiting your store and buying products.
That being said, let’s see how you can easily add product videos to your WooCommerce galleries. You can use the links below to jump to the method you want to use.
Method 1: Add WooCommerce Product Video Using YITH WooCommerce Featured Audio & Video Content (Free & Premium)
For this method, we will be showing you how to add product videos to WooCommerce galleries using a premium plugin. We recommend this method if you want more control over your video display and playback settings.
Upon activation, head over to the YITH » Featured Audio & Video Content page from the WordPress admin sidebar.
This will open up the ‘Video Settings’ page. From here, you can start by selecting an aspect ratio for the product video from the dropdown menu.
If you are using the free version, this will be the only setting that will be available to you.
Next, toggle the ‘AutoPlay’ switch to active if you want the video to start playing as soon as the page loads.
You can also toggle the ‘Loop’ switch so that the video will start over as soon as it ends.
Once you have done that, you need to move the slider next to the ‘Volume’ option to adjust the volume of the video. Then, simply toggle on the ‘Stoppable videos’ switch to allow users to pause a video.
Next, scroll down to the ‘YouTube Settings’ section and toggle the ‘Show Related’ switch on if you want to recommend other YouTube videos from the same channel as your video. This setting is only necessary if you are embedding a product video from YouTube.
After that, you can choose a theme and style for the YouTube video player.
Once you have done that, you need to scroll down to the ‘Vimeo Settings’ section and toggle on the ‘Show Video Title’ switch to display the video title in the Vimeo player. You will only need to change this setting if your product videos are hosted on Vimeo.
Additionally, you can select a playback control color for the Vimeo player.
After that, move to the ‘VideoJS Player Style’ section and choose ‘Custom’ as the ‘Style’ option.
This will open up customization settings, where you can configure the background color, slider color, button color, and more of the video player.
Once you are done, click the ‘Save Options’ button to store your settings.
Configure Modal Settings(Premium Plugin Only)
Now, you need to switch to the ‘Modal Settings’ tab from the top of the page. Keep in mind that this tab won’t be available if you are using the free plugin.
Once you are there, simply toggle the ‘Video in modal’ switch if you want to display the featured video in a modal window. This will show the video within a lightbox in front of the other content on the page.
After you have done that, you can also choose a ‘Modal displaying effect’ from the dropdown.
Next, click the ‘Save Options’ button to save your changes.
Configure Gallery Settings (Premium Plugin Only)
You now need to switch to the ‘Gallery Settings’ tab from the top. This tab is only available in the premium version.
From here, you have to select the ‘WooCommerce Gallery’ option as the ‘Video and Audio gallery mode’ to display the product videos in the WooCommerce gallery.
Alternatively, by selecting the ‘Plugin Gallery’ option, the featured video will be shown in a related gallery.
On the other hand, you can also toggle the ‘Video and Audio in sidebar’ switch if you want to display the product video in the sidebar instead of the WooCommerce or related gallery.
Once you are done, don’t forget to click the ‘Save Options’ button to store your settings.
Add the Product Video to the WooCommerce Gallery
It’s now time for you to add the WooCommerce product video to the WooCommerce gallery.
First, you need to visit the Products » All Products page from the WordPress admin sidebar. Once you are there, simply click the ‘Edit’ link under a product name to open up the ‘Edit Product’ page.
Next, scroll down to the ‘Product Data’ section and click on the ‘Video’ tab from the left column.
Now, you need to select how you want to add the video from the ‘Add Video’ dropdown menu. For this tutorial, we will be choosing the ‘By URL’ option because we will be adding a YouTube video URL.
Alternatively, you can upload a video using the WordPress media library. However, we don’t recommend this method because uploading videos uses a lot of bandwidth.
Upon activation, head over to the Settings » Really Simple Featured Video page from the WordPress admin sidebar.
From here, toggle the ‘Products’ switch to enable video support for WooCommerce. After that, simply click the ‘Save Changes’ button to store your settings.
Next, you need to switch to the ‘Controls’ tab from the top. Here you can configure settings for self-hosted and embedded videos.
Now, just move to the ‘Self-hosted videos’ section and start by toggling the ‘Controls’ switch to add controls to the video player.
After that, you can also toggle the ‘Loop’ switch to keep playing the video on a loop. Additionally, you can also mute the video by default by toggling the switch next to ‘Mute sound’.
Once you have done that, simply toggle on the ‘Autoplay’ switch if you want the video to start playing automatically.
Next, scroll down to the ‘Embed videos’ section, where you will find all these options repeated for embedded video.
Simply configure these settings to your liking and click the ‘Save Changes’ button to store your settings.
Add the Product Video to the WooCommerce Gallery
To add a product video to the WooCommerce gallery, head over to the Products » All Products page from the admin sidebar.
From here, go ahead and click the ‘Edit’ link under a product name to open it.
Once you are there, you need to scroll down to the ‘Featured Video’ section in the left column and select a video source.
If you want to upload a video from your computer or media library, then you need to select the ‘Self’ option. However, to embed a video from YouTube or some other platform, you will have to choose the ‘Embed’ option.
Note: We don’t recommend uploading videos on your website because they use a lot of bandwidth. For more details, you may want to read our guide on why you should never upload a video in WordPress.
For this tutorial, we will be choosing the ‘Embed’ option because we want to add a YouTube video.
Upon selecting that option, a ‘Video URL goes here’ field will be displayed. Simply add the YouTube, Vimeo, or Dailymotion video link into the field.
Finally, click the ‘Update’ or ‘Publish’ button at the top to save your changes.
Now you can visit your website to check out the WooCommerce product video.
We hope this article helped you learn how to add WooCommerce product videos to your product galleries. You may also want to see our tutorial on how to schedule coupons in WooCommerce and our top picks for the best WooCommerce plugins to grow your site.
If you liked this article, then please subscribe to our YouTube Channel for WordPress video tutorials. You can also find us on Twitter and Facebook.
Are you looking for a WordPress plugin to show WooCommerce products in a grid?
Showing your products in a grid view provides a better user experience for customers. With the right plugin, you can easily customize and style your product category grid.
In this article, we will show you the best product grid plugins for WooCommerce.
Why Use a Product Grid Plugin for WooCommerce?
When you’re creating an online store, it is important to showcase your best products and make it easier for customers to view them.
With the right WooCommerce plugin, you can easily display multiple products or features from a single product in a grid view. This provides a better user experience and makes it easy for customers to interact with your products.
Besides that, a product grid plugin also offers more flexibility for customization. You can easily adjust the grid, choose the number of rows and columns, change the color, and more.
Some plugins will also let you add category filters. This way, users can simply search for a product and view them in a grid rather than explore each product in your WooCommerce store. It helps boost conversions and increase sales.
That said, let’s look at the best product category grid plugins for WooCommerce.
SeedProd is the best WordPress website builder and landing page plugin. It is used by over 1 million professionals.
The plugin offers a drag-and-drop builder that lets you create custom themes and page layouts. You get prebuilt templates and lots of customization options.
In the page builder, SeedProd offers exclusive WooCommerce blocks to customize your product page. You simply drag and drop the products grid block on your template.
The plugin lets you choose the number of columns in the grid. It also offers options to filter products and show all products, best-selling products, top-rated products, and more. Besides that, you can select the order of the products based on date, title, rating, ID, and more.
Other than that, SeedProd offers other blocks for customization. For instance, you can add images, optin forms, countdown timers, contact forms, and more to your product pages.
It also easily integrates with email marketing tools to help you collect leads and grow your email list.
Pricing: SeedProd prices start from $39.50 per year. There is also a free SeedProd Lite version you use to get started.
MonsterInsights offers a Popular Posts feature that lets you show your best-selling products in a grid view. You get to choose from prebuilt themes for your product grid.
The plugin also shows a preview of your theme. Besides that, you get plenty of customization options.
For instance, you can change the color and size of the title, prices, and ratings. It also gives you the option to select a layout for your grid, choose product count to display, and more.
Other than that, you can also exclude certain products or product categories from appearing in the MonsterInsights popular post widget on the page.
ProductX is another popular product grid plugin for WooCommerce. It lets you create WooCommerce stores using the drag-and-drop builder.
There are different blocks you can use to customize your store. Plus, the plugin offers a template toolkit, so you can quickly select a design and edit it according to your requirements.
ProductX offers different product category grid blocks. You can choose from 3 different variations to display products in a grid view. Besides that, there are multiple settings to edit the design of the product grid.
Other features offered by ProductX include advanced product filters, a progress bar, product comparison, whitelist items, and much more.
Pricing: ProductX is a paid WordPress plugin with prices starting from $49 per year for 1 site.
YITH WooCommerce Best Sellers is a great plugin to have on your online store and display top-selling products in a grid layout.
The plugin is easy to use and offers different options to customize your product category grid. For example, you can change the text, ratings, colors, and other details of any product in the grid. Plus, you can choose the number of rows and columns to display.
Using YITH WooCommerce Best Sellers, you can show your most popular products or top-selling product category. There is also a best-seller badge you can use to highlight a product and get more conversions.
Pricing: YITH WooCommerce Best Sellers will cost you $59.99 per year.
If you’re using Instagram shopping to sell products online, then you can easily display items on your WordPress website using Smash Balloon’s Instagram Feeds plugin.
You can simply connect your Instagram account with the WooCommerce store. After that, display product feeds as grids, carousels, masonry, and other layouts.
The plugin also lets you link each Instagram post to a page on your WooCommere website. This way, users will land on the product page and easily make a purchase.
With Smash Balloon, you get full control over the appearance of your social media feeds. There are options to change the width, height, number of images, and more for your Instagram shoppable feed.
Pricing: You can get Smash Balloon Instagram Feed plugin for $49 per year.
The plugin offers built-in themes for carousels and grids. Plus, it lets you customize the grid by choosing the number of products to display per page, showing a header title, and controlling the image sizes. The plugin also gives you settings for selecting columns and rows and enabling pagination.
You can then choose which products to show in the grid. There are multiple options to choose from, like the latest products, older products, and featured products. After creating the product grid, you can easily add them anywhere on your WooCommerce store using shortcodes.
Besides that, there are options to show different badges on products. For instance, you display a sales badge, featured badge, discount badge, and sold-out badge in your product grid. You can also edit the style settings and change the product title font, color, ratings, and more.
Pricing: You can use the Product Carousel Slider & Grid Ultimate for WooCommerce plugin for free.
Grid/List View for WooCommerce is the next product category grid plugin on our list. The plugin is a great free solution for business owners looking to create simple product grids and lists.
You get to choose from 2 default styles, which include a grid or list layout. Besides that, there are basic options to customize your product grid. You can choose how many products to display and where to position the product count.
Sadly, there is no drag-and-drop customization option as you’d get in SeedProd. However, the plugin offers a wide variety of buttons to choose from for your WooCommerce product grid.
Pricing: Grid/List View for WooCommerce is a free-to-use plugin.
If you have different product categories on your WooCommerce store, then all you have to do is install the plugin and use shortcodes to display the products.
There are no customization options or additional settings that you’ll find in your WordPress dashboard. Everything is controlled through shortcodes. You can use different shortcodes for choosing the number of columns, order of product categories, design of the product grid, and more.
However, if you’re looking for more customization features and ease of use, then you can use any other plugin on our list, like SeedProd or MonsterInsights.
Pricing: You can get started with Product Categories Designs for WooCommerce for free.
Which is the Best Product Grid Plugin for WooCommerce?
In our experience, SeedProd is the best product grid plugin for WooCommerce. It is super easy to use because it offers a drag-and-drop builder with lots of template customization for your site and pages.
You can create stunning WooCommmerce pages with customized product grids that will help boost conversions. The plugin also offers tons of options to edit and change the appearance of your product category grids.
That’s not all, SeedProd also integrates with popular email marketing services, which helps grow your email list.
Bonus: If you’re looking to grow your WooCommerce store, then we also recommend that you try FunnelKit. It’s one of the best WooCommerce plugins to grow your store revenue.
If you liked this article, then please subscribe to our YouTube Channel for WordPress video tutorials. You can also find us on Twitter and Facebook.