Are you trying to understand the difference between WordPress widgets vs blocks?
WordPress widgets and blocks are both used to add dynamic content elements to posts, pages, sidebars, and templates. Widgets have been a core part of WordPress for 16 years, while blocks have only been a part of the platform since 2018. They serve similar functions, but they aren’t the same.
In this article, we’ll explain the difference between WordPress widgets and blocks, so you can learn how to use them properly.
Here is a quick overview of the topics we’ll cover in this article.
WordPress widgets are dynamic-content elements that you can add to widget-ready areas like sidebars.
Widgets were introduced in WordPress 2.2 (May 2007). The purpose was to provide users with an easy way to add customizable elements to their website without having to repeatedly insert the same element at the end of blog posts, for instance, or edit their WordPress theme files to create a sidebar and manually code in something like Google AdSense tracking codes.
Users could simply insert content or features using widgets that didn’t have to be part of their overall theme files or blog posts.
Widgets made it much easier for users to create their ideal WordPress blog, letting them easily add banner ads or email sign-up forms.
Gradually, almost all WordPress themes adapted widgets by adding widget-ready areas in their design and layouts. These were most often sidebars and footers.
The WordPress widget editor looked like this until WordPress 5.8 was released in 2021.
What are Blocks in WordPress?
Blocks are the elements that users can add to an area using the WordPress content editor. WordPress switched to this block-based content editor in WordPress 5.0.
You may also see it referred to as the Gutenberg editor, which was its development codename.
Blocks are very similar to widgets because each one handles a single element of the page or post. Unlike widgets, however, blocks were introduced only as part of the post and page editor, which means they could not be easily added to areas like the site footer or sidebar.
A block can be inserted into a post or page for any element, including a paragraph, an image, a gallery, a plugin-specific feature like email signups, or a video embed.
There are also blocks to add design layout elements like covers, patterns, tables, columns, groups, and more.
The Difference Between Widgets vs Blocks in WordPress
Until WordPress 5.8, the difference between widgets and blocks was quite obvious.
Users added widgets to their theme’s widget-ready areas. They were primarily used to display elements that were not post/page content. For instance, recent posts lists, important links, banner ads, forms, and more.
However, the difference between widgets and blocks has become quite blurry now.
Widgets are self-contained elements that can be used in widget-ready areas like sidebars on a WordPress website.
Blocks are also self-contained elements that you can access through the block editor. They can be used in posts and pages, as well as widget-ready areas. You can also use them in templates if your theme has enabled the full site editor.
Widgets were the first to allow developers to output other elements like contact forms, testimonials, social media feeds, and more.
However, the same can be achieved using blocks. Many of the top WordPress plugins now come with blocks that you can add anywhere.
For instance, WPForms comes with a contact form block that you can add anywhere to display a form.
Similarly, All in One SEO comes with blocks for the table of contents, HTML sitemap, breadcrumb navigation, and more.
The Block-Based Widget Editor
WordPress planned to adapt the block editor for editing all areas of your website including the widget-ready areas.
To make this happen, the new block-based widget editor was introduced in WordPress 5.8.
Users were now able to use blocks in widget-ready areas of their themes.
Widgets are still located under the Appearance » Widgets menu.
However, if you are using a block-based theme that doesn’t have any defined widget-ready areas, then you may not see it under there. You will see Appearance » Editor instead.
Many of the legacy WordPress widgets already have blocks that can do the same thing.
Click on the add new block button (+) and you will find a bunch of blocks categorized as Widgets.
These are still blocks, but they are just categorized as widgets so that users can understand that these blocks behave like legacy widgets.
However, if a user still needed to use a legacy widget that doesn’t have an alternative block, then they can do so by using the Legacy Widgets block.
If a WordPress plugin has a block that you can add to the posts and pages, you can now also use the same block in widget-ready areas.
Theme developers can also create custom blocks that users can add to different areas of their websites.
The Future of WordPress Widgets
WordPress is moving forward towards using a more intuitive and unified way to edit the content on a WordPress website.
This means that older widgets will no longer be available going forward. WordPress themes and plugin developers are already adapting and adding support for the block editor in their products.
However, many WordPress themes still use older widgets. Similarly, many WordPress plugins still use shortcodes and legacy widgets.
Upon activation, the plugin will simply replace the block-based widget editor with the older widget page.
Note: Classic Widgets plugin will only be supported until 2024. After then, the plugin will not be updated or maintained this is why we recommend using WPCode to future-proof your customization.
Blocks vs Widgets – Which One is Better?
We recommend users start using the new block-based widgets editor as soon as possible because that’s the direction WordPress development is heading.
It is easy to use, modern, and more flexible than the previous Widgets screen.
If a WordPress plugin or theme on your website doesn’t support block-based widgets, then you can reach out to the developer and ask them to convert their widgets into blocks.
If they don’t have plans to release an update, then you can easily find alternative plugins or themes to replace them.
If you liked this article, then please subscribe to our YouTube Channel for WordPress video tutorials. You can also find us on Twitter and Facebook.
Are you running into errors when using the WordPress block editor?
WordPress replaced the old classic editor in 2019 with a brand new content editor called Gutenberg. This new editor uses blocks to create content in WordPress. However, sometimes you may come across annoying issues when using it.
In this article, we’ll share how to fix the most common WordPress block editor problems, so you can improve your workflow.
What is WordPress Block Editor?
WordPress block editor, or Gutenberg, is a new content editor introduced in the WordPress 5.0 release. Since then, WordPress has improved the editor and added new features and functionalities.
It provides more customization features compared to the Classic Editor. You get different blocks to add different elements to your content and don’t have to edit code to change the appearance and style.
It tries to show how your blogs and pages will look in real time by mimicking the same font and colors of your WordPress theme.
For example, you can use an image block to add pictures to your blog posts. Plus, you get options like image style, size, alignment, and more using the block.
Besides that, many WordPress plugins add their blocks to the content editor. This makes it super easy to embed things like forms, social media feeds, and tables of content in just a few clicks.
That said, the block editor isn’t perfect. Like any other WordPress plugin, you may come across different errors or bugs. Here are a few common issues in the content editor. You can click the links below to see your preferred section.
One of the most common issues users face is the ‘WordPress block editor not working.’
There are multiple reasons why this error occurs. For instance, it could be because of an old outdated theme, a faulty plugin, or other technical errors.
The WordPress block editor may also not work if you have a misconfigured setting on your site, like disabling the visual editor when creating a user profile.
You can check this by going to Users » Profile from your WordPress dashboard. From here, just ensure that the ‘Disable the visual editor when writing’ option is not selected.
If the problem still persists, then you can try deactivating all the plugins on your site. This should help rule out any conflicts a plugin might be causing and stop the block editor from working.
Another common issue that some users face is the WordPress block editor would crash unexpectedly.
When it crashes, you would see a ‘The editor has encountered an unexpected error’ error message. WordPress would then show 3 options, including attempt recovery, copy post text, and copy error.
There could be multiple reasons for this issue. For instance, a plugin could break the block editor and show this error, or your WordPress version isn’t up to date.
You can fix this by deactivating all the plugins and reactivating them one by one. Another fix is to change your WordPress to a default theme, like Twenty Twenty-Two, and see if the problem persists.
If you’re still facing this issue after checking the WordPress plugins and theme, then try updating the WordPress version and clearing the WordPress cache.
3. Remove The Invalid JSON Error in the Content Editor
When you’re editing a blog post or page, a ‘The response is not a valid JSON response’ error may occur when you click the Update button in the block editor.
WordPress is in continuous communication with the website server in the background when you’re editing a post on your WordPress blog. This error is caused when WordPress fails to receive a response from the server or the response is not in the JSON format.
Here are a few reasons why you would get an invalid JSON error and how to fix them:
Check WordPress URLs in Settings – You will need to ensure that the WordPress Address and Site Address in your site’s settings are correct. Simply go to the Settings » General page and check if the URLs are the same. The JSON error could be triggered if the Site Address is different.
Fix Permalink Settings in WordPress – In WordPress, you can set up SEO-friendly URLs for your pages and posts. However, incorrect settings can make it hard for the block editor to get a valid JSON response. Just make sure to select the right permalink format.
Check WordPress .htaccess File Settings – The .htaccess file is used as a configuration file in WordPress to manage SEO-friendly URLs (permalinks). Usually, WordPress will automatically regenerate and update it. However, incorrect settings or out-of-date .htaccess files can cause JSON errors.
See REST API Debug Logs – The REST API is a set of techniques WordPress uses to communicate with your site’s server. A JSON error can also mean that REST API encountered an error. You can check this by viewing the REST API logs on the Site Health page in WordPress.
Try Deactivating All The Plugins – A conflict between different WordPress plugins can also result in an invalid JSON error. Try deactivating all the plugins on your website and see if the error reoccurs.
Switch to the Classic Editor – If you’re still unable to resolve the JSON error, then you can switch back to the Classic Editor in WordPress. The old content editor doesn’t rely on REST API to get a JSON response from the website server.
Another error you might see when updating or publishing a blog post or page in the WordPress block editor is: ‘Updating failed. You are probably offline.’
This issue occurs when WordPress REST API cannot communicate with the WordPress database.
If the block editor fails to send and receive requests from the WordPress hosting database, then different parts of your site won’t function. This includes the block editor.
The REST API may stop working if you’re not connected to the internet or have lost connectivity. To fix this issue, please make sure that your internet connection is working properly, and then try to update or publish your page.
Aside from that, you can go to Tools » Site Health from your WordPress dashboard and view the REST API logs. If there is an issue with REST API, then you will see it under the ‘recommended improvements’ section.
The error log will show what happened to the REST API and may give you clues about what might have caused the issue.
5. Add or Remove Blank Spaces between WordPress Blocks
When creating custom pages and posts using the WordPress block editor, you may notice too much or too little space between blocks.
Usually the spacing is controlled by your WordPress theme. However, there are options in the block editor that also let you control the layout of your page and offer a better user experience.
For instance, you can add a Spacer block to add blank spaces. Simply click the ‘+’ button and add the Spacer block anywhere in the content.
This way, you can add additional space between blocks.
WordPress also lets you adjust the size of the spacer block. You can make it bigger or smaller by dragging the block up or down.
If you want to remove extra blank space between blocks, then you will need to enter custom CSS into your WordPress theme or use a CSS plugin like CSS Hero.
The plugin lets you edit your website’s CSS without editing the code. It offers different spacing options that you can use to adjust the blank space between blocks.
6. Copy and Paste Content without Formatting Issues
Have you ever noticed that when you copy and paste content from a desktop app or a web page into the block editor, you end up pasting unwanted formatting as well?
You’ll see that the font and colors of the pasted content don’t match your WordPress theme. This is very common if you’re using Microsoft Word or Google Docs to write the content and then enter it in the block editor.
Some simple tips for keeping the original formatting include using Word and Google Docs heading styles. This way, WordPress automatically picks the headline level when you paste the content into the block editor.
Besides that, you should check the HTML code of your page or post after pasting the content. In the WordPress content editor, you can select a block and then click the 3 vertical dots option. From the dropdown menu, simply select the ‘Edit as HTML’ option.
This way, you should be able to find any formatting errors, like incorrect bolds and italics, unwanted text, and more.
Next, you might see an error when uploading images in the WordPress block editor. It is one of the most common image issues in WordPress.
The main reason for this error is due to incorrect file permissions. All your website files are stored on your web hosting service and require specific file and directory permissions to work.
If these permissions are incorrect, it can prevent WordPress from reading and uploading files onto the hosting server. As a result, you will notice that images will disappear from the media library when uploaded, or you may see an error that says:
‘Unable to create directory wp-content/uploads/2019/04. Is its parent directory writable by the server?’
To fix this issue, you’ll need to edit the file permissions. You can use an FTP client and access the /wp-content/ folder. From here, you can right-click the folder and change the file permissions.
Another issue you may encounter when uploading images in the WordPress block editor is the HTTP error.
WordPress will show a generic ‘HTTP’ error’ when you upload images in the Media Library and you won’t be able to see a preview of the picture.
There are several things that could cause this issue. The frustrating part is that the error message doesn’t give many clues to the actual cause.
To fix this, you can try a bunch of things. First, you can simply wait a few minutes and try reuploading the image. At times, your website server could encounter a problem like unusual traffic and low server resources.
Besides that, you can increase WordPress memory limit and prevent lack of memory from causing the HTTP error. Other things you can try include changing the image editor library used by WordPress and editing the .htaccess file.
Also, your login might have expired, and this error will sometimes go away by going to your login screen and entering your username and password again.
9. Remove Missed Schedule Post Errors in WordPress
Did you know that WordPress offers a built-in option to schedule blog posts?
In the WordPress content editor, you can change the date and time for publishing your blog posts. However, sometimes your scheduled content may not get published at the set time.
The main reason for this error is due to the WordPress hosting environment or plugin conflicts. WordPress uses a technology called ‘cron’ to automatically publish your post at a later time.
If a plugin or the website hosting server is affecting the cron jobs, then it will lead to missed schedule post error in WordPress.
You can fix this issue by checking the timezone of your WordPress site. It is possible that your site’s timezone doesn’t match the timezone you’d like to use for scheduling your blogs.
Simply head to Settings » General from the WordPress admin panel and scroll down to the Timezone section.
10. Fixing Alignment Issues in WordPress Block Editor
Another common WordPress block editor you might face is that your content and images may not be properly aligned.
For example, let’s say you added a bullet list to a blog post and center-aligned it. However, the list appears left-aligned in the block editor when editing the post. Similarly, a center-aligned image block may appear aligned to the left or right.
If you have the Gutenberg plugin installed and active on your WordPress site, then it can cause block alignment issues. We recommend that you deactivate the Gutenberg plugin and see if it resolves the problem.
Another solution is to add the following custom CSS code for the text you’d like to center-align:
Have you ever noticed that when you share an article on Facebook, the post thumbnails are incorrect?
The problem can be caused by conflicting plugins, content delivery network (CDN) issues, or missing open graph meta tags for Facebook.
Now, this isn’t an issue that you will see in the WordPress block editor. However, you can specify an open graph image for Facebook using the content editor.
Another social media-related block editor issue you will face is adding Facebook and Instagram content to WordPress.
In the past, you could easily embed posts from Instagram or Facebook in WordPress. However, Facebook has changed the way oEmbed works now.
You can no longer embed videos, images, updates, and other content in WordPress. It will instead show a plain URL of the content.
You can easily fix this issue using a social media WordPress plugin like Smash Balloon. It helps you embed content from Facebook and Instagram easily using oEmbed, and you can also show social media feeds on your website.
13. Unable to See Embedded Content Preview in Block Editor
This is an issue that was raised in WordPress 5.7 version. Whenever you embedded a video from YouTube and Vimeo or added audio from Spotify and SoundCloud, the preview wouldn’t appear in the block editor.
Instead, you would simply see ‘Preview is not available’ written in the blocks. The main cause of this problem was the default lazy loading feature.
In WordPress 5.5, iFrames were lazy-loaded by default, which meant embedded content like pictures would not load until a visitor scrolled down to the location of the content.
A simple fix to this issue is updating your WordPress version. This bug has since then been resolved. If you’re using version 5.7 or lower, then we highly recommend updating your WordPress to the latest version.
If you liked this article, then please subscribe to our YouTube Channel for WordPress video tutorials. You can also find us on Twitter and Facebook.
The Site Tagline Block is one of many useful blocks that make WordPress so easy to use. With it, you can add your site’s tagline anywhere on your site and customize it using built-in style options. In this article, we’ll discuss everything you need to know about the site tagline block so you can use it effectively on your website.
What is the Site Tagline Block?
Your site tagline (along with the site title) is usually added when you first install WordPress and can be found in the dashboard’s general settings. The tagline should be updated from the default “Just another WordPress Site” with a more appropriate summary of what your site is all about. To change your website’s tagline in the back end, you can navigate to Settings > General.
The Site Tagline Block is a theme block in WordPress that allows to you easily add your site tagline anywhere on your site as dynamic content. You can drag the block into a page, template, or header and customize it however you like. This is one of many blocks introduced with full site editing in WordPress.
How to Add the Site Tagline Block to your Post or Page
For this example, we are going to use the Twenty Twenty-Two theme to add the site tagline to the header area of the template. From the WordPress dashboard, go to Appearance  > Editor.
To add a Site Tagline block, start by clicking the Block Inserter icon when editing the page template.
From here you can search SiteTagline from the search bar.
Either click on it or drag it to your desired location to add the block to your page.
You can also type /tagline to quickly add your site’s tagline to your page.
Site Tagline Block Settings and Options
Toolbar Settings
If you hover over the block, you’ll see a formatting menu that includes the following options:
Transforming the block into another type of element
Changing the alignment of the text
Additional settings.
Here’s a quick cheat sheet that shows where each of those options is within the formatting toolbar:
Additional Settings
If you click on the three vertical dots on the right side of the toolbar and select show more settings or the cog in the upper right corner you can access the sidebar to view the additional block settings available.
From this side panel you can view the additional settings, first we’ll look at the Color settings available:
Change the text color.
Change the background color of the text.
You can also change the font, appearance (Bold, Italic, etc.), line height, letter spacing, decoration (underline, strikethrough), and letter casing by clicking the three vertical dots next to Typography under the Color section.
You can change the font from the font setting section.
Adjust the font size under the size setting.
The font-weight (bold, thin, etc.) can be changed in the appearance section.
You can also adjust the letter spacing and line height in their respective sections.
In the letter case setting, we can adjust the capitalization of the site tagline block.
And we can underline or strikethrough our site tagline by selecting those options in the decoration section.
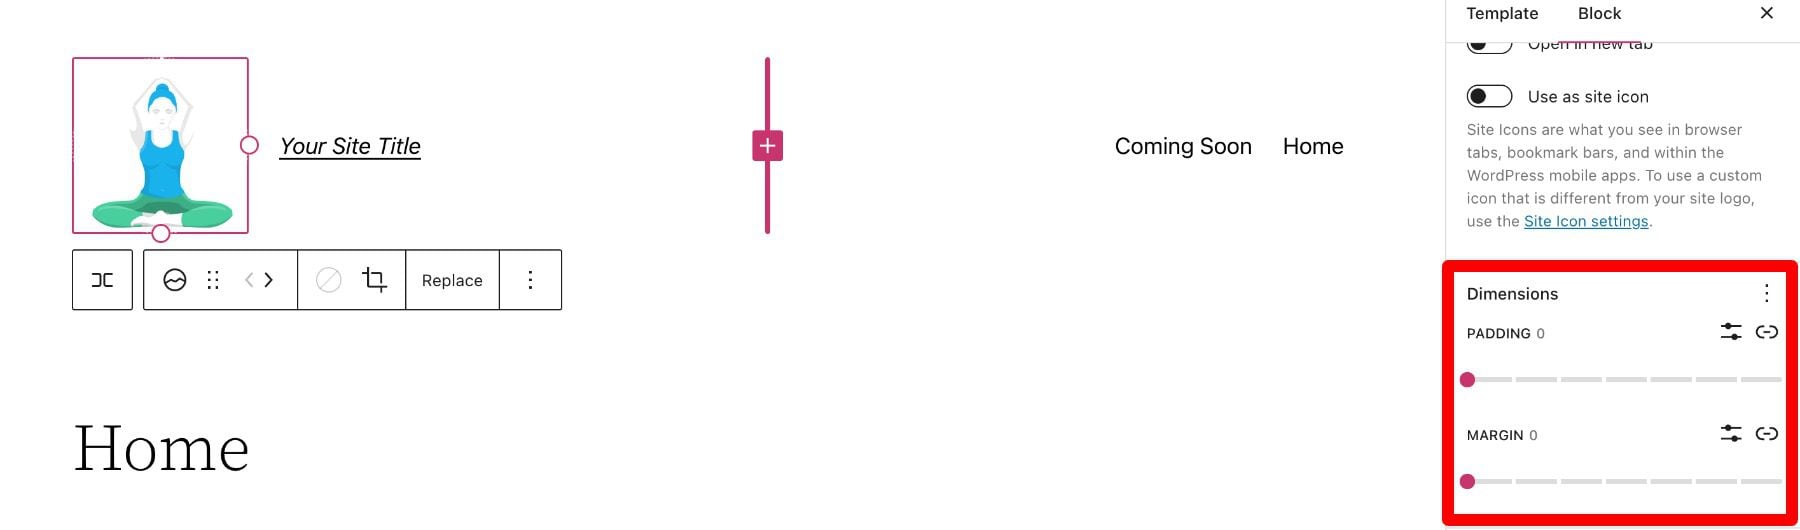
Below the settings section, you can find the dimensions tab where you can adjust the padding and margin of your site tagline block.
Changing the Global Style of Site Tagline Block in WordPress
As mentioned earlier, your actual WordPress Site Tagline (the text content) can be updated using the Site Tagline Block for all interactions of the block dynamically. However, the style (background color, text color, etc.) of the block won’t apply to all interactions unless you change the default global style of the block.
For example, below we have adjusted the background color of our site tagline block in the header to blue.
If we open a blog post, we can see that the header changes with the new style (1), but the style is off if we place the site tagline block somewhere else on the page (2).
To change the styles of all the site tagline blocks on your WordPress website site-wide, we can navigate to the styles tab by clicking the half-white, half-black circle in the top right of our template editor and selecting blocks.
From here, search “site tagline” from the search bar and select it.
Here you can make changes that will change the default style for all current and future iterations of the site tagline block on your website.
Of course, you can always override these global styles for any individual block as needed.
Frequently Asked Questions About the Site Tagline Block
Here are a few FAQs that may help you better understand the Site Tagline Block.
Do I need a Site Tagline for my website?
Absolutely! Like your Site Title, the Site Tagline helps define your website’s identity and purpose. Most importantly, a tagline helps SEO. It is used by search engines to help rank your site especially if it is displayed on the SERPs. Even if you choose not to display your tagline on your header, creating one in Settings > General, is still good practice for SEO.
Where Should I Use the Site Tagline Block?
Generally, the Site Tagline is used primarily behind the scenes. But it is common practice to add to your header or footer. You can place it next to the site logo block or site tile block to help visitors know what your site is about.
Can I Add Custom CSS to My Site Tagline Block?
Under the dimensions section in the additional settings sidebar, you can see the advanced section. Here you can add CSS classes to your block to target the block in your CSS stylesheet or use your theme’s Additional CSS area as needed.
To access the CSS editor, go to Appearance > Additional CSS:
Adding a Dynamic Site Tagline in Divi
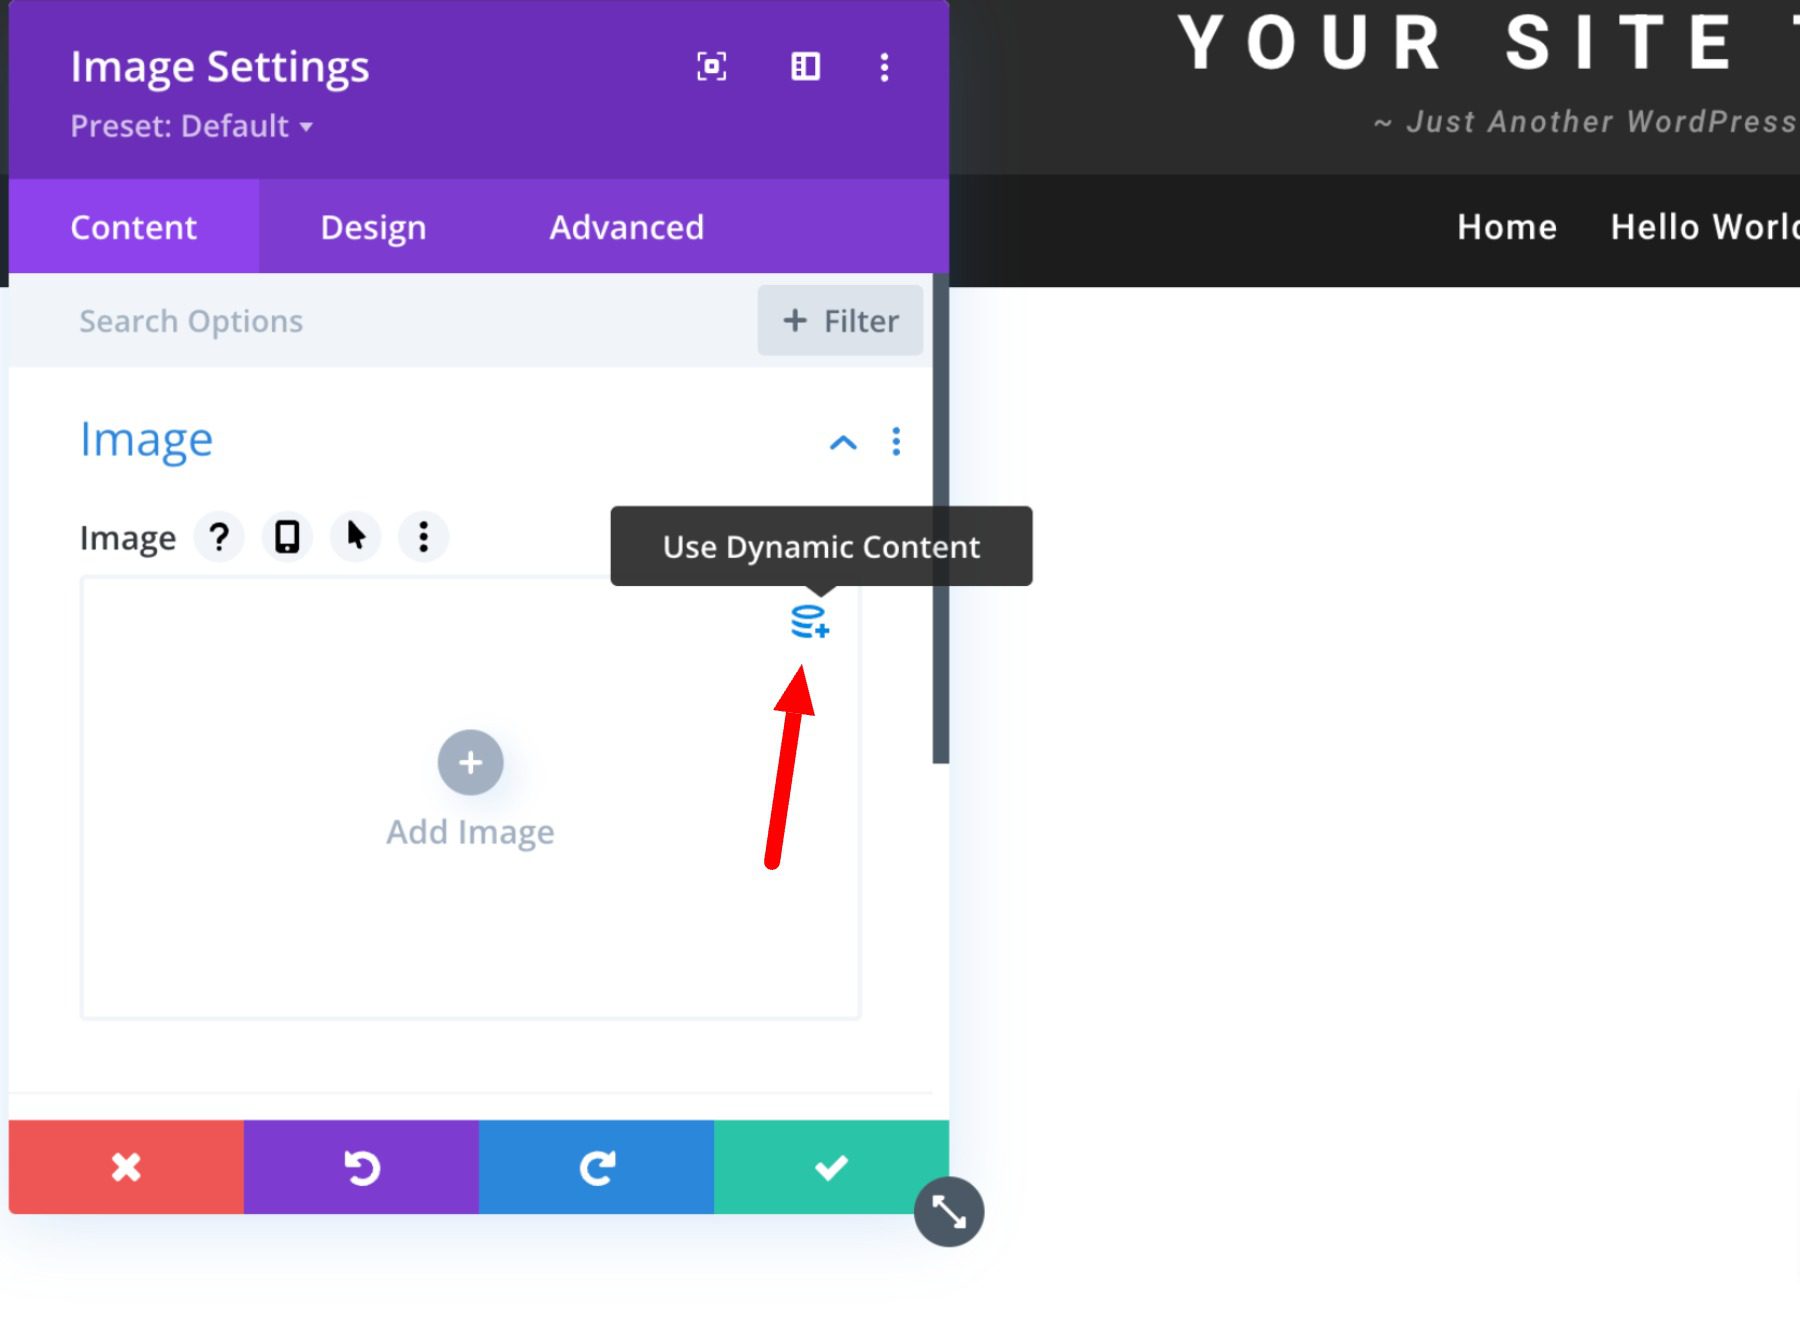
You can use the Divi Theme Builder to add a site tagline to your global header in just a few easy steps. You can start by clicking the edit button next to Global Header in your Divi Theme Builder. We’re using a premade template for this tutorial, but these steps will work with any theme.
Next, add a new Call to Action module in your header.
Next, hover over the body area and select the “Use Dynamic Content†icon. Then select “Site Tagline†from the list.
The site tagline block gives you full control over where you want to display it throughout your site. Using the built-in block settings available in the WordPress editor, you can easily add, edit, or style the block to fit your design. Use it to add a beautiful tagline to your site’s header, footer, or anywhere you want.
One of the most essential parts of running a WordPress site is branding, and nothing stands out more than a logo. Your logo defines your brand, so you need to use it properly. In this post, we’ll tell you how you can implement a logo into your website using the WordPress site logo block. We’ll also cover the block settings available and give you some helpful tips for using a logo effectively.
What is the WordPress Site Logo Block?
The site logo block in WordPress is one of many site blocks available in the WordPress editor with the rise of full site editing. The block gives you the ability to add your site’s logo to a page template or main header in WordPress.
The site logo block is also dynamic because it can pull your site logo from your website’s data as dynamic content. So changing your site logo via the site logo block or on the backend will automatically update all iterations of the site logo block throughout your site. Furthermore, when using the site logo block on a template, you have easier control over your global logo design.
It’s important to note that the Site Icon, the smaller image seen in your dashboard and browser tabs, etc., is distinct from the Site Logo. However, the site logo can also serve as the site icon if you choose by updating the block settings tab which we’ll get into further below.
How to Add the Site Logo Block to your WordPress Header
For this example, we will show you how to add or customize the site logo on your WordPress header in a template using the Twenty Twenty-Two theme. Here’s how to do it.
From the WordPress Dashboard, navigate to Appearance >  Editor.
There should already be a site logo inside the header area of the page template on the left of the Site Title. You can also open the list view to find it as well.
If you want to add the Site Logo block to the template, you can click on the +  block inserter icon.
Then search for “Site Logo” and click on it and/or drag it to your desired location to add the block to your page.
If you haven’t set your logo, you can upload it after clicking the upload sign on the Site Logo Block.
Once you change your site logo via the site logo block, all other copies of the site logo will display the same image. This is the dynamic functionality of the block in action.
Site Logo Block Settings and Options
The Site Logo Block comes with additional settings and options that make it easy to customize for your website. Here is a brief overview of the settings available.
Toolbar Settings
If you hover over the block, you’ll see a formatting menu that includes the following options:
Transforming the block into another type of element
Adjusting the shadow, highlights, or tone of your logo
Changing the zoom, aspect ratio, and rotation of your logo
Replacing your logo and image
Shows more advanced options such as copy, duplicate, move, lock, group, add to reusable blocks, or remove the block.
As you may have noticed these tools can help you adjust the look of your logo so that you can get the placement and design to match your website’s style.
To change the color of the logo image click the duotone tool and select your desired color scheme.
To set your colors, select the dots within the color bars:
Site Logo Block Settings
If you open the additional options or block settings toggle in the sidebar, you can find more block settings you can customize.
From here you can change your logo to:
Appear rounded instead of the default square or rectangle setting
Link image to home, if enabled will navigate users back to your home page when your logo is clicked
Open in a new tab, if enabled will open your home page in a new tab
Use as site icon, if enabled will use your logo as the site icon or favicon
Below the settings section, you can find the dimensions tab where you can adjust the padding and margin of your logo.
That covers everything you need to know about the settings available for your logo block, so you can customize your logo’s style to match perfectly to the rest of your site’s aesthetic. Now, let’s delve into some tips for how to use this block effectively.
Tips and Best Practices for Using the Site Logo Block Effectively
Using the site logo block is pretty straightforward to use, but it’s still important to keep some things in mind.
Optimize the Logo Image Before Uploading
Just like with any image uploaded via WordPress, it’s important to optimize your logo before you upload it to your site logo block. This will improve your load speeds and be beneficial for image SEO as well. Your logo should be a PNG, and the file shouldn’t be too big, we recommend using a web tool like TinyPNG, to help compress your image without losing quality in the process.
Match Your Website’s Style
Assuming your website already has a design and scheme, your logo mustn’t contrast too much with the style already in place on the rest of your site. So take a look at the colors and layout of your website and see if you can work your logo in as seamlessly as possible.
Prominently Display Your Logo
Making sure you use your logo properly after creating it is an essential step in effectively branding your website. In most cases, your logo should be displayed on your WordPress header area/template so that it can be seen on all the pages of your site. Also, it’s best practice to make your logo link back to your homepage to help with user flow and to constantly draw the user’s eye to your logo.
Frequently Asked Questions About the Site Logo Block
After you complete the difficult task of creating your logo, using the logo block in WordPress is relatively hassle-free. Still, as with anything, some questions need answering. Here are some answers to frequently asked questions about the logo block.
How Do I Change The Site Logo?
To replace the site logo, click on the site logo block and then click on Replace in the toolbar settings. There you can add one from your media library, upload a new one, or reset the site logo to the default.
When Should I Use the Site Logo Block?
Your logo is the symbol that represents your website and, therefore, should be prominent on nearly every page of your site. This is why we recommend putting your logo in the header area, where it can be used for both navigation (Home button) and branding purposes.
What’s the Difference Between a Logo and a Site Icon?
A site icon is used as a browser and app icon for your site; you may see it next to the tab in your browser. The logo for your site isn’t necessarily used as the site icon but can be activated in the logo block’s advanced settings.
Using Divi to Add a Site Logo to Your Global Header in WordPress
When using Divi, you can use the Divi theme builder to add a site logo to your global header in just a few easy steps. You can start by clicking the edit button next to Global Header in your default website template.
Now, you simply add an image module to the header and select the Use Dynamic Content option in the top right corner.
You will then be prompted to select from a list of all dynamic content that is accessible. Select Site Logo to add the dynamic logo to your header.
It is impossible to overstate the significance of your brand’s logo. However, you need a systematic approach to branding your site effectively. This is especially true if you want it to leave a lasting impression on audiences. Hopefully, some of the tips mentioned above can help you create your ideal logo and use the logo block correctly and effectively.
If you have any other tips on making memorable logos, leave them in the comment section below!
If you’re a fan of the online image-sharing community, Imgur, you’re in luck! WordPress has an Imgur Embed Block that makes it easy to embed Imgur content in your posts and pages. This article will show you how to use the WordPress Imgur Embed Block.
What is the Imgur Embed block?
Imgur is a popular image-sharing site with a loyal community of users. It allows users to upload, share, and comment on images. The site has a user-friendly interface and is one of the most popular image-sharing websites on the internet.
Homepage of Imgur / Sept. 1st 2022
If you’re a meme-loving human who uses Imgur you probably want to cross-pollinate your WordPress website with your Imgur posts. That is where WordPress’ Imgur Embed Block comes in.
In this article, we’ll cover the Imgur Embed block. This block allows you to pull images from your Imgur account onto a WordPress page. Here’s how it works!
How to Add the Imgur Embed Block to your Post or Page
If you’ve ever wanted to add an Imgur image post to your WordPress site but weren’t sure how this guide is for you. Adding an Imgur image using the embed block in the WordPress block editor is easy.
First, inside your Imgur account, find the image you want to add and copy its URL.
Then, in WordPress, click on the “Add Block” button, find Imgur Embed, and select it.
It will ask for a URL where you can paste the Imgur URL into the box that appears and hit enter.
The image will automatically be added to your post. Preview the Imgur image post to see how it looks with your theme and other content.
That’s all there is to it! Next, we’ll explore the few settings and options of the Imgur embed block in WordPress.
Imgur Embed Block Settings and Options
The block toolbar for the Imgur Embed block has four options for alignment on a page. Each of these shifts the Imgur embed on the page in accordance with the chosen alignment. If None is chosen, then default settings take effect.
None – No alignment that is determined at the Block level
Align left – Make the block left-aligned.
Align center – Make the block alignment centered.
Align right – Make the block right-aligned.
By clicking on the Tool Bar’s ellipsis icon, you’ll see universal Block commands and options. These are available for most every type of default block and not just for Imgur embeds.
There are run-of-the-mill shortcuts like Copy and Duplicate on the block level. Additional options are the block editor specific commands to Insert Before, Insert After, Move To, and Edit as HTML.
Lastly, there are the options to Lock the block in place, Add the Block to Reusable Blocks, and Group which groups multiple blocks together as a sort of unit.
You can change the content’s behavior for viewing on a phone through the Imgur Block Settings on Media Settings. The Toggle switch turns responsive resizing on or off for smaller devices. The default setting is set to on, but if you notice it behaves poorly for you, you can turn the setting off.
There is also the option to add a CSS Class to the block specifically. If you are editing this block’s styles via CSS, you’d assign the class in the Advanced settings section.
For more styling options, the Imgur Embed block can be converted to a Group.
This allows for spacing, typography, and background color settings to be applied to the whole block.
Additionally, in the Group’s Advanced Settings, there is also the option to add an HTML Anchor ID for creating anchor links.
Imgur Terms and Conditions
It is worth mentioning that there are limitations on how you use Imgur on a website. Here is a word from Imgur:
Please note that Imgur’s Terms of Service prohibit using Imgur as a content delivery network, hotlinking adult or illegal images, torrents, image hosting for commercial purposes, or sites that copy Imgur’s own functionality.
But for most use cases, using the Imgur embed block is completely safe and a great way to share your images.
Conclusion
In conclusion, the WordPress Imgur Embed Block is a great tool to use when you want to embed an Imgur image in your WordPress post or page. All you need is the URL of the Imgur image and the Imgur Embed Block will do the rest. Give it a shot!


 And we can underline or strikethrough our site tagline by selecting those options in the decoration section.