With digital currency growing in popularity, accepting bitcoin payments on your WordPress store can be quite beneficial for your business. With global acceptance and cutting-edge technology, bitcoin is not only a great way to attract new customers but also reduce business costs.
Accepting bitcoin payments on WordPress is an easy and straightforward process thanks to the many services that allow for a user-friendly experience that can get you started in no time.
In this article, we will discuss the many benefits of accepting Bitcoin payments, the things you will be needing, and one of the top WordPress plugins that allow you to accept BTC.
Benefits of Accepting Bitcoin Payments
There are many benefits to accepting Bitcoin payments on your WordPress store. Here are a few of the most important ones:
Increased customer base: Bitcoin is a global currency with an increasing user base, so accepting it on your eStore can boost sales as you get to tap into a wider customer base.
Lower transaction fees: The transaction fees involved with bitcoin is typically much lower than credit card fees. Plus you save up on bank fees for cross-border transactions, and currency conversion. This can save you money and you can pass those savings on to your customers or use it to grow your business.
Faster payments: Bitcoin payments are processed much faster than credit card payments. Fiat transactions typically take 5-7 days to settle and even longer if they are cross-border, while BTC payments can be settled in as little as 10 minutes. This can help you improve your customer satisfaction and reduce your payment processing time.
Secure payments: Blockchain is one of the most secure ways to transact in the current fintech ecosystem. And it is no surprise that many fiat institutions are looking to implement this technology into their systems. With bitcoin, no personal information is collected and all transactions can be validated on the blockchain.
No chargebacks: Bitcoin transactions are irreversible, which means that you are less likely to be charged back by fraudulent customers.
Things You Need to Accept Bitcoin Payments
In order to accept Bitcoin payments on your WordPress store, you will essentially need only two things:
Bitcoin Wallet
A Bitcoin wallet is an application that allows you to store, send and receive Bitcoin. Similar to a fiat bank account, a bitcoin wallet is your personal/business account you use to transact using BTC.
There are numerous options available in the market today. Some of the top wallets include:
Trezor [Hardware]
Electrum [Desktop]
MyCelium [Mobile]
Security-wise, choosing a hardware wallet is the way to go, but you would need to purchase these wallets as they come with dedicated hardware.
Since you are the sole owner of your wallet, its security is solely your responsibility. So do make sure that you follow some safety practices to keep your bitcoin safe.
Bitcoin Payment Processor
Bitcoin payment processor is a third-party service that allows you to accept Bitcoin payments on your website. There are multiple options in the market that you can choose from each offering varied features and services to fit the needs of your business.
As an eCommerce merchant, it is vital to choose the right payment gateway for your business and when it comes to choosing the best bitcoin payment plugin there are a few functionalities that you must look for:
Direct-to-wallet: The payments should come directly to your bitcoin wallet, giving you complete control of the funds that you receive.
No KYC/AML: If you value privacy, choose a service that does not ask you to undergo ID checks.
Low Fees
Easy integration: Ideally, a dedicated WordPress plugin that can easily integrate with your online store.
Secure and Safeguarded transaction
Excellent customer support
Accept Bitcoin Payments using Blockonomics
Blockonomics, one of the leading bitcoin payment gateway has made quite a name for its decentralized nature and easy integration, and it pretty much checks all the boxes mentioned above. They provide a dedicated WordPress plugin that can be integrated with your eStore in a matter of minutes.
One savvy feature that stands out with this plugin is that the entire checkout experience happens within your website and there are redirects to external pages, making the checkout more secure.
Blockonomics charges a flat rate of 1% per transaction with the first 20 transactions free. This makes it an affordable option for businesses and individuals who are looking to accept bitcoin payments without incurring high transaction fees.
Conclusion
Accepting Bitcoin payments on your WordPress store can be a great way to attract new customers and increase your sales. With the growing popularity of cryptocurrency, you are not only future-proofing your business but also partaking in the decentralized finance revolution.
You enjoy low transaction fees, secure and faster payments, global acceptance, and complete control of your funds with bitcoin. And the best part is that you can get started in a matter of minutes, all you need is a bitcoin wallet and payment plugin.
Blocknomics WordPress plugin is a great option if you are looking for a secure, fast, and affordable way to accept Bitcoin payments. The installation takes minutes and you have a 24X7 dedicated support channel to assist in any way possible.
If you’re looking for the best WordPress hosting company, you’ve come to the right place.
This article will present our curated 12 best WordPress hosting services. We’ll also include important factors to consider when selecting one to ensure you get the best possible hosting environment to create and develop your WordPress website.
Do you want a quick answer? In that case, our top picks are Hostinger and SiteGround, as both providers offer user-friendly yet affordable and feature-rich tools.
Hostinger offers an extensive toolset for all things WordPress, an intuitive and easy-to-use hPanel, and a free lifetime SSL certificate.
SiteGround includes unmetered traffic, custom-built SuperCacher caching tools, and daily backups.
We understand that each website has its unique requirements and constraints, and there is no one-size-fits-all solution. Our primary goal in this article is to empower you with the information and insights needed to make an informed decision.
Throughout this review, we will delve into a diverse range of WordPress hosting providers, scrutinizing their different features including performance, security, pricing, and customer support. To verify their performance claims, we used GT Metrix to determine their server response time, aka TTFB (Time to First Byte), which is a crucial metric in web performance that gauges the responsiveness of a web server or other network resources.
Without further ado, let’s get started!
10 Best Hosting Providers for WordPress
1. Hostinger
Features From 100 GB of SSD storage Unlimited bandwidth WordPress AI Tools Free Automatic Website Migration Feature-packed control panel called hPanel LSCWP integration Globally-distributed data centers Automated backups A free lifetime SSL certificate, CDN, and migration services 30-day money-back guarantee Try Hostinger WordPress hosting
Starting Price: $2.99/month
Rating: 4.8/5
Hostinger offers fully-optimized managed WordPress hosting for shared and cloud hosting environments. It’s perfect for projects of any size, whether you’re building a personal, professional, or eCommerce website.
Hostinger ensures exceptional server reliability. With the industry-standard 99.99% uptime guarantee, you shouldn’t worry about your WordPress website availability.
This web hosting company consistently delivers excellent performance. Hostinger’s speed optimization tools include multi-layered caching with LiteSpeed Cache for WordPress (LSCWP) and a content delivery network (CDN).
When it comes to CDN integration, users can enable WebP Image Compression, activate Smart Image Optimization, and toggle JavaScript and CSS minification features. These actions help reduce website load, resulting in excellent speed and performance.
On top of that, Hostinger owns multiple data centers worldwide. They’re located in France, the Netherlands, Lithuania, the United Kingdom, Singapore, India, the USA, and Brazil.
As a result, Hostinger managed to score a blazing 144 ms of TTFB score on GTmetrix.
Hostinger provides server-level protection as well as site security hardening. The web hosting company implements 24/7 server monitoring, robust firewall service, and built-in anti-malware software. In addition, it automates daily and weekly backups.
This WordPress hosting provider employs Cloudflare to protect its nameservers from cybersecurity threats like DDoS attacks. Above all, it lets users claim a free lifetime SSL certificate, ensuring end-to-end encryption between users and a web server.
WP-CLI – short for WordPress Command Line Interface, users can manage their WordPress websites using custom commands for specific tasks.
WordPress Multisite – manage multiple WordPress sites under a single WordPress installation.
WordPress AI Tools –Generate unique website content fast and easily.
A staging environment – test website changes before publishing.
Object cache tools – store database queries for faster retrieval.
Hostinger WordPress plugin – pre-installed once you activate the CMS; this plugin helps to set up your website. It streamlines your workflow, from uploading your logo to editing the heading or adding a new page.
WordPress Autoupdates –Secure your WordPress with auto updates.
If you’re a beginner, don’t worry, as Hostinger offers an intuitive custom-built control panel called hPanel.
Its minimalistic user-friendly design helps users to easily edit account details and immediately find important website information, including performance score and security status.
Hostinger offers three managed WordPress hosting packages – Premium, Business and Cloud Startup.
Its Premium WordPress plan, which costs $2.99/month, lets users host 100 websites. Resource-wise, users can utilize up to 100 GB of SSD storage and unlimited bandwidth. Upgrade to Business plan and get 200 GB NVMe storage with unlimited bandwidth.
If you’re building an online store, opt for the Business WordPress or higher-tier plans. These packages include daily backups and all of the easy-to-use WordPress optimization tools.
Hostinger’s Customer Success will gladly help in case you face any difficulties.
The web hosting company offers 24/7 live chat and email ticket support in over 10 languages. It also provides other online support types, including blog tutorials, the Hostinger Academy YouTube channel, and an extensive knowledge base.
2. SiteGround
Features From 10 GB of SSD storage Unmetered traffic Custom SuperCacher caching tools Daily backups An SSL certificate, CDN integration, and migration tools 30-day money-back guarantee Try SiteGround WordPress hosting.
StartingPrice: $1.99/month
Rating: 4.7/5
SiteGround, a WordPress.org-recommended platform, offers some of the best WordPress hosting built on the Google Cloud infrastructure. Website owners can choose from three plans depending on the project – StartUp, GrowBig, and GrowGeek.
SiteGround’s TTFB scored 258 ms on GTmetrix, meeting the industry standard.
A custom web application firewall (WAF) is among SiteGround’s key security features. It monitors ingoing and outgoing traffic, blocking out suspicious IP addresses.
In addition, SiteGround provides its custom-made security plugin called SiteGround Security. This feature protects your WordPress site from common cyber security threats, like brute force attacks.
Don’t worry about spending precious time optimizing your WordPress website, as SiteGround offers hassle-free, one-click WordPress installation. Also, you can streamline your web design process with WordPress Starter, which lets you quickly pick a theme and extend your site’s functionality.
SiteGround’s custom control panel is called Site Tools and is designed to ease your hosting account management tasks. It features multiple one-click installers for third-party plugins, like Cloudflare CDN, an SSL certificate, and SiteScanner.
SiteGround’s StartUp plan costs $1.99/month and lets you use up to 10 GB of SSD storage alongside unmetered bandwidth. It comes with a standard SSL certificate pre-installed and access to WP-CLI. Should you want to run an online store, you can enable the WooCommerce eCommerce platform.
Upgrade to the higher-tier package once your WordPress site outruns the StartUp plan. Aside from providing more resources, GrowBig and GrowGeek have more features, including an excellent staging environment.
SiteGround’s customer support is available over the phone, via live chat, and email if you need assistance. In addition, blog tutorials can also help solve issues at hand.
3. WP Engine
Features From 10 GB of SSD storage From 50 GB bandwidth One-click staging EverCache integration Automatic and on-demand backups Multiple data centers worldwide Free 10 premium themes, an SSL certificate, and CDN integration 60-day money-back guarantee Try WP Engine WordPress hosting.
Starting Price: $20/month
Rating: 4.6/5
WP Engine offers cloud-based, managed WordPress hosting options. Thanks to its cloud hosting infrastructure, this hosting company has dedicated servers and server clusters for its clients.
With WP Engine’s SLA-backed 99.99% uptime guarantee, no need to worry about your site’s availability. The EverCache and CDN integration ensures great website performance. WP Engine scored 277 ms of TTFB on GTmetrix.
Regarding security, WP Engine implements threat blocking and DDoS protection, among other features. All of its plans also come with a free SSL certificate.
In addition, users can purchase additional security features, such as automated plugin updates, managed WAF, and site monitoring services.
WP Engine pre-includes 10 premium WordPress themes to help streamline your WordPress website development process. It also offers a one-click staging feature, letting you create full copies of your website and merge them back to the live version if needed.
WP Engine provides a custom control panel called User Portal, where you can manage your WordPress site, eCommerce store, or users within the easily accessible dashboard.
WP Engine has four WordPress hosting plans – Startup, Professional, Growth, and Scale. The starter plan costs $20/month and lets you host a single WordPress website, including 10 GB of storage space and 50 GB of bandwidth.
While the Startup plan only offers chat support, the higher-tiered ones give access to 24/7 phone support. If you want to troubleshoot website issues yourself, feel free to delve into WP Engine’s blog page or video tutorials.
4. DreamHost
Features From 50 GB of SSD storage Unmetered bandwidth Custom-built WordPress Website Builder An SSL certificate and migration tools 97-day money-back guarantee Try DreamHost WordPress hosting.
Starting Price: $2.59/month
Rating: 4.7/5
DreamHost offers several WordPress hosting services. Users can choose from WordPress-optimized shared hosting, cloud-based, virtual private server (VPS), and dedicated hosting environments. This article will only focus on its shared and managed WordPress plans.
DreamHost offers a 100% uptime guarantee with compensation if it fails to deliver what it promised. Speed-wise, DreamHost showcased 252 ms of TTFB score on the GTmetrix speed test results.
Aside from a free SSL certificate, DreamHost offers its custom-built DreamShiled malware scanner and remover. It also performs automated daily backups so you won’t lose your site’s files in case of an unexpected incident.
Regarding WordPress-specific tools, DreamHost offers WP-CLI and its custom-built WP Website Builder. Aside from the automatic WordPress installation, it offers a free migration plugin to help you move your existing WordPress site to the web host’s hosting infrastructure.
The DreamHost Panel has a clean and minimalistic look. Once you set up your WordPress hosting account, DreamHost will automatically redirect you to the WordPress menu.
DreamHost offers two managed WordPress hosting plans on the shared infrastructure. The lower-tiered package costs $2.59/month for a three-year plan, while the higher-tiered package costs $3.95/month.
Worry not about scalability, as the WordPress Unlimited plan lets users utilize unmetered bandwidth and storage. Regarding WordPress itself, this plan grants unlimited WordPress websites.
Both plans are eligible for callbacks, live chat, and 24/7 ticket support. You can browse through DreamHost’s knowledge base if you prefer troubleshooting website issues on your own.
5. HostGator
Features Unmetered bandwidth From 1 GB of separate backup storage cPanel control panel $500 Google Ads credits A free domain name, SSL certificate, migration services 30-day money-back guarantee Try HostGator WordPress hosting.
Starting Price: $5.95/month
Rating: 4.1/5
HostGator provides a cloud-based, managed WordPress hosting option and promises a 99.9% server uptime guarantee.
To ensure optimal performance, the hosting provider lets users incorporate Cloudflare’s CDN free of charge. The GTmetrix speed test result shows HostGator’s TTFB of 189 ms.
HostGator employs several third-party integrations to boost site security, including CodeGuard and SiteLock. Additionally, it offers free scheduled backups and automatic malware removal.
HostGator offers up to three WordPress website migration services, depending on your hosting plan. It also includes hundreds of WordPress themes to ease the website design and development process and $500 Google Ads credits for marketing tasks.
HostGator has a customer portal where users can manage their hosting packages. In addition, users can implement cPanel for each hosting package, enabling separate configurations for each hosted site.
Starting at $5.95/month, HostGator offers three WordPress hosting packages. The Starter plan offers unmetered bandwidth and separated backup storage of 1 GB. It lets users host a single website while providing a free domain name for one year, an SSL certificate, and migration services.
Contact HostGator’s customer support over the phone, via live chat, and on Twitter if you encounter any issues. Opt for the knowledge base or blog tutorials should you prefer to troubleshoot website issues yourself.
InMotion Hosting offers managed WordPress hosting within a shared infrastructure. This web hosting company can also be a great option for people looking for managed VPS WordPress hosting services (currently in beta).
Unfortunately, InMotion Hosting’s 99.99% uptime guarantee only applies to its Shared Business Class Pro plan. You can view its server availability on the network status page.
InMotion Hosting registered 317 ms of TTFB score on GTmetrix. Regarding speeding up the WordPress site loading time, this web hosting company integrates W3 Total Cache and PHP workers. It also offers Brotli Compression to minimize the site’s HTTP content.
InMotion Hosting provides a free SSL certificate to guarantee a secure connection. On top of that, it incorporates anti-malware, DDoS protection, and WAF to harden the system’s security. In terms of preventive measures, it offers automated and remote backups.
From a staging environment to more than 200 free templates and BoldGrid site builder integration, managing your WordPress site will be a breeze. You can also streamline your workflow by enabling Google Workspace support.
InMotion Hosting uses the cPanel control panel. While it’s one of the most popular, it has quite a steep learning curve, especially for first-time users. If you go with the VPS-based WordPress hosting, you can try the InMotion Central control panel. However, this new custom-built control panel is still in beta.
This hosting company offers four shared WordPress plans. The cheapest plan costs $3.99/month and lets users host up to two WordPress sites. It packs unlimited bandwidth and 100 GB of NVMe SSD storage, supporting up to 20,000 monthly visitors.
Users can reach InMotion Hosting’s customer support team via live chat, phone, and email tickets. You can also find help in the community forum or browse its blog and knowledge base.
7. A2 Hosting
Features 99.9% uptime guarantee From 50 GB of NVMe Storage Unmetered bandwidth Redis, JetPack, and Imunify 360 integration Automated daily backups An SSL certificate and migration services 30-day money-back guarantee Try A2 Hosting WordPress hosting.
Starting Price: $11.99/month
Rating: 4.3/5
A2 Hosting offers managed WordPress hosting solutions hosted on its Turbo LiteSpeed Web Server. Following the industry benchmark, A2 Hosting guarantees 99.9% server uptime.
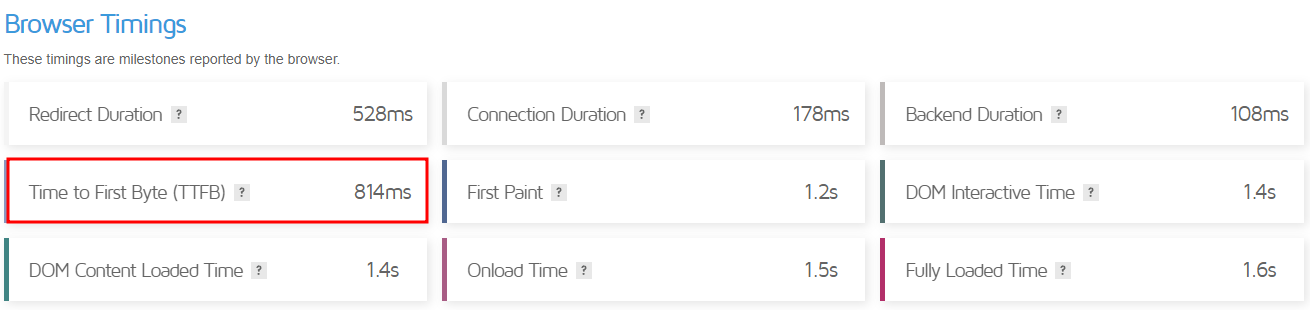
Aside from its custom-built web servers, A2 Hosting’s performance optimization tools include JetPack and multi-layer caching. It lets users choose from four data centers – Michigan, Arizona, Amsterdam, and Singapore. On GTmetrix, A2 Hosting got a score of 814 ms for TTFB.
Regarding security, A2 Hosting integrates Imunify360 to help with spam filtering, brute force protection, and virus scanning. Moreover, Backup Manager lets users schedule backups, download website copies, and commence a site restore.
While A2 Hosting offers managed services, it lets users opt for manual updates. Additionally, it provides comprehensive SEO tools and PHPMyAdmin database management features. A2 Hosting uses cPanel as its web hosting control panel.
A2 Hosting offers four WordPress hosting packages, good for scalability. Its cheapest plan, Run, costs $11.99/month on a 36-month subscription plan. It also includes a free SSL certificate and site migration services.
Opt for the higher-tiered plans to unlock more features, like WordPress multisite, daily offsite backups, and malware scanners.
24/7 phone, chat, and ticket support are available across A2 Hosting’s WordPress hosting packages. Other resources include an A2 Hosting knowledge base page and blog tutorials.
8. GreenGeeks
Features From 50 GB of web space Unmetered transfer Quick Launch Wizard Automated daily backups A free domain name, SSL certificate, migration services, and CDN Green energy web hosting service 30-day money-back guarantee Try GreenGeek WordPress hosting.
Starting Price: $2.95/month
Rating: 4.2/5
GreenGeeks provides best WordPress hosting built on a shared infrastructure. It’s also one of the leading cPanel-based hosting companies, perfect for users familiar with the control panel.
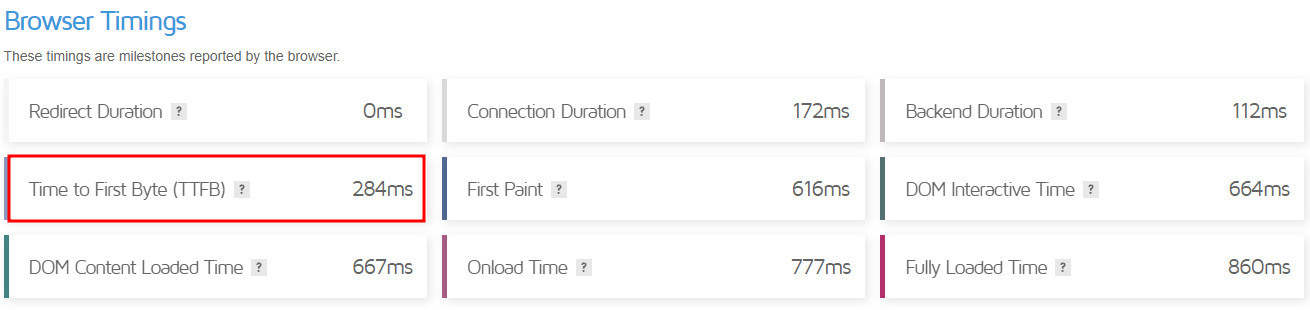
Like most competitors, this web hosting company offers a 99.9% uptime guarantee. It integrates user-friendly caching tools, LSCWP, and CDN to ensure good performance. As a result, it delivered a score of 284 ms of TTFB, as shown in the GTmetrix speed test result below.
GreenGeeks security features include Imunify360 integration and DDoS protection. In addition to the free daily backups, its Pro and higher-tier plans offer on-demand backup features. In case of an incident, you can request a backup restore over the ticket system.
This web hosting company lets users manage their WordPress hosting package using WP-CLI. Aside from that, it provides a staging environment and WordPress repair tools. On top of all, GreenGeeks’ Quick Launch Wizard helps ease your website management process.
GreenGeeks offers three WordPress plans – Lite, Pro, and Premium. The starter plan costs $2.95/month and lets users host one website and utilize up to 50 GB of storage. Opt for the other two plans if you wish to host unlimited websites and use unlimited storage.
Regarding customer care, GreenGeeks offers phone, live chat, and email ticket support. Or you can peruse its blog tutorials, webinars, and extensive knowledge base.
9. Liquid Web
Features From 15 GB of storage From 2 TB of bandwidth iThemes Security Pro and iThemes Sync integration Beaver Builder LitePlugin Performance Monitor An SSL certificate and migration services 30-day money-back guarantee Try Liquid Web WordPress hosting.
Starting Price: $7.60/month
Rating: 4.6/5
Liquid Web’s WordPress hosting is powered by Nexcess, its custom-built digital commerce cloud platform. Liquid Web also prefers cPanel for its users.
Liquid Web tops its competitors by offering an SLA-backed 100% uptime guarantee. In terms of performance, this best WordPress hosting company provides image compression tools combined with its custom configuration. Liquid Web’s GTmetrix test results showed a score of 206 ms of TTFB.
All their plans include iThemes Security Pro which provides increased login security, spam filtering, and vulnerability monitoring, available on all plans. This best WordPress host incorporates a plugin performance monitoring feature, ensuring protection from malicious plugins.
Its Beaver Builder Lite integration, on the other hand, lets users easily create websites using pre-made templates. Liquid Web also offers iThemes Sync for managing multiple WordPress sites.
Scalability is not an issue, as Liquid Web offers eight different WordPress hosting plans.
With its Spark starter plan at $7.60/month, users can host a single WordPress website and utilize 15 GB of storage and 2 TB of bandwidth. In terms of freebies, all plans include a free SSL certificate and migration services.
Liquid Web offers customer support over the phone, live chat, and email ticketing system. Other extensive resources include case studies, a knowledge base, a content hub, and blog tutorials. On a side note, Liquid Web is only available in the US and Europe.
10. Kinsta
Features 99.9% uptime guarantee From 10 GB of SSD storage From 25,000 visits/month Adminer integration An SSL certificate, CDN integration, migrations 30-day money-back guarantee Try Kinsta WordPress hosting.
Starting Price: $35/month
Rating: 4.2/5
Kinsta specializes in managed WordPress cloud-based hosting services, ensuring excellent WordPress site performance.
Kinsta offers an SLA-backed uptime guarantee of 99.9%. Regarding TTFB, Kinsta delivered a score of 171 ms on GTmetrix. Some of its performance optimization tools include CDN and PHP workers. Additionally, you can activate Redis Cache for $100/month per website.
To boost its system security, Kinsta employs DDoS protection, anti-malware, and HTTP/3, among other features. The web hosting company runs automatic backups every one and six hours. Moreover, users can install external backup add-ons.
All of Kinsta’s best WordPress hosting plans come with staging tools. It also includes Adminer, a database management tool, to help website owners edit or run SQL queries easily.
Kinsta’s custom control panel, MyKinsta, incorporates a minimalist design for easier navigation. Users can view their WordPress hosting account information on the dashboard, including resource usage and data transfer.
Kinsta offers 10 different WordPress hosting plans or a custom one based on your requirements.
Its most basic plan, Starter, costs $35/month and allows for a single website under one WordPress installation. It comes with 10 GB of SSD storage, bandwidth equal to 25,000 visits, 2 PHP workers, and 100 GB of CDN.
Kinsta’s 24/7 tech support is available via live chat, WhatsApp, and email tickets. You can also opt for blog tutorials, its own knowledge base, and Kinsta Academy.
11. Flywheel
Features 99.9% uptime guarantee From 5 GB of SSD storage From 20 GB of bandwidth Quick CDN integration FlyCache custom caching tool A free SSL certificate and migration Multiple data centers worldwide 60-day money-back guarantee Try Flywheel WordPress hosting.
Starting Price: $13/month
Rating: 4.2/5 (G2 Review)
Flywheel provides managed WordPress hosting in four WordPress packages – Tiny, Starter, Freelance, and Agency. So whether you’re working on personal or professional projects, this WordPress host might have the right solution for you.
Flywheel’s WordPress hosting services integrate Fastly CDN and FlyCache. It lets users choose from its multiple data centers, including the US, Canada, and Australia. Thanks to the performance boosters, Flywheel’s speed test result on GTmetrix showed a score of 127 ms of TTFB.
In terms of server reliability, Flywheel guarantees 99.9% uptime. The web hosting company implements several security features, like plugin security alerts and a free SSL certificate. It performs nightly backups and incorporates an auto-healing feature for preventive measures.
Streamline your WordPress web design process with 10 pre-included StudioPress premium WordPress themes. All of Flywheel’s WordPress plans come with Genesis Framework, letting web developers and designers tinker with the site’s functionality.
Flywheel’s custom dashboard is easy to navigate. Therefore beginners can easily perform their day-to-day hosting management tasks. The Add-Ons menu contains one-click installers for third-party apps, including one for integrating Google Analytics.
Flywheel’s managed WordPress plans start at $13/month.
The Tiny plan has 5 GB of storage and 20 GB of bandwidth. It includes several freebies, including a SSL certificate and migration services. Regarding WordPress installation, Tiny and Starter plans allow for a single website, Freelance up to 10, and Agency up to 30.
With four WordPress hosting plans available, you don’t need to worry about scalability. Flywheel also has an option for a custom-tailored plan if its clients’ WordPress sites outgrow the Agency plan.
If you need any help, you can contact Flywheel’s customer support via live chat and email. Unlock the nine-to-five phone support and dedicated account manager by upgrading to Agency and Custom plans.
12. Cloudways
Features From 25 GB of SSD storage From 1 TB of bandwidth Cloudflare Enterprise Automated backups Free site migration and SSL certificate 3-day free trial 30-day money-back guarantee Try Cloudways WordPress hosting.
Starting Price: $11/month
Rating: 4.4/5
Cloudways offers managed WordPress web hosting services within the cloud environment. Users can choose from three cloud service providers – DigitalOcean, Amazon Web Service (AWS), and Google Cloud.
Its systems are available to customers 24/7. For more information, check Cloudways’ system status to see its performance statistics. Regarding server speed, Cloudways delivers a 755 ms of TTFB score on GTmetrix.
This provider safeguards its hosting infrastructure with a dedicated firewall, regular security patching, Cloudflare Enterprise, and 24/7 real-time server monitoring. Automatic healing and backups are also available, and you can set the preferred time interval for the latter.
Regarding WordPress optimization, Cloudways supports WP-CLI and lets you create a staging environment. You can also activate WordPress DDoS protection, starting at $4.99/month.
Cloudways has its own custom control panel. The graphical user interface enables beginners to set up and manage their cloud servers without writing a single line of code.
Cloudways’ DigitalOcean starter plan costs $11/month. This plan lets you utilize up to 25 GB of SSD storage and 1 TB bandwidth.
Scalability shouldn’t be an issue, as Cloudways offers 11 packages on its Standard WordPress hosting on DigitalOcean. Storage space ranges from 25 to 3840 GB, and the bandwidth allocation ranges from 1 to 12 TB per month.
Contact Cloudways’ support team through live chat or the ticketing system for further assistance. You may also want to use its extensive library of information, including blog tutorials, a knowledge base, eBooks, case studies, and the Facebook users group.
What to Consider When Choosing a WordPress Hosting Provider
Here are several factors to consider to get the best WordPress hosting services for your project:
Type of hosting. Generally, WordPress hosting is shared hosting optimized for the CMS. Many web hosting companies offer dedicated WordPress hosting on a VPS or cloud environment. Depending on your site’s requirements, choose your hosting type carefully to help your WordPress site thrive.
Uptime. To ensure 24/7 availability, choose the best WordPress hosting company with reliable servers. It should offer at least a 99.9% uptime guarantee so your website is accessible to visitors at all times.
Speed and performance. The fastest WordPress hosting providers should offer a positive user experience and helps improve your ranking on the search results.
Security. Your chosen hosting company should have strong security measures to safeguard your website from hacking attempts and other cyber security threats. Some essential security features include a firewall, DDoS protection, and anti-malware.
Customer support. At some point, you may need assistance to resolve any website or hosting-related issues. Therefore, choosing a provider offering a reliable and responsive 24/7 support team is essential.
Price. The cost of your hosting plan should be reasonable and within your budget. When researching a web host’s pricing, some factors include introductory fees, renewal rates, free trials, and a money-back guarantee.
Scalability: As your website grows, it will need more server resources to ensure great performance and maintain an excellent user experience. Thus, easy scalability should be on your priority list when choosing the best WordPress hosting plan.
Backup and restore options. Your web host should offer regular, automated backups as a preventive security measure. This feature lets website owners save a copy of their site data to restore their WordPress sites in case of any issues.
Control panel and user interface. An easy-to-use control panel, as cPanel alternatives, eases your website and hosting account management.
WordPress optimization features. Web hosts often include website speed accelerators, caching tools, and a staging area. Such features help WordPress sites grow in the best possible environment.
Reputation and user reviews, Research the hosting provider’s reputation and read user reviews on sites like Trustpilot and G2 to understand their reliability and customer satisfaction.
Roundup of the Best WordPress Hosting Providers
Let’s recap the 12 best WordPress hosting providers of 2023.
WordPress Hosting Providers
Starting Price
Key Features
Link to Website
$2.99/month
Extensive WordPress optimization tools WordPress AI Tools & autoupdates Powerful hPanel and Hostinger WordPress plugin Globally-distributed data centers Free Domain & free lifetime SSL
Choosing the best hosting service for WordPress is easier if you know what to look for. Several factors that should be on your checklist include WordPress-specific features, server uptime, loading speed, security measures, and pricing.
User-friendliness is also just as important. If this is your first time building a website, pick a provider offering a custom-built control panel for easier hosting management. Finally, choose a provider whose pricing is within your budget.
Our top picks include Hostinger and SiteGround. Both providers offer excellent WordPress hosting prices and solutions without compromising quality and important features:
Hostinger – offers feature-packed WordPress optimization tools, custom-built hPanel, and a free lifetime SSL certificate.
SiteGround – unmetered traffic, SuperCacher caching tools, and daily backups.
Hopefully, this article has been helpful. If you have any further questions, leave us a comment.
WordPress Hosting FAQ
This section answers some of the most commonly asked questions about WordPress hosting.
What Is WordPress Hosting?
A WordPress hosting service offers an optimized environment for the content management system (CMS). Website owners can choose between managed and unmanaged WordPress hosting services, depending on their experience.
With managed WordPress hosting, your web host will take care of the maintenance and administrative aspects of the service, including performing important updates and security tasks.
With unmanaged WordPress hosting, users are responsible for their site’s performance and safety but have more control over their website configuration.
What Are the Different Types of WordPress Hosting?
WordPress hosting can be based on several hosting infrastructures, including shared, cloud, or VPS. It can also use a dedicated server. DreamHost is one of the few providers that offers dedicated WordPress hosting.
What Factors to Consider When Choosing a WordPress Hosting Provider?
To get the best WordPress hosting solution for your project, consider its ease of use, server reliability, security measures, price, customer support, and user reviews.
Study WordPress-focused features, such as staging tools, WP-CLI, and one-click WordPress installation along with third-party app features.
How Important Is Website Speed and Performance for a WordPress Website?
Consequently, website owners should track and optimize their WordPress website speed to generate more traffic, newsletter subscribers, and overall sales.
How Much Should I Pay For WordPress Hosting?
Our findings show WordPress hosting can cost as little as $1.99 or more than $1,000/month for large-scale websites. However, always choose one that fits your budget to avoid paying for resources your site doesn’t need.
Regarding the total cost of building a WordPress website, the price range falls between $30 and $400. This depends on your chosen WordPress plan and third-party integrations.
What Kind of Customer Support Should I Expect From Dedicated WordPress Hosting?
Phone calls, live chat, and email tickets are popular communication channels. You can also look into a web host’s other options, including blog tutorials, video tutorials, a community forum, and a knowledge base.
What Security Measures Should I Look For Regarding WordPress Hosting?
Must-haves include an SSL certificate, DDoS protection, anti-malware, and a firewall. You should also opt for a WordPress host with a dedicated backup and restore policy to prevent data loss.
Can I Upgrade or Downgrade My WordPress Hosting Plan?
You should be able to scale your WordPress plan easily and at anytime. However, this process highly depends on the provider. Contact its customer service for more information regarding this question.
What Backup and Restore Options Are Available With WordPress Hosting?
Backup and restore options highly depend on your chosen provider. Generally, WordPress hosting plans offer automated or scheduled backups, which can initiate daily, weekly, or monthly.
In terms of restore options, WordPress hosting providers often provide a one-click restore button. Sometimes, they may also have a dedicated auto-healing feature.
What Kind of Control Panel and User Interface Should I Expect With WordPress Hosting?
More often than not, a web host has an easy-to-use custom control panel to help clients manage their hosting accounts. Still, some providers offer other control panel options, including the popular cPanel.
What Kind of Optimizations Do WordPress Hosting Providers Offer for WordPress Websites?
Some of the best hosting sites for WordPress often include custom-built caching tools, options for image compression, and CDN integration to ensure optimal performance. Some providers also collaborate with third-party performance optimization plugins like JetPack and LSCWP.
How Do I Migrate an Existing WordPress Website to a New Web Hosting Provider?
Usually, you can utilize your new provider’s free migration services by submitting a request ticket during the setup process. If such a service is unavailable, your hosting provider might have a free migration tool accessible from the hosting control panel.
How Important Are Hosting Provider’s Reputation and User Reviews?
A hosting provider’s reputation and user reviews are key indicators regarding service quality. Customer satisfaction represents how well a company’s product or service meets its expectations. Therefore, don’t forget to read through users’ reviews on review sites like Trustpilot or G2.
What Kind of Uptime Guarantee Should I Expect From a WordPress Hosting Provider?
The industry benchmark for server uptime guarantee is 99.9%. The higher the percentage, the higher a website’s availability throughout the year.
How Can I Ensure My Website Is Optimized for Search Engines With My Chosen WordPress Hosting Provider?
The two critical indicators include fast page load time and responsive website design. Also, if your chosen WordPress web hosting provider offers dedicated SEO tools, it’s a good sign that you’re going with the right choice.
Having a website means being accessible to users all around the globe. However, what use is it if foreign language speakers do not understand your content? It would be such a great advantage if website owners are able to communicate effectively through different languages.
Offering multiple language translations will help websites stay competitive in today’s global marketplace because not only will you reach a wider audience, this opens up the opportunity of increasing conversions on your website. Studies actually show that translating a website into a local language increases conversions to an average of 70%.
The benefits are clear, now, how can you offer multiple language translations? We’ve actually partnered with the Weglot team to ensure compatibility with all Stackable blocks!
What is Weglot?
Weglot is a cloud-based translation management system that allows website owners and developers to easily make their websites multilingual. It offers a simple and efficient way to translate websites into multiple languages, without requiring any technical skills or knowledge of code.
Weglot works by integrating with your website’s code and automatically detecting all of your content, including text, images, and videos. You can then translate your content into multiple languages using Weglot’s intuitive translation interface, which allows you to edit and proofread your translations before publishing them live on your website.
How to Translate Your WordPress Website Using Weglot?
Translating your WordPress website with Stackable blocks using Weglot is pretty easy. As an example, here is a website made with Stackable blocks:
To make translations available, just follow these steps:
After creating your account you will brought to the dashboard but to access it, you will first have to confirm your email address. You should find an email confirmation from Weglot in your inbox.
Step 2: Create a project
You will first need to create a project. Once you’re in your dashboard, click Create a project.
You will be asked to name your project and select the CMS that you’re using for your website. Here, just input a Project Name and select WordPress for the Webstie Technology drop down menu. Click Next.
You have now created your Weglot project and you will be brought to the Setup page. Here, you will find your API key. You will need this for the following steps.
Step 3: Download and Activate Weglot on your WordPress dashboard
First head to the Add New page for plugins.
Type in Weglot in the Search bar. It should be the first entry in the search results.
Download and activate the plugin.
Step 4: Setup Weglot
You will find Weglot settings on the top toolbar menu. Hover over it and click Plugin settings.
You will now be brought to Weglot’s Main configuration page. It looks like this:
Remember the API Key you were given in Step 2? You will need this and you have to copy it.
Now paste it into the API Key field in the Weglot configuration page. Select your website’s original language in the Original language drop down menu, and finally, input the languages that you want to translate your website into in the Destination languages field. In our example below, we selected Korean and Japanese. Click Save Changes.
And that’s it! Your website is now multilingual!
When you head to your website, you will now see the small Language button on the bottom right of your page!
Select any of these and your page will now be translated! In this case, we’ve selected the Korean language and the Stackable blocks now reflect that.
In four easy steps, you now have a multilingual website!
How to Manually Translate Strings in Weglot?
You can take this a step further and edit translation strings manually. To do this, head over to https://dashboard.weglot.com/register and log into your account
Then you can manage your translations on your Weglot dashboard.
If you click on any of your translated languages, you will see that you can manually edit your translations.
As an example, in the first entry “A WordPress blog made with Stackableâ€, the word Stackable was translated in Korean but we want to keep the word Stackable as English.
Just hit the Save button (check icon) and head back to your website. The change should be reflected on your website like in the image below:
Conclusion
Weglot has emerged as a compelling solution for website translation on WordPress, offering seamless integration. Its ability to automatically detect and translate website content allows website owners to effortlessly translate and manage their content in multiple languages. Stackable’s compatibility integration with Weglot ensures a smooth user experience and expands your website’s reach to a more global audience.
With every new release, WordPress adds new features and bug fixes to enhance its performance and functionality. Last March 29, 2023, WordPress 6.2 (a.k.a. Dolphy) was released and comes with several exciting updates.
We’ve taken our time to explore “Dolphy’s†new features and here are the ones we’re loving from this latest release!
Site Editor Interface Enhancements
Personally when I would go through the site editor, it was a bit confusing going through the different parts of it, such as the Templates menu, and the Template Parts menu. If you wanted to design a specific Template or Template Part, the Site Editor would load a new page and you’d have to navigate back to the site editor. There was a lot of going back and forth to edit multiple templates.
Now, navigating through the Site Editor has become really smooth. Editing your templates is now one cohesive experience, because you could access your templates from the Navigation sidebar. For example, if I was editing my website header, and I wanted to go back and edit the footer, I could just open the Template Parts Menu from the Navigation sidebar and it’ll be opened in the workspace with just a few clicks!
It makes for a very efficient workflow when you’re designing the overall look of your page. This new Site Editor interface is actually very impactful, especially for beginners in WordPress. Thanks to its more intuitive interface, there would be less digging around the Site Editor just to find what you’re looking for!
Style Book
WordPress 6.2 introduces a new component in the Site Editor called the Style Book which gives users a preview of the styles of all the blocks in a tab-style content space—much like the usual style guide in web design!
The core Styles menu was a great addition back in WordPress 5.9, however, it was difficult to see how block default customizations affect your site design. Through the Style Book, you are able to see how any customizations to block defaults play out from a bigger picture and see how it compares to other block designs.
Selecting a block actually allows you to style it on the spot, without having to open it in the block or site editor. Creating a more uniform and cohesive look to your website design has been made easier because users now have one space where they could assign default styles for blocks and seeing how it goes with the overall design.
We’re really loving this feature because not only does it display core WordPress blocks, but it also includes third-party block libraries, such as Stackable. For now though, you can’t really style third-party blocks inside the Style Book, but hopefully this will change in the future.
Copy & Paste Styles
Another addition to the WordPress features is the ability to copy and paste styles. No, this will not copy a block, but the styles of a block. Imagine you’re designing a button on your page, and you wanted to replicate that design. You won’t have redesign a whole other block to match with the design you like. All you have to do is to just “copy†the style, and paste it to another. Just like this example below:
You will find the Copy & Paste Styles feature in the Options menu from the block toolbar. Note that this doesn’t always work with third-party blocks.
Stackable has always had a Copy Paste Styles feature but it’s much smarter and more advanced. You can basically copy/paste styles of entire sections of blocks including nested ones. When you copy styles from one column and paste it to another (with a whole set of different blocks), the styles will be pasted in a way that you would expect.
Copying and pasting styles is such a game changer because it saves so much time! While it’s still a new feature and the core copy and paste feature has more to improve, it’s great that there’s that option now for Block Editor users.
Stock media in inserter
Another introduction in WordPress 6.2 is the integration of OpenVerse stock media in the inserter. OpenVerse aims to give everyone open access to an extensive library of videos, images, and even audio. With this integration, you can access over 600 million royalty-free media directly from the block and site editor!
This feature is a great addition to WordPress especially for content creators (like me!) so you could easily add media to your content without scouring the web for open-source media.
You will find the Openverse library when you click the Inserter. In the Media tab, there is the Openverse button. This will open up another modal where you can view different images that you can add to your content. You can also use the search bar at the top to enter some keywords to look for the exact image you are looking for!
Just select the media that you want to add, and it will automatically be uploaded to your WordPress Media Library. It will include the attribution, and sometimes even captions, which you can turn on or off.
Distraction Free Mode
Another win for content creators is the new Distraction Free Mode. This is the perfect solution for WordPress users that just want to edit the text content in the block editor. This provides a clean view of the editor without all the other controls that could distract writers, and completely eliminating the possibility of accidentally altering the design of a website.
As an example, if you’re trying to edit the text in an About page and you want the design to remain the same, you could do so by using the Distraction Free mode. You will find the Distraction Free mode in the Options menu in the top toolbar, below the VIEW category.
It’s so distraction free, that honestly, I was a bit confused how to go get out of it. But don’t worry, I’ve figured this out so you won’t have to just move your cursor to the top of the content space and the top toolbar will appear. Click the Options menu again and uncheck the Distraction Free mode and it’ll go back to the default mode.
Conclusion
WordPress 6.2 Dolphy is a significant update that brings in a lot of new developments. The site editor enhancements, all-new style book, copy & paste styles, Openverse integration, and Distraction Free mode make WordPress 6.2 a compelling update for web designers and developers.
If you haven’t updated your WordPress website to version 6.2 yet, we recommend that you do so to make the most out of these new features. As always, don’t forget to back up your website before updating to ensure that you don’t lose any data or functionality.
Once you’ve tried and tested this latest release from WordPress, let us know which features you’re loving in the comments below!
This error prevents you from visiting your own website which makes it difficult to troubleshoot. Many beginners aren’t sure if it is just them or everyone else seeing this error.
The ‘DNS server not responding’ error means that your browser was unable to establish a connection with the servers that are hosting the website.
This error usually occurs when there is an unavailable DNS provider, firewall issues, network connectivity problems, or when there is an issue in your internet modem or router.
That being said, let’s take a look at multiple ways to easily troubleshoot and fix the ‘DNS server not responding’ error on your website.
You might get the ‘DNS server not responding’ error because your internet connection has been disconnected. So to start, you need to make sure that you’re currently connected to the internet.
If your internet is connected, but the error is still present, then you can restart your internet connection by switching your computer on and off.
Or you can simply disconnect your router from its power supply and then wait at least a minute before reconnecting it.
After that, try visiting your WordPress blog to see if the error’s gone.
2. Try Switching to Another Web Browser or Incognito Mode
Sometimes this error occurs because there is an issue in your default web browser.
You can simply try to solve the ‘DNS server not responding’ error by visiting your WordPress site using another browser like Mozilla Firefox or Microsoft Edge.
For example, if you use Google Chrome and the browser is showing the ‘DNS server not responding’ error, try accessing your website using Mozilla Firefox.
You could also try opening the page in a private tab, such as using Chrome’s Incognito mode.
If you are able to access the website in the other browser that means the problem is with your default web browser.
In that case, you can clear the browser cache to see if that fixes the issue. If that doesn’t solve the problem, then you can try reinstalling the browser.
3. Disable Your Firewall or Antivirus
Firewall and Antivirus programs protect your computer from malicious software.
However, sometimes these programs can also block trustworthy sites due to strict settings or an issue within the program itself.
To check if you’re getting the ‘DNS server not responding’ error due to these software, you need to temporarily deactivate your firewall and antivirus programs.
If you’re using Windows, then you can easily disable firewall and antivirus programs by selecting the Settings app from the Start menu.
Once you’re on the ‘Settings’ app, click the ‘Privacy and Security’ option from the sidebar.
Now simply choose the ‘Windows Security’ option in the ‘Privacy and Security’ tab.
On the ‘Windows Security’ page, you need to select the ‘Virus and Threat Protection’ option from the list.
After that, you need to toggle the switch below the ‘Microsoft Defender Firewall’ option and set it to Off.
If you’re using a Mac, then simply go to System Preferences » Security and Privacy from the Apple toolbar.
This will take you to the ‘Security and Privacy’ window.
Here simply click the ‘Firewall’ tab and then turn off the firewall.
You have now disabled the antivirus and firewall programs.
After disabling the firewall, visit your site to see if the error has been resolved.
4. Change the DNS Server Address
Sometimes the ‘DNS server not responding’ error is caused when the DNS server assigned to you by your internet service provider is unavailable or has incorrect information.
In that case, you can solve the problem by switching to a different public DNS server, such as Cloudflare or Google Public DNS which offer DNS address for free.
If you use Windows, go to the Windows Search Box from the taskbar and type ‘ncpa.cpl‘ to access the Network Connections page.
Once you’re on the ‘Network Connections’ page, right-click on the internet connection that you’re currently using.
Next, simply select the ‘Properties’ option from the prompt that opens up.
At this point, you may need to provide an administrator password. If you don’t have those permissions, contact your IT department or computer admin.
After that, you will see the ‘Properties’ window.
Here you have to locate and double-click the ‘Internet Protocol Version 4 (TCP/IPv4)’ option from the list which will open up a new window.
Once here, simply check the ‘Obtain an IP address automatically’ box and then check the ‘Use the following DNS server addresses’ box.
After that, you need to type the DNS address you obtained from the public DNS servers and click the ‘OK’ button at the bottom.
For example: Cloudflare public DNS is 1.1.1.1 vs Google public DNS is 8.8.8.8 and 8.8.4.4.
Now restart your computer and visit your site to see if the error is resolved.
If you’re a Mac user, simply select the Apple icon in the toolbar and click the ‘System Preferences option.
In the popup that appears, select ‘Network’ and then click on the ‘Advanced’ button.
After that, simply open the ‘DNS’ tab. Here you will find a ‘+’ button at the bottom-left corner.
Clicking it will add a new DNS server with the address 0.0.0.0.
Now go ahead and type the numbers for the public DNS server you want to use.
For example: Cloudflare public DNS is 1.1.1.1 vs Google public DNS is 8.8.8.8 and 8.8.4.4.
After that, simply click on the ‘OK’ button which will take you back to the previous popup.
Here, simply click the ‘Apply’ button to save your changes.
Now, you need to visit your site to check if the error has been removed.
5. Flush Your DNS Cache
Just like your browser, the computer also stores all the IP addresses of the websites that you visit so it won’t have to look up the same IP address twice.
However, DNS cache information can get outdated which can cause the ‘DNS server not responding’ error on your site.
If you liked this article, then please subscribe to our YouTube Channel for WordPress video tutorials. You can also find us on Twitter and Facebook.
WordPress 5.9 was released in January 2022 and served as the stepping stone to what looks to be the future of WordPress. Just four months later, we got WordPress 6.0 which is jam packed with new features.
New Blocks
Here’s a list of all the newly introduced blocks in WordPress 6.0:
Comments Query Loop
Read More block
Post Author Biography block
Avatar block
Let’s start with the new core blocks. One of the new core blocks is the Comments Query Loop which will display the comments in a post. It’s composed of different blocks that you can edit. You can also add blocks to further customize how the comments on a post appear.
Another new block would be the Read More block. This will give you more control over the appearance of the Read More link on your content, like adding borders, colors, typography, and more!
A new block that we’d find really useful is the Avatar and Post Author Biography blocks which we can now use separately in content. The Post Author Biography block gives us the ability to use the author’s description in our content. This has the usual typography design controls like changing the font color and adding a background color. You also have the option to change the font size using the size presets or by setting a custom value.
The new WordPress block, Post Author Biography
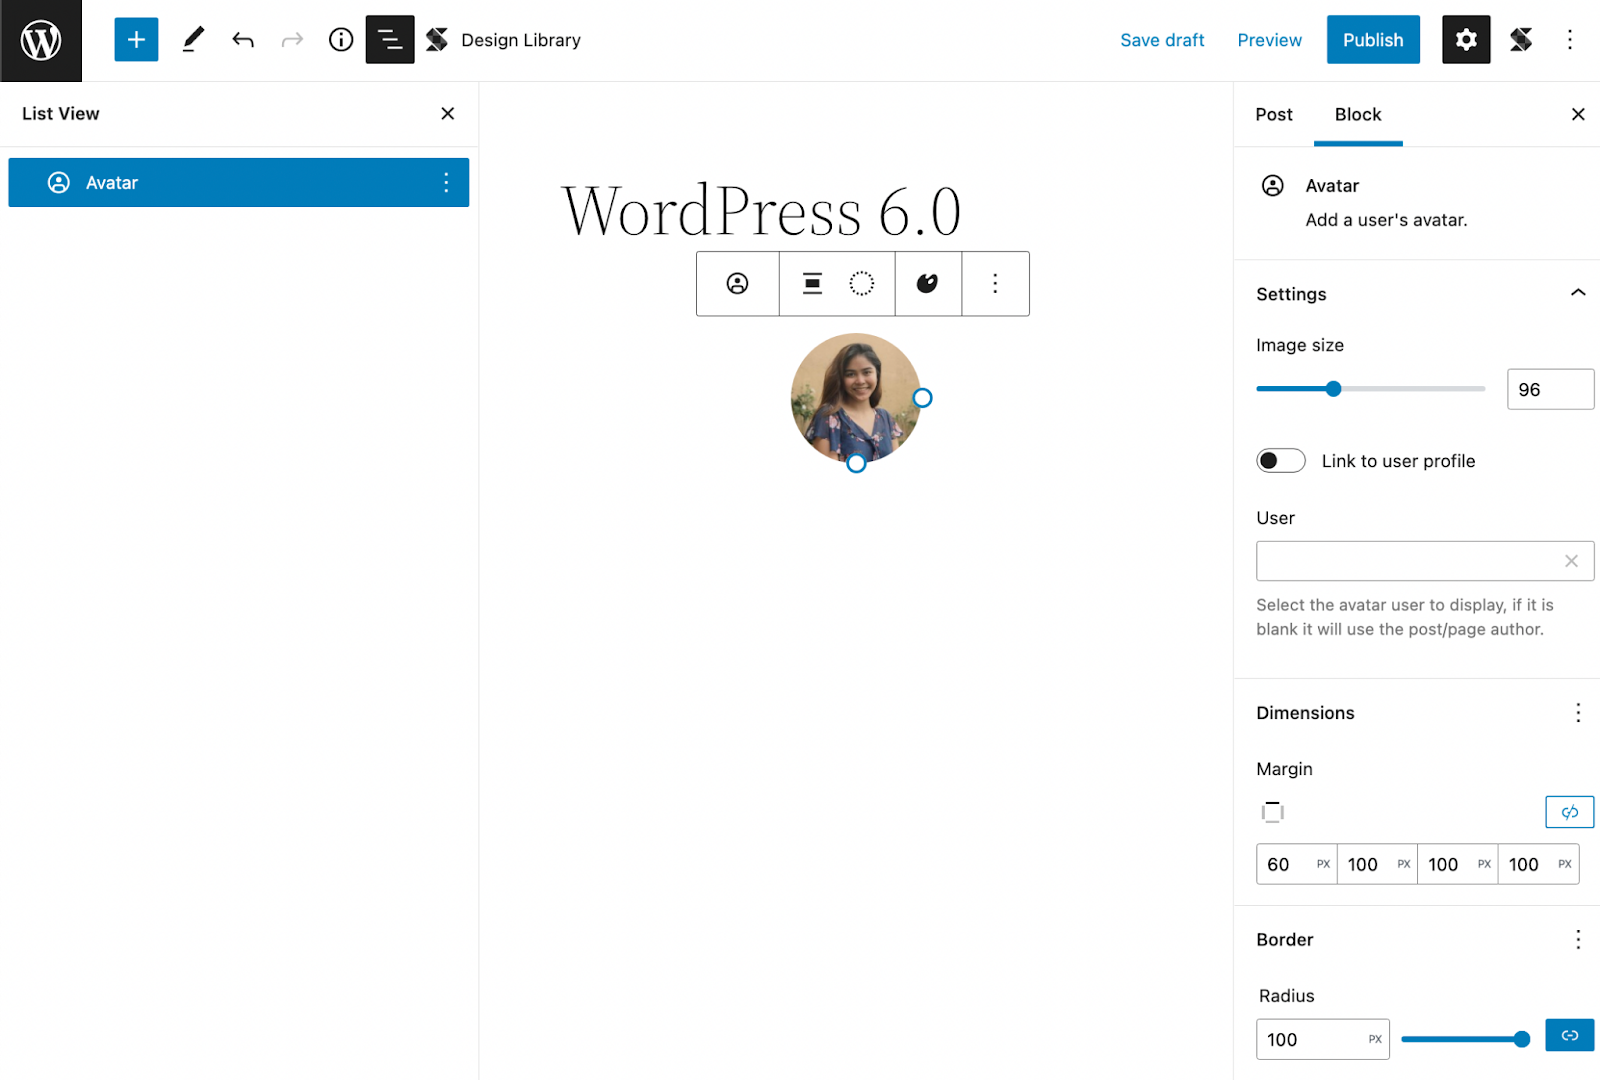
On the other hand, the Avatar block will display the avatar of the user that you select. This has various block settings where you can link the image to the user’s profile (and even open it in a new tab when clicked). You can adjust its size, margins, and border radius to customize it to your liking.
The new WordPress block, Avatar block, in the block editor
Global Styles
A new feature we’re particularly excited about is the Global Style switcher. This gives users the ability to change the look and feel of a website in just one click.
Global Styles are dependent on what theme you’re using, like in Twenty Twenty-two, it includes three style variations. You can see what available styles are in your theme by going to the Browse Styles section of the Global Styles sidebar.
You can also add a preset of your own by adding a JSON file to the styles folder of the theme you’re using. To learn more about how to create your own style presets, you can check out this article by the WordPress core team.
Theme Exporting
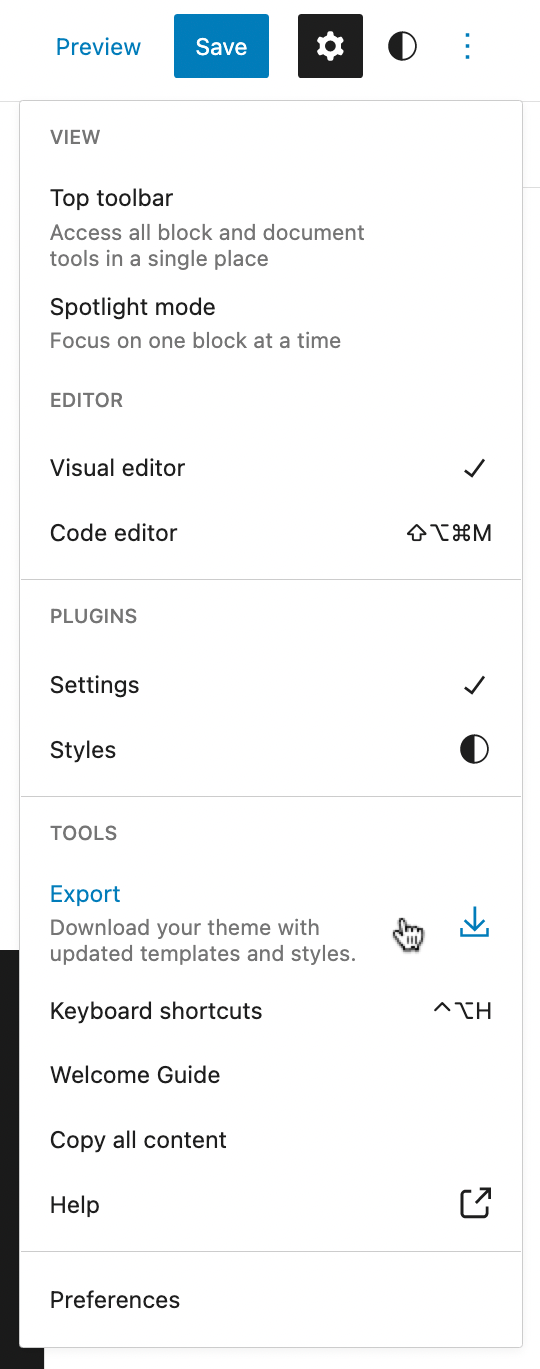
Another feature we’d like to talk about is the theme exporter which will allow you to download the theme with all the customizations you’ve added to it.
Demonstrating where the Export tool is located in the Options menu
You can find this by clicking the Options button in the top toolbar where you will see the Export option in the Tools section. This will download a zip file to your computer with all your custom styles and settings.
This brings a lot of possibilities because you can unleash your creativity and start creating your very own unique theme right from the WordPress site editor and export them to use for other websites!
Templates
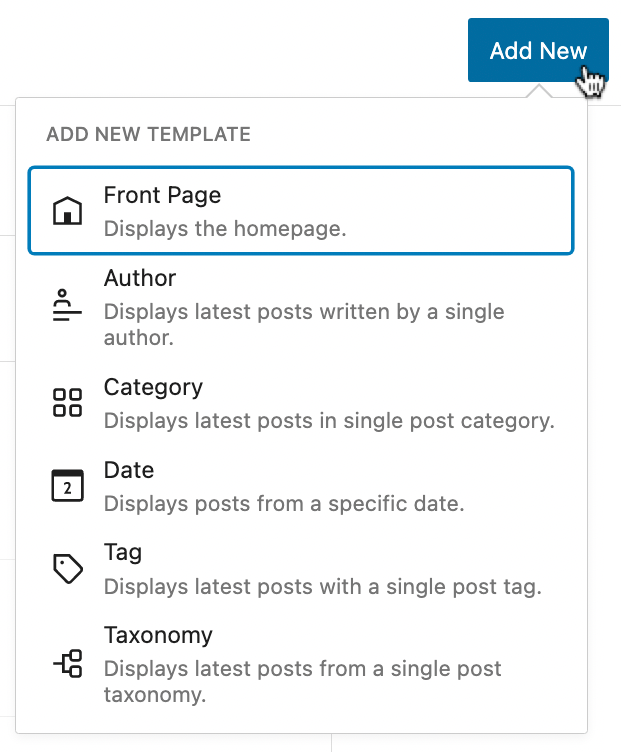
The templates that came with WordPress 5.9 were very limited (although you were given the ability to create your own) but in the latest release, you get more core templates such as Author, Category, Date, Tag, and Taxonomy.
You can customize these templates when you open the Site Editor, click the WordPress icon on the toolbar, and select Templates in the sidebar that opens. Just click the Add New button at the top, and click the template you want to customize.
The additional preset templates included in WordPress 6.0
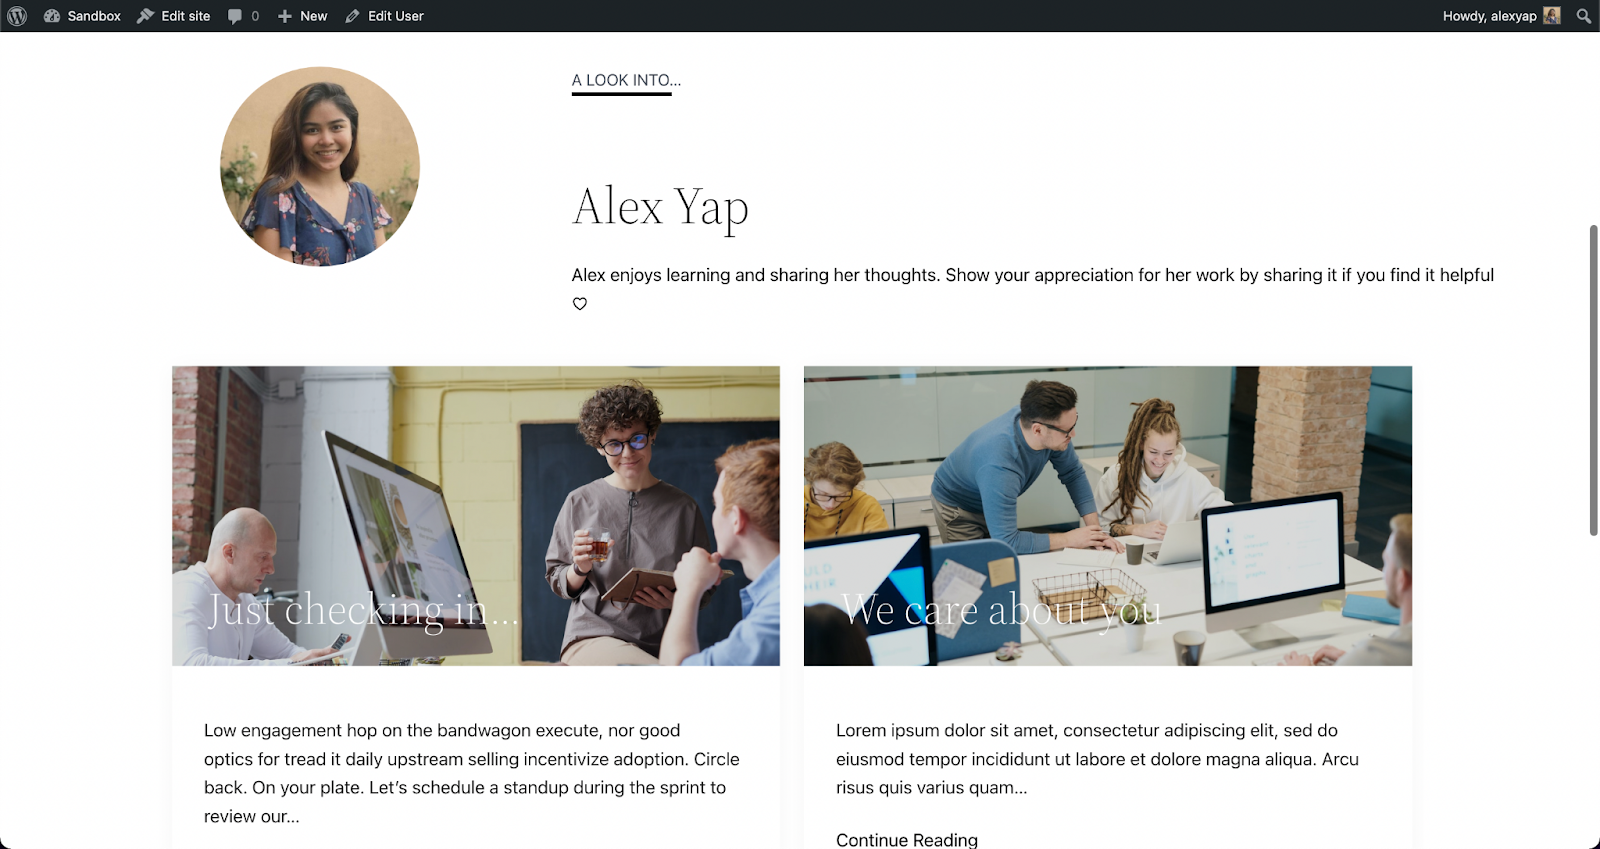
You can use any block to design templates, whether it’s core blocks or third party block libraries like Stackable! Once you’re done, hit Save and it gets applied right away! Here’s an example of us creating a simple design for the Author template.
Customizing the author template using native and custom blocks
Once we’ve hit save, it is automatically applied when you visit the Author’s profile.
A published page using the Author template with native and custom blocks
This is very helpful in making a smoother and more streamlined design workflow on WordPress. Instead of assigning a template to a custom page or post, you can just design the template according to what you envision and it’s automatically applied to that!
List View
Before, the List View was expanded by default, meaning all blocks present in the editor were listed in full view.
Now, in WordPress 6.0, the List View is collapsed by default, giving us a high-level view of the structure of the page or post. When you select a nested block, the parent block expands to highlight it in the List View. This makes the interface so much easier to navigate around while editing in WordPress.
The list view in the new default preview (collapsed)
They’ve also added a new feature that allows you to select multiple blocks at once and drag and drop them around the List View to rearrange your content. You could also click on the three dots to see more actions!
Post Publish Reminder
This next feature is for the ones that have forgotten to add tags and categories to their posts (honestly, I have been guilty of this)!
WordPress has added this new feature that “reminds†users not to forget to add tags and categories before publishing.
It comes as a panel in the sidebar that appears when you are about to publish the post.
The new post publish reminders in action
I personally find this very convenient!
Style Retention
When you transform a block to another, say for example a list to a paragraph, it will adopt the styles from the previous block.
The same goes for buttons, which will inherit the style of the first button adjacent to it. This saves a lot of time and effort in designing a new button from scratch.
To Summarize…
We’ve only highlighted a few of the more significant changes included in WordPress 6.0, however, the latest release brought in a lot of improvements to what was first established in WordPress 5.9, despite them only being released four months apart.
With Full-Site Editing (FSE) now being a part of WordPress core, we can only expect that it will change the way we use WordPress. As developments keep coming along, WordPress is, little by little, becoming a standalone CMS.
How about you? What are your thoughts and what is your favorite new feature in this release?
Full Site Editing has officially been released, ushering in a major upgrade to WordPress. With FSE in full swing, it brings in a lot of new features and functionalities. Get up to speed on what it is and how it changes the way you use WordPress.
What is Full Site Editing (FSE)?
Full Site Editing (FSE) is the ability to edit all elements of a WordPress website using Gutenberg blocks–aside from the usual page or post content, you may now use blocks to customize headers, footers, sidebars, and other elements.
In the old way of doing things, the looks of your website was completely dependent on what settings and styles were made available to you by the WordPress theme you have currently installed. If you wanted to change your website’s top menu area, and there weren’t any settings to change that, you’re out of luck.
Soon, “mega†themes came into the picture and contained tons of functionality and settings for people to fully customize the looks of their website, some even provided their own header builders and footer builders.
With Full Site Editing, you will now be able to edit any header, footer or even archive templates in any WordPress Theme that supports FSE.
What does full site editing bring to the table?
FSE sounds like a huge step since the first release of Gutenberg, which may lead us to wonder what changes come with it. Let us now look further into the features of FSE and how it changes the way we design with the block editor.
Block Themes
Full Site Editing is only available if you are using a Block Theme. A block theme is a WordPress theme with templates made up of blocks.
The new WordPress Theme named Twenty Twenty Two is a Block Theme. You can use that if you want to use FSE.
Before, we would go to different areas of the WordPress dashboard to edit certain parts of a website, like the Theme Customizer to design an activated theme, or the Widgets editor to add blocks to a section (i.e. header, footer, sidebar).
Now, with Block Themes, we could do all of these in one designated area called the Site Editor. The Site Editor is where we can edit themes using new features like the all-new Styles interface, and Template editing, which we will tackle more in a bit.
Although the selection is not yet that extensive as of the time of this writing, you may browse the Theme Directory to find themes that are compatible with full site editing. To look for a block theme, first you would need to log into your website’s dashboard:
Go to the Themes page
Click Add New on the top left area of the page
Click Feature filter
Select Full Site Editing in the Features column and click the Apply Filters button.
All the themes that appear should be compatible with FSE
You will see Twenty Twenty-Two is automatically installed to your website if your WordPress website is up to date. After browsing and finding a theme that you’d like to use, just click Install and Activate to implement it to your website!
The New Site Editor
The Site Editor is where you could modify templates, set global styles, edit navigation menus, and more. You will be able to access this once you’ve activated a block theme.
To open the Site Editor, click on Appearance > Editor (beta). At first glance, the Site Editor appears just like how the block editor interface would. However, there are some key elements that differentiate the two.
First, the WordPress logo opens the Navigation panel on the left, where you will see the three sections of the Site Editor: Site, Template, and Template Parts.
Second, the Styles sidebar, where you can access the sets of controls that change your theme’s colors, typography, and structure.
New Site-wide Blocks
Since the first release of Gutenberg, we’ve known blocks as content that we add to pages or posts. Blocks range from images, text, videos, buttons, and more.
Full Site Editing gives us new blocks that we can use across all areas of a website, such as the header or footer.
We get twelve new blocks that gives us more possibilities in designing your website:
Navigation
Site Logo
Site Title
Site Tagline
Post Author
Post Categories
Post Tags
Next Post
Previous Post
Post Comments
Term Description
Archive Title
These could be found under the Theme category in the Inserter, the button with the plus icon in the editor:
Page Templates
Block templates come with block themes. They are full-page layouts, containing the header, footer, and content section. Templates are dependent on the theme you’re using so we highly encourage testing and experimenting with the themes that are available in the theme directory!
If you would like to edit an existing template, click on the template name to open it in the Site Editor. Design it however you like with blocks and click Save once you’re done.
Custom Page Templates
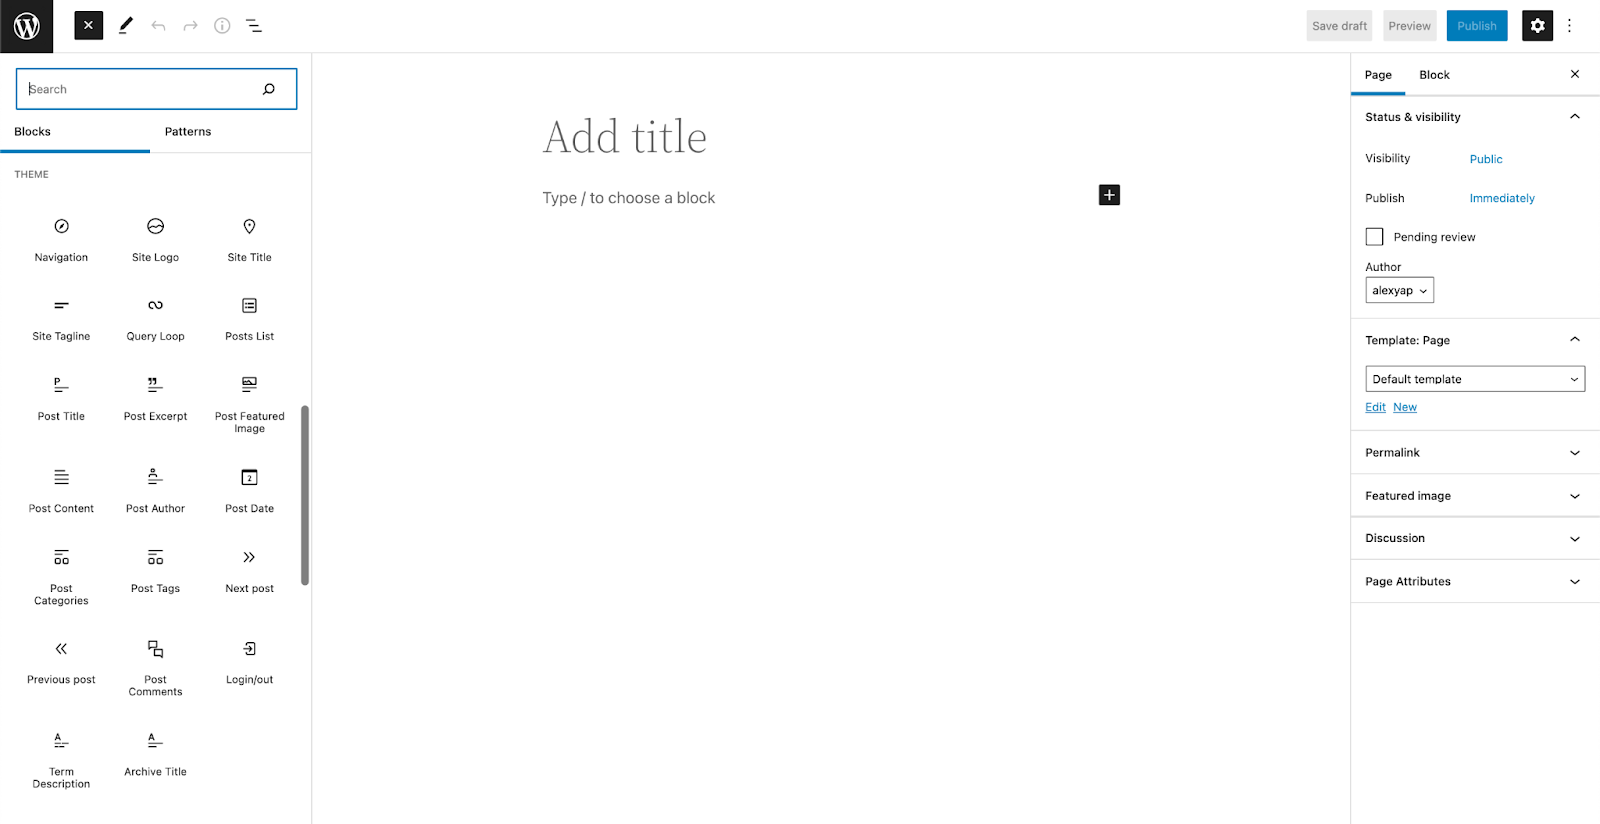
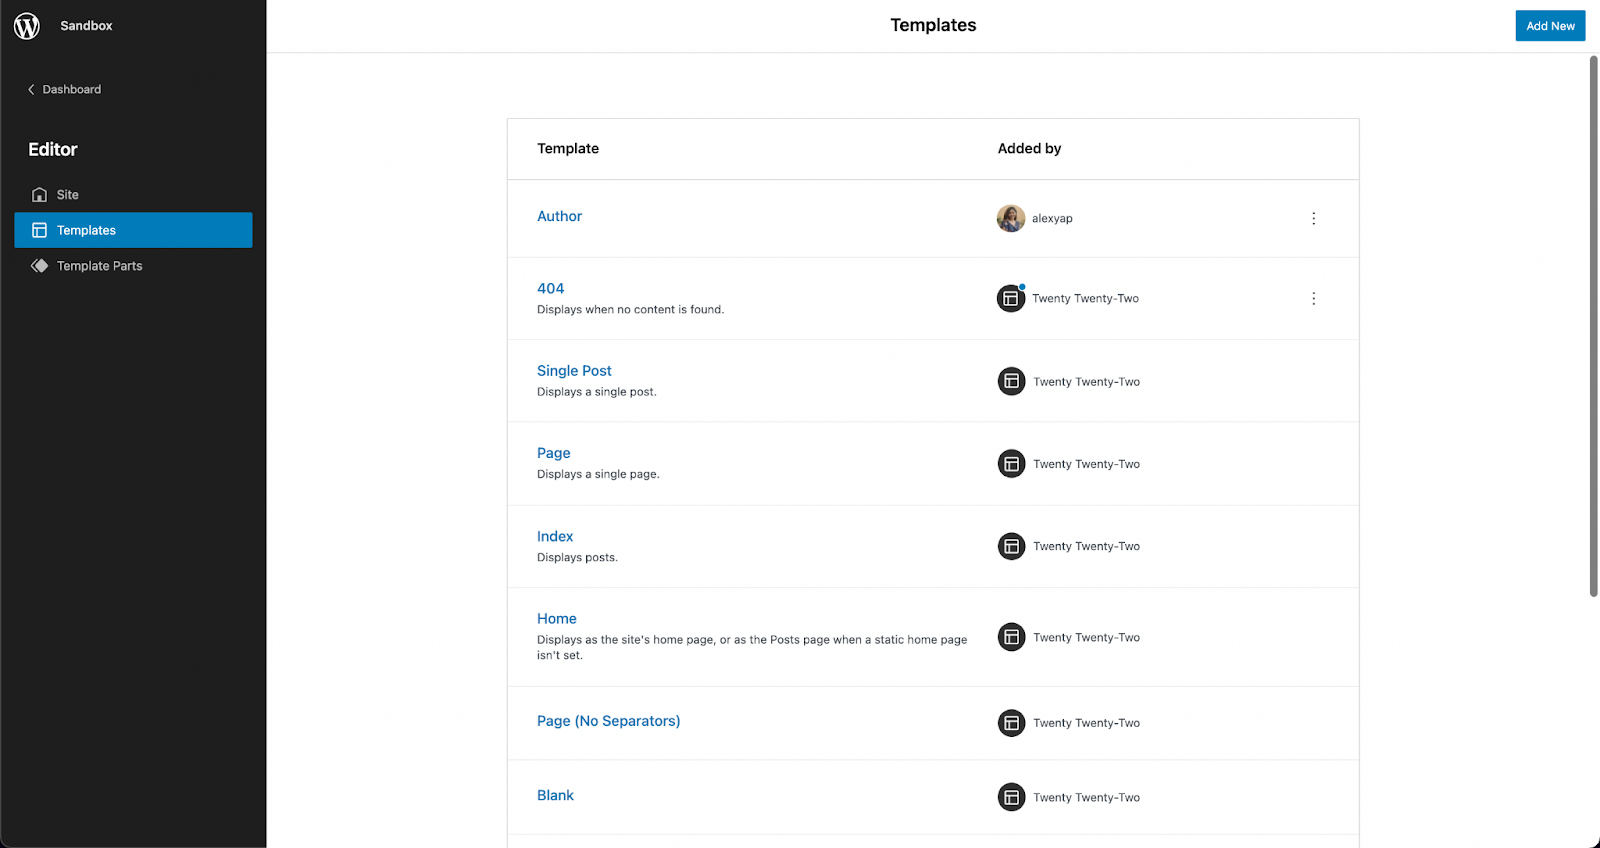
You could also create your own template by opening a new page or post and in the Post/Page tab of the Settings console, look for the Template: Page or Template: Single Post panel, depending on what post type you have opened. Click New below the dropdown menu, name your custom template, click Create and you will be directed to the Template Editor.
You will be able to add and design blocks the same way you would on a regular page or post in the Template Editor. Templates are saved as custom post types, called “wp_template†and once you’ve published your custom template, you should be able to see it in the Templates section of the site editor.
If you want to use this new template, you could use it by opening a new post or page. In the Page/Post tab of the Settings sidebar on the right, look for the Templates panel, and from the drop down, select your newly created template!
Add your page or post content in the editor, and when you’re finished editing, click Publish. Preview your page and it should inherit the template that you’ve selected.
Global Styles Interface
The Styles interface may be found in the site editor. This will allow you to quickly change all of the elements of your site–including typography, colors, and layout. The new Styles interface allows you to customize your blocks and site sections right within the site editor.
Through the Styles interface, you have the freedom to customize the typography, colors, and layout for entire pages, posts, and even individual native Gutenberg blocks.
This makes it very easy and convenient to personalize websites for all types of users! The Styles interface gives us a more straightforward and flexible way to make design changes across whole websites without having to go through each block, or changing themes.
Stackable and FSE Compatibility
We wanted to get on top of things and make sure that once FSE is released, you could already enjoy using Stackable with it. Along with other new features and bug fixes, our latest release (V3.1.2) includes compatibility with full site editing.
You can enjoy using Stackable blocks to edit your website and even create your own templates. If you’re a premium Stackable user, you may use premium features to elevate your site design such as dynamic content, website animations, and more!
As an example on how to use Stackable’s dynamic content feature in FSE, here’s we used our Card block and dynamic content to create an ‘Our Latest Posts’ section in the Author template.
Recap
Full Site Editing opens up a lot of new possibilities for DIYers and professional web designers alike! Considering all the new features that come with FSE, users now have a greater level of control and flexibility because design is no longer limited by themes.
In addition to that, FSE provides more efficiency–ultimately lessening the time needed to build websites from scratch, thanks to the new block patterns and theme templates.
There is no doubt that this move to full site editing is a big change. It is both a big step forward and a stepping stone to more opportunities. With the direction that WordPress core is going, we feel it is going to completely transform how users will be designing and using WordPress as a CMS.
Have you tried experimenting with full site editing? What are your initial thoughts? Let us know in the comments below


 just move your cursor to the top of the content space and the top toolbar will appear. Click the Options menu again and uncheck the Distraction Free mode and it’ll go back to the default mode.