EDITS.WS

Tag: wordpress tutorial

  • Beginner’s Guide: How to Safely Update WordPress (Infographic)

    Do you want to update WordPress but don’t know where to start? Often beginners are afraid that an update may break their website.

    This fear is understandable. However, it’s important to use the latest version of WordPress for the best website security and performance.

    In this beginner’s guide, we will show you how to safely update WordPress like a pro without breaking your website.

    Beginner's Guide: How to Safely Update WordPress (Infographic)

    Upgrading your WordPress website is a regular maintenance task. We have created an easy-to-follow infographic that you can use as a reference guide.

    Just click on the image below to view the full infographic, or continue reading the text instructions.

    Ultimate Guide to Upgrade WordPress - Infographic

    Why Should You Always Update WordPress?

    Leading WordPress security research shows that the majority of WordPress websites that get hacked have outdated WordPress core, plugins, or themes.

    WordPress is actively maintained by developers from all over the world. These developers find and fix bugs, add new features, and hunt down security vulnerabilities on a regular basis. These changes are then released in a new WordPress version.

    If it is not a big release, then WordPress can automatically update itself to the newer version. For major releases, unless you are on managed WordPress hosting, you will have to manually initiate the update yourself.

    You need to update to make sure that your website has the latest security patches, the newest features, and the best speed and performance.

    You can learn more on this important topic in our guide on why you should always use the latest version of WordPress.

    That being said, let’s take a look at how to safely update WordPress to the latest version.

    Things to Do Before Updating WordPress

    The most important thing you need to do before upgrading WordPress is to create a complete WordPress backup.

    Even if you have an automated WordPress backup plugin set up like Duplicator, you still need to create a new backup and store it safely in a remote location, such as your computer or cloud storage like Google Drive.

    A complete WordPress backup includes everything:

    • Your WordPress database
    • All your images and media uploads
    • Your WordPress plugins and themes
    • Your WordPress configuration files
    • Core WordPress files

    This step is crucial as it will allow you to restore WordPress from the backup in case something goes wrong.

    Once you have created a complete backup and stored it remotely, then you can move on to the next step.

    Updating WordPress to the Latest Version

    There are two easy ways to upgrade your WordPress site to the latest version. One is automatic, and the other one is manual. We will show you both of them.

    Method 1: Updating WordPress Using the Built-in System (1-Click)

    This method is easier and is recommended for all users.

    First, log in to the admin area of your WordPress website and go to the Dashboard » Updates page.

    You will see the notice that a new version of WordPress is available. Now you just need to click on the ‘Update to version X.X.X’ button to initiate the upgrade.

    Updating WordPress Core From the Dashboard

    WordPress will now fetch the latest version of the software and install it for you.

    You will see the update progress on your screen. During the upgrade, WordPress will put your site into maintenance mode.

    WordPress update progress

    Your site will still be visible to users, but you can’t install plugins or themes while the update is underway.

    Once the update is over, you will be redirected to the WordPress welcome screen. Depending on each release, you may see a page explaining what’s new in WordPress and the features you should try.

    That’s all; you have successfully upgraded WordPress to the latest version.

    Method 2: Manually Update WordPress Using FTP

    This method requires you to use FTP to manually upload WordPress files. You can use this if the first method doesn’t work.

    First, you will need to download the latest version of WordPress. Head over to the WordPress download page and click on the ‘Download’ button.

    Download WordPress

    Your browser will now download WordPress in a zip file. Once downloaded, you need to extract the zip file.

    Inside you will see a wordpress folder. This folder contains all the WordPress files you need for the update.

    Next, you need to open your FTP client and connect to your website. Once connected, go to the wordpress folder you just extracted from the zip file in the local files column.

    In the remote files column, go to your website’s root folder. This folder could be public_html or named after your website’s domain name. Inside this folder, you will see your WordPress files and folders.

    Using FTP to Upload a Fresh Version of WordPress

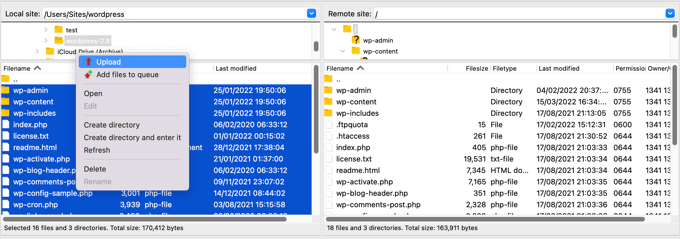
    You should select all files inside the wordpress folder on your computer and then right-click to select ‘Upload’.

    Your FTP client will now start uploading WordPress files from your computer to your website.

    However, your website already has older versions of the files with the same name. You will be asked what you want to do with those files. You need to select ‘Overwrite’ and check the box next to ‘Always use this action’.

    Overwriting Your Current WordPress Files Using FTP

    This will ensure that all WordPress files on your website are replaced by the newer versions.

    Once the upload is finished, you need to go to the admin area of your WordPress site. This step is necessary because sometimes, a newer version of WordPress may also need to update your WordPress database.

    Database update required

    In that case, you may see a page mentioning that a database update is required. Simply click the ‘Update WordPress Database’ button to continue.

    That’s all; you have successfully updated your WordPress website.

    Things to Do After Updating WordPress

    Once you have upgraded WordPress on your website, you need to make sure that everything is working as expected. Simply visit your website in a new browser window and review the settings in the WordPress admin area.

    If you come across any issues, then take a look at our list of common WordPress errors and how to fix them. If the issue you are facing is not listed there, then follow the steps in our WordPress troubleshooting guide to figure out the problem and apply a solution.

    We hope this article helped you update WordPress to the latest version. You may also want to see our step-by-step WordPress SEO guide for beginners or our expert picks for the best analytics solutions for WordPress users.

    If you liked this article, then please subscribe to our YouTube Channel for WordPress video tutorials. You can also find us on Twitter and Facebook.

    The post Beginner’s Guide: How to Safely Update WordPress (Infographic) first appeared on WPBeginner.

  • How to Make Separate RSS Feeds for Each Category in WordPress

    Do you want to make a separate RSS feed for each category in WordPress?

    Categories allow you to easily sort your content into major sections. Adding category RSS feeds can help your users subscribe to specific areas of your website that interest them.

    In this article, we will show you how to easily make a separate RSS feed for each category in WordPress. We will also talk about how you can use these feeds effectively to grow your website.

    How to make separate RSS feeds for each category in WordPress

    How to Find RSS Feeds for Different Categories in WordPress

    Categories and tags are two of the main default taxonomies in WordPress. They allow you to easily sort and organize your content into different subjects and topics.

    By default, each category on your WordPress website has its own RSS feed. You can locate this RSS feed by simply adding ‘feed’ at the end of the category page URL.

    For instance, if you have a category called ‘News’ with a URL like this:

    https://example.com/category/news/

    Then its RSS feed would be located at the following URL:

    https://example.com/category/news/feed/

    Tip: You can find your category URL by visiting the Posts » Categories page and clicking on the ‘View’ link under a category.

    View Category URL by clicking on the View link

    Now that you have located the RSS feed URLs for your categories, let’s look at some of the ways that you can share them with visitors on your WordPress website.

    If you want to add links to your category RSS feeds using the default WordPress settings, then this method is for you.

    First, you will need to open up a page or post where you want to add the RSS feed links in the block editor.

    Once you are there, you can type the name of all the categories on your website in a List block.

    After that, simply click the ‘Link’ icon in the block toolbar to open up the link prompt.

    Click the Link icon in the block toolbar

    Here, you can type the URL for your category RSS feed.

    You will need to repeat this process for each category RSS feed on your website by linking to it on the related name within the List block.

    Add category RSS feed links

    Once you are done, don’t forget to click the ‘Publish’ or ‘Update’ button to save your changes.

    You have now manually created a list of links to all your category RSS feeds. Now, you can visit your website to see these RSS feed links in action.

    Category RSS feed preview

    However, keep in mind that if you want to add, delete, or merge categories in the future, then you will have to manually update this list again.

    Method 2: Add Links for Category RSS Feeds Using WPCode (Recommended)

    If you want to create a list of category RSS feed links that are automatically updated every time you make changes, then this method is for you.

    To add URLs to the category RSS feed, we will need to add custom code to your website theme’s functions.php file. However, even the smallest error in the code can break your site, making it inaccessible.

    We recommend always using WPCode when adding custom code to your website. It is the best WordPress code snippet plugin that makes it safe and easy to add custom code without manually editing your functions.php file.

    First, you need to install and activate the WPCode plugin. For more instructions, you may want to see our guide on how to install a WordPress plugin.

    Note: You can also use the free WPCode plugin for this tutorial. However, upgrading to the pro WPCode plugin will give you access to a cloud library of code snippets, smart conditional logic, and more.

    Upon activation, head over to the Code Snippets » + Add Snippet page from the WordPress admin sidebar.

    Next, click on the ‘Use Snippet’ button under the ‘Add Your Custom Code (New Snippet)’ option.

    Add new snippet

    This will take you to the ‘Create Custom Snippet’ page, where you can start by typing a name for your code snippet.

    This name is only for your identification and won’t be used on the website’s front end.

    Next, you need to select ‘PHP Snippet’ as the code type from the dropdown menu on the right corner of the screen.

    Choose PHP Snippet as code type for category RSS feed

    After that, copy and paste the following code into the ‘Code Preview’ box.

    function wpbeginner_cat_feed_list() {
    	$string = '<ul>';
    	$string .= wp_list_categories( array(
    		'orderby'    => 'name',
    		'show_count' => true,
    		'feed_image' => '/path/to/feed-image.png',
    		'echo' => false,
    	) );
    	$string .= '</ul>';
    
    	return $string;
    }
    
    add_shortcode( 'wpb-cat-feeds', 'wpbeginner_cat_feed_list' );
    

    Once you have done that, you can now also choose an icon image that will be displayed next to your category RSS feed links.

    To do this, simply replace the /path/to/feed-image.png line in the code with the URL of your preferred icon image for the feed links.

    Paste the code for adding links for category RSS feeds

    Keep in mind that the icon image will first need to be uploaded to your WordPress media library.

    Once it’s uploaded, you can get its URL by visiting the Media » Library page from the admin sidebar and clicking on the icon image to view its attachment details.

    Copy image link from the media library

    After adding the URL for the icon image to the code, scroll down to the ‘Insertion’ section.

    From here, select the ‘Auto Insert’ method so that the code will be executed automatically on the website page where you add a shortcode.

    Note: Keep in mind that even after choosing the ‘Auto Insert’ mode, you will need to add a [wpb-cat-feeds] shortcode to the page where you want to list categories RSS feeds. This shortcode is not the WPCode ‘Shortcode’ feature, but a part of the code snippet itself.

    Choose an insertion method

    Next, scroll back to the top and toggle the ‘Inactive’ switch to ‘Active’.

    Finally, click the ‘Save Snippet’ button to store your settings.

    Save the code snippet for adding RSS feed links to categories

    After that, you need to open up the page or post where you want to add the category RSS feed links in your WordPress block editor.

    From here, click the ‘Add Block’ (+) button at the top left corner of the screen and locate the ‘Shortcode’ block.

    Upon adding the block, simply copy and paste the following shortcode into it.

    [wpb-cat-feeds]

    Add shortcode

    Finally, click the ‘Update’ or ‘Publish’ button to save your changes.

    Now visit your website to check the category RSS feed links in action.

    Preview for category RSS feeds

    Method 3: Display RSS Feed Subscription Option on the Category Pages

    If you want to add a Subscribe link at the top of all your category pages, then you can use this method.

    To do this, you will need to add custom code to your WordPress category.php or archive.php theme template.

    However, it can be risky, and the smallest error can break your website.

    This is why we recommend using WPCode instead. It is the easiest and safest way to add custom code to your WordPress website.

    First, you need to install and activate the WPCode plugin. For more instructions, please see our step-by-step guide on how to install a WordPress plugin.

    Upon activation, visit the Code Snippets » + Add Snippet page from the WordPress admin sidebar.

    Next, head over to the ‘Add Your Custom Code (New Snippet)’ option and click the ‘Use Snippet’ button under it.

    Add new snippet

    Once you are taken to the ‘Create Custom Snippet’ page, start by typing a name for your code snippet.

    It can be anything you like and is only for your identification purposes.

    After that, select ‘PHP Snippet’ as the code type from the dropdown menu on the right.

    Choose PHP code type for code snippet to add subscription links to category pages

    Next, simply copy and paste the following code into the ‘Code Preview’ box.

    <?php
    if ( is_category() ) {
    $category = get_category( get_query_var('cat') );
    if ( ! empty( $category ) )
    echo '<div class="category-feed"><p><a href="' . get_category_feed_link( $category->cat_ID ) . '" title="Subscribe to this category" rel="nofollow">Subscribe</a></p></div>';
    }
    ?>
    
    Paste the code snippet for adding subscription link

    Upon adding the code, scroll down to the ‘Insertion’ section and choose the ‘Auto Insert’ method.

    This way, the code will automatically be executed on your website.

    Choose an insertion method

    Next, you have to open up the ‘Location’ dropdown menu and switch to the ‘Page-Specific’ tab from the column on the left.

    After that, select the ‘Insert Before Excerpt’ option as the snippet location.

    Choose snippet location as Insert before excerpt

    Once you have done that, scroll back to the top and toggle the ‘Inactive’ switch to ‘Active’.

    Finally, click the ‘Save Snippet’ button to save your changes.

    Save snippet for adding subscription link to category pages

    Now, you can visit your website category page to view the Subscription link for the RSS feeds in action.

    This is what it looked like on our demo website.

    Preview for subscription link

    How to Optimize Category RSS Feeds in WordPress

    Category RSS feeds allow your users to subscribe only to content that interests them the most.

    For instance, if you have a technology news blog, then your users can choose to subscribe only to news about the devices that they use.

    However, a plain RSS feed isn’t readable without a feed reader, and most users aren’t using one to subscribe to their favorite websites.

    Luckily, you can still use your category feeds to deliver content to your users anywhere they want.

    For example, you can ask users to sign up for your email newsletter with the option to only get updates for specific content categories.

    With email marketing services like Constant Contact or Brevo (formerly Sendinblue), you can easily set up an automated RSS-to-email newsletter for specific categories. You can see our guide on how to notify subscribers of new posts for step-by-step instructions.

    Similarly, you can also allow users to get instant push notifications for each category using PushEngage. It is the best push notification service on the market that allows you to send messages directly to your users’ devices (desktops as well as mobile phones).

    PushEngage allows you to set up automatic push notifications using RSS feeds. You simply need to enter your category RSS feed URL, and a push notification will go out whenever a new post is published in that category.

    We hope this article helped you learn how to make separate RSS feeds for each category in WordPress. You may also want to see our easy tips to grow your blog traffic or read our comparison of the best live chat software for small businesses.

    If you liked this article, then please subscribe to our YouTube Channel for WordPress video tutorials. You can also find us on Twitter and Facebook.

    The post How to Make Separate RSS Feeds for Each Category in WordPress first appeared on WPBeginner.

  • Forget PowerPoint, How to Create Presentations in WordPress

    Are you looking to create a presentation in WordPress, but you are not sure where to start?

    By creating a presentation using a WordPress plugin, you can be confident that the finished slideshow will look great on your WordPress website. It can also save you time, effort, and money compared to using specialist software like PowerPoint.

    In this article, we will show you how to create PowerPoint-style presentations in WordPress.

    Forget PowerPoint, how to create presentations in WordPress

    Why Create Presentations in WordPress?

    Adding a presentation to your website can make it more interesting and engaging, which will keep visitors on your site for longer. This sends positive signals to search engines, which may improve your WordPress SEO.

    It is possible to create a presentation using software like Google Slides or PowerPoint. You can then add the presentation to your website using either a plugin or embed code.

    However, creating presentations in a standalone program can take a lot of time and effort, and you may even need to buy specialist software. If you use an external program, then there’s also no guarantee the finished presentation will look good on your WordPress website.

    The good news is that you can easily create beautiful, SEO-optimized presentations inside the WordPress dashboard. By using a WordPress plugin, you can be confident that the presentation will look great on your WordPress site, no matter what device the visitor is using.

    That said, let’s see how you can create PowerPoint-style presentations in WordPress.

    How to Create Presentations in WordPress

    The easiest way to create presentations in WordPress is by using Smart Slider 3. This free plugin works with any WordPress theme and is optimized for SEO. It also comes with pre-made slides, animations, and templates, so you can create beautiful presentations, fast.

    First, you will need to install and activate Smart Slider 3. If you need help, then please see our guide on how to install a WordPress plugin.

    Upon activation, go to Smart Slider » Dashboard and then click on ‘Go To Dashboard.’

    Creating a PowerPoint-style presentation in WordPress

    After that, simply click on ‘New Project.’

    At this point, you can decide whether to start with a blank slate or use one of Smart Slider’s ready-made presentation templates.

    If you want to create a professionally-designed presentation fast, then we recommend selecting ‘Start with a Template.’

    Choosing a presentation template

    Smart Slider will now show all the available templates.

    To take a closer look at a design, hover your mouse over it and then click on the eye icon when it appears. This opens the presentation template in a new tab.

    Choosing a presentation template

    When you find a template you want to use, just hover over it and then click on the ‘Import’ button.

    This will open your chosen template in the Smart Slider editor.

    How to create a PowerPoint style presentation in WordPress

    Configure Your PowerPoint-Style Presentation Using WordPress

    After choosing a template, it’s a good idea to configure the presentation’s settings. The options you see may vary depending on your template, but we will cover all the major settings.

    Configure General and Size Settings

    In the ‘General’ tab, you can give the presentation a name by typing it into the ‘Name’ field.

    Adding a title to an online presentation

    You can also add a thumbnail, which may be visible to visitors depending on how you configure the presentation.

    Simply click on the ‘+’ icon next to ‘Thumbnail’ and then either choose an image from the WordPress media library or upload a new file from your computer.

    Adding a presentation thumbnail to a slideshow in WordPress

    With that done, you need to scroll to the ‘Slider Design’ section.

    Here, you can change the slider’s alignment and add a margin to create more space around your slides.

    Changing the presentation slider design

    Next, you may want to make the slides bigger or smaller by selecting the ‘Size’ tab.

    Here, you can set different maximum sizes for tablet, mobile, and desktop users. By doing so, you can be confident that the presentation will look great across all devices.

    To set these maximum sizes, simply click to activate the Desktop, Mobile, and Tablet sliders and then type a number into the ‘Max’ field.

    Setting a maximum slider size in a presentation

    Under ‘Layouts’, you can choose whether the presentation should fill the entire width of the browser (‘Full width’) or fit the container it’s put in (‘Boxed’).

    By default, the presentation will scale up and down automatically to fit the visitor’s screen. You will typically want to leave these settings enabled, but you may want to set a minimum height by typing it into the ‘Min Height’ box.

    Changing the slideshow layout in WordPress

    Configure Controls and Animation Settings

    After that, click on the ‘Controls’ tab. Here, you can change how visitors move between the different slides.

    The default settings should be a good fit for most WordPress blogs and websites, but you may want to change how the arrows look.

    For example, you can change the color of the arrows and the inset, which controls where the arrows appear on the slide.

    Changing the arrow settings in a WordPress presentation

    As you make changes, you may want to preview how the arrows will look in your presentation.

    To do that, just click on the eye icon in the toolbar.

    Previewing a presentation in WordPress

    With that done, simply scroll to ‘Bullets.’ Here, you can customize the dotted icons that allow visitors to move between the different slides. You can try different bullet styles, add a box shadow, change the corner radius, and more.

    If you want to show each slide’s title, then just click to enable the ‘Text Bar’ toggle.

    How to configure a presentation in WordPress

    Another option is to show each slide’s thumbnail, which gives visitors another way to move between slides.

    To do this, you need to enable the ‘Thumbnail’ toggle. You will now get access to some additional settings to fine-tune how the thumbnails look.

    Configuring a presentation's thumbnails

    Finally, you may want to add a shadow to the bottom of your slideshow by clicking on the ‘Shadow’ toggle.

    After that, you can open the dropdown and choose between the different shadow styles.

    Adding a shadow to a Google Slides style presentation

    CSS animations are a great way to catch the visitor’s attention and encourage them to engage with your presentation. Smart Slider comes with built-in animations, so make sure you click on the ‘Animations’ tab to configure them.

    Here, open the ‘Main Animation’ dropdown and choose the effect that Smart Slider will play when it switches between slides. You can also change how long the animations will play by typing a number into the ‘Duration’ field.

    Adding slide animations and transition effects

    Depending on the template you are using, you may also see a ‘Background Animation’ option. This allows you to animate the slide’s background image and colors.

    Just be aware that background animations don’t work on videos or any presentations that use parallax scrolling.

    To take a closer look at Smart Slider’s background animations, click on the ‘+’ icon. This opens an editor where you can try different animations to see what effects you can create.

    Adding background animations to slides in WordPress

    Configure Autoplay Settings

    The next tab is ‘Autoplay.’

    By default, visitors will need to move between your slides manually. If you want the presentation to play automatically instead, then simply click to enable the ‘Autoplay’ slider.

    How to create an autoplaying presentation in WordPress

    If you enable this option, then you will get access to some additional settings where you can change how long the presentation shows each slide and how visitors can stop the slideshow.

    It also adds a ‘Buttons’ section, where you can customize the presentation’s ‘Play’ button.

    Adding a Play button to a slideshow

    Optimize Your Presentation

    After that, select the ‘Optimize’ tab. Here, you will find the settings for Smart Slider’s lazy loading.

    By default, the slider loads immediately, which is a good choice if the presentation is the first thing people see when they visit the page.

    However, if you are planning to place the presentation further down the page, then we recommend opening the ‘Loading type’ dropdown and choosing ‘After page loaded.’

    Enabling the lazy loading feature

    This can boost WordPress speed and performance, along with improving the visitor experience by loading the rest of the page first.

    Another option is ‘After delay,’ which allows you to set a load delay for the slider.

    Adding a delay to a WordPress presentation

    Configure Slide Settings

    By default, images will cover the entire slide, even if Smart Slider needs to crop the image to fit. This tends to work well for most presentations, but you change this default setting by selecting the ‘Slides’ tab.

    Here, simply open the ‘Slide Background Image Fill’ dropdown and choose a different option from the list, such as stretch, center, or blur fit.

    How to create a PowerPoint style presentation in WordPress

    The ‘Developer’ tab has some advanced settings, including an area where you can add custom CSS to your presentations.

    Most website owners won’t need to use these settings. However, if you want to learn more about any of the ‘Developer’ options, then simply hover over the little ‘i’ icon. This will show a tooltip with some more information, plus a link to the Smart Slider documentation.

    Advanced developer settings in the Smart Slider WordPress plugin

    Create Slides for Your PowerPoint-Style Presentation in WordPress

    When you are happy with how the presentation is configured, it’s time to start creating slides.

    Simply click on the ‘Add Slide’ button to get started.

    Creating presentation slides in the WordPress dashboard

    Smart Slider lets you create a few different types of slides. It even has a ‘Post’ option, which allows you to embed a WordPress post inside a slide.

    You can experiment with the different options, but in this guide, we will be using the ‘Blank’ design as an example.

    Smart Slider's presentation types

    After choosing a slide type, you will see the slide’s thumbnail near the top of the screen.

    Just hover your mouse over the thumbnail and then click on the ‘Edit’ button when it appears.

    Editing slides in the WordPress editor

    This opens the Smart Slider editor.

    Along the top of the screen is a breadcrumb navigation bar where you can move between the different slides in the presentation.

    Smart Slider's breadcrumb navigation

    Along the left-hand side of the screen are all the layers that make up the slide. You can hover your mouse over any icon to see that layer’s name, such as Image or Row.

    To edit a layer, just give it a click in the left-hand menu. This opens a popup with all the settings you can use to customize that layer.

    The Smart Slider presentation and slideshow editor

    You can also select a layer by clicking on it in the live preview. For example, to replace some of the default text with your own messaging, just click to select that layer.

    In the popup that appears, type your message into the ‘Text’ field.

    Adding text to a presentation in WordPress

    You can also change how the text looks by clicking on the ‘Style’ tab.

    Here, you can change the text color, font, size, and more.

    Changing the text style in a slideshow

    To customize the slide, simply click on the different layers and then make your changes in the popup that appears.

    If you want to delete a layer, then just hover your mouse over it and then click on the dotted icon. In the dropdown menu, you need to select ‘Delete.’

    Deleting layers in Smart Slider

    Do you want to add more layers to the slide?

    Simply click on the green ‘+’ icon in the left-hand menu.

    Adding layers to a WordPress presentation

    The ‘Layers’ tab shows some basic layers, such as images, buttons, and text.

    You can add any of these layers to the slide using drag and drop.

    Adding layers to a slideshow in WordPress

    Smart Slider also has a library of pre-made slides that you can add to your presentation.

    To take a look at these options, click on the ‘Library’ tab.

    The Smart Slider library

    You can now continue working on this slide by adding layers and customizing them with your own content and settings.

    When you are happy with how the slide is set up, click on the ‘Save’ button.

    Saving a presentation in WordPress

    To start working on the next slide, you need to click on ‘Slides’ in the toolbar.

    Then, select ‘Add Slide.’

    Adding slides to a presentation

    How to Publish a Presentation in WordPress

    When you have finished working on the presentation, simply click on ‘Back’ to return to the main Smart Slider dashboard.

    By default, Smart Slider publishes all your slides, but it’s still worth checking that there’s a green checkmark next to every slide you want to show on your site.

    Publishing slides to a website or blog

    If you see an ‘x’ next to any slide, then it means the slide is unpublished. You will need to click on the ‘x’ to turn it into a green checkmark, which makes the slide live.

    After that, you are ready to add the presentation to your online store, website, or blog. Simply open any post or page and then click on the ‘+’ icon.

    Next, you need to type ‘Smart Slider 3’ into the popup and select the right block when it appears.

    Adding the Smart Slider 3 block to a page or post

    This adds a Smart Slider block to the page.

    Next, go ahead and click on the ‘Select Slider’ button.

    How to add the Smart Slider 3 block to a page or post

    This opens a popup showing all the presentations you have created.

    Simply click on the presentation you want to use and then select ‘Insert.’

    Adding a Smart Slider 3 block to WordPress

    This adds the presentation to your website. You can now either click on ‘Update’ or ‘Publish’ to make the presentation live.

    Now, if you visit your website,e you will see the PowerPoint-style presentation in action.

    A PowerPoint-style presentation, created using a WordPress plugin

    We hope this article helped you learn how to create presentations in WordPress. You may also want to see our list of the best drag and drop WordPress page builders or our guide on how to choose the best web design software.

    If you liked this article, then please subscribe to our YouTube Channel for WordPress video tutorials. You can also find us on Twitter and Facebook.

    The post Forget PowerPoint, How to Create Presentations in WordPress first appeared on WPBeginner.

  • 9 Things to Do if Your WordPress Site Keeps Going Down

    Are you wondering what to do if your WordPress site keeps going down?

    A website that is down (offline) can hurt your business. It creates a bad user experience for visitors who cannot access your content, and you may even lose customers and potential sales.

    In this article, we will share the most important things you need to do if your WordPress website keeps going down.

    Things to do if your WordPress website keeps going down

    Why Does Your WordPress Website Keep Going Down?

    When your WordPress website is down, your users will see an error message that prevents them from visiting the page.

    If your website is down due to one of the common WordPress errors, then you can simply fix it to resolve the issue.

    However, if the issue keeps happening, or your website is not showing an error, then you will need to investigate it further.

    Website downtime can happen for several reasons, including unreliable hosting, an expired domain, security reasons, an error in custom code, and more.

    Another reason for downtime can be increased website traffic that exceeds your WordPress hosting resource limits.

    No matter the reason, if your WordPress website keeps going down on a regular basis, then it can harm your business. Your conversion rates may fall, and you might lose customers.

    Luckily, we have compiled a list of things to do if your WordPress website keeps going down. These steps will help you troubleshoot the cause and fix it easily.

    1. Check if It Is Just You or if the Website Is Down for Everyone

    Your WordPress website may not be down for everyone. Sometimes you might just be unable to access your site due to a network error or lack of internet connection.

    First, you will need to verify that your website is down for everyone and not just you.

    To do that, you can use IsItWP’s free uptime checker.

    First, visit the Website Uptime Status Checker website and enter your site URL.

    IsItWP Uptime Checker Tool

    Click on the ‘Analyze Website’ button, and the tool will tell you if your website is down for everyone or just you.

    If it is only down for you, then we recommend checking your internet connection. You can try clearing your browser cache or restarting your network router.

    On the other hand, if your website is down for everyone, then continue reading to learn how to fix it.

    2. Make Sure Your WordPress Hosting Plan Has Not Expired

    One of the most common reasons for website downtime is your WordPress hosting provider. Your plan may have expired, or the provider might be having server problems.

    First, you need to make sure that your hosting plan hasn’t expired. You can usually find this information in your hosting account dashboard.

    If your plan has not expired, but your WordPress website keeps going down, then you will need to contact your hosting provider. It is possible that they are facing an issue on their end and can provide you with more information about it.

    For example, your hosting company might be performing server maintenance, facing DDoS attacks, or may have taken down a few servers. All of these reasons could result in downtime.

    Your website may also be down due to the failure of some hardware components of the host’s server.

    In these cases, your website should be up and running again once the hosting provider fixes the issues.

    If you’re constantly running into issues with your hosting provider, then it’s a good idea to switch to a more reliable managed WordPress hosting company.

    We recommend going with either SiteGround, Hostinger, or WP Engine.

    3. Make Sure Your Domain Has Not Expired

    Sometimes the website goes down because the domain name you bought when starting your website might have expired. If this is the case, it needs to be renewed.

    To check if your domain is still valid, you can use a WHOIS lookup tool. You just need to enter your domain name and click the ‘Lookup’ button.

    The tool will then look up details of your domain name. If your domain has expired, it might show as available for registration.

    Domain available for registration

    If your domain has expired, then you can now go ahead and renew it using any domain registrar, such as Domain.com.

    You can also obtain a free domain from some hosting providers, including Hostinger. This is a top WordPress hosting company that provides a free domain name with any web hosting plan.

    You can also use our Bluehost coupon code, which provides WPBeginner users with a free domain name, SSL certificate, and a discount on web hosting plans.

    4. Check Your Plugins and Themes

    WordPress plugins or themes can sometimes cause website downtime. The software may be outdated and / or have a vulnerability that hackers can use to take down your site.

    Similarly, a WordPress theme can conflict with a particular WordPress version or a plugin on your website.

    To see if a plugin or theme is causing downtime, you will need to deactivate all of your plugins and switch to a default theme.

    Deactivate All WordPress Plugins

    Deactivating all of your WordPress plugins can quickly show you if one of the tools is causing your site’s downtime.

    If you have access to the WordPress admin area, then you need to visit the Plugins » Installed Plugins page from the admin sidebar.

    From here, you can select all plugins by simply checking the bulk select checkbox at the top.

    Check the box next to the Plugins option

    Next, open the ‘Bulk actions’ dropdown menu and select the ‘Deactivate’ option.

    After that, click on the ‘Apply’ button to deactivate all of the plugins.

    Choose the deactivate option from the Bulk Options dropdown menu

    However, if you don’t have access to the WordPress admin, then you can deactivate plugins using a File Transfer Protocol (FTP) client.

    First, you need to connect to your website using an FTP client or the File Manager app in your hosting account control panel. Once your site is connected, head to the /wp-content/ folder.

    Inside, you should see a folder named ‘plugins.’ This is where all your WordPress plugin files are stored.

    Rename plugins folder

    Simply rename the plugins folder to ‘plugins_deactivate.’ This will deactivate all WordPress plugins installed on your website.

    For more detailed instructions, please see our tutorial on how to deactivate WordPress plugins when not able to access WP-Admin.

    Switch to a Default WordPress Theme

    Your WordPress theme may also cause your website to malfunction. This can happen if you are using a poorly coded or outdated WordPress theme that has not been updated for a while.

    To find out if your current WordPress theme is causing downtime, you will need to switch to a default WordPress theme.

    First, connect to your website using an FTP client or the File Manager app in your hosting account control panel.

    After that, go to the /wp-content/themes/ folder.

    From here, you need to locate the ‘themes’ folder. This is where all the themes from your WordPress website are stored.

    Simply rename the folder to ‘themes_deactivate’ to deactivate your current theme.

    Rename themes folder

    Next, you need to create a new folder named ‘themes.’

    After that, you can go ahead and download a default WordPress theme like Twenty Twenty-Three from the WordPress themes directory.

    Downlaod default theme to your computer

    Once it has been downloaded, you need to unzip the file.

    Next, simply upload the downloaded theme file in the new ‘themes’ folder. This will activate it on your WordPress website.

    Upload theme folder

    You can also delete themes using the WordPress database. For more instructions, you can see our guide on how to delete a WordPress theme.

    If changing the theme or deactivating plugins didn’t resolve the issue, then continue reading.

    5. Check Your WordPress Settings

    Your website may also experience downtime due to incorrect WordPress configuration settings. Most commonly, your site may be using the wrong WordPress address.

    First, you will need to check if your WordPress address and site address are the same.

    The WordPress address is where your WordPress files and folders are stored. By contrast, the site address points to the part of your website that visitors see and interact with.

    If you have access to the WordPress admin dashboard, then just visit the Settings » General page from the admin sidebar.

    From here, make sure that the ‘WordPress Address’ and ‘Site Address’ boxes have the same URL.

    Check your WordPress and site address from the WordPress admin

    However, if you don’t have access to the WordPress admin, then you can check your site URLs by editing the wp-config.php file.

    For more detailed instructions, you can check out our tutorial on how to change your WordPress site URLs.

    Permalinks are the permanent URLs for posts and pages on your website.

    Your permalinks can break due to installing or updating a particular theme or plugin. Additionally, migrating your website to a new server or domain can also break your permalinks and cause your site to go down.

    In this case, you can regenerate your site’s permalinks by going to Settings » Permalinks from the admin sidebar. Here, make sure that you have the right permalink structure selected.

    Next, you simply need to click on the ‘Save Changes’ button at the bottom to repair the broken permalinks.

    Check Permalinks

    If this method doesn’t work, we recommend checking out our tutorial on how to regenerate permalinks in WordPress for other solutions.

    If your website is still down after repairing its permalinks, then you will need to continue reading.

    7. Try Reuploading the WordPress Core Files

    Updating the core WordPress software can also cause downtime due to changes or corruption of the core files. When this happens, important system files for your website cannot be accessed.

    To fix this problem, you can try reuploading the /wp-admin/ and /wp-includes/ folders from a fresh WordPress install.

    Note: This method will not remove any information or content from your site, but it may fix a corrupted core file.

    First, you’ll need to visit the WordPress.org website and click the ‘Download & Extend’ menu link, followed by ‘Get WordPress’. Next, click the blue ‘Download WordPress’ button to download the .zip folder to your computer.

    How to download WordPress

    Next, you’ll need to extract the zip file and find the ‘wordpress’ folder inside of it.

    After that, connect to your website using an FTP client. Once you have made the connection, head to the root folder of your website. It is typically called ‘public_html’ and it contains the wp-admin, wp-includes, and wp-content folders, along with other files.

    Open the WordPress folder on your computer in the left column. Then, select all of its files and hit ‘Upload’ to transfer them to your website.

    Upload core WordPress files

    The FTP client will now transfer these folders to your server.

    Next, it will ask if you would like to overwrite the files. You need to simply check the ‘Overwrite’ option and then select ‘Always use this action.’

    Overwrite WordPress core files

    Finally, hit the ‘OK’ button. Your older WordPress files will now be replaced with fresh copies.

    If replacing corrupted files doesn’t solve the problem, then you need to move to the next step.

    8. Install a Firewall on Your Website

    Your WordPress website might also be down due to malware or DDoS attacks.

    During a DDoS attack, a hacker sends a large amount of data requests to your WordPress hosting server. This causes the server to slow down and eventually crash.

    Similarly, malware is software that injects itself into your WordPress files. It uses up your WordPress server resources by attacking other websites or generating spam.

    Luckily, you can easily prevent DDoS attacks and malware by using a web application firewall.

    The firewall acts as an filter between your website and incoming traffic. It identifies and blocks all suspicious requests before they reach your server.

    We recommend using Sucuri because it is the best WordPress security plugin with a website firewall.

    It runs on a DNS level and catches DDoS attacks before they can even make a request to your website.

    Sucuri Website Application Firewall

    However, if you are looking for a free solution, then we recommend using Cloudflare instead.

    You may want to read our article on Sucuri vs Cloudflare for a detailed comparison.

    For better website protection, you will also need to use security best practices on your WordPress website. For more details, see our complete WordPress security guide with step-by-step instructions on how to secure your site.

    9. Move to a Reliable WordPress Hosting Plan

    Finally, if you have tried all the steps above and your website keeps going down, then it might be time to move to a reliable WordPress hosting provider.

    If you have a small business or blog, then we recommend moving to Bluehost or Hostinger.

    If you run an online store, then SiteGround is the go-to hosting provider because it comes with a managed EDD hosting plan. This enables you to launch a ready-to-go eCommerce store.

    Alternatively, if you have a rapidly growing business, then you should consider switching to a managed WordPress hosting provider like WP Engine.

    Once you have chosen a provider, you will need to move your website to the new host.

    Most hosting companies offer a free migration service that allows you to migrate your website without downtime.

    You can also move your website on your own. For detailed instructions, you may want to see our tutorial on how to move WordPress to a new host or server.

    We hope this article helped you learn what to do if your WordPress website keeps going down. You may also want to see our article on the best email marketing services compared and our tutorial on how to get a free SSL certificate for your website.

    If you liked this article, then please subscribe to our YouTube Channel for WordPress video tutorials. You can also find us on Twitter and Facebook.

    The post 9 Things to Do if Your WordPress Site Keeps Going Down first appeared on WPBeginner.

  • How to Change Block Height and Width in WordPress

    Do you want to change block height and width in WordPress?

    By default, WordPress makes it easy to create beautiful content layouts for your posts and pages using blocks. However, sometimes you may want to resize blocks to make them look better.

    In this article, we will show you how to easily change block height and width in WordPress.

    How to change block height and width in WordPress

    Why Change Block Height and Width in WordPress?

    The block editor enables you to add content to your WordPress website using different blocks, including headings, paragraphs, images, videos, audio, and more.

    However, sometimes you may want to change the width or height of a specific block to improve its appearance or the layout of the overall content.

    Adjusting block sizes can also ensure that your content is responsive and displays properly on all devices, including phones, tablets, and laptops.

    For example, you may have uploaded an image in the content editor, but it is too large and makes the page look unappealing.

    Preview of an image

    Or, you might want to change the size of the heading block to align it better with the content.

    By adjusting the width and height of the blocks, you can make your posts and pages look more aesthetically pleasing.

    That being said, let’s see how you can easily change block height and width in WordPress.

    Method 1: Change the Block Height and Width Using Block Settings

    For this method, we will show you how to change a block’s height and width using the default settings offered by WordPress.

    Currently, WordPress does not offer the same resizing options for all of the blocks. However, the block editor provides many ways to resize the height and width of different blocks.

    Let’s start with the Image block in WordPress.

    First, you can change the alignment of the Image block by clicking on the ‘Align’ button in the toolbar above the block.

    Here, choosing the ‘Wide Width’ option will make the block the same width as the container.

    Or, the ‘Full Width’ alignment option will make the block the entire width of the page.

    Use alignment settings to resize an image

    You can also resize a block by going to the ‘Block Settings’ panel on the right and scrolling down to the ‘Settings’ section. From here, you can resize a block from the ‘Image Size’ dropdown menu.

    You can also adjust the block’s width and height by typing the preferred pixel size into the ‘Width’ and ‘Height’ boxes in the ‘Image dimensions’ section.

    Below that, you can also adjust the block’s size by percentage.

    Resize an image using block panel settings

    Another way to resize an Image block is by clicking on the image itself to bring up a blue border with circular anchors.

    Then, simply drag these anchors to change the height and width of the image block.

    Resize Image block using anchors

    Once you are done, click on the ‘Update’ or ‘Publish’ button to store your settings.

    Method 2: Change the Block Height and Width Using the Columns Block

    If the block you want to resize does not come with alignment buttons or resize settings, then this method is for you.

    For this method, we will place our block inside the Columns block. It acts as a container where you can add blocks in each column. Then, you can resize those blocks by adjusting the height and width of the columns.

    First, you will need to click on the ‘Add Block’ (+) button in the top left corner of the screen.

    From here, simply locate and add the Columns block to the content editor. Then, you will be asked to choose a variation.

    Choose the column block

    After that, the column layout will be displayed on the screen, and you can now add the block you want by clicking on the ‘Add Block (+)’ button inside a column.

    Once the block has been added, you can resize it by using the ‘Column settings’ located in the right panel.

    Add Block using column

    Once you are done, simply click the ‘Publish’ button to store your changes.

    This is how the content looked on our demo website after resizing and aligning two paragraph blocks inside a two-column block.

    Column block preview

    Method 3: Change the Block Height and Width Using the Group Block

    You can also adjust the width and height of blocks using the Group block. It allows you to group different blocks and style them together.

    First, you will need to click on the ‘Add Block’ (+) button at the top. Next, you must locate and add the Group block to the content editor.

    Once you do that, the Group block will display three different layout options that you can choose from. For this tutorial, we will use the ‘Group’ layout.

    Choose the Group block and select a layout

    After that, the ‘Add Block’ button will be displayed on the screen. You can now add any block you want.

    In this tutorial, we will be adding and resizing a Heading block, a Paragraph block, and an Image block.

    Add a heading block to the Group block

    To add multiple blocks to the Group, you must click on the ‘Select Group’ button from the block toolbar.

    Once the Group is selected, simply click on the ‘Add Block’ button (+) at the bottom.

    Add multiple blocks in Group

    Clicking on the ‘Select Group’ button also opens up the block settings in the right column. From here, you can easily adjust the layout, justification, and orientation of all the blocks.

    Changing the layout will also change the different block sizes. You can configure these settings until you are happy with the result.

    Configure the block settings of the Group block

    Once you are done, click on the ‘Update’ or ‘Publish’ button to store your settings.

    This is how the Group block looked on our demo website.

    Group block preview

    Method 4: Change the Block Height Using the Cover Block

    This resizing method is for you if you want to use the Cover block. It enables you to display text and other content on top of an image or video.

    First, you will need to click on the ‘Add Block’ (+) button at the top and find the Cover block.

    Once you have done that, you will be asked to choose a color or upload an image from the WordPress media library. This image or color will be used as the background for the Cover block.

    Add the Cover block

    Next, simply drag and drop any block you want into the Cover block.

    After that, you need to click on the Cover block to open up its block settings in the right column.

    From here, scroll down to the ‘Dimensions’ panel, where you can adjust the height of the Cover block using pixels.

    Change the Cover block height

    Finally, don’t forget to click on the ‘Save Changes’ button to store your settings.

    For more detailed instructions on how to use the Cover block, you may want to see our beginner’s guide on Cover Image vs. Featured Image in the WordPress block editor.

    Bonus: Create Beautiful Pages Using Advanced Blocks in SeedProd

    You can easily create beautiful and aesthetically-pleasing pages using the SeedProd plugin.

    It is the best WordPress page builder on the market that allows you to create landing pages using blocks. These blocks are also super easy to customize and resize according to your needs.

    First, you will need to install and activate the SeedProd plugin. For more details, you can read our guide on how to install a WordPress plugin.

    Note: SeedProd also offers a free version, but we will be using the premium version for this tutorial.

    Upon activation, you must go to the SeedProd » Settings page from your WordPress dashboard and enter the license key in the ‘License Key’ box.

    You can find the license key on your account page on the SeedProd website.

    Paste license key in the field

    Next, you need to visit the SeedProd » Landing Pages screen from the admin sidebar to start creating a landing page.

    From here, just click on the ‘Add New Landing Page’ button.

    Click the Add New Landing Page button

    You will now be taken to the ‘Choose a New Page Template’ page. SeedProd offers many pre-made templates that you can pick from.

    After you have selected a template, you will be asked to provide a name and URL for your landing page.

    Upon adding these details, simply click on the ‘Save and Start Editing the Page’ button to continue.

    Enter your page details

    This will launch SeedProd’s drag-and-drop page builder, where you can now start editing your page.

    For more detailed instructions, please see our guide on how to create a landing page with WordPress.

    For this tutorial, we will be adding and resizing an Image block and a Button block.

    First, you will need to drag the Image block from the block panel on the left and drop it anywhere you like on the page.

    Choose the image block in the SeedProd

    Next, simply click on the Image block to open its block settings in the left column. From here, you can upload an image from your media library.

    Next, you can change the block’s height and width using pixels or percentages.

    Change the block size in SeedProd

    You can also adjust the image size and position by switching to the ‘Advanced’ tab at the top of the settings panel.

    Then, just click on the Spacing panel to expand its settings.

    Visit the Spacing panel by switching to the Advanced tab

    Here, simply add values to adjust the block’s margin and padding according to your needs.

    You can adjust the margin and padding for the top, bottom, left, and right areas of the block.

    Ajust the margin and padding of the block

    With Seedprod, you can also add a Spacer block between two different blocks to put some space between them.

    First, you will need to locate and add the ‘Spacer’ block from the left column. Then, click on it to open its settings.

    Add the Spacer block

    Now, you can control the height of the spacer using the ‘Height’ slider.

    The spacer block can help you create a clutter-free website.

    Use the height slider to adjust Spacer block

    You can also change the width and height of other blocks in the same way, including the Video, Heading, and Button blocks.

    Simply find the Button block in the left column and drag it onto your page.

    Add the Button block to the website

    Next, you will need to click on the Button to open up its block settings.

    From here, switch to the ‘Advanced’ tab from the top. You can change the height of the block by dragging the ‘Vertical Padding’ slider.

    Changing height of the button block

    To change the width, drag the ‘Horizontal Padding’ slider in the left column.

    Once you are done, don’t forget to click on the ‘Save’ button.

    Change width of the button block

    We hope this article helped you learn how to change block width and height in WordPress. You may also want to see our article on how to add and align images in the WordPress block editor and our top picks for the must-have WordPress plugins to grow your site.

    If you liked this article, then please subscribe to our YouTube Channel for WordPress video tutorials. You can also find us on Twitter and Facebook.

    The post How to Change Block Height and Width in WordPress first appeared on WPBeginner.

  • How to Enable / Activate WordPress Plugins from the Database

    Are you looking to enable or activate plugins from the WordPress database?

    If you are unable to access your WordPress admin area and need to activate a plugin to restore your access, then you can do that from the WordPress database.

    In this article, we will show you how to easily activate your WordPress plugins using the database.

    How to enable/activate WordPress plugins from the database

    When Should You Activate WordPress Plugins Using Database

    A number of common WordPress errors can prevent a website owner from accessing the WordPress admin area. In most of those situations, the user is looking to deactivate WordPress plugins without admin access.

    However in some situations, a website owner may need to activate certain plugins to restore access to their WordPress website.

    For example, let’s assume an error is stopping you from accessing your WordPress dashboard, and you have found a plugin that can fix that error.

    Luckily, WordPress stores the active plugins information in your WordPress database. This means you can manually enter this information directly in the database and tell WordPress to activate a plugin.

    The only condition is that the plugin must be installed on your WordPress site. Which means that it should be present in the plugins folder on your WordPress website.

    With that being said, let’s see how you can easily enable/activate a plugin using the database.

    Step 1. Find Your Database Name Using the Hosting Control Panel

    To activate your WordPress plugins using phpMyAdmin, first, you need to find out your WordPress database’s name.

    Now, to find the name of your database, you need to log in to your web hosting dashboard. For this tutorial, we will be using Bluehost.

    If you are using a different hosting company, then your WordPress hosting dashboard may look slightly different.

    Once you are on the cPanel, scroll down to the ‘Files’ section and click the ‘File Manager’ option.

    Click at the file manager

    This will open up the File Manager in a new window. Here you simply need to locate and click the public_html folder from the left column.

    This will open up all the files that are stored in the public_html folder. Now, you simply need to locate and click the folder with your site’s name on it present under the ‘Name’ column.

    Go to the publich_html file and find your site name

    Some users may instead see their WordPress files and folders installed inside public_html folder.

    After you have opened up your WordPress site’s file, locate the wp-config.php file under the ‘Name’ section and right-click on it.

    This will open up a menu where you need to select the ‘View’ option.

    Click View

    This will open up the wp-config.php file in a new window where you can locate your database details.

    We recommend that you copy and paste your database details including username and password into a notepad on your computer.

    Database details

    Now you’ve successfully found your database’s name, let’s move to our next step.

    Step 2. Locate Active Plugins Option via PhpMyAdmin

    After you have found out the name of your database, you need to go back to your WordPress hosting control panel.

    Once there, scroll down to the ‘Databases’ section and click the ‘phpMyAdmin’ option.

    Click the phpMyAdmin option in the cPanel

    This will launch the phpMyAdmin app in a new browser tab.

    Note: Before you make any kind of changes, please make sure to create a complete backup of your database. It will come in handy if anything goes wrong with the process.

    Next, you simply need to click the ‘Database’ tab from the navigation menu present at the top of the page.

    Now, simply locate your WordPress database and click on the browse button to expand it.

    Click the Database tab from the navigation menu

    This will show your WordPress database tables.

    Here, you will simply need to locate wp_options table and click browse next to it.

    Note: By default, WordPress uses wp_ as the prefix for table names. Your WordPress database table may have a different table prefix.

    Click at wp-options

    Inside the wp_options table, you’ll need to find the row where option_name is set toactive_plugins.

    After that, click on the Edit link next to it.

    Click the Activate_Plugins option

    This will open up a box where you can manually enter details to activate a plugin.

    Step 3. Activate a Plugin Using phpMyAdmin

    WordPress stores the active plugins information in a special format so that it can be programatically accessed by the software.

    In order to tell WordPress which plugins to activate, we’ll need to use that same format.

    First, we’ll start by entering the option_value as a:1: and then open up the curly bracket ({).

    We are entering this value as 1 because we only want to activate one plugin. You have to change the value to the number of plugins you plan on activating.

    Add option value

    Next, we will be entering i:0; after the curly bracket. Here we are essentially assigning a serial number to our plugin.

    Remember to always assign numbers starting from 0 instead of 1.

    Add serial number

    Next, we will be entering the number of characters present in the plugin’s name and the php file name of the plugin that we’re about to activate.

    For that, we will type s:24: in the box. Keep in mind that the number of characters will differ for each plugin based on the characters in the plugin directory and file name.

    For instance, we are activating WPForms in this tutorial which has 24 characters in its name including the file name of the plugin as stored in our file manager.

    Add character number

    Next, you just need to type the plugin’s directory name. You can find it by visiting the /wp-content/plugins/ folder using the File Manager app.

    Don’t forget to add quotation marks before typing the plugin’s directory name.

    Type the plugins' name

    After the /, you need to enter the plugin’s file name. This is usually the file with similar name inside the plugin folder.

    Plugin file and folder name

    Now, go back to phpMyAdmin and type the name of the plugin and then close the quotation marks.

    After that, simply add a semi-colon (;) and close the curly brackets (}). The final value in this example would look like this:

    a:1:{i:0;s:24:"wpforms-lite/wpforms.php";}
    

    This is how it will look once you’re done.

    Activating a single plugin

    Next, simply click the ‘Go’ button to execute the command.

    Now go visit your WordPress dashboard and head over to Plugins » Installed Plugins.

    Your plugin has been successfully activated.

    activated-plugin

    Now let’s say you want to activate two more plugins.

    First you will need to change the number of plugins. After you will adjust each entry for the plugin that you want to activate.

    Here is an example:

    a:3:{
    i:0;s:47:"all-in-one-seo-pack-pro/all_in_one_seo_pack.php";
    i:1;s:35:"insert-headers-and-footers/ihaf.php";
    i:2;s:24:"wpforms-lite/wpforms.php";
    }
    

    Note: We have added line breaks here to make the code look more readable. You need to make sure that there are no line breaks or spaces in your code. Otherwise, it wouldn’t work.

    We hope you learned how to activate a plugin using the database. You may also want to see our guide on how to add social media feeds to WordPress, and our comparison of the best domain registrars in the world.

    If you liked this article, then please subscribe to our YouTube Channel for WordPress video tutorials. You can also find us on Twitter and Facebook.

    The post How to Enable / Activate WordPress Plugins from the Database first appeared on WPBeginner.

  • How to Properly Disable Lazy Load in WordPress (Step by Step)

    Do you want to disable lazy loading in WordPress?

    By default, WordPress comes with a lazy load feature, which delays downloads for images and other media to improve page load speed.

    However, for some websites, it may affect user experience by not displaying images and media right away.

    In this article, we’ll show you how to easily disable lazy load in WordPress both using a code method as well as a plugin method.

    How to properly disable lazy load in WordPress

    What is Lazy Loading?

    WordPress first introduced lazy loading images in WordPress 5.5. Later it extended the lazy load feature to iframes embeds (e.g. YouTube videos, Spotify, and other embeds).

    This practice helps improve your website’s speed and performance by quickly loading content and the visible area first.

    A faster website is not just good for users, but it is also good for SEO. Search engines like Google consider speed as an important ranking factor.

    Apart from images and embeds, you can also easily lazy load comments and Gravatars to further improve page load speed.

    Lazy loading can be seen in action by right-clicking on an image and selecting the Inspect tool in your browser.

    Lazy loading images in WordPress

    This will split your browser screen and show you the HTML source code. From here, you’ll be able to see the “loading=lazy” attribute added to the image.

    Now normally, we don’t recommend disabling lazy load due to its overall benefits for your WordPress website. Turning it off can result in slower website speed, lower conversion rates, and lower SEO rankings.

    However, sometimes lazy loading can affect the user experience for some websites.

    For instance, if you run a photography website where images are the most significant aspect of your content, then lazy loading them may ruin the user experience for your customers.

    In other cases, you might be using a different lazy loading solution and just want to turn off the default WordPress lazy load.

    That being said, let’s see how you can easily disable lazy load in WordPress.

    You can simply disable the lazy load feature in WordPress by adding a custom code snippet to your theme’s functions.php file.

    However, keep in mind that the smallest error while adding the code can result in breaking your website and making it inaccessible to your users.

    This is why we recommend using the WPCode plugin to add custom code to your site.

    It is the best custom code snippets plugin that makes it super easy for beginners to safely add custom code to their website.

    First, you need to install and activate the WPCode plugin. See our guide on how to install a WordPress plugin for more instructions.

    Upon activation, go to the Code Snippets » + Add Snippet page.

    Add new snippet

    This will take you to the ‘Add Snippets’ screen where you’ll see a bunch of ready-to-use code snippets that you can add to your website.

    From here, you need to click the ‘Use Snippet’ button under the ‘Add Your Custom Code (New Snippet)’ option.

    Once you’re on the ‘Create Custom Snippet’ page, you can start by typing a name for your code snippet.

    It can be anything that will help you identify the code snippet and what it does.

    Snippet title and type

    After that, select ‘PHP Snippet’ from the dropdown menu next to the ‘Code Type’ option.

    Now, copy and paste the following PHP code in the ‘Code Preview’ box.

    add_filter( 'wp_lazy_loading_enabled', '__return_false' );
    

    This is how the code will look after it is pasted in the ‘Code Preview’ box.

    Add code snippet

    After adding the code, scroll down to the ‘Insertion’ section.

    Here, simply choose ‘Auto Insert’ as the insertion mode. This will ensure that your custom code is automatically executed everywhere on your website once you activate the snippet.

    Choose an insertion method

    Next, you need to scroll to the top of the page and simply toggle the ‘Inactive’ switch to ‘Active’.

    After that, don’t forget to click the ‘Save Snippet’ button to save and execute your custom snippet.

    Save your code snippet

    Once activated, this custom code snippet will disable the lazy loading feature on your WordPress website.

    You can test by right-clicking on an image and selecting Inspect from the browser menu.

    In the HTML code for the image, the loading=lazy attribute will now disappear.

    Lazy loading disabled

    Method 2. Disable Lazy Load in WordPress Using a Plugin

    If you don’t want to add code to your site, then you can use the Disable Lazy Load plugin.

    The only thing you need to do is install and activate the Disable Lazy Load plugin. For more instructions, check our guide on how to install a WordPress plugin.

    Activate plugin to disable lazy load

    The plugin works out of the box and does not require any configuration. Once activated, it will automatically disable the lazy load feature on your site.

    We hope this article helped you learn how to properly disable lazy load in WordPress. You may also want to see our guide on how to optimize WordPress images for better page load times, or see our pick of the best WordPress image compression plugins.

    If you liked this article, then please subscribe to our YouTube Channel for WordPress video tutorials. You can also find us on Twitter and Facebook.

    The post How to Properly Disable Lazy Load in WordPress (Step by Step) first appeared on WPBeginner.

  • How to Add Multilingual Search in WordPress (2 Ways)

    Do you want to add a multilingual search in WordPress?

    If you have a multilingual WordPress site, then adding a multilingual search feature can help users find information more quickly by searching in their own language.

    In this article, we’ll show you how to easily add multilingual search in WordPress and delight your users with a better user experience.

    How to add multilingual search in WordPress

    Why Should You Add Multilingual Search in WordPress?

    Often users have trouble finding information on multilingual websites because either there is no search feature that they can use, or the search feature shows them content in the wrong language.

    Adding a multilingual search feature helps users easily find the content they are looking for. This improves user experience which means users will stay longer on your website.

    Research shows that engaged users are more likely to convert, subscribe, or make a buying decision.

    That being said, let’s take a look at how to easily add a multilingual search in WordPress without breaking your website or writing any code.

    Method 1: Adding Multilingual Search Using TranslatePress

    If you haven’t made your multilingual website yet, or already using TranslatePress, then this method is for you.

    TranslatePress is the best WordPress translation plugin on the market. It allows you to easily create a multilingual website using a live editor for quick and easier translation.

    It works out of the box and allows default WordPress search to display multilingual results.

    The disadvantage of this method is that it uses the default WordPress feature which is not very good at fetching the right results.

    If you haven’t used TranslatePress before or need help, then see our tutorial on how to easily create a multilingual WordPress website.

    Note: Keep in mind that the free version of TranslatePress only allows you to translate your website into one other language. So if you want to add multilingual search in WordPress for more than two languages, then you’d need to buy the TranslatePress Premium version.

    Once you have translated some content on your WordPress website. It is time to add the search form.

    Add a Search Block to your WordPress Site

    WordPress comes with a built-in search block that you can add anywhere on your website.

    If you’re using a block-based theme like Ultra, then you’ll be using the full site editor to add the search block.

    Simply visit the Appearance » Editor page from the WordPress dashboard.

    This will launch the full site editor which looks a lot like the block editor you use for writing posts and pages.

    Now, click on the add block button (+) to add the Search block.

    Adding search block in site editor

    You can move the search block up and down to display it anywhere on the page.

    Search block also comes with a few style options that you can choose from the block toolbar or settings.

    Search block settings

    Once you are finished, don’t forget to click on the Save button to save your changes.

    You can now visit your website to see the search form in action.

    Search form preview

    On the other hand, if you’re using a theme that does not support the full-site editor, then you can add a search form as a widget.

    Simply go to the Appearance » Widgets page from the WordPress admin dashboard.

    Here, click the Add widget block button (+) and add the Search block to your widget area.

    Search widget

    Once the ‘Widget Block Menu’ opens up, locate the ‘Search’ block and add it to your WordPress sidebar.

    Don’t forget to click the ‘Update’ button at the top to save your changes.

    Once you’ve saved the changes, visit your site and see the search box in action.

    Website preview

    Method 2: Adding Multilingual Search Using SearchWP (Recommended)

    The default WordPress search feature used by TranslatePress is not very good. It is quite basic and only looks for search terms in certain places.

    This is where SearchWP comes in.

    It is the best WordPress search plugin on the market and allows you to easily replace the default WordPress search with a more powerful search feature.

    SearchWP

    SearchWP automatically builds a search index and matches search keywords in content, title, categories, tags, shortcodes, documents, products, and more.

    Plus, it automatically replaces the default search form upon activation so you don’t need to replace it if you were already using it on your site.

    That being said, let’s take a look at how to easily add a better multilingual search to your WordPress site.

    First, you need to install and activate the SearchWP plugin. For more information, see our guide on how to install a WordPress plugin.

    After that, go to the SearchWP » Settings page and then click on the ‘License’ menu option to enter your license key.

    You can get the license key from your ‘SearchWP Accounts’ page. Simply copy the license key from there.

    After that, paste it into the ‘License Key’ field and then click on the Activate button.

    SearcWP license

    Now, you are ready to create your first custom search engine.

    Simply go to the SearchWP » Settings page from the dashboard.

    From here, you will see SearchWP’s first default search engine for you. It is pre-configured to work for most websites including multilingual websites.

    You’ll see all your post types with different attributes. Next to each attribute there will be a slide that you can move to assign weight for that attribute.

    SearchWP settings

    You can also click on the Add/Remove Attributes button to include more areas in the search.

    For instance, you can add custom fields and taxonomies to the attributes as well.

    Add more attributes to search

    If you are unsure about a setting, you can leave it as it is. The default options would work for more use cases.

    Finally, click on the Save Engines button to store your settings.

    SearchWP will now start building your search index in the background.

    Now, all you need to do is add the search form to your site.

    Add a Search Block to your WordPress Site

    SearchWP replaces the built-in search feature, which means you can use the default WordPress search form and it would still use SearchWP to show the results.

    If you haven’t already added a search form to your website, then here is how you would add it.

    If you’re using a block-based theme, then you’ll be adding a search block using a full-site editor.

    Simply go to the Appearance » Editor page from the admin dashboard.

    On the edit screen, click on the add block button (+) at the top and add the search block.

    You can move the search block to the area where you want to display the search form by moving it up or down.

    Adding search block in site editor

    Finally, don’t forget to click on the Save button to save your changes.

    If you’re using a theme that doesn’t support the full-site editor, then you’ll need to add a search widget to your website’s sidebar or widget-ready area.

    For that, head over to the Appearance » Widgets page from the dashboard.

    Now click on the add block button (+) at the top to open up the ‘Widget Block Menu’.

    From here, locate and add the Search widget to your preferred widget area.

    Search widget

    Don’t forget to click the ‘Update’ button at the top to save your changes.

    Next, simply visit your website and use your improved search box.

    Website preview

    For more information and detailed instructions, take a look at our guide on how to improve WordPress search using SearchWP.

    We hope this article helped you learn how to add multilingual search in WordPress. You may also want to check out our tutorial on how to fix WordPress search errors, and our article on how to create a multilingual sitemap in WordPress.

    If you liked this article, then please subscribe to our YouTube Channel for WordPress video tutorials. You can also find us on Twitter and Facebook.

    The post How to Add Multilingual Search in WordPress (2 Ways) first appeared on WPBeginner.

  • How to Highlight a Menu Item in WordPress

    Do you want to highlight a menu item on your WordPress site?

    Highlighting a menu item can really help you point user’s attention to a specific area on your menu. This can be great if you want to highlight the Pricing or Contact Us page on your website.

    In this article, we will show you how to easily highlight a menu item in WordPress using CSS code.

    How to Highlight a Menu Item in WordPress

    Why Should You Highlight a Menu Item?

    A navigation menu is a list of links pointing to important areas of your website. They are usually presented as a horizontal bar at the top of every page on a WordPress website.

    This navigation menu is created by adding different menu items. For more details, you can see our article on how to add a navigation menu in WordPress.

    A highlighted menu item can be a great way to capture the user’s attention to your most prominent call to action. The eyes of the visitors will be automatically drawn to the menu item when they visit your website.

    WPForms highlighted menu icon

    By adding this feature, you can create a user-friendly website and highlight important menu items that you want your users to check out.

    That being said, let’s see how you can highlight a menu item in WordPress using CSS.

    Method 1. Highlighting a Menu Item Using Full Site Editor

    If you’re using a block-enabled theme then you’ll have the Full Site Editor instead of the older Theme Customizer. You can easily highlight a menu item in it as well.

    First, head over to Appearance » Editor from the WordPress admin dashboard. This will direct you to the full site editor.

    Here simply double-click the menu item you want to highlight, and then click the gear icon at the top. This will immediately open up that specific menu item’s ‘Settings’ block.

    Select the menu item you want to highlight and then click the gear icon at the top

    Simply scroll down in the ‘Settings’ block to the ‘Advanced’ tab and click the arrow icon beside it to expand the tab.

    This will open up an ‘Additional CSS Class’ field where you simply have to write highlighted-menu in the field.

    Write highlighted menu in Additional CSS Class field

    Next, click the ‘Save’ button at the top of the page to store your changes.

    After that, you will need to add a small bit of CSS to your theme for the highlight effect. You can either fix the missing Theme Customizer, or you can use a code snippet plugin to add CSS code.

    How to Add CSS Snippets Using WPCode

    For adding CSS in WordPress, we recommend using WPCode because it’s the easiest way to add any custom code to WordPress.

    First you need to install and activate the free WPCode plugin. For more instructions, check out our guide on how to install a WordPress plugin.

    Upon activation, navigate to Code Snippets » Add Snippet from your WordPress admin panel. Now click on the ‘Add New’ button.

    Go to Code Snippets and click Add New

    This will take you to the ‘Add Snippet’ page.

    Here, hover your mouse over the ‘Add Your Custom Code (New Snippet)’ option and simply click on the ‘Use Snippet’ button below it.

    Click Use Snippet button

    Now that you’re on the ‘Create Custom Snippet’ page, start by choosing a name and a ‘Code Type’ for your CSS snippet.

    You can choose any name you like.

    Select Universal Snippet as Code Type

    Next, simply click the dropdown menu beside the ‘Code Type’ option on the right and then choose the ‘Universal Snippet’ option.

    After that, copy/paste the following CSS code into the ‘Code Preview’.

    <style type="text/css">
    /* Highlighted menu */
    .highlighted-menu
    {
    background: #d3d3d3;
    border-radius: 35px;
    padding: 0px 20px;
    line-height: 50px;
    }
    </style>
    

    Be sure to include the style tags, as you see on Lines 1 and 10 below.

    Paste code

    After pasting the code, go to the ‘Insertion’ section by scrolling down.

    Here simply choose the ‘Auto Insert’ mode so that the code can be automatically executed on your entire website.

    Choose Auto Insert as insert method

    Now, go to the top of the page and toggle the switch from ‘Inactive’ to ‘Active’.

    Then simply click the ‘Save Snippet’ button.

    Save your highlight menu item snippet

    You have now successfully highlighted a menu item in WordPress using a full site editor.

    This is how your menu item will look after you add the CSS code.

    Highlighted menu item

    How to Access the Theme Customizer Using a Block Theme

    If you want to use the Theme Customizer and use an FSE theme, then simply copy and paste the URL below into your browser. Make sure to replace ‘example.com’ with your own site’s domain name.

    https://example.com/wp-admin/customize.php
    

    Here you simply have to click the ‘Additional CSS’ tab.

    Click Additional CSS tab

    Now, expand the ‘Additional CSS’ field, and then just copy/paste the following code snippet.

    /* Highlighted menu */
    .highlighted-menu
    {
    background: #FFB6C1;
    border-radius: 35px;
    padding: 0px 20px;
    line-height: 50px;
    }
    

    After that, simply click the ‘Publish’ button at the top.

    Paste your CSS code

    That’s all it takes to highlight a menu item.

    It should look something like this on your website when finished:

    Highlighted menu item

    Method 2. Highlighting a Menu Item Using Theme Customizer

    If you’re using a non-block-enabled theme, then you’ll probably have a theme customizer enabled by default. Highlighting a menu item in a theme customizer is a fairly simple process.

    First, simply go to Appearance » Customize in your WordPress dashboard to launch the theme customizer. Once the theme customizer opens up, simply click on the ‘ Menus’ tab.

    Go to Menu in Theme Customizer

    Once you’re in the ‘Menus’ section, simply click on the gear icon at the top right to display advanced properties.

    Now, simply check the ‘CSS Classes’ box.

    Check CSS Classes box

    After that, scroll down to the ‘Menus’ section.

    If you have multiple menus on your website, simply click on the menu whose menu items you want to highlight.

    Select a menu

    This will open up a new tab where you can select the menu item that you want to highlight. It could be ‘Get Started’ like in our example, or it might be your contact form page or the link to your online store.

    Simply click on the menu item of your choice which will expand it to display some options. Click into the ‘CSS Classes’ field.

    All you have to do is write 'highlighted-menu' in the field. You can add this CSS Class to multiple menu items, and they will all be highlighted.

    Write highlighted menu as CSS Class

    Next, simply go to the ‘Additional CSS’ tab in the theme customizer.

    Now, simply copy and paste the following CSS code.

    /* Highlighted menu */
    .highlighted-menu
    {
    background: #FFB6C1;
    border-radius: 35px;
    padding: 0px 20px;
    line-height: 50px;
    }
    

    Congratulations! You’ve successfully highlighted a menu item.

    Note: Your theme might not have an ‘Additional CSS’ field in the theme customizer. If not, check theme settings to find out how to add custom CSS. If you can’t find it, you might want to contact the developer or add it using WPCode.

    Paste CSS code in Additional CSS tab

    Customizing Your Menu Item Highlight

    Now that you have highlighted the menu item, you can adjust the CSS code to customize your menu item the way you like it.

    For example, you can change the background color of your menu item.

    Pink highlighted menu item

    Simply look for the following code in the CSS snippet, you just pasted.

    background: #FFB6C1
    

    After locating it, you can simply replace the pink color code number with the hex code of any color of your choice:

    background: #7FFFD4;
    

    Above is the hex code for aquamarine.

    Blue highlighted menu item

    You can check out our guide to easily add custom CSS for other ideas on how to customize the highlighted menu item.

    After you’re satisfied with your choices, simply click on the ‘Publish’ button in the theme customizer or ‘Save Snippet’ in WPCode to save your changes.

    We hope this article helped you learn how to highlight a menu icon in WordPress. You may also want to check out our beginner’s guide on how to style WordPress navigation menus or our expert picks of the must-have WordPress plugins to grow your site.

    If you liked this article, then please subscribe to our YouTube Channel for WordPress video tutorials. You can also find us on Twitter and Facebook.

    The post How to Highlight a Menu Item in WordPress first appeared on WPBeginner.