Do you want to fade images on mouseover in WordPress?
A simple fade-in or fade-out animation when a user moves their mouse over an image can make your site more engaging. It also encourages visitors to interact with your content, which can keep them on your site for longer.
In this article, we’ll show you how to add a fade image effect on mouseover in WordPress.
Why Fade Images on Mouseover in WordPress?
Animations are an easy way to make your website more interesting, and can even draw the visitor’s attention toward your page’s most important content, such as your website logo or a call to action.
There are lots of different ways to use CSS animations in WordPress, but adding a hover effect to images is particularly effective. The fade animation means your images will slowly appear or disappear when visitors hover over them.
This encourages people to interact with your images, and can even add a storytelling element to the page. For example, different images might fade in and out as the visitor moves around the page.
Unlike some other animations, the fade image on mouseover effect is subtle so it won’t negatively impact the visitor’s reading experience or any image optimization you’ve done.
With that said, let’s show you how to add a fade to your images on mouseover in WordPress.
Adding Image Fade on Mouseover to all WordPress Images
The easiest way to add a fade effect to all your images is by using WPCode. This free plugin allows you to easily add custom code in WordPress without having to edit your theme files.
With WPCode, even beginners can edit their website’s code without risking mistakes and typos that can cause many common WordPress errors.
In the code editor, add the following code snippet:
.post img:hover{
opacity:0.6;
filter:alpha(opacity=60); /* For IE8 and earlier */
-webkit-transition: all 2s ease;
-moz-transition: all 2s ease;
-ms-transition: all 2s ease;
-o-transition: all 2s ease;
transition: all 2s ease;
}
This code snippet will fade each image for 2 seconds when the user hovers their mouse over it. To make the image fade slower, simply replace ‘2s ease’ with a higher number. If you want to make the picture fade faster, then use ‘1s ease’ or smaller.
You can also make the ‘opacity’ higher or lower by changing the opacity:0.6 line.
If you change any of these numbers then make sure you change them across all the properties (webkit, moz, ms, and o), so the fade effect looks the same on every browser.
When you’re happy with the snippet, scroll to the ‘Insertion’ section. WPCode can add your code to different locations, such as after every post, frontend only, or admin only.
To add a fade effect to all your images, click on ‘Auto Insert.’ Then, open the ‘Location’ dropdown menu and choose ‘Site Wide Header.’
After that, you’re ready to scroll to the top of the screen and click on the ‘Inactive’ toggle, so it changes to ‘Active.’
Finally, click on ‘Save Snippet’ to make the CSS snippet live.
Now, if you hover the mouse over any image on your WordPress website, you’ll see the fade effect in action.
Adding Image Fade Animations to Individual Pages
Using a fade effect for every single image can become distracting, especially if you’re running a photography website, a stock photo store, or any other site that has lots of images.
With that in mind, you may want to use fade effects on a specific page or post only.
The good news is that WPCode allows you to create custom shortcodes. You can place this shortcode on any page, and WordPress will show fade effects on that page only.
To do this, simply create a custom code snippet and add the fade animation code following the same process described above. Then, click on the ‘Save snippet’ button.
After that, scroll to the ‘Insertion’ section, but this time select ‘Shortcode.’
This creates a shortcode that you can add to any page, post, or widget-ready area.
After that, go ahead and make the snippet live following the same process described above.
You can now go to any page, post, or widget-ready area and create a new ‘Shortcode’ block. Then, simply paste the WPCode shortcode into that block.
With that done, either click on the ‘Update’ or ‘Publish’ button to make the shortcode live. You can then visit that page, page, or widget-ready area to see the fade on mouseover effect.
Adding Image Fade Animations to Featured Images
Another option is to add fade animations to your featured images or post thumbnails. These are the post’s primary image and they often appear next to the heading on your home page, archive pages, and other important areas of your website.
By fading featured images on mouseover, you can make your site more eye-catching and engaging, without animating every single image across your WordPress blog or website.
To add a fade animation to your post thumbnails, simply create a new custom code snippet following the same process described above.
However, this time add the following code to the editor:
img.wp-post-image:hover{
opacity:0.6;
filter:alpha(opacity=60); /* For IE8 and earlier */
-webkit-transition: all 2s ease;
-moz-transition: all 2s ease;
-ms-transition: all 2s ease;
-o-transition: all 2s ease;
transition: all 2s ease;
}
After that, scroll to the ‘Insertion’ box and select ‘Auto Insert.’ Then, open the ‘Location’ dropdown menu and choose ‘Site Wide Header.’
After that, you can go ahead and make the code snippet live using the same process described above.
Now, you can hover the mouse over any featured image to see the fade animation in action.
Fade effects are a fun way to make images more interesting, but there are lots more ways to use animations in WordPress. For example, you might use flipbox animations to reveal text when a visitor hovers over an image, or use zoom effects so users can explore a picture in more detail.
If you want to try different effects, then SeedProd has over 40 animations that you can add to images, text, buttons, videos, and more. You can even animate entire sections and columns with just a few clicks.
Inside the SeedProd editor, simply click on the content you want to animate, and then select the ‘Advanced’ tab in the left-hand menu.
You can then go ahead and click to expand the ‘Animation Effects’ section.
After that, simply choose an animation from the ‘Entrance Animation’ dropdown, including a wide range of different fade effects.
If you liked this article, then please subscribe to our YouTube Channel for WordPress video tutorials. You can also find us on Twitter and Facebook.
Conversion tracking is the ability to track and measure the success of your various marketing efforts.
Depending on your business, the conversion is the desired action you want users to perform on your website.
For an online store or eCommerce website, a conversion could be a successful purchase.
For a news/blog site, the conversion could be a successful subscription to the email newsletter.
For a professional services website, a conversion could be a user filling up a contact form.
Simply put, conversion tracking shows you how many of your website visitors successfully perform the desired action.
Why is Conversion Tracking Important?
Conversion tracking is important because it helps you make data-driven decisions to grow your business.
For instance, it shows that users from a specific traffic source are more likely to convert. You can then focus your attention on getting more traffic from that particular source.
Conversion tracking also helps you uncover the users who are not converting so well.
For instance, you may learn that users open the contact page, but many abandon it before submitting the form. You can then make your form easier by removing unnecessary fields, making it conversational, changing colors, setting up partial form submission, etc.
Basically, you need conversion tracking to measure your success and failures and then improve upon them to grow your online business.
That being said, let’s take a look at what tools we’ll need to set up conversion tracking in WordPress.
Tools You Need to Setup Conversion Tracking in WordPress
Most conversion optimization experts rely heavily on Google Analytics. It is a free tool provided by Google that helps you track your website traffic.
It shows where your users are coming from, and what they do while on your website.
If you are running Google AdWords, Facebook Ads, and Twitter Ads to promote your business, then you’ll need to set up those for conversion tracking.
This may sound complicated, but you’ll only have to set it up once, and we’ll walk you through every step of the way.
Ready? Let’s get started.
Setting Up Conversion Tracking in Google Analytics
First, you need to install Google Analytics on your website.
The easiest way to do this is by using MonsterInsights. It is the best Google Analytics plugin on the market that comes with enhanced eCommerce tracking, form tracking, and other conversion tracking tools built-in.
You’ll need the PRO version of the plugin to access eCommerce and other conversion tracking features. For basic tracking, the free version works as well.
Upon activation, you’ll see the setup wizard. Go ahead and click the ‘Launch the Wizard’ button.
Next, you can follow the on-screen instructions to connect your WordPress site to Google Analytics using MonsterInsights. For more details, see our guide on how to install Google Analytics in WordPress.
With MonsterInsights, you can also easily create a Google Analytics 4 (GA4) property. GA4 is the latest version of the famous analytics platform, and it will replace the old version on July 1, 2023.
Now that you have installed Google Analytics, let’s set up conversion tracking on your website.
Turning on Enhanced Ecommerce Conversion Tracking
Ecommerce tracking helps you see which products are doing well on your site, which products are being looked at but not purchased, and what’s bringing you the most revenue.
Google Analytics comes with enhanced eCommerce tracking, which works for most eCommerce websites, including WooCommerce, Easy Digital Downloads, MemberPress, and more. However, you’ll need to enable it for your website manually.
Step 1. Turn on eCommerce Tracking in MonsterInsights
MonsterInsights comes with an eCommerce addon that lets you properly set up eCommerce conversion tracking in Google Analytics.
It works with all top eCommerce platforms for WordPress, including WooCommerce, MemberPress, LifterLMS, Easy Digital Downloads, and more.
First, you need to visit the Insights » Addons page to install and activate the eCommerce addon.
Step 2. Turn on Enhanced Ecommerce in Google Analytics
Next, you need to enable enhanced eCommerce tracking in your Google Analytics account. Go to your Google Analytics dashboard and select your website.
From here, you need to click on the Admin button located at the bottom left corner of the screen.
On the next screen, you’ll see different Google Analytics settings.
Under the ‘View’ column, click the ‘Ecommerce Settings’ link.
After that, you need to turn on the ‘Enable Ecommerce’ and ‘Enable Enhanced Ecommerce Reporting’ options.
Don’t forget to click the ‘Save’ button when you’re done.
Google Analytics will now turn on the eCommerce reporting feature for your account.
Afterward, you can return to your WordPress dashboard and visit the Insights » Settings page. From here, switch to the eCommerce tab.
MonsterInsights will automatically detect your eCommerce software and enable advanced eCommerce tracking for your store.
Note: the manual process for adding eCommerce conversion tracking has a lot of room for errors, so we strongly recommend using a plugin like MonsterInsights.
Viewing eCommerce Conversion Tracking Reports
Now that you have enabled eCommerce conversion tracking on your website. Let’s see how to view these reports and use them to make informed decisions about your business.
Ecommerce Conversion Reports in MonsterInsights
Simply go to the Insights » Reports page inside the WordPress admin area and then switch to the eCommerce tab.
At the top, you’ll see your most important metrics, like the conversion rate, transactions, revenue, and average order value.
Below that, you will see a list of your top products with quantity, sale percentage, and total revenue. This shows you which products are doing well in your store.
Next, you’ll see your top conversion sources with the number of visits, conversion share, and revenue. You can see which sources are bringing you more revenue and which traffic sources are not very effective.
MonsterInsights will also show you shopper behavior reports with the number of times products were added to and removed from the cart.
That’s not all the data. You can drill down these reports even further inside Google Analytics.
Ecommerce Conversion Reports in Google Analytics
In Google Analytics 4, you can head to Reports » Monetization » Overview to view the report.
Here, you can see the total revenue your online store is making. Besides that, there are more metrics you can track, like items purchased, first-time purchasers, and total purchases.
On the other hand, you can visit your Universal Analytics dashboard and click on the Conversions » Ecommerce from the left column.
The overview section offers the most important stats, such as revenue, conversion rate, transactions, and average order value.
You can further drill down to view different reports. For example, you can switch to shopping and checkout behavior reports to see how users reach the conversion page. You can also figure out what stopped them at the last minute from completing the transaction.
Turning on Form Conversion Tracking in Google Analytics
Not all websites use an eCommerce platform to conduct business. For instance, a restaurant website may use an order delivery form, or a salon may use a booking form.
Many businesses use contact forms to capture leads from their website. A lot of news and blogs use an email newsletter to convert website visitors into subscribers.
To track them, you need to enable form conversion tracking in Google Analytics.
MonsterInsights comes with a Forms addon that lets you easily track form conversions on your WordPress site. It works with all popular WordPress form plugins, including WPForms, Formidable Forms, Gravity Forms, Contact Form 7, and more.
Simply go to the Insights » Addons page. Scroll down to the ‘Forms’ addon, and then click on the Install button.
Upon activation, you need to visit the Insights » Settings page and switch to the ‘Conversions’ tab.
MonsterInsights will automatically detect your WordPress form plugin and will also start tracking miscellaneous WordPress forms on your site.
Viewing Your Form Conversion Reports
You can now view your form conversion reports inside your WordPress admin area.
Head over to the Insights » Reports page and switch to the ‘Forms’ tab.
You’ll see a list of forms on your website with their impressions, conversion, and conversion rates.
This helps in tracking how each WordPress form is performing. You can optimize low-converting forms while increasing the visibility of high-converting forms.
Setting Up Goals for Conversion Tracking in Universal Analytics
So far, we have covered how to track eCommerce and form conversions.
What if you wanted to manually set up conversion goals and track them in Google Analytics?
For instance, you may want to consider users visiting a specific page as a conversion. Since it is not a form submission or an eCommerce transaction, it will not appear as a conversion in your reports.
Universal Analytics allows you to create your own goals and track their conversion.
However, an important thing to note is that Google Analytics 4 doesn’t have goals anymore. It is one of the major differences you’ll see between the new and old versions.
That said, let’s see how to set them up in Universal Analytics and track them on your website.
Go to the Google Analytics dashboard and click the ‘Admin’ tab on the bottom left. Then, in the View column, click on Goals.
Now, you will need to create a new goal.
Simply click the ‘+ New Goal’ button to set up a new goal.
Next, you will need to select the goal type. Universal Analytics offers 4 types:
Destination: This tracks whether a visitor went to a specific page. This could be a thank you page or any conversion page on your site.
Duration: This tracks how long a visitor spends on your website. More time spent on a website means more engagement.
Pages/Screens per session: This tracks how many pages an average visitor looks at on your site.
Event: This can track all sorts of things, like button clicks, video plays, and downloads. It requires a bit more setup than the other options.
Destination and Event types are the most commonly used goal types for most businesses.
For this tutorial, we will create a ‘Destination’ goal to track visitors who view our thank you page after completing a form.
First, provide a name for your Goal. It needs to be something meaningful so that you can easily identify it in your Google Analytics reports.
After that, choose ‘Destination’ as your goal type and click the Continue button.
Now you can simply provide the last part of the URL you want to track as the destination.
For instance, if your page is: https://www.example.com/thank-you-for-booking/
Then you should enter the following: /thank-you-for-booking/
Below that, you can optionally add value for the conversion. This makes sense if people are completing a payment form or if you know how much each lead is worth to you on average.
If you want to track a funnel, such as a customer moving through a checkout process, then you can also do this as part of the destination goal. This can help you pinpoint areas you might want to improve.
Once you’re happy with your goal, click the Save button. You should then see your goal listed in a table. You can edit it, switch it off and on, or create more goals here.
Viewing Your Goal Conversions in Universal Analytics
Now that you have created your goal, allow Google Analytics to collect some data. After that, you can view your Goal Conversion report under the Google Analytics dashboard.
Simply, go to the Conversions » Goals and then click on Overview.
Like all Google Analytics reports, you can drill down to view visitor journeys and get deeper insights.
Google Analytics 4 replaces goals with events. You can manually configure events to track different user interactions in GA4.
First, you’ll need to go to the ‘Admin’ settings from your GA4 property.
Next, you will need to navigate to the Property column.
After that, simply click the ‘Event’s option.
You are now ready to create a new event in GA4.
Simply click the ‘Create event’ button to get started.
You should now see a new window slide in from the right. This is where all your custom events will be listed.
Go ahead and click the ‘Create’ button.
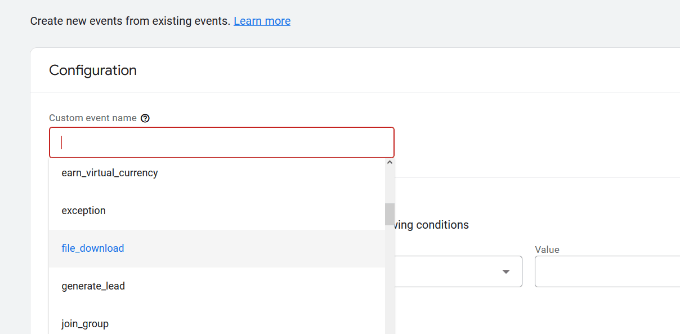
On the next screen, you can enter details of your new event.
Google Analytics 4 already has pre-built events. Simply click the Custom event name dropdown menu and choose an event. For example, we’ll select the ‘file_download’ event for this tutorial.
GA4 will automatically enter the specific Parameter and Operator for your custom event.
Next, you can enter a value for your event. For instance, we will enter ‘.pdf’ since we want to track PDF file downloads. However, you can enter any specific word you use to organize filenames on your site.
After entering these details, click the ‘Create’ button at the top.
You will now see your new custom event listed under the Custom events area in GA4.
Viewing Your Event Conversions in Google Analytics 4
Now that you’ve created a custom event in GA4, the next step is to view the conversions.
To do that, simply head to Reports » Engagement » Event: Event name from the menu on your left and view the report.
You can now repeat this step to track other custom events.
That said, an easier way of tracking user behavior is by using MonsterInsights. The plugin automatically sets up different events in Google Analytics.
This way, you don’t have to manually configure events or worry about messing up your tracking.
Google Ads Conversion Tracking in WordPress
If you run Google Ads (formerly Google AdWords) to bring targeted traffic to your website, then you may want to track those conversions.
Setting up is a bit complicated because it requires adding code to your website. However, with MonsterInsights, you can easily set up Google Ads conversion tracking without editing code or hiring a developer.
First, you can go to Insights » Addons from your WordPress dashboard and install the Ads addon.
Once you install the addon, it should automatically activate.
From here, you can go to Insights » Settings and head to the Publisher tab.
Next, you can scroll down to the ‘Ads Tracking’ section.
Here, you will need to enter the Conversion ID, which will be in this format: AW-123456789.
If you’re tracking Google Ads on an eCommerce store, then you can also enter the Conversion Label.
To find the Conversion ID and Conversion Label, you’ll need to go to your Google Ads dashboard and create a conversion action.
Viewing Google Ads Conversion Reports in Google Analytics 4
Your Google Ads conversion tracking will now appear in your Google Analytics reports.
In Google Analytics 4, you can head to Acquisition » Acquisition overview and then navigate to the ‘Session Google Ads’ report.
After that, click the ‘View Google Ads campaigns’ option at the bottom of the report.
This will expand the report and show more details about your ad campaigns.
You can see the total number of users, sessions, Google Ads clicks, and more.
Viewing Google Ads Conversion Reports in Universal Analytics
For Universal Analytics, you can open your website property.
After that, view the Google Ads report by going to the Acquisition » Google Ads » Campaigns section. Here, you can see conversions for all your paid campaigns.
Use UTM Parameters for Conversion Tracking in Google Analytics
UTM parameters are special tags you can add to URLs to pass important information to Google Analytics.
For instance, if you want to track users coming from a particular ad, then you can add UTM parameters to your ad URL like this:
MonsterInsights makes it super easy to build URLs with UTM parameters. Simply head over to the Insights » Tools page and select the ‘URL Builder’ tab.
Simply enter the UTM parameters you want to use, and it will automatically generate the URL, which you can then use in your campaigns.
For instance, you can enter a campaign source, like a newsletter or Google, which tells you where the users are coming from. After that, you can define a campaign medium, such as emails or banner ads, and enter a campaign name.
MonsterInsights will also give you additional options to add campaign terms and content.
This is useful if you’re split-testing different emails or paid campaigns.
For creating a custom URL, you can leave these options blank.
Next, you can scroll down to the bottom to see your custom URL.
Go ahead and use the link for campaigns and track conversions on your website.
Viewing UTM Parameter Reports in Google Analytics 4
Now that you’ve added UTM parameters to a URL, you can track its performance in Google Analytics.
First, log in to your GA4 account. After that, head to Reports » Acquisition » Traffic Acquisitionfrom the menu on your left.
You should now see traffic from different sources on your website, such as organic search, email, display, and more.
You can use the search bar to filter the traffic source for your custom campaign. For example, if you’re tracking conversions from a newsletter, then you can look up ‘Email’ in the report.
After that, you further drill down and filter your traffic.
Simply click the ‘+’ button under the search bar.
GA4 will then show different options to filter your traffic.
You can select Traffic source » Session source from the dropdown list.
Next, Google Analytics will list your email campaigns.
You can now see which campaign performs best and gets the most conversions.
Viewing UTM Parameter Reports in Universal Analytics
In Universal Analytics, you can track the conversions of your campaigns under your Google Analytics dashboard.
Simply switch to the Acquisition » Campaigns » All Campaigns report.
Your campaigns will appear here.
You can click on any of them to drill down further.
Setting Up Facebook Conversion Tracking in WordPress
Facebook is the largest social media website on the planet, with billions of active users. This is why Facebook ads are sometimes the easiest way to reach a niche audience.
Now, if you are running Facebook ads, then you may want to see how well your ads are doing by implementing conversion tracking for your Facebook ads.
Usually, you’d need to add a code snippet to your WordPress website to track Facebook conversions. However, WPCode makes it very simple, and you can simply enter the Facebook Pixel ID to set up tracking.
First, you’ll need to log in to Facebook and visit the Meta Business Suite. Then, click on All Tools » Events Manager.
Next, you need to add a data source to the Event Manager.
Simply click the ‘+ Connect to Data Sources’ button in the left-hand menu.
You should now see different options to connect your new data source.
Go ahead and select the ‘Web’ option and click the ‘Connect’ button to continue.
After that, enter a name for your pixel.
Once that’s done, you can click the ‘Create Pixel’ button.
Next, you need to choose how to connect your website and send activity to Facebook.
At the bottom, you will see the Facebook Pixel. Go ahead and copy the pixel ID.
Note that you’ll need at least the WPCode Plus plan because it includes the Conversion Pixel Addon. However, there is also a free version of WPCode you can use to get started.
Upon activation, you need to visit the Code Snippets » Conversion Pixel page and go to the Facebook tab. From here, you need to paste the Facebook Pixel ID in the respective field.
WPCode will now automatically add the code to your site that’s needed to track Facebook ad conversions.
Setting Up Twitter Conversion Tracking in WordPress
If you run Twitter Ads to promote your business, then you’ll need to set up Twitter conversion tracking to measure the success of your ads.
Simply log in to your Twitter Ads account and click on the Tools » Event manager from the menu at the top.
You should now see a pixel created by Twitter.
Go ahead and click the ‘View Twitter Pixel’ option.
On the next screen, you will see different options to add the Twitter pixel to your site.
You can use the ‘Pixel Code’ method and simply copy the code.
You will need to add this code to the header of your WordPress site.
First, you need to switch back to your WordPress website’s admin area.
If you haven’t already done so, then go ahead and install and activate the WPCode plugin. For more details, please see our guide on how to install a WordPress plugin.
Upon activation, you need to visit the Code Snippets » Header & Footer page. Now you can paste the Twitter pixel code into the Header section.
Don’t forget to click the ‘Save Changes’ button to store your settings.
After you have successfully installed the pixel code, you can track conversions on your Twitter Ads account.
Optimizing Conversion Rates to Boost Sales
Once you start tracking conversions on your website, the next step is to improve those conversion rates.
You’d be surprised how little things can make a huge impact on your business.
The best way to improve your conversions is by using OptinMonster. It is the best conversion optimization software on the market and helps you convert more visitors into customers.
It integrates with any email marketing service and works with all popular eCommerce platforms.
OptinMonster’s display rules allow you to show targeted messages to your customers at the precise time and nudge them into making a buying decision.
For instance, if you notice that customers are leaving a product page without taking any action, then you can offer them a discount when they are about to exit.
Similarly, you can run time-sensitive campaigns to trigger the FOMO effect and give customers a nudge in the right direction.
If you liked this article, then please subscribe to our YouTube Channel for WordPress video tutorials. You can also find us on Twitter and Facebook.
Do you want to add image icons to your WordPress navigation menus?
Images can help visitors understand your site’s navigation at a glance. You can even use icons to highlight the menu’s most important content or call to action.
In this article, we will show you how to add image icons to navigation menus in WordPress.
Why Add Image Icons With Navigation Menus in WordPress?
Usually, WordPress navigation menus are plain text links. These links work for most websites, but they don’t always look interesting or engaging.
By adding image icons to the navigation menu, you can encourage visitors to pay attention to the menu and explore more of your site.
If your menu has lots of different options, then image icons can make it easier for visitors to scan the content and find what they’re looking for. This can be an easy way to increase pageviews and reduce bounce rate in WordPress.
You might even use an image icon to highlight the most important menu item, such as the Checkout link on your online marketplace.
By highlighting a call to action in the menu bar, you can often get more signups, sales, members, and other conversions.
With that being said, let’s see how you can add image icons to your WordPress navigation menu. Simply use the quick links below to jump straight to the method you want to use.
Method 1: Add Image Icons to Navigation Menus Using a Plugin (Quick and Easy)
The easiest way to add image icons to your WordPress menus is by using the Menu Image plugin. This plugin comes with dashicon icons that you can add with just a few clicks.
If you have added Font Awesome icons to your website, then you can use them with this free plugin. For more information on how to set up Font Awesome, see our guide on how to easily add icon fonts to your WordPress theme.
If you want to use your own icon files, then Menu Image also lets you select an image or icon from the WordPress media library.
Upon activation, click on Menu Image in the WordPress dashboard. On this screen, you can choose whether to get security and feature notifications or click on the ‘Skip’ button.
This will take you to a screen where you can configure the plugin’s settings. To start, you’ll see all the different sizes you can use for the image icons.
If you plan to use icons from Font Awesome or dashicons, then Menu Image will resize them automatically. However, if you use images from the media library, then you’ll need to select the size manually.
The plugin supports the default WordPress image sizes, such as thumbnail, image, and large. It also adds three unique sizes that are set to 24×24, 36×36, and 48×48 pixels by default.
These settings should work well for most websites, but you can make the icons bigger or smaller by typing in different numbers for 1st, 2nd, or 3rd Menu Image size.
When you’re adding icons to your menu, you’ll see an ‘image on hover’ field by default. This allows you to show a different icon when the visitor hovers over that menu item.
Just be aware this setting is only available when you’re using your own images. You don’t need to worry about the ‘image on hover’ feature if you plan to use dashicons or Font Awesome icons.
Showing a different icon can help visitors see where they are in the navigation menu. This is particularly useful if a menu has lots of different items. For example, you might use different colors or icon sizes to highlight the currently-selected menu item.
If you want to try different hover effects, then make sure you check ‘Enable the image on hover field.’
With that done, click on ‘Save Changes’ to store your settings.
To add icons to the navigation menu, head over to Appearance » Menus. By default, WordPress will show your site’s primary menu.
If you want to edit a different menu, then simply open the ‘Select a menu to edit’ dropdown and choose a menu from the list. After that, click on ‘Select.’
Now, find the first menu item where you want to add an icon and give it a click. Then, simply select the new ‘Add Image / Icon’ button.
You can now decide whether to use your own image or choose an icon.
To use a ready-made icon, click on the radio button next to ‘Icons.’ You can then click to select any dashicon or Font Awesome icon.
Do you want to use your own images instead?
Then select the radio button next to ‘Image’ and click the ‘Set Image’ link.
You can now either choose an image from the WordPress media library or upload a new file from your computer.
If you checked ‘Enable the image on hover field’ in the plugin’s settings, then you’ll also need to click on ‘Set image on hover.’
Now, choose an image to show when the user hovers over this menu item.
Sometimes, you may want to ignore this setting and show the same icon no matter what. To do this, click on ‘Set image on hover’ and then choose the exact same image.
If you don’t do this, then the icon will disappear when the visitor hovers over it.
After that, open the Image Size dropdown and choose a size from the list. Using the same size for all icons tends to make the menu look more organized.
However, you might make the menu’s most important icon bigger. For example, if you’ve created an online store using a plugin like WooCommerce, then you might use a bigger icon for ‘Checkout’ so it stands out.
When you’re happy with the icon, it’s time to look at the menu item’s label.
By default, the plugin shows the title label after the icon.
To change this, select any of the radio buttons in the ‘Title position’ section.
Another option is to remove the navigation label completely, creating an icon-only menu. This can prevent a menu with a lot of items from looking cluttered.
However, you should only hide the labels if it’s obvious what each icon means. If it’s unclear, then visitors will struggle to navigate your WordPress blog or website.
To go ahead and hide the label, select the radio button next to ‘None.’
When you’re happy with how the menu item is set up, click on ‘Save Changes.’
To add an icon to other menu items, simply follow the same process described above.
When you’ve finished, don’t forget to click on the ‘Save Menu’ button. Now, if you visit your website you’ll see the updated navigation menu live.
Method 2: Add Icons to WordPress Menus Using Code (More Customizable)
You can also add image icons to your navigation menus using custom CSS. This gives you more flexibility to control exactly where the icons appear in your menus.
However, it does require you to add custom code in WordPress, so it’s recommended for more intermediate or advanced WordPress users.
Before you start, go ahead and upload all your image files to the WordPress media library. For each image, make sure you copy its URL and paste it into a text editor like Notepad. You’ll need to use the links in your code, so this can save you a lot of time.
To find an image’s URL, simply select it in the WordPress media library and then look at the ‘File URL’ field.
Next, open the ‘Select a menu to edit’ dropdown and choose the menu where you want to add the image icons.
After that, go ahead and click on ‘Select.’
Next, you need to enable custom CSS classes by clicking on ‘Screen Options.’
In the panel that appears, check the box next to ‘CSS Classes.’
With that done, you can add custom CSS classes to any item in the navigation menu. This is how you will link each menu item to an image in the WordPress media library.
You can call these classes anything you want, but it’s a good idea to use something that helps you identify the menu item.
To get started, simply click on the first item you want to add an image icon to. In the ‘CSS Classes (optional)’ field, type in the class name you want to use.
You’ll use these custom CSS classes in the next step, so make a note of them in your Notepad or similar app.
Simply follow the same process to add a separate class to all your menu items. After that, click on ‘Save Menu’ to store your settings.
Note: Each icon will be tied to its own CSS class, so be sure to label the menu items differently if you want to use separate icons.
Now you’re ready to add image icons to your WordPress navigation menus using CSS.
Often, WordPress tutorials will tell you to add code snippets to your WordPress theme files. However, doing so may cause common WordPress errors and isn’t very beginner-friendly.
WPCode is the most popular code snippets plugin used by over 1 million WordPress websites. It allows you to add custom code without editing your theme’s functions.php file.
Upon activation, head over to Code Snippets » Add Snippet.
Here, simply hover your mouse over ‘Add Your Custom Code.’
When it appears, click on ‘Use snippet.’
To start, type in a title for the custom code snippet. This can be anything that helps you identify the snippet in the WordPress dashboard.
With that done, open the ‘Code Type’ dropdown and select ‘CSS Snippet.’
In the code editor, you’ll need to add some code for every icon you want to show.
To help you out, we’ve created a sample snippet below. You can go ahead and change ‘.carticon’ to the custom CSS class you created in the previous step. You’ll also need to replace the URL with a link to the image in your WordPress media library:
Note: You will need to keep the dot ‘.’ in front of the CSS class in the code snippet. That’s what tells WordPress that it’s a class and not another kind of CSS selector.
You will need to adjust the snippet above for each individual menu item you created above. You can simply paste them all into the ‘Code Preview’ field.
When you’re happy with your code, scroll to the ‘Insertion’ section. WPCode can add code to different locations, such as after every post, frontend only, or admin only.
You want to use the custom CSS code across our entire WordPress website, so click on ‘Auto Insert’ if it isn’t already selected.
Then, open the ‘Location’ dropdown menu and choose ‘Site Wide Header.’
After that, you’re ready to scroll to the top of the screen and click on the ‘Inactive’ toggle, so it changes to ‘Active.’
Finally, click on ‘Save Snippet’ to make the custom CSS live.
Now, if you visit your website you’ll see all the image icons in your navigation menu.
Depending on your theme, you may need to tweak the CSS so it shows the image icons in exactly the right spot. If this is the case, then head to Code Snippets » Code Snippets in the WordPress dashboard.
Then, simply hover over the snippet and click on the ‘Edit’ link when it appears.
This opens the code editor, ready for you to make some changes.
If you liked this article, then please subscribe to our YouTube Channel for WordPress video tutorials. You can also find us on Twitter and Facebook.
Do you want to organize media uploads by user in WordPress?
If you run a multi-author website, then you may want to restrict each author’s media library access to only their own uploads. This can prevent an author from accidentally deleting another user’s images, and help keep subscriber-only content private.
In this article, we’ll show you how to organize media uploads by users in WordPress.
Why Restrict Author Access to Media Uploads?
If you have a multi-author WordPress blog, then people might be uploading lots of different images. This can make it difficult for an author to find the right image, or they might delete or edit another person’s media file by accident.
This can cause all sorts of problems including poor productivity, lots of extra work for site admins and editors, and a complicated editorial workflow.
This unlimited access can also be a privacy concern. For example, if you’re working on a new product or idea, then other authors might see confidential images in the media library before you make a public announcement.
If you have a WordPress membership site, then contributors and subscribers may be able to access premium media files they shouldn’t have access to. For example, if you sell online courses then a contributor might use their media library access to download premium PDFs and other course materials, without buying a subscription.
That being said, let’s take a look at how to restrict who can see media uploads inside your WordPress admin area. Simply use the quick links below to jump straight to the method you want to use.
If the user doesn’t have this permission, then once this plugin is activated, they won’t be able to access another user’s files in the WordPress media library. This allows you to organize media uploads by users, without restricting access for admins and editors.
This plugin works out of the box and there are no settings for you to configure, so you can simply install and activate the Frontier Restrict Access plugin. For more details, see our guide on how to install a WordPress plugin.
Method 2. Organizing Media Uploads Using Code (Advanced)
Another option is to restrict access to files in the media library using code. This method requires you to add a code snippet to your WordPress blog or website, so it isn’t the most beginner-friendly method. However, you won’t need to install a separate plugin just to organize your media uploads.
Often, you’ll find guides with instructions to add custom code to your WordPress theme. However, this isn’t recommended as mistakes and typos in your code can cause common WordPress errors, or even break your site completely.
WPCode is the best code snippets plugin used by over 1 million WordPress websites. It makes it easy to add custom code in WordPress without having to edit the functions.php file.
For this method, we’ll be adding code that checks whether the user has the edit_others_posts permission. If they don’t have this permission, then the code snippet below will stop them from accessing other people’s files in the WordPress media library.
Next, just scroll to the ‘Insertion’ section. WPCode can add your code to different locations, such as after every post, frontend only, or admin only.
We want to use the custom PHP code across our entire WordPress website, so click on ‘Auto Insert’ if it isn’t already selected. Then, open the ‘Location’ dropdown menu and choose ‘Run Everywhere.’
After that, you’re ready to scroll to the top of the screen and click on the ‘Inactive’ toggle, so it changes to ‘Active.’
Finally, click on ‘Save Snippet’ to make the PHP snippet live.
Now, users will only have access to the files they upload to the WordPress media library.
If you liked this article, then please subscribe to our YouTube Channel for WordPress video tutorials. You can also find us on Twitter and Facebook.
By default, WordPress comes with a lazy load feature, which delays downloads for images and other media to improve page load speed.
However, for some websites, it may affect user experience by not displaying images and media right away.
In this article, we’ll show you how to easily disable lazy load in WordPress both using a code method as well as a plugin method.
What is Lazy Loading?
WordPress first introduced lazy loading images in WordPress 5.5. Later it extended the lazy load feature to iframes embeds (e.g. YouTube videos, Spotify, and other embeds).
A faster website is not just good for users, but it is also good for SEO. Search engines like Google consider speed as an important ranking factor.
Apart from images and embeds, you can also easily lazy load comments and Gravatars to further improve page load speed.
Lazy loading can be seen in action by right-clicking on an image and selecting the Inspect tool in your browser.
This will split your browser screen and show you the HTML source code. From here, you’ll be able to see the “loading=lazy” attribute added to the image.
Now normally, we don’t recommend disabling lazy load due to its overall benefits for your WordPress website. Turning it off can result in slower website speed, lower conversion rates, and lower SEO rankings.
However, sometimes lazy loading can affect the user experience for some websites.
For instance, if you run a photography website where images are the most significant aspect of your content, then lazy loading them may ruin the user experience for your customers.
In other cases, you might be using a different lazy loading solution and just want to turn off the default WordPress lazy load.
That being said, let’s see how you can easily disable lazy load in WordPress.
This is how the code will look after it is pasted in the ‘Code Preview’ box.
After adding the code, scroll down to the ‘Insertion’ section.
Here, simply choose ‘Auto Insert’ as the insertion mode. This will ensure that your custom code is automatically executed everywhere on your website once you activate the snippet.
Next, you need to scroll to the top of the page and simply toggle the ‘Inactive’ switch to ‘Active’.
After that, don’t forget to click the ‘Save Snippet’ button to save and execute your custom snippet.
Once activated, this custom code snippet will disable the lazy loading feature on your WordPress website.
You can test by right-clicking on an image and selecting Inspect from the browser menu.
In the HTML code for the image, the loading=lazy attribute will now disappear.
Method 2. Disable Lazy Load in WordPress Using a Plugin
If you don’t want to add code to your site, then you can use the Disable Lazy Load plugin.
The plugin works out of the box and does not require any configuration. Once activated, it will automatically disable the lazy load feature on your site.
If you liked this article, then please subscribe to our YouTube Channel for WordPress video tutorials. You can also find us on Twitter and Facebook.
Recently one of our readers asked if there is an easy way to add box shadows in WordPress?
Shadows can make your most important content stand out and grab your visitors’ attention. They can also help flat website designs appear more engaging and interesting.
In this article, we will show you how to easily add box shadows in WordPress, step by step.
Why Add Box Shadows in WordPress?
A box shadow, sometimes also known as a drop shadow, is a visual effect that makes it look like an onscreen object is casting a shadow.
We tend to pay more attention to objects that appear closer to us. That’s why many website owners add box shadows to their most important content to make it look like it’s hovering above the page.
For example, if you add a big shadow to a call to action button, then it will look physically closer to the visitor. This will draw the person’s attention toward this important button.
With that said, let’s see how you can add box shadows to your WordPress blog or website. Simply use the quick links below to jump straight to the method you want to use.
Method 1. How to Add Box Shadows Using Code (Recommended)
When adding box shadow, the best practice is to only add it on your most important website elements. If you add a unique shadow effect to each WordPress block, then it can make your site look messy and confusing.
It’s also important that you keep your box shadows consistent across the site. The best way to do this is by defining the style in CSS using WPCode.
WPCode is the best code snippets plugin used by over 1 million WordPress websites. It makes it easy to add custom code in WordPress without having to edit the functions.php file.
With WPCode, even beginners can edit their website’s code without risking mistakes and typos that can cause many common WordPress errors.
In the above snippet, you may need to replace the px values depending on the kind of shadow you want to create.
To help you out, here’s what the different px values mean, going from left-to-right:
Horizontal offset. When you set a positive value, the shadow gets pushed to the left. If you type in a negative value like -5px, then the shadow will be pushed to the right. If you don’t want to add a horizontal offset, then you can use 0px instead.
Vertical offset. If you use a positive value, then the shadow will be pushed downwards. If you type in a negative value then the shadow will be pushed upwards. If you don’t want to offset the shadow vertically, then just type in 0px.
Blur radius. This blurs the shadow so that it doesn’t have any harsh edges. The higher the value, the greater the blur effect. If you prefer to use sharp edges, then type in 0px.
Spread radius. The higher the value, the greater the shadow’s spread. This value is optional, so skip this one if you don’t want to show a spread.
Color. Although grey is the most common color for shadows, you can use any color you want by typing in a hex code. If you’re not sure what code to use, then you can explore different colors using a resource like HTML Color Codes.
When you’re happy with the snippet, scroll to the ‘Insertion’ section. WPCode can add your code to different locations, such as after every post, frontend only, or admin only.
We want to use the custom CSS code across our entire WordPress website, so click on ‘Auto Insert’ if it isn’t already selected. Then, open the ‘Location’ dropdown menu and choose ‘Site Wide Header.’
After that, you’re ready to scroll to the top of the screen and click on the ‘Inactive’ toggle, so it changes to ‘Active.’
Finally, click on ‘Save Snippet’ to make the CSS snippet live.
Now, you can add the custom CSS class to any block.
In the WordPress content editor, simply select the block where you want to add a box shadow. Then, in the right-hand menu click to expand the ‘Advanced’ section.
Here, you’ll see fields where you can add different classes.
In ‘Additional CSS Class(es),’ type in shadow-effect.
When you’re ready to publish the box shadow, just click on the ‘Publish’ or ‘Update’ button.
Now if you visit your website, you’ll see the box shadow live.
Method 2. Add a Box Shadow Using a Free Plugin (Quick and Easy)
If you’re not comfortable writing code, then you might prefer to create shadows using Drop Shadow Box. This free plugin allows you to add box shadows to any block using the built-in WordPress page and post editor.
First, you’ll need to install and activate the plugin. If you need help, then please see our guide on how to install a WordPress plugin.
There are no settings to configure, so you can start using this plugin straight away.
To add a drop shadow, simply click on the ‘+’ icon and start typing in ‘Drop Shadow Box.’ When the right block appears, give it a click to add it to the page or post.
This adds the drop shadow as an empty box, so the next step is adding some content.
To do this, go ahead and click on the ‘+’ inside the Drop Shadow Box block.
Then, simply add the block you want to use and configure it as normal.
For example, in the following image we’ve added an Image block and selected a picture from the WordPress media library.
With that done, click to select the Drop Shadow Box block. In the right-hand menu, you’ll see all the settings you can use to style this block.
WordPress sets the shadow’s width automatically but you can change this by opening the ‘Width’ dropdown and then choosing either ‘Pixels’ or ‘%.’
You can then resize it using the settings that appear.
The Drop Box Shadow plugin comes with a few different effects such as curved edges and an eye-catching ‘Perspective’ effect.
To preview the different effects, simply open the ‘Effect’ dropdown and choose from the list. The preview will update automatically so you can try different styles to see what you prefer.
You can also change whether the plugin shows the shadow inside the box, outside the box, or both using the ‘Inside Shadow’ and ‘Outside Shadow’ toggles.
After that, you can change the color of the box and border using the settings under the ‘Colors’ header.
Just be aware that ‘Background’ refers to the inside of the Drop Shadow Box, while ‘Border’ appears outside of the block.
If you want to create a softer, curved shadow box then you can enable the ‘Rounded corners’ toggle. Finally, you can change the alignment and padding, similar to how you customize other blocks in WordPress.
To create more box shadows, just follow the same process described above.
When you’re happy with how the page looks, simply click on ‘Update’ or ‘Publish’ to make all your new box shadows live.
Method 3. Add a Box Shadow Using a Page Builder (Advanced)
If you want to add box shadows to landing pages, custom homepages, or any part of your WordPress theme, then we recommend using a page builder plugin.
It also lets you add box shadows to any block using its advanced drag-and-drop editor.
First, you need to install and activate the SeedProd plugin. For more details, see our step-by-step guide on how to install a WordPress plugin.
Note: There’s also a premium version of SeedProd that comes with more professionally-designed templates, advanced features, and WooCommerce integration. However, we’ll be using the free version as it has everything you need to add box shadows in WordPress.
After activating the plugin, SeedProd will ask for your license key.
All of SeedProd’s templates are easy to customize, so you can use any design you want.
When you find a template that you like, simply hover your mouse over it and click on the checkmark icon.
You can now type in a name for your landing page into the ‘Page Name’ field. SeedProd will automatically create a ‘Page URL’ using the page name.
It’s smart to include relevant keywords in your URL wherever possible, as this can help search engines understand what the page is about. This will often improve your WordPress SEO.
To change the page’s automatically-generated URL, simply type into the ‘Page URL’ field.
When you’re happy with the information you’ve typed in, click on ‘Save and Start Editing the Page.’ This will load the SeedProd page builder interface.
This simple drag-and-drop builder shows a live preview of your page design to the right. On the left is a menu showing all the different blocks and sections you can add to the page.
When you find a block that you want to add, simply drag and drop it onto your template.
To customize a block, go ahead and click to select that block in the SeedProd editor. The left-hand menu will now update to show all the settings you can use to customize the block.
For example, if you click on a Headline block then you can type in your own text, or change the text color and font size.
As you’re building the page, you can move blocks around your layout by dragging and dropping them. For more detailed instructions, please see our guide on how to create a landing page with WordPress.
To create a box shadow, click to select any block in the SeedProd page editor. The settings in the left-hand menu may vary between blocks, but you’ll typically need to click on an ‘Advanced’ tab.
Here, look for a ‘Shadow’ dropdown menu under the ‘Styles’ section. Simply open this dropdown and choose a shadow style such as Hairline, Medium, or 2X Large.
The preview will update automatically, so you can try different styles to see what looks the best on your page design.
If you don’t want to use any of the ready-made styles, then click on ‘Custom.’
This adds some new settings where you can change the color, blur, spread, and position of the custom shadow.
That done, you can continue working on the page by adding more blocks and box shadows.
When you’re happy with how the page looks, click the ‘Save’ button and then choose ‘Publish’ to make it live.
Method 4. How to Add a Box Shadow Using CSS Hero (Premium Plugin)
If you’re not comfortable working with code but still want to create advanced box shadows, then you can try CSS Hero. This premium plugin allows you to fine-tune every part of your WordPress theme without having to write a single line of code.
CSS Hero allows you to create a unique shadow for each block, so it’s also a great choice if you want to create lots of different shadow effects.
Upon activation, you’ll see a ‘Proceed to Product Activation’ button at the top of the screen. Go ahead and click on this button.
This will take you to the CSS Hero website where you can log into your account and get a license key. Simply follow the onscreen instructions, and you’ll be redirected back to your site in a few clicks.
Next, click the ‘Customize with CSS Hero’ text in the WordPress admin toolbar.
By default, clicking on any piece of content will open a panel with all the settings you can use to customize that content.
This is great if you want to add a box shadow to your website’s homepage. However, if you want to customize any other page then you’ll need to switch from ‘Select’ mode to ‘Navigate’ mode, as this allows you to interact with menus, links, and other content as normal.
To do this, click on the ‘Select / Navigate’ toggle in the toolbar so that it shows ‘Navigate.’
You can now navigate to the page or post where you want to add the shadow.
As soon as you reach that page, go ahead and click on the ‘Select / Navigate’ toggle again so that it shows ‘Select.’
With that done, click on the paragraph, image, button, or any other content where you want to add a box shadow.
In the left-hand panel, click on ‘Extra.’
You can now go ahead and click on ‘Make Shadow,’ which shows all the settings you can use to create a box shadow.
To start, you can change whether the shadow appears inside or outside the block using the ‘Shadow Position’ settings.
After making this decision, you can fine-tune the shadow’s orientation using the small dot in the ‘Orientation’ box.
Simply drag and drop the dot into a new position to see it move in the live preview.
When you’re happy with the shadow’s position, you can change its color, blur, and spread.
CSS Hero will show these changes immediately, so you can try different settings to see what looks the best.
To add a box shadow to other blocks, just follow the same process described above.
When you’re happy with how the page looks, click on ‘Save & Publish’ to make it live.
If you liked this article, then please subscribe to our YouTube Channel for WordPress video tutorials. You can also find us on Twitter and Facebook.
Do you want to know how much revenue you’re generating from Google Ads on your website?
Setting up Google Ads conversion tracking will help you uncover insights about your ad campaign’s performance. You can find out which campaign is performing the best, how users interact with your ads, and how you can improve conversions.
In this article, we’ll show you how to properly set up eCommerce Google Ads conversion tracking in WordPress. This is the exact same method that we use on our own websites.
Why Set Up Google Ads Conversion Tracking in WordPress?
If you’re running Google Ads for your WordPress blog, eCommerce store, or membership site, then it is important to know how they’re performing. You can’t improve, what you can’t measure.
Tracking Google Ads conversions helps you see how much revenue you earned from users who clicked on your ad campaigns. It also helps you see which paid keywords and ad groups drive the most conversions. This way, you can optimize your campaigns and budget for more profitable search terms.
Besides that, Google Ads conversion tracking also uncovers how users behave on your WordPress site after clicking an ad. For instance, you might see a lot of users arrive on a landing page, but abandon it after adding products to the cart.
You can use this information to improve the checkout process, offer discounts and incentives as users are about to leave your site, and provide a better user experience.
That said, let’s see how you can add Google Ads conversion tracking in WordPress.
MonsterInsights offers an Ads addon that lets you setup comprehensive conversion tracking without touching a single line of code or hiring a developer.
We will use the MonsterInsights Pro license for this tutorial because it includes the Ads addon. There is also a MonsterInsights Lite version you can use for free.
First, you’ll need to install and activate the MonsterInsights plugin. If you need help, then please see our guide on how to install a WordPress plugin.
Upon activation, you will be redirected to the welcome screen in your WordPress dashboard. Go ahead and click the ‘Launch the Wizard’ button.
Next, you can follow the onscreen instructions to connect Google Analytics to your site. For more details, you can see our guide on how to install Google Analytics in WordPress.
With MonsterInsights, you can also use dual tracking to set up a Google Analytics 4 property. It is the latest analytics version and will soon replace Universal Analytics. You can learn more by following our guide on how to switch to Google Analytics 4 in WordPress.
Once you’ve connected Google Analytics with WordPress, the next step is to install the Ads addon. Simply go to Insights » Addons from your WordPress dashboard and navigate to the ‘Ads’ addon.
Go ahead and click the ‘Install’ button. The addon will now automatically install and activate on your site.
Creating a Conversion Action in Google Ads
Next, you’ll need to create a conversion action in Google Ads.
After that, go ahead and click the ‘Tools and settings’ option at the top. Under the ‘Measurement’ column, simply select the Conversions option.
On the next screen, you’ll need to create a conversion action.
You can click the ‘New conversion action’ button to get started.
Next, Google Ads will ask you to select the type of conversions you want to track. It will show you 4 options, including a website, app, phone call, or import.
For this tutorial, we’ll choose the ‘Website’ option for tracking ad conversions.
After that, you’ll need to enter the website URL where you’d like to measure conversions.
Once that’s done, simply click the ‘Scan’ button.
Google Ads will now show 2 options to create conversion actions, including an automatic and manual method. In the automatic method, you’ll need to select the conversion goal, choose a match type, and enter the URL. This way is suitable if you know which events to count as conversions.
However, we recommend selecting the manual method. Simply scroll down and click the ‘+ Add a conversion action manually’ option.
Next, you’ll need to enter the Conversion action details.
First, you can select the ‘Goal and action optimization’ for your conversion. This is the action you’d like to track. For example, when a user subscribes to your newsletter, makes a purchase, adds a product to a cart, submits a contact form, and more.
For the sake of this tutorial, we will select ‘Subscribe’ as the goal. After that, you can enter the Conversion name.
You can now scroll down and select a Value for your conversion. Google Ads lets you choose the same value for each conversion, assign different values for conversions, or don’t use a value for conversion action.
We will select the ‘Use the same for each conversion’ option, select the currency, and enter a value for this tutorial.
Besides that, you can also choose how many conversions to count per click.
If you’re tracking email newsletter signups, then we recommend selecting the ‘One’ option. This way, each subscriber is counted once. However, you can use the ‘Every’ option in an eCommerce store and count each purchase as a conversion.
After selecting these options, simply click the ‘Done’ button at the bottom.
You can now see your conversion action under the ‘Create conversion actions manually using code’ section.
Go ahead and click the ‘Save and continue’ button to get instructions for adding the tracking tags for conversion action to your site.
On the next screen, you’ll see 3 options to add the conversion action to your site.
Simply select the ‘Use Google Tag Manager’ option. You should see the Conversion ID and Conversion Label. Copy these to a notepad file or keep the browser window/tab open.
To finish the setup process, you’ll need to head to your WordPress website dashboard and view the MonsterInsights settings.
From here, go to Insights » Settings and click on the ‘Publisher’ tab.
After that, you can scroll down to the ‘Ads Tracking’ section.
Go ahead and enter the Conversion ID. Make sure you follow the format, which will look like this: AW-123456789.
That’s it. You’ve successfully set up Google Ads conversion tracking on your WordPress website.
View Google Ads Conversion Tracking Data in Google Analytics
You can take it a step further and connect Google Ads with Google Analytics to get more insights about how people use your website after clicking on an ad.
For instance, you can see the number of visitors from paid search and find out which pages they view after landing on your site. You can also use different filters and create custom reports in Google Analytics.
Let’s see how you can link your Google Ads account with Google Analytics 4 and Universal Analytics.
Connect Google Ads with Google Analytics 4
First, you’ll need to log in to your GA4 account and then go to the ‘Admin’ settings.
After that, you can click the ‘Google Ads Links’ option.
It is located under the Property column.
A new window will now slide in from the right.
Go ahead and click the ‘Link’ button in the top right corner.
Next, you will see different options for Link setup.
First, you can click the ‘Choose Google Ads accounts’ option.
On the next screen, you’ll need to select the Google Ads account you wish to connect.
Once that’s done, simply click the ‘Confirm’ button at the top.
You will now see the Google Ads account that you want to link.
Go ahead and click the ‘Next’ button.
In the next step, Google Analytics will give you options to enable personalized advertising and enable auto-tagging.
You can use the default settings and click the ‘Next’ button.
After that, you’ll see a summary of your Link setup settings.
If everything checks out, then go ahead and click the ‘Submit’ button.
You should now see a ‘Link Created’ notification in front of your Google Ads account. This means that you’ve successfully connected Google Ads with Google Analytics.
Do note that it can take up to 24 hours for your Google Ads data to appear in Analytics reports.
Next, you can view the Google Ads conversion tracking report in Google Analytics 4.
First, you can head to Acquisition » Traffic acquisition from the menu on your left and scroll down to see how many visitors came from the Paid Search channel.
After that, you can go to Acquisition » Acquisition overview and view the Session Google Ads campaign report. This will show which campaign got the most traffic.
You can also click the ‘View Google Ads campaigns’ option at the bottom to view more details.
For each campaign, you can see the total number of users, sessions, number of Google Ads clicks, cost per click (CPC), conversions, and more.
Using the information from this report, you can see which campaigns perform the best.
Connect Google Ads with Universal Analytics
If you’re using Universal Analytics, then you can first log in to your account.
After that, head to the ‘Admin’ settings.
Next, you’ll need to go to the Google Ads Links option.
You can find the option under the Property column.
On the next screen, you’ll need to select the Google Ads account you want to connect.
After selecting your account, simply click the ‘Continue’ button.
Next, you will need to enter a Link group title.
You can then select the Views to link with your Google Ads account. Simply click the toggle to ON for the correct Views.
Once that’s done, simply click the ‘Link accounts’ button.
Google Analytics will now show a summary of your settings. Simply scroll down and click the ‘Done’ button.
That’s it. Your Google Ads account will now be linked to the Universal Analytics property.
To view data from your ad campaigns, head to Acquisition » Google Ads » Campaigns from the menu on your left. You can see the number of clicks, cost, CPC, and more for each campaign.
Final Thoughts on Google Ads Conversion Tracking in WordPress
When it comes to setting up any conversion tracking, the most important thing you want to make sure is that the setup is done properly. This is why we use and recommend MonsterInsights because it just does everything for you behind the scenes without touching any code.
However if you prefer to add code directly on your WordPress site, then you can do that as well by using a plugin like WPCode. This will help future-proof your customizations. There’s a free version of WPCode that you can use by following our tutorial on adding custom code in WordPress.
If you liked this article, then please subscribe to our YouTube Channel for WordPress video tutorials. You can also find us on Twitter and Facebook.
Do you want to highlight a menu item on your WordPress site?
Highlighting a menu item can really help you point user’s attention to a specific area on your menu. This can be great if you want to highlight the Pricing or Contact Us page on your website.
In this article, we will show you how to easily highlight a menu item in WordPress using CSS code.
Why Should You Highlight a Menu Item?
A navigation menu is a list of links pointing to important areas of your website. They are usually presented as a horizontal bar at the top of every page on a WordPress website.
A highlighted menu item can be a great way to capture the user’s attention to your most prominent call to action. The eyes of the visitors will be automatically drawn to the menu item when they visit your website.
By adding this feature, you can create a user-friendly website and highlight important menu items that you want your users to check out.
That being said, let’s see how you can highlight a menu item in WordPress using CSS.
Method 1. Highlighting a Menu Item Using Full Site Editor
If you’re using a block-enabled theme then you’ll have the Full Site Editor instead of the older Theme Customizer. You can easily highlight a menu item in it as well.
First, head over to Appearance » Editor from the WordPress admin dashboard. This will direct you to the full site editor.
Here simply double-click the menu item you want to highlight, and then click the gear icon at the top. This will immediately open up that specific menu item’s ‘Settings’ block.
Simply scroll down in the ‘Settings’ block to the ‘Advanced’ tab and click the arrow icon beside it to expand the tab.
This will open up an ‘Additional CSS Class’ field where you simply have to write highlighted-menu in the field.
Next, click the ‘Save’ button at the top of the page to store your changes.
After that, you will need to add a small bit of CSS to your theme for the highlight effect. You can either fix the missing Theme Customizer, or you can use a code snippet plugin to add CSS code.
How to Add CSS Snippets Using WPCode
For adding CSS in WordPress, we recommend using WPCode because it’s the easiest way to add any custom code to WordPress.
Be sure to include the style tags, as you see on Lines 1 and 10 below.
After pasting the code, go to the ‘Insertion’ section by scrolling down.
Here simply choose the ‘Auto Insert’ mode so that the code can be automatically executed on your entire website.
Now, go to the top of the page and toggle the switch from ‘Inactive’ to ‘Active’.
Then simply click the ‘Save Snippet’ button.
You have now successfully highlighted a menu item in WordPress using a full site editor.
This is how your menu item will look after you add the CSS code.
How to Access the Theme Customizer Using a Block Theme
If you want to use the Theme Customizer and use an FSE theme, then simply copy and paste the URL below into your browser. Make sure to replace ‘example.com’ with your own site’s domain name.
https://example.com/wp-admin/customize.php
Here you simply have to click the ‘Additional CSS’ tab.
Now, expand the ‘Additional CSS’ field, and then just copy/paste the following code snippet.
After that, simply click the ‘Publish’ button at the top.
That’s all it takes to highlight a menu item.
It should look something like this on your website when finished:
Method 2. Highlighting a Menu Item Using Theme Customizer
If you’re using a non-block-enabled theme, then you’ll probably have a theme customizer enabled by default. Highlighting a menu item in a theme customizer is a fairly simple process.
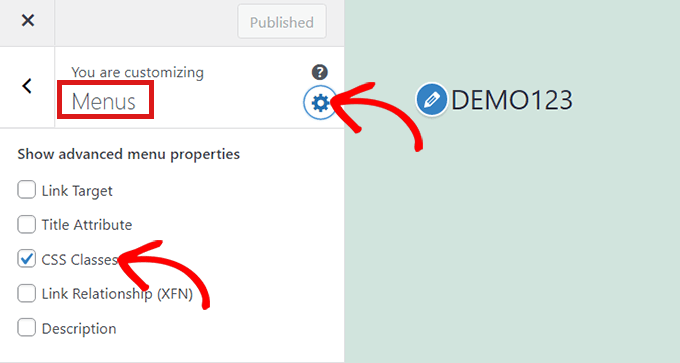
First, simply go to Appearance » Customize in your WordPress dashboard to launch the theme customizer. Once the theme customizer opens up, simply click on the ‘ Menus’ tab.
Once you’re in the ‘Menus’ section, simply click on the gear icon at the top right to display advanced properties.
Now, simply check the ‘CSS Classes’ box.
After that, scroll down to the ‘Menus’ section.
If you have multiple menus on your website, simply click on the menu whose menu items you want to highlight.
This will open up a new tab where you can select the menu item that you want to highlight. It could be ‘Get Started’ like in our example, or it might be your contact form page or the link to your online store.
Simply click on the menu item of your choice which will expand it to display some options. Click into the ‘CSS Classes’ field.
All you have to do is write 'highlighted-menu' in the field. You can add this CSS Class to multiple menu items, and they will all be highlighted.
Next, simply go to the ‘Additional CSS’ tab in the theme customizer.
Now, simply copy and paste the following CSS code.
Congratulations! You’ve successfully highlighted a menu item.
Note: Your theme might not have an ‘Additional CSS’ field in the theme customizer. If not, check theme settings to find out how to add custom CSS. If you can’t find it, you might want to contact the developer or add it using WPCode.
Customizing Your Menu Item Highlight
Now that you have highlighted the menu item, you can adjust the CSS code to customize your menu item the way you like it.
For example, you can change the background color of your menu item.
Simply look for the following code in the CSS snippet, you just pasted.
background: #FFB6C1
After locating it, you can simply replace the pink color code number with the hex code of any color of your choice:
background: #7FFFD4;
Above is the hex code for aquamarine.
You can check out our guide to easily add custom CSS for other ideas on how to customize the highlighted menu item.
After you’re satisfied with your choices, simply click on the ‘Publish’ button in the theme customizer or ‘Save Snippet’ in WPCode to save your changes.
If you liked this article, then please subscribe to our YouTube Channel for WordPress video tutorials. You can also find us on Twitter and Facebook.